
If you've ever contributed to a project, whether it's your app at work or an open-source tool, you've likely created a pull request. This requests that your code changes to merged into the main codebase.
We use pull requests to ensure only quality code is merged into our main branches. But sometimes we miss the little things after a grueling coding session developing a new feature.
At worst the, those mistakes can be missed by teammates and merged into the main codebase and create bugs or inefficiencies. At best, finding those tiny nits can take up other team members' time to notice and point out.
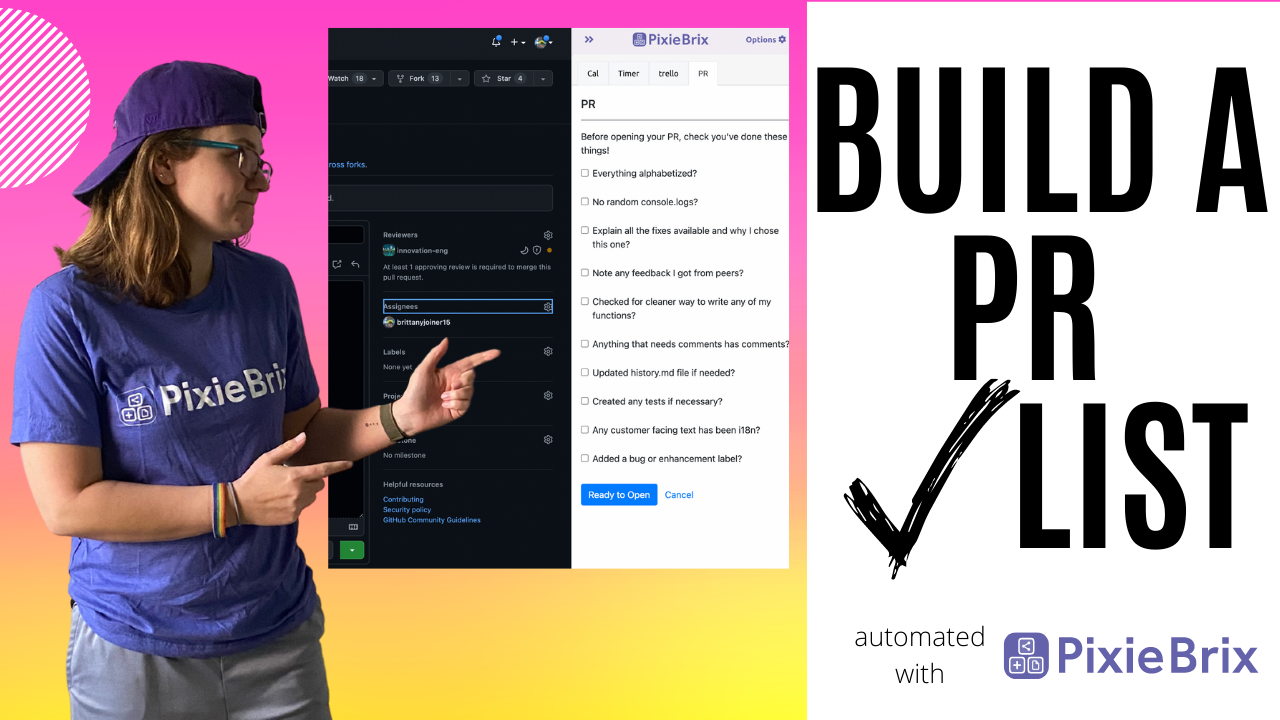
I am particularly susceptible to opening a lazy pull request, so I did what any developer would do... I found a way to automate a PR checklist and force myself to do the work!
This tutorial shows you how to build an extension in your browser that will automatically generate a pull request checklist and hide the Create Pull Request button until you check every item on that list.
Grab Your Tools
Before you get started, you'll want to get a few things together.
Make a list of what to check in your code
Forget any tools or any automation... for a few minutes, think about what makes a good pull request, and list those items out.
What makes it easy for you to review other pull requests? Or what's a common mistake you often find people commenting on?
If you need some ideas, here is what I've incorporated in my own list.
- Everything sorted alphabetically
- Instructions for how reviewers can test the code locally
- Tests have been added
- Screenshot of the feature/bug fix (if applicable)
- If any new text is added, it's internationalized
- Any new elements have aria labels
- No unintentional
console.logsleft behind after debugging - Did I use the clear and concise names for variables and functions?
- Did I explain all possible solutions and why I chose the one I did?
- Added any comments to make new functions clearer
- Added PR labels
- Update any history/changelog file
If you're still not sure, talk to more senior developers on your team and see what they are looking for when they review pull requests.
Create a PixieBrix account (your browser automation tool)
There are a handful of browser extensions that let you create automations, but I've found PixieBrix to be extremely powerful and the community is friendly and helpful.
PixieBrix offers the most versatile low-code platform for extending the web applications you and your teams already use. The result? You get the productive, personalized experience you need... and deserve. (Source: PixieBrix website)
In order to create the automation that I describe below, you'll need to sign up for a free PixieBrix account.
Just select "Start for Free" on their website, and follow the wizard to create an account. You'll be prompted to install the PixieBrix Chrome Extension.
Now you're ready to go!
How to Build the Pull Request Checklist Automation
Alright, you're all set. Now it's time to build.
If you want to take the most straightforward route, you can just activate the extension I already built, and edit as you please.
But if you want to build it from scratch and get more familiar with how browser automation works, follow these steps.
Step 1 – Open the Page Editor in PixieBrix
To build extensions in PixieBrix, you don't need VSCode or any other editor. You can do everything entirely in your browser.
I like to start by going to the page that I want the action to happen on, in this case, github.com.
To access the editor, right click on any webpage to open the Context Menu and select Inspect. Scroll through your tabs (you know, the ones that say things like Elements, Console, Network, etc) until you see PixieBrix.
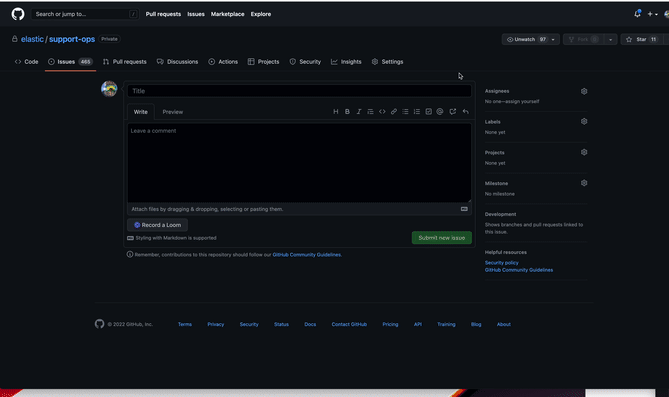
You might be prompted to grant some permissions, but then you'll find a blank page with a button in the top left that says "Add". That's where we'll get started.
Step 2 – Add a trigger brick
To build an extension in PixieBrix, you need to chain bricks together. You can think of bricks as functions and an extension is the main function that executes the smaller functions in the sequence you configure.
You have multiple options to trigger this extension.
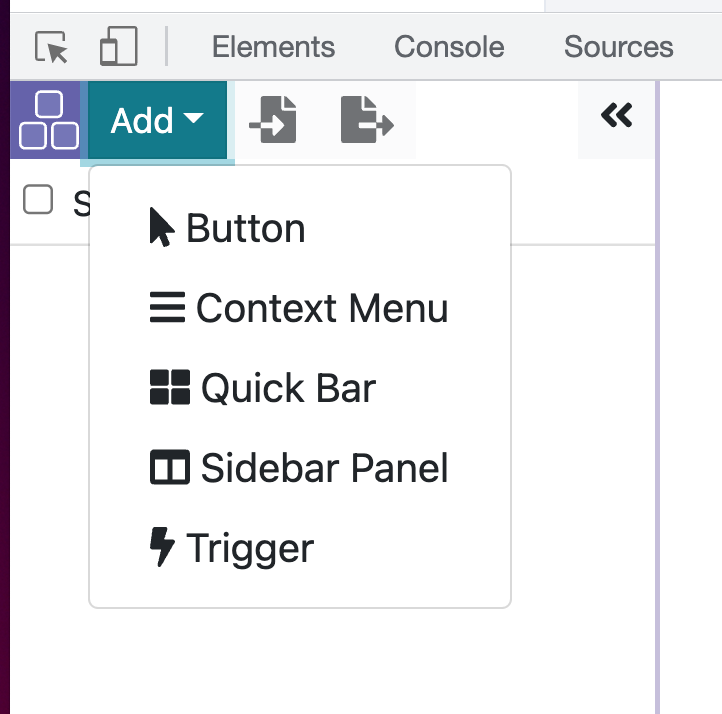
You can choose a manual action, like adding a button to a page, or a context menu (which is when you right click on a webpage – that same menu where you got to your inspector!) Or you could use a quickbar command (a keyboard shortcut).
The sidebar panel opens a panel on the right side of your browser and is not actually a trigger but instead used to create a display for another trigger.
For this specific workflow, use the Trigger option, which runs the extension whenever you load a specific webpage and additional criteria that you configure are met.
This is what it looks like at first:
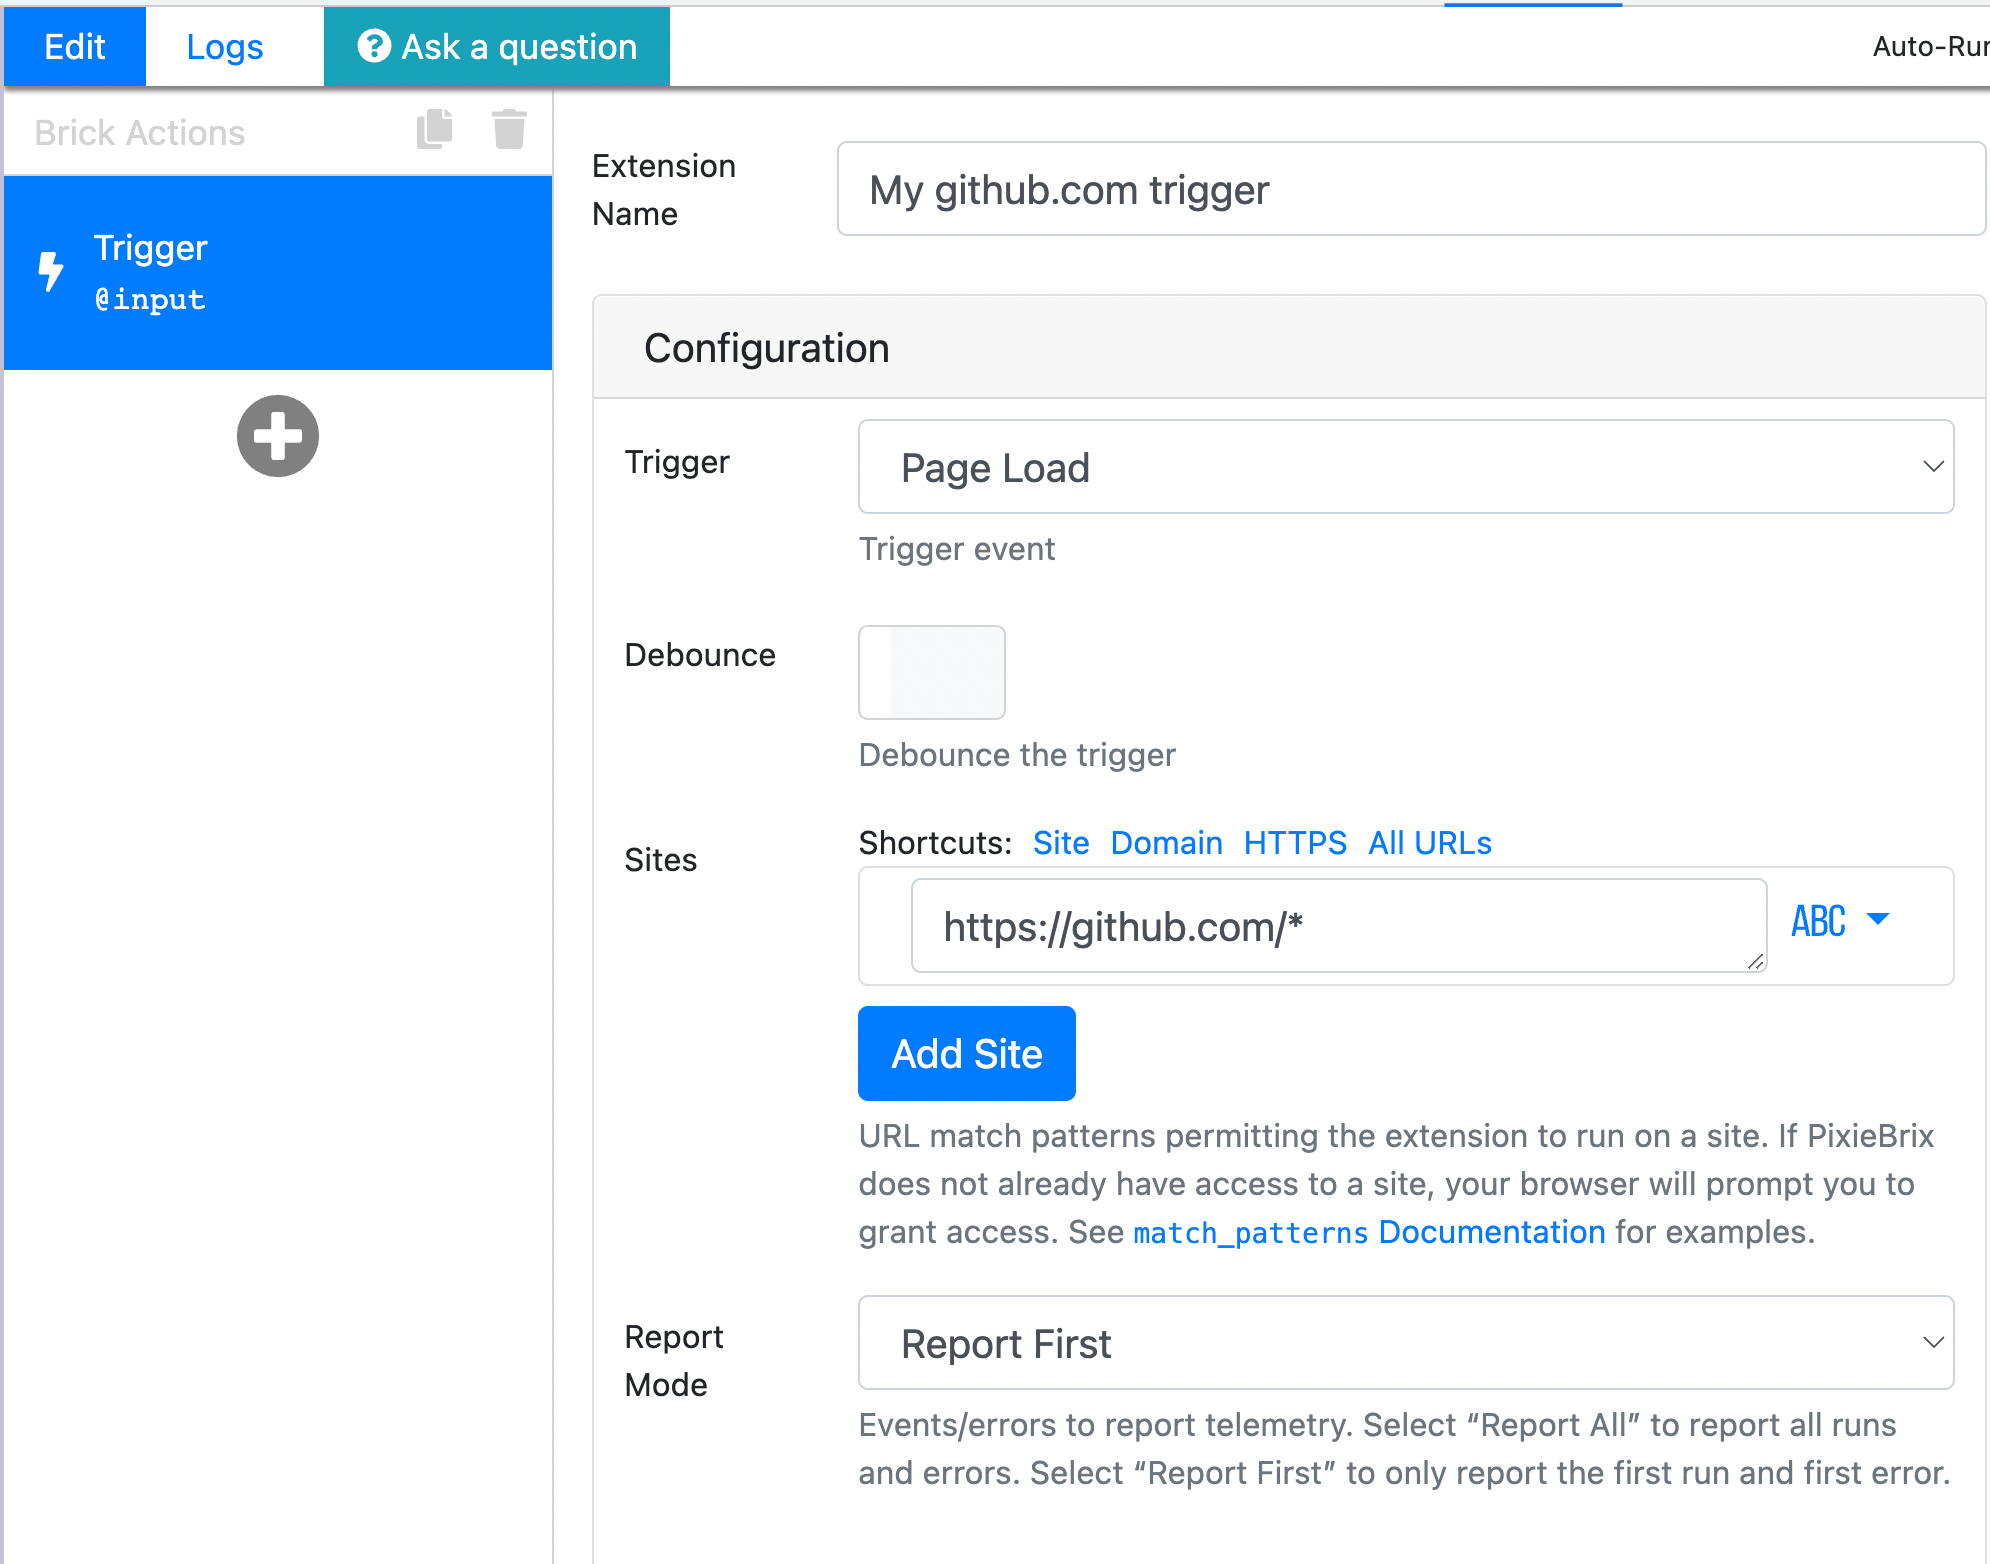
You can change the name at the top to be whatever you'd like to call this, such as Github PR Checklist.
To configure the Trigger, think about when you want to see your checklist. You could make it launch anytime you go to GitHub, but that's probably more frequent than you want since you don't need the checklist when you're reading through issues or searching for something in a repo.
I decided to trigger whenever a create pull request button element is on the page, which is indicative that I'm about to open a pull request. So that's probably a good time to go through my checklist!
So go through the motions of opening a pull request and navigate to a page that has that green button (while keeping your page editor open).
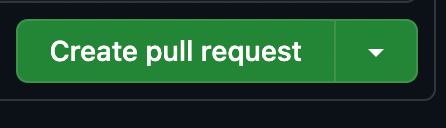
Once you've got that button in view, scroll to the Advanced: Match Rules section of the Trigger brick, and look for the Selectors field.
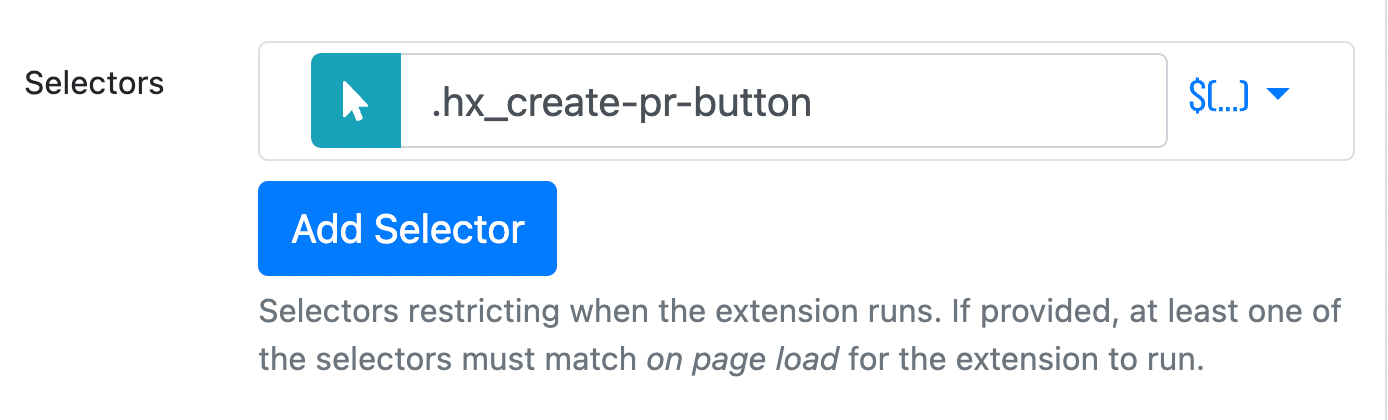
From there, you can use the mouse button to open an element selector view and click to select the button, or you can copy this class directly in the field.
.hx_create-pr-button
So now you've created a trigger that says anytime you load a page hosted on github.com.
Alright, so we've identified the class for that button, so the hardest part is behind us! Now we just need to hide it, show the checklist, and then display it again when the checklist has been completed.
Step 3 – Hide the create pull request button
Select the plus button below the Trigger brick to add another brick. You'll see a marketplace open allowing you to search for all the available bricks. Search for hide and you'll see this brick.
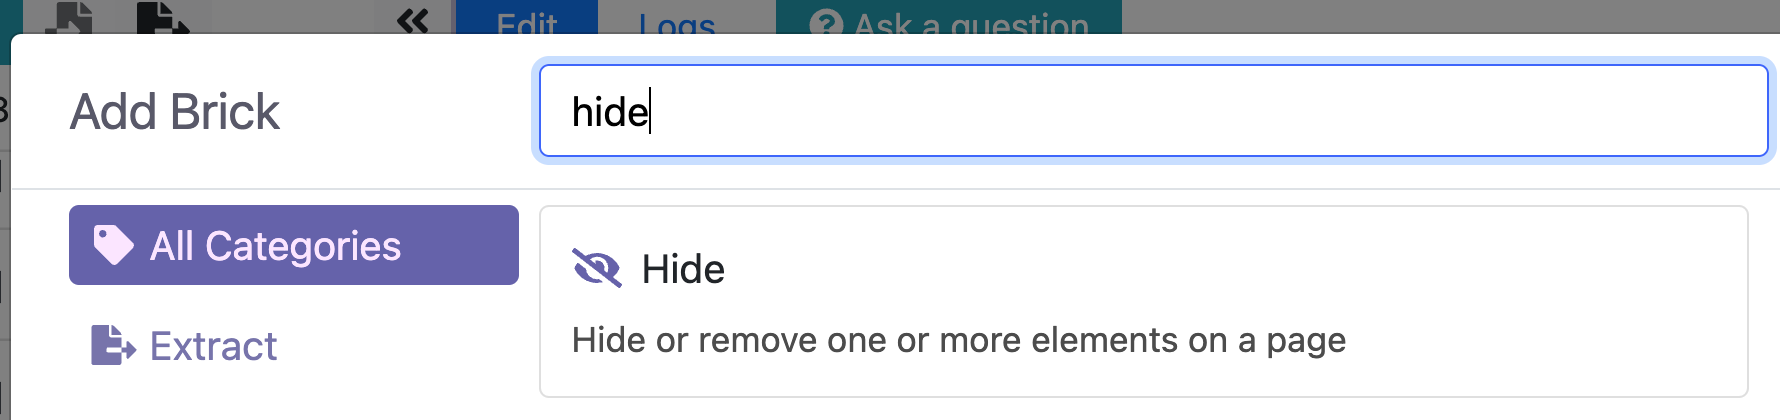
Mouse over the "Hide" brick and to see more options, then select "Add" to bring it into your extension.
The only configuration this brick needs is which element to hide. In this case, it will be exactly the same element we used in our trigger – the create pull request button. So you can copy that same class and set it as the value for the selector.
Step 4 – Open a sidebar
Add another brick called Show Sidebar. This will open a panel on the right side of your browser to display content in.
I set the panelHeading field to PR to specify that it should load the PR tab. If you don't already have other sidepanels set up, you won't need to place anything here and you can skip to the next step.
Step 5 – Assign yourself to the issue
Before we get to the checklist, I added one more piece of automation to this besides displaying the checklist and hiding the button.
I created an action to assign myself to the issue. It's just a click, but why not make the robots do it? 😊
To do this, add another brick called the Simulate a DOM event brick. This brick does exactly what it sounds like... it pretends to do something to a specific element, such as click it.
Provide a selector for the element you wish to interact with, and an event.
Just like in the trigger and hide bricks, you can use the mouse button to open a selector picker on your screen and select the assign yourself link to automatically apply those classes to the selector field.
You can also manually apply the class by copying and pasting this into the selector field:
#new_pull_request .js-issue-assign-self
Make sure to select click for the event, and you're all set!
Step 6 – Create your checklist
Now we're in the meat of our extension. Time to build out the checklist. Select the plus button and add the Show a modal or sidebar form brick.
This is the brick that designs a form, and for each item we want to acknowledge or think about before submitting a pull request will be a checkbox field.
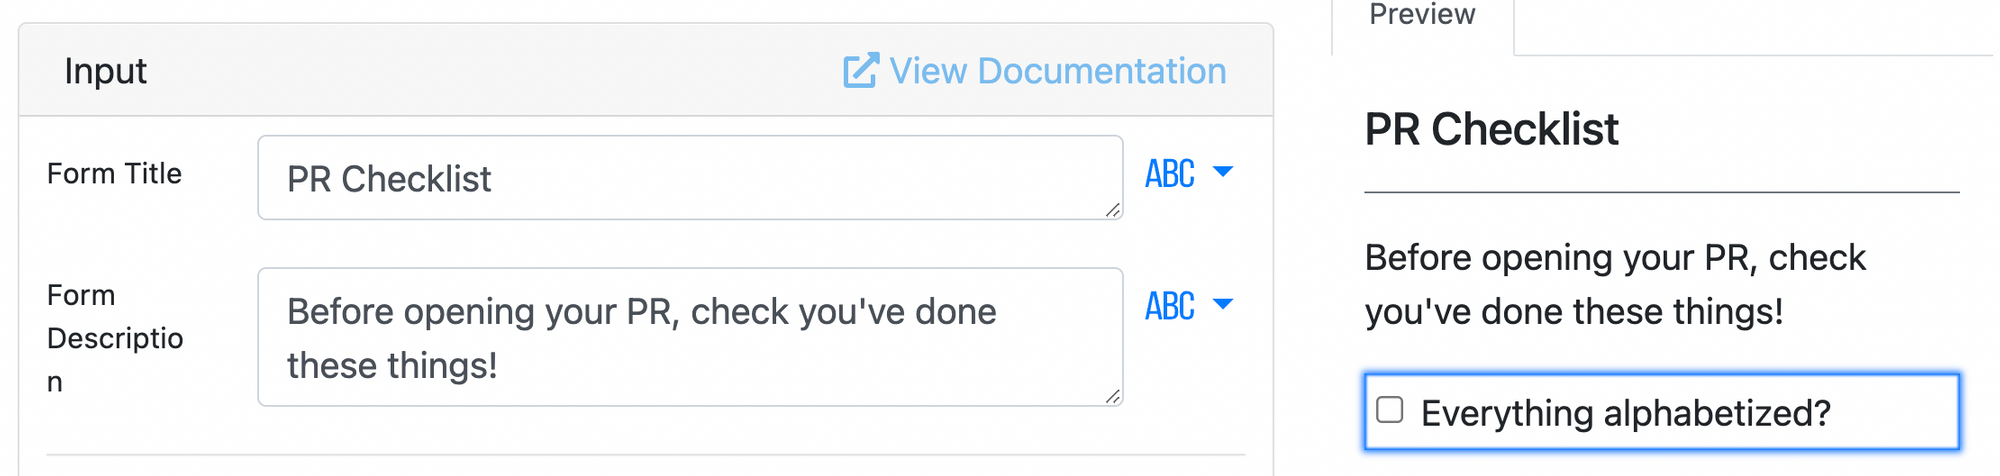
Set a form title and description
These are purely cosmetic, so set them to whatever you'd like.
Configure your first field
Grab your list of what items to review before opening a pull request, and pick your first one. This will be our first form field, and you'll need to set the following fields in PixieBrix:
namelabelinput type
Name and label can be whatever you want. Keep the name simple as you'll need to reference that in the next step when you check for if it's true or not. Label is what appears visually next to the checkbox. For input type, select checkbox.
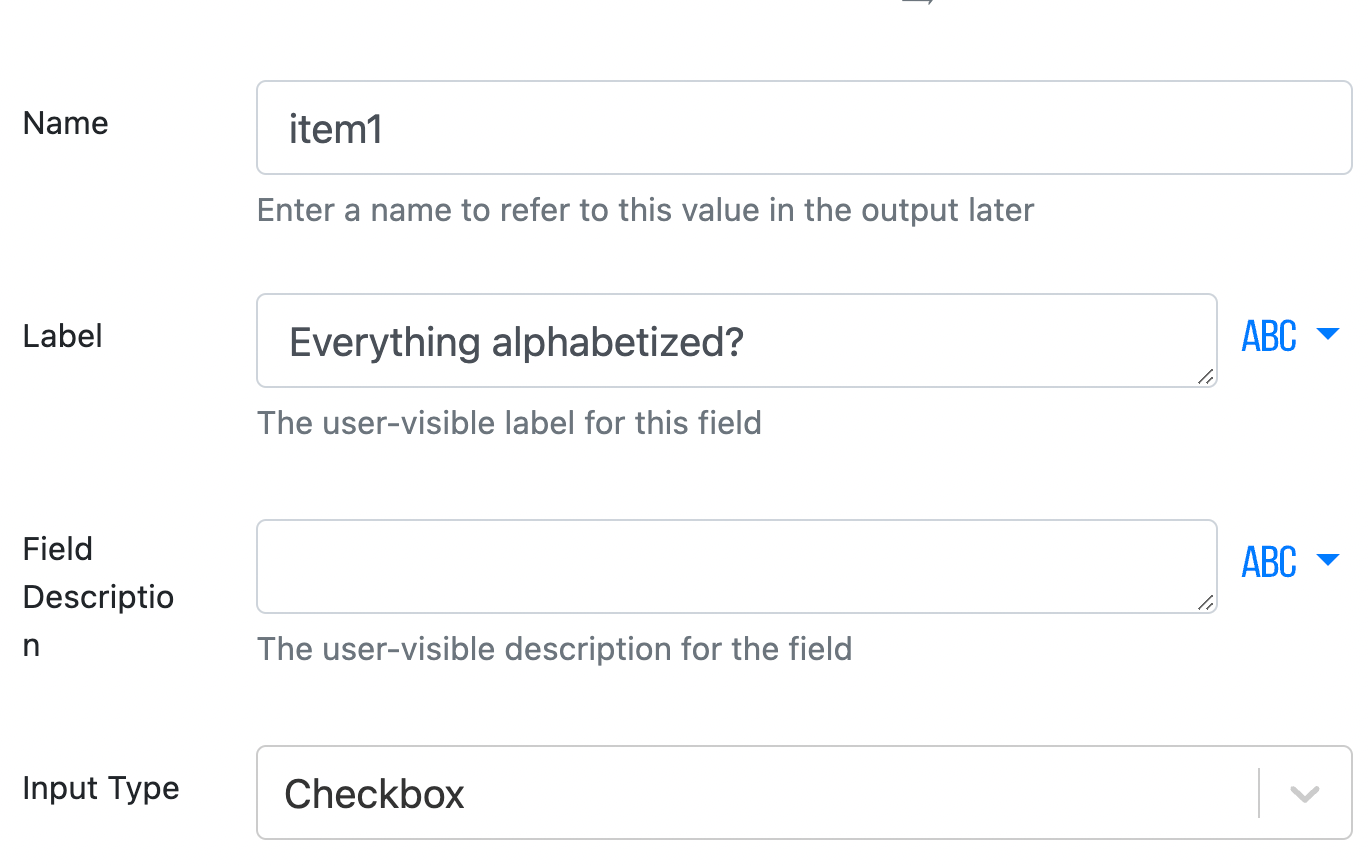
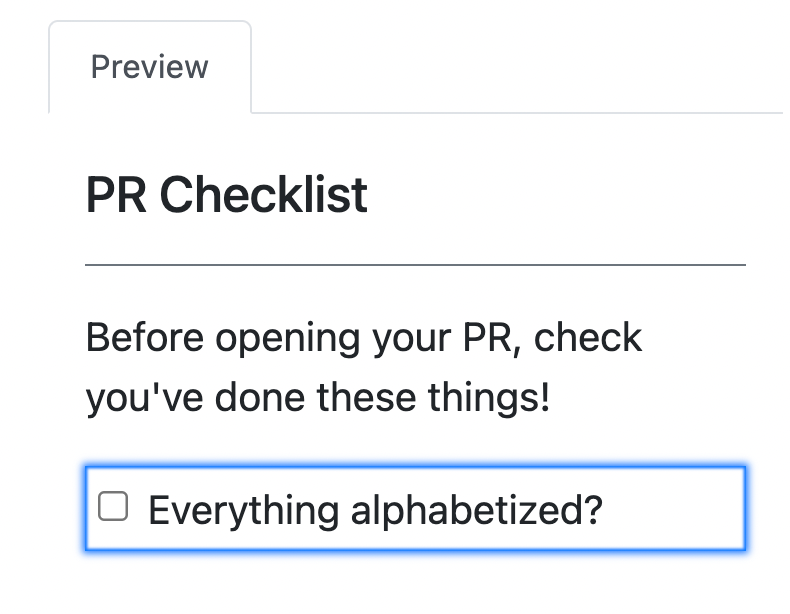
You can preview how it looks on the right side panel of the PixieBrix page editor.
Add the rest of the items as new fields
Scroll above the field to select the blue button that says "Add new field", and do it all again for as many items as you have.
Final form configuration
Almost done! Scroll below the form field options until you see Submit Button Text. You can leave it as is, but I customized mine to say Ready to Open to make the button action more clear.
Most importantly, change the Location value to sidebar instead of modal by selecting the dropdown. This sets the form to appear in the sidebar we opened in the previous step.
Step 7 – Show the create pull request button when the checklist is completed
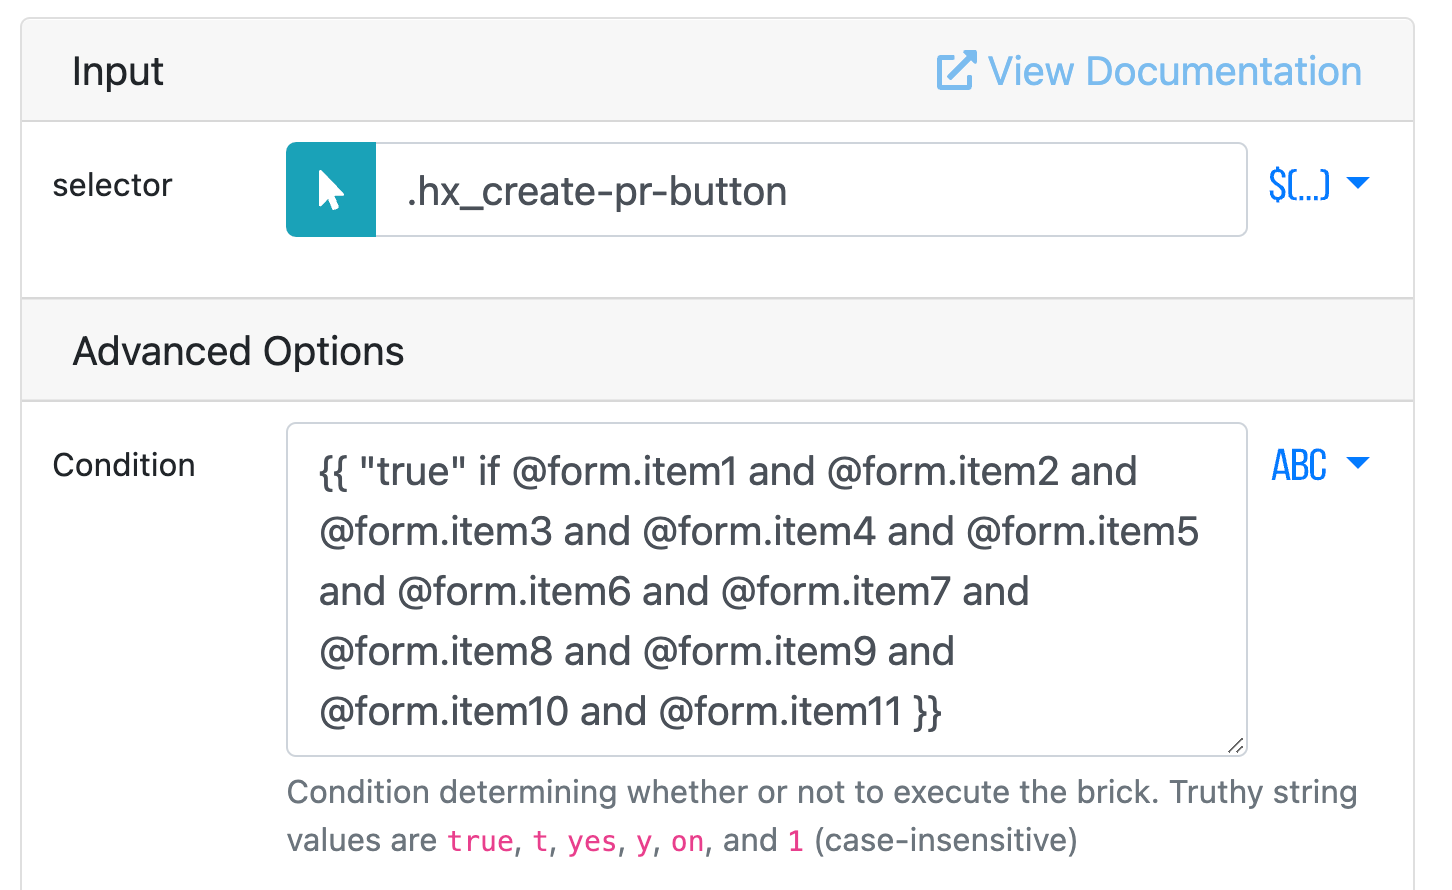
Add one final brick to this extension called Show. This is similar to Hide, and we'll pass it that same class we've been referencing this whole time for the create pull request button.
Here it is once again if you need a refresher:
.hx_create-pr-button
There's one more piece to configure because we want to control when this brick executes since we only want to show the button if every item was checked in the form submission.
We could have just made each field in the form required so you couldn't submit the form until everything was checked. But another way to do this is to edit the Condition field under Advanced Options on this brick.
This is where you can specify when this specific brick should run. You'll build a statement that returns true if every field in the checklist is true.
This is what the syntax looks like, although you'll need to swap the item value with the name of each item.
{{ "true" if @form.item1 and @form.item2 and @form.item3 and @form.item4 and @form.item5 and @form.item6 and @form.item7 and @form.item8 and @form.item9 and @form.item10 and@form.item11 }}
When you're done, your brick should look like this:
Select the blue save button at the top right of the PixieBrix page editor to save your extension.
Take it for a spin
Now give it a try! Whether you've activated the prebuilt extension, or followed the tutorial and built it on your own, you're ready to test.
Open a pull request and you'll see the sidebar form and no green button. Check off all the items in the list, and submit, then suddenly your button appears, and you're already assigned to the PR!
If you have any trouble getting started with building this or it's not working as intended, the PixieBrix community is active and the maintainers are always willing to jump in and help.
But if you're more of a visual learner and prefer to watch, I created a video that shows you how to build this automated PR checklist.
Thank you for reading!