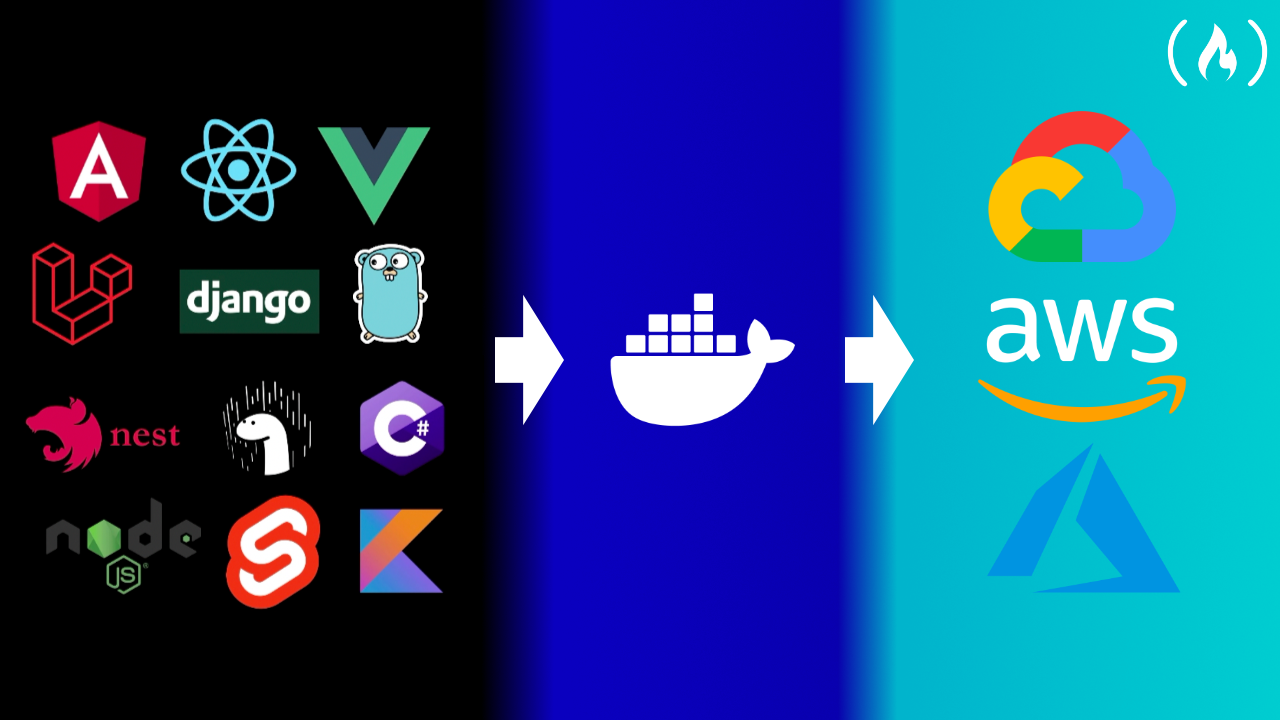
Dockerizing an app makes it simpler to deploy.
We just published a full course on the freeCodeCamp.org YouTube channel that will teach you how to deploy 12 apps to 3 popular hosting services.
Scalable Scripts developed this course. They create courses on all sorts of languages and frameworks on their YouTube channel.
In this course, you will learn to create and dockerize the following types of apps:
- React app
- NodeJS app
- VueJS app
- NestJS app
- Angular app
- Golang app
- Svelte app
- Django app
- Laravel app
- .NET Core app
- Spring Boot app with Kotlin
- Deno app
You will then learn to deploy those apps to:
- AWS
- Azure
- Google Cloud
Watch the full 2-hour course below or on the freeCodeCamp.org YouTube channel.
Transcript
(autotranslated)
This course will teach you how to deploy 10 of the most popular types of apps on the three most popular cloud providers.
So if you want to learn to deploy a specific type of app, this course is for you.
In this video, we'll create a Docker container for each of these apps.
And we'll deploy the container to assure AWS and Google Cloud, the result will be the same for all apps.
So check the timestamps of this video to select your favorite language or framework, and then select your favorite deployment platform.
So let's start deploying this apps.
In this video, we will create a production container for this react app.
And we will deploy it to Google Cloud, AWS, and the zoo.
So let's start.
First, I'll create a file called Docker file.
And, of course, make sure you have installed Docker in your machine.
And in the Docker file, we have to start from the container itself, what type of container will it be, and we'll start with from this container will be a nod container.
And here I will specify the version of not so I will pick 15.4.
And I will name it as build.
I will explain later why I named it like this.
So let's start with this container, we have to specify the working directory.
I'll call it up.
So you can put whatever you want here.
And let's copy the packages the JSON to that working directory.
So this means we have to copy this package dot JSON dot mean, so the working directory here.
So a lot of star here.
The star means that we cannot anything in between package and JSON.
This means that we'll copy package JSON and also package lock that JSON.
So we copied those files, then we have to run npm install.
So this is self explanatory.
So we have NPM already installed in the container because we are using a node environment here.
So that's why this is important.
After we installed all the packages, we have to copy again, all the files to the working directory.
So this means all the other files, we have to copy them to the working directory.
And then we have to build the container.
So run NPM run build.
So if we go to package JSON, we have a build script here.
And what this will do it it will create a distribution folder so let's run that command NPM run build.
So we can visualize that folder.
So we have built a folder here which will have all the necessary files and we completed the first stage.
So this will be a multi stage Docker build, which means that we will have another stage so we have all these files inside this Docker container but we need only the build folder so there is no need to keep all of them we can have a smaller container.
And to do to do that we have to add another from here and this container will have nginx so I'll pick the latest version.
So if I want the latest version, I will just add nginx here, or I will add the one point 19.
And in this nginx container, we need to add here I will create another directory nginx.
And here I'll create a file nginx.com.
And here I'll paste this configuration So there's a lot of text.
But you can copy this file on the source code in the video description.
So this is required to access the file index dot HTML directly here.
So the build is index, HTML, HTML and all the JavaScript files that we need.
So we have to copy this file to this nginx container.
So copy nginx nginx.com, to etc nginx nginx.com.
So we added our own nginx configuration, then in the second step is to add the build folder to the nginx.
html.
So that's why we named this as build here.
So here, I will copy from built.
So this is a command from this container here, which has this build folder will copy up build, we specified the working directory to be up.
So it will make sense that the build folder is up, built.
And we have to copy this from user user share nginx.
html.
And that's it.
So this is our Docker container to build this react app in production.
So to run this, simply run Docker build, I will specify the name for this container.
So to specify the name for the container, you have to add here minus deep.
And the name of the container, I'll specify to up when we need the context, which is this directory.
So we specified with dot.
And that's it.
So we'll build this Docker file.
And we will assign it a name to up.
Let's build it.
So it's building.
Now the container has been built now is ready to be deployed.
But before we deploy it, let's see if this is running fine.
But by running it on the browser, so to do it, run Docker run our app, but we have to specify our port.
So minus b here, and the port of our container will be ad.
So this will run on port 80.
And this is a part of our browser, so our boot ad it will work on my machine.
But if it doesn't work on your machine, you can put another port like a day date doesn't matter.
So I'll put ad here.
And this will run our Docker container.
Now, I'll go to my browser around here, localhost, just localhost, because 80 is the default port.
And we can see our react up.
So we created a Docker container to be deployed now.
And now let's deploy it out close this ID because we don't need it anymore.
In this video, we will create a simple node app and we will deploy it to AWS Azure and Google Cloud.
So let's create it I will open my terminal and write NPM in it.
So Oh, Pika everything by default, and then I will install Express.
So I'll create also an index.
So JavaScript file index.js.
Here I will get the Express so const Express is equal to require Express.
Then I will get so Okay, the first up is equal to express and up a get request to The main road all of the function here that it will have a request and the response.
And this will be very simple, I will just do response send.
Hello, world.
That's it.
So, super simple.
In the end, I will listen to Port 80.
So I want to start this up.
So this is self explanatory, but I will start this up via a Docker container.
Because of the Port 80 is just localhost.
And it may conflict your browser.
So let's create a Docker file.
The Docker file will be very simple.
So we need a node environment.
And the version is 15.4.
So we will specify a working directory, I'll call it up, then we will copy the package Jason.
So package dot JSON dot min sir, it will copy to the working directory here.
So in short, is dot a lot a start here.
So this will take package JSON and also biggest minus log that JSON.
So if we do it like this, it will copy both of these, then we'll run npm install because we get from the node environment, then I'll copy all the files there.
So the first dot means all the files here, and the second.is the working directory, then the last command is not index that j s.
And that's it.
So this is our Docker file.
To build this Docker file, we have a first make sure to have installed Docker and then around Docker build, we need to specify a name for this Docker build, I will call it up.
So this is a command to pick a name for the Docker container.
And then we need dot here, which means this context here, so it will select this Docker file.
And now it's building once it is completed, let's so it is completed.
And now to see the app on our browser or on Docker around, we need to specify the port which we need to run.
So 80 is a port inside the Docker container.
And then is our app.
So in our browser output for eighth.
So if we run this command and go to localhost Port 8888, we will see HelloWorld here.
So this is our container.
And now let's get this up and deployed to AWS, Azure and Google Cloud.
Now close also with window because we don't need it.
In this video, we'll create a Docker file for this view up and deploy that Docker container to AWS, Google Cloud and Azure.
So let's start.
Let's create a Docker file.
So to build this app, we will use the multistage builds in Docker, I will explain you what is that So first, we have to start from node.
And I will put the version of node to this version.
And I will name this as build.
So I'll explain later why I named it like this.
First, let's specify the working directory.
I'll name it up.
Then, let's copy package the JSON to up.
So to the working directory.
The second dot means this working directory I would love to start here.
So this will get the package JSON and also baggage log that Jason.
So after we got those files, were run npm install So to install the node models event will copy all the files to the working directory.
So all these files will, it will be copied to this working directory.
And then we run NPM run build.
So this will build this view up to distribution folder.
So if we run this command NPM run build, we'll see a distribution folder will be created here.
So this is a folder, and it will have an index that HTML index etc.
So now what I will do is old, add another from here.
And I will get nginx version one point 19 why I'm adding another from here.
So this is multistage building so, so we don't need all these folders anymore inside the Docker container inside the Docker container, we need only the distribution folder, so only this folder.
And to do that, first we have to create the first stage, which we have all the files and the distribution folder.
And then we create another from here.
And first, we need an nginx file.
So we'll use nginx here, let's create directory nginx.
And inside I'll create a file nginx.com.
Here, I'll paste this code.
So it's a lot of code.
But I'll provide the link in the description of this video.
So you can get this code.
And to copy that nginx file we are on copy nginx nginx.com, we have to copy it to the EDC folder nginx nginx.com.
So we'll put this file where when will copy from build.
That's why I named it like this.
So once we finish, we have a reference for this build.
So from that build, we want only the distribution folder.
So in the app distribution folder.
That's why we named also the working directory up so it is in up and also distribution folder.
We'll copy it to user share nginx.
html.
And that's it.
So in the end, we'll have a smaller container just containing HTML and JavaScript and CSS files.
So let's run this container.
To run this container.
Make sure first to have installed Docker and run Docker build, we need to specify the name for this container our call it up.
So if you want to name your container, whatever name you want, with minus D and the name here, then I'll put a dot which means that it is this folder here and it will select this Docker file.
So with this our Docker is building.
Let's wait till is completed and so it is built now anger to sit on the browser, we need to run it.
So around Docker around, we need to specify a port.
So to see it on our browser output this port to our browser.
And this app will run on port 80 since we are using nginx here, and then we need the name of our container which is up so let's run this and is running now.
So if we go to localhost Port 8888 we'll see the view up.
So this is our container.
And now I will close this window now because we don't need it anymore.
Now let's deploy This container.
In this video, we'll create a production readiness JS Docker container.
And we'll push that container to AWS, Google Cloud and ashore.
So let's start.
First, I want to change in main.ts, the port here to add, because all our containers will start with the Port 80.
And now let's create the Docker file.
So also make sure to have installed the Docker in your machine.
So let's start the build.
So we need to start from the node environment and output to the version 15.4.
And I'll name it as build.
So this is a multi stage Docker build.
I will explain that later.
First, let's begin with the first stage.
So let's begin with node 15.4.
And what do we want to do here, let's specify a working directory up.
And we want to copy package that JSON to the app.
So dot min.
So this working directory, also, I would love to start here.
So if I had to start here, this will get package JSON and also package log that JSON.
So I added to the biggest the JSON now run NPM installed.
Since we are from the node environment, this NPM command is available.
After we finished that, we want to copy everything to the working directory.
So this first dot means all the files here, the second dot means this working directory after we finish around NPM run build.
So with this, we build this nest j s up.
So let's run NPM run build here and see what it does generate.
So this will generate this folder here.
So as we can see, we have a dist folder.
And here we have all the necessary files.
So in order to run this in production, we have to have this dist folder, and we don't need the other files.
That's why we do like a multistage build, because we will create another node environment here from node 15.4.
Also.
And in this node environment will specify again the working directory up.
So don't confuse this with this because there are two different containers.
Then we'll copy also the here I will copy only the package JSON actually will run npm install, but we need only the production packages.
So if we go to package JSON, we have dependencies and dev dependencies, if we run it like this, we will install only the dependencies.
So there are fewer packages here.
And this not package will be smaller than this one.
Of course, because we have less packages, then we'll copy from built will copy the distribution folder.
So up disk.
So up is the working directory here.
This is the folder that we just generated.
And we'll copy that to the dot means our up here, this so we will copy the distribution folder there.
This distribution folder has a JavaScript file.
So this needs also not models.
And that's it basically.
So in the end, we'll run the command MPM around start broad.
So this is a smaller version of this one, because this will this other container will have only the distribution folder and not models, but only the production packages so we don't need all these vials.
So we created the production rate the next JS up, let's around it.
So to run it, simply run Docker build, we need to specify the name of the container, I'll call it up.
So if you want to name a container, you put minus D and the name of the container.
And dot means this folder, and it will select this Docker file.
So if we run this, it will build our app.
No, let's wait till it's completed.
So it is completed.
Now this container can be pushed to the to the cloud.
But first, let's test it.
So to test it, we have to run it.
So Docker run.
And we have to specify the port the port inside the Docker container is 80.
But in our browser, we can put any port we want.
So output this port, and the name of the container is up.
So we can run our container like this, as we see is running successfully, and we can go to localhost 8888.
And we can see HelloWorld here, so the container is running.
Now we need to push this production container to the cloud.
And I will close this ID here because we don't need it.
In this video, we'll create a production ready Docker container for an Angular app, then we'll push this container to AWS as your Google Cloud.
So let's start.
First of all, create a Docker file.
Make sure also to have installed Docker in your machine.
So we need the environment here.
So we need the node environment.
And the version that I will put here is 15.4.
And I'll name it as built.
So, we will do a multistage Docker build, I will explain that later.
First, let's focus from this node.
This part here, we want to build our app.
Let's start with the working directory.
You can name it whatever you want, I will call it up event will copy package that JSON to the working directory.
So, I will add also the start here.
So this will copy package the JSON and also package log that JSON this dot means this working directory.
So, once we have those files there, we are on NPM installed and since we are using the node the container we have NPM available.
So, after we install it, then we need to build it to production.
So, before I run anything here, I will I want to make a change who we have energy bill here in our scripts, but if we want to build to production we have to add prod here.
So, what I will do is I will add a new script prod and this will be mg build prod like this.
So this will be easier.
And now here I will run the command NPM run probe.
So this will build our up to production.
So I will run that command here also.
And let's see what files it does generate shop.
Now we will learn why I named it like this.
Because once we run NPM run prod it will create some files here.
And when don't need the these files anymore, we need only the distribution folder.
So we created the build.
So not sure why my app doesn't get the files doesn't matter.
So let's add the new from here and this time we want have not but I will add nginx and the version will be one point 19.
So here we want to read not we will simply serve the HTML files which I need to refresh, not sure why they reload.
So we have the distribution folder here.
And we can see, we have index HTML and these files.
So it's located in the distribution folder, angular Docker.
This is the name of my project, by the way, you can name your project, whatever.
So now we are at nginx.
We need also a directory here nginx.
And I will add here a file nginx.com.
Here, I'll paste this nginx code.
So I will provide this code in the description of this video.
And let's go to the Docker file.
I'll copy copy here nginx nginx.com.
And we'll copy that to edisi nginx nginx.
That calm.
So dot here.
So we have copied that file in this other container.
And now, we will use this build here.
So as I said before, we don't need this virus anymore, we need only the distribution folder, since it will serve the index HTML file with these JavaScript built files.
So for that, we will copy it from build will copy we have the working directory is up here.
So from up this and this, there's another folder here, which is angular Docker, in my case, Angular, Docker.
And we'll copy that to throw a lot of flesh just in case to user share nginx.
html.
So this way, this was a bigger container, since we did not models and all these files, but this one has only HTML and JavaScript files.
So the smaller container is only going nginx, which is serving only this HTML file.
And we need this engine x, we needed to because when we go to a specific URL, we want to redirect all of them to the index dot HTML.
So this is this location.
Otherwise, we'll get an error.
So this is the Docker file.
And now let's run it.
So to run this Docker file, right Docker build, we need to specify a name for this Docker file for each Docker container.
I will specify the not to app but you can name it whatever you want.
And we need to build this Docker file, so we have to add it as a dot here.
So now is building Let's wait till it's completed.
So it failed.
Because I forgot one line here between npm install and NPM, run prod, which is to copy all the files to the working directory.
So my better.
So this will copy all these files to this working directory.
And then we need to build to production.
So now that we fixed the problem, let's run it again.
So now it was built successfully.
And now this container is ready to be pushed to the cloud.
But first, let's see on our browser.
So to sit on our browser, we have to run the container.
So Docker run, we need to specify the port.
So the port inside the container is 80.
In our local host, we can put whatever port you want.
So I will put a date a date so and then we need the name of our container, which we named it up.
So that's it.
If we're on this and go to our browser, let's go to localhost 8888.
And we'll see the Angular app running.
So this was our container that was built.
Now let's push this container to the cloud in our clothes.
This ID because we won't use it anymore.
In this video, we'll create a production ready, go File, and we'll push it to AWS, Google Cloud and as your so let's start, first, let's run, go mod in it.
We'll call the project, Docker doesn't matter.
So also go to a go fiber framework, we want to use this framework, but we will just copy the HelloWorld part thought will create main that go file.
And so enable integration here, let's create a go File, main.
The package, so I'll base it here.
This is our main go file.
And, of course, let's also get this fiber model here.
So go get this.
So we got that we either did on our go mod.
So we also got some so these are important because we need to add them to Docker.
So this is our goal up.
Now let's create a Docker file.
So I'll create a file here.
Docker file.
Also make sure to have Docker installed in your machine.
So now here, we need to specify the environment which this container will be billed.
And this will be a golang container.
So I'll put the version here, which is a latest version for this time is one point 16.
And I will add the Alpine here, which is a version of Linux, which is the smallest one.
And now let's specify a working directory, I'll call it up but you can name name it whatever you want.
So the working directory is up now let's copy go mod to the app directory.
So this other dot means that it will be copied to this working directory.
Let's copy also got some there.
So we copied this now we can download them.
So to download them we need to run the command go mod download.
So with this all the packages that we will install here, they will be downloaded also in the Docker container.
After that is finished, we have to copy all of the files.
So this dot means all the files here, the second one will mean sir, all of the files will be COVID copied to the working directory.
So once we copy everything we run, go build in the output will be out this so you can name the output as you want.
And it will learn on these files here.
So we can run that command also.
Now so we can test what it does generate.
So we have out and we have a distribution here that we can use.
So now that we have this, this the exact executable, we run the command which is simply out this, that's it.
So you can name it, whatever you want.
I named it this.
And simply we will run this file and I will go run go up will run.
Okay, one last thing that I will make which all the backends needs to listen to Port 80.
So I don't want to listen to Port 3000.
I will listen to Port 80.
But this will be the port inside the Docker container.
So don't worry if this conflicts to your browser.
So now that we have built everything, let's run this.
So to run this run Docker build, we need to name the container I will name the container up.
So to Name the container, we have to put minus d in front of it, then we need to add dot here, which means that it will search for this folder, and it will run this Docker file.
So let's build it.
And now it's building.
So it will learn all these commands.
And let's wait till it's completed.
So everything was successfully built.
And now we can push this container to the cloud.
But before let's see on our browser, if everything runs fine, so run Docker run, we need to specify the port.
So the port inside the Docker container was ad.
But in our local host, we can put whatever port we want, I'll put 8888.
And then we need the name of the container, which we call it up.
So as you can see, the fiber up is running.
And now if we go to localhost Port 8888, we'll see hello world here.
So we successfully build the production ready, container for golang.
And now let's push it to the cloud.
And I'll close this ID because we don't need it anymore.
In this video, we'll create a Docker container for Roosevelt up in the wall bushes that container to AWS, Google Cloud and Azure.
So let's get started.
First, let's create a Docker file here.
And, of course, make sure to have installed the Docker in your machine.
And here, I will add from not the version I will specify 15.4 here and I will name it as build.
So this will be a multistage build.
I will explain later this as build what does this mean.
And let's add the working directory.
I will call it up.
So this is the folder that will create our project.
You can name it whatever you want.
And then we'll copy package that JSON to that folder.
So we'll copy package dot JSON dot means this working directory, a lot of star here, which means that we'll get package JSON and also package lock that Jason so we can add anything in between the star.
So now that we are those are on npm install.
Since we are from a node environment, this MPM will be available.
And after npm install is finished.
Let's copy everything.
So this is all these files and folders to this working directory.
So once we add everything we have to build, so run NPM run build.
So this is the first stage so we can run NPM run build here to see what files does it generate.
So this generates a bundle dot j s here on the public folder.
So this is what we're gonna do.
So once this is generated here, we don't need this other files.
So we don't need scripts SRC everything, so we need only the public folder, we don't need even the node modules.
So that's why we do a multistage build.
So we can create another container here nginx the version is one point 19.
So this container now we want get, we want to get only the public folder.
But first let's add here our directory nginx and inside our create a file nginx.com.
And here, I will copy this code.
So I'll provide this code in the description of this video.
And we need to copy this file to copy nginx nginx zatkoff to ATC nginx nginx.com.
So we added the configuration and now We named this built, and we will copy from the built in the app.
So up is the working directory, we want only the public folder.
So we got the public folder, and we'll copy it to user.
Share nginx.
html.
So that's it.
So before it was all this, it was a container with all these files.
So we don't need not models or all these files here.
Then we created a smaller container that contains only the public folder with the bundle JS files.
With this, we can run our Docker container.
So let's create it.
So to build this Docker file we're on Docker build, we need to specify the name for this Docker container.
So I'll put d minus d.
Up.
So up is a name that I put so you can put whatever name you want.
And the.in.
The end is we will build to this context, and we'll get this Docker file.
And that's it.
So this will build our app.
Let's wait till this completed.
So it is completed.
And now this container is ready to be pushed to the cloud.
But before let's test it on the browser.
So to run on the browser on Docker run.
And we have to specify the port output 8888.
And the port inside this Docker container is 80.
And the name of the container is up.
So it started and now in our browser, go to localhost Port 8888.
And we can see hello world and our belt up is running.
So with this, we are ready now to push the container to the cloud and outlaws this ID because we don't need it anymore.
In this video, we'll build a Docker container for the jungle up.
And we'll push that container to AWS, Google Cloud and Azure.
So let's get started.
So first, I will create here, a Docker file.
So we need to start from Python.
And the version that I will put here is 3.9.
Alpine.
So this container will have a Python pre installed with this version.
And also Alpine is the smallest version of Linux.
Let's add an environment variable, which is Python.
And buffered.
Once this is needed in order to see the logs in our Python app, and now let's create a working directory.
So this you can name it whatever you want.
All the files will be added in this app folder.
Then we need to install the dependencies.
So I will add here a file called requirements dot txt.
And here, I will just add Django with this version.
So this is our only requirement.
And we need to copy that file to the working directory.
So this dot means this working directory so we'll copy this file to the working directory.
And then we need to run the command PIP installed minus R.
I will copy the file here.
So this will list out all the dependencies inside this container.
Don't forget also once you add the dependency to update, also your requirements that txt once we install everything will copy all the files.
So we'll copy everything here to this working directory.
And that's it.
So in the end, we'll learn the command Python manage that py run server output here the host, it needs to be 0.0 point 0.0.
So it should be inside the Docker container.
So this should be the port, the host, and the port should be 80.
Why did I change the port to 80, because all our containers in this project will learn on port 80.
And I'm reusing videos.
So that's why I put 80.
But if you want, you can put the normal Port 1000.
So let's run this Docker file to run this Docker file we have to build, we have to build it first.
So Docker build.
And we want to specify the name for this container.
So to specify a name, put minus d, I'll call it up.
And I will add the.in the end which means it will build in this context, and it will select this Docker file.
Let's run it.
And as we see it's building.
Let's wait through this completed.
So it is built.
Now this container can be pushed to the cloud.
But before let's test it on our browser.
So to test it on our browser or on Docker run, we need to specify a port.
So for the back for the container is a D as we thought.
And in our fronted in our browser, we can put whatever port we want output 8888.
In the end, we need our container, which is up.
Let's run it.
As you can see, our server is running.
And now we can go to our browser and type localhost Port 8888.
And this is our Django up running.
So the container is working fine.
And now we are ready to push it to the cloud.
I will also close the ID because we won't use it anymore.
In this video, we'll create a Docker container for Laravel project.
And then we will push that Docker container to AWS, Google Cloud and Azure.
So let's get started.
First of all, create here, a Docker file.
And of course make sure to have installed Docker in your machine.
And here in the Docker file, we'll start from bhB the very version will be 7.4 FPM.
So this is the container that will have PHP already installed there.
Still, we need to install some other packages.
I will base them here.
So these are some libraries that we need to install in the VCs.
The installation of composer because composer is not already installed here.
And this is a command that will enable these two extensions in our PHP dot INI file.
So that's it.
After we add everything that we need, let's specify the working directory.
I'll call it up, we need to copy composer that JSON to the working directory.
So this means that this dot means that this composer that JSON will be copied here.
And after we got composer that JSON, we need to run composer install.
And we'll add no scripts here.
So we will simply install everything that composer needs.
And we want around this post scripts like this ones.
So we will simply install everything and after that, we will copy all the files here into the working directory.
So now we have everything and we will simply run the command php artisan serve, we need to specify also the host which will be 0.0 point zero and also the port two ad so we don't need to put the ad port here, but I need it because I combine multiple video Yes, and they all have Port 80.
So we finished with Docker file, now we are, we're ready to build it.
So to build this Docker file around Docker build, we need to specify the name for this Docker build.
And we can specify a name by adding minus d, the name, I'll put it up, but you can name it whatever you want in the end dot min service contacts here.
And we do search for this Docker file.
So it will learn that Docker file, and now is building Let's wait till it's completed.
So it is built.
Now this container is ready to be deployed on the cloud.
But before let's test it on our browser to see if it works.
So to run it on our browser or on Docker around, we need to specify a port.
So the port inside the Docker container is ad.
And in our browser, you can put whatever port you want output 8888.
So in the end, we need the name of our container, so we specified it to be up.
So this is our Docker run, and is running.
So if we go to the browser now and go to localhost Port 8888, we'll see the Laravel app running so the container is running fine.
Now, let's push this container to the cloud.
Also, I'll close this ID because we won't use it anymore.
This video will create a Docker container for a dotnet project.
And we'll push that project to AWS, Google Cloud and Azure.
So let's get started.
First, in this web API, I will make just a small change, I will remove this controller here.
And the route will be the empty route.
And our app will simply return the default weather.
So that is not important.
What is important is to create a new Docker file, so new file, Docker file.
So make sure also to we have installed Docker in your machine.
And let's start with from we need to the image that we want to start.
So I will write Microsoft Azure Container Registry microsoft.com slash dotnet.
Slash SDK.
So we'll start with the version five.
So this is the container that will start and it will ever instigate already installed in this container.
And I will name it as built.
So this will be a multistage Docker build.
And I'll explain it later why I name it like this.
So let's start with the working directory.
I'll name it up for a week, you can specify whatever folder that you want, I will name it like this.
And here, we'll copy the C sharp project.
So all that C sharp project.
So like this, and we will copy to the working directory.
So this project will be copied to this dot means this working directory and after it's copied, we're on the command.net restore.
After we run the copy, that command will copy all in that folder again.
So this will get all the files here.
And it will copy it to the working directory.
And after we copied all the files, we need to publish to a DLL.
So to do it, we're on the command run.net publish.
We need to specify release and into the output will be in the out folder.
And that's it for the first stage.
So let's run this command in our local machine to see what this does generate.
So If we run this command, we will get an output folder here, where we will have a lot of files.
The one that we are interested is this dotnet Docker DLL.
So we're interested only in this file, and we can ignore all the other files.
That's why we use now a multistage build, because this will contain all the files, and also the output.
But this other container that we will build now, so from all copy this dotnet.
And we will specify a ASP dotnet here.
This other container will live the same working directory.
But don't confuse this working directory with this one because there are different containers.
And we'll copy from the built from this build will copy up, which is the working directory there.
out.
So we'll copy everything in the out folder to this dot, which is this working directory.
So we created another container with only the out folder, so it is a smaller one.
And what is left is to add an entry point.net and will execute.net Docker DLL.
And that's it.
So in the end, we have a lighter Docker container, which is just a DLL, so we can execute it.
So we finished with this Docker file.
Let's build it.
So to build a Docker file run Docker build.
And we want to specify a name for this Docker build.
And we can specify a name by adding minus d up that is the name that we want to build.
And we will add the context which is a.so.
This will execute this Docker file.
So is building Let's wait to is completed.
So the container has been built.
And now we it is ready to be pushed to the cloud.
But before let's test it on our browser.
to test it on our browser, we have to run this container, we need to specify the port.
So inside of the container, the port is 80.
But in our localhost, we can put whatever port we want output 8888.
Enter the name of our container was up.
So let's run this.
And it's successfully running now.
So if we open our browser, and right here, localhost Port 8888.
We can see this is a JSON array that is returning this weather forecast.
So it's working fine.
So this container has been built.
And now we need to push it to the cloud.
I will close also this ID because we don't need it anymore.
In this video, we'll create a Docker container for a kotlin app.
And we'll push that container to AWS, Google Cloud and Azure.
So let's get started.
First alder move here the test folder and the in the resources I will add the server port to AD so I want all the containers that I deployed to run on port 80 because I'm reusing content, but you can you may change it to the port that you want doesn't matter.
So, I added the Port 80 and also I will add a controller here.
So a lot of directory controllers in that will create a new kotlin file.
So home controller so this will be a class home controller and it will have a function Home.
So let's add also a here, this should be a rest controller.
Actually, I will paste everything, so I don't want to import it again.
So this is our home controller, it will be a rest controller, it will have only one method that will return hello world.
So that's it.
So this is simple.
And now we want to create a Docker container with this simple app.
So let's create a Docker file.
So first, make sure to have installed Docker in your machine.
And here I'll add from we need the environment will be grayed out.
And the version will be seven, and the JDK will be eight.
So this is a version of that of the gradel and dedicated, I want to start all named this as built.
So this will be a multistage Docker build.
I will explain that later.
Why I name it like that.
But let's focus first on this part.
let's specify a working directory, I'll call it up.
So you can put whatever name you want here.
So all the files will be created inside this folder now, so let's copy everything there.
So this first.is all these files, and the second one is this working directory.
Once we added everything there, we need to run the command dot flesh Gradle W, we will execute this file built with the stack trace.
So this will generate a build folder here.
Let us see.
So if I run Gradle w build here.
This will generate a builder folder.
So as you can see, we have a build folder now.
So what we want here is to go to the libs and this is our jar that we want to execute.
Actually, I'll remove this snapshot to remove that snapshot, we need to go to Gradle, build that gather that kotlin to remove this.
So this will create a shorter name without the snapshot.
So we don't need to know any of these files, except for this jar files.
So that's why we created a model a multistage built because now we can create another container from openjdk.
And this will be a smaller one, we'll specify the same working directory.
But these are different containers.
So don't worry if they have the same name.
We'll expose the Port 80 because we set it to our source folder, and then we'll copy it from there builder will copy this path.
So up built lips.
And then we need the name of the file.
So I will copy this.
But the we don't need the snapshot.
So we remove this snapshot.
So it will be like this, that jar.
So this will be the name of the build.
And we'll copy it to this working directory.
And this container only has this jar and we will just execute it so command Java jar and then they will copy this name.
And that's it.
So this is a container.
Let's start let's run it and test it.
So first we have to build it.
So Docker built.
We need to specify the name for this Docker build.
And we can do that by adding minor step.
The name of the container will be up.
So we added this and then we need to add dot which means So that it will be in this context, and it will, it will execute this Docker file.
Let's run it.
So I made a mistake.
This is built, I forgot a nail here.
So now everything is running.
Let's wait till this is completed.
So it is completed.
Now this container is ready to be published to the cloud.
But before let's test it to our browser.
To desert our browser, we need to run the container.
So Docker run, we need to specify the port, so minus b, not D.
and the port inside the Docker container is 80.
But in our localhost, we can put whatever we want, I will put 8888.
And the name of the container was up.
If we run it like this, it will execute it.
So it's running fine.
Now, let's test it on the browser, localhost Port 8888.
We can see HelloWorld here, which means our app is running fine.
Now, let's deploy this app to the cloud.
And I will close this ID because we don't need it anymore.
In this video, we'll create a Docker container for a demo up, and we'll push it to AWS, Google Cloud and Azure.
So let's get started.
So make sure first to have installed Dino.
And I will simply copy this code.
I'll create in an empty directory here, a file that yes, and I will paste this code.
So this is a really simple, if we run this up, then around of the tears, we need also to add the allow net flag.
And as we can see, it's running on port 8000.
So if we go here, localhost Port 8000.
We'll see Hello, world.
So this is our demo app that we will push.
And let's start now by creating a Docker file.
Make sure also you have Docker installed in your machine.
So this will be super simple.
We need to come from dental land.
They're not the latest version kerlin currently is one point 11.0.
And we have to specify a working directory up.
And then we'll copy everything there.
So this command means that the will copy of the DS to this working directory.
And what is left is to Sibley around the command that we just ran before, which is we don't need to specify they're not but we will around.
We'll add the flag.
Allow.
net and the file is up that yes.
And that's it super simple.
Also, I will change something here.
I want to serve it to Port 1000.
But I want to serve it to Port 80.
Because all our Docker containers will server on port 80.
And it's easier for me to combine these tutorials, but you can put the Port 1000 it's totally okay.
Now that we have everything, let's run this Docker file, first we have to build it.
So to build it around Docker build, we want we need the name of the container.
So we specified by minus D and will specify the name of the container to be up and then we'll add a dot here which means it is this context and it will select this Docker file.
So let's build up now it is building it will be fast once he's done loading everything.
So it is completed.
Now we can push this container to the cloud.
But before let's test it again to our browser.
And to test it, we have to run it.
So Docker run.
This time, we have to specify a port and the back end port.
So the container port is 80, as we said, and in the front end, we can put 8888 not in the front and in our localhost.
And then we have to specify the name of our container.
So this is a command to run this container to Port 8888.
So it's downloading again, because it's running inside the container and not sure why it has this problem.
Now.
After I run it again, it worked.
Not sure why it failed the first time.
And it says a localhost ad here, but that is inside the Docker container.
Our localhost now, eight 1000 won't work as we see.
But our port now is 8888.
And now we can see Hello word.
Now this HelloWorld is running inside the Docker container.
And that's it, we completed the Docker container for this demo up.
Now, let's push it to the cloud.
I'll also close this ID because we don't need it anymore.
So I'm logged in now to my AWS Management Console.
And we will push now our Docker container to the elastic Container Registry.
So I have a shortcut here, or we can search it.
So let's go to the Container Registry.
And this is a Container Registry.
Let's see the repositories so we don't have any repositories or registries, we have to create one.
So we will push our Docker container here to have our read repository.
First, before we do anything, make sure to install the AWS COI, so go to AWS amazon.com slash c li.
And on the right side here, you can download the Windows version of Mac OS version or the Linux version.
So with this, you will have access to your terminal to AWS and you have several commands that you can use.
So now let's first log into elastic Container Registry by using this command.
So AWS ECR is elastic Container Registry.
This is the command to log in.
This is the region region US East two pipe Docker login is the username will be AWS, the password, we it will be generated by this one.
So that's why his password SD, and this other URL is like this is our user ID.
So we can find that, if we go to our account you we have the ID here.
So that's it.
And the Docker dot ECR, this is also the same region in Amazon aws.com.
Let's run this command.
And we successfully logged in.
And now what is left is to push out Docker container to the elastic Container Registry.
So to do that, we have to do Docker dog, the name of our container was up.
And I will copy again this URL.
So we have to target to this URL slash in the end up so the name should be the same here and this URL will use it a lot.
So let's target this.
And after we target we have to push it.
So remove tug to push.
And let's wait till it's completed.
So we get an error that repository with name up does not exist.
So let's create it.
We are here at the repositories and let's create a repository.
So this is the same URL And it will be up.
So I'm just checking region if it is the same.
So this will be a private repository.
This is the repository name.
And I will leave the others by default, let's create this repository.
And we created it.
So let's push our image now, not here, here, Docker push.
And now it's pushing.
So this will take some time, and the image will be pushed to the repository.
So our image has been pushed.
So if we go to our repository, we have one latest image here, the size and everything else.
So we have our image in our repository.
I will copy the URL right here for the repository, because we will need it.
And now let's go to Amazon Container Service, elastic Container Service ECS.
And here, go to the clusters, and we'll create a cluster.
So I will select the AWS fargate cluster, because it will take care of the managing of the server for us.
If you want to manage your server, select this other one.
But this is way easier if we select the AWS fargate.
So let's go next, the cluster name, so my up and I will create a default VPC VPC for this cluster.
And I want to select anything else.
Let's create it.
And let's wait till this is completed.
So the cluster is created, click View cluster.
And now we need the task definition.
So go to task definitions.
And let's create a new task definition.
So I'll select fargate.
Next step, the task definition name, I'll call it up the role, I'll select None.
And the network model, select the default.
And for the task memory, 0.5 gigabytes, the CBO.
So I'll select the minimal versions.
And the container here we need to add the container that we just copied.
So this container and the container name, it will be also up here we need to set up the port.
So 80 was the port inside the container.
So we have to map it here.
And we can add all of our configurations.
But I won't add any thought.
Let's add this.
And we added our container there.
And that's it basically let's create this task definition.
So it was successful.
And now let's go to our cluster.
And here, now we can create our service.
So this will be also a fargate we need the task definition that we created.
So Amazon will automatically assign it we need the service name.
So up so we have a lot of ups with names number of tasks, I will select one but you can select two it will create two containers.
One it will be only one container.
So I will keep everything minimal, but you can select two and everything should be okay now.
So let's go to the next step subnets I'll select the one of these options and also assign a public IP Yes, load balancer I will select None.
And the next step Oh, here we can auto scale but since this is an example I will not auto scale.
So it will be just a simple container.
Review create service.
So everything is created.
So let's go to the View service.
And let's click here.
And the status is pending.
Let's wait till is running and then after it's done.
We will have a public IP, which we will see it.
Let's wait.
So our task is running now.
And we have a public IP for it.
So I'll copy this IP, or visit here.
And this is our app.
So this is how we deploy a Docker container to AWS fargate.
Thank you for watching this video.
Don't forget to like, share, and subscribe.
Thank you.
So I'm logged into my azuro portal here.
And before I create anything, make sure to have installed the Azores ccli.
So download the right version for your machine and follow the instructions, you will have access to this is the command which it will show these options.
So before let's go back to the Azure portal.
And we'll create a Container Registry.
So we don't have any Container Registry yet.
So let's create a Container Registry.
So I'll create the Container Registry here, the resource group, I have a demo demo resource group here, which I gather just the name.
The registry name, I'll call it up.
So it needs to have five characters, so I will call it my up.
Oh, already news for my container.
Okay, container up.
So which name is not used.
So my container up, I will use this name.
And for location, you can pick your location for this SKU, I will select the basic version.
Let's create it.
And we can create this registry.
And now that we created our registry, we need also to log in.
So first, we have to log in via USB or like this is the login.
So we need to sign into our account here.
And we logged in to MC soft Azure.
So as you can see, it shows this data.
So after we log in there, we have to run this other command.
So as your as your Container Registry login, and here we need the name, which was which was up.
So let's copy it also forgot to the resource.
And let's copy the URL, which is this one.
So we don't need the suffix.
So let's log in.
So this will allow us to push a Docker container to ashore.
So we successfully logged in.
And now that we logged in, we can push our image to push our image.
First, we have to talk the image.
So Docker tag, the name of our container is up.
And I'll paste again, this URL, which I copied.
And do we need to add Indian slash up.
So this is our repository here.
So I gather this.
And after we tag, we have to push it.
So let's push it.
And now it's pushing our container to it as your Container Registry.
So let's wait till this completed.
So it is completed.
Now we can go back.
And here we'll go to the repositories.
This is our upper repository.
And here we have our image.
So this is our image.
And what I will do here is I will copy this container name, so I'll copy this.
And let's go back to home.
And let's create a container instance now.
So let's create a container instance.
I'll select the same resource group.
We need the container name.
The container name is up And we have to select the image source to zero Container Registry.
And we have our container app.
So we need to enable admin here.
So let's click learn more.
And we have to run this command.
So I will copy this command.
And I will run it here.
So we need the name here, or our ID directly.
Not sure if we need my container up.
So I made the mistake here, it should be with one m, not two M's.
So it is enabled.
And now we can use it.
So do we need to refresh here, I will refresh.
And I will select this resource group, I'll select up here, registry, and now it is selected.
So everything is correct, I'll change the size here, I will keep everything minimal.
So point five is minimal.
memory.
So I'll select this, review and create.
Also, I think, Oh, I forgot something.
So we need to also go to the networking part.
And we have to map the Port 80.
So by default is automatically mapped, so we don't have anything to change.
But if your container port is different, we need to select here, the the other port, so ad is correctly.
And we don't need to change anything else.
Let's create it.
So deployment is in progress.
The deployment is complete.
So let's go to the resource.
And we have a public IP address here.
So we can copy this IP address.
And if we go to the IP address, we can see our app deployed.
So this is how we deploy a Docker container to a zoo content container instance.
Thank you for watching this video, I hope you like share, and subscribe.
Thank you.
So I'm logged into my Google Cloud Platform now.
And we will we will use two services Container Registry and cloud run.
So let's go to the Container Registry.
And before adding anything here, we need to install the Google Cloud SDK.
So make sure to download the right installer for Mac OS, you don't load it here, also for Windows and Linux, and also make sure to add it to your path.
Once it is completed, you can use G Cloud.
So I already have my G Cloud configured.
And now let's log in first.
So in order to push containers to the Google Cloud registry, we have to be logged in first.
So G Cloud, our login.
So this will connect with our Google Cloud account.
And we will allow everything.
And now we are logged in.
If we go to our terminal, we will see this so I'll clear it now.
And now we can push our image to a Docker registry to the Container Registry story.
So first, we have to tag the image.
So Docker tag, the name of the image is up.
And we will target to Google Cloud registry.
So gcr.io slash we need the project name.
So if we go to our cloud platform, click our project here.
And this is my project name.
So I'll copy this ID here.
And I will add it here.
So this is our project ID.
And then we need the name of our container.
So this should be the same with the last one.
I talked about this and then we need to push it so I'll remove this and we'll push it and this will Push the container to our Google Cloud Platform.
So let's wait till is completed.
So the image is pushed.
Now, we will see the image here.
So in the Container Registry, we have our app image.
And let's go here and let's copy the URL.
So I'll copy the URL here.
Because we will need it.
And let's go down now to the cloud run.
So here, we need to create a service.
When you add the service name, I'll call it up the region, you can select your own region, we need the container image URL.
So here, we can select it directly.
And this is the container, the last container that we pushed.
So select this.
And this was our container.
We cannot some advanced settings here like variable secrets, etc.
But the only thing that we will change is the port.
So our container port is 80.
So I'll put ad here.
And we don't need to change anything else there.
Next.
So we need to allow an unauthenticated invocations.
So this is public.
And that's it.
So let's create this.
And let's wait till it's completed.
So it should be fast.
So it is completed, not sure why I made a mistake here.
The port was 76.
Here, it should be 80.
And we have also a URL here.
If we go to the URL, we'll see our app deployed.
So it was this simple.
This is how we deploy an app to the Google Cloud run.
Don't forget to like, share and subscribe.
Thank you.