
Markdown editors are trending these days. Everybody is creating a markdown editor, and some of them are innovative while some of them are boring.
As for myself, however, I have always been a fan of doing things which haven't been done by others. (I will explain below why other devs don't want to build a markdown editor with Tkinter.)
If you already are familiar with Python and Tkinter you can easily get into this guide.
But If you are just starting out with Python and/or Tkinter, you can check out these:
Python Tutorials: FreeCodeCamp Python Tutorial , Python 3 Playlist by sentdex , FreeCodeCamp Python for Beginners etc. (More can be found one Google search away)
Tkinter Tutorials: Tkinter Basics , FreeCodeCamp Tkinter Course , TheNewBoston Tkinter Playlist etc. (More can be found one Google search away)
So, before we start, I want to explain why people don't want to build markdown editors with tkinter. It's because there's no default easy way to display the html output of the markdown input. There's not even a default tkinter widget to display html data. You can just simply write/edit markdown, but there's no easy way to display the output inside your application.
But one day, while I was roaming the streets of the Internet, I found something interesting: tk_html_widgets. It can display html output!
But ofcourse it did have some problems: the fonts were too small, and it had no support for attaching remote photos. So as usual I created my own fork and fixed some issues and kinda improved the stability. I named it tkhtmlview. ?
Ugh, I think I'm boring you ?, so let's stop talking and start building.
?️ Start Building:
First make sure you have Python 3 and Tkinter installed. If not you can download them from here:
python.org/downloads (Tkinter is already packed with Python).
Other Things we will need are tkhtmlview and markdown2. You can install them by running pip install tkhtmlview markdown2 or pip3 install tkhtmlview markdown2 (if you have multiple versions of Python).
Now fire up your favorite editor or IDE and create a new file (eg. tdown.py (I named the editor tdown)).
We will start by importing the necessary libraries.
from tkinter import *
from tkinter import font , filedialog
from markdown2 import Markdown
from tkhtmlview import HTMLLabel
In the first line we import everything (almost) from the tkinter package.
In the second line we import the font and filedialog. font is needed to style (eg. Font , Font Size) our input field, and filedialog is imported to open markdown files for editing (and/or for saving our markdown file).
In the 3rd line, Markdown is imported to help us convert our markdown source to html and display it in the output field using HTMLLabel (which we import on the 4th line).
After that, we will create a frame class called Window which will be inherited from tkinters's Frame class. It will hold our input and output fields.
class Window(Frame):
    def __init__(self, master=None):
        Frame.__init__(self, master)
        self.master = master
        self.myfont = font.Font(family="Helvetica", size=14)
        self.init_window()

    def init_window(self):
        self.master.title("TDOWN")
        self.pack(fill=BOTH, expand=1)
Here in this codeblock, we first define a class called Window which inherits tkinter's Frame widget class.
Now in the initialization function we take master as a argument which will serve as the parent of the frame. In the next line we initialize a Frame.
Next we declare a custom font object called self.myfont with the font family Helvetica (you can choose any font family you want) and size 14 which will be used in our markdown input field.
Finally we call the init_window function where we will put the heart of our application.
In the init_window function we first set the title of the window as TDOWN. In the next line self.pack(fill=BOTH, expand=1) , we tell our Frame to take the full space of our window.
We set the fill keyword argument to BOTH which is actually being imported from the tkinter library. It tells the frame to fill the window both horizontally and vertically, and the expand keyword argument is set to 1 (signifies True) which tells our Frame to be expandable. In simple terms the Frame will fill the window no matter how we stretch the window size or maximize it.
Now if you run the tdown.py script you'll not see anything because we have only defined the class but never called it.
To fix this we are gonna put this at the end of our script:
root = Tk()
root.geometry("700x600")
app = Window(root)
app.mainloop()
Here we create a Tk object and store it in the root variable which will serve as the root of our Window class.
Next we set the geometry of our window to 700x600 - 700 is the height and 600 is tthe width of the window. In the next line you can see that we are creating a Window object. We push the root variable as root of the frame and store it in a variable called app.
The next thing we do is just call the mainloop function which tells our app to run! ?
Now run the tdown.py script. You will see a blank window like this if you did everything correctly:
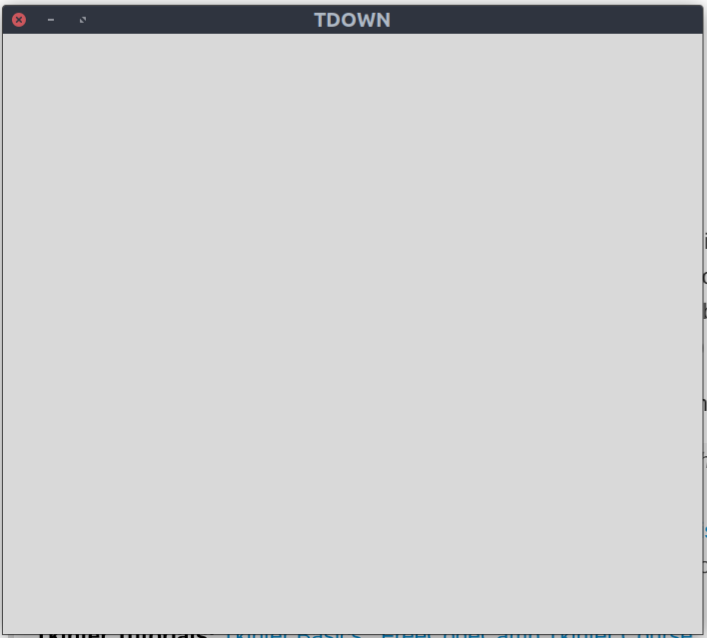
But it's just a blank window. To write something in the window we need to add a Text Field where we will write our markdown. To do that we are gonna use the Text widget from tkinter.
...
def init_window(self):
    self.master.title("TDOWN")
    self.pack(fill=BOTH, expand=1)

    self.inputeditor = Text(self, width="1")
    self.inputeditor.pack(fill=BOTH, expand=1, side=LEFT)
Don't get confused with the ... (three dots) , I put them there only to signify that there are multiple lines of code before this code block.
Here we create a Text widget with a width of 1. Don't scratch your head - here sizes are done using ratios. You'll understand it more clearly in next few seconds when we put in the output box. ?
We then pack it into the Frame and tell it to be both Horizontally and Vertically stretchable.
When you run the script, you'll see that a Multiline Input Field has taken over our whole World Window. If you start writing in it, you may notice that the characters are so tiny!
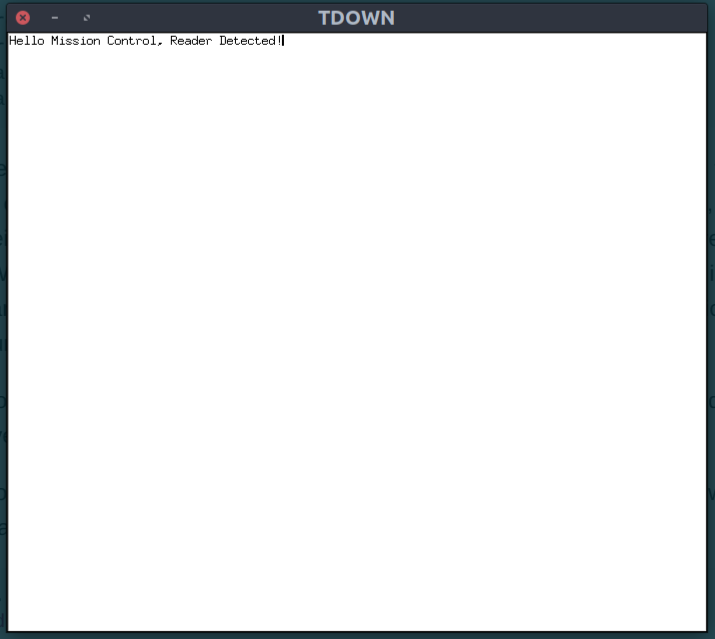
I already knew this problem would arise. That's why I told you earlier to create a custom font object (self.myfont). Now if you do something like this:
self.inputeditor = Text(self, width="1" , font=self.myfont)
(Here, we tell our Text widget to use our custom font instead of the default tiny one!)
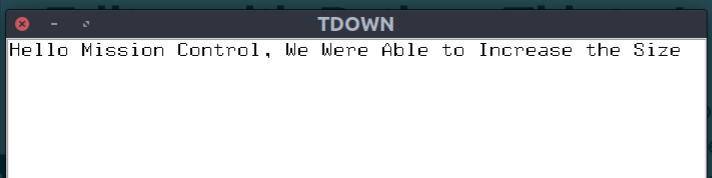
...the font size of the input field will be increased to 14. Run the script to check if everything worked perfectly.
Now, I think it's time to add the outputbox where we will see the html output of our markdown source while we write.
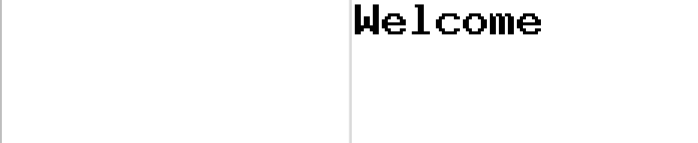
To do that we are gonna add an HTMLLabel, something like this inside init_window function:
self.outputbox = HTMLLabel(self, width="1", background="white", html="<h1>Welcome</h1>")
self.outputbox.pack(fill=BOTH, expand=1, side=RIGHT)
self.outputbox.fit_height()
We use HTMLLabel from tkhtmlview with a width of 1 (again). We set the width to 1 because the window will be shared between Input Field and Output Box with ratio of 1:1 (You'll understand what I mean when you run the script).
The html keyword argument stores the value which will be shown the first time.
Then we pack it in the window with side as RIGHT to put it in the right side of the Input Field. The fit_height() makes the texts fit inside the widget (as far as I know... ?)
Now run the code.
Now if you start writing in the input field, you may be disappointed (but don't be!) to see that the output is not getting updated as we type. That's because we have not told our program to do so yet.
To do that we are gonna first bind a event with our editor. Then whenever the text is modified the output will be updated, something like this:
self.inputeditor.bind("<<Modified>>", self.onInputChange)
Put that line inside the init_window() function.
So basically that line tells the inputeditor to call the onInputChange function whenever the text is changed. But as we don't have that function yet, we need to write it.
...
def onInputChange(self , event):
    self.inputeditor.edit_modified(0)
    md2html = Markdown()
    self.outputbox.set_html(md2html.convert(self.inputeditor.get("1.0" , END)))
In the first line, using edit_modified(0) we reset the Modified flag so that it can be reused. Otherwise, after the first event call, it will not work anymore.
Next we create a Markdown object named md2html. On the last line, where first we.... wait! The last line may be confusing for some readers. So let me it break it down into three lines.
markdownText = self.inputeditor.get("1.0" , END)
html = md2html.convert(markdownText)
self.outputbox.set_html(html)
Here in the first line we fetch the markdown text from top to bottom of the input field. The first argument, self.inputeditor.get, tells it to start scanning from the first line's 0th character (1.0 => [LINE_NUMBER].[CHARACTER_NUMBER]) , and the last argument tells it to stop scanning it has when reached the end.
Then we convert the scanned markdown text to html using the md2html.convert() function and store it in the html variable.
Finally we tell outputbox to display the output using the .set_html() function!
Run the script. You will see a functioning (almost) markdown editor. As you type in the input field, the output will also be updated!
But...our work is not yet finished. Users need to be able to at least open and save their text.
To do that, we are gonna add a File menu in the menubar. This is where users will be able to open and save files as well as quit the application.
In the init_window function we will add these lines:
self.mainmenu = Menu(self)
self.filemenu = Menu(self.mainmenu)
self.filemenu.add_command(label="Open", command=self.openfile)
self.filemenu.add_command(label="Save as", command=self.savefile)
self.filemenu.add_separator()
self.filemenu.add_command(label="Exit", command=self.quit)
self.mainmenu.add_cascade(label="File", menu=self.filemenu)
self.master.config(menu=self.mainmenu)
I'll make this quick:
Here we define a new menu with Frame as its parent.
Next, we define another menu and previous menu as its parent. It will serve as our File menu.
Then we add 3 sub menus (Open, Save as, and Exit) and a separator using the add_command() and add_separator() functions. The Open sub-menu will execute the openfile function, the Save as sub-menu will execute the savefile function. and finally Exit will execute a builtin function quit which will close the program.
Then using the add_cascade() function we tell the first Menu object to include the filemenu variable. This includes all our sub-menus with the label File.
At last we use self.master.config() to tell our window to use mainmenu as our window's menubar.
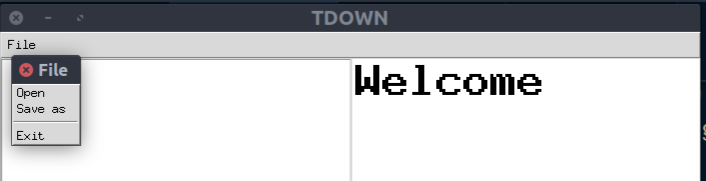
It will look something like this, but don't run it yet. You'll get errors saying that the
openfile&savefilefunctions aren't defined.
As you can see now, we have to define two functions inside the Window class where we will use tkinter's filedialog.
First Let's define the function to open files:
def openfile(self):
    openfilename = filedialog.askopenfilename(filetypes=(("Markdown File", "*.md , *.mdown , *.markdown"),
                                                                  ("Text File", "*.txt"),
                                                                  ("All Files", "*.*")))
    if openfilename:
        try:
            self.inputeditor.delete(1.0, END)
            self.inputeditor.insert(END , open(openfilename).read())
        except:
            print("Cannot Open File!")
Here, at first we show the user a file browser dialog that allows them to choose a file to open using filedialog.askopenfilename(). With the filetypes keyword argument we tell the dialog to only open these types of files by passing a tuple with supported files (basically all types of files):
- Markdown files with
.md,.mdown,.markdownextensions, - Text Files with
.txtextension, - and in the next row using a wildcard extension, we tell the dialog to open files with any extension.
Then we check if the user has selected a file or not. If yes, we try to open the file. Then we delete all the text inside the input field from the first line's 0th character to the END of the field.
Next we open and read the content of the selected file and insert the contents in the input field.
If our program can't open a file it will print out the error. But wait, that's not a good way to handle errors. What we can do here is show an Error Message to the user that looks like this:
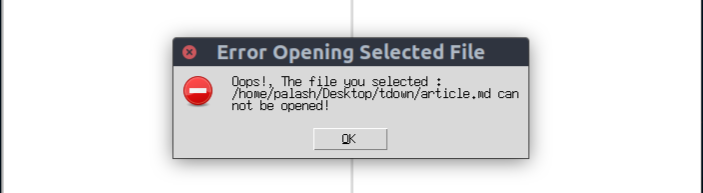
To do that, we are gonna first import messagebox from the tkinter package.
from tkinter import messagebox as mbox
Then instead of just printing an error message like we did above, we're gonna replace that line with the below line to show a proper error message to the user.
mbox.showerror("Error Opening Selected File" , "Oops!, The file you selected : {} can not be opened!".format(openfilename))
This will create an Error message like the above screenshot I showed you when the file can not be opened.
In the mbox.showerror function, the first argument is the title of the messagebox. The second one is the message to be displayed.
Now, we need to write a savefile function to save our markdown input.
def savefile(self):
        filedata = self.inputeditor.get("1.0" , END)
        savefilename = filedialog.asksaveasfilename(filetypes = (("Markdown File", "*.md"),
                                                                  ("Text File", "*.txt")) , title="Save Markdown File")
        if savefilename:
            try:
                f = open(savefilename , "w")
                f.write(filedata)
            except:
                mbox.showerror("Error Saving File" , "Oops!, The File : {} can not be saved!".format(savefilename))
Here at first we scan all the content of the input field and store it in a variable. Then we ask the user for the filename where they want to save the contents by giving the option for two types of file types (.md and .txt).
If the user chooses a filename we try to save the contents of the input field stored in the variable filedata. If an exception occurs, we show the user an error message stating that the program wasn't able to save the file.
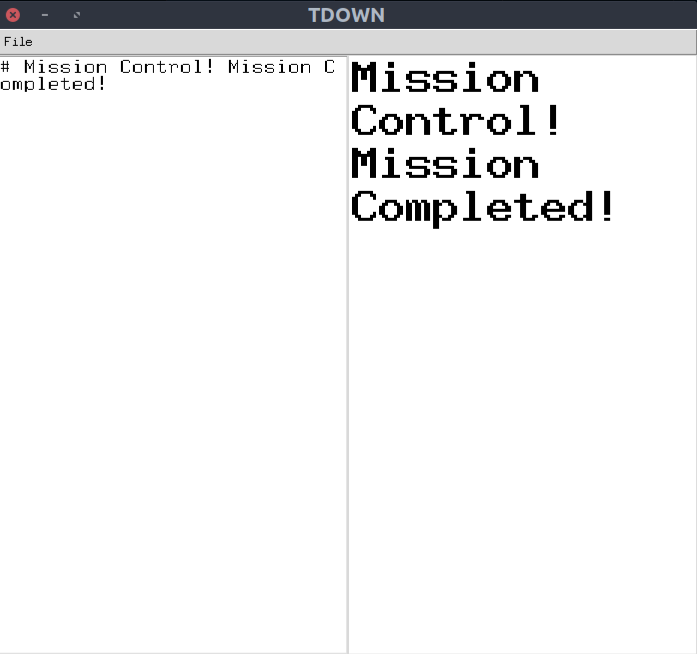
Don't forget to test your application to check for any bugs! If you and I haven't made any mistakes, our programs should run perfectly and shouldlook something like this:
Full source code for this 'tdown' markdown editor is available at GitHub and also at Repl.it where you can test the editor on your browser!

If you get into any problems as you're going through this article you can let me know in the comments or DM me on twitter at @bauripalash.
Some Notes:
-
First, remember that this is just a toy editor. If you want to build more powerful editor you can use any other GUI libraries such as wxPython, PyQT , Kivy and many more which at least have better html support (Full List).
-
In this article I only showed how to build a basic editor. You can also add many more cool features of your own such as exporting as HTML or PDF, adding buttons to simplify writing Markdown... etc etc.
-
The HTML Rendering modules tkhtmlview or tk_html_widgets are not fully stable and only support some basic html functionalities, so don't expect much.
So... I hope you enjoyed this article and learned some new things. Don't forget to let me know if you are stuck somewhere or can't understand something.
Last but not Least, please Let me know if I made any mistakes above. And I'd love to hear your ideas or suggestions via comments or DM.
Thank You. ?