

In this tutorial I will walk you through a fairly complex production-level AWS deployment setup from scratch. I will assume very little prior knowledge about AWS and assume you are a beginner.
We will setup a React Express full stack app with a PSQL database. We will deploy the app to an AWS EC2 instance running an Amazon Linux AMI 2. The setup will use NGINX as a reverse proxy and PM2 as a cluster manager. The PSQL database will be deployed to AWS RDS.
We will stay in the free tier so following along with this tutorial will not cost you anything.
Why learn AWS?
AWS is currently the biggest cloud computing platform. Wordpress powers more smaller websites, but AWS is used by the vast majority of commercial high-traffic websites. Which means people with AWS skills are in huge demand.
You can watch a video version of this tutorial here
https://www.youtube.com/playlist?list=PLMc67XEAt-yzxRboCFHza4SBOxNr7hDD5
Useful terminal commands:
https://github.com/iqbal125/terminal_commands_fullstack
Sample React/Express Project:
https://github.com/iqbal125/react-express-sample
Theory
- How networking works in AWS cloud computing
- AWS EC2 instance
- public vs private IP addresses
- IPv4 addresses
- connecting to the public internet from a private network
- AWS VPC conceptual overview
- how subnetting works in AWS
- ssh
Practice
- Simple EBS deployment
- setting up the VPC and subnets
- Internet Gateways and Route Tables
- Security Groups setup
- launching a cloud computer with AWS EC2
- setting up the database on AWS
- setting up the React build for production
- PM2 setup
- Nginx setup
Theory
Cloud Computing has drastically simplified deploying a web app. Websites like Digital Ocean and Heroku make it even easier by hiding away all the complexity and allow you to just deploy your app with a few simple steps.
Those tools are good but what we want is a robust, highly secure and highly performant cloud computing setup which means we will do it from scratch.
The AWS setup will mainly involve networking which is why most of this tutorial will focus on networking concepts and setups.
Everything else such as provisioning databases and Ec2 instances is easy to do on AWS, networking will be the biggest challenge.
But don't worry if you don't have any networking experience. I will give you all the information you need to know.
How networking works in cloud computing
It works in basically the same way networking works with hardware expect that everything that is hardware, (routers, switches, internet gateways) is virtualized in cloud computing.
Networking in cloud computing essentially determines how your virtual resources communicate with each other and the wider internet.
VPCs, IP addresses and subnets are the most important concepts to understand about networking in AWS.
This is essentially what we will be building.
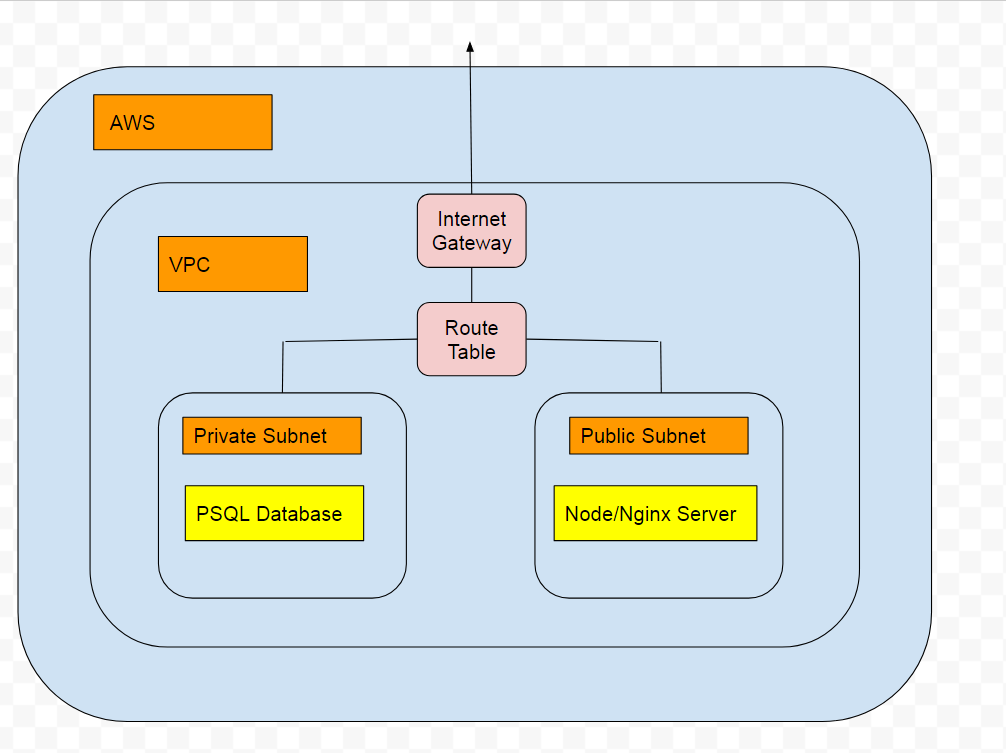
We will have a public and private subnet in our VPC. The public subnet will contain our web server and will be accessible over the internet. Our private subnet will contain our database but will not be accessible over the internet.
Our webserver and database will be able to communicate with each other through a route table.
We will see examples of both of these when we are setting up our project on the AWS console.
public vs private ip addresses
A public IP address is a the location of where your computer is in the wider internet. However, what we call the internet is just one of many networks.
The same way you can have an IP address on the internet you can also have an IP address in another network that is not the internet.
IP address is simply a way to identify a single computer on a network. Regardless of whether this network is the internet or not.
So private IP addresses are just a way we can identify computers on our own network and public IP addresses are a way we can identify computers on the “internet” network.
IPv4
IPv4 is the format in which IP addresses are written.
Example IPv4 address: 10.12.15.22
Referred to as IPv4 since there are 4 bytes which can represent the address. Each byte contains 8 bits and is therefore referred to as an octet.
Since each octet contains 8 bits and each bit can be a 0 or 1, there is 2 ^ 8 = 256 different combinations. But we start at 0 so an octet can be a number between 0-255. Since we have 4 octets we have 256 ^ 4 = 4.3 billion different combinations and therefore IP addresses!
A IPv4 address is resolved to human readable format: “https://google.com” through a DNS.
There is also IPv6, but to keep things concise we will skip this, we will only need to know IPv4 for the purposes of this tutorial.
More info about IPv6 can be found here:
https://searchnetworking.techtarget.com/definition/IPv6-Internet-Protocol-Version-6
Connecting to a Public Network from a Private Network
Done through an internet gateway
When a request is made by a computer in a private network a routing table checks to see if the destination is for a local computer or not.
If not then the request is forwarded to the internet gateway which forwards it out of the private network and to an Internet Service Provider where then it is sent to the intended destination.
The internet gateway also receives requests from the internet as well.
The internet gateway has its own public IP address, so a network can have 1 public ip address even if it has 1000s of private ip addresses.
The protocol used for sending and receiving data is called TCP. This is a pattern and blueprint that ensures data integrity and reliability.
VPC and Subnetting
VPC and Subnetting are by far the hardest things to understand and grasp in AWS, which is why I will dedicate a longer section to it.
Virtual Private Cloud. A virtual location you can deploy AWS resources into. You can deploy web servers, databases, file servers and messaging services into a VPC and have all your resources contained in one virtual place.
Each resource has its own private IP address.
A subnet is short for sub network or a small part of your entire VPC. Subnetting is essentially a way to divide up your VPC for performance and security reasons.
Example: To Deploy a database in a Subnet that is inaccessible by the internet. While another subnet that has the web servers will need to be accessible by the internet. Even though both of these subnets are separate they are still part of the same VPC.
Subnetting in AWS is done with CIDR notation.
Example subnet CIDR notation: 10.11.12.0/24
Subnet Mask
The subnet mask determines the number of ip addresses available to the subnet. The /24 is the subnet mask.
A subnet mask is used as a way to divide your subnet into an approximate number of IP addresses
network prefix: The unchanging beginning octets that identify a unique subnet or VPC.
host address: The IP addresses available to use for the different resources in a subnet.
/24 means the first 24 bits are to be used as a network prefix and therefore are unusable. Since an IPv4 has 32 total bits we have 8 bits left which are known as the Host address. These are the usable IP addresses. Since 8 bits has 256 combinations our subnet can have any address that is between 10.11.12.0 and 10.11.12.255
1s represent the network prefix and 0s represent the host address
/24 = 255.255.255.0 = 11111111.11111111.11111111.00000000
Same:
10.11.12.0/24
10.11.12.0/255.255.255.0
10.11.12.0/11111111.11111111.11111111.00000000
A subnet does not have to evenly divide into octets either.
10.11.12.0 /19 means a subnet mask of 11111111.11111111.11100000.0000000
If we go to a subnet calculator we can see how this works. A subnet calculator gives you the number of IP addresses available in a subnet. And it also gives you the minimum and maximum IP address.
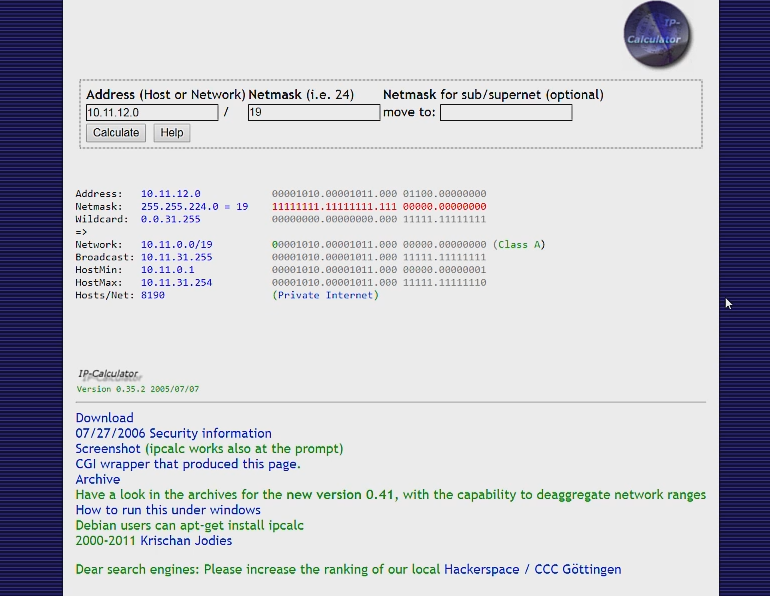
As you can see this subnet gives us 8190 total usable ip addresses.
The first 2 octets are all 1s so both the octets are used as the network prefix, and they can be any number between 0-255.
But our third octet has only the partial network prefix and we have only 5 bits to use as our host address. This means that the second octet can only be a number between 0-31 since 2 ^ 5 = 32.
Our last octet is all 0, so as normal it can be any number between 0-255.
All together this means that our subnet can be any address that is between
10.11.0.0 - 10.11.31.255
**Note: The first and last IP addresses are used as network and broadcast addresses which are special IP addresses with special functions. This is why the Host min is the second IP address and the Host Max is the second to last IP address.
You can learn more about Network and broadcast addresses here:
To avoid all the complexity mentioned above, it is best to stick with Subnet Masks of either /8 /16 /24. Doing so will make sure there are no partial octets.
10.11.12.0/8 will have the entire last 3 octets available as IP addresses
10.11.12.0/16 will have the entire last 2 octets available as IP addresses
10.11.12.0/24 will have the entire last 1 octet available as IP addresses
Real Example
VPC: 10.11.0.0/16
Public Subnet 1: 10.11.1.0/24, any IP address between 10.11.1.0 and 10.11.1.255
Public Subnet 2: 10.11.2.0/24, any IP address between 10.11.2.0 and 10.11.2.255
Private Subnet 1: 10.11.3.0/24, any IP address between 10.11.3.0 and 10.11.3.255 Private Subnet 2: 10.11.4.0/24, any IP address between 10.11.4.0 and 10.11.4.255
**Note: Not every single IP address will be available to your Subnet. A few addresses like the Network and Broadcast addresses and a few more utility addresses will be reserved by AWS.
AWS EC2
Is the "computing" in cloud computing. Is essentially a virtual computer. Has everything your computer at home does: CPU, RAM, Hard Drive etc.
This will essentially be our web server and we will use the Amazon Linux AMI 2 as the operating system.
There are also other Linux operating systems available such as Ubuntu and Red Hat.
There are also Windows based operating systems available such as Windows Server. Windows systems allow you to use a Graphical UI if you prefer not working with the command line.
A single Ec2 computer is referred to as an instance.
SSH
Secure shell: used to login to our Linux EC2 server from our home computer.
You can use Putty for SSH if you prefer a graphical user interface.
I will use Git Bash. It is simpler to use but doesn’t have a GUI.
We will SSH with Private and Public Keys. Both these keys are generated by AWS.
The private key will be stored on your own computer and will be used during the login process.
The public key will stored on amazon and allow for logins. The public key does not need to kept secret. The private key should be kept in a safe place on your computer, you will be out of luck if you accidentally delete it, since there is no way to get another one.
Practice
Simple EBS deployment
Before doing our complex deployment we can do a simple EBS deployment to get our feet wet.
AWS Elastic Beanstalk is way to launch an app to the Cloud without having to first manually setup the underlying resources such as the VPC, web server and database. It is very easy and fast to get a running app on AWS ELB and a good way to get acquainted with AWS.
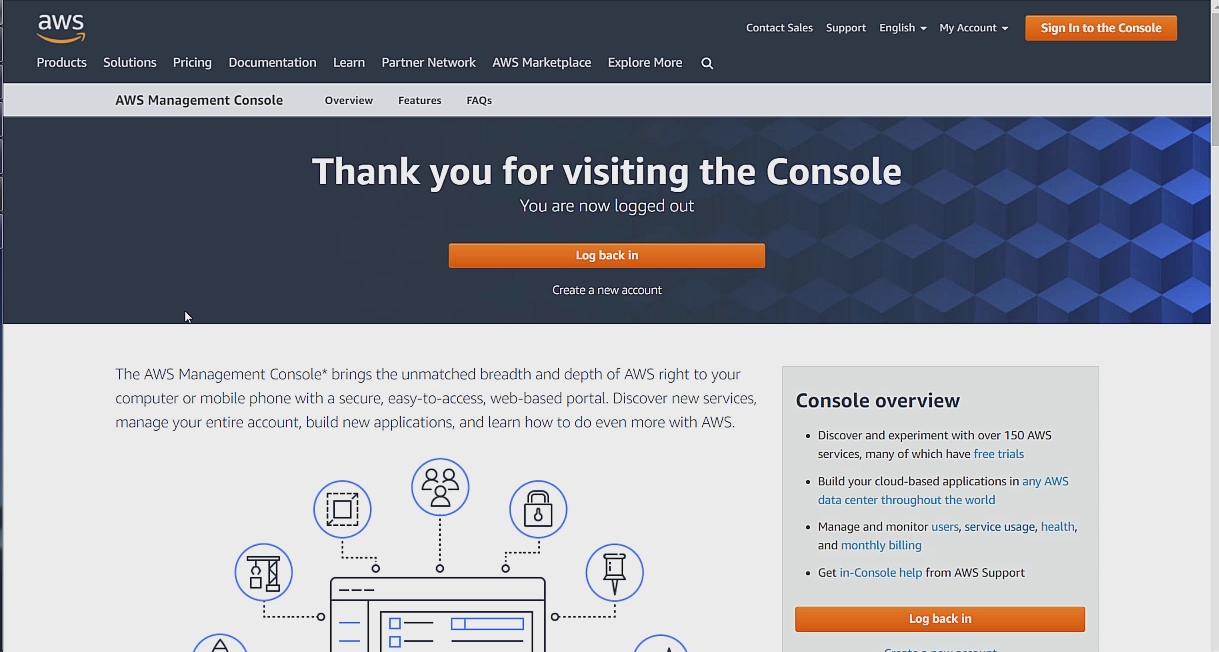
Go to the AWS home page and create a new account if you don't already have one.
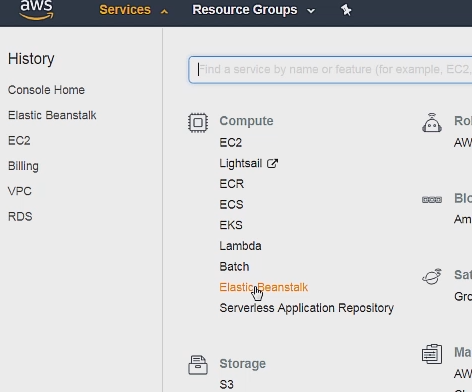
Then go on Services then ElasticBeanStalk under Compute.
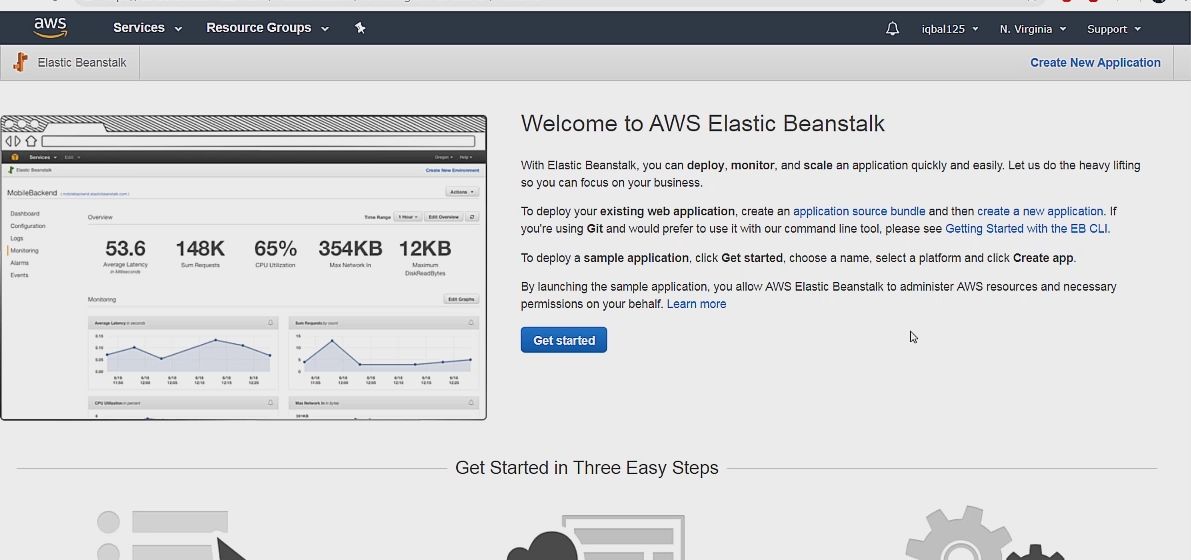
Which will bring you to the EBS home page. After this go ahead and click on Create New Application and then give it a name and description.
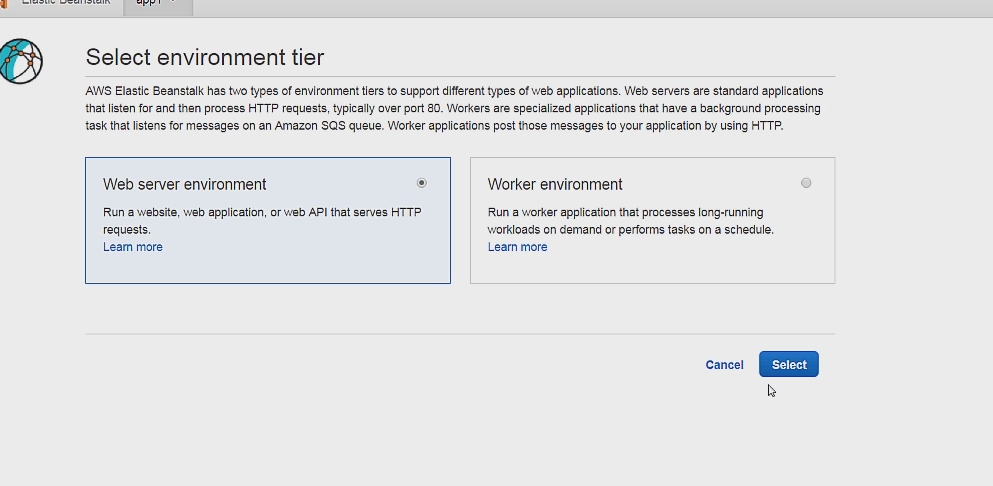
You can then click on Create New Environment and after that select Web Server Environment.
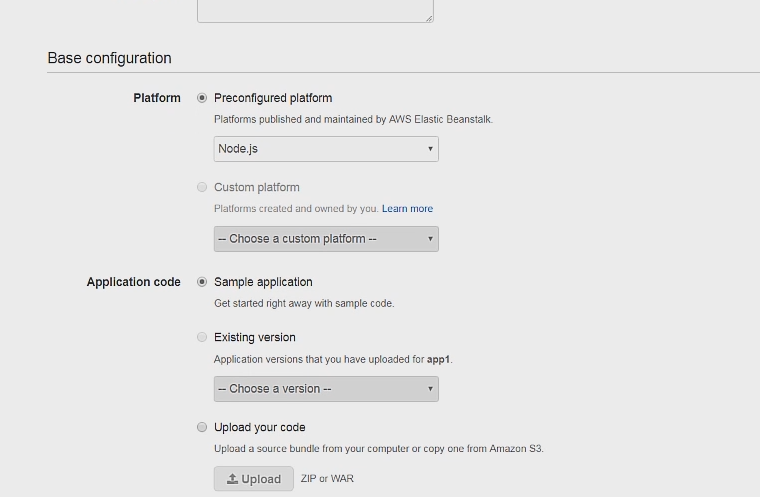
On this page select Node.js as the platform and use the Sample Application code, everything else can be left to default.
I havent had luck directly deploying the app from here, so let's click on Configure more options to set up the project some more.
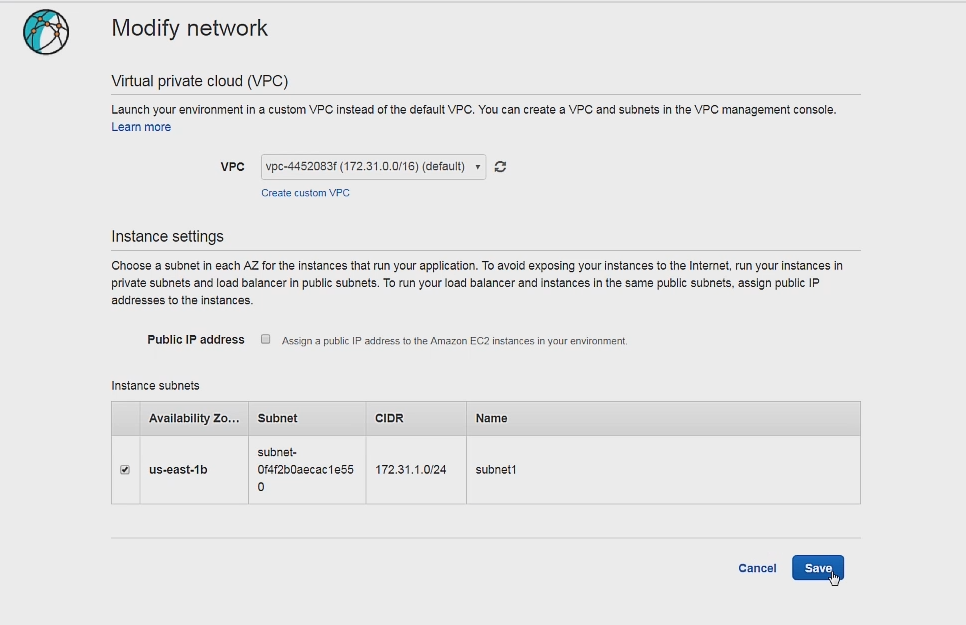
Click on the Network card on the bottom of the page and make sure the default VCP is used along with the default subnet being checked.
Then click on the Instances card and make sure the default security groups box is checked.
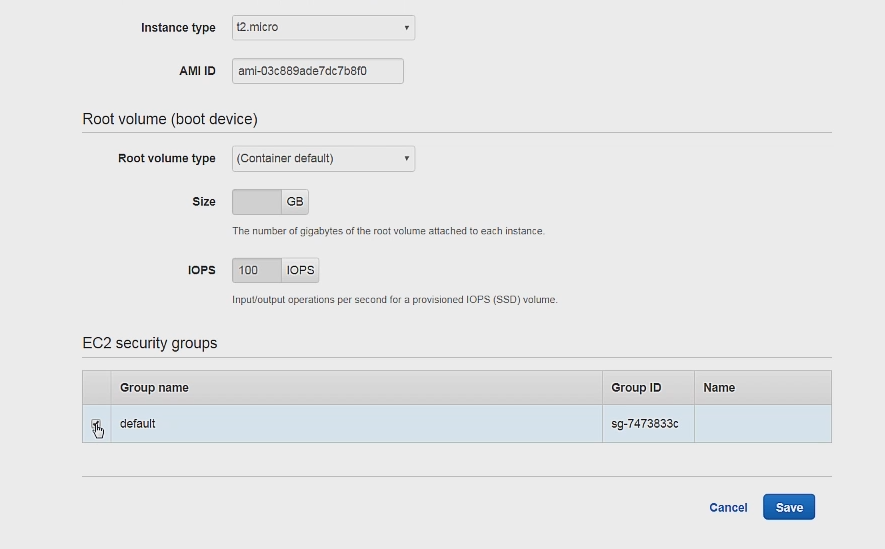
And that is it, we can now click on create environment to launch our app.
If it worked you should be seeing successfully launched environment on your screen.
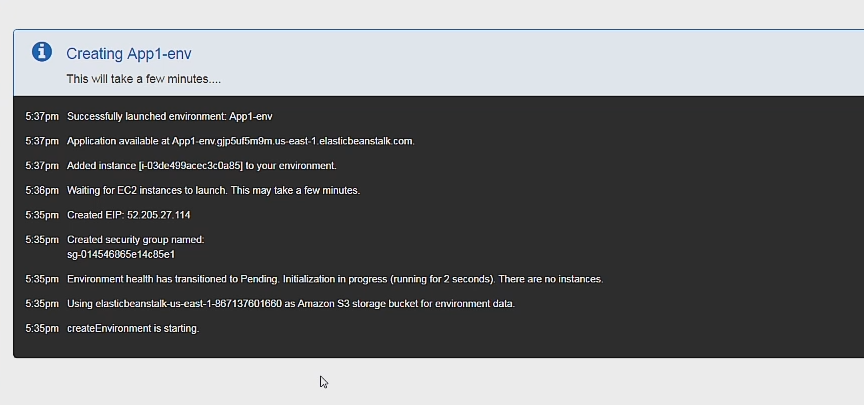
And if you click on the URL you can see your deployed app
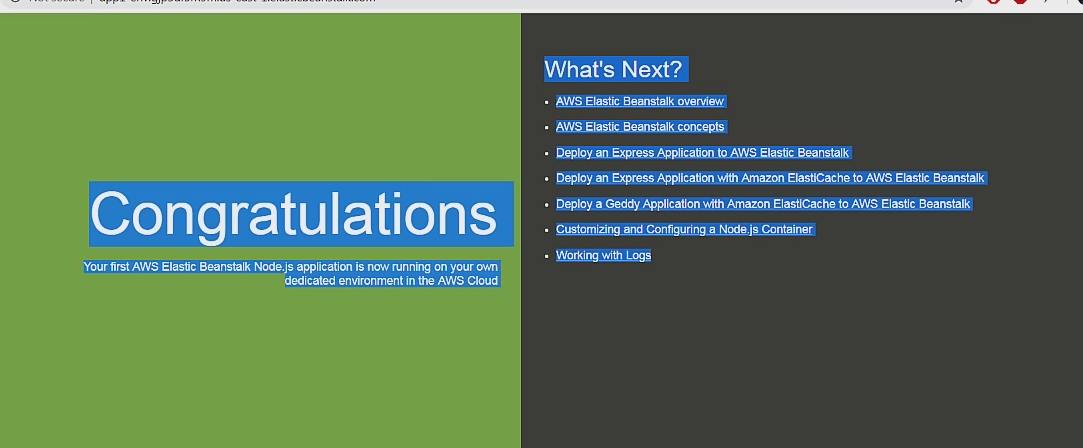
Congrats on deploying an app to the AWS Cloud!
**Important: Make sure to clean up so you don't get charged for using AWS.
To clean simply click on Terminate Environment under actions and this will delete the app along with all underlying resources.

We can now go over the complex setup.
VPC setup
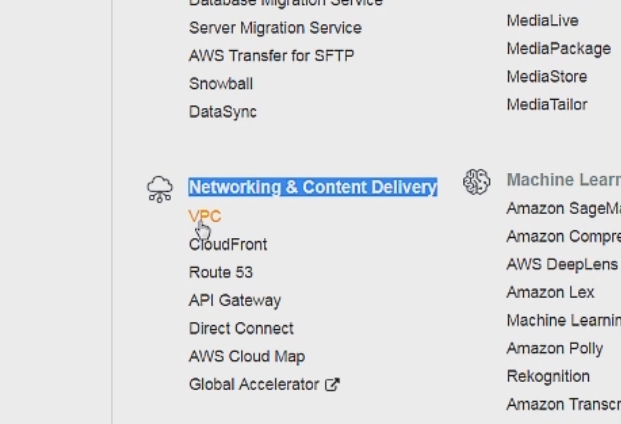
So first we can go to the VPC dashboard which is under the Network & Content Delivery section.
Then you should now be on the VPC dashboard. You can create a VPC with the Launch VPC Wizard button, which is a little bit easier, but I will show how to set it up from scratch which is a little bit more difficult but will give you a better understanding of how a VPC works.
First Click on the VPCs tab and click on the Create VPC button which will take you to a page that looks like this.
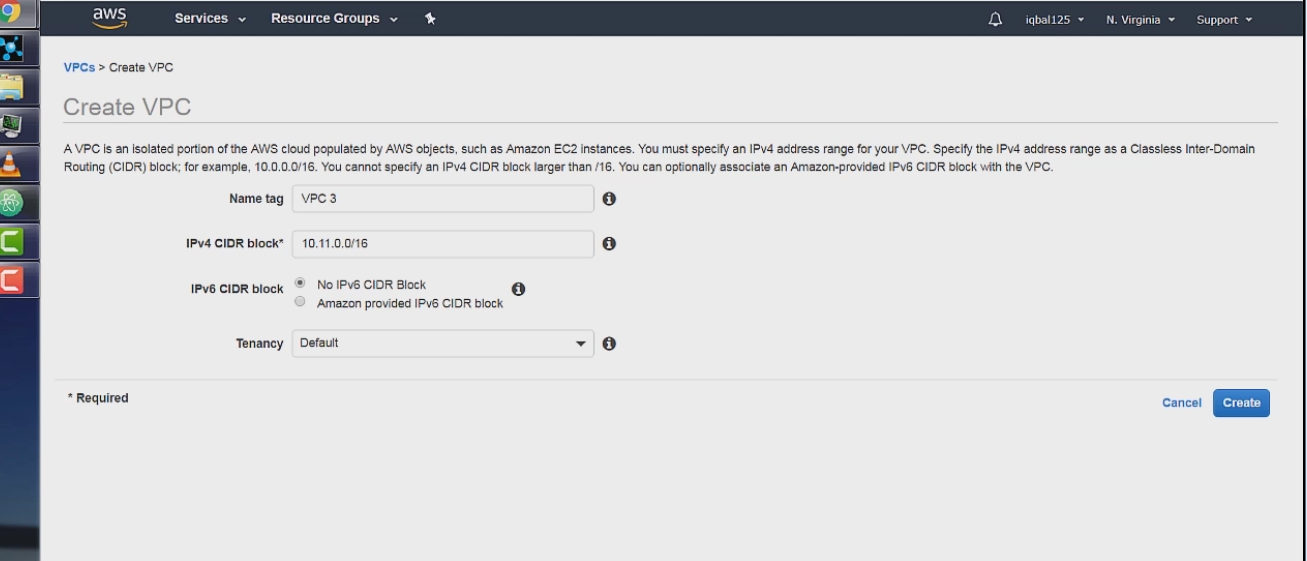
We can name the VPC to VPC 3
We can set the CIDR block to 10.11.0.0/16. If you remember from the VPC and Subnet Theory sections, this means that the first 2 octets are the network prefix and the last 2 octets are the Host Address, and are available for us to use.
Tenancy means if the VPC will be on its own dedicated hardware or not. There is a perception that Dedicated Tenancy is m0re secure or has better performance but there isn't any data to suggest this.
Default tenancy means your VPC will share the underlying hardware with other AWS users but will be isolated from them through software.
After this we can hit create VPC which will finish our VPC setup.
Subnets setup
Next we will setup the subnets. We can start by clicking on the Subnets tab and click create subnet.
We will first create our Public Subnet Like so
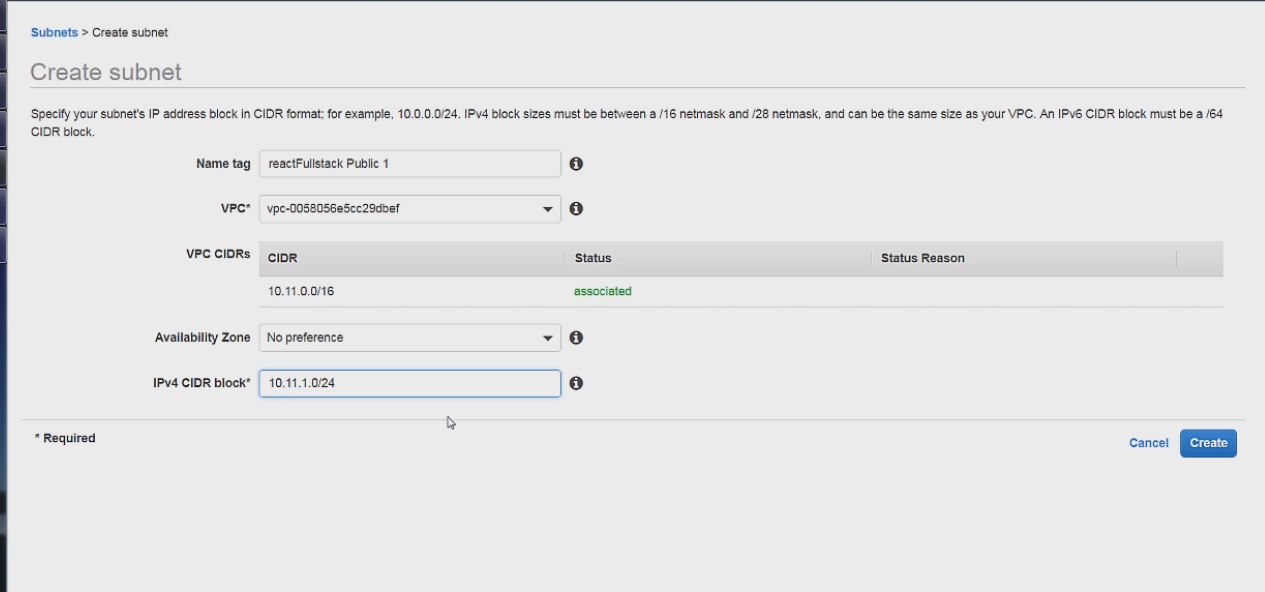
The main thing to note is the IPv4 CIDR block, which is 10.11.1.0/24.
10.11 is our unchanging network prefix from our VPC. Which makes .1 also part of the network prefix since the subnet mask is /24 and .1 is also the identifier for this subnet.
The last octet then serves as the host address, which means this subnet can have any address between 10.11.1.0 - 10.11.1.255.
And after this we can hit create which will create the subnet and list it under the subnets.
Now for our Private subnet

It is setup in a similar way to public subnet, with the the main difference being it has a .2 instead of a .1 in the 3rd octet. Also we have to specify an availability zone to make this subnet work with our database.
So basically 10.11 is the network prefix we got from the VPC. .2 is the 3rd octet and the unique identifier for this subnet, and the last octet .0 is the available IP addresses between 0-255.
So this means that this subnet can have any IP address from 10.11.2.0 - 10.11.2.255.
If you compare this to our public subnet which has an IP address range of 10.11.1.0 -10.11.1.255, it should be much more clear what the pattern for setting up the subnet is.
Deploying a database to AWS requires 2 subnets in different availability zones so you can setup the second one like so.

Internet Gateways and Route Tables
route tables are essentially routers and determine how and where traffic is directed.
Now we can create an internet gateway which we will attach to our public subnet.
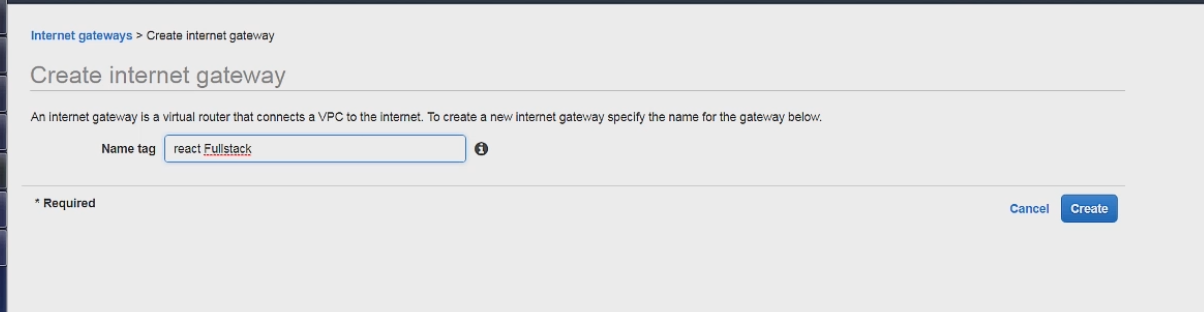
Since all internet gateways function in the same way we only need to set the name. Before we can attach this internet gateway to our subnet we first have to setup the route table.
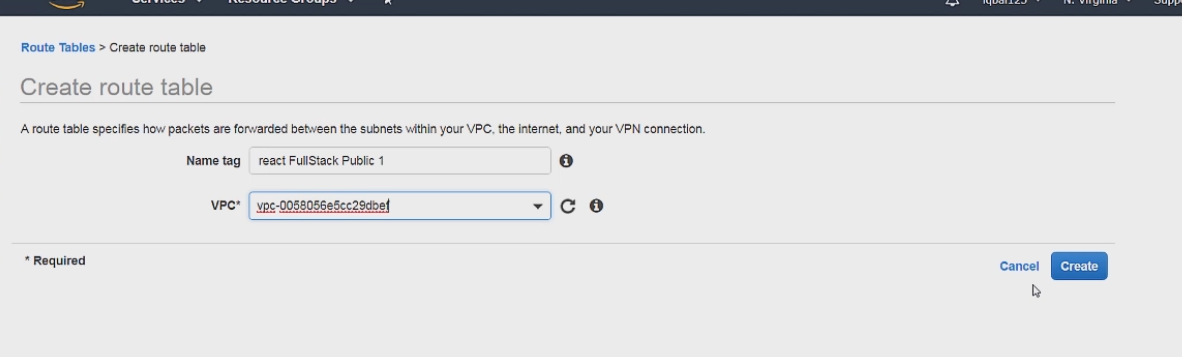
We can go to the route tables tab and click create route table
We just have to set the name and associate it with the VPC. We can associate it with VPC 3 and the just click create.
Once this is done we can now attach our internet gateway to this VPC. Let's go back to the internet gateway tab and hit the actions button and then click on attach to VPC.
For the attach option just select VPC 3.
Next we can go back to our route table we setup and add a route. We can add the route like so.
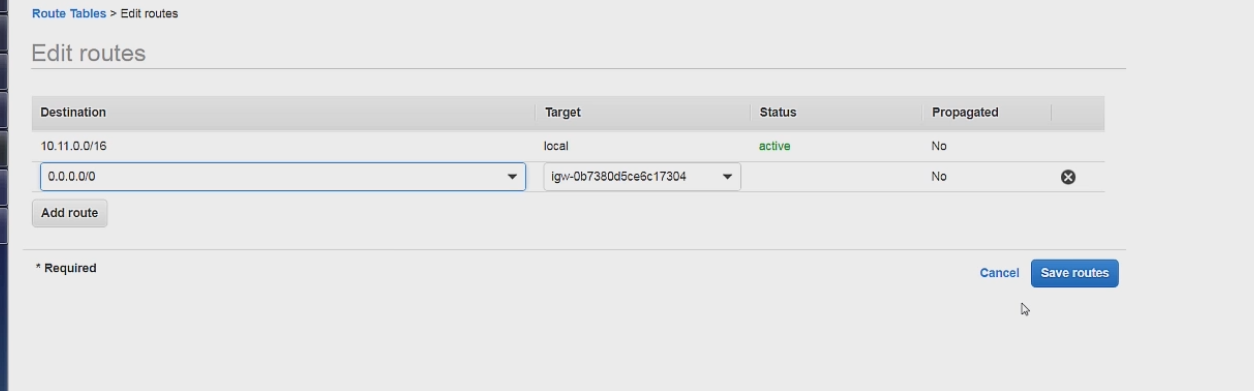
This is saying that if a request is made the route table first checks to see if the route is for a local 10.11.0.0/16 route, if not then we forward that request to the internet gateway to all the other routes which is represented by 0.0.0.0/0.
Then we can click on the subnet associations tab and then on the edit subnet associations button.
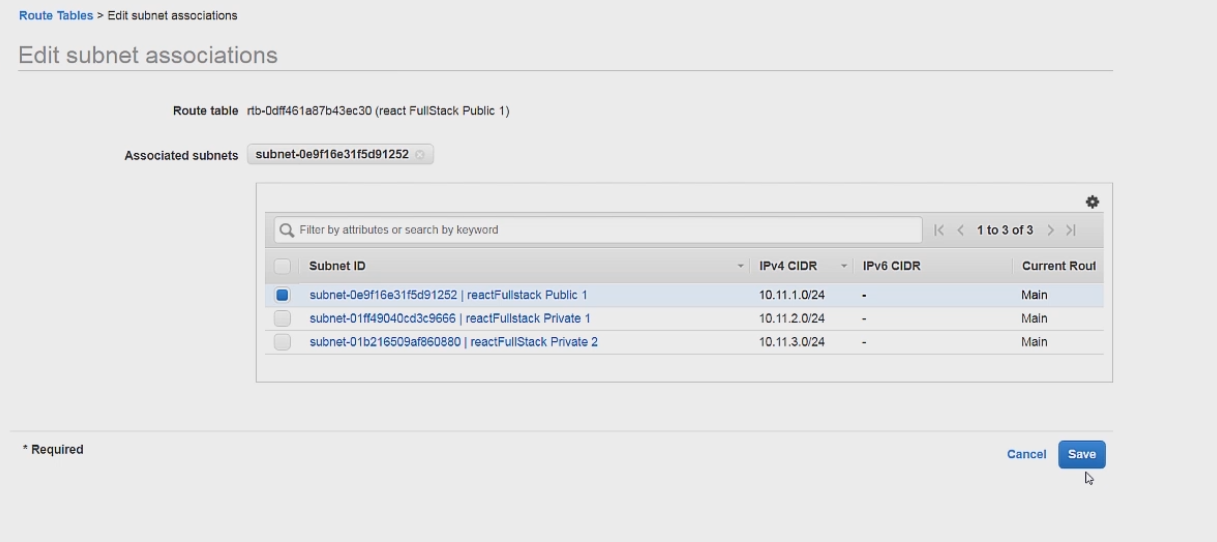
We only want the public subnet associated with this route table so we only check that one, and then we can click save.
And we cant forget about our Private subnets. Simply create another route table and associate the the private subnets to them in the same way we did for the public subnet. Do not add an internet gateway, just leave the route table for local targets.
Security Groups
security groups are essentially firewalls that filter incoming and outgoing traffic.
we need to now setup the security groups to work with this setup. Click on the security groups tab and click on create security group.
Creating the security group is very easy we can just set the name and description then just associate it with our VPC 3.
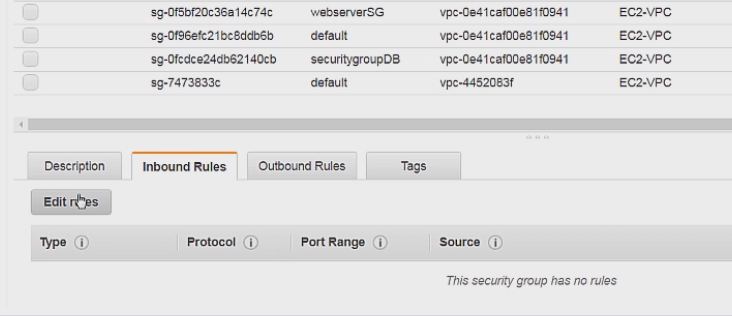
After creating the security groups click on edit inbound rules.
Next we can setup the security rules like so
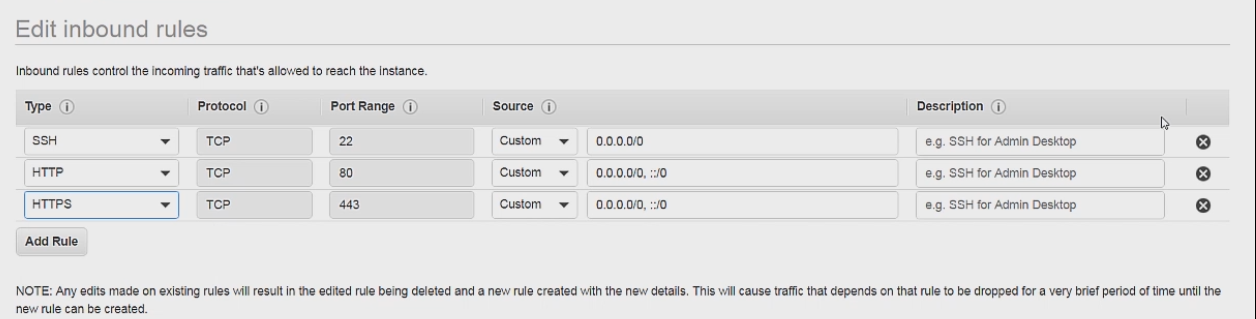
First we have SSH which how we log in to our Ec2 instance from our home computer. I have left the source to 0.0.0.0/0 because I dont want to put my personal IP address, but in a real app you will want to your own ip address here.
After that we have the normal port 80 and port 443 which allows normal traffic over the internet. ::/0 allows all IPv6 traffic along with IPv4.
Launching a EC2 instance cloud computer
First let's go the ec2 dashboard and click on launch instance. Then we can select the Amazon Linux AMI as the operating system.
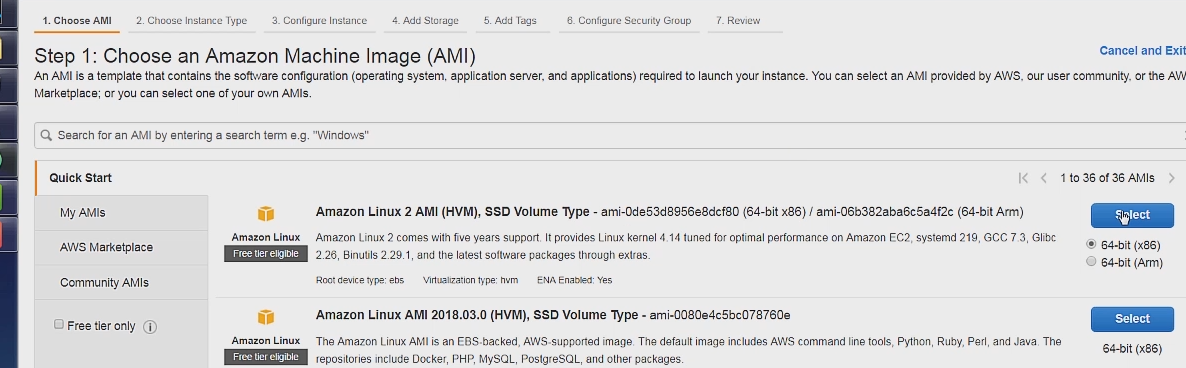
Then to stay in the free tier select the t.2 micro option for Instance type.
Then the for the 3rd step we have to configure the instance details which we can do like so.
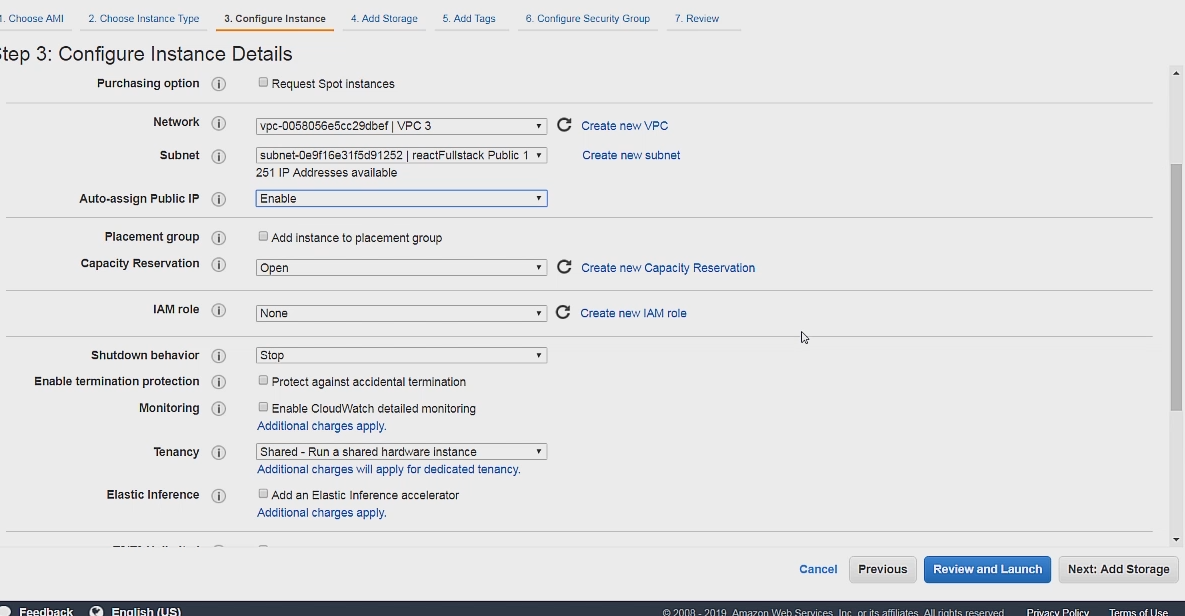
For network we can select our VPC 3 and for our subnet we can select our public subnet. Since this is our webserver we want it be in our public subnet attached to an internet gateway.
Adding tags and adding storage can be left to the default.
For security make sure to add the web server security group we setup in the last section.
Then on the final step we can just hit launch.
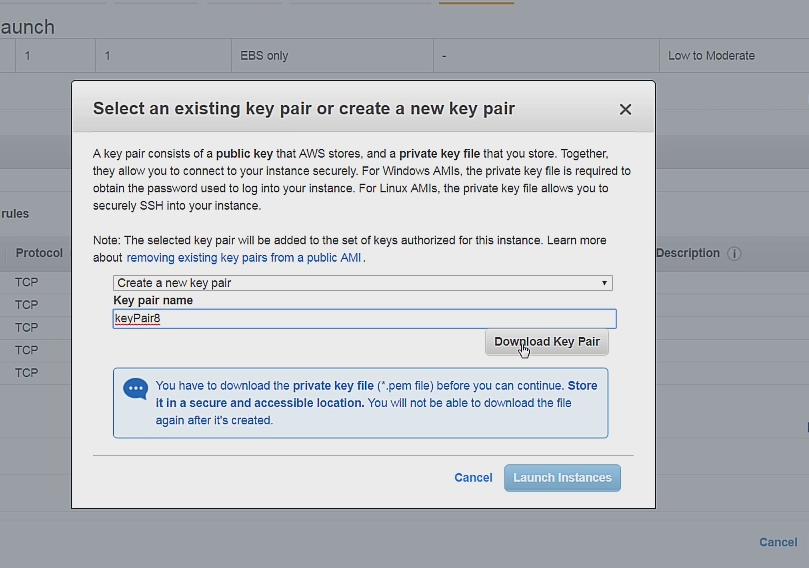
This will prompt a popup to offer us a keypair. We can good ahead and select create new key pair and then download the keypair.
If done correctly you should be seeing this to your screen.
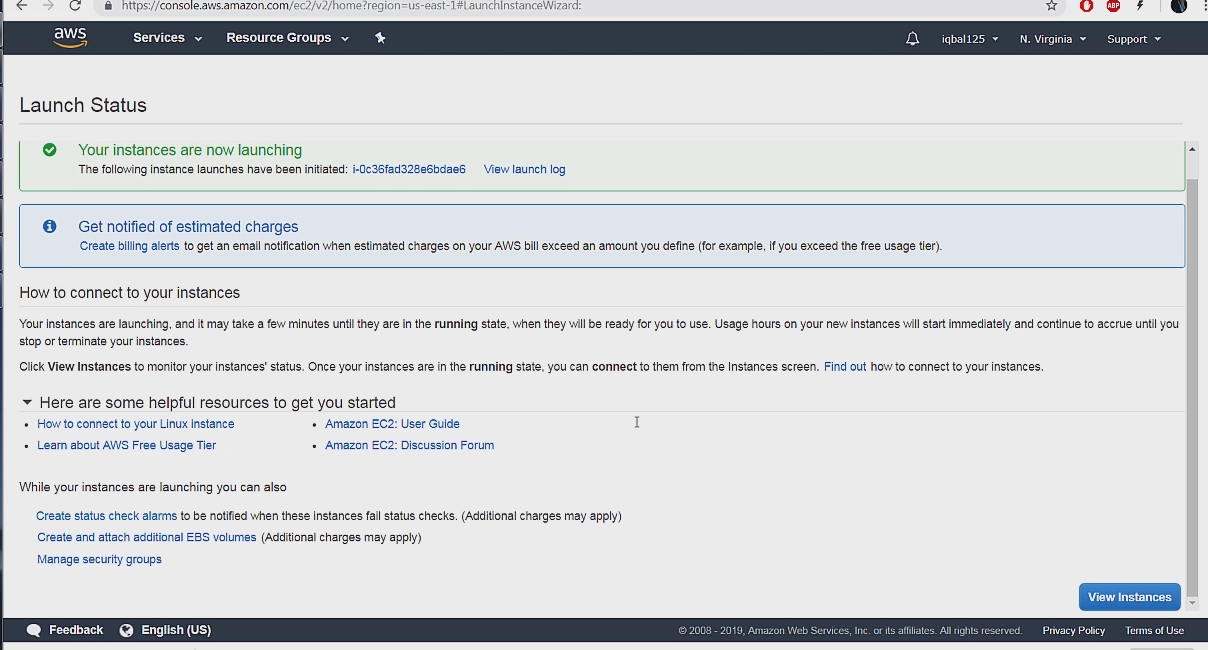
After this our instance is launched and available for us to ssh into. We can ssh into our instance with the command:
ssh i- “keypair.pem” ec2-user@public-ip-address
Database Setup
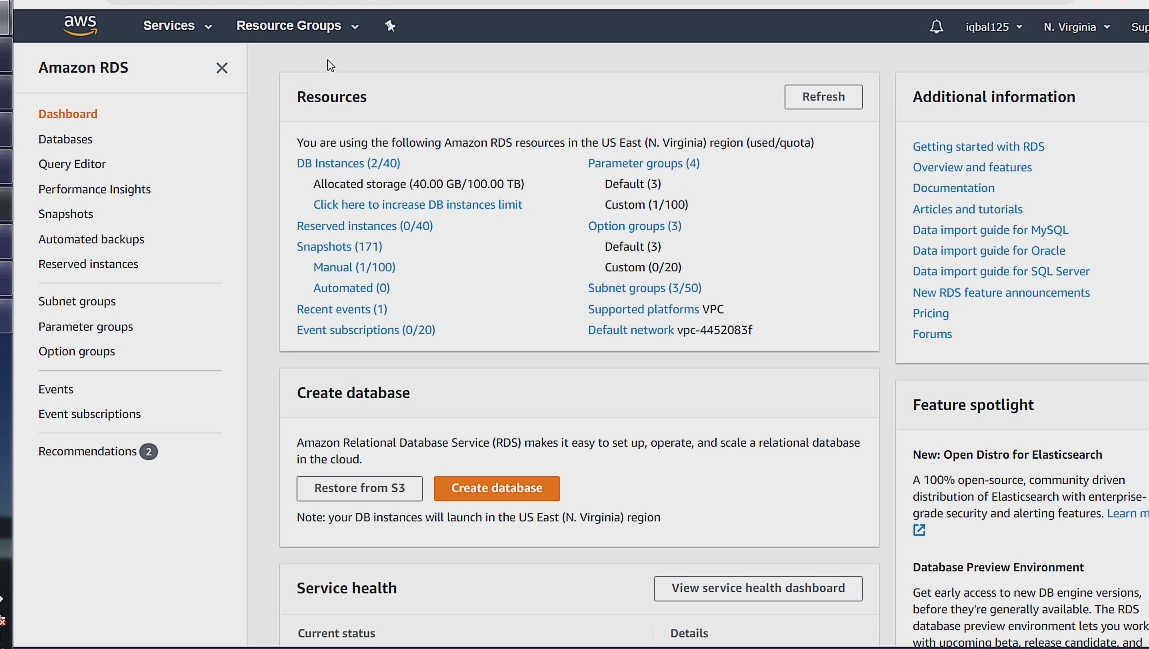
Let's now setup the database. We can begin by going to the RDS tab under the database section, under services. Which will take us to the RDS database dashboard.
But before we can create a database we have to first create a subnet group. To begin we can go to the subnet groups tab and click create db subnet group.
A db subnet group is there to protect against any sort of complete server failure or accidental deletion which is why it expands 2 availability zones. On the low chance that a server completely fails on one availability zone, your database will still be fine. It is extremely unlikely that both servers will completely fail on 2 different availability zones at the same time.
We first set the name and description. Then we associate our VPC 3 with the subnet group. After this we can add our subnets.
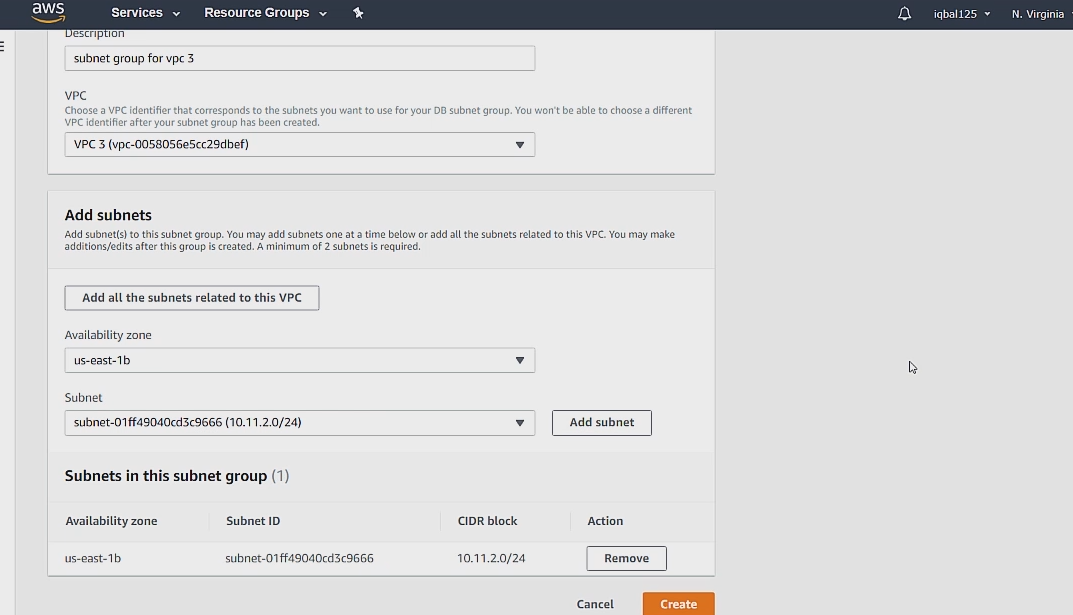
The subnets will be listed under the availability zone that we set them up in, in the previous section. Then we can just click create.
after creating the subnet group we are ready to create our actual database.
We can first go ahead and select free tier eligible at the bottom.
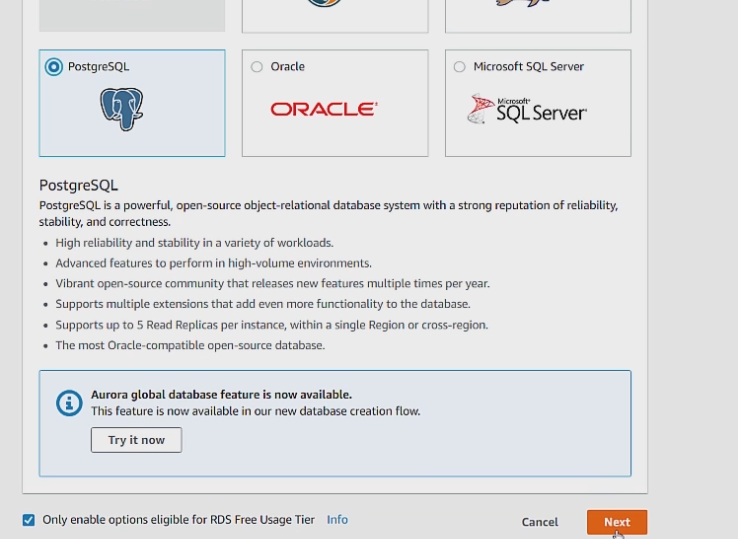
We can then click next. We can leave everything else on the next page to the default settings. Be sure to remember the username and password you set here.
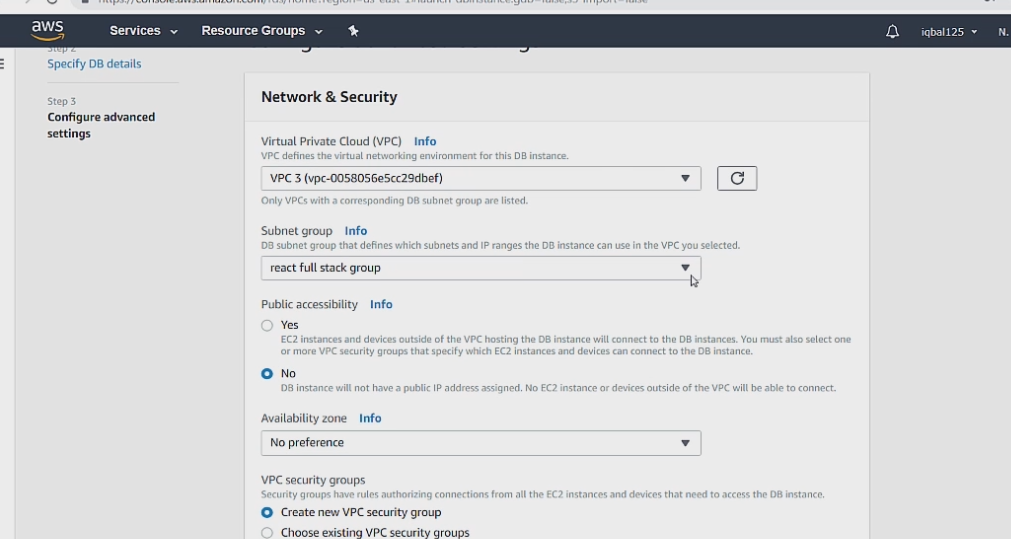
On the next page we can set the VPC to our VPC 3, the subnet group to the one we just setup.
Make sure to also leave publicly accessible to no. For obvious security reasons we don't want our app to be available over the internet.
Everything else can be left to default. We will setup our Database security groups in a second.
Now we can click create database and we can create the database security groups while the database is being created.
We can go ahead and go to the security groups tab in the VPC dashboard and create a new security group as we saw previously. For inbound rules we can limit it to the CIDR range of our web server. With the port set to the defualt port 5432 of PSQL.
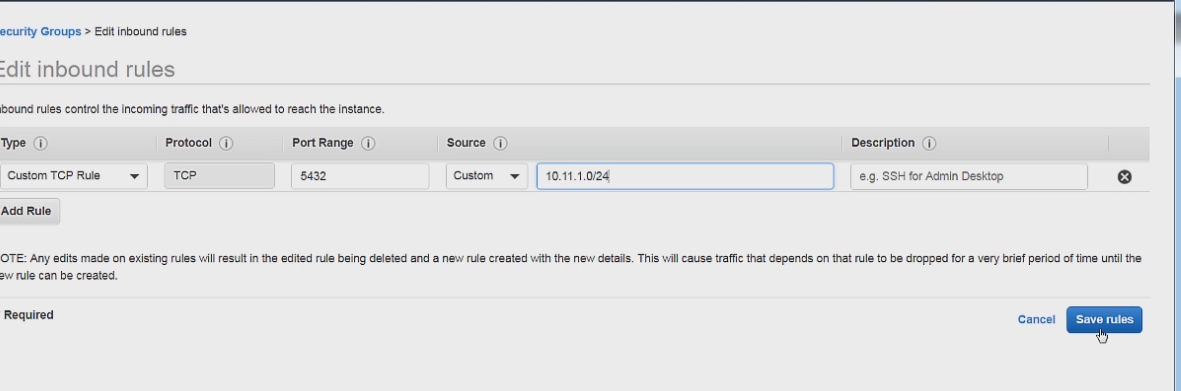
Click create and we are ready to add this to our database.
To add this new security group we can go to the database from the database dashboard. Then click the modify button.
After that we can just select the security group we just setup under the Networking and Security section.
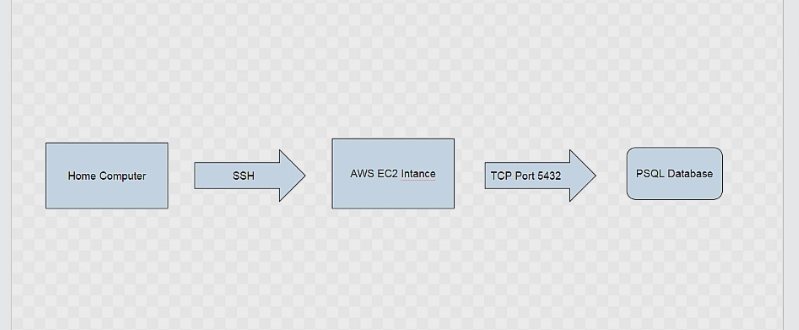
A question you might now have is how do connect to our database if it is not public ally accessible over the internet.
The way we do it is we first ssh into our linux instance then connect to our database from that instance over the PSQL TCP port we setup on our route table.
To test this we can go ahead and ssh into our ec2 instance in the same way we saw above. Then we can install psql with the command.
sudo amazon-linux-extras install postgresql9.6
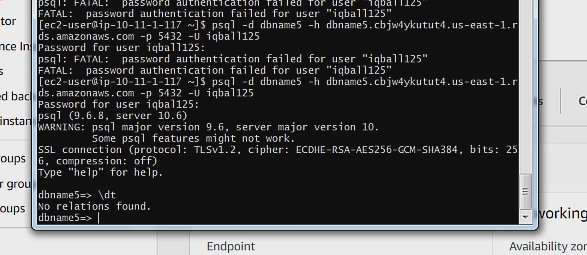
After this we can connect to the psql database with the following command.
psql -d name-of-db -h host-name -p port -U username
If you connected successfully you will see the name of your database followed by an arrow.
React and Node Project Setup
Here I will go over a sample setup with React and node/express. The very first thing to do is run the npm run build command which will output a production build of your app in a directory called build.
**Note: Make sure that all the routes that are localhost in your build version are changed to the public IP. This will probably be true for authentication. Everything else can be left as is.
Cut and paste this entire build directory into a node/express server. Then set a path to it as shown below.
....
//express server

app.use(express.static(path.join(__dirname, 'build')));

if(process.env.NODE_ENV === 'production') {
  app.get('/*', function (req, res) {
   	res.sendFile(path.join(__dirname, 'build', 'index.html'));
  });
}

....
The first function is how we serve the static files from our React app, (the JS, CSS PWA files).
The second function first checks to see if the environment is production then serves the main React HTML file.
This approach keeps our client side routing intact. For example, in our development build we can just use routes such as /post/22 and it will be correctly routed to http://localhost:3000/post/22.
But because our React app is now in production being served by an express server, the the route /post/22 will point to http://publicip/build/post/22. In order to not rewrite our entire routing we use the path.join() and the above code to fix this.
After this, simply deploy the React Express project to a Github repo.
And thats it, next we can deploy this React Express app to a Linux server.
Deploying the project to AWS EC2 instance.
Now we are ready to deploy our project. First SSH into your EC2 instance with Gitbash using the following command.
ssh i- “keypair.pem” ec2-user@public-ip-address
The next thing we have to do is actually install git, with the command:
sudo yum install git
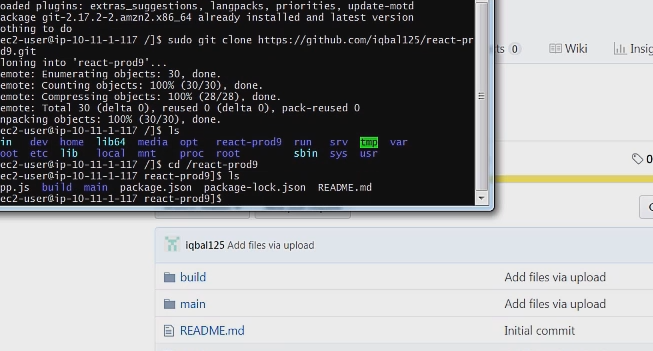
then we can clone the project into the server with the command
sudo git clone link-to-repo
After doing this you should be able to see your project files by doing cd into the directory.
We are not done yet, we still have to install node and npm, because we will want to install our dependencies of our project. We have to first install the node version manager which will then allow us to install node and npm. we can install nvm like so.
sudo curl https://raw.githubusercontent.com/creationix/nvm/v0.34.0/install.sh | bash
This will install nvm which we can then use to install node and npm. To do so simply list out the versions of node available for download and install the latest stable.
list version of node commandnvm ls remote
install commandnvm install version-of-node
But after installing npm and node if you go to run npm install on the project directory you will get a permission denied error.
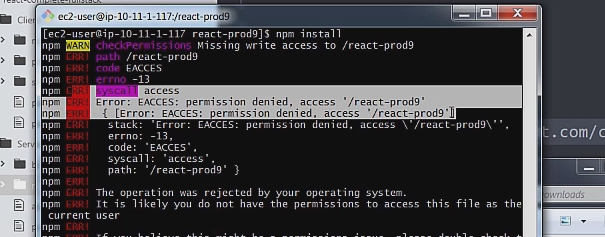
You can then run the command below to give write permission on the directory. The command below gives far more than just write permissions but configuring Linux permissions is far out of the scope of this tutorial.
sudo chmod 777 on the directory
Here is a link to a tutorial if you would like to know more about chmod.
https://www.computerhope.com/unix/uchmod.htm
After this your npm modules should install normally with the regular npm install command.
Then you can simply run your app with the npm start command which will start your node server and serve your React project as static files.
But the problem is that the project will only run on the non traditional ports like 5000 or 3000, or whichever port you were running on localhost. If you try to take the naive approach and just change the port to port 80 on the server you will get a permission denied error.
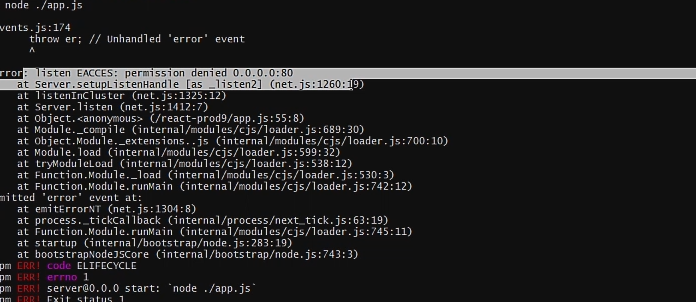
To fix this we will use nginx.
nginx
You might be wondering why we are using ngnix if we already have node. It is possible to use nginx as a http server but we will be using nginx as a reverse proxy instead, which will keep node as the actual http server.
The setup will look like this.
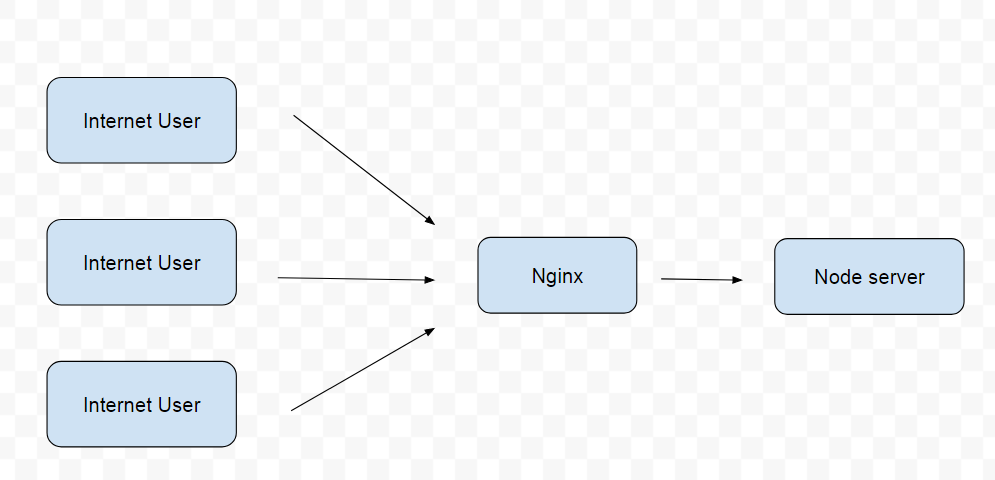
The benefits of doing this are:
- nginx acts as an application level load balancer
- Helps node with performance and reliability
- Improves Security
- Prevents DoS attacks
And here is a diagram that shows a regular proxy verses a reverse proxy.
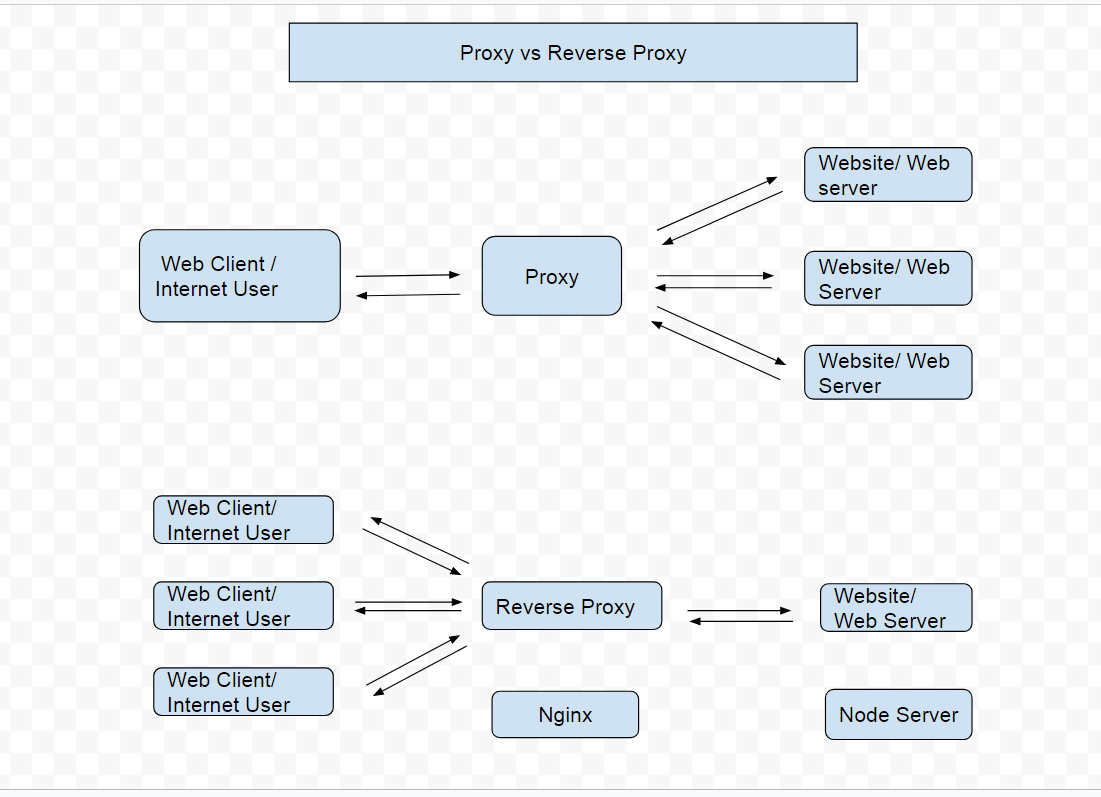
In a regular proxy a web client can send and receive data from multiple web servers. In a reverse proxy a single web server can send and receive data from multiple web clients.
Now let's move onto our Ec2 instance and ssh into it.
The very first thing we will need to do is install nginx. The Amazon Linux AMI 2 already comes with nginx so you can install it like so
sudo amazon-linux-extras install nginx1.12
Then we can cd into the nginx directory with
cd /etc/nginx
Then we can edit the nginx configuration file with the command
sudo nano nginx.conf
Which will open up the nginx.conf file in the sudo nano editor.
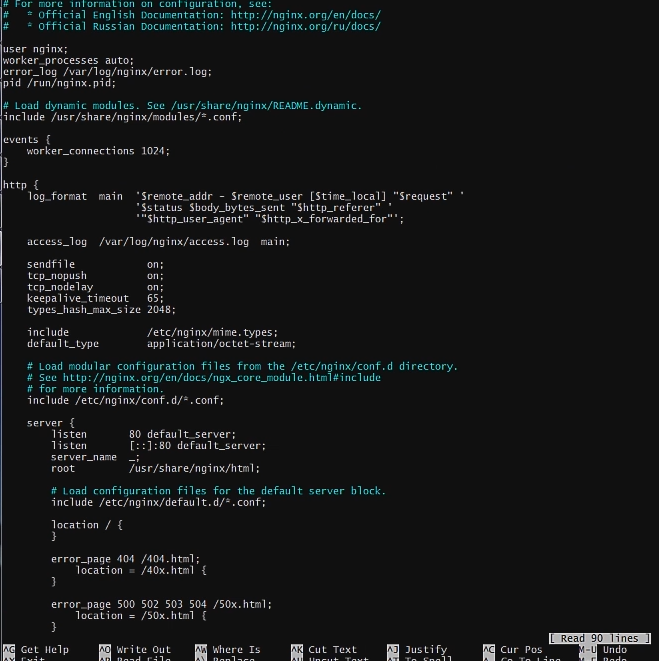
Then we can add this code to the home location route
Basically we are saying that set the react build as the root route. Then set the index.html file as the main index, finally on every subsequent request serve the same index.html file.
This is because React is a single page app and literally a single html file. So to make it possible to navigate within the React app we have to serve this same html file again in case of errors.
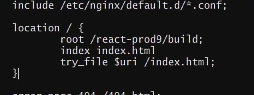
Next we can also setup nginx to handle our API routes.
This is mostly boiler plate code but the one property to note is the proxy_pass which is our public IP and the non standard port.
This ip address is then going to be proxied to the regular port 80 which will allow us to access the website as normal.
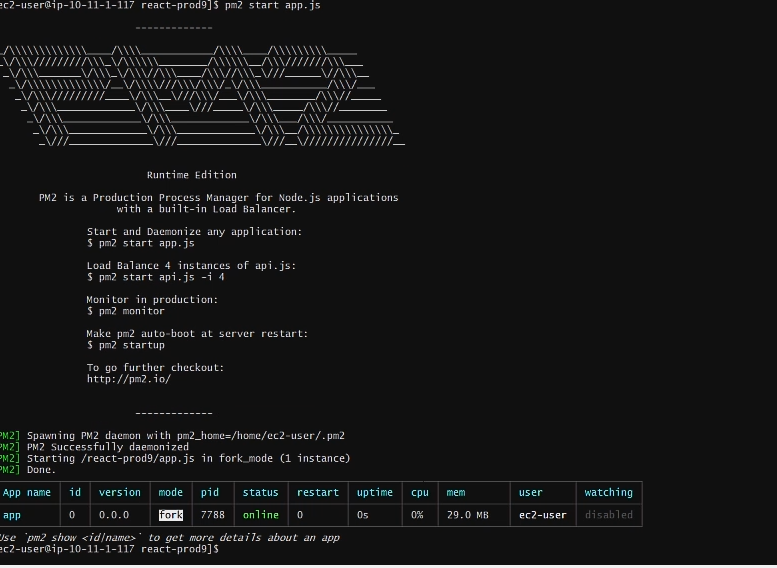
Copy and pastable version of the code:
    server {
        listen       80 default_server;
        listen       [::]:80 default_server;
        server_name  localhost;


        # Load configuration files for the default server block.
        include /etc/nginx/default.d/*.conf;

        location / {
                root /react-prod5/build;
                index index.html;
                try_files $uri /index.html;

        }

        location /api/ {
                proxy_set_header X-Forwarded-For $proxy_add_x_forwarded_for;
                proxy_set_header Host $http_host;
                proxy_set_header X-NginX-Proxy true;
                proxy_pass http://10.0.1.187:3000;
                proxy_http_version 1.1;
                proxy_set_header Upgrade $http_upgrade;
                proxy_set_header Connection 'upgrade';
                proxy_set_header Host $host;
                proxy_cache_bypass $http_upgrade;

        }
After this we can just save and exit the editor.
Now we also have to restart nginx for the changes to reflect.
sudo systemctl restart nginx
This is all you need to do to have nginx as the reverse proxy. Your app will now be able to run on the normal Port 80.
PM2
PM2 is a cluster manager and allows us to run our app automatically and also restart it automatically if it crashes.
So let's ssh back into our instance and install PM2
npm install pm2 -g
the -g flag is important because it installs PM2 globally. And this is crucial because this is what allows PM2 to do its job.
If you think about it, if PM2 was installed locally it would crash when our app crashed, so that wouldnt work. We install it globally so that it is outside our project and can restart our project if it crashes.
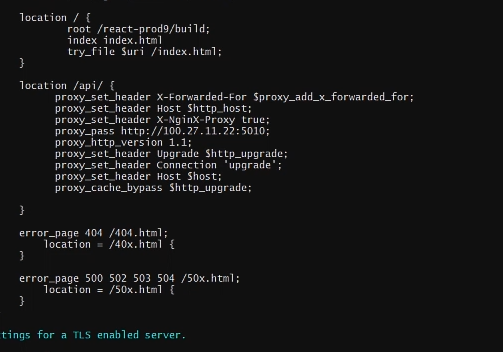
Then you can run PM2 on your project with
pm2 start app.js -i max
This will start the project with the max number of cores. This is important because node is single threaded and using all the cores will maximize performance.
If done successfully you should see a page that looks like this.
Here are a few other useful commands for PM2
pm2 list: list all running processes
pm2 stop app 0: stop app with id 0
pm2 delete app 0: delete app with id 0
pm2 restart app 0: restart app with id 0
pm2 start app.js -i max: start app.js with max number of threads available
And this is it! Thanks for reading and Congrats if you made it through the entire tutorial - this is not easy stuff.
Connect with me on Twitter for more updates on future tutorials: https://twitter.com/iqbal125sf