

Ever wondered how login/signup on a website works on the back-end? Or how when you search for "cute kitties" on YouTube, you get a bunch of results and are able to stream off of a remote machine?
In this beginner friendly guide, I will walk you through the process of setting up a RESTful API. We'll declassify some of the jargon and have a look at how we can code a server in NodeJS. Let's dive a bit deeper into JavaScript!
Get that jargon away
So, what is REST? According to Wikipedia:
Representational state transfer (REST) is a software architectural style that defines a set of constraints to be used for creating Web services. RESTful Web services allow the requesting systems to access and manipulate textual representations of Web resources by using a uniform and predefined set of stateless operations
Let's demystify what that means (hopefully you got the full form). REST is basically a set of rules for communication between a client and server. There are a few constraints on the definition of REST:
- Client-Server Architecture: the user interface of the website/app should be separated from the data request/storage, so each part can be scaled individually.
- Statelessness: the communication should have no client context stored on server. This means each request to the server should be made with all the required data and no assumptions should be made if the server has any data from previous requests.
- Layered system: client should not be able to tell if it is communicating directly with the server or some intermediary. These intermediary servers (be it proxy or load balancers) allow for scalability and security of the underlying server.
Okay, so now that you know what RESTful services are, here are some of the terms used in the heading:
- REST Client: code or an app that can access these REST services. You are using one right now! Yes, the browser can act as an uncontrolled REST client (the website handles the browser requests). The browser, for a long time, used an in-built function called XMLHttpRequest for all REST requests. But, this was succeeded by FetchAPI, a modern, promise based approach to requests. Others examples are code libraries like axios, superagent and got or some dedicated apps like Postman (or an online version, postwoman!), or a command line tool like cURL!.
- REST Service: the server. There are many popular libraries that make creation of these servers a breeze, like ExpressJS for NodeJS and Django for Python.
- REST API: this defines the endpoint and methods allowed to access/submit data to the server. We will talk about this in great detail below. Other alternatives to this are: GraphQL, JSON-Pure and oData.
So tell me now, how does REST look?
In very broad terms, you ask the server for a certain data or ask it to save some data, and the server responds to the requests.
In programming terms, there is an endpoint (a URL) that the server is waiting to get a request. We connect to that endpoint and send in some data about us (remember, REST is stateless, no data about the request is stored) and the server responds with the correct response.
Words are boring, let me give you a demonstration. I will be using Postman to show you the request and response:
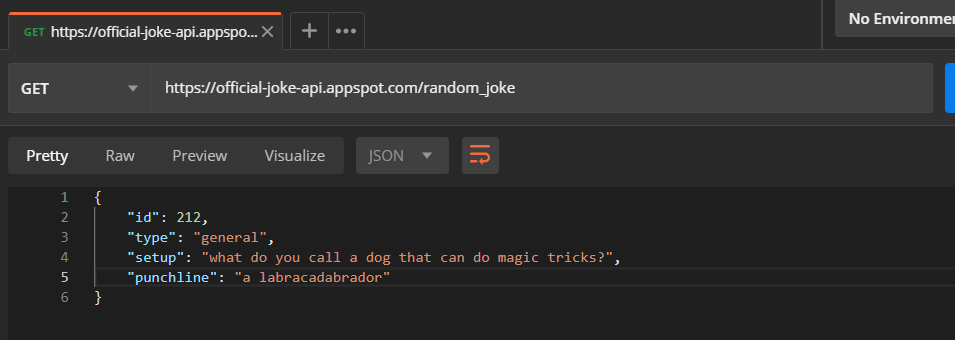
The returned data is in JSON (JavaScript Object Notation) and can be accessed directly.
Here, https://official-joke-api.appspot.com/random_joke is called an endpoint of an API. There will be a server listening on that endpoint for requests like the one we made.
Anatomy of REST:
Alright, so now we know that data can be requested by the client and the server will respond appropriately. Let's look deeper into how a request is formed.
- Endpoint: I have already told you about this. For a refresher, it is the URL where the REST Server is listening.
- Method: Earlier, I wrote that you can either request data or modify it, but how will the server know what kind of operation the client wants to perform? REST implements multiple 'methods' for different types of request, the following are most popular:
- GET: Get resource from the server.
- POST: Create resource to the server.
- PATCH or PUT: Update existing resource on the server.
- DELETE: Delete existing resource from the server. - Headers: The additional details provided for communication between client and server (remember, REST is stateless). Some of the common headers are:
Request:
- host: the IP of client (or from where request originated)
- accept-language: language understandable by the client
- user-agent: data about client, operating system and vendor
Response:
- status: the status of request or HTTP code.
- content-type: type of resource sent by server.
- set-cookie: sets cookies by server - Data: (also called body or message) contains info you want to send to the server.
Enough with the details – show me the code.
Let's begin coding a REST Service in Node. We will be implementing all the things we learnt above. We will also be using ES6+ to write our service in.
Make sure you have Node.JS installed and node and npm are available in your path. I will be using Node 12.16.2 and NPM 6.14.4.
Create a directory rest-service-node and cd into it:
mkdir rest-service-node
cd rest-service-node
Initialize the node project:
npm init -yThe -y flag skips all the questions. If you want to fill in the whole questionnaire, just run npm init.
Let's install some packages. We will be using the ExpressJS framework for developing the REST Server. Run the following command to install it:
npm install --save express body-parserWhat's body-parser there for? Express, by default, is incapable of handling data sent via POST request as JSON. body-parser allows Express to overcome this.
Create a file called server.js and add the following code:
const express = require("express");
const bodyParser = require("body-parser");

const app = express();

app.use(bodyParser.json());

app.listen(5000, () => {
  console.log(`Server is running on port 5000.`);
});
The first two lines are importing Express and body-parser.
Third line initializes the Express server and sets it to a variable called app.
The line, app.use(bodyParser.json()); initializes the body-parser plugin.
Finally, we are setting our server to listen on port 5000 for requests.
Getting data from the REST Server:
To get data from a server, we need a GET request. Add the following code before app.listen:
const sayHi = (req, res) => {
  res.send("Hi!");
};

app.get("/", sayHi);
We have created a function sayHi which takes two parameters req and res (I will explain later) and sends a 'Hi!' as response.
app.get() takes two parameters, the route path and function to call when the path is requested by the client. So, the last line translates to: Hey server, listen for requests on the '/' (think homepage) and call the sayHi function if a request is made.
app.get also gives us a request object containing all the data sent by the client and a response object which contains all the methods with which we can respond to the client. Though these are accessible as function parameters, the general naming convention suggests we name them res for response and req for request.
Enough chatter. Let's fire up the server! Run the following server:
node server.jsIf everything is successful, you should see a message on console saying: Server is running on port 5000.
Note: You can change the port to whatever number you want.

Open up your browser and navigate to http://localhost:5000/ and you should see something like this:
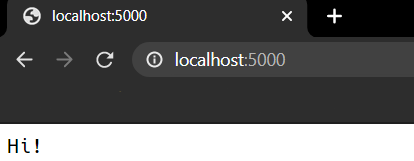
There you go! Your first GET request was successful!
Sending data to REST Server:
As we have discussed earlier, let's setup how we can implement a POST request into our server. We will be sending in two numbers and the server will return the sum of the numbers. Add this new method below the app.get :
app.post("/add", (req, res) => {
  const { a, b } = req.body;
  res.send(`The sum is: ${a + b}`);
});
Here, we will be sending the data in JSON format, like this:
{
    "a":5,
    "b":10
}
Let's get over the code:
On line 1, we are invoking the .post() method of ExpressJS, which allows the server to listen for POST requests. This function takes in the same parameters as the .get() method. The route that we are passing is /add, so one can access the endpoint as http://your-ip-address:port/add or in our case localhost:5000/add. We are inlining our function instead of writing a function elsewhere.
On line 2, we have used a bit of ES6 syntax, namely, object destructuring. Whatever data we send via the request gets stored and is available in the body of the req object. So essentially, we could've replaced line 2 with something like:
const num1 = req.body.a;
const num2 = req.body.b;
On line 3, we are using the send() function of the res object to send the result of the sum. Again, we are using template literals from ES6. Now to test it (using Postman):
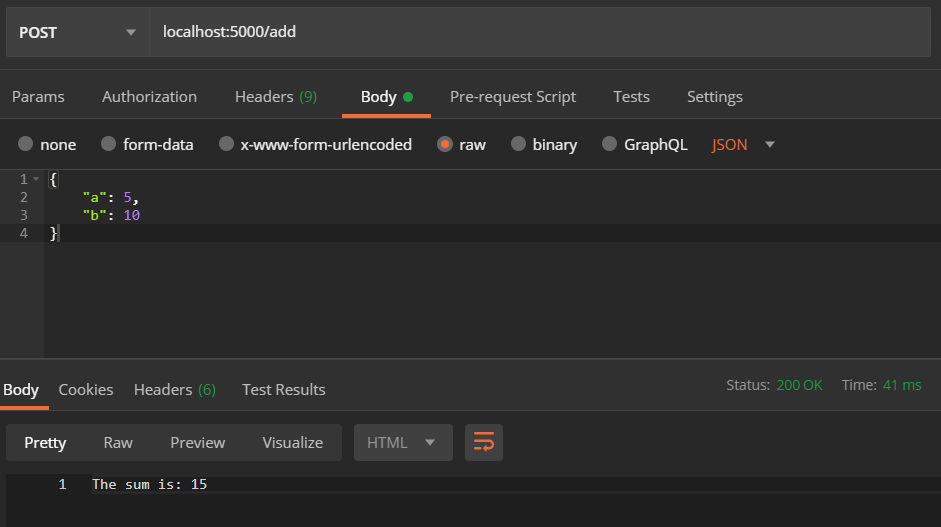
So we have sent the data 5 and 10 as a and b using them as the body. Postman attaches this data to the request and sends it. When the server receives the request, it can parse the data from req.body , as we did in the code above. The result is shown below.
Alright, the final code:
const express = require("express");
const bodyParser = require("body-parser");

const app = express();

app.use(bodyParser.json());

const sayHi = (req, res) => {
  res.send("Hi!");
};

app.get("/", sayHi);

app.post("/add", (req, res) => {
  const { a, b } = req.body;
  res.send(`The sum is: ${a + b}`);
});

app.listen(5000, () => {
  console.log(`Server is running on port 5000.`);
});
REST Client:
Okay, we have created a server, but how do we access it from our website or webapp? Here the REST client libraries will come in handy.
We will be building a webpage which will contain a form, where you can enter two numbers and we will display the result. Let's start.
First, let's change the server.js a bit:
const path = require("path");
const express = require("express");
const bodyParser = require("body-parser");

const app = express();

app.use(bodyParser.json());

app.get("/", (req, res) => {
  res.sendFile(path.join(__dirname, "index.html"));
});

app.post("/add", (req, res) => {
  const { a, b } = req.body;
  res.send({
    result: parseInt(a) + parseInt(b)
  });
});

app.listen(5000, () => {
  console.log(`Server is running on port 5000.`);
});
We imported a new package path, which is provided by Node, to manipulate path cross-platform. Next we changed the GET request on '/' and use another function available in res, ie. sendFile, which allows us to send any type of file as response. So, whenever a person tries to navigate to '/', they will get our index.html page.
Finally, we changed our app.post function to return the sum as JSON and convert both a and b to integers.
Let's create an html page, I will call it index.html, with some basic styling:
<!DOCTYPE html>
<html lang="en">
  <head>
    <meta charset="UTF-8" />
    <meta name="viewport" content="width=device-width, initial-scale=1.0" />
    <title>REST Client</title>
  </head>
  <style>
    * {
      margin: 0;
      padding: 0;
      box-sizing: border-box;
    }
    .container {
      height: 100vh;
      font-family: -apple-system, BlinkMacSystemFont, "Segoe UI", Roboto, Helvetica, Arial, sans-serif, "Apple Color Emoji", "Segoe UI Emoji", "Segoe UI Symbol";
      display: flex;
      flex-direction: column;
      justify-content: center;
      align-items: center;
    }
    form {
      display: flex;
      flex-direction: column;
      margin-bottom: 20px;
    }
    label,
    input[type="submit"] {
      margin-top: 20px;
    }
  </style>
  <body>
    <div class="container">
      <h1>Simple POST Form</h1>
      </h1>
      <form>
        <label>Number 1:</label>
        <input id="num1" type="number" />
        <label>Number 2:</label>
        <input id="num2" type="number" />
        <input type="submit" value="Add"/>
      </form>
      <div class="result">Click Add!</div>
    </div>
  </body>
</html>
Let's add a script tag just before the closing body tag, so we don't need to maintain a .js file. We will begin by listening for the submit event and call a function accordingly:
<script>
	document.addEventListener("submit", sendData);
</script>
First we need to prevent page refresh when the 'Add' button is clicked. This can be done using the preventDefault() function. Then, we will get the value of the inputs at that instant:
function sendData(e) {
    e.preventDefault();
    const a = document.querySelector("#num1").value;
    const b = document.querySelector("#num2").value;
}
Now we will make the call to the server with both these values a and b. We will be using the Fetch API, built-in to every browser for this.
Fetch takes in two inputs, the URL endpoint and a JSON request object and returns a Promise. Explaining them here will be out-of-bounds here, so I'll leave that for you.
Continue inside the sendData() function:
fetch("/add", {
        method: "POST",
        headers: {
            Accept: "application/json",
            "Content-Type": "application/json"
        },
        body: JSON.stringify({
            a: parseInt(a),
            b: parseInt(b)
        })
    })
    .then(res => res.json())
    .then(data => {
        const {
            result
        } = data;
        document.querySelector(
            ".result"
        ).innerText = `The sum is: ${result}`;
    })
    .catch(err => console.log(err));
First we are passing the relative URL of the endpoint as the first parameter to fetch. Next, we are passing an object which contains the method we want Fetch to use for the request, which is POST in this case.
We are also passing headers, which will provide information about the type of data we are sending (content-type) and the type of data we accept as response (accept).
Next we pass body. Remember we typed the data as JSON while using Postman? We're doing kind of a similar thing here. Since express deals with string as input and processes it according to content-type provided, we need to convert our JSON payload into string. We do that with JSON.stringify(). We're being a little extra cautious and parsing the input into integers, so it doesn't mess up our server (since we haven't implemented any data-type checking).
Finally, if the promise (returned by fetch) resolves, we will get that response and convert it into JSON. After that, we will get the result from the data key returned by the response. Then we are simply displaying the result on the screen.
At the end, if the promise is rejected, we will display the error message on the console.
Here's the final code for index.html:
<!DOCTYPE html>
<html lang="en">
  <head>
    <meta charset="UTF-8" />
    <meta name="viewport" content="width=device-width, initial-scale=1.0" />
    <title>REST Client</title>
  </head>
  <style>
    * {
      margin: 0;
      padding: 0;
      box-sizing: border-box;
    }
    .container {
      height: 100vh;
      font-family: -apple-system, BlinkMacSystemFont, "Segoe UI", Roboto, Helvetica, Arial, sans-serif, "Apple Color Emoji", "Segoe UI Emoji", "Segoe UI Symbol";
      display: flex;
      flex-direction: column;
      justify-content: center;
      align-items: center;
    }
    form {
      display: flex;
      flex-direction: column;
      margin-bottom: 20px;
    }
    label,
    input[type="submit"] {
      margin-top: 20px;
    }
  </style>
  <body>
    <div class="container">
      <h1>Simple POST Form</h1>
      </h1>
      <form>
        <label>Number 1:</label>
        <input id="num1" type="number" />
        <label>Number 2:</label>
        <input id="num2" type="number" />
        <input type="submit" value="Add"/>
      </form>
      <div class="result">Click Add!</div>
    </div>
    <script>
      document.addEventListener("submit", sendData);
      function sendData(e) {
        e.preventDefault();
        const a = document.querySelector("#num1").value;
        const b = document.querySelector("#num2").value;

        fetch("/add", {
          method: "POST",
          headers: {
            Accept: "application/json",
            "Content-Type": "application/json"
          },
          body: JSON.stringify({
            a: parseInt(a),
            b: parseInt(b)
          })
        })
          .then(res => res.json())
          .then(data => {
            const { result } = data;
            document.querySelector(
              ".result"
            ).innerText = `The sum is: ${result}`;
          })
          .catch(err => console.log(err));
      }
    </script>
  </body>
</html>
I have spun up a little app on glitch for you to test.
Conclusion:
So in this post, we learnt about REST architecture and the anatomy of REST requests. We worked our way through by creating a simple REST Server that serves GET and POST requests and built a simple webpage that uses a REST Client to display the sum of two numbers.
You can extend this for the remaining types of requests and even implement a full featured back-end CRUD app.
I hope you have learned something from this. If you have any questions, feel free to reach out to me over twitter! Happy Coding!