

For six years in a row, Rust has been voted the most loved programming language by Stack Overflow.
So if you're ready to learn this popular programming language, this course will introduce you to Rust so you can start using it in your projects.
You will be working entirely within your browser by using the Replit interactive programming environment. freeCodeCamp has partnered with Replit who has made this course possible.
There is also a video version of this course on the freeCodeCamp YouTube channel.
To get the most out of this course, you should have intermediate knowledge of at least one other programming language. If you are new to programming, you should try out freeCodeCamp's interactive curriculum and then come back to this course.
To help you learn Rust, we will create two projects:
- A calculator for the command line
- A command line tool which takes two images and combines their pixels
Table of Contents
Here are the sections and topics we'll cover in this course. You can click through the table of contents below to jump to particular parts, or you can just go through from start to finish.
- Rust Overview
- How to Use Rust in Replit
- Basics of Rust
- Project #1 - Build a CLI Calculator in Rust
- Project #2 - Build an Image Combiner in Rust
- Project Outcome
- Image Combiner Project Methodology
- Step 1 - Create a New Project
- Step 2 - Add a New Module for Args
- Step 3 - Import and Use the
argsModule - Step 4 - Add an External Crate
- Step 5 - Read an Image File
- Step 6 - Handle Errors with
Result - Step 7 - Resize the Images to Match
- Step 8 - Create a Floating Image
- Step 9 - Create the Combined Image Data
- Step 10 - Attach the Combined Data to the Floating Image
- Step 11 - Write the Image to a File
- Step 12 - Bring It All Together
- Conclusion
Rust Overview
Rust is a systems-level programming language.
"[Rust] deals with low-level details of memory management, data representation, and concurrency."
"... the language is designed to guide you naturally towards reliable code that is efficient in terms of speed and memory usage." (Source: Rust docs)
The main tooling within the Rust ecosystem is:
- rustc – The compiler which takes your Rust code and compiles it into binary (machine readable code)
- rustup – The command line utility to install and update Rust
- cargo – The Rust build system and package manager
How to Use Rust in Replit
For this course, you will be using this GitHub repository as a boilerplate.
To begin, click the following link to create a new REPL from the boilerplate:
Then in the Import from GitHub modal, open the Language dropdown and select Bash:
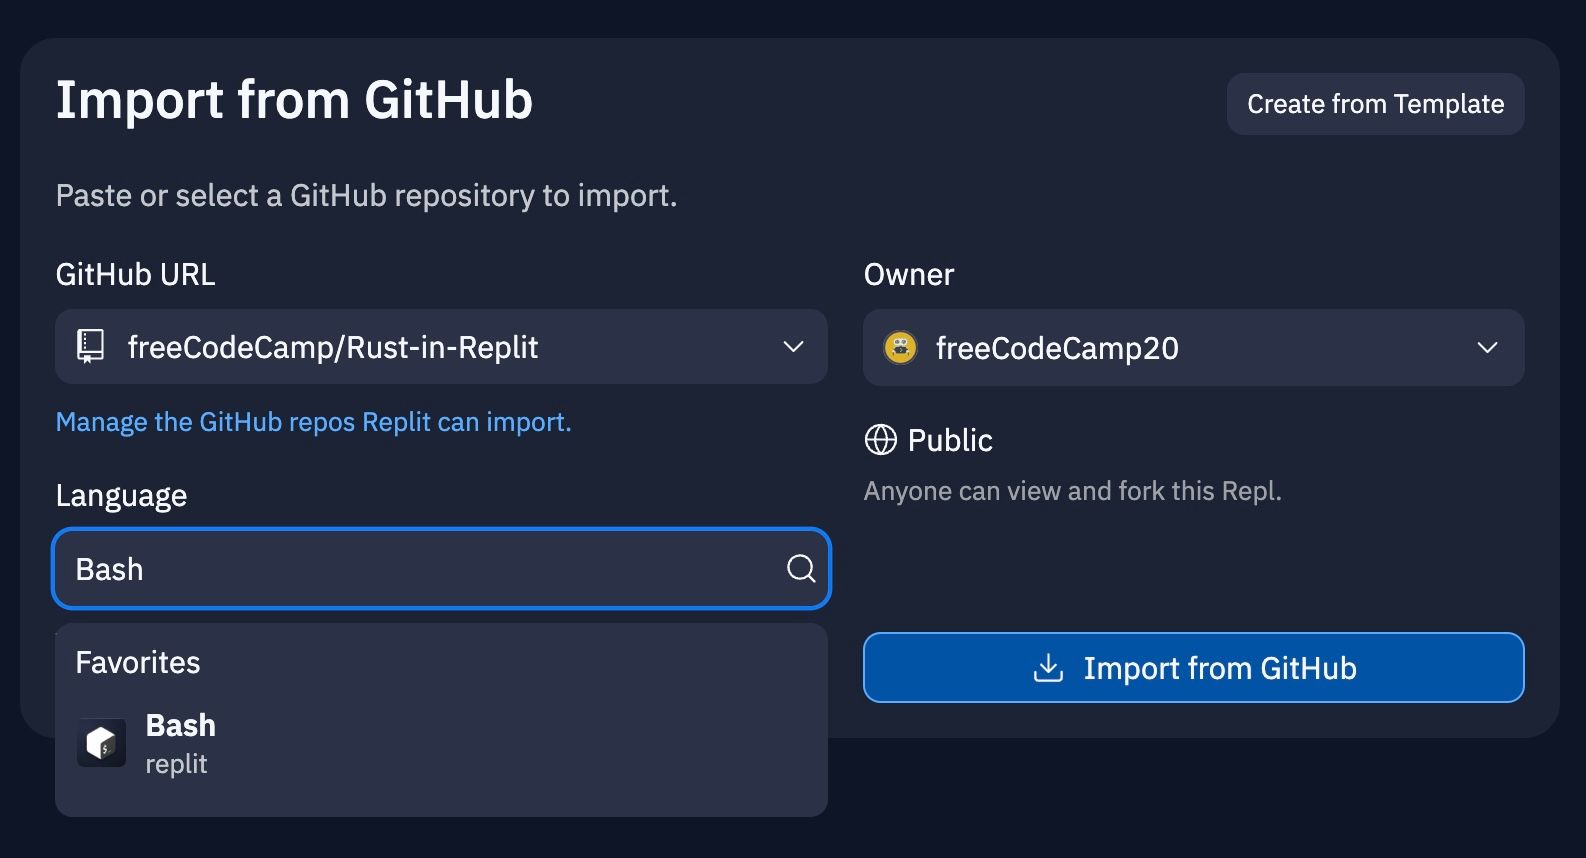
Then click the Import from GitHub button in the lower right to import the boilerplate code into Replit.
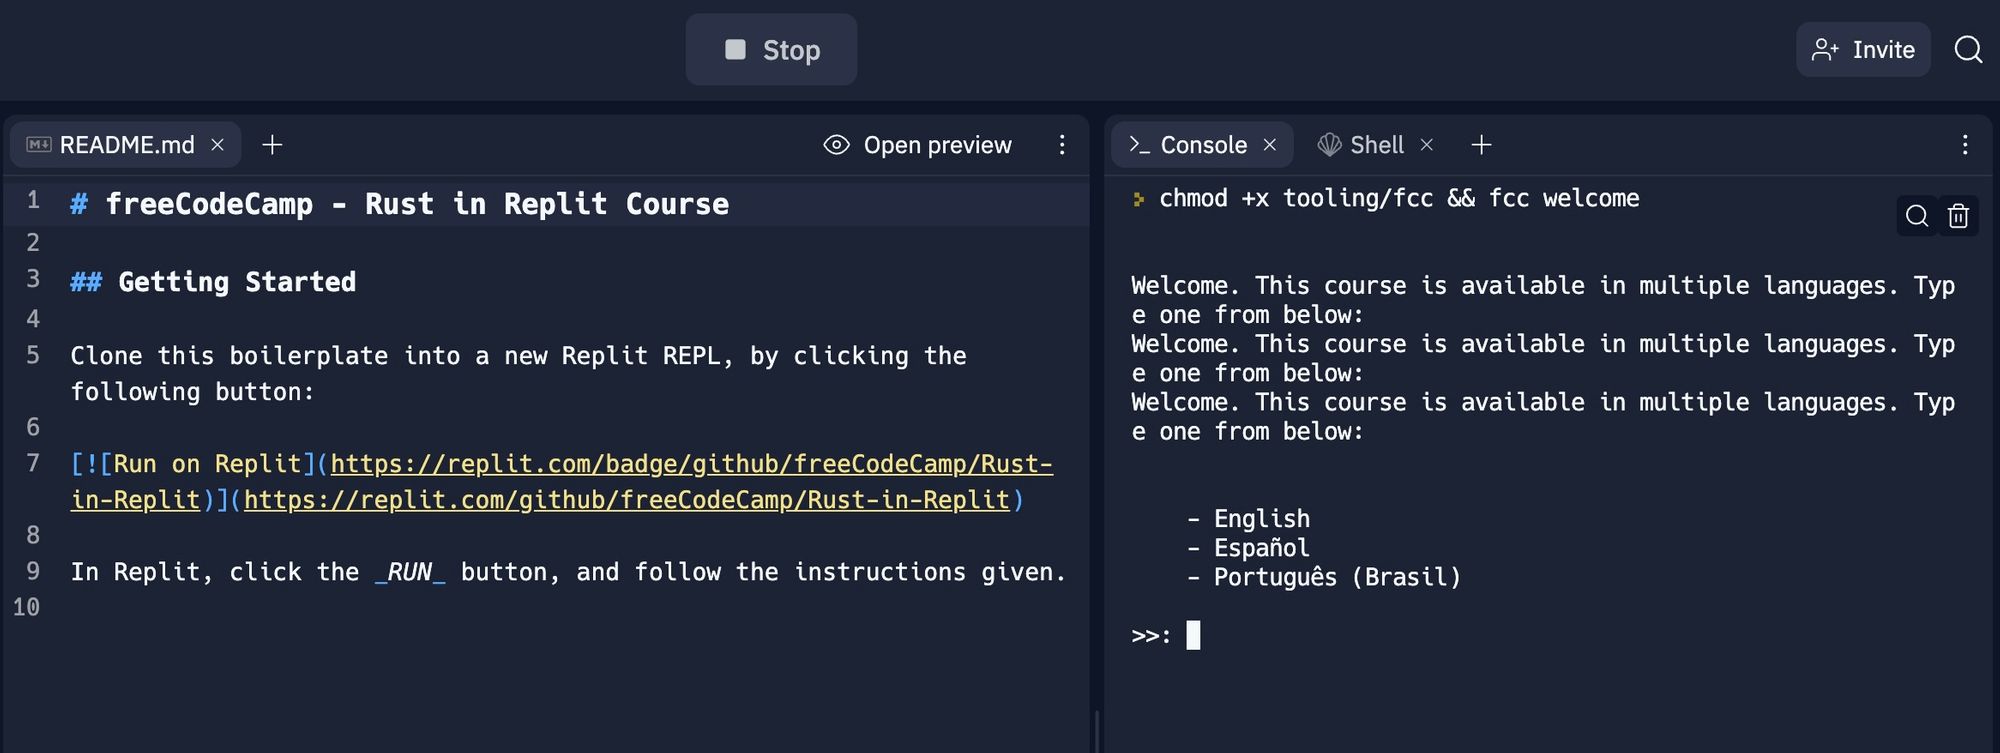
Finally, to start the course, click the Run button at the top of the screen and follow the instructions in the console on the right:
Basics of Rust
Variables in Rust
You can declare variables using the let, const, or static keywords:
let my_variable = 0;
const MY_CONSTANT: u8 = 0;
static MY_STATIC: u8 = 0;
By default, all variables are immutable. You can make a variable mutable by using the mut keyword:
let mut my_mutable_variable = 0;
Rust convention relies on the following casing conventions:
| Object | Casing |
|---|---|
| Variables | snake_case |
| Functions | snake_case |
| Files | snake_case |
| Constants | SCREAMING_SNAKE_CASE |
| Statics | SCREAMING_SNAKE_CASE |
| Types | PascalCase |
| Traits | PascalCase |
| Enums | PascalCase |
Since Rust is statically typed, you'll need to explicitly type variables – unless the variable is declared with let and the type can be inferred.
Functions in Rust
You declare functions using the fn keyword:
fn main() {
  // This is a code comment
}
Functions return using the return keyword, and you need to explicitly specify the return type of a function, unless the return type is an empty tuple ():
fn main() -> () { // Unnecessary return type
  my_func();
}

fn my_func() -> u8 {
  return 0;
}
Functions also return an expression missing the semi-colon:
fn my_func() -> u8 {
  0
}
Function parameters are typed using the : syntax:
fn main() {
  let _unused_variable = my_func(10);
}

fn my_func(x: u8) -> i32 {
  x as i32
}
The underscore before a variable name is a convention to indicate that the variable is unused. The as keyword asserts the type of the expression, provided the type conversion is valid.
Strings and Slices in Rust
A common point of confusion for beginner Rustacians is the difference between the String struct and the str type.
let my_str: &str = "Hello, world!";

let my_string: String = String::from("Hello, world!");
In the above example, my_str is a reference to a string literal, and my_string is an instance of the String struct.
An important distinction between the two is that my_str is stack stored, and my_string is heap allocated. This means my_str's value cannot change, and its size is fixed, whilst my_string can have an unknown size at compile time.
The string literal is also known as a string slice. This is because a &str refers to part of a string. Generally, this is how arrays and strings are similar:
let my_string = String::from("The quick brown fox");
let my_str: &str = &my_string[4..9]; // "quick"

let my_arr: [usize; 5] = [1, 2, 3, 4, 5];
let my_arr_slice: &[usize] = &my_arr[0..3]; // [1, 2, 3]
The [T; n] notation is used to create an array of n elements of type T.
The char Type in Rust
A char is a USV (Unicode Scalar Value), which is represented in unicode with values like U+221E – the unicode for '∞'. You can think of a collection or array of chars as a string:
let my_str: &str = "Hello, world!";

let collection_of_chars: &str = my_str.chars().as_str();
Number Types in Rust
There are many types of numbers in Rust:
- Unsigned Integers:
u8,u16,u32,u64,u128 - Signed Integers:
i8,i16,i32,i64,i128 - Floating Point Numbers:
f32,f64
Unsigned integers only represent positive whole numbers.
Signed integers represent both positive and negative whole numbers.
And floats only represent positive and negative fractions.
Structs in Rust
A struct is a custom data type used to group related data. You have already come across a struct in the Strings and Slices section:
struct String {
  vec: Vec<u8>,
}
The String struct consists of a vec field, which is a Vec of u8s. The Vec is a dynamically-sized array.
An instance of a struct is then declared by giving values to the fields:
struct MyStruct {
  field_1: u8,
}

let my_struct = MyStruct { field_1: 0, };
Previously, the String struct was used with its from function to create a String from a &str. This is possible, because the from function is implemented for String:
impl String {
  fn from(s: &str) -> Self {
    String {
      vec: Vec::from(s.as_bytes()),
    }
  }
}
You use the Self keyword in place of the type of the struct.
Structs can also take other variants:
struct MyUnitStruct;
struct MyTupleStruct(u8, u8);
Enums in Rust
Similar to other languages, enums are useful for acting as types and as values.
enum MyErrors {
  BrainTooTired,
  TimeOfDay(String)
  CoffeeCupEmpty,
}

fn work() -> Result<(), MyErrors> { // Result is also an enum
  if state == "missing semi-colon" {
    Err(MyErrors::BrainTooTired)
  } else if state == "06:00" {
    Err(MyErrors::TImeOfDay("It's too early to work".to_string()))
  } else if state == "22:00" {
    Err(MyErrors::TimeOfDay("It's too late to work".to_string()))
  } else if state == "empty" {
    Err(MyErrors::CoffeeCupEmpty)
  } else {
    Ok(())
  }
}
Macros in Rust
A macro is similar to a function, but you can think of it as a piece of code which writes other code. For now, the main differences between a function and a macro to keep in mind are:
- Macros are called using a bang (
!) - Macros can take a variable number of arguments, while functions in Rust cannot
One of the most common macros is the println! macro, which prints to the console:
let my_str = "Hello, world!";
println!("{}", my_str);
You use the {} syntax to insert a variable into a string.
Another common macro is panic!. Panicking is Rust's way of 'erroring out'. It is wise to think of a panic in Rust as a poorly-handled error. The macro accepts a string literal, and panics with that message.
let am_i_an_error = true;

if (am_i_an_error) {
  panic!("There was an error");
}
$ cargo run
   Compiling fcc-rust-in-replit v0.1.0 (/home/runner/Rust-in-Replit)
    Finished dev [unoptimized + debuginfo] target(s) in 1.66s
     Running `target/debug/calculator`
thread 'main' panicked at 'There was an error', src/main.rs
note: run with `RUST_BACKTRACE=1` environment variable to display a backtrace
Ownership in Rust
An important concept in Rust is ownership. There are three main ownership rules:
- Each value in Rust has a variable that's called its owner.
- There can only be one owner at a time.
- When the owner goes out of scope, the value will be dropped.
(Source: The Rust Book)
This is how Rust gets away with not having a typical garbage collector, whilst also not requiring the programmer to explicitly manage memory. Here is an example of ownership:
fn main() { // first_string is not declared yet -> has no value
  let first_string = String::from("freeCodeCamp"); // first_string is now owner of the value "freeCodeCamp"
  let second_string = first_string; // second_string takes ownership of the value "freeCodeCamp"

  println!("Hello, {}!", first_string); // first_string is NOT valid, because the value was moved to second_string
}
As the println! macro tries to refer to an invalid variable, this code does not compile. To fix this, instead of moving the value of first_string into second_string, second_string can be assigned a reference to first_string:
fn main() {
  let first_string: String = String::from("freeCodeCamp");
  let second_string: &String = &first_string; // first_string is still the owner of the value "freeCodeCamp"

  println!("Hello, {}!", first_string);
}
The ampersand (&) indicates that the value is a reference. That is, second_string no longer takes ownership of "freeCodeCamp", but, instead, points to the same point in memory as first_string.
Project #1 – Build a CLI Calculator in Rust
Project Outcome
At the end of this project, you will be able to perform basic arithmetic operations on numbers using the command line.
Examples of expected input and output look like this:
$ calculator 1 + 1
$ 1 + 1 = 2

$ calculator 138 / 4
$ 138 / 4 = 34.5
CLI Calculator Project Methodology
Step 1 – Create a New Project
Use Cargo to create a new project named calculator:
$ cargo new calculator
This creates a new directory named calculator, initialises it as a Git repository, and adds useful boilerplate for your project.
The boilerplate includes:
Cargo.toml– The manifest file used by Cargo to manage your project's metadatasrc/– The directory where your project code should livesrc/main.rs– The default file Cargo uses as your application entrypoint
Step 2 – Understand the Syntax
The calculator/Cargo.toml file contains the following:
[package]
name = "calculator"
version = "0.1.0"
edition = "2018"

# See more keys and their definitions at https://doc.rust-lang.org/cargo/reference/manifest.html

[dependencies]
The [package] denotes your project's metadata.
The [dependencies] heading denotes the crates your project depends on. Crates are like external libraries.
The calculator/src/main.rs file contains the following:
fn main() {
  println!("Hello, world!");
}
This file contains a function declaration with the handle main. By default, rustc calls the main function first whenever the executable is run.
println! is a built-in macro which prints to the console.
Step 3 – Run the Project
You can either use Cargo to run your project code:
# Within the calculator/ directory
$ cargo run
   Compiling fcc-rust-in-replit v0.1.0 (/home/runner/Rust-in-Replit-1)
    Finished dev [unoptimized + debuginfo] target(s) in 0.80s
     Running `target/debug/calculator`
Hello, world!
Or, you can use rustc to compile your project, then you can run the binary:
# Within the calculator/ directory
$ rustc src/main.rs
$ ./main
Hello, world!
Step 4 – Command Line Arguments
The Rust standard library comes with an env module, which allows access to the command line arguments passed when calling the program.
The necessary exports from the env module are the args function, and the Args struct. The args function returns an instance of the Args struct, and is imported into the file scope with:
use std::env::{args, Args};
To get an idea of what the Args struct looks like, the args variable is printed to the console:
fn main() {
  let args: Args = args();
  println!("{:?}", args);
}
$ cargo run -- fCC
   Compiling calculator v0.1.0 (/home/runner/Rust-in-Replit/calculator)
    Finished dev [unoptimized + debuginfo] target(s) in 1.71s
     Running `target/debug/calculator`
Args { inner: ["target/debug/toto", "fCC"] }
The above shows that the Args struct contains a field called inner which consists of the location of the compiled binary, and the command line arguments passed to the program.
To access the argument values, you can use the nth method on the args variable. The nth method takes an index argument, and returns the value at that index wrapped in an Option. So, the value needs to be unwrapped.
fn main() {
  let mut args: Args = args();

  let first: String = args.nth(1).unwrap();
}
The args variable needs to be declared as mutable, because the nth method mutable iterates over the elements, and removes the element accessed.
fn main() {
  let mut args: Args = args();

  // The first argument is the location of the compiled binary, so skip it
  let first: String = args.nth(1).unwrap();
  // After accessing the second argument, the iterator's next element becomes the first
  let operator: String = args.nth(0).unwrap();
  let second: String = args.nth(0).unwrap();

  println!("{} {} {}", first, operator, second);
}
$ cargo run -- 1 + 1
   Compiling calculator v0.1.0 (/home/runner/Rust-in-Replit/calculator)
    Finished dev [unoptimized + debuginfo] target(s) in 1.71s
     Running `target/debug/calculator`
1 + 1
Step 5 – Parse Strings into Numbers
The first and second variables are strings, and you need to parse them into numbers. The String struct implements the parse method, which takes a type annotation, and returns a Result containing the parsed value.
use std::env::{args, Args};

fn main() {
  let mut args: Args = args();

  let first: String = args.nth(1).unwrap();
  let operator: String = args.nth(0).unwrap();
  let second: String = args.nth(0).unwrap();

  let first_number = first.parse::<f32>().unwrap();
  let second_number = second.parse::<f32>().unwrap();

  println!("{} {} {}", first_number, operator, second_number);
}
The above parse method uses the turbofish syntax to specify the type to try to parse the string into.
Step 6 – Perform Basic Arithmetic Operations
Rust uses the standard operators for addition, subtraction, multiplication, and division.
To handle the operations, you define a function named operate which will take three arguments: the operator as a char, and the two numbers as f32s. The function should also return an f32 representing the outcome of the operation.
fn operate(operator: char, first_number: f32, second_number: f32) -> f32 {
  match operator {
    '+' => first_number + second_number,
    '-' => first_number - second_number,
    '/' => first_number / second_number,
    '*' | 'X' | 'x' => first_number * second_number,
    _ => panic!("Invalid operator used."),
  }
}
The match expression works similarly to a switch statement in other languages. The match expression takes a value, and a list of arms. Each arm is a pattern and block. The pattern is a value to match against, and the block is the code to execute if the pattern matches. The _ pattern is a wildcard, acting like an else clause.
The multiplication arm includes the OR comparison to allow cases for X and x to be handled.
Now, to call operate with the operator, you need to converted it into a char first. You do this with the chars method on the String struct which returns an iterator over the characters in the string. Then, the first character is unwrapped:
fn main() {
  let mut args: Args = args();

  let first: String = args.nth(1).unwrap();
  let operator: char = args.nth(0).unwrap().chars().next().unwrap();
  let second: String = args.nth(0).unwrap();

  let first_number = first.parse::<f32>().unwrap();
  let second_number = second.parse::<f32>().unwrap();
  let result = operate(operator, first_number, second_number);

  println!("{} {} {}", first_number, operator, second_number);
}
The return of operate is stored in the result variable.
Step 7 – Format the Output
To get the desired output, the first_number, second_number, operator, and result variables need to be formatted. You can use the format! macro to create a String from a format string and a list of arguments:
fn output(first_number: f32, operator: char, second_number: f32, result: f32) -> String {
  format!(
    "{} {} {} = {}",
    first_number, operator, second_number, result
  )
}
Step 8 – Bring It All Together
use std::env::{args, Args};

fn main() {
  let mut args: Args = args();

  let first: String = args.nth(1).unwrap();
  let operator: char = args.nth(0).unwrap().chars().next().unwrap();
  let second: String = args.nth(0).unwrap();

  let first_number = first.parse::<f32>().unwrap();
  let second_number = second.parse::<f32>().unwrap();
  let result = operate(operator, first_number, second_number);

  println!("{}", output(first_number, operator, second_number, result));
}

fn output(first_number: f32, operator: char, second_number: f32, result: f32) -> String {
  format!(
    "{} {} {} = {}",
    first_number, operator, second_number, result
  )
}

fn operate(operator: char, first_number: f32, second_number: f32) -> f32 {
  match operator {
    '+' => first_number + second_number,
    '-' => first_number - second_number,
    '/' => first_number / second_number,
    '*' | 'X' | 'x' => first_number * second_number,
    _ => panic!("Invalid operator used."),
  }
}
To build the code into an executable binary, run the following command:
$ cargo build --release
   Compiling calculator v0.1.0 (/home/runner/Rust-in-Replit/calculator)
    Finished release [optimized] target(s) in 3.26s
The --release flag tells Cargo to build the binary in release mode. This will reduce the size of the binary, and will also remove any debugging information.
The binary is built in the target/release directory. To run the binary, and test your application, run the following command:
$ target/release/calculator 1 + 1
1 + 1 = 2
Project #2 – Build an Image Combiner in Rust
Project Outcome
At the end of this project, you will be able to combine two images using the command line.
Here is an example of an expected input:
$ combiner ./image1.png ./image2.png ./output.png
For an example of the output, look no further than the first image in this article ☝️
Image Combiner Project Methodology
Step 1 - Create a New Project
Use Cargo to create a new project named combiner:
$ cargo new combiner
Step 2 - Add a New Module for Args
To prevent the main.rs file from becoming too overwhelming, create a new file named args.rs in the src directory.
Within args.rs, create a function named get_nth_arg which takes a usize, n, and returns a String. Then, from the std::env module, call the args function, and chain the nth method to get the nth argument, unwrapping the value:
fn get_nth_arg(n: usize) -> String {
  std::env::args().nth(n).unwrap()
}
Define a public struct named Args which consists of three public fields of type String: image_1, image_2, and output:
pub struct Args {
  pub image_1: String,
  pub image_2: String,
  pub output: String,
}
Declare the struct and its fields as public with the pub keyword so you can access them from outside the args.rs file.
Lastly, you can use the get_nth_arg function to create a new Args struct in a new function:
impl Args {
  pub fn new() -> Self {
    Args {
      image_1: get_nth_arg(1),
      image_2: get_nth_arg(2),
      output: get_nth_arg(3),
    }
  }
}
All together, the args.rs file looks like this:
pub struct Args {
  pub image_1: String,
  pub image_2: String,
  pub output: String,
}

impl Args {
  pub fn new() -> Self {
    Args {
      image_1: get_nth_arg(1),
      image_2: get_nth_arg(2),
      output: get_nth_arg(3),
    }
  }
}

fn get_nth_arg(n: usize) -> String {
  std::env::args().nth(n).unwrap()
}
Step 3 – Import and Use the args Module
Within main.rs, you need to declare the args.rs file as a module. Then, to use the Args struct, you need to import it:
mod args;
use args::Args;

fn main() {
  let args = Args::new();
  println!("{:?}", args);
}
But testing the code reveals an error:
$ cargo run -- arg1 arg2 arg3
   Compiling combiner v0.1.0 (/home/runner/Rust-in-Replit/combiner)
error[E0277]: `args::Args` doesn't implement `Debug`
  --> src/main.rs:12:20
   |
12 |   println!("{:?}", args);
   |                    ^^^^ `args::Args` cannot be formatted using `{:?}`
   |
   = help: the trait `Debug` is not implemented for `args::Args`
   = note: add `#[derive(Debug)]` or manually implement `Debug`
   = note: required by `std::fmt::Debug::fmt`
   = note: this error originates in a macro (in Nightly builds, run with -Z macro-backtrace for more info)

error: aborting due to previous error

For more information about this error, try `rustc --explain E0277`.
error: could not compile `combiner`

To learn more, run the command again with --verbose.
Similarly to how functions are implemented for structs, traits can be implemented for structs. However, the Debug trait is special in that it can be implemented using attributes:
#[derive(Debug)]
pub struct Args {
  pub image_1: String,
  pub image_2: String,
  pub output: String,
}
The Debug trait has been derived for the Args struct. This means that the Debug trait is automatically implemented for the struct, without you having to manually implement it 🚀.
Now, running the code works:
$ cargo run -- arg1 arg2 arg3
    Finished dev [unoptimized + debuginfo] target(s) in 0.01s
     Running `target/debug/combiner arg1 arg2 arg3`
Args { image_1: "arg1", image_2: "arg2", output: "arg3" }
Step 4 – Add an External Crate
In much the same way other languages have libraries or packages, Rust has crates. In order to encode and decode images, you can use the image crate.
Add the image crate with version 0.23.14 to the Cargo.toml file:
[package]
name = "combiner"
version = "0.1.0"
edition = "2018"

# See more keys and their definitions at https://doc.rust-lang.org/cargo/reference/manifest.html

[dependencies]
image = "0.23.14"
Now, when cargo run is next called, Cargo will fetch and install the image crate.
Step 5 – Read an Image File
The image crate comes with an io module including a Reader struct. This struct implements an open function which takes a path to an image file, and returns a Result containing a reader. You can format and decode this reader to yield the image format (for example PNG, JGP, and so on) and the image data.
Create a function named find_image_from_path to open the image file from a path argument:
fn find_image_from_path(path: String) -> (DynamicImage, ImageFormat) {
  let image_reader: Reader<BufReader<File>> = Reader::open(path).unwrap();
  let image_format: ImageFormat = image_reader.format().unwrap();
  let image: DynamicImage = image_reader.decode().unwrap();
  (image, image_format)
}
The image and image_format variables are returned as a tuple.
Include the necessary imports at the top of the file:
use image::{ io::Reader, DynamicImage, ImageFormat };

fn main() {
  // ...
  let (image_1, image_1_format) = find_image_from_path(args.image_1);
  let (image_2, image_2_format) = find_image_from_path(args.image_2);
}
Within main, the returned tuple can be destructured into two new variables for each image path.
Step 6 – Handle Errors with Result
It is important to be able to handle errors that come up. For example, you might have a case where two images of different formats are given as arguments to combine.
A semantic way of handling such an error is to return a Result which can consist of either an Ok or an Err.
fn main() -> Result<(), ImageDataErrors> {
  let args = Args::new();
  println!("{:?}", args);

  let (image_1, image_1_format) = find_image_from_path(args.image_1);
  let (image_2, image_2_format) = find_image_from_path(args.image_2);

  if image_1_format != image_2_format {
    return Err(ImageDataErrors::DifferentImageFormats);
  }
  Ok(())
}
The main function returns an Err containing an enum with unit variant DifferentImageFormats if the two image formats are not equal. Otherwise, it returns an Ok with an empty tuple.
The enum is defined as:
enum ImageDataErrors {
  DifferentImageFormats,
}
Step 7 – Resize the Images to Match
To make combining the images easier, you resize the largest image to match the smallest image.
First, you can find the smallest image using the dimensions method which returns the width and height of the image as a tuple. These tuples can be compared, and the smallest returned:
fn get_smallest_dimensions(dim_1: (u32, u32), dim_2: (u32, u32)) -> (u32, u32) {
  let pix_1 = dim_1.0 * dim_1.1;
  let pix_2 = dim_2.0 * dim_2.1;
  return if pix_1 < pix_2 { dim_1 } else { dim_2 };
}
The tuple values are accessed using dot-notation from zero-based indexing.
If image_2 is the smallest image, then image_1 needs to be resized to match the smallest dimensions. Otherwise, image_2 needs to be resized.
fn standardise_size(image_1: DynamicImage, image_2: DynamicImage) -> (DynamicImage, DynamicImage) {
  let (width, height) = get_smallest_dimensions(image_1.dimensions(), image_2.dimensions());
  println!("width: {}, height: {}\n", width, height);

  if image_2.dimensions() == (width, height) {
    (image_1.resize_exact(width, height, Triangle), image_2)
  } else {
    (image_1, image_2.resize_exact(width, height, Triangle))
  }
}
The resize_exact method implemented on the DynamicImage struct mutably borrows the image, and, using the width, height, and FilterType arguments, resizes the image.
Using the return of the standardise_size function, you can redeclare the image_1 and image_2 variables:
use image::{ io::Reader, DynamicImage, ImageFormat, imageops::FilterType::Triangle };

fn main() -> Result<(), ImageDataErrors> {
  // ...
  let (image_1, image_2) = standardise_size(image_1, image_2);
  Ok(())
}
Step 8 – Create a Floating Image
To handle the output, create a temporary struct to hold the metadata for the output image.
Define a struct named FloatingImage to hold the width, height, and data of the image, as well as the name of the output file:
struct FloatingImage {
  width: u32,
  height: u32,
  data: Vec<u8>,
  name: String,
}
Next, implement a new function for FloatingImage which takes values for the width, height, and name of the output image:
impl FloatingImage {
  fn new(width: u32, height: u32, name: String) -> Self {
    let buffer_capacity = 3_655_744;
    let buffer: Vec<u8> = Vec::with_capacity(buffer_capacity);
    FloatingImage {
      width,
      height,
      data: buffer,
      name,
    }
  }
}
As you haven't created the data for the image yet, create a buffer in the form of a Vec of u8s with a capacity of 3,655,744 (956 x 956 x 4). The <number>_<number> syntax is Rust's easy-to-read numbering which separates the number into groups or three digits.
Use the image_1 variable's width and height values to create an instance of the FloatingImage, and use the third argument stored in args to set the name of the FloatingImage:
fn main() -> Result<(), ImageDataErrors> {
  // ...
  let mut output = FloatingImage::new(image_1.width(), image_1.height(), args.output);
  Ok(())
}
Declare the output variables as mutable so you can modify the data field later.
Step 9 – Create the Combined Image Data
In order to process the images, you need to convert them into a vector of RGBA pixels. The pixels are stored as u8s, because their values are between 0 and 255.
The DynamicImage struct implements the to_rgba8 method, which returns an ImageBuffer containing a Vec<u8>, and the ImageBuffer implements the into_vec method, which returns the Vec<u8>:
fn combine_images(image_1: DynamicImage, image_2: DynamicImage) -> Vec<u8> {
  let vec_1 = image_1.to_rgba8().into_vec();
  let vec_2 = image_2.to_rgba8().into_vec();

  alternate_pixels(vec_1, vec_2)
}
Next, the vec_1 and vec_2 variables are passed to the alternate_pixels function which returns the combined image data by alternating the RGBA pixel sets of the two images:
fn alternate_pixels(vec_1: Vec<u8>, vec_2: Vec<u8>) -> Vec<u8> {
  // A Vec<u8> is created with the same length as vec_1
  let mut combined_data = vec![0u8; vec_1.len()];

  let mut i = 0;
  while i < vec_1.len() {
    if i % 8 == 0 {
      combined_data.splice(i..=i + 3, set_rgba(&vec_1, i, i + 3));
    } else {
      combined_data.splice(i..=i + 3, set_rgba(&vec_2, i, i + 3));
    }
    i += 4;
  }

  combined_data
}
The set_rgba function takes a reference to a Vec<u8>, and returns the RGBA pixel set for that Vec<u8> starting and ending at a given index:
fn set_rgba(vec: &Vec<u8>, start: usize, end: usize) -> Vec<u8> {
  let mut rgba = Vec::new();
  for i in start..=end {
    let val = match vec.get(i) {
      Some(d) => *d,
      None => panic!("Index out of bounds"),
    };
    rgba.push(val);
  }
  rgba
}
The ..= syntax is Rust's range syntax which allows the range to be inclusive of the end value. The * symbol before a variable is Rust's dereferencing operator, which allows the value of the variable to be accessed.
Then, assign the return of combine_images to the combined_data variable:
fn main() -> Result<(), ImageDataErrors> {
  // ...
  let combined_data = combine_images(image_1, image_2);
  Ok(())
}
Step 10 – Attach the Combined Data to the Floating Image
To set the data of combined_data into the output image, a method on FloatingImage is defined to set the data field of output to the value of combined_data.
So far, you've only implemented functions on structs. Methods are defined in a similar way, but they take an instance of the struct as their first argument:
struct MyStruct {
  name: String,
}
impl MyStruct {
  fn change_name(&mut self, new_name: &str) {
    self.name = new_name.to_string();
  }
}

let mut my_struct = MyStruct { name: String::from("Shaun") };
// my_struct.name == "Shaun"
my_struct.change_name("Tom");
// my_struct.name == "Tom"
Since you need to change the value of the instance of FloatingImage, the method set_data takes a mutable reference to the instance as its first argument.
impl FloatingImage {
  // ...
  fn set_data(&mut self, data: Vec<u8>) -> Result<(), ImageDataErrors> {
    // If the previously assigned buffer is too small to hold the new data
    if data.len() > self.data.capacity() {
      return Err(ImageDataErrors::BufferTooSmall);
    }
    self.data = data;
    Ok(())
  }
}
The enum needs to be extended to include the new unit variant BufferTooSmall:
enum ImageDataErrors {
  // ...
  BufferTooSmall,
}
Notice: The method is still only called with one argument:
fn main() -> Result<(), ImageDataErrors> {
  // ...
  output.set_data(combined_data)?;
  Ok(())
}
The ? syntax at the end of an expression is a shorthand way of handling the result of a function call. If the function call returns an error, the error propagation operator will return the error from the function call.
Step 11 – Write the Image to a File
Finally, save the new image to a file. The image crate has a save_buffer_with_format function taking the following form:
fn save_buffer_with_format(
    path: AsRef<Path>,
    buf: &[u8],
    width: u32,
    height: u32,
    color: image::ColorType,
    format: image::ImageFormat
  ) -> image::ImageResult<()>;
Seeing as AsRef is implemented for String, you can use an argument of type String for the path.
fn main() -> Result<(), ImageDataErrors> {
  // ...
  image::save_buffer_with_format(
    output.name,
    &output.data,
    output.width,
    output.height,
    image::ColorType::Rgba8,
    image_1_format,
  )
  .unwrap();
  Ok(())
}
Step 12 – Bring It All Together
Here's the final code:
mod args;

use args::Args;
use image::{
  imageops::FilterType::Triangle, io::Reader, DynamicImage, GenericImageView, ImageFormat,
};

fn main() -> Result<(), ImageDataErrors> {
  let args = Args::new();
  println!("{:?}", args);

  let (image_1, image_1_format) = find_image_from_path(args.image_1);
  let (image_2, image_2_format) = find_image_from_path(args.image_2);

  if image_1_format != image_2_format {
    return Err(ImageDataErrors::DifferentImageFormats);
  }

  let (image_1, image_2) = standardise_size(image_1, image_2);
  let mut output = FloatingImage::new(image_1.width(), image_1.height(), args.output);

  let combined_data = combine_images(image_1, image_2);

  output.set_data(combined_data)?;

  image::save_buffer_with_format(
    output.name,
    &output.data,
    output.width,
    output.height,
    image::ColorType::Rgba8,
    image_1_format,
  )
  .unwrap();
  Ok(())
}

enum ImageDataErrors {
  BufferTooSmall,
  DifferentImageFormats,
}

struct FloatingImage {
  width: u32,
  height: u32,
  data: Vec<u8>,
  name: String,
}

impl FloatingImage {
  fn new(width: u32, height: u32, name: String) -> Self {
    let buffer_capacity = 3_655_744;
    let buffer: Vec<u8> = Vec::with_capacity(buffer_capacity);
    FloatingImage {
      width,
      height,
      data: buffer,
      name,
    }
  }
  fn set_data(&mut self, data: Vec<u8>) -> Result<(), ImageDataErrors> {
    if data.len() > self.data.capacity() {
      return Err(ImageDataErrors::BufferTooSmall);
    }
    self.data = data;
    Ok(())
  }
}

fn find_image_from_path(path: String) -> (DynamicImage, ImageFormat) {
  let image_reader = Reader::open(path).unwrap();
  let image_format = image_reader.format().unwrap();
  let image = image_reader.decode().unwrap();
  (image, image_format)
}

fn standardise_size(image_1: DynamicImage, image_2: DynamicImage) -> (DynamicImage, DynamicImage) {
  let (width, height) = get_smallest_dimensions(image_1.dimensions(), image_2.dimensions());
  println!("width: {}, height: {}\n", width, height);
  if image_2.dimensions() == (width, height) {
    (image_1.resize_exact(width, height, Triangle), image_2)
  } else {
    (image_1, image_2.resize_exact(width, height, Triangle))
  }
}

fn get_smallest_dimensions(dim_1: (u32, u32), dim_2: (u32, u32)) -> (u32, u32) {
  let pix_1 = dim_1.0 * dim_1.1;
  let pix_2 = dim_2.0 * dim_2.1;
  return if pix_1 < pix_2 { dim_1 } else { dim_2 };
}

fn combine_images(image_1: DynamicImage, image_2: DynamicImage) -> Vec<u8> {
  let vec_1 = image_1.to_rgba8().into_vec();
  let vec_2 = image_2.to_rgba8().into_vec();

  alternate_pixels(vec_1, vec_2)
}

fn alternate_pixels(vec_1: Vec<u8>, vec_2: Vec<u8>) -> Vec<u8> {
  let mut combined_data = vec![0u8; vec_1.len()];

  let mut i = 0;
  while i < vec_1.len() {
    if i % 8 == 0 {
      combined_data.splice(i..=i + 3, set_rgba(&vec_1, i, i + 3));
    } else {
      combined_data.splice(i..=i + 3, set_rgba(&vec_2, i, i + 3));
    }
    i += 4;
  }

  combined_data
}

fn set_rgba(vec: &Vec<u8>, start: usize, end: usize) -> Vec<u8> {
  let mut rgba = Vec::new();
  for i in start..=end {
    let val = match vec.get(i) {
      Some(d) => *d,
      None => panic!("Index out of bounds"),
    };
    rgba.push(val);
  }
  rgba
}
Building the binary:
$ cargo build --release
Creating a combined image, using the images in freeCodeCamp/Rust-In-Replit:
$ ./target/release/combiner images/pro.png images/fcc_glyph.png images/output.png
And here's the result in images/output.png:

Conclusion
With that, you now know the basics of Rust.
There is still a lot to learn. So, watch this space for more content 😉.