

Most trained machine learning models are saved as pickle files. This file type is the standard way of serializing and de-serializing objects in Python.
In order to make predictions, you need to load the saved trained model and then perform predictions from the inputs provided.
In this article you will learn how to use the m2cgen Python library to convert the trained machine learning model into native code (for example Python, PHP, or JavaScript) with zero dependencies. Then you'll make predictions based on it.
What is the m2cgen Python Library?
m2cgen (Model 2 Code Generator) is a simple Python library that converts a trained machine learning model into different programming languages.
For example, you can train your machine learning model from the Scikit-learn library and then convert it into the programming language of your choice.
This library is very useful if you want to deploy models into environments where you can't install your Python stack to support your model prediction.
Languages supported by the m2cgen library
M2cgen supports 14 different programming languages:
- C
- C#
- Dart
- F#
- Go
- Haskell
- Java
- JavaScript
- PHP
- PowerShell
- Python
- R
- Ruby
- Visual Basic (VBA-compatible)
Models supported by the m2cgen library
The library supports different regression and classification models from Scikit-learn, and different gradient boost frameworks such as XGBoost and LightGBM (Light Gradient Boosting Machine).
If you want to learn about other supported models, check here: https://github.com/BayesWitnesses/m2cgen#supported-models.
How to Install the m2cgen Python Library
To install m2cgen, run the following command in your terminal:
pip install m2cgenNote that m2cgen is supported by Python versions >= 3.6.
How to Use the m2cgen Python Library
In the following examples, we will use the loan dataset to create a simple machine learning model using a LogisticRegression algorithm. The algorithm will be able to predict if a customer is eligible for loan amount.
Then we will convert the trained model into Python, PHP and JavaScript using the m2cgen library. You can download the dataset here.
Let's get started! 🚀
Import the following important packages for this use case:
import pandas as pd
import numpy as np
from sklearn.preprocessing import StandardScaler, LabelEncoder
from sklearn.model_selection import train_test_split
from sklearn.linear_model import LogisticRegression
import m2cgen as m2c
import warnings                        # To ignore any warnings
warnings.filterwarnings("ignore")
Load the loan dataset by using Pandas with this command:
data = pd.read_csv("data/loans_data.csv")Then show a list of all columns from the dataset:
list(data.columns)These are the columns we'll be interested in:
Loan_ID
Gender
Married
Dependents
Education
Self_Employed
ApplicantIncome
CoapplicantIncome
LoanAmount
Loan_Amount_Term
Credit_History
Property_Area
Loan_Status
We have 12 independent features and a target (Loan_Status). You can read the description of each feature here:
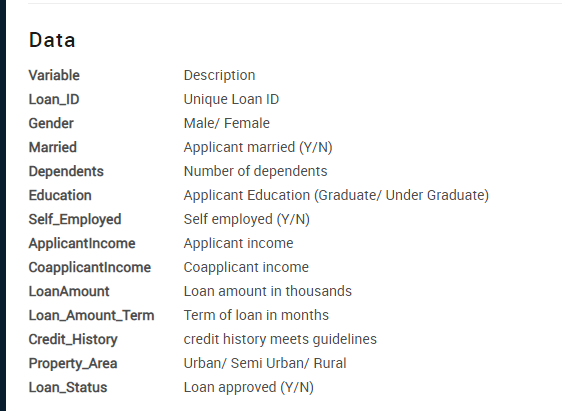
Here are the first 5 rows from the dataset:
#show the first 5 rows of the dataset
data.head() 
As you can see the dataset has some missing data and categorical features that need to be converted into numerical values. Here is a simple Python function that will help us handle missing data and feature engineering. Then it will return the processed features and the target.
# preprocessing the dataset.

def preprocessing(data):

    # replace with numerical values
    data['Dependents'].replace('3+', 3,inplace=True)
    data['Loan_Status'].replace('N', 0,inplace=True)
    data['Loan_Status'].replace('Y', 1,inplace=True)

    # handle missing data
    data['Gender'].fillna(data['Gender'].mode()[0], inplace=True)
    data['Married'].fillna(data['Married'].mode()[0], inplace=True)
    data['Dependents'].fillna(data['Dependents'].mode()[0], inplace=True)
    data['Self_Employed'].fillna(data['Self_Employed'].mode()[0], inplace=True)
    data['Credit_History'].fillna(data['Credit_History'].mode()[0], inplace=True)
    data['Loan_Amount_Term'].fillna(data['Loan_Amount_Term'].mode()[0], inplace=True)
    data['LoanAmount'].fillna(data['LoanAmount'].median(), inplace=True)

    # drop ID column
    data = data.drop('Loan_ID',axis=1)

    #split features and target
    X = data.drop('Loan_Status',axis=1)
    y = data.Loan_Status.values

    #scale the  features
    X  = pd.get_dummies(X,columns=["Gender","Married","Education","Self_Employed","Property_Area"])
    X = StandardScaler().fit_transform(X)


    return X,y
Let’s preprocess the loan dataset. It will return processed features and the target.
X,y = preprocessing(data) We then split the processed data into train and test data sets by using the train_test_split function from Scikit-learn.
# split into train and test set
X_train, X_test, y_train, y_test = train_test_split(X, y, test_size=0.1)
Now, we create and train the LogisticRegression model into our train set.
# create and train the classifier

classifier = LogisticRegression()

classifier.fit(X_train,y_train)
How to Convert the Trained Model into Python Code
The m2cgen library provides methods to convert the trained model into any of the supported languages mentioned above. In this example, we will convert the trained model into Python by using the export_to_python() method from m2cgen.
# convert model to pure python code
model_to_python = m2c.export_to_python(classifier)
Here is the trained model represented in Python code:
#pure python code

def score(input):

    return (((((((((((((((((0.7929123964945446) + ((input[0]) * (0.07801862594632314))) + ((input[1]) * (-0.014853900985478468))) + ((input[2]) * (-0.15783041201914427))) + ((input[3]) * (-0.05222073553791883))) + ((input[4]) * (-0.0787403404504791))) + ((input[5]) * (1.3714807410150505))) + ((input[6]) * (0.015077765348160292))) + ((input[7]) * (-0.015077765348160353))) + ((input[8]) * (-0.12161041350915254))) + ((input[9]) * (0.12161041350915253))) + ((input[10]) * (0.09387440269562626))) + ((input[11]) * (-0.09387440269562626))) + ((input[12]) * (-0.0047109053878701835))) + ((input[13]) * (0.004710905387870008))) + ((input[14]) * (-0.14569247529698154))) + ((input[15]) * (0.19858601990225683))) + ((input[16]) * (-0.06417592734444703))
The Python function code it generates will receive input data and then perform its predictions. Now let's test the Python code generated.
We will first make predictions from the actual trained model. Here is the sample test data we will use from the test set:
test_data = X_test[6]
print(test_data)
array([ 1.24474546, 1.9817189 , -0.55448733, 3.02536229, 0.2732313 , 0.41173269, -0.47234264, 0.47234264, -0.72881553, 0.72881553, 0.52836225, -0.52836225, -2.54711697, 2.54711697, 1.55889948, -0.7820157 , -0.70020801])
Now we make predictions with the actual trained model.
pred = classifier.predict(test_data.reshape(1,-1))
print("prediction result: {}".format(pred))
prediction result: [1]
The model prediction is 1, which means that the customer is eligible for the loan amount.
We will use the same test data to perform predictions in the pure Python code generated and evaluate if it will give the same prediction.
# test prediction in pure python code
input = [ 1.24474546,  1.9817189 , -0.55448733,  3.02536229,  0.2732313 ,
        0.41173269, -0.47234264,  0.47234264, -0.72881553,  0.72881553,
        0.52836225, -0.52836225, -2.54711697,  2.54711697,  1.55889948,
       -0.7820157 , -0.70020801]

pred = score(input)
print("prediction result: {}".format(int(pred)))
prediction result: 1
The pure Python code also provides the same prediction results.
How to Convert the Trained Model into PHP Code
We will use the export_to_php() method from m2cgen to convert the trained model into pure PHP code.
# convert model to pure PHP code
model_to_php = m2c.export_to_php(classifier)
Here is the trained model represented in PHP code:
function score(array $input)
{
    return (((((((((((((((((0.8166973302490392) + (($input[0]) * (0.035269518507829584))) + (($input[1]) * (0.05203333118549156))) + (($input[2]) * (-0.13217178253938103))) + (($input[3]) * (-0.13136526173536608))) + (($input[4]) * (-0.024875019809902837))) + (($input[5]) * (1.2864103414352563))) + (($input[6]) * (-0.005259373701309709))) + (($input[7]) * (0.005259373701309715))) + (($input[8]) * (-0.11512289603368371))) + (($input[9]) * (0.11512289603368378))) + (($input[10]) * (0.06905305123713898))) + (($input[11]) * (-0.06905305123713898))) + (($input[12]) * (0.021080906307735767))) + (($input[13]) * (-0.02108090630773594))) + (($input[14]) * (-0.14491490189610398))) + (($input[15]) * (0.2189862115713242))) + (($input[16]) * (-0.08599736364921017));
}
We will use the same test data to perform predictions in the pure PHP code generated and evaluate if it will give us the same prediction:
# test prediction in pure PHP code
$input = [1.24474546, 1.9817189, -0.55448733, 3.02536229, 0.2732313,
    0.41173269, -0.47234264, 0.47234264, -0.72881553, 0.72881553,
    0.52836225, -0.52836225, -2.54711697, 2.54711697, 1.55889948,
    -0.7820157, -0.70020801];

// perform predition with pure php code
$pred = score($input);


echo "Predicton result: ". round($pred);
Prediction result: 1
The pure PHP code also provides the same prediction results.
How to Convert the Trained Model into JavaScript Code
In our last example, we will use the export_to_javascript() method from m2cgen to convert the trained model into pure JavaScript code.
# convert model to pure Javascript code
model_to_javascript = m2c.export_to_javascript(classifier)
Here is the trained model represented in JavaScript code:
function score(input)
{
    return (((((((((((((((((0.8166973302490392) + ((input[0]) * (0.035269518507829584))) + ((input[1]) * (0.05203333118549156))) + ((input[2]) * (-0.13217178253938103))) + ((input[3]) * (-0.13136526173536608))) + ((input[4]) * (-0.024875019809902837))) + ((input[5]) * (1.2864103414352563))) + ((input[6]) * (-0.005259373701309709))) + ((input[7]) * (0.005259373701309715))) + ((input[8]) * (-0.11512289603368371))) + ((input[9]) * (0.11512289603368378))) + ((input[10]) * (0.06905305123713898))) + ((input[11]) * (-0.06905305123713898))) + ((input[12]) * (0.021080906307735767))) + ((input[13]) * (-0.02108090630773594))) + ((input[14]) * (-0.14491490189610398))) + ((input[15]) * (0.2189862115713242))) + ((input[16]) * (-0.08599736364921017));
}
We will use the same test data to perform predictions in the pure JavaScript code generated and evaluate if it will give us the same prediction.
// perform predition with pure Javascript code
let input =  [1.24474546, 1.9817189, -0.55448733, 3.02536229, 0.2732313,
    0.41173269, -0.47234264, 0.47234264, -0.72881553, 0.72881553,
    0.52836225, -0.52836225, -2.54711697, 2.54711697, 1.55889948,
    -0.7820157, -0.70020801];

let pred = score(input);

console.log("Prediction results:",Math.round(pred));
"Prediction result:", 1
The pure JavaScript code also provides the same prediction results.
Wrapping Up
Sometimes, the native code generated by the m2cgen library can provide different results compared to the original Python trained ML model. Here's a brief explanation from the library's developers:
"Some models force input data to be particular type during prediction phase in their native Python libraries. Currently, m2cgen works only withfloat64(double) data type. You can try to cast your input data to another type manually and check results again. Also, some small differences can happen due to specific implementation of floating-point arithmetic in a target language." (Source: Github Repository)
In the examples mentioned above, I use int() for Python , round() for PHP, and Math.round() for JavaScript to convert the prediction results from the float data type to the integer data type.
Congratulations, you have made it to the end of this article!
You can download the dataset, notebook, and script files used in this article here: https://github.com/Davisy/Convert-Trained-ML-Models-To-Native-Code
If you learned something new or enjoyed reading this article, please share it so that others can see it. Until then, see you in the next post! I can also be reached on Twitter @Davis_McDavid.