
By Mehul Mohan
Redis is a popular in-memory database used for a variety of projects, like caching and rate limiting.
In this blog post, we will see how you can use Redis as an in-memory database, why you'd want to use Redis, and finally we'll discuss a few important features of the database. Let's start.
What is an in-memory database?
Traditional databases keep part of the database (usually the "hot" or often-accessed indices) in memory for faster access, and the rest of the database on disk.
Redis, on the other hand, focuses a lot on latency and the fast retrieval and storage of data. So it operates completely on memory (RAM) instead of storage devices (SSD/HDD). Speed is important!
Redis is a key-value database. But don't let it fool you into thinking it's a simple database. You have a lot of ways to store and retrieve those keys and values.
Why do you need Redis?
You can use Redis in a lot of ways. But there are two main reasons I can think of:
- You are creating an application where you want to make your code layer stateless. Why? - Because if your code is stateless, it is horizontally scalable. Therefore, you can use Redis as a central storage system and let your code handle just the logic.
- You are creating an application where multiple apps might need to share data. For example, what if somebody is trying to bruteforce your site at
payments.codedamn.com, and once you detect it, you'd also like to block them atlogin.codedamn.com? Redis lets your multiple disconnected/loosely connected services share a common memory space.
Redis Basics
Redis is relatively simple to learn as there are only a handful of commands you'll need to know. In the next couple sections, we'll cover a few main Redis concepts and some useful common commands.
The Redis CLI
Redis has a CLI which is a REPL version of the command line. Whatever you write will be evaluated.
The above image shows you how to do a simple PING or hello world in Redis in one of my codedamn Redis course exercises (the course is linked at the end if you want to check it out).
This Redis REPL is very useful when you're working with the database in an application and quickly need to get a peek into a few keys or the state of Redis.
Common Redis commands
 Trying out common commands on Redis CLI in codedamn course
Here are a few very commonly used commands in Redis to help you learn more about how it works:
SET
SET allows you to set a key to a value in Redis.
Here's an example of how it works:
SET mehul "developer from india"
This sets the key mehul to the value developer from india.
GET
GET allows you to get the keys you've set.
Here's the syntax:
GET mehul
This will return the string "developer from india" as we set above.
SETNX
This key will set a value only if the key does not exist. This command has a number of use cases, including not accidentally overwriting the value of a key which might already be present.
Here's how it works:
SET key1 value1
SETNX key1 value2
SETNX key2 value2
After running this example, your key1 will have the value value1 and key2 as value2. This is because the second command will have no effect as key1 was already present.
MSET
MSET is like SET, but you can set multiple keys together in one command. Here's how it works:
MSET key1 "value1" key2 "value2" key3 "value3"
Right now we are using key and value as the prefix for keys and values. But in reality when you write such code it's easy to lose track of what is a key and what is a value in such a long command.
So one thing you can do is always quote your value using double quotes, and leave your keys without quotes (if they are valid keynames without quotes).
MGET
MGET is similar to GET, but it can return multiple values at once, like this:
MGET key1 key2 key3 key4
This will return four values as an array: value1, value2, value3 and null. We got key4 as null because we never set it.
DEL
This command deletes a key – simple enough, right?
Here's an example:
SET key value
GET key # gives you "value"
DEL key
GET key # null
INCR and DECR
You can use these two commands to increment or decrement a key which is a number. They are very useful and you'll use them a lot, because Redis can perform two operations in one – GET key and SET key to key + 1.
This avoids roundtrips to your parent application, and makes the operation also safe to perform without using transactions (more on this later)
Here's how they work:
SET favNum 10
INCR favNum # 11
INCR favNum # 12
DECR favNum # 11
EXPIRE
The EXPIRE command is used to set an expiration timer to a key. Technically it's not a timer, but a kill timestamp beyond which the key will always return null unless it's set again.
SET bitcoin 100
EXPIRE bitcoin 10

GET bitcoin # 100
# after 10 seconds
GET bitcoin # null
EXPIRE uses a little bit more memory to store that key as a whole (because now you have to also store when that key should expire). But you probably won't ever care about that overhead.
TTL
This command can be used to learn how much time the key has to live.
Example:
SET bitcoin 100
TTL bitcoin # -1
TTL somethingelse # -2

EXPIRE bitcoin 5
# wait 2 seconds
TTL bitcoin # returns 3
# after 1 second
GET bitcoin # null
TTL bitcoin # -2
So what can we learn from this code?
- TTL will return
-1if the key exists but doesn't have an expiration - TTL will return
-2if the key doesn't exist - TTL will return time to live in seconds if the key exists and will expire
SETEX
You can perform SET and EXPIRE together with SETEX.
Like this:
SETEX key 10 value
Here, the key is "key", the value is "value", and the time to live (TTL) is 10. This key will get unset after 10 seconds.
Now that you have fundamental knowledge of basic Redis commands and how the CLI works, let's build a couple of projects and use those tools in real life.
Project 1 – Build an API Caching System with Redis
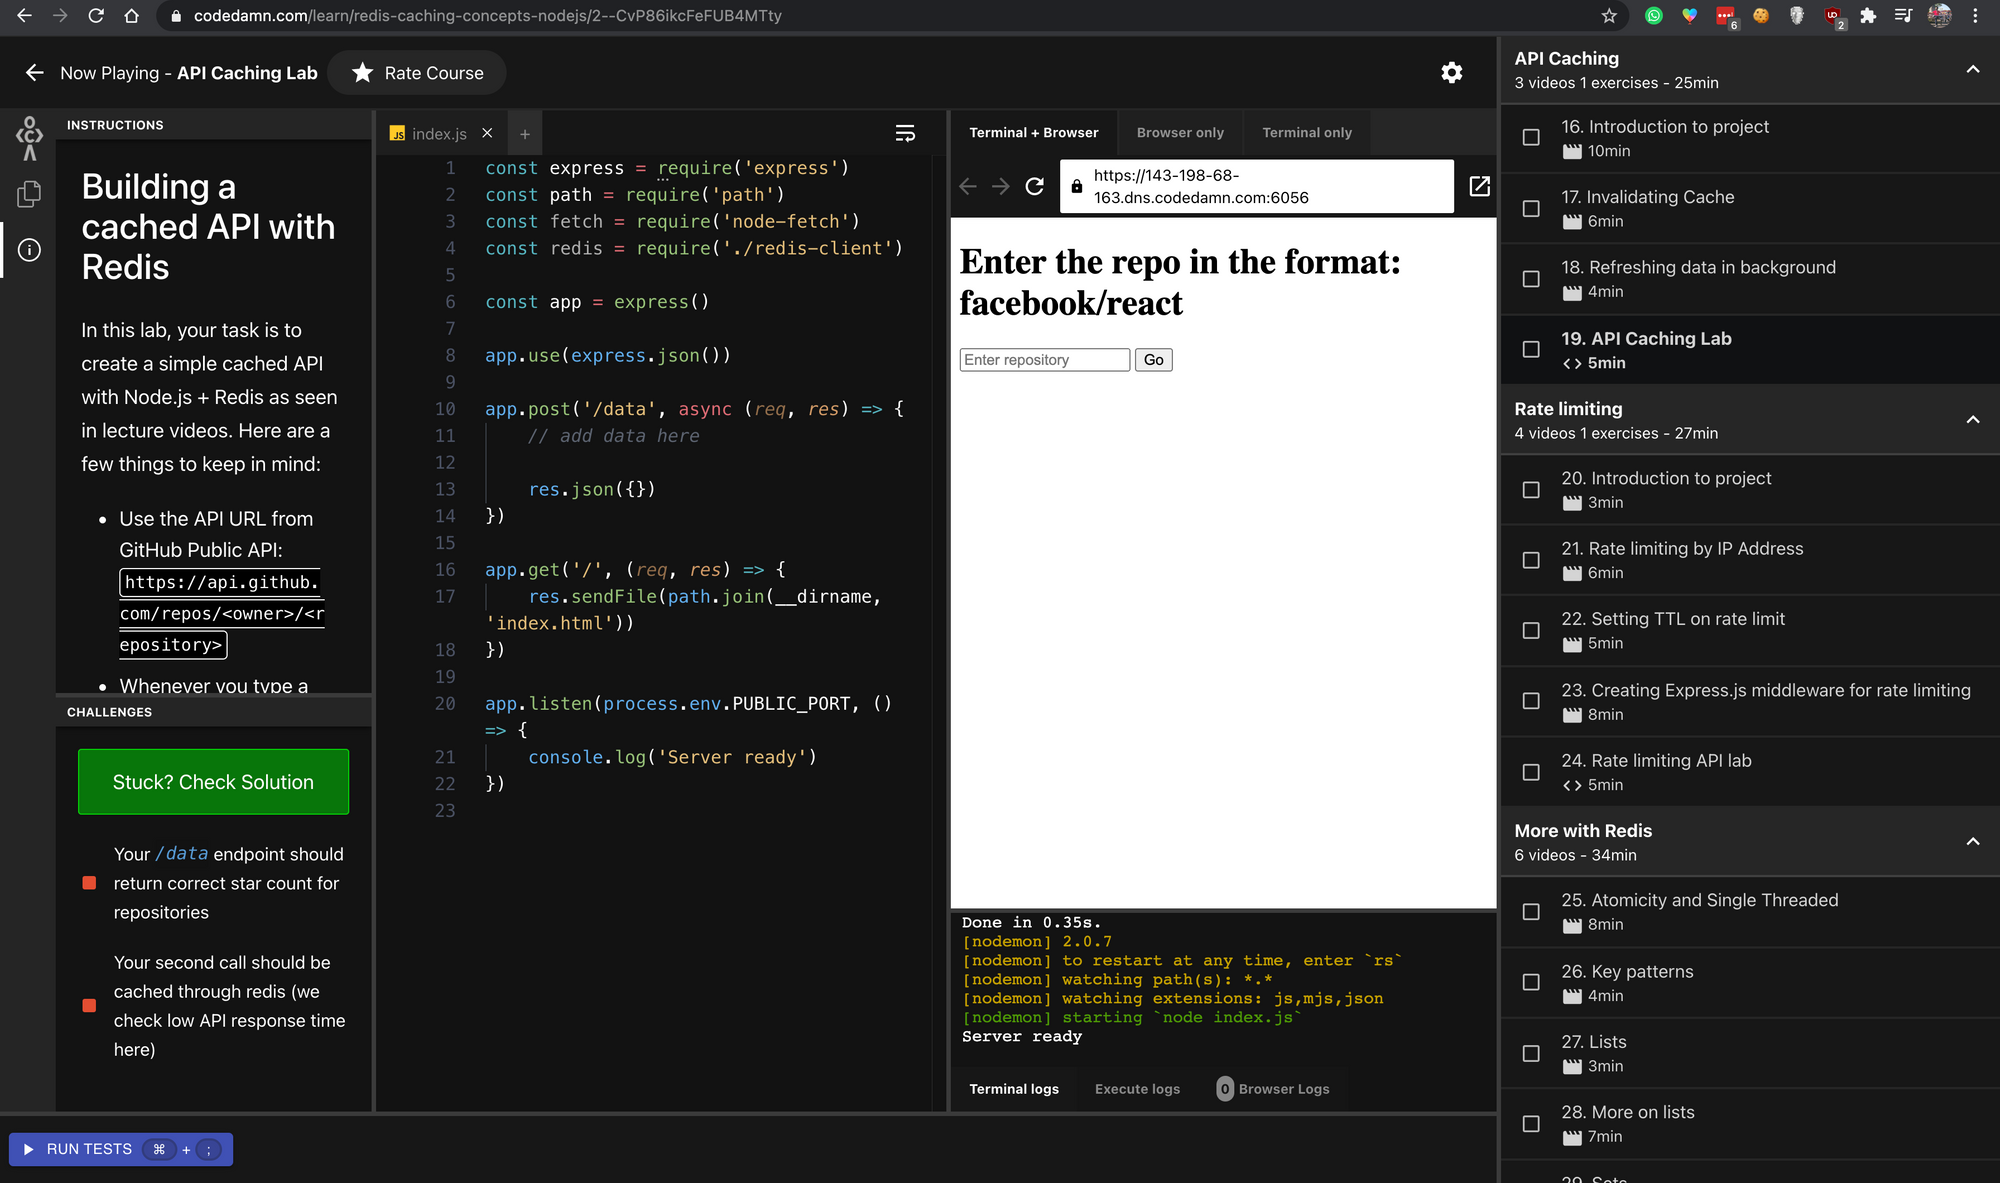 Preview of API caching system building lab on codedamn
This project involves setting up an API caching system with Redis, where you cache results from a 3rd party server and use it for some time.
This is useful so that you are not rate limited by that third party. Also, caching improves your site's speed, so if you implement it correctly it's a win-win for everyone.
You can build this project interactively on codedamn inside the browser using Node.js. If you're interested, you can try the API caching lab for free.
If you're only interested in the solution (and not building it yourself) here's how the core logic will work in Node.js:
app.post('/data', async (req, res) => {
    const repo = req.body.repo

    const value = await redis.get(repo)

    if (value) {
        // means we got a cache hit
        res.json({
            status: 'ok',
            stars: value
        })

        return
    }

    const response = await fetch(`https://api.github.com/repos/${repo}`).then((t) => t.json())

    if (response.stargazers_count != undefined) {
        await redis.setex(repo, 60, response.stargazers_count)
    }

    res.json({
        status: 'ok',
        stars: response.stargazers_count
    })
})
Let's see what's happening here:
- We try to get the
repo(which is the passed repo format -facebook/react) from our Redis cache. If present, great! We return the star count from our redis cache, saving us a roundtrip to GitHub's servers. - If we don't find it in cache, we do a request to GitHub's servers, and get the star count. We check if the star count is not undefined (in case a repo doesn't exist/is private). If it has a value, we
setexthe value with a timeout of 60 seconds. - We set a timeout because we don't want to serve stale values over time. This helps us refresh our star count at least once a minute.
Here's the full source code:
Project 2 - Rate limiting API with Redis
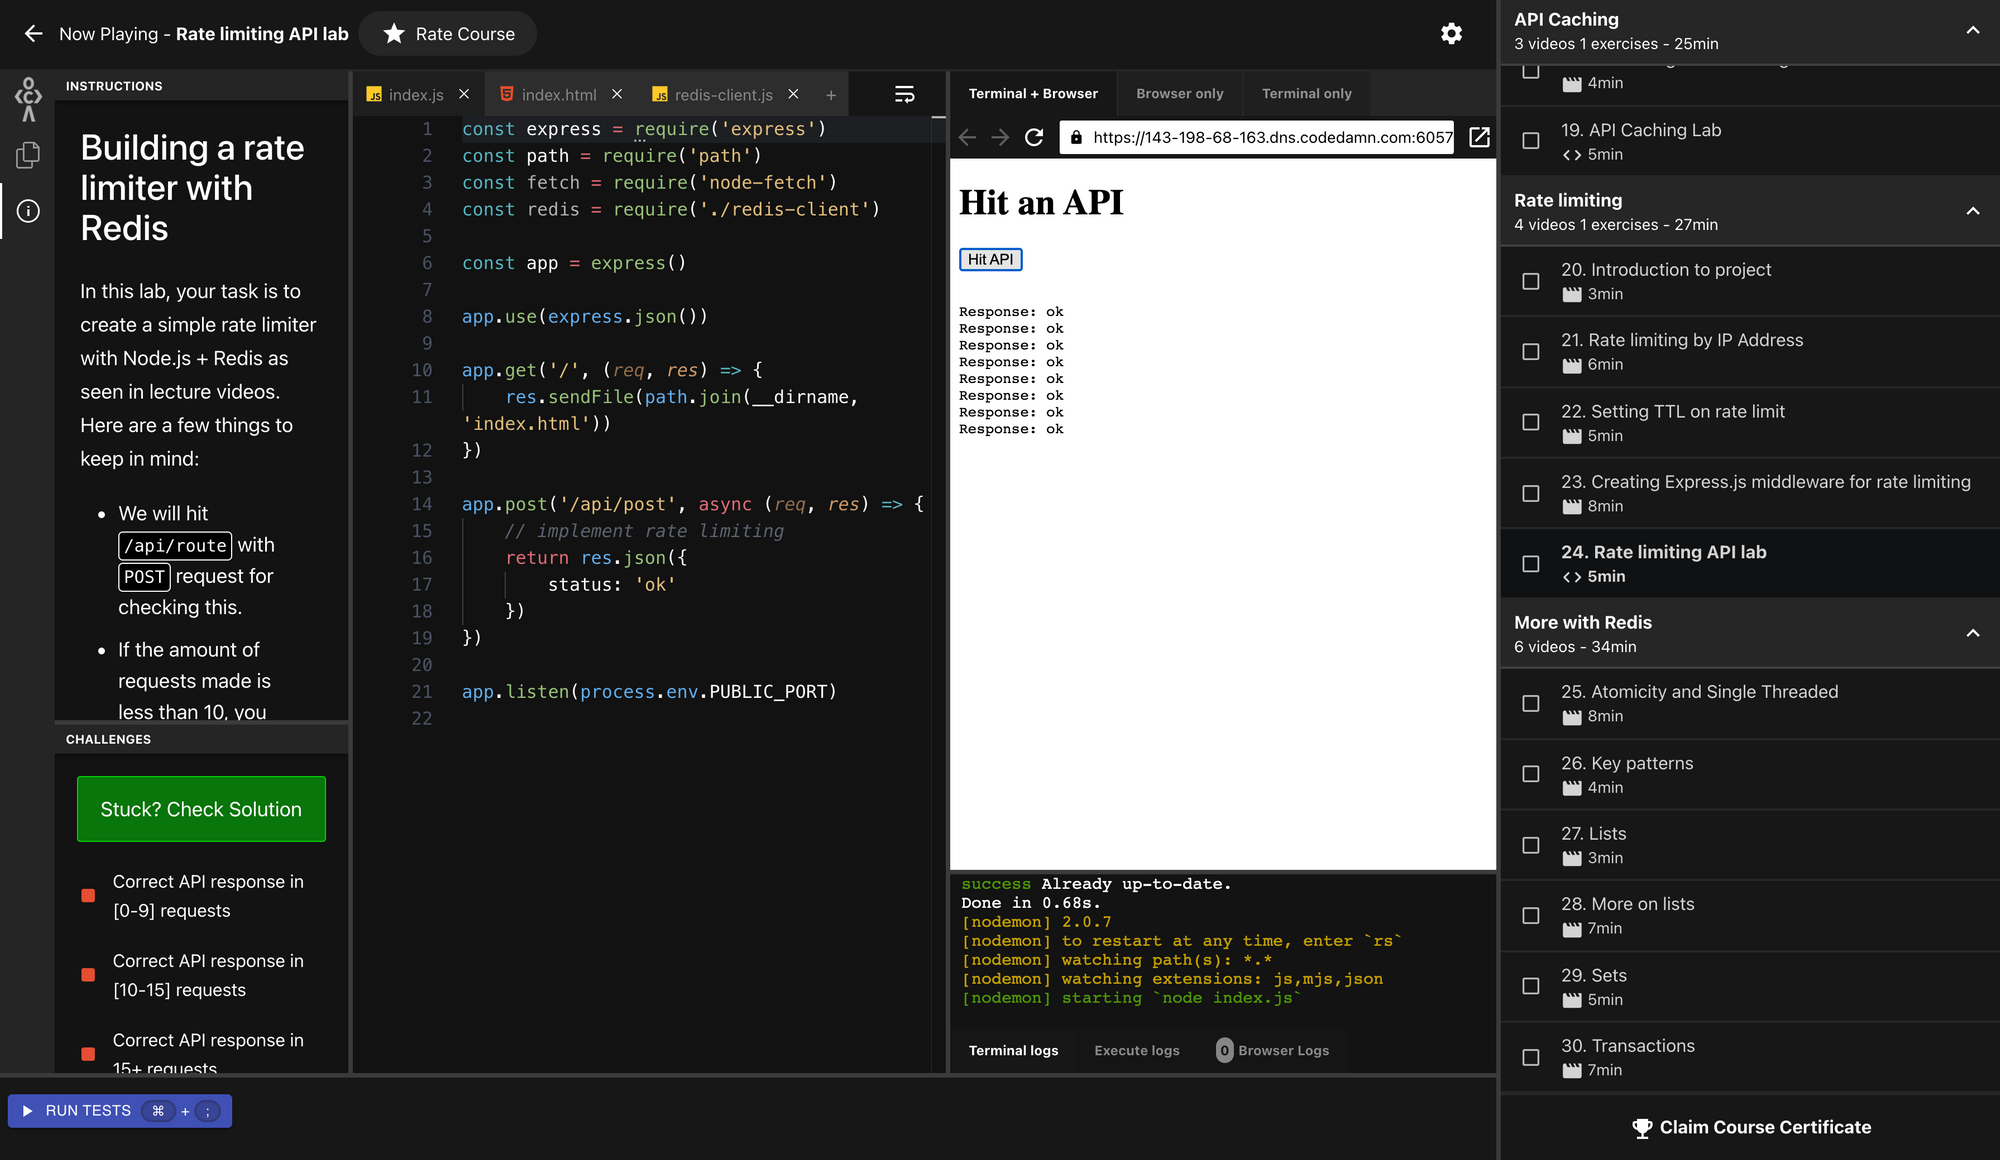 Preview of rate limiting API with Redis
This project involves rate limiting a certain endpoint to protect it from bad actors, and then blocking them from accessing that particular API.
This is very useful for login and sensitive API endpoints, where you don't want a single person to hit your endpoint with thousands of requests.
We perform rate limiting by IP address in this lab. If you want to attempt this codelab, you can try it for free on codedamn.
If you're only interested in the solution (and not building it yourself) here's how the core logic will work in Node.js:
app.post('/api/route', async (req, res) => {
    // add data here
    const ip = req.headers['x-forwarded-for'] || req.ip

    const reqs = await redis.incr(ip)
    await redis.expire(ip, 2)

    if (reqs > 15) {
        return res.json({
            status: 'rate-limited'
        })
    } else if (reqs > 10) {
        return res.json({
            status: 'about-to-rate-limit'
        })
    } else {
        res.json({
            status: 'ok'
        })
    }
})
Let's understand this code block:
- We try to extract the IP from the
x-forwarded-forheader (or you can usereq.ipas we are using express) - We
INCRthe IP address field. If our key in Redis never existed, INCR would automatically set it to 0 and increment, that is finally set it to 1. - We set the key to expire in 2 seconds. Ideally you'd want a larger value - but this is what the codedamn challenge specified above, so there we have it.
- Finally we check the request counts, if they are greater than a certain threshold, we block the request from reaching the main function body.
Here's the full solution:
More on Redis
Redis is much more than what we have learned so far. But the good thing is that we have learned enough to start working with it already!
In this section, let's cover a few more Redis fundamentals.
Redis is single threaded
Redis runs as a single threaded process, even on a multiple core system supporting multi threading. This is not a performance nightmare, but a safety measure against inconsistent read/writes in a multi threaded environment.
If Redis were multi threaded, to ensure thread safety when accessing a single key, you'd eventually have resolved to some locking mechanism, which probably would perform worse than single threaded/sequential access anyway.
Redis Transactions
Of course, you cannot do everything in Redis in a single command. But you can surely ask it to do a block of commands in a single go (that is, nobody else talks to Redis while it is executing that block). You can do that using the MULTI command.
Here's how that works:
MULTI
SET hello world
SET yo lo
SET number 1
INCR number
EXPIRE hello 10
EXPIRE yo 5
EXEC
This will perform all these operations in one go, that is it will not run anything at all after MULTI, and will run everything at once the moment it sees the EXEC keyword.
Redis includes support for lists and sets for more advanced use cases. You can also use Redis as a broadcasting service where you publish to a channel and others who have subscribed to the channel receive a notification. This is very useful in multi-client architecture.
Conclusion
I hope you liked this introduction to Redis. This blog post is a part of codedamn's new interactive course: Redis + Node.js caching, where you not only learn about these concepts, but practice them within your browser on the go.
Feel free to give the course a try and let me know what you think. You can find me on twitter to send any feedback :)