

Serverless 架构在业内炙手可热,很多大厂已经开始拥抱它了。
本文将介绍 Serverless 是什么,为什么要拥抱它。以及 AWS 设置,如何创建 serverless app,如何创建 slack app。
什么是 Serverless
Serverless 是云计算范例,开发者只需关注代码,无需担忧服务器运维。
云提供商,比如 AWS 或者 Azure,通过动态分配资源来运行代码以及运维服务。很多事件都可以触发代码,包括定时任务、http 请求或者数据库事件。
开发者发送到云端的代码通常只是一个函数,因此,serverless 架构通常实现为函数即服务(Function-as-a-Service),即 FaaS。很多云服务商提供 FaaS 框架,比如 AWS 的 Lambda 和 Azure 的 Functions。
为什么使用 Serverless
Serverless 除了让开发者只关心代码外,还有如下优势。
由于云服务商负责运行代码以及分配资源,所以可以按请求数或者代码执行次数付费。
另外,由于云服务商接管服务器,不必担心流量涌入等问题,云服务商会搞定。综上,serverless app 便宜、易维护、高可用。
设置 AWS Lambda
在这个教程里会使用 AWS Lambda,首先来创建一个 AWS 账号。AWS UI 不是很友好,我会给每个步骤贴一个截图。
登录后,如下:

首屏
接下来,创建一个 IAM 用户。IAM (Identity and Access Management) 用户可以操作 AWS 以及指定的资源。可以按场景创建具有相应权限的不同的 IAM 用户,不必担忧泄露 root 用户账号从而引发安全隐患。
点击页面导航栏的 "services“ ,在搜索框输入 ”IAM“ :

单击第一个搜索结果,看到如下的左侧边栏,这就是 IAM 控制台了。点击 ”User“ 选项来创建一个新的 IAM 用户。

点击 ”Add user“ 按钮创建一个新用户。按照下图填写详情:

IAM 用户用什么名字都可以,在这里用的是 serverless-admin。确保选中了 ”Programmatic access“,取消 ”AWS Management Console Access“ 选中。 后者是给团队成员或者其它需要访问 AWS 的人用的。这里的 IAM 用户只需要和 AWS Lambda 交互,只需要给予 programmatic 权限即可。
在权限这里,因为还没有任何 Groups,也没有存在的可以复制权限的用户,选择 Attach existing policies。由于只是一个私人的项目,这里创建了一个具有超级管理员(Administrator)访问权限的用户。如果在生产环境使用 serverless app,IMA 用户应该限制为只具有访问 AWS Lambda 的权限。(这里有介绍)。

我没有给创建的用户添加任何标签。这对于接下来保存 Access ID 和 Secret Access Key 信息很重要。
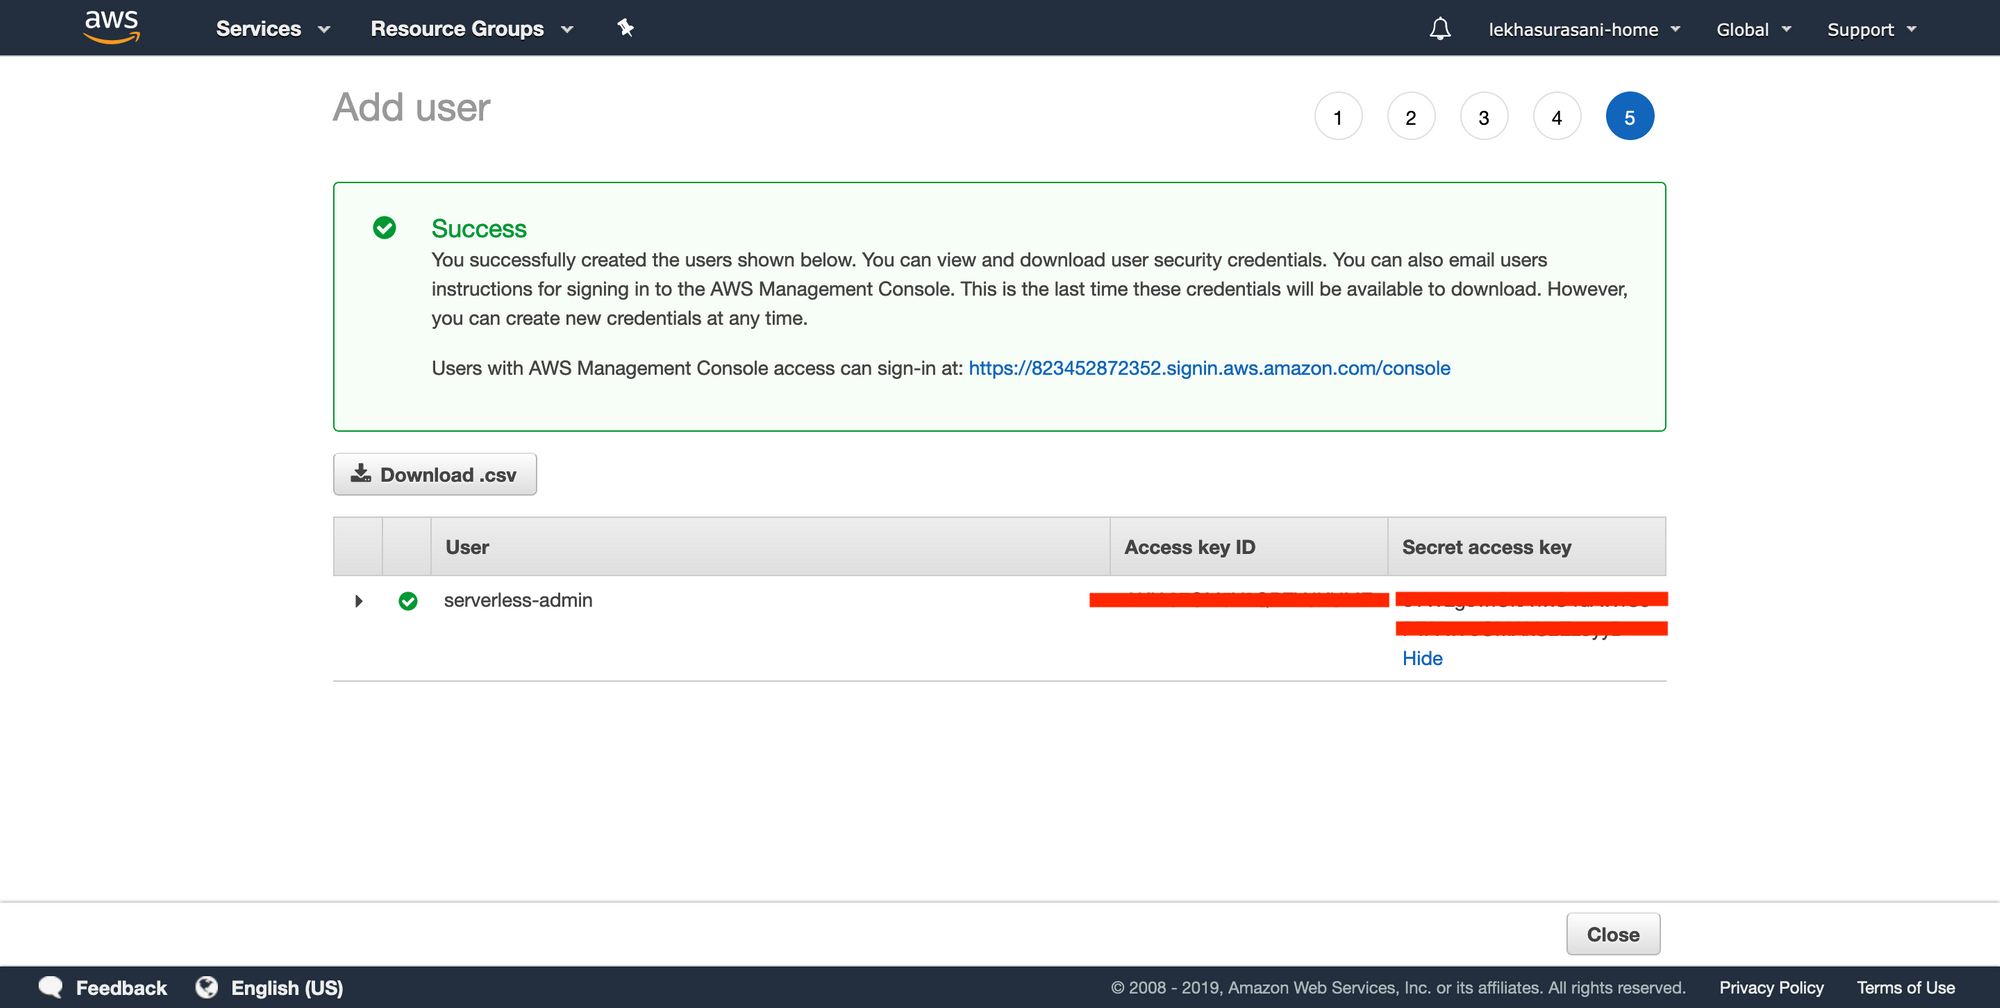
千万不要在没有复制和下载 key 前关掉这个页面。关掉了就在也看不到 Secret access key 了。
最后,使用 AWS 命令行添加 credentials 。可以根据这个指引来安装 aws cli。
运行 aws --version来确保已经安装成功。如下:

接着运行 aws configure 填写 Key 信息:

上面默认的地区就是 us-east-2, 可以通过这个来确定你的地区是什么。
为了确保 credentials 设置成功,可以在终端里运行 cat ~/.aws/credentials。
如果想设置某一个属性,可以运行如下命令:aws configure --profile [profile name]。
如果有和预期不符的地方,可以查询 AWS 的文档。
设置 serverless
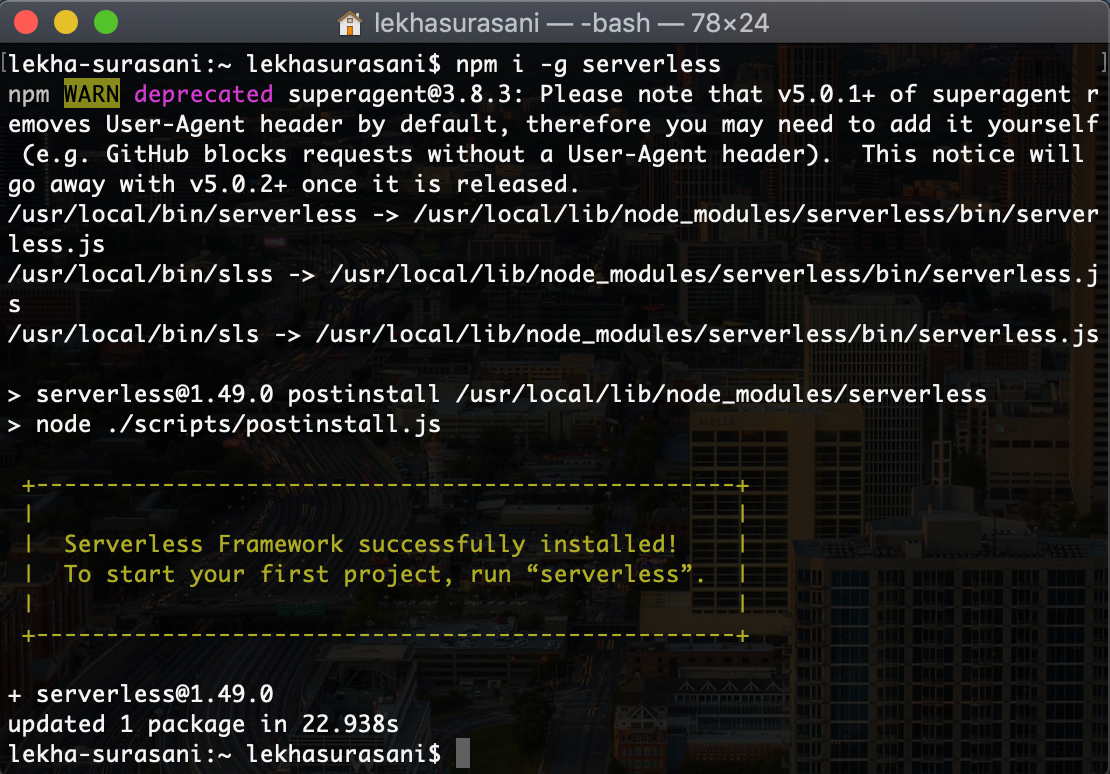
打开终端执行命令 npm i -g serverless 在全局安装 serverless 框架。如下所示。戳此了解更多 serverless 框架。
接着,到工作目录下,运行 serverless,按如下填写:
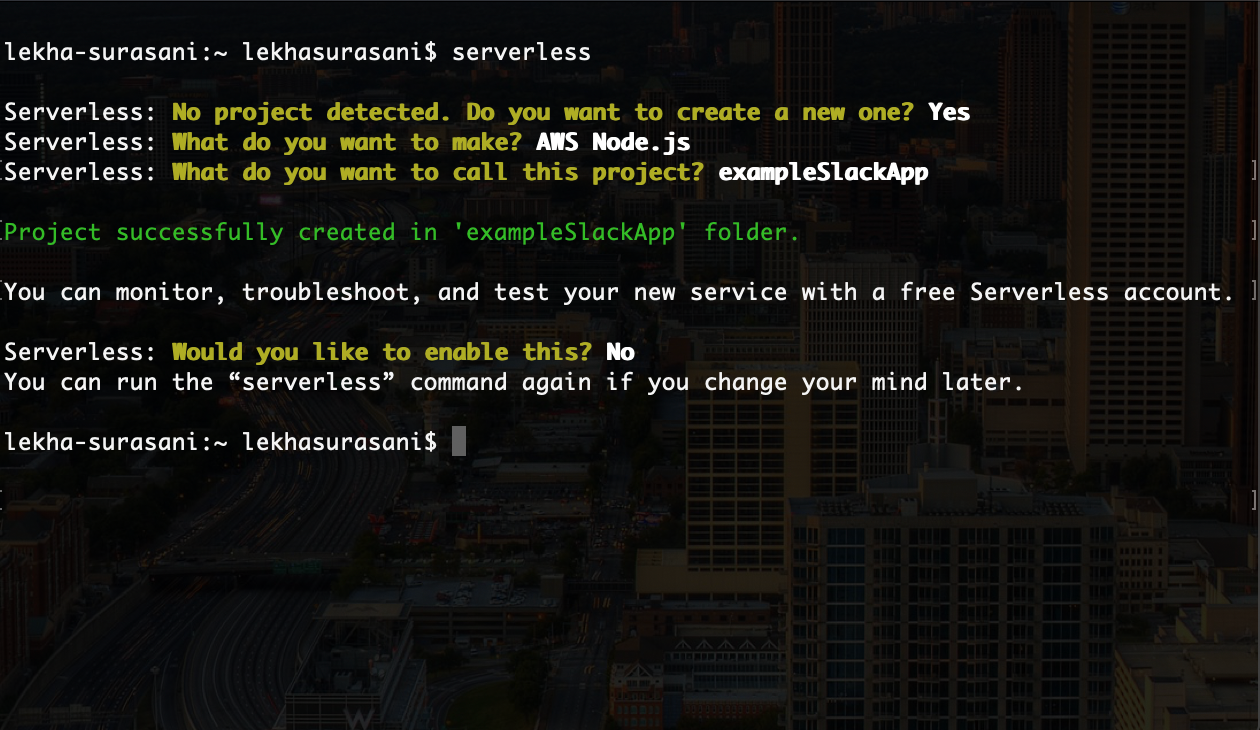
在这里使用 Node.js。可以给 app 起任何名字,在这里使用 exampleSlackApp。
用代码编辑器打开 exampleSlackApp(或者你命名的项目)。
首先,打开 serverless.yml。会看到有大量的注释的代码描述了可以再这个文件使用的不同的选项。可以了解一下,下面的文件它们都删除了,便于显示:
service: exampleslackapp

provider:
  name: aws
  runtime: nodejs10.x
  region: us-east-2
serverless.yml
由于默认的 region 是 us-east-1 我添加了 region 改成 us-east-2。
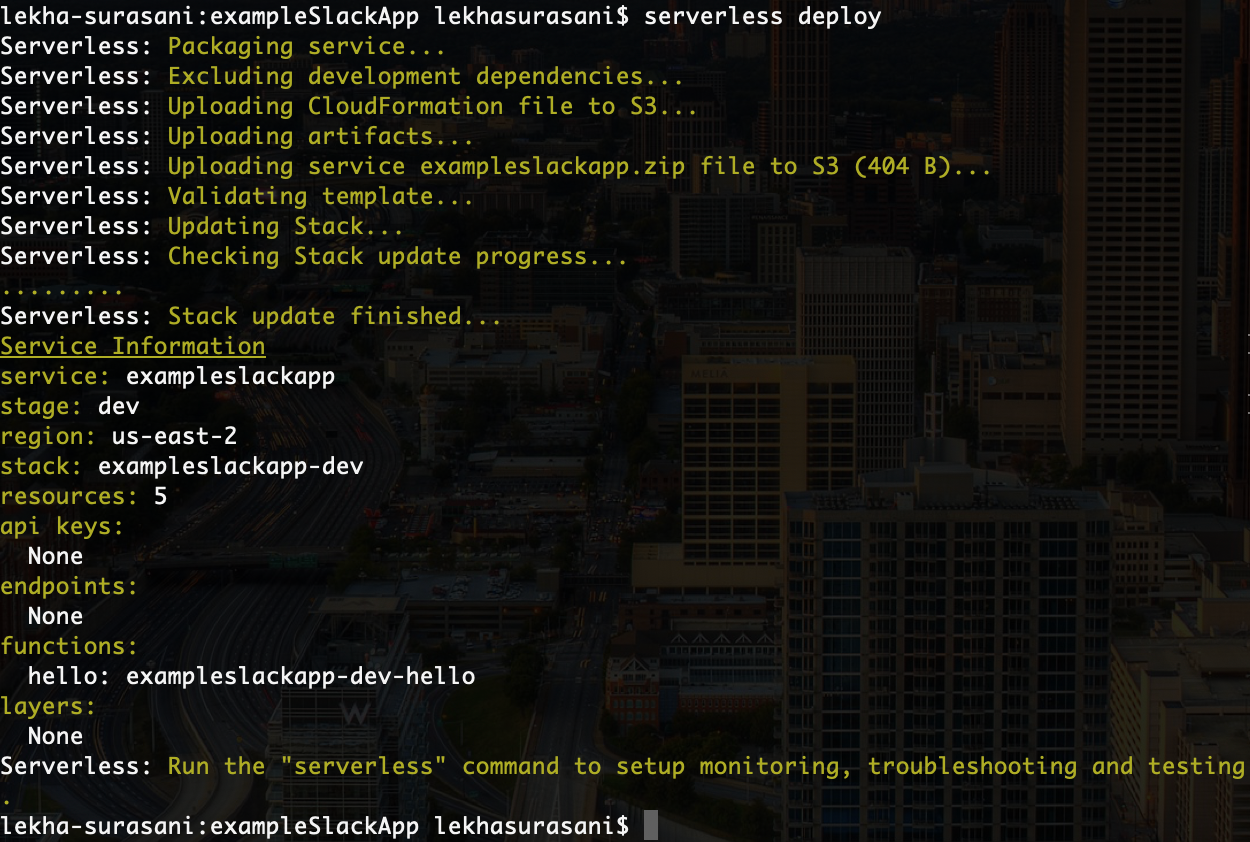
运行 serverless deploy 来部署 serverless 刚刚创建的 app。输出如下:
如果在终端运行 serverless invoke -f hello,会启动 app,输出如下:
{
    "statusCode": 200,
    "body": "{\n  "message": "Go Serverless v1.0! Your function executed successfully!",\n  "input": {}\n}"
}
为了证明 slack app 已经在线,回到 AWS 控制台。打开 services 下拉菜单,搜索 ”Lambda“,选择第一个选项(Run code without thinking about servers)。

这里就是我们的 app!

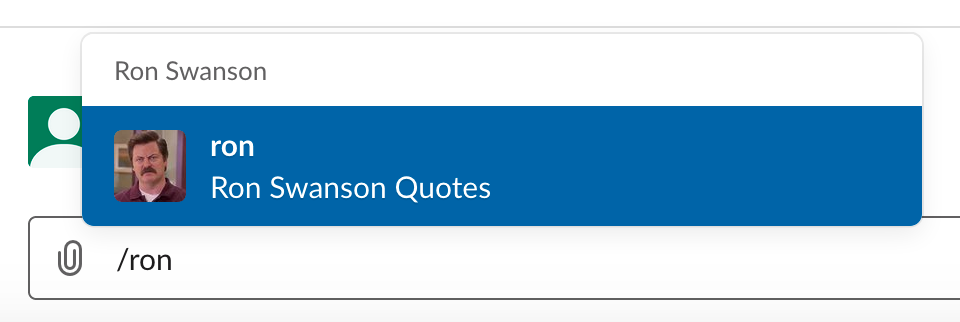
接下来,通过 serverless 构建 slack app,可以通过 slash command 向 slack 随机发送 Ron Swanson 的名言,如下:
下面的步骤不必按顺序做,如果想跳着来,随意。
给我们的代码添加 API
我使用这个 API 来生成 Ron Swanson 的名言,它的文档很清晰(最重要的是免费)。如果想知道怎么调用以及返回格式,把这个链接复制到浏览器,访问一下:
https://ron-swanson-quotes.herokuapp.com/v2/quotes
结果如下:

打开默认的函数改成如下:
module.exports.hello = (event) => {
  getRon();
};
注:我已经移除了 async
getRon 方法如下
function getRon() {
  request('https://ron-swanson-quotes.herokuapp.com/v2/quotes', function (err, resp, body) {
    console.log('error:', err)
    console.log('statusCode:', resp && resp.statusCode)
    console.log('body', body)
  })
}
现在,检查一下是否正常。在终端里执行:serverless invoke local -f hello,在本地测试代码。输出如下:

Spoiler: There was a wrong way to consume alcohol
serverless invoke -f hello 会运行已经部署的代码,如前文所述。
serverless invoke local -f hello,在本地运行代码,用它来测试很方便。测试无虞后 serverless deploy 部署一下,棒。
创建 Slack App
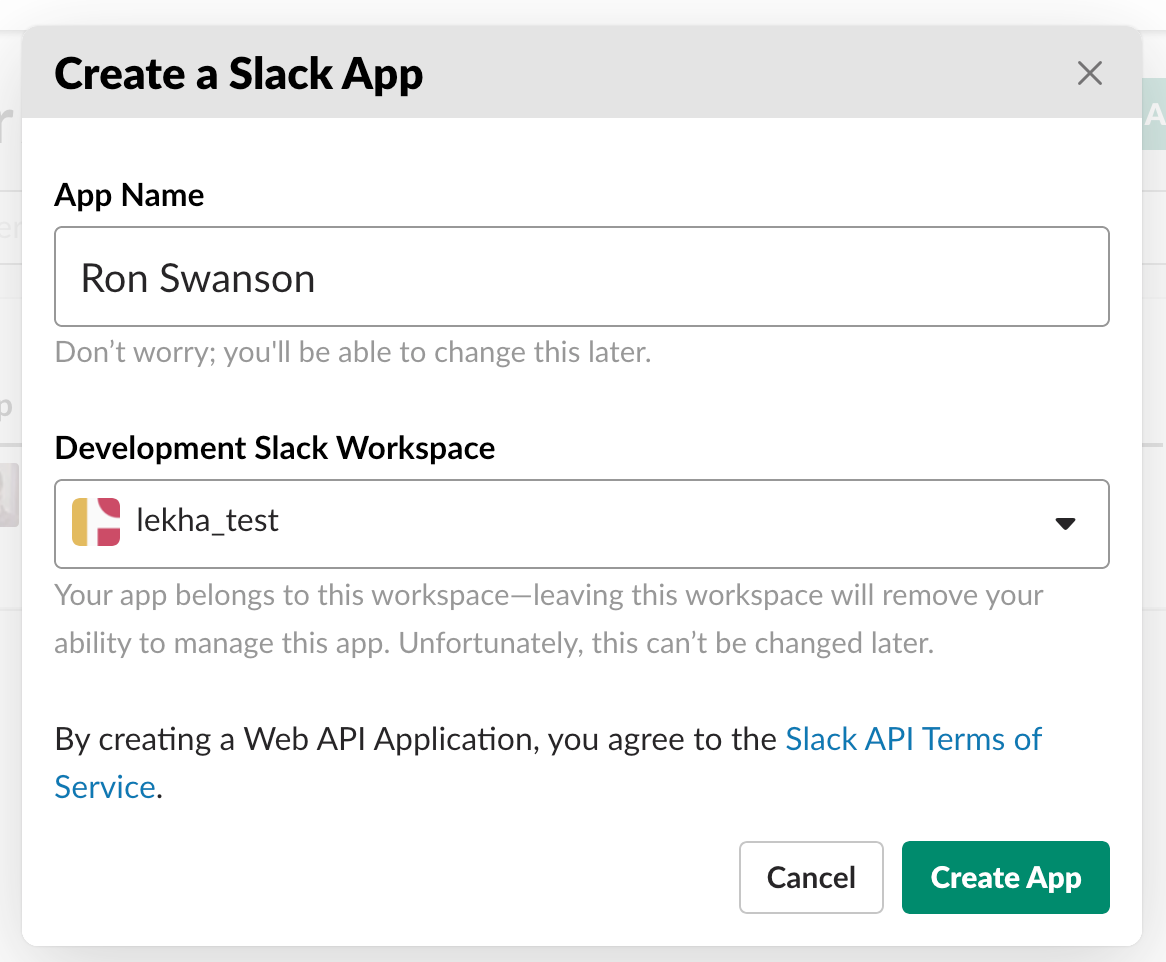
按照这个链接创建 slack app。需要先注册 slack worksapce,确保有添加 slack app 的权限。这里创建了一个测试。弹出这个弹窗后,信息按需填写,如下:
接下来,是 app 的首页。这里可以好好研究一下,我是像下面这样定制的 app:

Display information 可以在 app 的 ”Basic information“ 标签页打开
接下来需要给 app 添加一些权限:
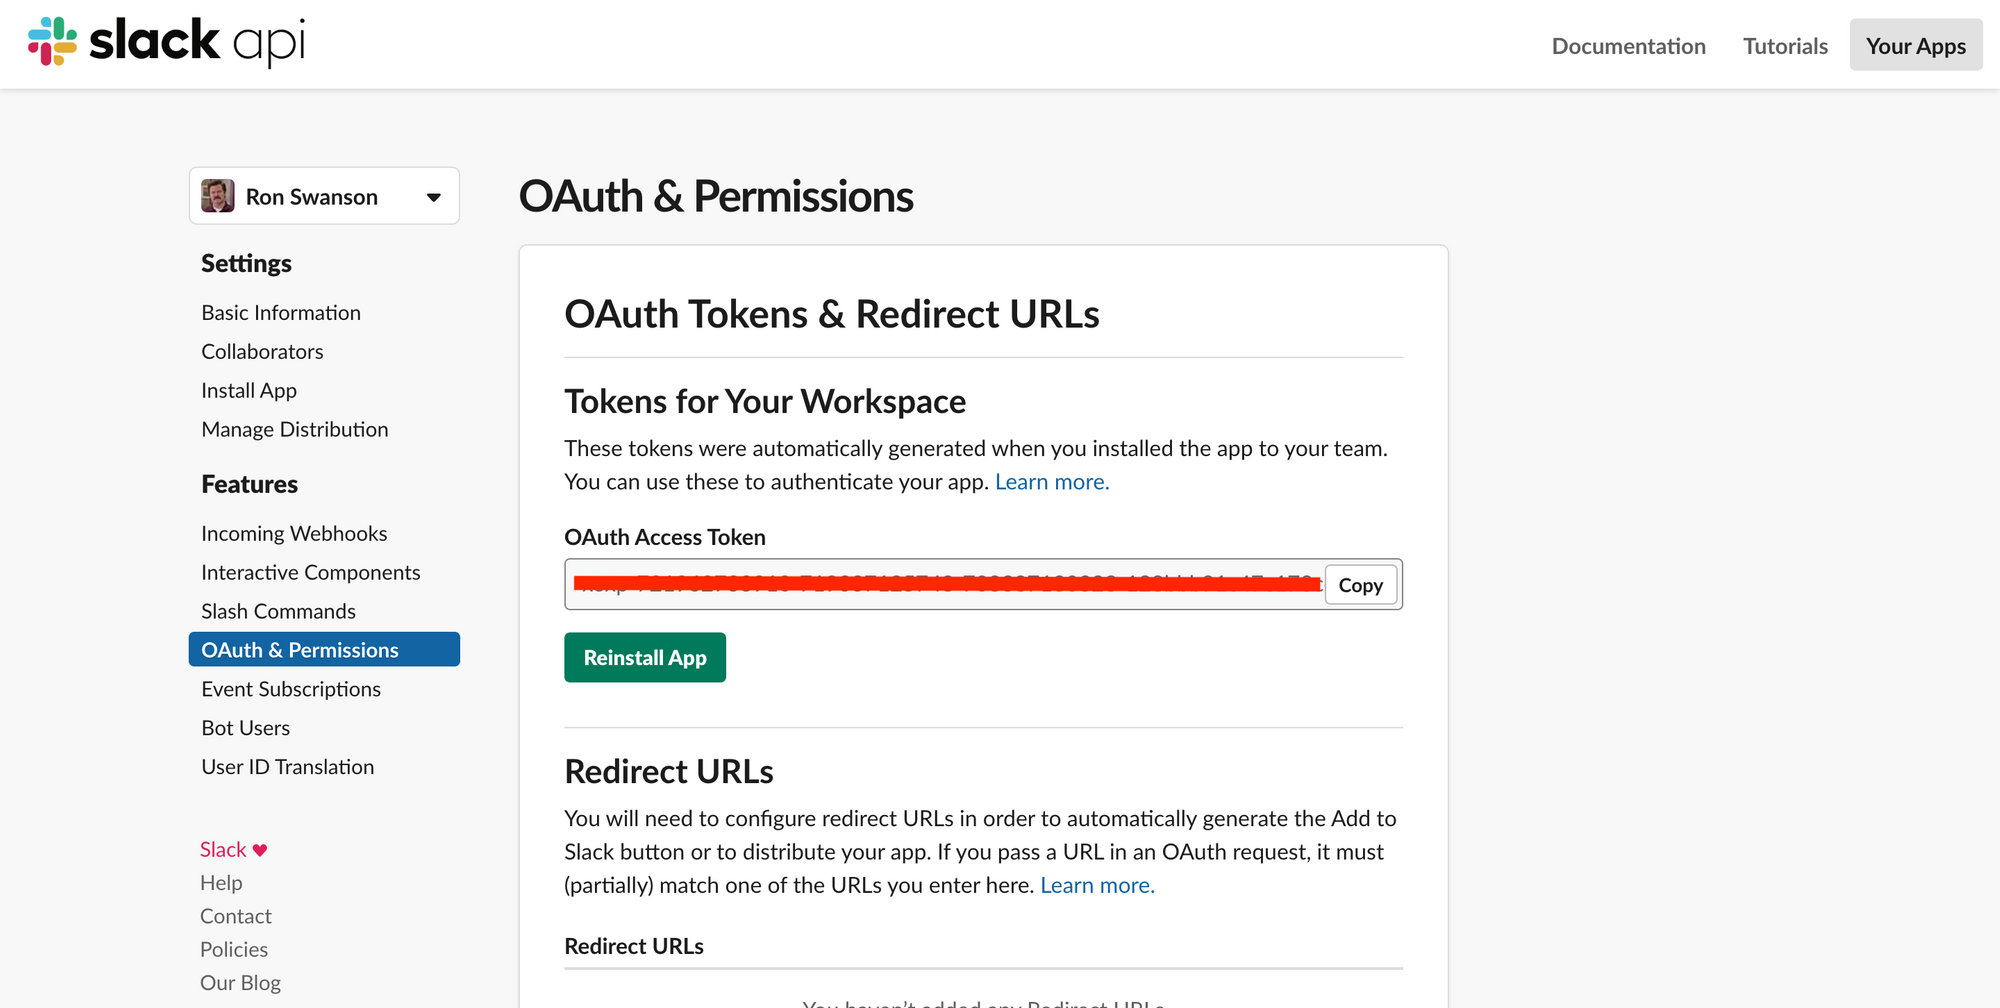
向下滚动页面,添加 scope 和 permissions 来获得 OAuth Access Token。
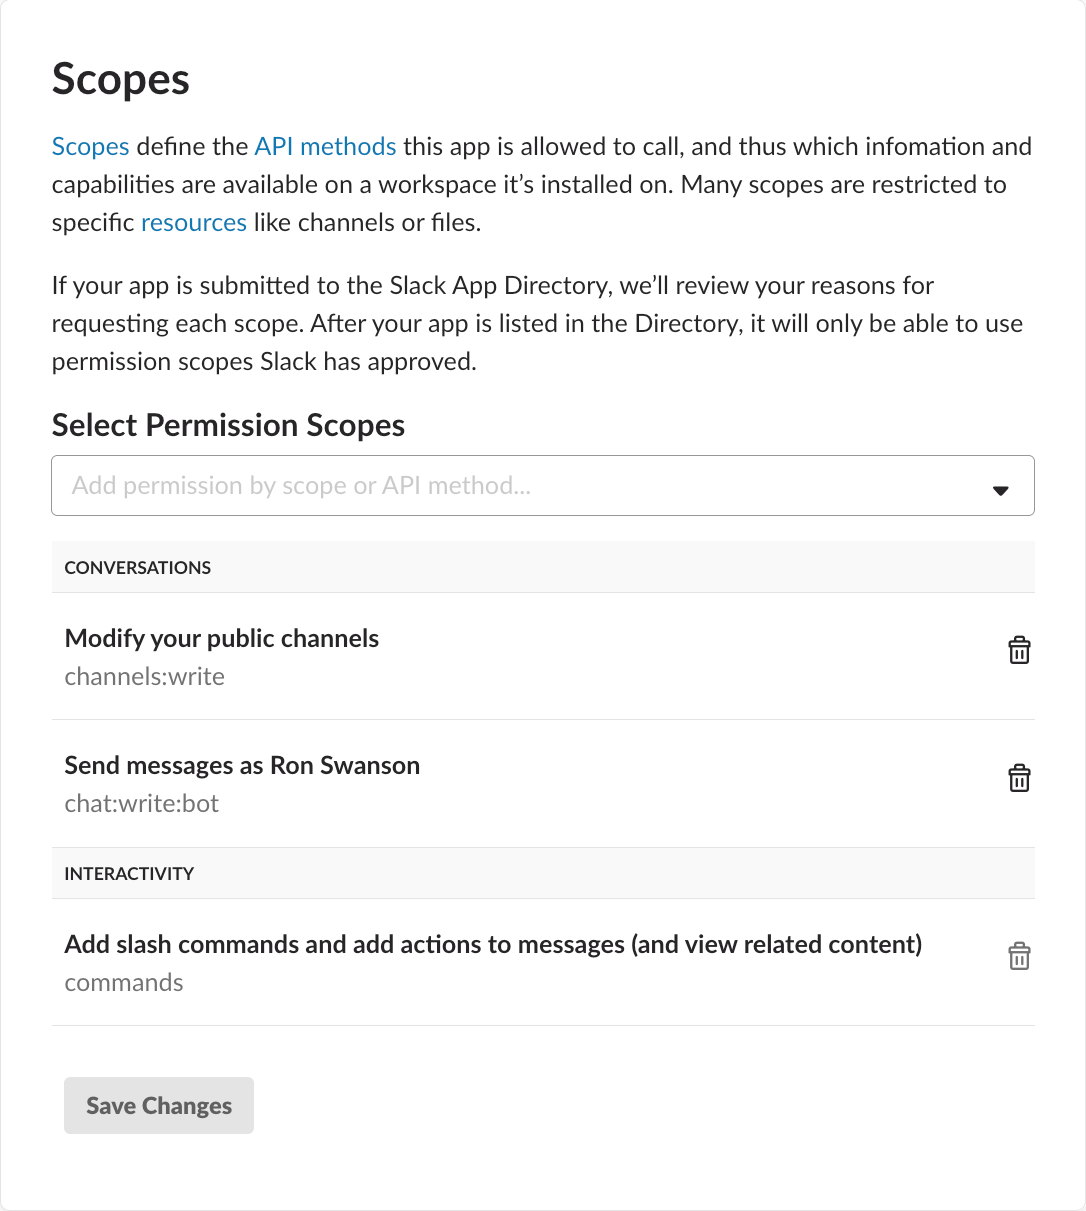
I've added "Modify your public channels" so that the bot could write to a channel, "Send messages as Ron Swanson" so when the message gets posted, it looks like a user called Ron Swanson is posting the message, and slash commands so the user can "request" a quote as shown in the screenshot at the beginning of the article. After you save the changes, you should be able to scroll back up to OAuths & Permissions to see:
添加 ”Modify your public channels“ 以便机器人可以向 channel 发消息。添加 ”Send messages as Ron Swaon“,这样收到信息时,看起来像是 Ron Swanson 用户发送的,以及 ”slash commands“,以便用户可以像文章开头的截图那样请求名言。点击 Save Changes 后,滚动回 OAuths & Permissions 如下:

点击 Install App to Workspace 按钮,就会获得一个 OAuth Access Token。一会会用到它,复制或者下载它到某个地方。
链接代码到 Slack App
在 AWS Lambda 里,找到对应的 slack app 函数。函数代码部分应该显示更新过的代码,包含调用 Ron Swanson API 的代码(如果没有,在终端里执行一下 serverless deploy)。
滚动屏幕到 ”Environment Variables“ 部分,把 Slack OAuth Access Token 放在这里(给 key 起一个名字):

返回代码在函数里添加 Slack key。在文件顶部,声明一个 const ,引用 OAuth Token。
const SLACK_OAUTH_TOKEN = process.env.OAUTH_TOKEN`.
process.env 只是获取到环境变量(戳此查看介绍)。接下来看一下 Slack API 来研究一下怎么向 channel 里发消息。
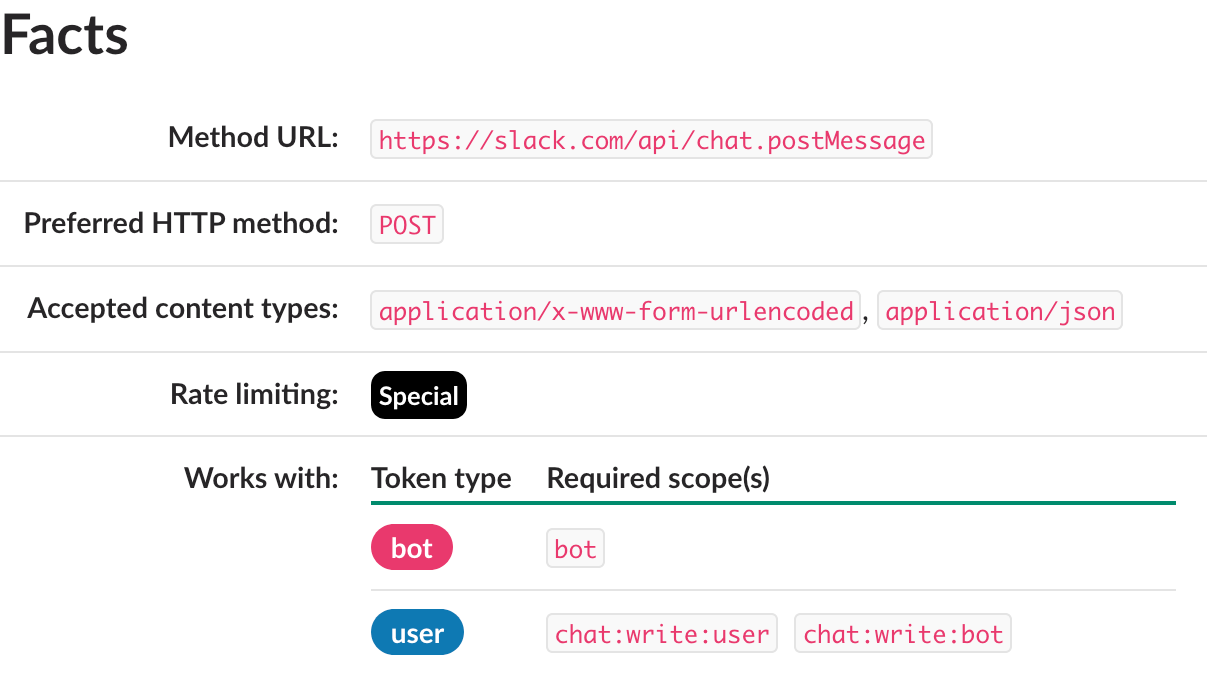

上面的两幅图片是我在 API 文档里面截的,参考文档发起对应请求,这里使用 request 方法传入了一个名为 options 的对象:
  let options = {
    url: 'https://slack.com/api/chat.postMessage',
    headers: {
      'Accept': 'application/json',
    },
    method: 'POST',
    form: {
      token: SLACK_OAUTH_TOKEN,
      channel: 'general', // hard coding for now
      text: 'I am here',
    }
  }
然后发起请求:
  request(options, function(err, resp, body) {
    console.log('error:', err)
    console.log('statusCode:', resp && resp.statusCode)
    console.log('body', body)
  })
最后封装成函数:
function postRon(quote) {
  let options = {
    url: 'https://slack.com/api/chat.postMessage',
    headers: {
      'Accept': 'application/json',
    },
    method: 'POST',
    form: {
      token: SLACK_OAUTH_TOKEN,
      channel: 'general',
      text: quote,
    }
  }
给这个函数命名为 getRon,如下:
function getRon() {
  request('https://ron-swanson-quotes.herokuapp.com/v2/quotes', function (err, resp, body) {
    console.log('error:', err)
    console.log('statusCode:', resp && resp.statusCode)
    console.log('body', body)
    postRon(body.substring(2, body.length - 2)) // here for parsing, remove if you want to see how/why I did it
  })
}
整个代码看起来如下:
'use strict';
let request = require('request');
const SLACK_OAUTH_TOKEN = process.env.OAUTH_TOKEN
module.exports.hello = (event) => {
  getRon();
};
function getRon() {
  request('https://ron-swanson-quotes.herokuapp.com/v2/quotes', function (err, resp, body) {
    console.log('error:', err)
    console.log('statusCode:', resp && resp.statusCode)
    console.log('body', body)
    postRon(body.substring(2, body.length - 2))
  })
}
function postRon(quote) {
  let options = {
    url: 'https://slack.com/api/chat.postMessage',
    headers: {
      'Accept': 'application/json',
    },
    method: 'POST',
    form: {
      token: SLACK_OAUTH_TOKEN,
      channel: 'general',
      text: quote,
    }
  }
现在来测试一下!很不幸 AWS Lambda 里的环境变量在运行 serverless invoke local -f hello 时并不可用。有很多方法来解决这个问题,这里我们把 SLACK_OAUTH_TOKEN 替换成真实的 OAuth Token(确保以字符串的形式)。一定要记得不要把它提交到版本控制里面去哦。
运行 serverless invoke local -f hello,在 #general channel 会看到类似下面的信息:

注意我的是测试 workspace 所以 channel 名字是 general,如果在真实的 workspace 里,应该为测试 app 创建一个单独的 channel,在测试的时候把消息发到这里面。
终端里输出如下:

如果正常,使用命令 serverless deploy 部署。如果有问题,通过 serverless invoke local -f hello 来debug。
添加 slash command
最后一件事就是添加 slash command!返回 AWS Lambda 函数的首页,找到 “Add trigger” 按钮:

我们将要添加 API Gateway(其实已经存在了)。
单击按钮打开 “Add trigger” 页,在列表中选择 "API Gateway":

按下图填写信息:
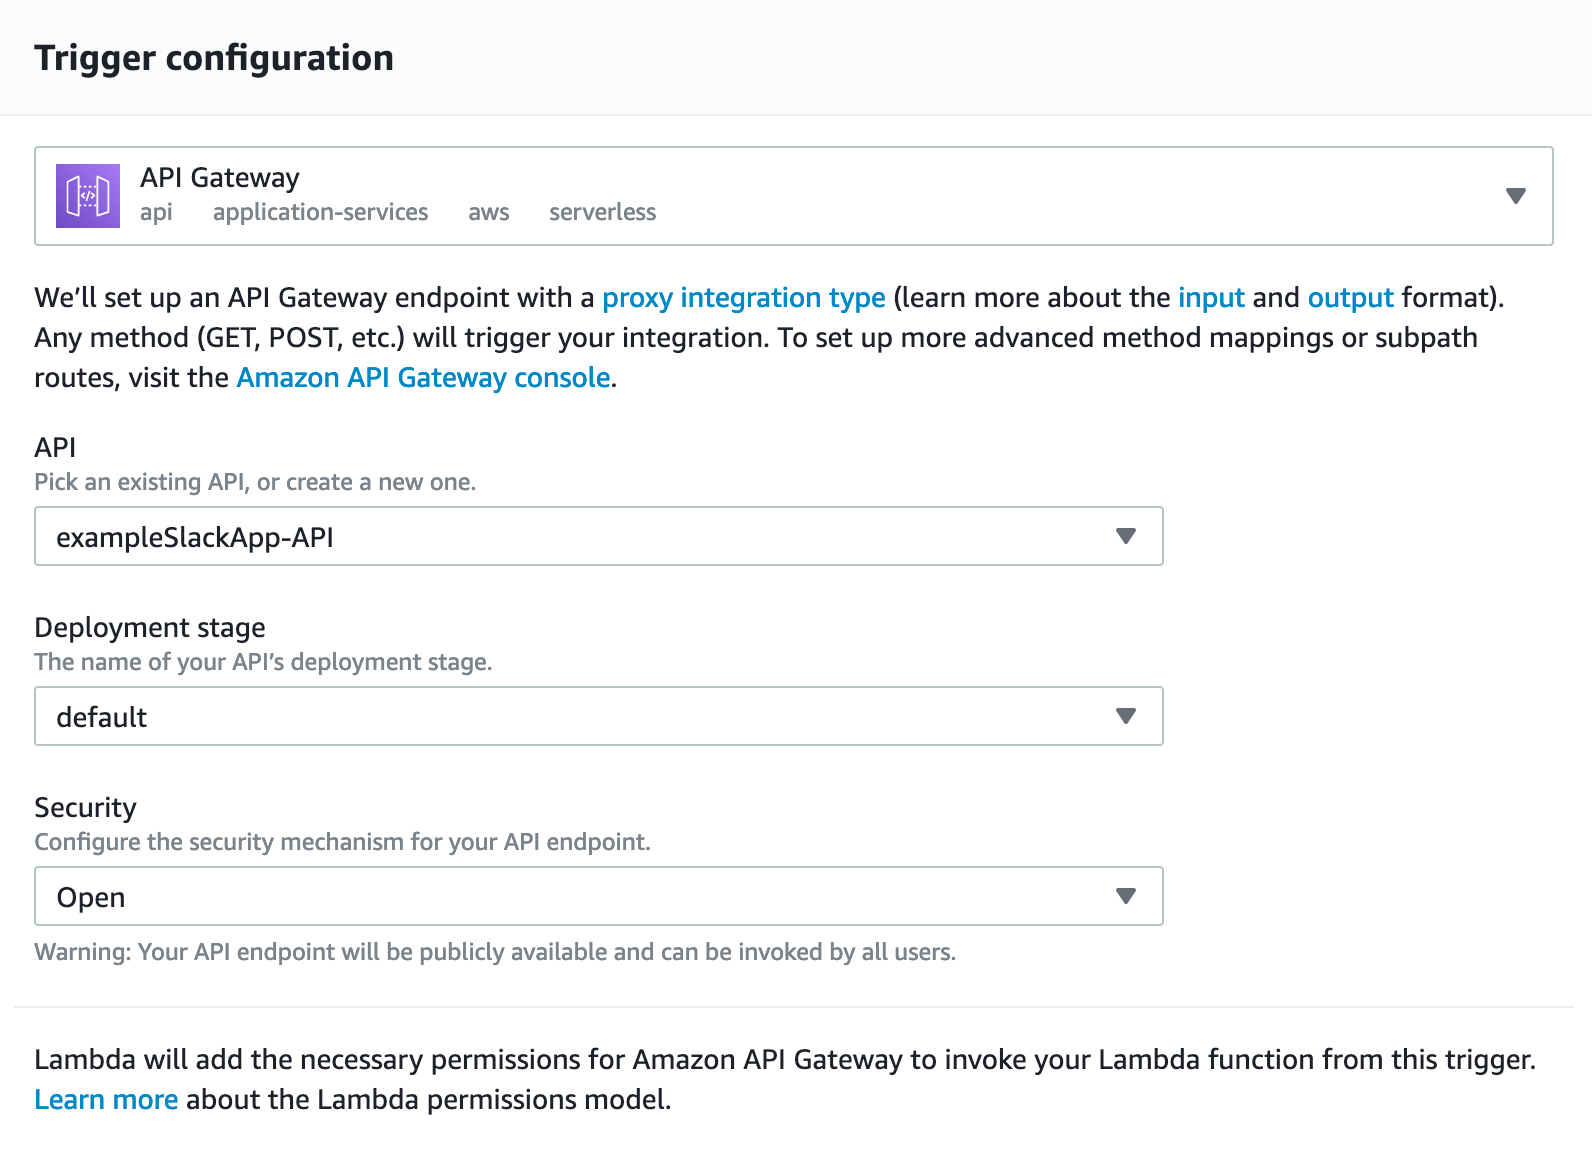
这个 API 会开放使用,如果用于生产环境,需要和团队讨论一下协议标准。”Add“ API,会收到一个 API endpoint。记住它,在下一步会用到。
返回 slack app 添加 slash 命令:

点击 ”Create New Command“,会弹出一个新窗口来创建命令。下面是我的填写:
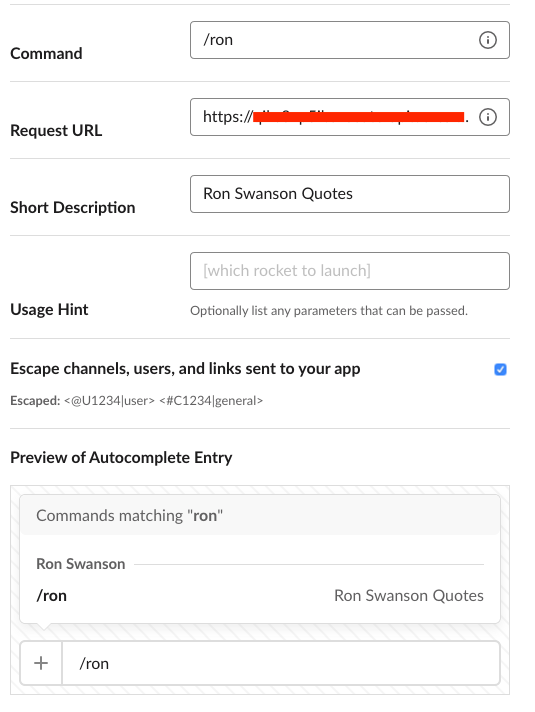
”command“ 和 ”short description“ 可以随意填写,但是 ”request URL“,需要填写刚才的 API endpoint。
最后,返回代码做最后的调整。如果尝试使用 slash command,会返回错误 - 这是因为 slack 预期收到一个 response,AWS 也预期 endpoint 触达时返回一个响应。修改代码返回 callback(文档)
module.exports.hello = (event,context,callback) => {
  getRon(callback);
};
修改 getRon 返回 callback:
function getRon(callback) {
  request('https://ron-swanson-quotes.herokuapp.com/v2/quotes', function (err, resp, body) {
    console.log('error:', err)
    console.log('statusCode:', resp && resp.statusCode)
    console.log('body', body)
    callback(null, SUCCESS_RESPONSE)
    postRon(body.substring(2, body.length - 2))
  })
}
在文件顶部添加 SUCCESS_RESPONSE:
const SUCCESS_RESPONSE = {
  statusCode: 200,
  body: null
}
可以把 callback 放在 postRon 里 - 具体取决于代码。
我的代码如下:
'use strict';
let request = require('request');
const SLACK_OAUTH_TOKEN = OAUTH_TOKEN
const SUCCESS_RESPONSE = {
  statusCode: 200,
  body: null
}
module.exports.hello = (event,context,callback) => {
  getRon(callback);
};
function getRon(callback) {
  request('https://ron-swanson-quotes.herokuapp.com/v2/quotes', function (err, resp, body) {
    console.log('error:', err)
    console.log('statusCode:', resp && resp.statusCode)
    console.log('body', body)
    callback(null, SUCCESS_RESPONSE)
    postRon(body.substring(2, body.length - 2))
  })
}
function postRon(quote) {
  let options = {
    url: 'https://slack.com/api/chat.postMessage',
    headers: {
      'Accept': 'application/json',
    },
    method: 'POST',
    form: {
      token: SLACK_OAUTH_TOKEN,
      channel: 'general',
      text: quote,
    }
  }
现在可以再 slack 里面使用 /ron 命令获取 Ron Swanson 的名言啦。如果有问题,可以使用 Cloudwatch 日志来看一下哪里出了问题:
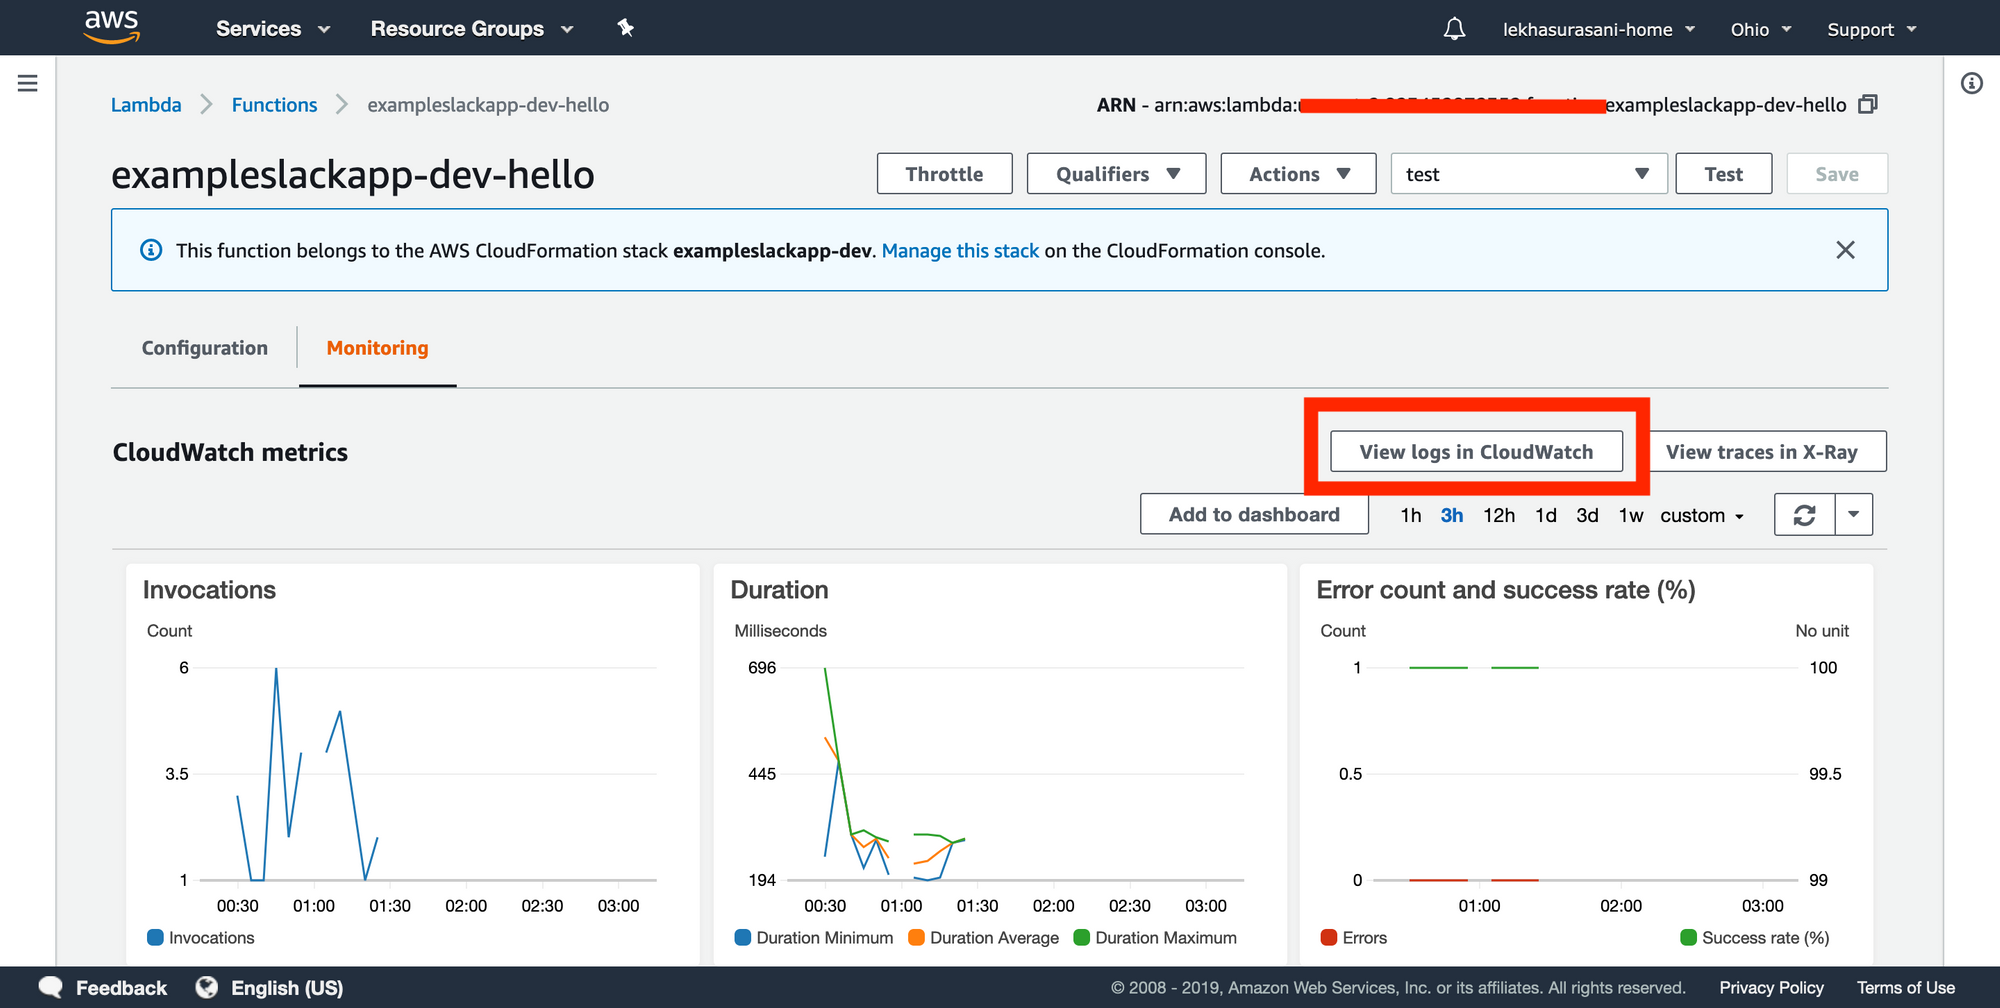
代码现在可以运行,我们已经 hardcoded 了 channel name。但是实际上我们想在任何发送 /ron 的 channel 返回名言。
在函数里面使用 event。
module.exports.hello = (event,context,callback) => {
  console.log(event)
  getRon(callback);
};
使用 /ron 来运行函数,然后检查 Cloudwatch 日志来看控制台输出了什么(可能会需要刷新)。检查最新的日志会看到如下:

列表的第一项(也就是 "resource"、"path",等)是 event,如果展开它,你会发现一长列表东西,我们关注的是在底部的 “body”。

waldo 在哪里: 发现 param 版本
Body 是含有一些相关信息的字符串,其中的一个是 “channel_id”。可以使用 channel_id (或者 channel_name)做为参数传入创建 Slack 信息的函数。为了方便,直接给出获取该参数方法:event.body.slit("&")[3].split("=")[1],这会返回 channel_id。hardcoded 了一下,第三个值就是 channel_id。
Now, we can alter our code to save that string as a variable:
现在,可以获取到的字符串保存为一个变量:
let channel = 'general'(做为 fallback)
module.exports.hello = (event,context,callback) => {
  console.log(event)
  channel = event.body.split("&")[3].split("=")[1]
  console.log(context)
  getGoat(callback);
};
以及 postRon:
  let options = {
    url: 'https://slack.com/api/chat.postMessage',
    headers: {
      'Accept': 'application/json',
    },
    method: 'POST',
    form: {
      token: SLACK_OAUTH_TOKEN,
      channel: channel,
      text: quote,
    }
  }
可选的 psotRon 里的 var
最后,如果在 workspace 的任何 channel 使用 slack command,会看到 Ron Swanson 的名言。如果没有,就像之前说的那样,最好的 debug serverless app 的工具是 serverless invoke local -f <function name> 以及 Cloudwatch 日志。
希望你能成功的创建 Slack 应用!我已经在文末附了相关资料和背景阅读。希望能够解决你的问题。
Final Repo with code: https://github.com/lsurasani/ron-swanson-slack-app/
原文:https://www.freecodecamp.org/news/make-a-serverless-slack-app/,作者:Lekha Surasani