
原文: How to Add Bootstrap to an Angular Application
在这篇文章中,我们将使用最新版本的 Angular 构建一个 web 应用。然后我们将添加 Bootstrap CSS 框架,它提供了丰富的、响应式的界面组件。
让我们开始吧。
前提条件
在你开始之前,你需要安装和配置下面的工具来创建 Angular 应用程序。
- Git:Git 是一个分布式版本控制系统,我们将用它来同步仓库。
- Node.js 和 npm:Node.js 是一个基于谷歌 V8 引擎的 JavaScript 代码运行时软件。npm 是 Node.js 的一个包管理器(Node Package Manager)。我们将使用这些工具来构建和运行 Angular 应用程序并安装库。
- Angular CLI:Angular CLI 是 Angular 的一个命令行工具,我们将用它来创建 Angular 应用程序的基础结构。
- 集成开发环境(如 Visual Studio Code 或 WebStorm):集成开发环境是一种具有图形界面的工具,可以帮助你开发应用程序。我们将使用它来开发我们的 Angular 应用程序。
如何创建 Angular 应用程序
Angular 是一个开发平台,用于使用 HTML、CSS 和 TypeScript(JavaScript)构建 Web、移动和桌面应用程序。目前,Angular 的版本为 13,谷歌是该项目的主要维护者。
Bootstrap 是一个开源的 CSS 框架,它有许多组件用于构建响应式 web 界面。
让我们使用 @angular/cli 与路由文件和 SCSS 样式格式创建具有 Angular 基础结构的应用程序。
ng new angular-bootstrap
? Would you like to add Angular routing? Yes
? Which stylesheet format would you like to use? SCSS   [ https://sass-lang.com/documentation/syntax#scss                ]
CREATE angular-bootstrap/README.md (1062 bytes)
CREATE angular-bootstrap/.editorconfig (274 bytes)
CREATE angular-bootstrap/.gitignore (604 bytes)
CREATE angular-bootstrap/angular.json (3273 bytes)
CREATE angular-bootstrap/package.json (1079 bytes)
CREATE angular-bootstrap/tsconfig.json (783 bytes)
CREATE angular-bootstrap/.browserslistrc (703 bytes)
CREATE angular-bootstrap/karma.conf.js (1434 bytes)
CREATE angular-bootstrap/tsconfig.app.json (287 bytes)
CREATE angular-bootstrap/tsconfig.spec.json (333 bytes)
CREATE angular-bootstrap/src/favicon.ico (948 bytes)
CREATE angular-bootstrap/src/index.html (302 bytes)
CREATE angular-bootstrap/src/main.ts (372 bytes)
CREATE angular-bootstrap/src/polyfills.ts (2820 bytes)
CREATE angular-bootstrap/src/styles.scss (80 bytes)
CREATE angular-bootstrap/src/test.ts (743 bytes)
CREATE angular-bootstrap/src/assets/.gitkeep (0 bytes)
CREATE angular-bootstrap/src/environments/environment.prod.ts (51 bytes)
CREATE angular-bootstrap/src/environments/environment.ts (658 bytes)
CREATE angular-bootstrap/src/app/app-routing.module.ts (245 bytes)
CREATE angular-bootstrap/src/app/app.module.ts (393 bytes)
CREATE angular-bootstrap/src/app/app.component.scss (0 bytes)
CREATE angular-bootstrap/src/app/app.component.html (23809 bytes)
CREATE angular-bootstrap/src/app/app.component.spec.ts (1090 bytes)
CREATE angular-bootstrap/src/app/app.component.ts (222 bytes)
✔ Packages installed successfully.
    Successfully initialized git.
现在我们需要安装 bootstrap 和 bootstrap-icons 库,其中包含具有 Bootstrap 的样式和 JavaScript 代码的文件,像这样:
npm install bootstrap bootstrap-icons
安装后,我们将配置 bootstrap 和 bootstrap-icons 库。修改 angular.json 文件并添加 bootstrap.scss、bootstrap-icons.css 和 bootstrap.bundle.min.js 文件,如下所示:
"styles": [
  "node_modules/bootstrap/scss/bootstrap.scss",
  "node_modules/bootstrap-icons/font/bootstrap-icons.css",
  "src/styles.scss"
],
"scripts": [
  "node_modules/bootstrap/dist/js/bootstrap.bundle.min.js"
]
现在我们将安装 @ng-bootstrap/ng-bootstrap 库,其中包含原生 Angular 支持:
npm install @ng-bootstrap/ng-bootstrap@next
安装后,我们将导入 NgbModule 模块。改变 app.module.ts 文件并添加以下几行:
import { NgbModule } from '@ng-bootstrap/ng-bootstrap';

imports: [
  BrowserModule,
  NgbModule,
  AppRoutingModule,
],
现在我们将从 src/app/app.component.ts 文件中删除 AppComponent 类的内容。导入 NgbModal 服务并创建 open 方法以打开一个模态,如下所示:
import { Component } from '@angular/core';
import { NgbModal } from '@ng-bootstrap/ng-bootstrap';

@Component({
  selector: 'app-root',
  templateUrl: './app.component.html',
  styleUrls: ['./app.component.scss'],
})
export class AppComponent {

  constructor(private modalService: NgbModal) {
  }

  public open(modal: any): void {
    this.modalService.open(modal);
  }

}
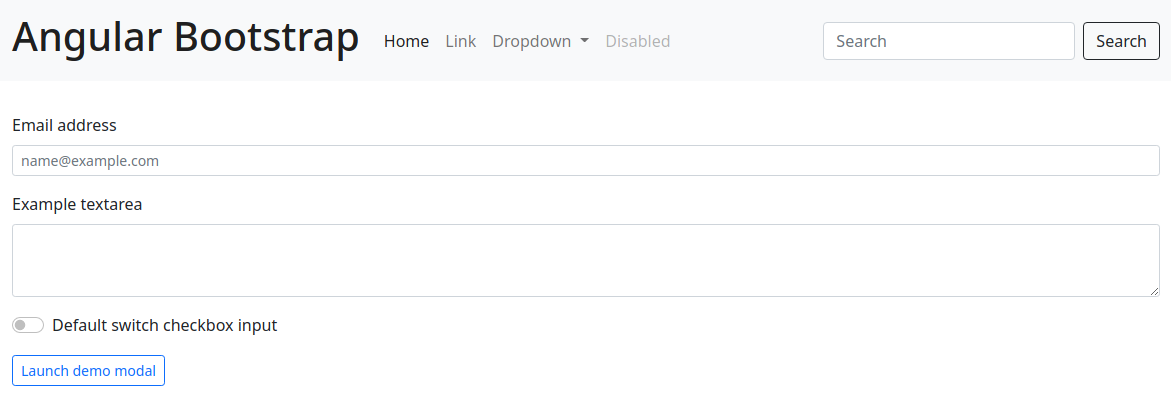
接下来我们将删除 src/app/app.component.html 文件中的内容。在 HTML 中添加一些组件,以查看和测试这些组件,如下所示:
<nav class="navbar navbar-expand-sm navbar-light bg-light">
  <div class="container-fluid">
    <a class="navbar-brand" href="#">
      <h1>Angular Bootstrap</h1>
    </a>
    <button class="navbar-toggler" type="button" data-bs-toggle="collapse" data-bs-target="#navbarSupportedContent" aria-controls="navbarSupportedContent" aria-expanded="false" aria-label="Toggle navigation">
      <span class="navbar-toggler-icon"></span>
    </button>
    <div class="collapse navbar-collapse" id="navbarSupportedContent">
      <ul class="navbar-nav me-auto mb-2 mb-lg-0">
        <li class="nav-item">
          <a class="nav-link active" aria-current="page" href="#">Home</a>
        </li>
        <li class="nav-item">
          <a class="nav-link" href="#">Link</a>
        </li>
        <li class="nav-item dropdown">
          <a class="nav-link dropdown-toggle" href="#" id="navbarDropdown" role="button" data-bs-toggle="dropdown" aria-expanded="false">
            Dropdown
          </a>
          <ul class="dropdown-menu" aria-labelledby="navbarDropdown">
            <li><a class="dropdown-item" href="#">Action</a></li>
            <li><a class="dropdown-item" href="#">Another action</a></li>
            <li><hr class="dropdown-divider"></li>
            <li><a class="dropdown-item" href="#">Something else here</a></li>
          </ul>
        </li>
        <li class="nav-item">
          <a class="nav-link disabled" href="#" tabindex="-1" aria-disabled="true">Disabled</a>
        </li>
      </ul>
      <form class="d-flex">
        <input class="form-control me-2" type="search" placeholder="Search" aria-label="Search">
        <button class="btn btn-outline-success" type="submit">Search</button>
      </form>
    </div>
  </div>
</nav>
<div class="container-fluid py-3">
  <div class="row my-3">
    <div class="col">
      <label for="exampleFormControlInput1" class="form-label">Email address</label>
      <input type="email" class="form-control form-control-sm" id="exampleFormControlInput1" placeholder="name@example.com">
    </div>
  </div>
  <div class="row my-3">
    <div class="col">
      <label for="exampleFormControlTextarea1" class="form-label">Example textarea</label>
      <textarea class="form-control form-control-sm" id="exampleFormControlTextarea1" rows="3"></textarea>
    </div>
  </div>
  <div class="row my-3">
    <div class="col">
      <div class="form-check form-switch">
        <input class="form-check-input" type="checkbox" id="flexSwitchCheckDefault">
        <label class="form-check-label" for="flexSwitchCheckDefault">Default switch checkbox input</label>
      </div>
    </div>
  </div>
  <div class="row my-3">
    <div class="col">
      <button class="btn btn-sm btn-outline-primary" (click)="open(demoModal)">Launch demo modal</button>
    </div>
  </div>
</div>

<ng-template #demoModal let-modal>
  <div class="modal-header">
    <h4 class="modal-title" id="modal-basic-title">Profile update</h4>
    <button type="button" class="btn-close" data-bs-dismiss="modal" aria-label="Close" (click)="modal.dismiss('Cross click')"></button>
  </div>
  <div class="modal-body">
    <form>
      <div class="form-group">
        <label for="dateOfBirth">Date of birth</label>
        <div class="input-group">
          <input id="dateOfBirth" name="dateOfBirth" class="form-control" placeholder="yyyy-mm-dd" ngbDatepicker #dp="ngbDatepicker">
          <button type="button" class="btn btn-outline-secondary bi bi-calendar" (click)="dp.toggle()"></button>
        </div>
      </div>
    </form>
  </div>
  <div class="modal-footer">
    <button type="button" class="btn btn-outline-dark" (click)="modal.close('Save click')">Save</button>
  </div>
</ng-template>
最后,我们将用下面的命令运行该应用程序:
npm start

> angular-bootstrap@1.0.0 start
> ng serve

✔ Browser application bundle generation complete.

Initial Chunk Files | Names         |      Size
vendor.js           | vendor        |   3.38 MB
styles.css          | styles        | 255.86 kB
polyfills.js        | polyfills     | 128.56 kB
scripts.js          | scripts       |  76.94 kB
main.js             | main          |  22.81 kB
runtime.js          | runtime       |   6.59 kB

                    | Initial Total |   3.86 MB

Build at: 2021-06-27T21:28:22.756Z - Hash: 122b9fa4d57b962e7bcc - Time: 21933ms

** Angular Live Development Server is listening on localhost:4200, open your browser on http://localhost:4200/ **


✔ Compiled successfully.
准备好了!我们将访问 http://localhost:4200/,并检查应用程序是否在工作。你可以在 GitHub Pages 和 Stackblitz 上看到该应用程序正在工作。
应用程序的仓库是 https://github.com/rodrigokamada/angular-bootstrap。
总结
让我们总结一下本文的内容:
- 我们创建了一个 Angular 应用程序。
- 我们添加了一些 Bootstrap CSS 框架组件。
你可以使用这篇文章来创建丰富的、响应式的应用程序,提供更好的用户体验和更大的可用性。
感谢阅读,希望你喜欢这篇文章!
这篇教程是在我的博客上用葡萄牙语发布的。
请在 Twitter 上关注我,以便及时阅读我更新的文章。