
By Rodrigo Kamada
In this article, we'll build a web application using the latest version of Angular. Then we'll add the Bootstrap CSS framework which provides rich and responsive interface components.
Let's get started.
Prerequisites
Before you start, you need to install and configure the tools below to create the Angular application.
- Git: Git is a distributed version control system and we'll use it to sync the repository.
- Node.js and npm: Node.js is a JavaScript code runtime software based on Google's V8 engine. npm is a package manager for Node.js (Node Package Manager). We'll use these tools to build and run the Angular application and install the libraries.
- Angular CLI: Angular CLI is a command line utility tool for Angular and we'll use it to create the base structure of the Angular application.
- An IDE (like Visual Studio Code or WebStorm): an Integrated Development Environment is a tool with a graphical interface that helps you develop applications. We'll use one to develop our Angular application.
How to Create the Angular application
Angular is a development platform for building web, mobile, and desktop applications using HTML, CSS and TypeScript (JavaScript). Currently, Angular is at version 13 and Google is the main maintainer of the project.
Bootstrap is an open source CSS framework that has many components for building responsive web interfaces.
Let's create the application with the Angular base structure using the @angular/cli with the route file and the SCSS style format.
ng new angular-bootstrap
? Would you like to add Angular routing? Yes
? Which stylesheet format would you like to use? SCSS   [ https://sass-lang.com/documentation/syntax#scss                ]
CREATE angular-bootstrap/README.md (1062 bytes)
CREATE angular-bootstrap/.editorconfig (274 bytes)
CREATE angular-bootstrap/.gitignore (604 bytes)
CREATE angular-bootstrap/angular.json (3273 bytes)
CREATE angular-bootstrap/package.json (1079 bytes)
CREATE angular-bootstrap/tsconfig.json (783 bytes)
CREATE angular-bootstrap/.browserslistrc (703 bytes)
CREATE angular-bootstrap/karma.conf.js (1434 bytes)
CREATE angular-bootstrap/tsconfig.app.json (287 bytes)
CREATE angular-bootstrap/tsconfig.spec.json (333 bytes)
CREATE angular-bootstrap/src/favicon.ico (948 bytes)
CREATE angular-bootstrap/src/index.html (302 bytes)
CREATE angular-bootstrap/src/main.ts (372 bytes)
CREATE angular-bootstrap/src/polyfills.ts (2820 bytes)
CREATE angular-bootstrap/src/styles.scss (80 bytes)
CREATE angular-bootstrap/src/test.ts (743 bytes)
CREATE angular-bootstrap/src/assets/.gitkeep (0 bytes)
CREATE angular-bootstrap/src/environments/environment.prod.ts (51 bytes)
CREATE angular-bootstrap/src/environments/environment.ts (658 bytes)
CREATE angular-bootstrap/src/app/app-routing.module.ts (245 bytes)
CREATE angular-bootstrap/src/app/app.module.ts (393 bytes)
CREATE angular-bootstrap/src/app/app.component.scss (0 bytes)
CREATE angular-bootstrap/src/app/app.component.html (23809 bytes)
CREATE angular-bootstrap/src/app/app.component.spec.ts (1090 bytes)
CREATE angular-bootstrap/src/app/app.component.ts (222 bytes)
✔ Packages installed successfully.
    Successfully initialized git.
Now we need to install the bootstrap and bootstrap-icons libraries that contain the files with Bootstrap's styles and JavaScript code like this:
npm install bootstrap bootstrap-icons
After install, we will configure the bootstrap and bootstrap-icons libraries. Change the angular.json file and add the bootstrap.scss, bootstrap-icons.css and bootstrap.bundle.min.js files as below:
"styles": [
  "node_modules/bootstrap/scss/bootstrap.scss",
  "node_modules/bootstrap-icons/font/bootstrap-icons.css",
  "src/styles.scss"
],
"scripts": [
  "node_modules/bootstrap/dist/js/bootstrap.bundle.min.js"
]
Now we will install the @ng-bootstrap/ng-bootstrap library which contains native Angular support:
npm install @ng-bootstrap/ng-bootstrap@next
After install, we will import the NgbModule module. Change the app.module.ts file and add the lines as below:
import { NgbModule } from '@ng-bootstrap/ng-bootstrap';

imports: [
  BrowserModule,
  NgbModule,
  AppRoutingModule,
],
Now we will remove the contents of the AppComponent class from the src/app/app.component.ts file. Import the NgbModal service and create the open method to open a modal as below.
import { Component } from '@angular/core';
import { NgbModal } from '@ng-bootstrap/ng-bootstrap';

@Component({
  selector: 'app-root',
  templateUrl: './app.component.html',
  styleUrls: ['./app.component.scss'],
})
export class AppComponent {

  constructor(private modalService: NgbModal) {
  }

  public open(modal: any): void {
    this.modalService.open(modal);
  }

}
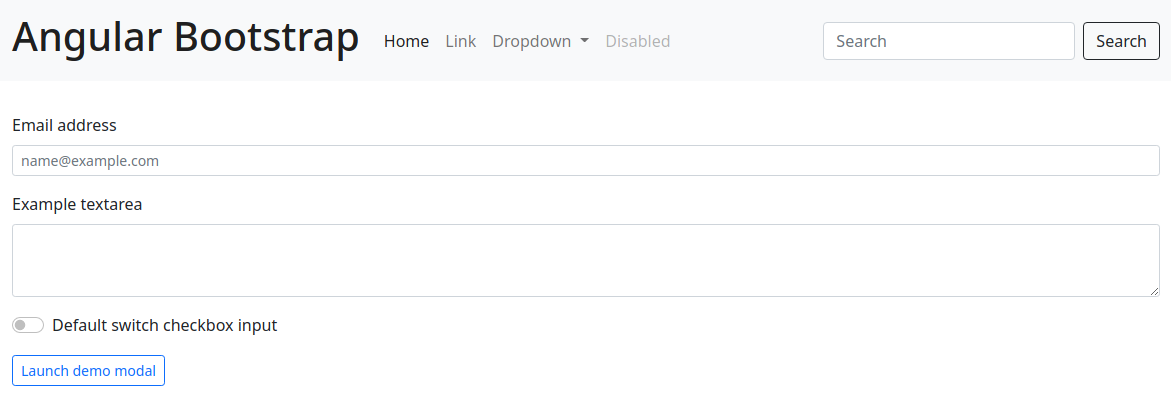
Next we will remove the contents of the src/app/app.component.html file. Add some components in the HTML to view and test the components as below.
<nav class="navbar navbar-expand-sm navbar-light bg-light">
  <div class="container-fluid">
    <a class="navbar-brand" href="#">
      <h1>Angular Bootstrap</h1>
    </a>
    <button class="navbar-toggler" type="button" data-bs-toggle="collapse" data-bs-target="#navbarSupportedContent" aria-controls="navbarSupportedContent" aria-expanded="false" aria-label="Toggle navigation">
      <span class="navbar-toggler-icon"></span>
    </button>
    <div class="collapse navbar-collapse" id="navbarSupportedContent">
      <ul class="navbar-nav me-auto mb-2 mb-lg-0">
        <li class="nav-item">
          <a class="nav-link active" aria-current="page" href="#">Home</a>
        </li>
        <li class="nav-item">
          <a class="nav-link" href="#">Link</a>
        </li>
        <li class="nav-item dropdown">
          <a class="nav-link dropdown-toggle" href="#" id="navbarDropdown" role="button" data-bs-toggle="dropdown" aria-expanded="false">
            Dropdown
          </a>
          <ul class="dropdown-menu" aria-labelledby="navbarDropdown">
            <li><a class="dropdown-item" href="#">Action</a></li>
            <li><a class="dropdown-item" href="#">Another action</a></li>
            <li><hr class="dropdown-divider"></li>
            <li><a class="dropdown-item" href="#">Something else here</a></li>
          </ul>
        </li>
        <li class="nav-item">
          <a class="nav-link disabled" href="#" tabindex="-1" aria-disabled="true">Disabled</a>
        </li>
      </ul>
      <form class="d-flex">
        <input class="form-control me-2" type="search" placeholder="Search" aria-label="Search">
        <button class="btn btn-outline-success" type="submit">Search</button>
      </form>
    </div>
  </div>
</nav>
<div class="container-fluid py-3">
  <div class="row my-3">
    <div class="col">
      <label for="exampleFormControlInput1" class="form-label">Email address</label>
      <input type="email" class="form-control form-control-sm" id="exampleFormControlInput1" placeholder="name@example.com">
    </div>
  </div>
  <div class="row my-3">
    <div class="col">
      <label for="exampleFormControlTextarea1" class="form-label">Example textarea</label>
      <textarea class="form-control form-control-sm" id="exampleFormControlTextarea1" rows="3"></textarea>
    </div>
  </div>
  <div class="row my-3">
    <div class="col">
      <div class="form-check form-switch">
        <input class="form-check-input" type="checkbox" id="flexSwitchCheckDefault">
        <label class="form-check-label" for="flexSwitchCheckDefault">Default switch checkbox input</label>
      </div>
    </div>
  </div>
  <div class="row my-3">
    <div class="col">
      <button class="btn btn-sm btn-outline-primary" (click)="open(demoModal)">Launch demo modal</button>
    </div>
  </div>
</div>

<ng-template #demoModal let-modal>
  <div class="modal-header">
    <h4 class="modal-title" id="modal-basic-title">Profile update</h4>
    <button type="button" class="btn-close" data-bs-dismiss="modal" aria-label="Close" (click)="modal.dismiss('Cross click')"></button>
  </div>
  <div class="modal-body">
    <form>
      <div class="form-group">
        <label for="dateOfBirth">Date of birth</label>
        <div class="input-group">
          <input id="dateOfBirth" name="dateOfBirth" class="form-control" placeholder="yyyy-mm-dd" ngbDatepicker #dp="ngbDatepicker">
          <button type="button" class="btn btn-outline-secondary bi bi-calendar" (click)="dp.toggle()"></button>
        </div>
      </div>
    </form>
  </div>
  <div class="modal-footer">
    <button type="button" class="btn btn-outline-dark" (click)="modal.close('Save click')">Save</button>
  </div>
</ng-template>
Finally, we will run the application with the command below:
npm start

> angular-bootstrap@1.0.0 start
> ng serve

✔ Browser application bundle generation complete.

Initial Chunk Files | Names         |      Size
vendor.js           | vendor        |   3.38 MB
styles.css          | styles        | 255.86 kB
polyfills.js        | polyfills     | 128.56 kB
scripts.js          | scripts       |  76.94 kB
main.js             | main          |  22.81 kB
runtime.js          | runtime       |   6.59 kB

                    | Initial Total |   3.86 MB

Build at: 2021-06-27T21:28:22.756Z - Hash: 122b9fa4d57b962e7bcc - Time: 21933ms

** Angular Live Development Server is listening on localhost:4200, open your browser on http://localhost:4200/ **


✔ Compiled successfully.
Ready! We will access the URL at http://localhost:4200/ and check if the application is working. You can see the application working on GitHub Pages and Stackblitz.
The application repository is available at https://github.com/rodrigokamada/angular-bootstrap.
Conclusion
Let's summarize what we covered in this article:
- We created an Angular application.
- We added some Bootstrap CSS framework components.
You can use this article to create rich and responsive applications that provide a better user experience and greater usability.
Thank you for reading and I hope you enjoyed the article!
This tutorial was posted on my blog in Portuguese.
To stay updated whenever I post new articles, follow me on Twitter.