

原文: How to Solve a Sudoku Puzzle Using Azure AI
这篇文章将带你使用 Azure 表单识别器创建一个数独解题器,Azure 表单识别器是一个由 AI 驱动的文档提取服务。
我们的程序将首先让用户上传一张数独表的图片,接下来我们将从图像中提取数据,然后基于此数据实现数独解题算法。
我们将在后端使用 .NET,在前端使用 Angular,并用 Angular material 来设计程序的 UI 风格。
下面是此软件的一个演示。
准备
- 从 https://nodejs.org/zh-cn/download/ 下载并安装最新的 LTS 版本的 Node.js
- 从 https://cli.angular.io/ 下载并安装 Angular CLI
- 一个 Azure 订阅账号,你可以在 https://azure.microsoft.com/zh-cn/free/ 创建一个免费的 Azure 账号
- 从 https://dotnet.microsoft.com/zh-cn/download/dotnet/5.0 下载并安装 .NET Core 5.0 SDK
- 从 https://visualstudio.microsoft.com/downloads/ 下载并安装最新版本的 Visual Studio 2019(译者注:已推出了更新版本的 Visual Studio 2022)
源代码
你可以在 GitHub 上获取源代码。
什么是 Azure 表单识别器认知服务
得益于 Azure 表单识别器认知服务,我们可以使用机器学习技术构建自动数据处理软件。它能从文档中提取文本、键-值对、选择标记、表格和结构。
在 REST API 或客户端库 SDK 的帮助下,我们可以轻松地调用表单识别器模型。
表单识别器认知服务提供了以下功能:
- 预构建模型:我们可以使用预先建立的模型,从独特的文件类型中提取数据,比如发票、收据、身份证和名片。
- 自定义模型:我们可以使用自定义模型从表单中提取文本、键-值对、选择标记和表格数据。但我们需要使用自己的数据来训练自定义模型,使其适合我们的自定义需求。
- 布局 API:它允许我们从文件中提取文本、选择标记和表格结构。
在这篇文章中,我们将使用布局 API 从用户上传的数独表图片中提取内容。
如何创建 Azure 表单识别器认知服务资源
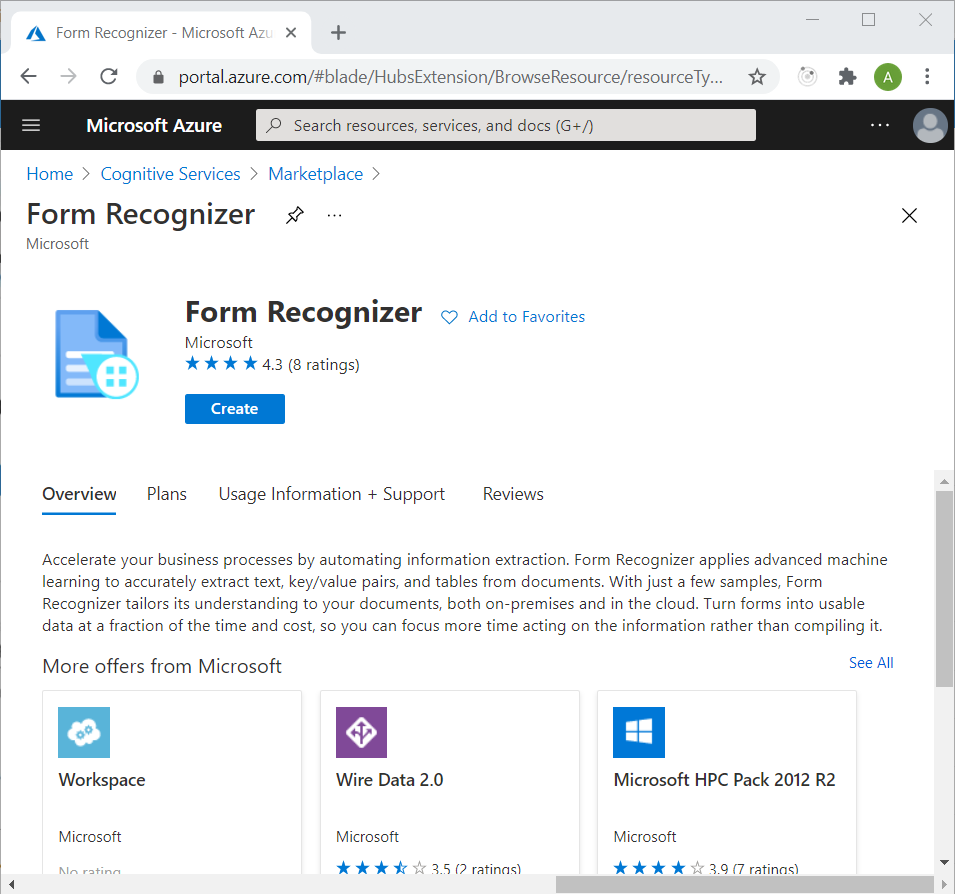
登录 Azure 门户,在搜索栏中搜索“认知服务”并点击结果。在下一个屏幕上,点击“创建”按钮。这将打开认知服务市场的页面。在搜索栏中搜索“表单识别器”,并点击搜索结果中的“表单识别器”选项。
这将打开表单识别器 API 页面。点击“创建”按钮来新建一个表单识别器资源。如下图所示。
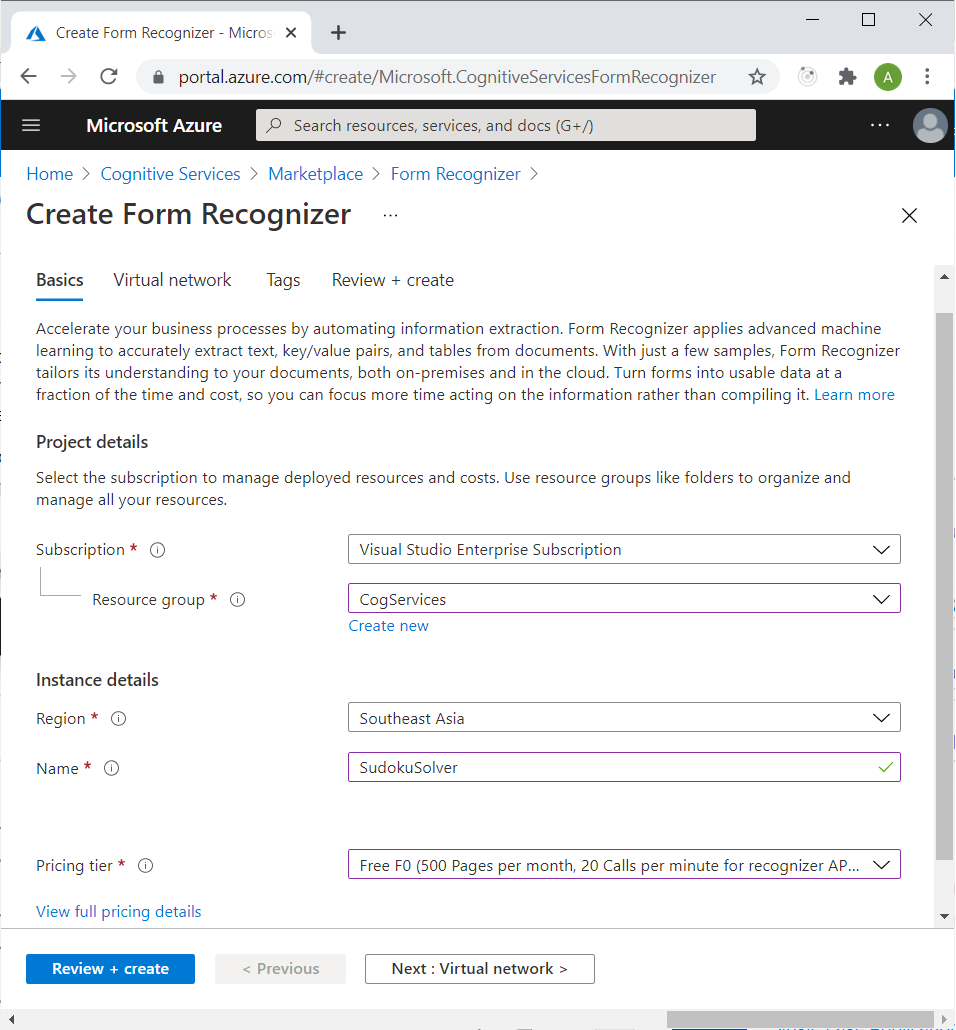
在创建表格识别器的页面中,按照下面的指引填写详细信息。
- 订阅 / Subscription:从下拉菜单中选择订阅类型。
- 资源组 / Resource group:选择一个现有的资源组或新建一个资源组。
- 地区 / Region:选择你所在的地区。
- 名称 / Name:为你的资源起一个独特的名字。
- 定价 / Pricing tier:选择你想要的定价级别。
点击“检查并创建”按钮。如下图所示。
在下一个页面,勾选确认使用条款,检查核对你所提供的信息,然后点击“创建”按钮。
在你的资源被成功部署后,点击“转到资源”按钮。点击左边菜单上的“密钥和端点”链接。如下图所示。
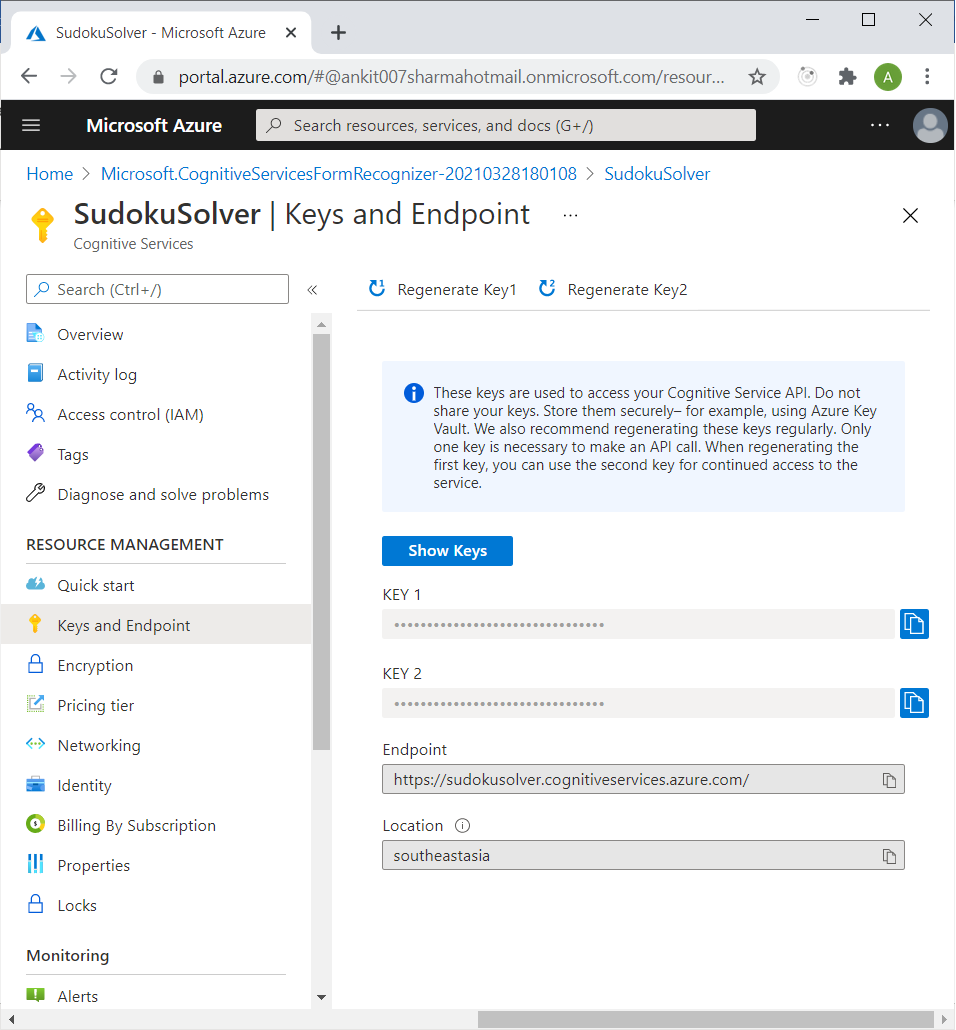
记下端点和页面上提供的任意一个密钥。我们将在本文的后半部分使用这些来从 .NET 代码中调用表单识别器服务的布局 API。
如何创建 ASP.NET Core 程序
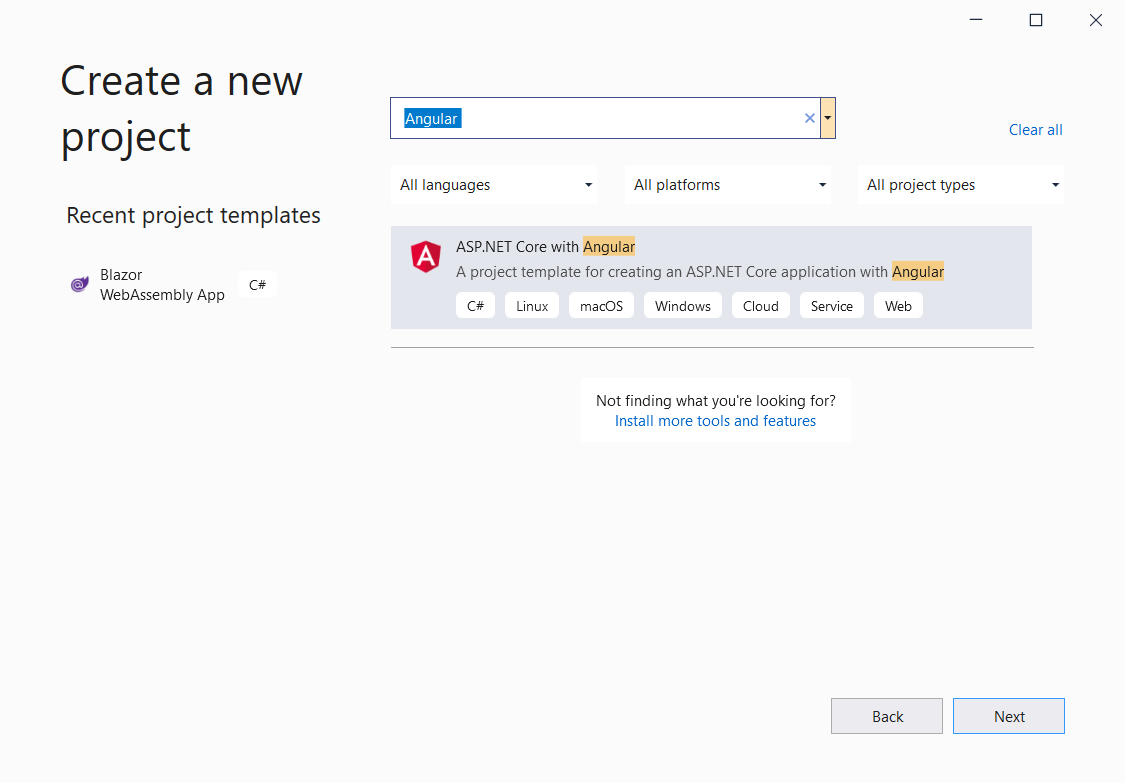
打开 Visual Studio 2019(或更新版本),点击“创建一个新项目”,这将打开一个“创建新项目”对话框。选择“ASP.NET Core with Angular”并点击“下一步”。如下图所示。
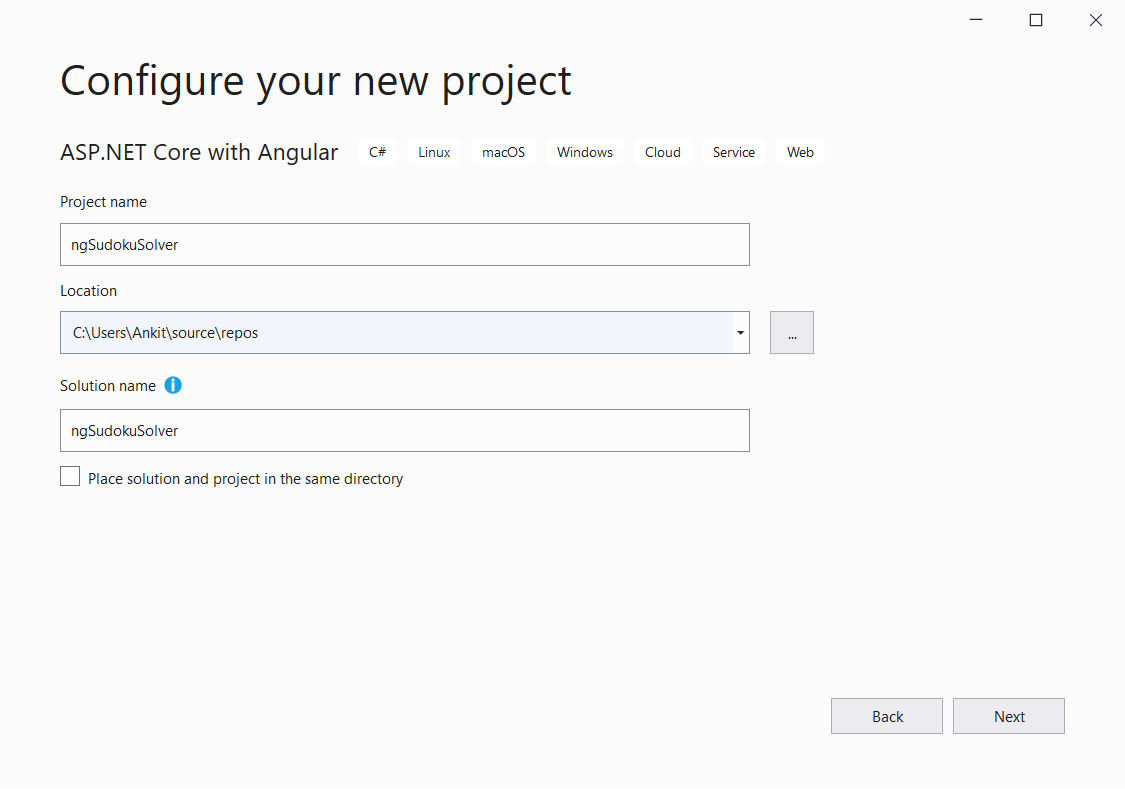
现在你将进入“配置新项目”界面。为该应用程序设置一个名称,比如 ngSudokuSolver,并点击“下一步”。如下图所示。
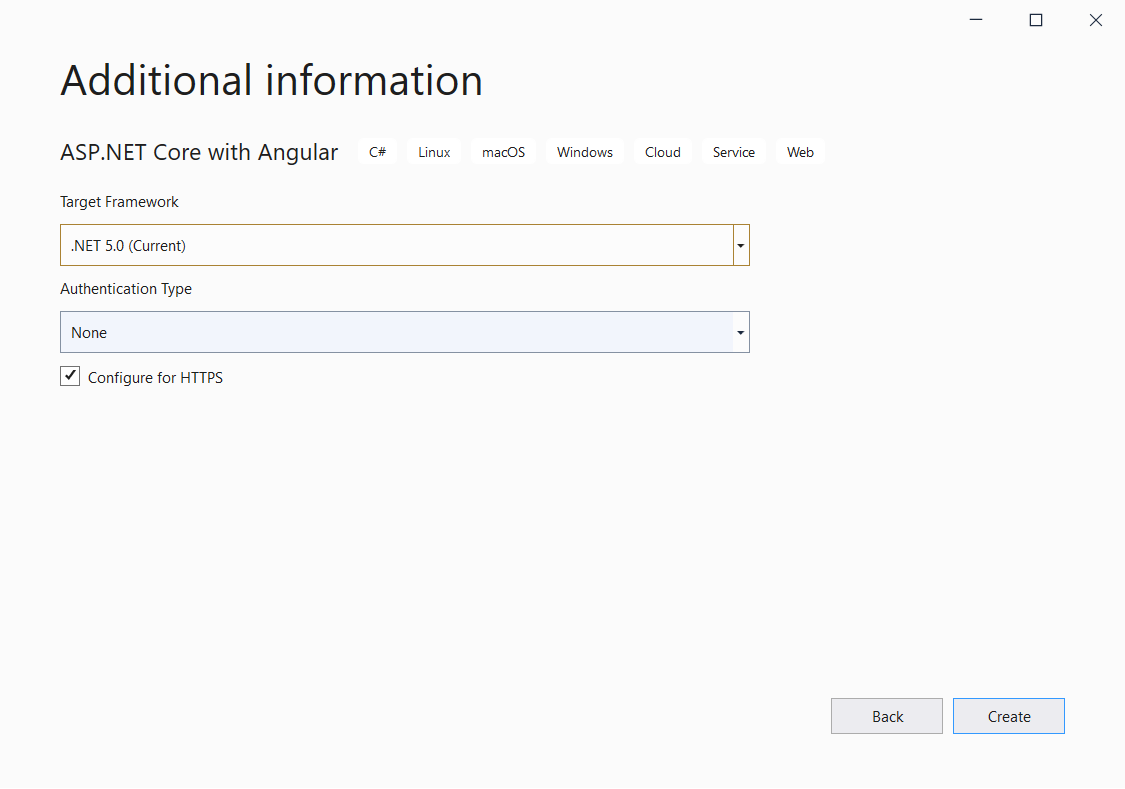
在附加信息页面,选择目标框架为 .NET 5.0,并将认证类型设置为“无”,如下图所示。
现在,我们创建了一个工程。这个程序的文件夹结构应与下图类似:
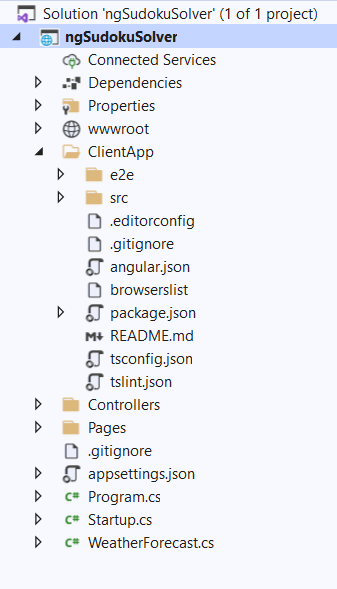
ClientApp 文件夹中包含我们程序的 Angular 代码。Controllers 文件夹将包含 API 控制器。Angular 组件则位于 ClientApp/src/app 文件夹中。
默认模板包含了一些 Angular 组件。这些组件不会影响我们的应用程序,但为了简单起见,我们将从 ClientApp/src/app 文件夹中删除 fetchdata 和 counter 文件夹。同时,从 app.module.ts 文件中删除对这两个组件的引用。
如何安装所需的 NuGet 包
要安装 NuGet 包,请打开 工具 >> NuGet 包管理器 >> 包管理器控制台。这将在 Visual Studio 内打开包管理器控制台。
运行以下命令来安装 Polly。这个库能让你以流畅和线程安全的方式表达弹性和瞬时故障处理策略,如重试、断路、超时、隔板隔离和回退。
Install-Package Polly -Version 7.2.1
运行以下命令来安装 Newtonsoft.Json。
Install-Package Newtonsoft.Json -Version 13.0.1
如何创建 RetryMessage Handler
右键单击 ngSudokuSolver 项目,选择 添加 >> 新文件夹。将该文件夹命名为 Models。
接下来,右键单击 Models 文件夹并选择 添加 >> 类 来添加一个新的类文件。把这个类的名字定为 HttpRetryMessageHandler.cs,然后点击“添加”。
将下面的代码放入这个类里面。
using Newtonsoft.Json;
using Polly;
using System;
using System.Net.Http;
using System.Threading;
using System.Threading.Tasks;

namespace ngSudokuSolver.Models
{
    public class HttpRetryMessageHandler : DelegatingHandler
    {
        public HttpRetryMessageHandler(HttpClientHandler handler) : base(handler) { }

        protected override Task<HttpResponseMessage> SendAsync(
            HttpRequestMessage request,
            CancellationToken cancellationToken) =>
            Policy
                .Handle<HttpRequestException>()
                .Or<TaskCanceledException>()
                .OrResult<HttpResponseMessage>(x =>
                {
                    string result = x.Content.ReadAsStringAsync().GetAwaiter().GetResult();
                    dynamic array = JsonConvert.DeserializeObject(result);

                    if (array["status"] == "running")
                    {
                        return true;
                    }
                    else
                    {
                        return false;
                    }
                })
                .WaitAndRetryAsync(7, retryAttempt => TimeSpan.FromSeconds(Math.Pow(2, retryAttempt)))
                .ExecuteAsync(() => base.SendAsync(request, cancellationToken));
    }
}
我们将使用 RetryMessageHandler 来重试对 sendAsync 的调用。如果 HttpResponseMessage 的状态是“运行中”,我们将重试 HTTP 调用。
我们把最大重试次数设置为 7 次。每次重试时,都会增加等待时间,将其翻倍。如果所有重试次数已经用完,而 HttpResponseMessage 还没有成功,我们将返回 false。
如何加入 FormRecognizer 控制器
我们现在在程序里加入一个新的控制器。
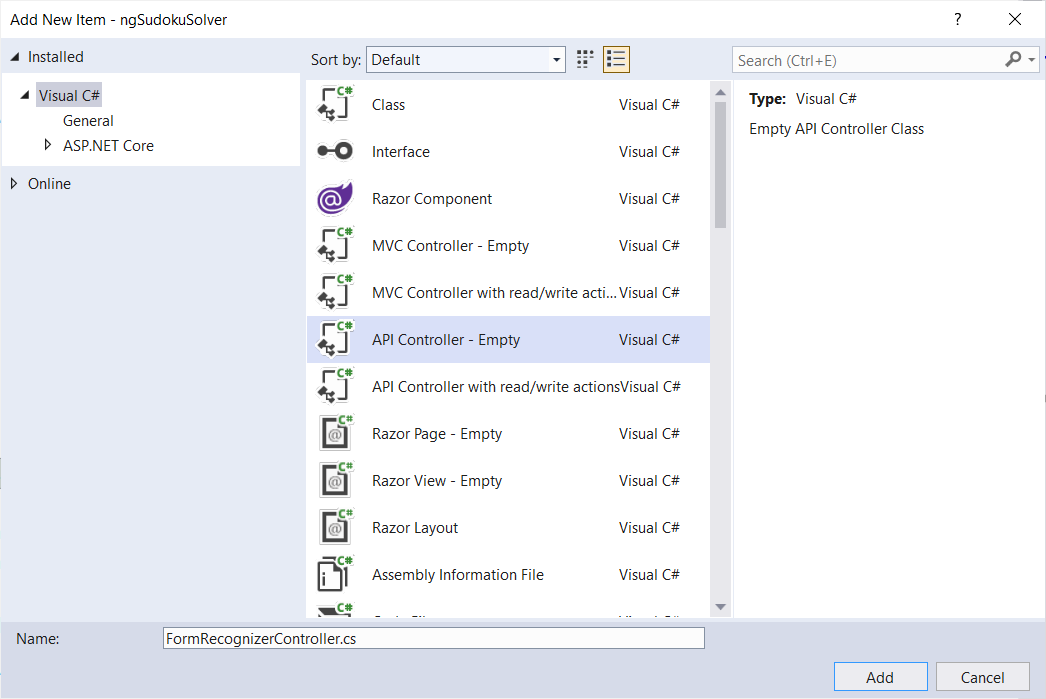
右键单击 Controllers 文件夹,选择 添加 >> 新项目。这将打开一个“添加新项目”的对话框。
从左侧栏选择 “Visual C#”,然后在模版栏中选择 “API Controller-Empty”,并将其命名为 FormRecognizerController.cs,点击“添加”。如下图所示。
将以下代码放入该类。
using Microsoft.AspNetCore.Mvc;
using Newtonsoft.Json;
using Newtonsoft.Json.Linq;
using ngSudokuSolver.Models;
using System;
using System.Collections.Generic;
using System.IO;
using System.Linq;
using System.Net.Http;
using System.Net.Http.Headers;
using System.Threading.Tasks;

namespace ngSudokuSolver.Controllers
{
    [Produces("application/json")]
    [Route("api/[controller]")]
    public class FormRecognizerController : ControllerBase
    {
        static string endpoint;
        static string apiKey;

        public FormRecognizerController()
        {
            endpoint = "https://sudokusolver.cognitiveservices.azure.com/";
            apiKey = "a9f75796b3ba49bdade48eb3b905cb0e";
        }

        [HttpPost, DisableRequestSizeLimit]
        public async Task<string[][]> Post()
        {
            try
            {
                string[][] sudokuArray = GetNewSudokuArray();

                if (Request.Form.Files.Count > 0)
                {
                    var file = Request.Form.Files[Request.Form.Files.Count - 1];

                    if (file.Length > 0)
                    {
                        var memoryStream = new MemoryStream();
                        file.CopyTo(memoryStream);
                        byte[] imageFileBytes = memoryStream.ToArray();
                        memoryStream.Flush();

                        string SudokuLayoutJSON = await GetSudokuBoardLayout(imageFileBytes);
                        if (SudokuLayoutJSON.Length > 0)
                        {
                            sudokuArray = GetSudokuBoardItems(SudokuLayoutJSON);
                        }
                    }
                }

                return sudokuArray;
            }
            catch
            {
                throw;
            }
        }

        static async Task<string> GetSudokuBoardLayout(byte[] byteData)
        {
            HttpClient client = new();
            client.DefaultRequestHeaders.Add("Ocp-Apim-Subscription-Key", apiKey);
            string uri = endpoint + "formrecognizer/v2.1-preview.3/layout/analyze";
            string LayoutJSON = string.Empty;

            using (ByteArrayContent content = new(byteData))
            {
                HttpResponseMessage response;
                content.Headers.ContentType = new MediaTypeHeaderValue("image/png");
                response = await client.PostAsync(uri, content);

                if (response.IsSuccessStatusCode)
                {
                    HttpHeaders headers = response.Headers;

                    if (headers.TryGetValues("Operation-Location", out IEnumerable<string> values))
                    {
                        string OperationLocation = values.First();
                        LayoutJSON = await GetJSON(OperationLocation);
                    }
                }
            }
            return LayoutJSON;
        }

        static async Task<string> GetJSON(string endpoint)
        {
            using var client = new HttpClient(new HttpRetryMessageHandler(new HttpClientHandler()));
            var request = new HttpRequestMessage();
            request.Method = HttpMethod.Get;
            request.RequestUri = new Uri(endpoint);

            client.DefaultRequestHeaders.Add("Ocp-Apim-Subscription-Key", apiKey);

            var response = await client.SendAsync(request);
            var result = response.Content.ReadAsStringAsync().GetAwaiter().GetResult();

            return result;
        }

        static string[][] GetSudokuBoardItems(string LayoutData)
        {
            string[][] sudokuArray = GetNewSudokuArray();
            dynamic array = JsonConvert.DeserializeObject(LayoutData);
            int countOfCells = ((JArray)array?.analyzeResult?.pageResults[0]?.tables[0]?.cells).Count;

            for (int i = 0; i < countOfCells; i++)
            {
                int rowIndex = array.analyzeResult.pageResults[0].tables[0].cells[i].rowIndex;
                int columnIndex = array.analyzeResult.pageResults[0].tables[0].cells[i].columnIndex;

                sudokuArray[rowIndex][columnIndex] = array.analyzeResult.pageResults[0].tables[0].cells[i]?.text;
            }
            return sudokuArray;
        }

        static string[][] GetNewSudokuArray()
        {
            string[][] sudokuArray = new string[9][];

            for (int i = 0; i < 9; i++)
            {
                sudokuArray[i] = new string[9];
            }

            return sudokuArray;
        }
    }
}
在 FormRecognizerController 类的构造函数中,我们初始化了表单识别器 API 的密钥和端点 URL。
上面的 Post 方法将接收请求体中作为文件集合的图像数据,并返回一个二维数组。我们将把图像数据转换为字节数组并调用 GetSudokuBoardLayout 方法。如果我们得到一个成功的响应并且 JSON 结果非空,我们将调用 GetSudokuBoardItems 方法。
在 GetSudokuBoardLayout 方法中,我们将实例化一个新的 HttpClient。我们会在请求头中传递订阅密钥。
当我们调用表单识别器 API 时,Azure 服务将返回状态码 202。这表明该服务已经接受了请求,并将在稍后开始处理。
响应包括一个“Operation-Location”首部。“Operation-Location”字段里的数据就我们将用来获取表单识别结果的 URL,这个 URL 会在 48 小时后过期。
在获取表单识别结果前需要等待一段时间,等待时间的长短与文本的长度相关。
这里就要用到了我们前面配置的 RetryMessageHandler。我们将从“Operation-Location”首部获取 URL,并调用 GetJSON 方法来获取 JSON 结果。
在 GetJSON 方法中,我们创建了一个 HttpClient,并用自定义的 HttpRetryMessageHandler 来初始化它。这个方法将以字符串的形式返回 JSON 响应。
GetSudokuBoardItems 方法接受 JSON 字符串。然后它将遍历 JSON 字符串中的 table 属性,以准备二维的 sudokuArray。
现在,让我们开始实现程序的客户端部分
客户端的代码位于 ClientApp 文件夹中。我们将使用 Angular CLI 来处理客户端的代码。
Angular CLI 并非你的唯一选择。本文中使用 Angular CLI 是因为它对用户友好且直接。如果你不想使用 CLI,你可以手动创建组件和服务的文件。
进入 ngSudokuSolver/ClientApp 文件夹并在此打开一个命令窗口。我们将在这个窗口中执行我们所有的 Angular CLI 命令。
如何安装 Angular Material
运行以下命令以将 Angular Material 添加到项目中。
ng add @angular/material
该命令将为你的项目安装 Angular Material,它会询问以下问题,以确定要包括哪些功能:
- Choose a prebuilt theme name, or "custom" for a custom theme: 请选择 Indigo/Pink 主题
- Set up global Angular Material typography styles? (Y/n): Y
- Set up browser animations for Angular Material? (Y/n): Y
如下图所示:

如何为 Angular Material 添加模块
运行以下命令来创建一个新的模块。
ng g m ng-material
将下面的代码放入 src\app\ng-material\ng-material.module.ts 文件中。
import { NgModule } from '@angular/core';
import { CommonModule } from '@angular/common';
import { MatButtonModule } from '@angular/material/button';
import { MatCardModule } from '@angular/material/card';
import { MatInputModule } from '@angular/material/input';
import { MatToolbarModule } from '@angular/material/toolbar';
import { MatDividerModule } from '@angular/material/divider';
import { MatIconModule } from '@angular/material/icon';

const materialModules = [
  MatButtonModule,
  MatCardModule,
  MatInputModule,
  MatToolbarModule,
  MatDividerModule,
  MatIconModule,
];

@NgModule({
  declarations: [],
  imports: [CommonModule, ...materialModules],
  exports: [...materialModules],
})
export class NgMaterialModule {}
我们正在导入我们将在这个应用程序中使用的 Angular material 组件的所有必要模块。独立的 Angular material 模块将使该应用易于维护。
在 app.module.ts 文件中导入 NgMaterialModule,如下所示:
import { NgMaterialModule } from './ng-material/ng-material.module';

@NgModule({
	...
	imports: [
		...
		NgMaterialModule,
	],
})
如何配置程序的导航栏
打开 nav-menu.component.html,在里面放入以下代码。
<mat-toolbar color="primary" class="mat-elevation-z2">
  <mat-toolbar-row>
    <div>
      <button mat-button [routerLink]='["/"]'>
        <mat-icon>book</mat-icon> Sudoku Solver
      </button>
    </div>
  </mat-toolbar-row>
</mat-toolbar>
现在,我们成功地在程序中加入了 Angular material 工具栏,和一个链接到程序根路由的按钮。
如何创建表单识别器服务
我们将创建一个 Angular 服务,它将调用 Web API 端点并将响应传递给我们的组件。请运行下面的命令。
ng g s services\form-recognizer
这个命令将创建一个名为 services 的文件夹,然后在里面创建以下两个文件:
- form-recognizer.service.ts - 服务类文件
- form-recognizer.service.spec.ts - 服务的单元测试文件
将下面的代码放入 form-recognizer.service.ts 文件中。
import { Injectable } from '@angular/core';
import { HttpClient } from '@angular/common/http';

@Injectable({
  providedIn: 'root',
})
export class FormRecognizerService {
  baseURL: string;

  constructor(private http: HttpClient) {
    this.baseURL = '/api/FormRecognizer';
  }

  getSudokuTableFromImage(image: FormData) {
    return this.http.post(this.baseURL, image);
  }
}
我们定义了一个存有 API 的端点 URL 的变量 baseURL。我们会在构造器中初始化 baseURL,并将其赋值为 FormRecognizerController 的端点。
getSudokuTableFromImage 方法将向 FormRecognizerController 发送一个 Post 请求并提供 FormData 类型的参数。它将获取一个表示数独表的二维数组。
如何更新主页组件
把下面的代码放入 home.component.html 中。
<div class="container">
  <h1 class="display-4"> 用 Azure AI 解决数独问题 </h1>
  <mat-divider></mat-divider>
  <div class="row mt-3">
    <div class="col-md-6">
      <mat-card class="mat-elevation-z4">
        <mat-card-content>
          <table>
            <tr *ngFor="let row of gameBoard">
              <td *ngFor="let col of gameBoard">
                {{game[row][col]}}
              </td>
            </tr>
          </table>
        </mat-card-content>
        <mat-card-actions>
          <button type="button" mat-raised-button color="primary" (click)="SolveSudoku()"> 解数独 </button>
        </mat-card-actions>
      </mat-card>
    </div>
    <div class="col-md-6">
      <div class="image-container">
        <img class="preview-image" src={{imagePreview}}>
      </div>
      <input type="file" (change)="uploadImage($event)" />
      <hr />
      <button mat-raised-button color="accent" (click)="GetSudokuTable()">
        <span *ngIf="loading" class="spinner-border spinner-border-sm mr-1"></span> 提取数独表
      </button>
    </div>
  </div>
</div>
我们创建了一个 9x9 的数独表格。我们定义了一个支持上传图片的文件上传控件。上传图片后,<img> 元素中将显示图片的预览。
点击“提取数独表”按钮将从图像中获取数独的内容,并将这些数字填入表格中。点击“解数独”将解决数独,并将结果更新到表格中。
把以下代码放入 home.component.ts 中。
import { Component, OnDestroy, OnInit } from '@angular/core';
import { Subject } from 'rxjs';
import { FormRecognizerService } from '../services/form-recognizer.service';
import { takeUntil } from 'rxjs/operators';

@Component({
  selector: 'app-home',
  templateUrl: './home.component.html',
  styleUrls: ['./home.component.scss'],
})
export class HomeComponent implements OnDestroy {
  gameBoard = [0, 1, 2, 3, 4, 5, 6, 7, 8];
  loading = false;
  imageFile;
  imagePreview;
  maxFileSize: number;
  isValidFile = true;
  status: string;
  DefaultStatus: string;
  imageData = new FormData();
  game = new Array(9);
  private unsubscribe$ = new Subject();

  constructor(private formRecognizerService: FormRecognizerService) {
    this.DefaultStatus = '允许上传的最大图像大小为 4 MB';
    this.status = this.DefaultStatus;
    this.maxFileSize = 4 * 1024 * 1024; // 4MB

    for (var i = 0; i < this.game.length; i++) {
      this.game[i] = new Array(9);
    }
  }

  uploadImage(event) {
    this.imageFile = event.target.files[0];
    if (this.imageFile.size > this.maxFileSize) {
      this.status = `文件大小为 ${this.imageFile.size} 比特,超出所允许的大小上限 ${this.maxFileSize} 比特。`;
      this.isValidFile = false;
    } else if (this.imageFile.type.indexOf('image') == -1) {
      this.status = '请上传有效的图片文件';
      this.isValidFile = false;
    } else {
      const reader = new FileReader();
      reader.readAsDataURL(event.target.files[0]);
      reader.onload = () => {
        this.imagePreview = reader.result;
      };
      this.status = this.DefaultStatus;
      this.isValidFile = true;
    }
  }

  GetSudokuTable() {
    if (this.isValidFile) {
      this.loading = true;
      this.imageData.append('imageFile', this.imageFile);

      this.formRecognizerService
        .getSudokuTableFromImage(this.imageData)
        .pipe(takeUntil(this.unsubscribe$))
        .subscribe(
          (result: any) => {
            this.game = result;
            this.loading = false;
          },
          () => {
            console.error();
            this.loading = false;
          }
        );
    }
  }

  SolveSudoku() {
    this.sudokuSolver(this.game);
  }

  ngOnDestroy() {
    this.unsubscribe$.next();
    this.unsubscribe$.complete();
  }

  private sudokuSolver(data) {
    for (let i = 0; i < 9; i++) {
      for (let j = 0; j < 9; j++) {
        if (data[i][j] == '') {
          for (let k = 1; k <= 9; k++) {
            if (this.isSudokuValid(data, i, j, k)) {
              data[i][j] = `${k}`;
              if (this.sudokuSolver(data)) {
                return true;
              } else {
                data[i][j] = '';
              }
            }
          }
          return false;
        }
      }
    }
    return true;
  }

  private isSudokuValid(board, row, col, k) {
    for (let i = 0; i < 9; i++) {
      const m = 3 * Math.floor(row / 3) + Math.floor(i / 3);
      const n = 3 * Math.floor(col / 3) + (i % 3);
      if (board[row][i] == k || board[i][col] == k || board[m][n] == k) {
        return false;
      }
    }
    return true;
  }
}
我们在 HomeComponent 的构造器中注入 formRecognizerService,并设置提示信息和允许的图像的最大尺寸。我们还将初始化一个二维数组来保存数独的值。
上传图片时将调用 uploadImage 方法。我们将检查上传的文件是否是一个有效的图像,并且在允许的大小限制之内。我们将使用一个 FileReader 对象来处理图像数据。readAsDataURL 方法将读取上传文件的内容。
当读取操作成功完成后,reader.onload 事件将会被触发。imagePreview 的值将被设置为 fileReader 对象的 ArrayBuffer 类型的返回值。
在 GetSudokuTable 方法中,我们将把图像文件附加到一个 FormData 类型的变量中。我们将调用服务的 getSudokuTableFromImage,并将结果绑定到游戏数组中。
sudokuSolver 方法将接受数独表作为入参。然后我们使用回溯算法来解出这道数独。
运行演示程序
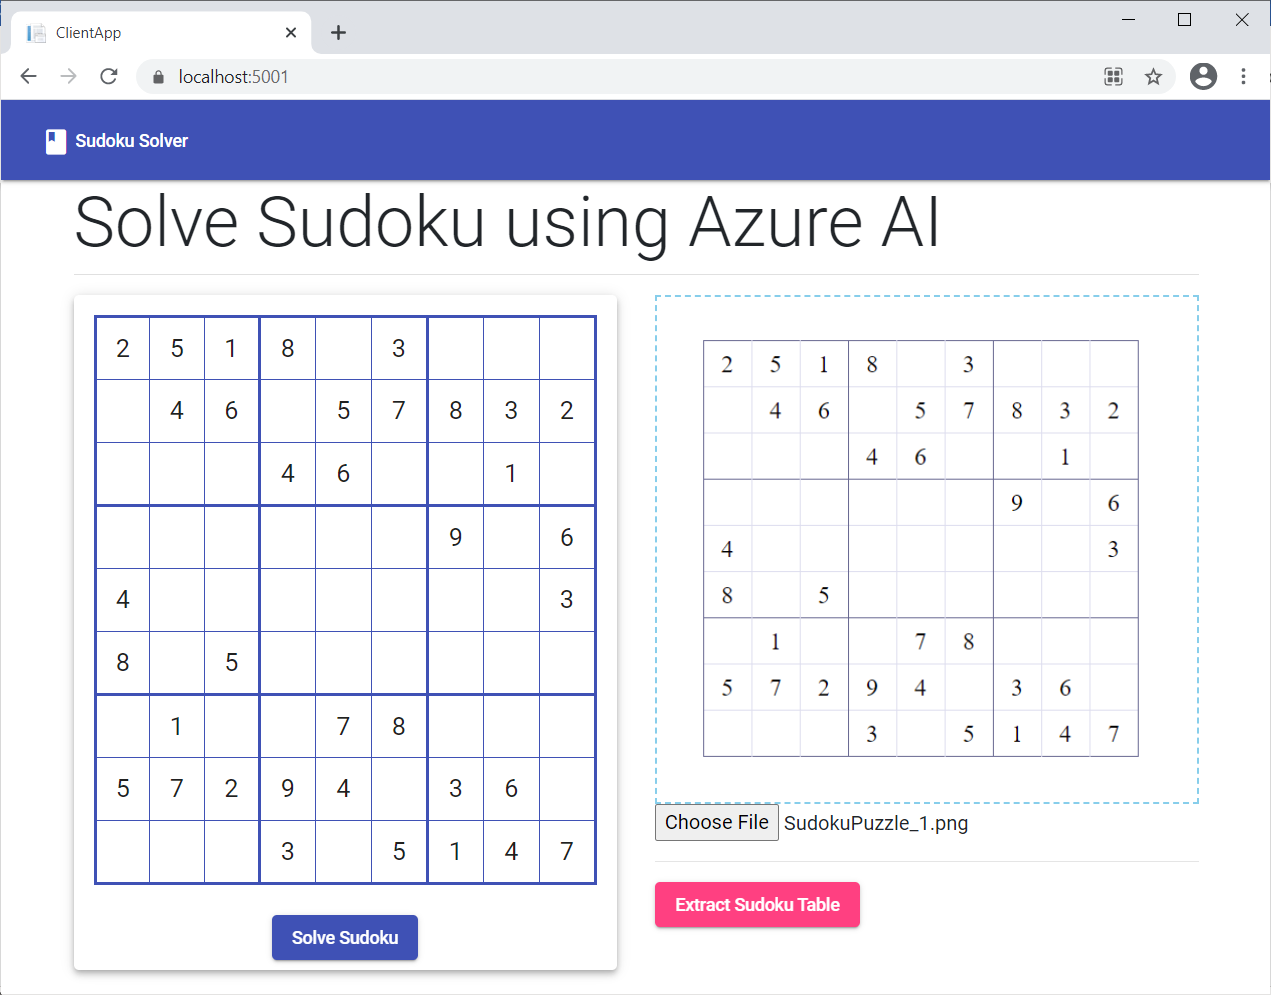
按 F5 键来启动该程序。上传一张数独表的图片。点击“提取数独表”按钮,你会看到左边的表格中出现了从图像中提取出来的内容。如下图所示。
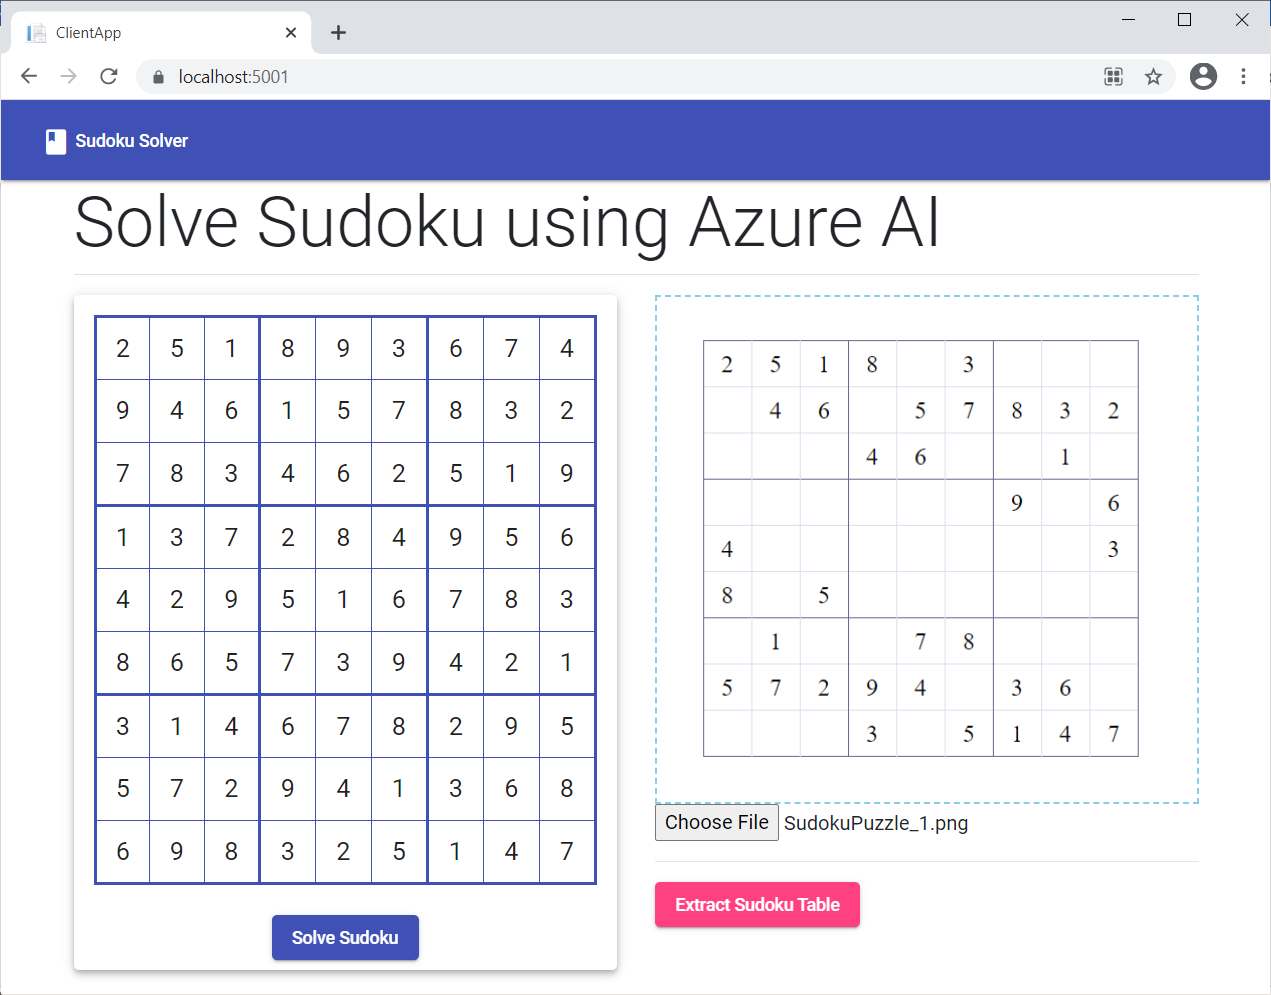
点击“解数独”按钮。你可以在界面上看到数独的答案。如下图所示。
总结
我们用 Angular 和 Azure 表单识别器服务创建了一个数独解题器。这个程序可以从用户上传的数独表的图片中提取数据。我们接着用回溯法解决数独问题。另外,我们使用了 Angular material 来设计程序的 UI 风格。
你可以从 GitHub 上获取源代码,随便看看或把玩一下以加深你的理解。
拓展阅读
- Optical Character Reader Using Angular And Azure Computer Vision(使用 Angular 和 Azure 计算机视觉的光学字符阅读器)
- Multi-Language Translator Using Blazor And Azure Cognitive Services(使用 Blazor 和 Azure 认知服务的多语言翻译器)
- Facebook Authentication And Authorization In Server-Side Blazor App(在服务器端 Blazor 应用中进行 Facebook 认证和授权)
- Continuous Deployment For Angular App Using Heroku And GitHub(使用 Heroku 和 GitHub 为 Angular 应用程序进行持续部署)
- Going Serverless With Blazor(利用 Blazor 实现无服务器化)