

创建具有验证功能的表单可能很困难,而且可能遇到问题。在这篇文章中,我将向你展示如何以简单直接的方式进行操作。
我们将学习如何使用 React 和 React Hook Form 在表单中添加验证。
如何在 React 中创建表单
我们将首先使用语义 UI 库创建一个表单。 因此,让我们使用以下命令之一安装它:
yarn add semantic-ui-react semantic-ui-css
## Or NPM
npm install semantic-ui-react semantic-ui-css
安装后,你需要将包导入到 index.js 文件中,该文件是应用程序的主入口文件。
import 'semantic-ui-css/semantic.min.css'然后我们需要一个有四个字段的表单。因此,让我们使用以下代码创建它:
import React from 'react';
import { Form, Button } from 'semantic-ui-react';

export default function FormValidation() {
    return (
        <div>
            <Form>
                <Form.Field>
                    <label>First Name</label>
                    <input placeholder='First Name' type="text" />
                </Form.Field>
                <Form.Field>
                    <label>Last Name</label>
                    <input placeholder='Last Name' type="text" />
                </Form.Field>
                <Form.Field>
                    <label>Email</label>
                    <input placeholder='Email' type="email" />
                </Form.Field>
                <Form.Field>
                    <label>Password</label>
                    <input placeholder='Password' type="password" />
                </Form.Field>
                <Button type='submit'>Submit</Button>
            </Form>
        </div>
    )
}
我们现在有一个表格。它有四个字段,分别是 First Name、Last Name、Email 和 Password。 还有一个 Submit 按钮,用户可以提交表单。

如何安装 React Hook Form
使用以下命令安装 React Hook Form:
npm install react-hook-form如果你想了解有关该库的更多信息,可以阅读文档。我们可以将它用于 React Web 和 React Native 应用程序。
我们需要在这里做的第一件事是从输入字段中获取数据,并将它们显示到控制台中。我们需要先导入包:
import { useForm } from "react-hook-form";然后,我们需要在应用程序中解构 useForm 对象,如下所示:
const { register, handleSubmit, formState: { errors } } = useForm();现在,我们将使用对象 useForm 中的 register 属性来注册表单字段。它会是这样的:
<Form.Field>
                    <label>First Name</label>
                    <input
                        placeholder='First Name'
                        type="text"
                        {...register("firstName")}
                    />
                </Form.Field>
现在 First Name 表单字段具有 firstName 键。如你所见,我们已经在 register 中声明了它。对所有其他字段重复此操作。
import React from 'react';
import { Form, Button } from 'semantic-ui-react';
import { useForm } from "react-hook-form";

export default function FormValidation() {
    const { register, handleSubmit, formState: { errors } } = useForm();
    return (
        <div>
            <Form>
                <Form.Field>
                    <label>First Name</label>
                    <input
                        placeholder='First Name'
                        type="text"
                        {...register("firstName")}
                    />
                </Form.Field>
                <Form.Field>
                    <label>Last Name</label>
                    <input
                        placeholder='Last Name'
                        type="text"
                        {...register("lastName")}
                    />
                </Form.Field>
                <Form.Field>
                    <label>Email</label>
                    <input
                        placeholder='Email'
                        type="email"
                        {...register("email")}
                    />
                </Form.Field>
                <Form.Field>
                    <label>Password</label>
                    <input
                        placeholder='Password'
                        type="password"
                        {...register("password")}
                    />
                </Form.Field>
                <Button type='submit'>Submit</Button>
            </Form>
        </div>
    )
}
这是到目前为止的全部代码。四个字段,并且都注册了。
现在,在表单上,我们需要创建一个 onSubmit 事件。这意味着如果我们点击底部的 Submit 按钮,我们的表单数据应该被提交。
<Form onSubmit={handleSubmit(onSubmit)}>我们还需要创建一个 onSubmit 函数,它会在点击或按下 Submit 按钮时执行一些特定的操作。
const { register, handleSubmit, formState: { errors } } = useForm();
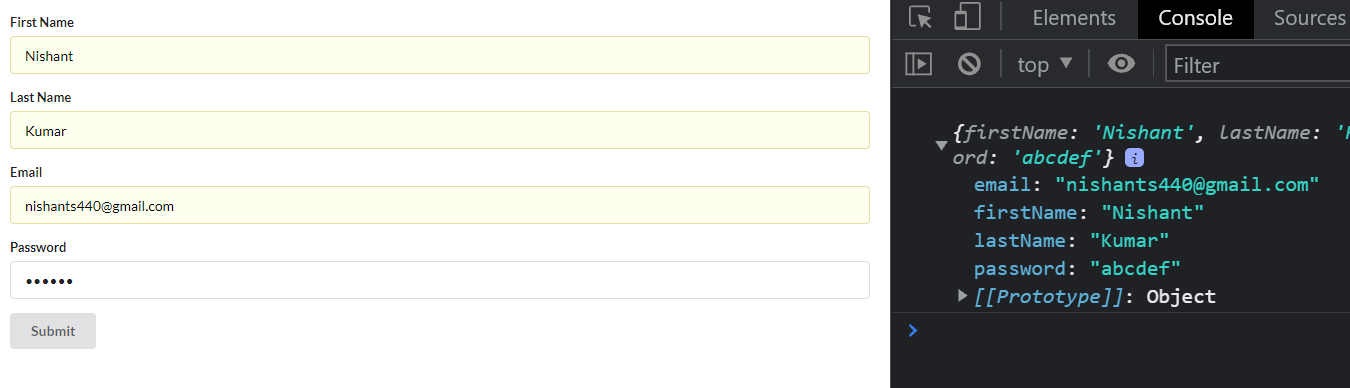
const onSubmit = (data) => {
console.log(data);
}因此,如果我们单击提交按钮,我们输入的数据将显示在控制台中。
如何向表单添加验证
现在,这是最后也是最值得期待的一步。让我们添加验证。
让我们从 First Name 字段开始。我们将使用 required 和 maxLength 属性,它们是不言自明的。
- Required 意味着该字段是必填的。
- MaxLength 表示我们输入的字符的最大长度。
<input
  placeholder='First Name'
  type="text"
  {...register("firstName", { required: true, maxLength: 10 })}
/>
所以,设置 required 为 true,maxLength 为 10。如果我们提交表单时没有输入 First Name,或者如果字符数超过 10,就会抛出错误。
但是我们也需要添加错误消息本身。在 First Name 字段后添加以下错误消息。
{errors.firstName && <p>Please check the First Name</p>}在这里,它会抛出一个错误。让我们来看看发生了什么。

你可以在 First Name 字段后面看到 “Please check the First Name” 的错误。
对 Last Name 重复该过程。

输入超过 10 个字符也会引发错误。
现在,我们需要为 email 和 password 字段添加验证。在这里,我们将使用另一个名为 Pattern 的属性。Pattern 将包含一个正则表达式值,它将根据表单中输入的数据进行检查。
pattern: /^(([^<>()\[\]\\.,;:\s@"]+(\.[^<>()\[\]\\.,;:\s@"]+)*)|(".+"))@((\[[0-9]{1,3}\.[0-9]{1,3}\.[0-9]{1,3}\.[0-9]{1,3}\])|(([a-zA-Z\-0-9]+\.)+[a-zA-Z]{2,}))$/ 这就是正则表达式模式的样子。这很难阅读,但这是电子邮件验证的一种模式。让我们在我们的应用程序中使用它。
<Form.Field>
                    <label>Email</label>
                    <input
                        placeholder='Email'
                        type="email"
                        {...register("email",
                        {
                            required: true,
                            pattern: /^(([^<>()\[\]\\.,;:\s@"]+(\.[^<>()\[\]\\.,;:\s@"]+)*)|(".+"))@((\[[0-9]{1,3}\.[0-9]{1,3}\.[0-9]{1,3}\.[0-9]{1,3}\])|(([a-zA-Z\-0-9]+\.)+[a-zA-Z]{2,}))$/
                        })}
                    />
                </Form.Field>
在 Email 字段中,添加此模式。
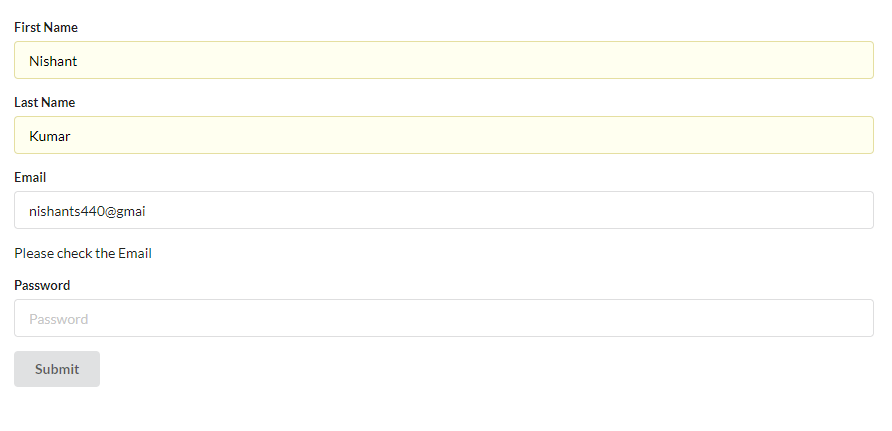
输入错误的电子邮件格式将引发错误。但是当我们输入正确的格式时错误就会消失。

让我们对 Password 字段做同样的事情。对于该字段,我们有一个条件,它应该包含一个大写字母、一个小写字母,并且字符数应该在 6 到 15 之间。如果我们输入的值没有通过这些检查中的任何一个,它就会抛出错误。
 <Form.Field>
                    <label>Password</label>
                    <input
                        placeholder='Password'
                        type="password"
                        {...register("password", {
                            required: true,
                            pattern: /^(?=.*\d)(?=.*[a-z])(?=.*[A-Z]).{6,15}$/
                        })}
                    />
                </Form.Field>
                {errors.password && <p>Please check the Password</p>}
现在,我们所有的四个表单字段都已完成。
import React from 'react';
import { Form, Button } from 'semantic-ui-react';
import { useForm } from "react-hook-form";

export default function FormValidation() {
    const { register, handleSubmit, formState: { errors } } = useForm();
    const onSubmit = (data) => {
        console.log(data);
    }
    return (
        <div>
            <Form onSubmit={handleSubmit(onSubmit)}>
                <Form.Field>
                    <label>First Name</label>
                    <input
                        placeholder='First Name'
                        type="text"
                        {...register("firstName", { required: true, maxLength: 10 })}
                    />
                </Form.Field>
                {errors.firstName && <p>Please check the First Name</p>}
                <Form.Field>
                    <label>Last Name</label>
                    <input
                        placeholder='Last Name'
                        type="text"
                        {...register("lastName", { required: true, maxLength: 10 })}
                    />
                </Form.Field>
                {errors.lastName && <p>Please check the Last Name</p>}
                <Form.Field>
                    <label>Email</label>
                    <input
                        placeholder='Email'
                        type="email"
                        {...register("email",
                            {
                                required: true,
                                pattern: /^(([^<>()\[\]\\.,;:\s@"]+(\.[^<>()\[\]\\.,;:\s@"]+)*)|(".+"))@((\[[0-9]{1,3}\.[0-9]{1,3}\.[0-9]{1,3}\.[0-9]{1,3}\])|(([a-zA-Z\-0-9]+\.)+[a-zA-Z]{2,}))$/
                            })}
                    />
                </Form.Field>
                {errors.email && <p>Please check the Email</p>}
                <Form.Field>
                    <label>Password</label>
                    <input
                        placeholder='Password'
                        type="password"
                        {...register("password", {
                            required: true,
                            pattern: /^(?=.*\d)(?=.*[a-z])(?=.*[A-Z]).{6,15}$/
                        })}
                    />
                </Form.Field>
                {errors.password && <p>Please check the Password</p>}
                <Button type='submit'>Submit</Button>
            </Form>
        </div>
    )
}
这是整个代码供你参考。我们还可以为错误消息添加一些样式——也许像这样:

总结
现在你知道如何在 React Forms 中添加验证了。请注意,React Hook Form 仅适用于功能组件,不适用于类组件。
你可以在我的 YouTube 频道查看我的视频,让我们使用 React 和 React Hook Form 在表单中添加验证。
这是 GitHub 上的完整代码,供你参考。
祝你学习愉快。
原文:How to Add Form Validation in React Forms using React Hook Form,作者:Nishant Kumar