
By Nishant Kumar
Creating forms with proper validation can be tough and problematic. But in this blog post, I will show you how to do so in a simple and straightforward way.
We'll learn how to add validation in a form using React and React Hook Form.
Here's an interactive scrim about how to add form validation in React forms:
How to Create a Form in React
We will start by creating a form using the Semantic UI library. So, let's install it using one of the following commands:
yarn add semantic-ui-react semantic-ui-css
## Or NPM
npm install semantic-ui-react semantic-ui-css
After you've installed it, you need to import the package into your index.js file, which is your application's main entry file.
import 'semantic-ui-css/semantic.min.css'
Then we need a form with four fields. So, let's create it with the following code:
import React from 'react';
import { Form, Button } from 'semantic-ui-react';

export default function FormValidation() {
    return (
        <div>
            <Form>
                <Form.Field>
                    <label>First Name</label>
                    <input placeholder='First Name' type="text" />
                </Form.Field>
                <Form.Field>
                    <label>Last Name</label>
                    <input placeholder='Last Name' type="text" />
                </Form.Field>
                <Form.Field>
                    <label>Email</label>
                    <input placeholder='Email' type="email" />
                </Form.Field>
                <Form.Field>
                    <label>Password</label>
                    <input placeholder='Password' type="password" />
                </Form.Field>
                <Button type='submit'>Submit</Button>
            </Form>
        </div>
    )
}
We have a form now. It has four fields, which are First Name, Last Name, Email, and Password. It also has a Submit button so users can submit the form.

How to Install React Hook Form
To install React Hook Form, use the command below:
npm install react-hook-form
You can read the documentation if you want to learn more about the library. We can use it for both React web and React Native applications.
The first thing we need to do here is get the data from the input fields and display them into the console. We need to import the package first:
import { useForm } from 'react-hook-form';
Then, we need to destructure the useForm object in our app, like this:
const { register, handleSubmit, formState: { errors } } = useForm();
Now, we are going to use the register property from the object useForm to register our form fields. It will be something like this:
<Form.Field>
  <label>First Name</label>
  <input placeholder='First Name' type='text' {...register('firstName')} />
</Form.Field>;
Now the First Name form field has the key of firstName. As you can see, we have declared it in the register. Repeat this for all other fields.
import React from 'react';
import { Form, Button } from 'semantic-ui-react';
import { useForm } from 'react-hook-form';

export default function FormValidation() {
  const {
    register,
    handleSubmit,
    formState: { errors },
  } = useForm();
  return (
    <div>
      <Form>
        <Form.Field>
          <label>First Name</label>
          <input
            placeholder='First Name'
            type='text'
            {...register('firstName')}
          />
        </Form.Field>
        <Form.Field>
          <label>Last Name</label>
          <input
            placeholder='Last Name'
            type='text'
            {...register('lastName')}
          />
        </Form.Field>
        <Form.Field>
          <label>Email</label>
          <input placeholder='Email' type='email' {...register('email')} />
        </Form.Field>
        <Form.Field>
          <label>Password</label>
          <input
            placeholder='Password'
            type='password'
            {...register('password')}
          />
        </Form.Field>
        <Button type='submit'>Submit</Button>
      </Form>
    </div>
  );
}
This is the whole code to this point. Four fields, and all registered.
Now, on the Form, we need to make an onSubmit event. This means that if we click the Submit button at the bottom, our form data should be submitted.
<Form onSubmit={handleSubmit(onSubmit)}>
And we also need to create a function onSubmit, that will do some specific action when the submit button is clicked or pressed.
const { register, handleSubmit, formState: { errors } } = useForm();
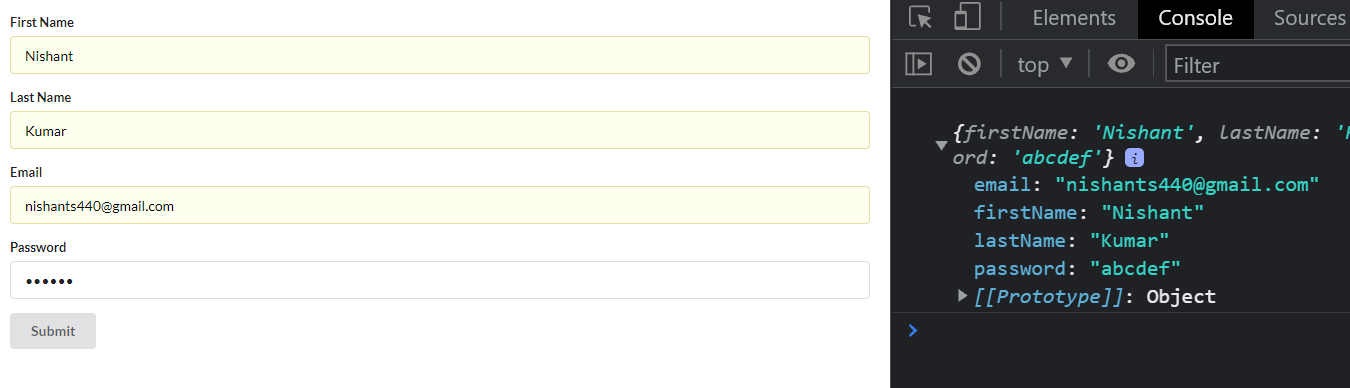
const onSubmit = (data) => {
console.log(data);
}
So, if we click the submit button, our entered data will show up in the console.
How to Add Validation to our Forms
Now, here comes the final and most awaited step. Let's add the validations.
Let's start with the First Name field. We will use the required and maxLength properties, which are pretty self-explanatory.
- Required means that the field is required.
- MaxLength denotes the maximum length of the characters we enter.
<input
  placeholder='First Name'
  type="text"
  {...register("firstName", { required: true, maxLength: 10 })}
/>
So, set required to true and maxLength to 10. Then if we submit the form without entering the First Name, or if the number of characters is more than 10, it will throw an error.
But we need to add the error message itself too. Add the following error message after the First Name form field.
{errors.firstName && <p>Please check the First Name</p>}
Here, it will throw an error. So, let's check what happened.

You can see the error after the First Name field that says "Please check the First Name".
Repeat that process for Last Name.

Entering more than 10 characters will also throw an error.
Now, we need to add validation for the email and password fields. Here, we will use another property called Pattern. Pattern will contain a Regular Expression value, and it will be checked against the entered data in the form.
pattern: /^(([^<>()\[\]\\.,;:\s@"]+(\.[^<>()\[\]\\.,;:\s@"]+)*)|(".+"))@((\[[0-9]{1,3}\.[0-9]{1,3}\.[0-9]{1,3}\.[0-9]{1,3}\])|(([a-zA-Z\-0-9]+\.)+[a-zA-Z]{2,}))$/
This is what a Regular Expression pattern looks like. It's hard to read, but this is a pattern for Email Validation. Let's use this in our application.
<Form.Field>
  <label>Email</label>
  <input
    placeholder='Email'
    type='email'
    {...register('email', {
      required: true,
      pattern:
        /^(([^<>()\[\]\\.,;:\s@"]+(\.[^<>()\[\]\\.,;:\s@"]+)*)|(".+"))@((\[[0-9]{1,3}\.[0-9]{1,3}\.[0-9]{1,3}\.[0-9]{1,3}\])|(([a-zA-Z\-0-9]+\.)+[a-zA-Z]{2,}))$/,
    })}
  />
</Form.Field>
In the Email Form Field, add this pattern.
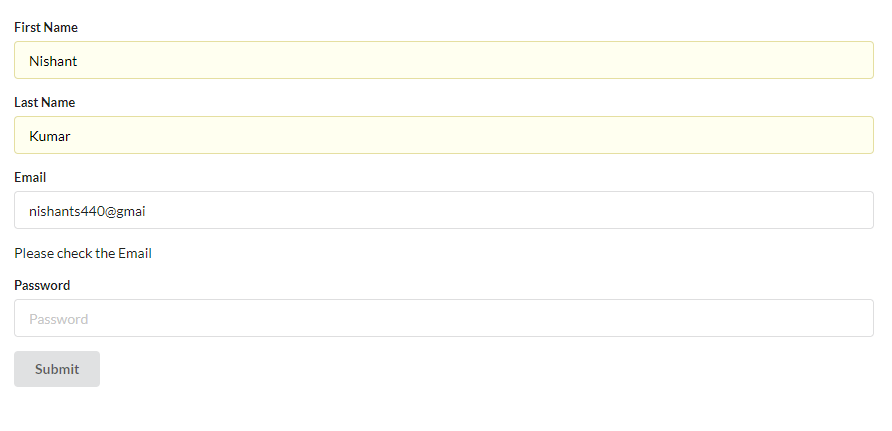
Entering the wrong email format will throw an error. But the error will disappear when we enter the right format.

Let's do the same for the Password Form Field. For the password field, we have the condition that it should contain one Capital Letter, one Small Letter, and the number of characters should be between 6 to 15. If our entered value fails any of these checks, it will throw an error.
<Form.Field>
  <label>Password</label>
  <input
    placeholder='Password'
    type='password'
    {...register('password', {
      required: true,
      pattern: /^(?=.*\d)(?=.*[a-z])(?=.*[A-Z]).{6,15}$/,
    })}
  />
</Form.Field>
{
  errors.password && <p>Please check the Password</p>;
}
Now, our all the four form fields are completed.
import React from 'react';
import { Form, Button } from 'semantic-ui-react';
import { useForm } from 'react-hook-form';

export default function FormValidation() {
  const {
    register,
    handleSubmit,
    formState: { errors },
  } = useForm();
  const onSubmit = (data) => {
    console.log(data);
  };
  return (
    <div>
      <Form onSubmit={handleSubmit(onSubmit)}>
        <Form.Field>
          <label>First Name</label>
          <input
            placeholder='First Name'
            type='text'
            {...register('firstName', { required: true, maxLength: 10 })}
          />
        </Form.Field>
        {errors.firstName && <p>Please check the First Name</p>}
        <Form.Field>
          <label>Last Name</label>
          <input
            placeholder='Last Name'
            type='text'
            {...register('lastName', { required: true, maxLength: 10 })}
          />
        </Form.Field>
        {errors.lastName && <p>Please check the Last Name</p>}
        <Form.Field>
          <label>Email</label>
          <input
            placeholder='Email'
            type='email'
            {...register('email', {
              required: true,
              pattern:
                /^(([^<>()\[\]\\.,;:\s@"]+(\.[^<>()\[\]\\.,;:\s@"]+)*)|(".+"))@((\[[0-9]{1,3}\.[0-9]{1,3}\.[0-9]{1,3}\.[0-9]{1,3}\])|(([a-zA-Z\-0-9]+\.)+[a-zA-Z]{2,}))$/,
            })}
          />
        </Form.Field>
        {errors.email && <p>Please check the Email</p>}
        <Form.Field>
          <label>Password</label>
          <input
            placeholder='Password'
            type='password'
            {...register('password', {
              required: true,
              pattern: /^(?=.*\d)(?=.*[a-z])(?=.*[A-Z]).{6,15}$/,
            })}
          />
        </Form.Field>
        {errors.password && <p>Please check the Password</p>}
        <Button type='submit'>Submit</Button>
      </Form>
    </div>
  );
}
Here's the whole code for your reference. And we can also add some styling to our error messages – something like this, maybe:

Conclusion
Now you know how to add validation in React Forms. Note that React Hook Form only works in Functional Components, not in Class Components.
You can check out my video on Let's add Validation in Forms using React and React Hook Form, which is on my YouTube channel.
And here's the whole code on GitHub for your reference.
Happy Learning.