

As a developer, it's important to understand how APIs work. APIs have helped bridged the gap between the frontend and backend. They also let you separate parts of large codebases and take advantage of a microservices architecture.
This separation of concerns makes learning and building RESTful APIs an in-demand skill for any software engineer, especially backend developers.
In this tutorial, we will explore the nitty-gritty of building RESTful APIs with AdonisJS 5. You will learn how to properly build out the authentication and authorization process within the AdonisJS 5 framework.
AdonisJS is the Laravel of JavaScript and it's a highly in-demand skill. So learning to build your first REST API with it will be a game-changer.
You can read through the Ultimate Guide to AdonisJS 5 to learn more about it.
What You'll Learn:
- How to Set Up AdonisJS
- How to Create the Database
- How to Set Up Authorization and Authentication
- How to Create the Todo Model
- How to Create the Todo Controller
- How to Create the Endpoint Routes
- How to Test the Todo API
- Conclusion
How to Set Up AdonisJS 5
Setting up AdonisJS has become easier as the framework has gained more popularity lately.
If you already work with JavaScript frameworks, you should have Node.js installed. If you don't, you can install the latest version of Node.js from the official documentation.
Make sure you install the required Node.js version which will install the right NPM version too. AdonisJS 5 requires Node.js version 12 and NPM version 6 and above.
If you have installed and set up Node.js and NPM properly in your local machine following the step from the documentation, you can create a new AdonisJS 5 project by running this command:
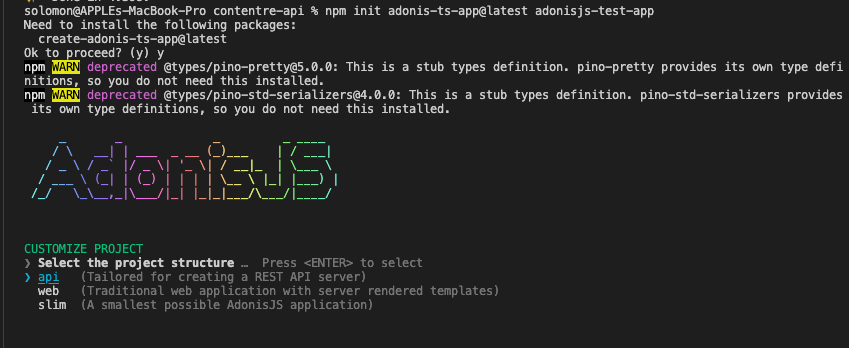
npm init adonis-ts-app@latest adonisjs-test-appThe command will ask for the project structure. Just select API Server and continue with the other default options as shown below:
Lastly, after installing successfully, open the folder with any text editor and run the following command to start and inspect the project for new changes:
cd <PROJECT_NAME>
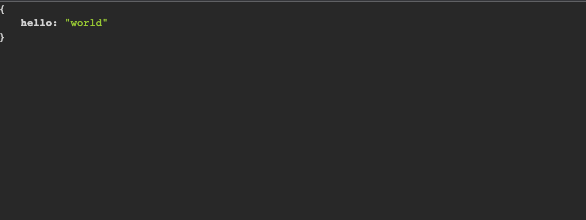
node ace serve –watchIf everything is successful without errors, open your browser with the generated URL. Here is a screenshot of the welcome page.
How to Create the Database
Now that we have successfully installed Adonis, let's go ahead to build a Todo application API to learn the nitty-gritty of creating a RESTful API with AdonisJS.
We will start with creating and seeding the database with proper database schemas and structures that will represent the data storage of the Todo application.
First, we need to create a new MySQL database. You can use any of these database clients to create and manage your database.
Next, we will install and configure AdonisJS Lucid. It's powerful ORM for AdonisJS that you use to access and manipulate databases without writing a single SQL query.
Let's install Lucid using this command:
npm install @adonisjs/lucidTo configure the newly installed package with the project and the newly created database, run this command:
node ace invoke @adonisjs/lucidThe command will present different database options. Select MySQL/MariaDB, and lastly, select In the Terminal for the instructions.
Read through the instructions and update your .env file accordingly with the right database credentials as shown below:
DB_CONNECTION=mysql
MYSQL_HOST=localhost
MYSQL_PORT=3306
MYSQL_USER= //DB_USER
MYSQL_PASSWORD= //DB_PASSWORD
MYSQL_DB_NAME= //DB_NAME
If you encounter this error – Client does not support authentication protocol requested by server; – while testing your Todo API, follow these steps to solve it:
npm install mysql2Open the config/database.ts and update the client field to mysql2. That should fix the bug and you'll be ready for development and testing.
AdonisJS 5 makes developing RESTful APIs very easy. With a single package, you can set up an entire authentication and authorization flow.
In the next section, we are going to cover how to protect our API with authentication and authorization.
How to Set Up Authorization and Authentication
To set up authentication and authorization, install the Auth package from AdonisJS and configure your authentication and authorization process.
You can install the Auth package using the command below:
npm install @adonisjs/auth@alphaNext, call the invoke command to configure the newly installed Auth package using the following command:
node ace invoke @adonisjs/authWhen you call the invoke command, it will take you through a configuration process for the Auth package. Follow the below steps to set up the API Token authentication process for the Todo application:
- Choose
LucidandAPI Tokensince we're building APIs. - Type
Usermodel for your authentication. - Press
Yto create a new user migration. - Choose
Databaseas your provider. - Press
Yto create anapi_tokenmigration.
After following the steps successfully, you should have 2 migrations generated in your database/migrations folder. You open the xxxx_users.ts migration to update the information according to your application needs.
Here is a sample of our user's migration for this demo.
import BaseSchema from '@ioc:Adonis/Lucid/Schema'

export default class UsersSchema extends BaseSchema {
  protected tableName = 'users'

  public async up () {
    this.schema.createTable(this.tableName, (table) => {
      table.increments('id').primary()
      table.string('name', 255).notNullable()
      table.string('email', 255).notNullable()
      table.string('password', 180).notNullable()
      table.string('remember_me_token').nullable()
      table.timestamps(true)
    })
  }

  public async down () {
    this.schema.dropTable(this.tableName)
  }
}
Lastly, we will add the auth middleware into the start/kernel.ts file. This will always check every request to make sure that it's properly authenticated.
Server.middleware.registerNamed({
auth: 'App/Middleware/Auth',
})
After setting the authentication and authorization, we need to create more migrations for the Todo application.
In the next section, we will create more migrations and seed data into the Todo application for testing.
How to Create Migrations
Next, we are going to create the remaining migrations for the Todo model following the steps outlined below.
To create a new migration, type in the following command:
node ace make:migration todosAfter running the command, open the new file in database/migrations/xxxx_todos.ts and paste in the following code.
import BaseSchema from "@ioc:Adonis/Lucid/Schema";

export default class Todos extends BaseSchema {
	protected tableName = "todos";

	public async up() {
        this.schema.createTable(this.tableName, (table) => {
            table.increments("id");
            table.string("title", 255).notNullable();
            table.string("desc", 255).notNullable();
            table.boolean("done").default(false);
            table.timestamps(true);
		});
	}

	public async down() {
		this.schema.dropTable(this.tableName);
	}
}
For now, we are keeping it simple without defining any database constraints. Lastly, we will run the migrations to generate and create the database tables as specified in the migrations. Make sure to stop the server and start it again before running the migration:
node ace serve --watch
// Then
node ace migration:run
You can set up database seeders to generate fake data or clone my repository since we have configured that already.
How to Create the Todo Model
To communicate with the database, we need to define a database model using the Lucid ORM we installed earlier. It lets us manipulate the database without writing a single SQL query.
We will create different models for each database schema we have created. But we only have 2 database schemas that are relevant to our Todo application.
We will use the following command to generate the database models for users and todos schemas:
node ace make:model User
node ace make:model Todo
After generating the models, we will open each of the models and configure the data and columns representing the database columns, respectively. Let's look at the code snippet for the User model.
import { DateTime } from "luxon";
import Hash from "@ioc:Adonis/Core/Hash";
import {
  column,
  beforeSave,
  BaseModel,
  hasMany,
  HasMany,
} from "@ioc:Adonis/Lucid/Orm";
import Todo from "App/Models/Todo";

export default class User extends BaseModel {
  @column({ isPrimary: true })
  public id: number;

  @column()
  public name: string;

  @column()
  public email: string;

  @column({ serializeAs: null })
  public password: string;

  @column()
  public rememberMeToken?: string;

  @column.dateTime({ autoCreate: true })
  public createdAt: DateTime;

  @column.dateTime({ autoCreate: true, autoUpdate: true })
  public updatedAt: DateTime;

  @hasMany(() => Todo)
  public todos: HasMany<typeof Todo>;

  @beforeSave()
  public static async hashPassword(user: User) {
    if (user.$dirty.password) {
      user.password = await Hash.make(user.password);
    }
  }
}
Code Walkthrough
Let's walk through the details of the above code:
Step 1: Require Package
First, we import the required libraries and files above. Next, we create a User class and map each of the database columns to the newly created User model. This lets us communicate with our database by calling columns as object properties using AdonisJS custom-defined annotations.
Step 2: The HashPassword Method
Lastly, we defined the database columns and create the hashPassword hook to be automatically called before saving any data to the database.
@beforeSave()
    public static async hashPassword(user: User) {
        if (user.$dirty.password) {
        	user.password = await Hash.make(user.password);
        }
    }
Now that we've created these individual models and configured them accordingly, in the next section, we will create AdonisJS controllers. These will interact with the models to create, retrieve, update, and delete todos from the database.
How to Create the Todo Controller
To manipulate the database using the model when a request is sent to the Todo application API, we will create a controller to intercept each request directed at Todos.
The controller will manipulate the Model with the right business logic and serve the request with a proper response.
How to Create the Auth Controller
In AdonisJS, we can generate controllers using the following command. First, we will generate the Auth controller to handle the business logic for authentication and authorization.
node ace make:controller AuthNext, open the newly created file in app/Controllers/Http/AuthController.ts and paste in the following code:
import { HttpContextContract } from "@ioc:Adonis/Core/HttpContext";
import User from "App/Models/User";
export default class AuthController {
public async login({ request, auth }: HttpContextContract) {

    const email = request.input("email");
    const password = request.input("password");

    const token = await auth.use("api").attempt(email, password, {
        expiresIn: "10 days",
        });
        return token.toJSON();
    }

    public async register({ request, auth }: HttpContextContract) {

        const email = request.input("email");
        const password = request.input("password");
        const name = request.input("name");

        /**
        * Create a new user
        */

        const user = new User();
        user.email = email;
        user.password = password;
        user.name = name;
        await user.save();

        const token = await auth.use("api").login(user, {
        	expiresIn: "10 days",
        });

        return token.toJSON();
    }
}
Code Walkthrough
Step 1: Require Packages
First, we imported the required libraries and files. Secondly, we created two important methods inside the AuthController class.
import { HttpContextContract } from "@ioc:Adonis/Core/HttpContext";
import User from "App/Models/User";
Step 2: The Login Method
The first method is the Login method which handles the business logic for logging in a user successfully by checking if a particular user with the email and password exists in the database.
public async login({ request, auth }: HttpContextContract) {

    const email = request.input("email");
    const password = request.input("password");

    const token = await auth.use("api").attempt(email, password, {
    	expiresIn: "10 days",
    });

    return token.toJSON();
}
Step 3: The Register Method
The second method is the Register method which we use to create a new user in the database. After creating a new user successfully, the register method will automatically log in the user.
public async register({ request, auth }: HttpContextContract) {

const email = request.input("email");
const password = request.input("password");
const name = request.input("name");

/**
* Create a new user
*/

const user = new User();
user.email = email;
user.password = password;
user.name = name;
await user.save();

const token = await auth.use("api").login(user, {
	expiresIn: "10 days",
});

return token.toJSON();
}
How to Create the Todo Controller
Next, we will create the Todo controller to handle the business logic of the Todo application. Type in the following command to create a TodoController:
node ace make:controller TodoNext, open the TodosController.ts file inside app/Controllers/Http folder and add the following code:
import { HttpContextContract } from "@ioc:Adonis/Core/HttpContext";
import Todo from "App/Models/Todo";

export default class TodosController {

    public async index({ request}: HttpContextContract)
    {
    const todos = await Todo.query();
    return todos
    }

    public async show({ request, params}: HttpContextContract)
    {
        try {
            const todo = await Todo.find(params.id);
            if(todo){
            return todo
        }
        } catch (error) {
        	console.log(error)
        }
    }

    public async update({ auth, request, params}: HttpContextContract)
    {
        const todo = await Todo.find(params.id);
        if (todo) {
            todo.title = request.input('title');
            todo.content = request.input('desc');
            todo.done = request.input('done')

            if (await todo.save()) {
            	return todo
        	}
        	return; // 422
        }
        return; // 401
    }

    public async store({ auth request, response}: HttpContextContract)
    {
        const user = await auth.authenticate();
        const todo = new Todo();
        todo.title = request.input('title');
        todo.desc = request.input('desc');
        await todo.save(todo)
        return todo
    }

    public async destroy({response, auth, request, params}: HttpContextContract)
    {
        const user = await auth.authenticate();
        const todo = await Todo.query().where('id', params.id).delete();
        return response.json({message:"Deleted successfully"})
    }
}
Code Walkthrough
Let's walk through the nitty-gritty of the code.
Step 1: Required Packages
First, we imported the required libraries and files and created the TodosController class. Next, we created 5 different methods inside the class that correspond to the CRUD (Create, Read, Update, Delete) operations. These methods, which we'll discuss next, are index, show, update, store, and destroy.
Step 2: The Index Method
The first method is the index method which returns all the todo lists created by the user. You can also configure the index method to use pagination if the to-do list is too big to return at once.
public async index({ request}: HttpContextContract)
{
    const todos = await Todo.query();
    return todos
}
Step 3: The Show Method
The second method is the show method which you use to retrieve a single to-do list by providing the ID of the Todo in the request.
public async show({ request, params}: HttpContextContract)
{
    try {
    	const todo = await Todo.find(params.id);
        if(todo){
        	return todo
        }
    } catch (error) {
    	console.log(error)
    }
}
Step 4: The Update Method
The third method is the update method which you use to update the value of each column in the Todo schema. As the name suggests, you can change any specific column in the database by passing the new data in the request.
public async update({ auth, request, params}: HttpContextContract)
{
    const todo = await Todo.find(params.id);
    if (todo) {
        todo.title = request.input('title');
        todo.content = request.input('desc');
        todo.done = request.input('done')
        if (await todo.save()) {
        return todo
    }
    return; // 422
    }
    return; // 401
}
Step 5: The Store Method
The fourth method is the store method which you use to create a new Todo in the database. By calling the method and providing the required information, a new Todo will be created.
public async store({ auth request, response}: HttpContextContract)
{
    const user = await auth.authenticate();
    const todo = new Todo();
    todo.title = request.input('title');
    todo.desc = request.input('desc');
    await todo.save(todo)
    return todo
}
Step 6: The Destroy Method
Lastly, the fifth method is the destroy method. You use this method to delete a single Todo from the database. It requires the ID of the Todo for deletion.
public async destroy({response, auth, request, params}: HttpContextContract)
{
    const user = await auth.authenticate();
    const todo = await Todo.query().where('id', params.id).delete();
    return response.json({message:"Deleted successfully"})
}
So far, we have created the business logic of the Todo API inside the controller and used the model to manipulate the database. You can clone the repository at this point to understand more or follow along.
In the next section, we will create all the endpoints that the frontend application will use to access the controller.
How to Create the Endpoint Routes
To expose our business logic to the frontend or users, we need to create different endpoints to access different methods of the TodosController.
To do that, open the route.ts file inside the start folder and add the following code:
//......

Route.group(() => {

    Route.post("register", "AuthController.register");
    Route.post("login", "AuthController.login");

        Route.group(() => {
        Route.get("todos", "TodosController.index");
        Route.get("todos/:id", "TodosController.show");
        Route.put("todos/update", "TodosController.update");
        Route.post("todos", "TodosController.store");
        }).middleware("auth:api");

}).prefix("api");

//......
Now that we have created different endpoints for our Todo API, let's start the server again and test out the Todo API.
How to Test the Todo API
When testing your endpoint using any HTTP clients (like Postman), if you encounter any error saying Cannot find module 'phc-argon2' just run the following command to install the package:
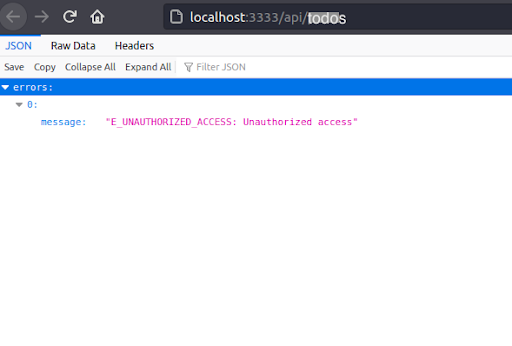
npm install phc-argon2First, let's test out the Todo API endpoint without authentication and see the error it will generate because we haven't activated the Auth package.
But if we login using the /api/login or register using the /api/register endpoint to retrieve our API Token, we get this:
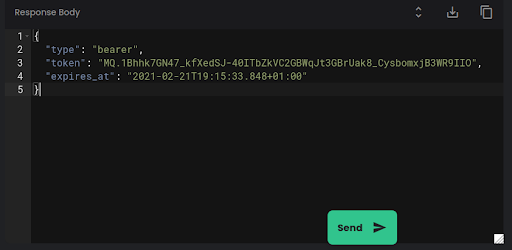
Now we can access the protected endpoints after inserting the token as the Authorization header value of the HTTP client.
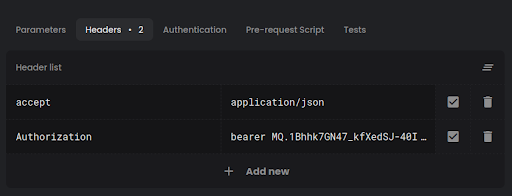
Now, we can access our protected endpoints:
If everything works correctly, congratulations! You have successfully created your first RESTful API with AdonisJS 5.
Conclusion
In this tutorial, you learned how to build RESTful APIs with AdonisJS 5, and how to properly build out the authentication and authorization process within the AdonisJS 5 framework.
We discussed different concepts from creating databases, migrations, and models to controllers and endpoints to accessing the Todo API.
Let me know what you're building - I'd love to know! You can also follow me on Twitter, LinkedIn, and my blog.