
Hey there! 👋 Ever since I started working with NestJS, I've been looking for a reliable way to manage my database with TypeORM. Today, I'll share my journey and the steps I took to get it all set up.
Alright, before we dive in, let's try to understand what TypeORM and NestJS are.
Table of contents:
- What is TypeORM?
- What is NestJS?
- Tutorial Prerequisites
- How to Set Up a NestJS Project
- How to Set Up TypeORM DataSource for Data Persistency
- Extending The DataSource Repository For Custom Methods
- Conclusion
- Resources
What is TypeORM?
TypeORM is an Object-Relational Mapping (ORM) tool that simplifies working with databases in Node.js and TypeScript applications. It supports various databases like MySQL, PostgreSQL, SQLite, and more, allowing developers to use object-oriented programming concepts instead of dealing with low-level SQL queries.
TypeORM also provides features like schema migrations, query building, and managing relationships between tables.
What is NestJS?
NestJS is a progressive Node.js framework designed for building efficient, reliable, and scalable server-side applications. It leverages TypeScript's features to enable developers to write structured, maintainable code.
NestJS adopts a modular architecture pattern, allowing you to organize your code into modules, controllers, services, and providers. It provides built-in support for features like dependency injection, middleware, and GraphQL, making it a popular choice for building modern web applications and APIs.
Additionally, NestJS integrates seamlessly with other libraries and frameworks, including TypeORM, to streamline development workflows. Under the hood, it uses a robust HTTP server framework like Express (default) and can be configured to use other Node.js HTTP server frameworks.
Alright, that's a lot, right? Well, before we move on, let's try to break down the phrase, 'NestJS is a progressive Node.js framework,' which simply means that NestJS leverages the latest features of the JavaScript language and server frameworks, thereby providing flexibility for developers to write code in the most suitable language for their projects.(Source)
Tutorial Prerequisites
- Node.js. At least version 18
- npm. Atleast Version 8
- Postgresql. Download Here
- Basic familiarity with Typescirpt and Nestjs
- Pgadmin 4. Download Here
How to Set Up a NestJS Project
Run the following commands to install your NestJS project:
npm i -g @nestjs/cli # install nestj cli globally
nest new simple-crm # start a new nestjs project
After installation, run the development server:
npm run start:dev # start the app in watch mode
Now, let's test our project to see if the nest-cli has properly set up all boiler plate code, by sending a get request to the root URL /

Nice! Our project is up and running.
How to Set Up TypeORM DataSource for Data Persistency
npm install --save @nestjs/typeorm typeorm # nestjs typeorm drivers
npm install --save pg # typeorm postgressql driver
Let's create the database for the project from Pgadmin 4 interface
Open the Pgadmin 4 interface and right click on the Databases tab to create new database, like so 👇.


Confirm your database has been created successfully.

Great, it's time to add the database to our NestJS app using TypeORM.
Create new folder, datasource in the src/ folder of your app, like so 👇

Create a new file typeorm.module.ts, in the datasource folder, and add the following code:
import { DataSource } from 'typeorm';
import { Global, Module } from '@nestjs/common';

@Global() // makes the module available globally for other modules once imported in the app modules
@Module({
  imports: [],
  providers: [
    {
      provide: DataSource, // add the datasource as a provider
      inject: [],
      useFactory: async () => {
        // using the factory function to create the datasource instance
        try {
          const dataSource = new DataSource({
            type: 'postgres',
            host: 'localhost',
            port: 5432,
            username: 'ayo',
            password: 'haywon',
            database: 'simple-crm_db',
            synchronize: true,
            entities: [`${__dirname}/../**/**.entity{.ts,.js}`], // this will automatically load all entity file in the src folder
          });
          await dataSource.initialize(); // initialize the data source
          console.log('Database connected successfully');
          return dataSource;
        } catch (error) {
          console.log('Error connecting to database');
          throw error;
        }
      },
    },
  ],
  exports: [DataSource],
})
export class TypeOrmModule {}
Add the TypeORM module to the App module imports array, like so 👇
import { Module } from '@nestjs/common';
import { AppController } from './app.controller';
import { AppService } from './app.service';
import { TypeOrmModule } from './datasource/typeorm.module';

@Module({
  imports: [TypeOrmModule],
  controllers: [AppController],
  providers: [AppService],
})
export class AppModule {}
Then save and confirm from your console if the database has been connected successfully.
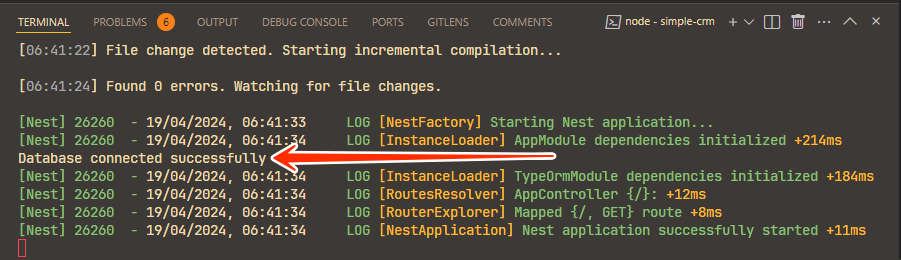
If you see the database connected successfully, good job! Otherwise, go back to the previous steps to see if you followed the configurations correctly.
Now, we can continue to consume our datasource service leveraging the TypeORM.
Let's create users module, controller, provider and entity to interact with our newly connected database.
nest g module users && nest g service users && nest g controller users
The above command will generate the users module, service and controller and update the app.module.ts with the users module.
Add the following code inside the users.entity.ts file and restart your development server to create the user table in the database.
import { Column, Entity, PrimaryGeneratedColumn } from 'typeorm';

@Entity('user')
export class UserEntity {
  @PrimaryGeneratedColumn()
  id: number;

  @Column({ unique: true })
  username: string;

  @Column()
  password: string;
}
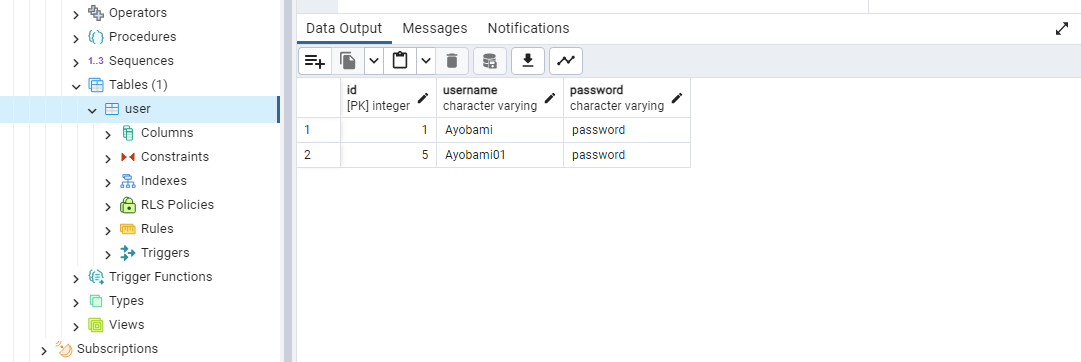
Check your Pgadmin 4 interface and confirm that TypeORM has automatically loaded the UserEntity and created the user table in your database, like so 👇.
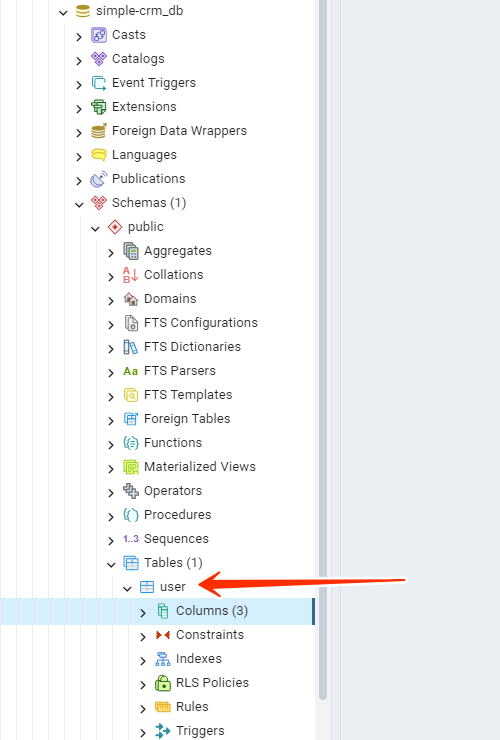
You might want to refresh the database if you don't see it at first.
Now let's implement our first users service handler, add the following code to your users.service.ts file:
import {
  HttpException,
  HttpStatus,
  Injectable,
  InternalServerErrorException,
  Logger,
} from '@nestjs/common';
import { DataSource } from 'typeorm';
import { UserEntity } from './users.entity';

export interface CreateUser {
  username: string;
  password: string;
}

@Injectable()
export class UsersService {
  private userRepository;
  private logger = new Logger();
  //   inject the Datasource provider
  constructor(private dataSource: DataSource) {
    // get users table repository to interact with the database
    this.userRepository = this.dataSource.getRepository(UserEntity);
  }
  //  create handler to create new user and save to the database
  async createUser(createUser: CreateUser): Promise<UserEntity> {
    try {
      const user = await this.userRepository.create(createUser);
      return await this.userRepository.save(user);
    } catch (err) {
      if (err.code == 23505) {
        this.logger.error(err.message, err.stack);
        throw new HttpException('Username already exists', HttpStatus.CONFLICT);
      }
      this.logger.error(err.message, err.stack);
      throw new InternalServerErrorException(
        'Something went wrong, Try again!',
      );
    }
  }
}
We've added the createUser method to handle creating a user when a POST request is sent with the required request body to the endpoint controller that utilizes the createUser service method.
The function takes an object createUser as an argument of type CreateUser interface. Usually, this should be a DTO (Data Transfer Object) for the data type structure and validation, but since it is out of the scope of this tutorial, we're using the interface just for the data shape.
We called the create method of the userRepository then assigned it's return to the user variable to hold the newly created user object. We then called the save method to save the object to the database.
Now, let's utilize the createUser service handler in our users controller that handles the POST request to create new user.
import { Body, Controller, Post } from '@nestjs/common';
import { CreateUser, UsersService } from './users.service';

@Controller('users')
export class UsersController {
  constructor(private userService: UsersService) {}

  @Post('/create')
  //   handles the post request to /users/create endpoint to create new user
  async signUp(@Body() user: CreateUser) {
    return await this.userService.createUser(user);
  }
}
Test the newly created endpoint, by sending a POST request to http://localhost:3000/users/create with the username and password as the request body.
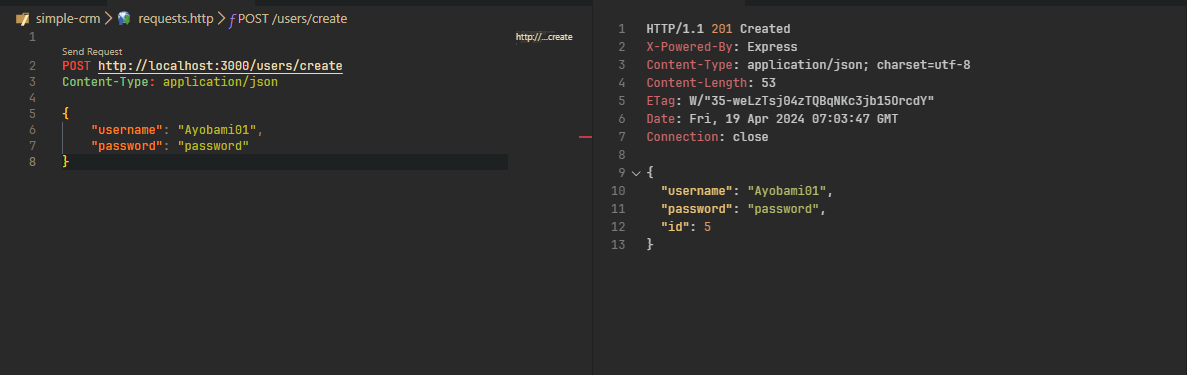
Alright, let's check the database just to be sure that's all, because we already got a 201 response status code which should be enough to know that our application is smoothly interacting with our database using the TypeORM Datasource.
Extending The DataSource Repository For Custom Methods
Whether you're looking to optimize database queries, introduce new data manipulation operations, or integrate with third-party services, extending the DataSource repository with custom methods can be a game-changer interacting with the database seamlessly.
Here, we'll explore the benefits of custom methods, and provide a step-by-step guide to implementing them in your NestJS applications. So, let's dive in and unlock the full potential of the DataSource repository!
Some of the basic benefits of repository custom methods are:
Tailored Functionality: Custom methods allow developers to introduce specific functionalities that are not available in the standard DataSource repository. By tailoring the DataSource repository with custom methods, developers can address unique use cases, data manipulation operations and aggregations, or optimizations that are essential for their project requirements.
Optimized Performance: Custom methods can be designed to optimize database queries, data retrieval, and data manipulation operations, leading to improved performance and efficiency. By leveraging custom methods, developers can implement optimized algorithms, caching mechanisms, or query optimizations tailored to the specific needs and characteristics of their applications.
Improved Code Reusability and Maintainability: Custom methods promote code reusability by encapsulating specific logic, algorithms, or operations within reusable components. By modularizing the custom methods, developers can maintain cleaner, more organized, and maintainable codebases, making it easier to manage, debug, and enhance the DataSource repository in the long run.
Ok, That's that, let's move to the action. So, we have a simple CRM application that has to do with user management. Let's add a custom repository method that can help us filter users by username.
To implement this, let's create our datasource module and datasource service. We're going to create these files to to align with the modularity principles of the NestJS architectural pattern.
Create the files inside your previously created datasource folder and add the following code:
// datasource.module.ts
import { Module } from '@nestjs/common';
import { TypeOrmModule } from './typeorm.module';
import { DataSourceService } from './datasource.service';

@Module({
  imports: [TypeOrmModule],
  providers: [DataSourceService],
  exports: [DataSourceService],
})
export class DataSourceModule {}
// datasource.service.ts
import { Injectable } from '@nestjs/common';
import { UserEntity } from 'src/users/users.entity';
import { DataSource } from 'typeorm';

export interface UsernameQuery {
  username: string;
}

@Injectable()
export class DataSourceService {
  constructor(private dataSource: DataSource) {}

  //   extend userRepository to add custom methods
  userCustomRepository = this.dataSource.getRepository(UserEntity).extend({
    async filterUser(usernameQuery: UsernameQuery): Promise<UserEntity[]> {
      const { username } = usernameQuery;
      console.log(username);
      // initialize a query builder for the userrepository
      const query = this.createQueryBuilder('user');
      //   filter user where username is like the passed username
      query.where('(LOWER(user.username) LIKE LOWER(:username))', {
        username: `%${username}%`,
      });
      return await query.getMany();
    },
  });
}
From the above datasource.service.ts code, we've extended the UserRepository, by calling the getRepository method on the dataSource service and passing UserEntity as an argument to get the repository for the particular table.
Then we called the extend method on the userRepository we got back from our getRepository to add our custom method. In our extend method, we passed an object that will contain all our custom methods for the custom repository we've assigned to the userCustomRepository. Here, we've simply added just one custom method to our custom user repository which is filterUser. It runs a filter query on the user table by the username provided.
Since our DataSourseService is an injectable, we can inject it in our UserService and consume the newly created filterUser method after adding the DataSourceModule to the imports array of the user module like so 👇
// users.module.ts
import { Module } from '@nestjs/common';
import { UsersController } from './users.controller';
import { UsersService } from './users.service';
import { DataSourceModule } from 'src/datasource/datasource.module';

@Module({
  imports: [DataSourceModule], // add the DataSourceModule to the import array
  providers: [UsersService],
  controllers: [UsersController],
})
export class UsersModule {}
Let's consume the filter method from CustomUserRepository in our UserService to filter users by any username passed as our query argument when sending the request.
// users.service.ts
import {
  HttpException,
  HttpStatus,
  Injectable,
  InternalServerErrorException,
  Logger,
} from '@nestjs/common';
import { DataSource } from 'typeorm';
import { UserEntity } from './users.entity';
import {
  DataSourceService,
  UsernameQuery,
} from 'src/datasource/datasource.service';

export interface CreateUser {
  username: string;
  password: string;
}

@Injectable()
export class UsersService {
  private userRepository;
  private customUserRepository;
  private logger = new Logger();
  //   inject the Datasource provider
  constructor(
    private dataSource: DataSource,
    private dataSourceService: DataSourceService, // inject our datasource service
  ) {
    // get users table repository to interact with the database
    this.userRepository = this.dataSource.getRepository(UserEntity);
    // assigning the dataSourceService userCustomRepository to the class customUserRepository
    this.customUserRepository = this.dataSourceService.userCustomRepository;
  }
  //  create handler to create new user and save to the database
  async createUser(createUser: CreateUser): Promise<UserEntity> {
    try {
      const user = await this.userRepository.create(createUser);
      return await this.userRepository.save(user);
    } catch (err) {
      if (err.code == 23505) {
        this.logger.error(err.message, err.stack);
        throw new HttpException('Username already exists', HttpStatus.CONFLICT);
      }
      this.logger.error(err.message, err.stack);
      throw new InternalServerErrorException(
        'Something went wrong, Try again!',
      );
    }
  }
  // the userService filterByUsername handler
  async filterByUsername(usernameQuery: UsernameQuery): Promise<UserEntity[]> {
    try {
    // calling the customUserRepository filterUser custom method
      return await this.customUserRepository.filterUser(usernameQuery);
    } catch (err) {
      this.logger.error(err.message, err.stack);
      throw new InternalServerErrorException(
        'Something went wrong, Try again!',
      );
    }
  }
}
From the above, code we've injected our custom DataSourceService by adding the following to the class constructor private dataSourceService: DataSourceService,.
The filterByUsername service handles the request we consume in our custom filterUser method await this.customUserRepository.filterUser(usernameQuery);, which will return a promise.
Now, let's utilize this service handler in our user controller to filter users by their username.
// users.controller.ts
import { Body, Controller, Get, Post, Query } from '@nestjs/common';
import { CreateUser, UsersService } from './users.service';
import { UserEntity } from './users.entity';
import { UsernameQuery } from 'src/datasource/datasource.service';

@Controller('users')
export class UsersController {
  constructor(private userService: UsersService) {}

  @Post('/create')
  //   handles the post request to /users/create endpoint to create new user
  async signUp(@Body() user: CreateUser): Promise<UserEntity> {
    return await this.userService.createUser(user);
  }

  @Get('') // get request handler that returns the filtered results of the users table
  async filterUser(
    @Query() usernameQuery: UsernameQuery // extracts the username query param for the endpoint url,
  ): Promise<UserEntity[]> {
    return await this.userService.filterByUsername(usernameQuery);
  }
}
Test our filter endpoint,
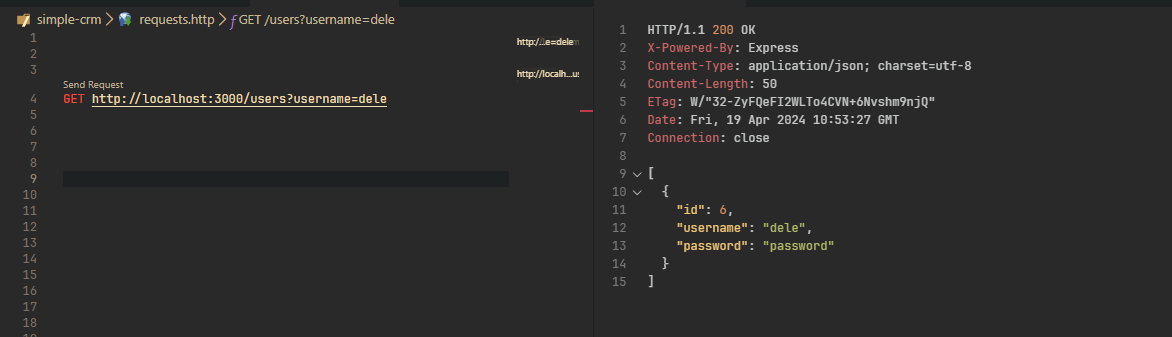
Here, we got back a list with one user object with username like the username we passed as a query.
Conclusion
Voila! That's it, now you ready to start working with NestJS, TypeORM, and DataSource.
Thanks for reading!
If you've found it helpful, please share it with your friends and colleagues! Stay tuned for more insightful content, and let's continue learning and growing together. Cheers to building smarter, more efficient solutions with NestJS!