

What are Wireframes?
Wireframes are visual representations of the structure, layout, and functionality of a website, application, or other digital product.
You typically create them during the early stages of the design process, and they provide a simplified and focused view of the user interface and user experience.
You can create a wireframe using a variety of tools, including paper and pencil, whiteboards, or specialized digital software. They usually consist of basic shapes, lines, and text, and aim to communicate the hierarchy of information, the placement of interactive elements, and the flow of user interactions.
Wireframes serve as a blueprint for the design process. They allow designers and stakeholders to quickly iterate and refine ideas before investing time and resources into creating a fully functional prototype or final product. They are an essential tool for creating effective and user-friendly digital experiences.
Why is Wireframing Important?
Wireframing is an important process in web and app design because it helps designers to plan and communicate the layout and functionality of a website or application before it is built. Here are some reasons why wireframing is important:
- Wireframing helps stake holders visualize the structure of the design: Wireframing allows designers to create a visual representation of the website or application's structure. This includes the layout of pages, navigation, and the placement of various elements.
- It helps designers focus on functionality: With wireframing, designers can focus on the functionality of the website or application without getting distracted by colors, typography, and other design elements.
- It saves time and money: Wireframing can save time and money in the long run by identifying potential problems and making necessary changes early on in the design process, rather than during the development phase.
- It's an easy way to gather feedback: Wireframes are a great way to gather feedback from stakeholders and users, as they provide a clear and simple representation of the design without distracting visual elements.
- Plan for responsive design: Wireframing is essential when designing for different screen sizes and devices. It allows designers to plan for responsive design and ensure that the website or application works well on all devices.
Types of Wireframes
Everyone has a specific way of doing wireframes. Some designers go from paper sketches to high fidelity wireframes or from low-fidelity wireframes to high-fidelity wireframes.
It all depends on the particular project the designer is working on, what they intend to achieve, and the timeframe they have.
Paper Sketches
I begin my wireframing process by doing paper sketches first, because it allows me put out my ideas really fast without having to bother about neatness and quality. It also saves time when designing – you just think of quick solutions and put them on paper.
Some Techniques for Paper Sketching
- Crazy Eights
In the design world, "Crazy Eights" is a quick sketching exercise that helps designers to quickly generate a variety of design ideas and explore different solutions to a problem, in a short amount of time.
Here's how to do Crazy Eights in design:
- Start with a blank sheet of paper and fold it in half, then in half again, and one more time so that you end up with 8 rectangles on the page.
- Set a timer for 8 minutes.
- Within the first rectangle, sketch out an idea for the design problem you're working on. It doesn't need to be perfect, just get the basic idea down on paper.
- When the timer goes off, move on to the next rectangle and sketch a new idea. Keep going until you've filled all 8 rectangles.
- Once you've completed all 8 sketches, take a few minutes to review your ideas and identify the strongest ones.
- Use the strongest ideas as a starting point for your design, and continue refining and iterating until you have a final product.
You'll see an example of this in a bit when I walk you through my wireframing process.
- 20 Second Sketches
Set a timer for 20 seconds and sketch a simple object or scene. Repeat this exercise multiple times, trying to capture as much detail as possible in each sketch.
- Collaborative Sketching
Pair up with another person and take turns adding to a sketch. Each person has a set amount of time to add their own unique element to the drawing. This exercise encourages collaboration and improvisation.
Low-Fidelity Wireframing
Low-fidelity wireframing is a technique of creating a rough visual representation of a design using simple shapes, lines, and text. Low-fidelity wireframes are the most basic of wireframes. This type of wireframing is typically done with pen and paper, or with a digital tool that allows for quick, low-detail sketches.
Mostly, they focus on the core content and structure of the interface, and are simple and straightforward. Low-fidelity wireframes are a useful tool for designers to quickly explore and iterate on different layout and content options, without getting bogged down in details that can distract from the overall design direction.
Advantages of Low Fidelity Wireframing
- Speed: Low-fidelity wireframes can be created quickly and easily, allowing designers to explore multiple ideas in a short amount of time.
- Flexibility: Low-fidelity wireframes are easy to modify and change as the design evolves, allowing designers to iterate quickly.
- Focus: By focusing on the structure and layout of a design, low-fidelity wireframing helps designers avoid getting distracted by details that may not be relevant.
- Collaboration: Low-fidelity wireframes can be easily shared and discussed with other team members, allowing for greater collaboration and feedback.
Disadvantages of Low Fidelity Wireframing
- Lack of Detail: Low-fidelity wireframes may not provide enough detail to fully convey the intended design, which can lead to misunderstandings and miscommunications.
- Limited Interactivity: Low-fidelity wireframes are static and do not allow for interaction, which can make it difficult to test usability and user flow.
- Limited Realism: Unlike high fidelity wireframes, low-fidelity wireframes may not accurately represent the final product, which can make it difficult to communicate the design to stakeholders who may not be familiar with wireframes.
Why You Might Want to Use Low-Fidelity Wireframes
- For early-stage conceptualization: Low-fidelity wireframes are great for early-stage conceptualization. Because they allow you to quickly iterate and experiment with different layout options without getting caught up in the visual details, low-fidelity wireframes are extremely useful during the initial stages of your design.
- For Time and Resource Efficiency: In situations where time is of great essence, low-fidelity wireframes helps to make changes more rapidly, saving time when needed. Also, it requires fewer resources, which is ideal for situations where resources are scarce.
- For User Testing and Feedback: Low-fidelity wireframes provide a clear representation of the overall structure of your design, allowing for easier feedback from stakeholders and team members. Low-fidelity wireframes are also important during user testing sessions, as it helps you collect valuable insights on the fundamental structure and functionality of a design, before investing significant effort in visual design.
Mid-Fidelity Wireframing
Mid-fidelity wireframing refers to wireframes that are created with a moderate level of detail and design elements. These wireframes typically focus on the overall structure of a product and may include basic typography and design elements.
Advantages of Mid-Fidelity Wireframing
- Efficient Design Process: Mid-fidelity wireframing can be completed quickly and efficiently, allowing designers to iterate and test their designs faster.
- Cost-effective: Mid-fidelity wireframes are less expensive to create than high fidelity wireframes, making them a more cost-effective option for design projects.
- Usability Testing: Mid-fidelity wireframes can be used for usability testing, providing insights into user behaviour and interaction with the product.
- Flexibility: Definitely one of the most importnat advantages of mid-fidelity wireframes. Mid-fidelity wireframes are less detailed than high fidelity wireframes, making it easier to make changes and pivot design direction during the design process.
Disadvantages of Mid-Fidelity Wireframing
- Less Realistic: Mid-fidelity wireframes may not accurately represent the design's final look, which can impact stakeholder and client expectations.
- Limited Visual Details: Mid-fidelity wireframes do not provide as much detail as high fidelity wireframes, making it difficult to communicate the final design vision to stakeholders.
- User Experience Limitations: Because mid-fidelity designs do not have enough visual details to test the user experience effectively, leading to potential usability issues.
You'll see an example of this below when we walk through my process.
Why You Might Want to Use Mid-Fidelity Wireframes
- For Refining Structure and Content: When you need to refine the structure, content and layout of your design, mid-fidelity wireframes are beneficial. They allow you add more detail to your wireframes while being relatively quick to create and modify.
- Information Architecture: Mid-fidelity wireframes provide a clearer structure and visual representation of the design, showing off the userflow better than low-fidelity wireframes.
- Stakeholder Presentation and Approvals: Mid-fidelity wireframes are more polished and appealing than low-fidelity wireframes. This makes them a more effective tool when presenting design ideas to stakeholders and clients.
- Design Consistency: By adding more visual details to the wireframes, a consisent design language can be established across multiple screens or pages.
High-Fidelity Wireframing
High fidelity wireframing refers to the creation of detailed, visually-rich wireframes that closely resemble the final product or website.
These wireframes are often created using tools like Adobe XD or Figma and include elements like typography, color schemes, and detailed user interface elements.
Advantages of High-Fidelity Wireframing
Some advantages of high-fidelity wireframes include:
- Detailed Representation: High fidelity wireframes provide a more detailed representation of the final product, making it easier to communicate the design vision to stakeholders.
- Efficient Testing: High fidelity wireframes can be used for testing purposes, helping designers identify any usability issues before the development phase begins.
- Better Visuals and User Experience: High fidelity wireframes are aesthetically pleasing and provide a more realistic view of the final product which helps users visualize the design better. It gives the users better understanding of how to interact with the product.
Disadvantages of High-Fidelity Wireframing
- Time-consuming: High fidelity wireframes take longer to create than low-fidelity wireframes. It can be challenging to complete high fidelity wireframes withing tight project timelines.
- Cost: High fidelity wireframes can be expensive to create, as it requires a significant amount of skill and effort from the design team.
- Limited Flexibility: High fidelity wireframes are not as flexible as low-fidelity or mid-fidelity wireframes. They are detailed and specific, which makes it challenging to change the design direction once they are completed.
You'll see an example of this in a moment during my process walkthrough.
Why You Might Want to Use High-Fidelity Wireframes
- Hand-off to Development: High-fidelity wireframes provide accurate visuals, detailed specifications, and design assets that facilitate the handoff process to developers.
- High Visual Realism: High-fidelity wireframes closely resemble the final visual design and provides a realistic representation of the user interface, to potential users and stakeholders.
- User Experience Validation: High-fidelity wireframes allow you to test and validate the user experience more accurately. With realistic visuals, you can simulate user interactions, flows and transitions, enabling users to provide meaningful feedback and uncover potential usability issues before development.
- Design Consistency: By including more visual elements than the mid-fidelity wireframes, high-fidelity wireframes helps establish a consistent visual hierarchy and design language that can be carried over to the final product.
- Style Guide Creation: High-fidelity wireframes play a crucial role in developing a style guide for your design. They establish the visuals and design assets that will be used till the launch of the product.
My Wireframing Process
I worked on a mobile app to help pregnant mothers through their pregnancy journey. I started with paper sketches, moved on to mid fidelity wireframes, and then did my high fidelity wireframes.
Step 1 – Paper Sketches
For my paper sketches, I used the Crazy Eights(8s) method, which is a very quick way to put out ideas and inspirations.
Basically, I took out my drawing book, drew 8 identical phone frames and sketched out how I wanted my design to look using a pen. The sketches were more elaborate than usual, because I wanted to move straight to doing mid-fidelity wireframes.

Step 2 – Moving to Mid Fidelity Wireframes
Next up, I opened a new Figma file on my laptop and transferred my sketches on paper to phone mockups on Figma.
First, I chose the frame I wanted to use for the designs – Iphone 13 pro.
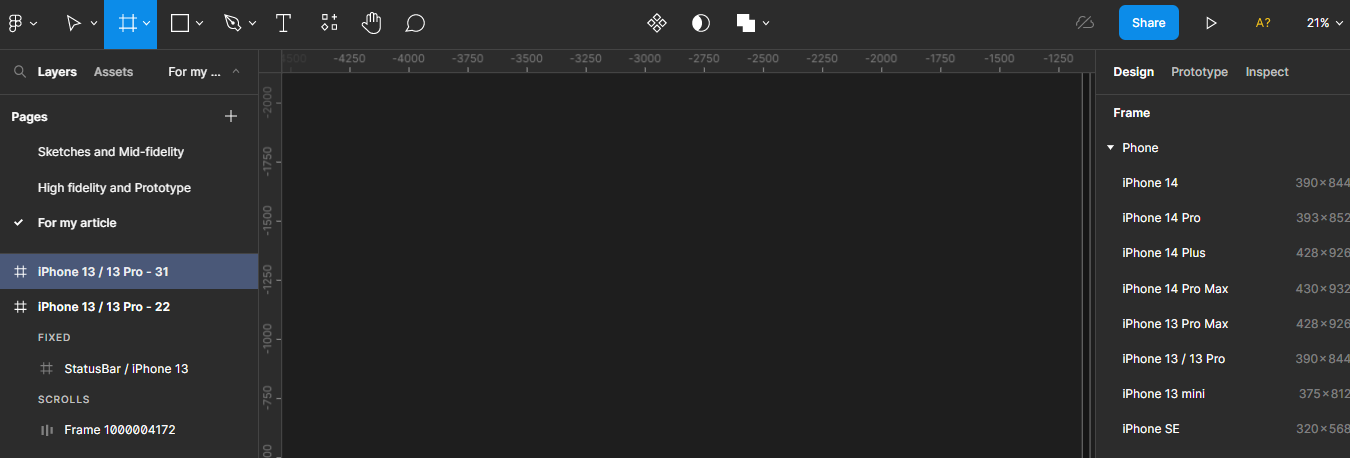
Then I used my sketches as a guide. It was mostly replicating what I already had on paper, digitally.
Next I used rectangles to denote images, and lorem ipsum (dummy text) for parts of the design which needed long texts.
Prior to this, I had created a style guide. So I just got the icons from the style guide.

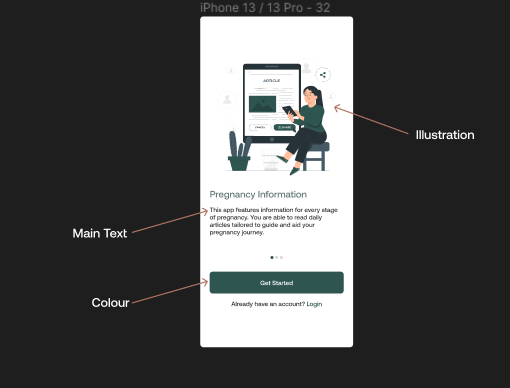
Step 3 – Creating High Fidelity Wireframes
This was the last phase of my wireframing. Here, I added colours, images, and real text to my designs.
- I started by adding colours to the mid-fidelity screens.
- I also wrote out real text for the screens, making sure the copy matched the branding and purpose of the app.
- Lastly, I added illustrations and images where needed, helping users relate to the design.
In high-fidelity wireframing, once the overall structure is in place, you can start adding more details and refining the design. This includes adding visual elements such as images, icons, and typography, as well as defining interactions and transitions.
Share the high-fidelity wireframe with stakeholders, users, or other team members, and gather feedback. Use this feedback to refine the design and make any necessary changes.
Once the wireframe has been approved and refined, finalize it by adding annotations, notes, and any other necessary documentation. The wireframe should be detailed enough to provide a clear understanding of the design to developers, but not so detailed that it hinders the design process.

Note that you can use any type of wireframe you would like to, depending on the specific project you're working on, the stage of the project and your objectives. You should also consider the complexity of the design, the available time and resources, and the needs of the stakeholders and users when determining the appropriate fidelity level for your wireframes.
Conclusion
Wireframing is an essential step in the design process that helps ensure a successful outcome. It enables designers to visualize the layout and functionality of a platform before investing significant time and resources into coding and development.
Incorporating wireframing into your design process can lead to more efficient, effective, and user-friendly designs.