By Sam Williams
In today's tech landscape, integrating AI is no longer a luxury – it's a necessity.
AI-driven applications have the potential to transform user experiences, automate complex tasks, and unlock new realms of possibilities. Understanding and leveraging AI APIs is a pivotal skill for developers looking to stay at the forefront of innovation.
Brief Overview of AI APIs
Artificial Intelligence APIs are powerful tools that allow developers to tap into the capabilities of pre-trained machine learning models. These APIs expose functionalities like natural language processing, computer vision, and more, enabling developers to easily incorporate advanced AI capabilities into their applications.
You no longer have to understand training epochs and neural network architecture to use AI in your projects and build incredibly powerful features for your users.
The purpose of this tutorial:
The goal of this tutorial is to equip you with the knowledge and practical skills you need to seamlessly integrate AI APIs into your projects.
I'll walk you through the entire process, from choosing the right API for your specific needs to hands-on implementation and best practices for seamless integration.
By the end, you'll be well-equipped to infuse AI-powered intelligence into your applications, opening up a world of new possibilities.
So, let's embark on this journey together and unlock the true potential of AI APIs.
Current AI API Options
There are more and more AI services available through a simple API than ever before. In this article we’ll be using Amazon Bedrock, but there are loads more out there. Even Amazon Bedrock has 6 models available, with more coming in the future.
Comparing available AI APIs
To help you make an informed decision, let's compare some of the leading AI APIs available in the market. Below is a comparison table of some prominent options:
| API | Description | Price | |||
|---|---|---|---|---|---|
| GPT-3.5 (16k) | Cutting-edge language model that can understand as well as generate natural language or code | $0.0003/ 1000 input tokens $0.004/ 1000 output tokens | |||
| GPT-4 (32K) | OpenAI’s most advanced system, producing safer and more useful responses | $0.06/ 1000 input tokens $0.12/ 1000 output tokens | |||
| A2I Jurassic-2 Mid model (Bedrock) | Mid-sized model, designed to strike the right balance between exceptional quality and affordability | $0.0125/ 1000 input tokens $0.0125/ 1000 output tokens | |||
| A2I Jurassic-2 Ultra model (Bedrock) | AI21’s most powerful model, offering exceptional quality | $0.0188/ 1000 input tokens $0.0188/ 1000 output tokens | |||
| Anthropic Claude Instant (Bedrock) | Cutting-edge general purpose large language model | $0.00163/ 1000 input tokens $0.01102/ 1000 output tokens | |||
| Stability AI (Bedrock) | Image Generation | $0.018 - $0.072 per image depending on size and quality |
Key factors to consider when selecting an API
When choosing an AI API for your project, it's crucial to consider several key factors:
- API capabilities and features: Assess the specific functionalities offered by the API and ensure they align with your project requirements. The quality of the generated content can also vary a lot between models, so it's a good idea to test them out and see how well they perform for your use case.
- Scalability and performance: Evaluate the API's ability to handle varying workloads and ensure it meets your performance expectations, especially during peak usage.
- Cost considerations: Understand the pricing model of the API, including any associated costs for usage, and determine its compatibility with your budget.
- Data privacy and security: Ensure that the API provider complies with data protection regulations and has robust security measures in place to safeguard sensitive information.
By taking these factors into account, you'll be better equipped to choose the AI API that best suits the needs of your project.
For this tutorial we’re going go with Amazon Bedrock using the A2I Jurassic-2 Mid model.
How to Request Model Access
As this service is brand new, you have to request access to the models you want to use.
To do this, log into your AWS account, Search for “Bedrock” and then select the “Base models” tab on the left. Mouse over any model and it’ll say that you don’t currently have access and to request access in “Model Access”.
This lists all of the models. Click the edit button in the top right, select the models you want to have access to and then click “Save”. For this you need to select Jurassic-2 Ultra and Jurassic-2 Mid.
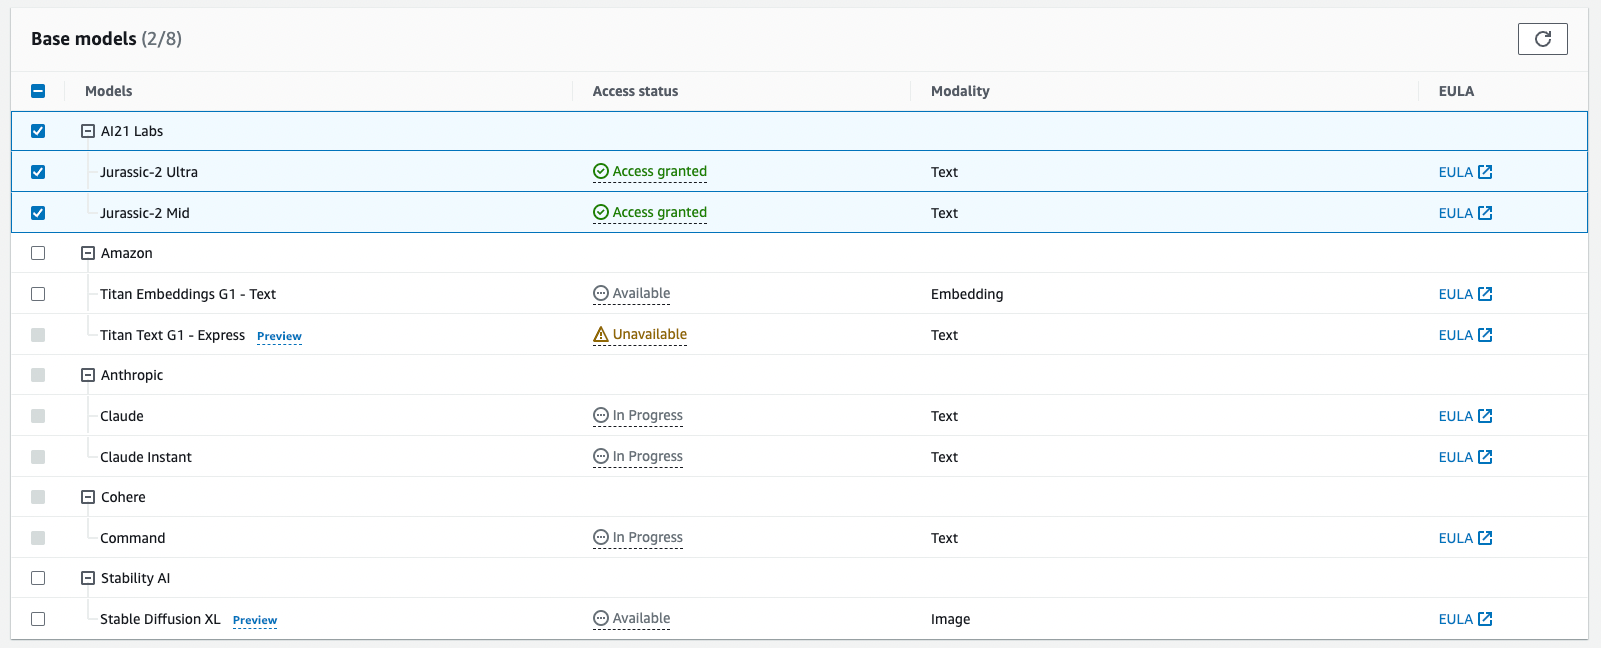 Select models for which you'd like to request access
This should only take a minute or two to be approved but best to do it ASAP.
Project: Build a Holiday Planning API
What Our API Will Do
Our API is designed to simplify holiday planning. By providing the state code of your destination and the duration of your visit, we'll generate a personalised itinerary, suggesting the best activities and places to explore.
How to set up the Repo
We'll be using the Serverless Framework for this project. If you've never used it before then you can follow this quick tutorial to install Serverless and get everything set up.
We're going to be using JavaScript for this project so create a new repo like this:
sls create --template aws-nodejs --path aiTourGuide
Create a Lambda with comments
We need to start by creating our Lambda function. I like to store mine under /src/functions/{functionName}/index.js. In this case my functionName will be aiTourGuide.
In the new index.js file we can start with this code. It tries to get the state and the duration from the request and then returns a response.
exports.handler = async (event) => {
    const { state_code, duration } = JSON.parse(event.body);

    // Code for generating itinerary will go here

    const response = {
        statusCode: 200,
        body: JSON.stringify('Itinerary generated successfully!')
    };

    return response;
};
Sign up to the National Park Service API
Now we want to get some data to pass to the AI. We could just ask it to generate an itinerary for us, but giving it specific data to work with usually ends up with a much better result.
- Visit the National Park Service API website and sign up for an API key.
- Once registered, you'll receive an API key by email to access their services.
Add the National Park Service API Call to the Lambda
const axios = require('axios');
const parksApiKey = process.env.parksApiKey

exports.handler = async (event) => {
    const { state_code, duration } = JSON.parse(event.body);

    // Make a request to the National Park Service API
    const parksApiUrl = `https://developer.nps.gov/api/v1/parks?stateCode=${state_code}&api_key=${parksApiKey}`

    const parksResponse = await axios.get(parksApiUrl);

    // Extract relevant data from the response
    const parks = parksResponse.data.data.map(park => {
        return {
            name: park.fullName,
            description: park.description
        };
    });

    // Code for generating itinerary with park data will go here

    const responseBody = parks;
    const response = {
        statusCode: 200,
        body: JSON.stringify(responseBody)
    };

    return response;
};
We're making the request to the parks API using Axios, then getting just the name and description of each park from the response. For now we are just going to return that data in the API to see what we get.
One thing we're doing is to get the parksApiKey from the environment variables at the start of the file. To add the parksApiKey as an environment variable in a Serverless Framework serverless.yml file, you can follow these steps:
- Open your
serverless.ymlfile in a text editor. - Locate the
providersection, which defines the AWS provider settings. Under it, add anenvironmentblock if it doesn't already exist. - Within the
environmentblock, define your environment variable like this:
provider:
  name: aws
  runtime: nodejs18.x
  environment:
    parksApiKey: "YOUR API KEY"
Configure the Serverless.yml config
To actually deploy an API and our code, we need to tell Serverless what to deploy. We do this by changing the functions section of the config.
functions:
  aiTourGuide:
    handler: src/functions/aiTourGuide/index.handler
    events:
      - httpApi:
          path: /tourguide
          method: post
This means we’ll be deploying a aiTourGuide lambda function with a post API endpoint pointing at /tourguide. Just make sure that the handler section is the correct path for your repo and folder structure.
If you have configured your AWS credentials to a specific profile, you need to add that to your provider section, otherwise it will use your default AWS credentials.
provider:
  name: aws
  runtime: nodejs18.x
  profile: "Your Profile" // optional
Deploy and test
Now that we've created our Lambda function and integrated the National Park Service API, it's time to deploy and test our holiday planning API.
- Deployment: All we need to do is run
sls deployagain and our changes will be deployed. - Testing: Use a tool like Postman to send a POST request to your API with the required parameters, such as
state_codeandduration. You should get a response like this.
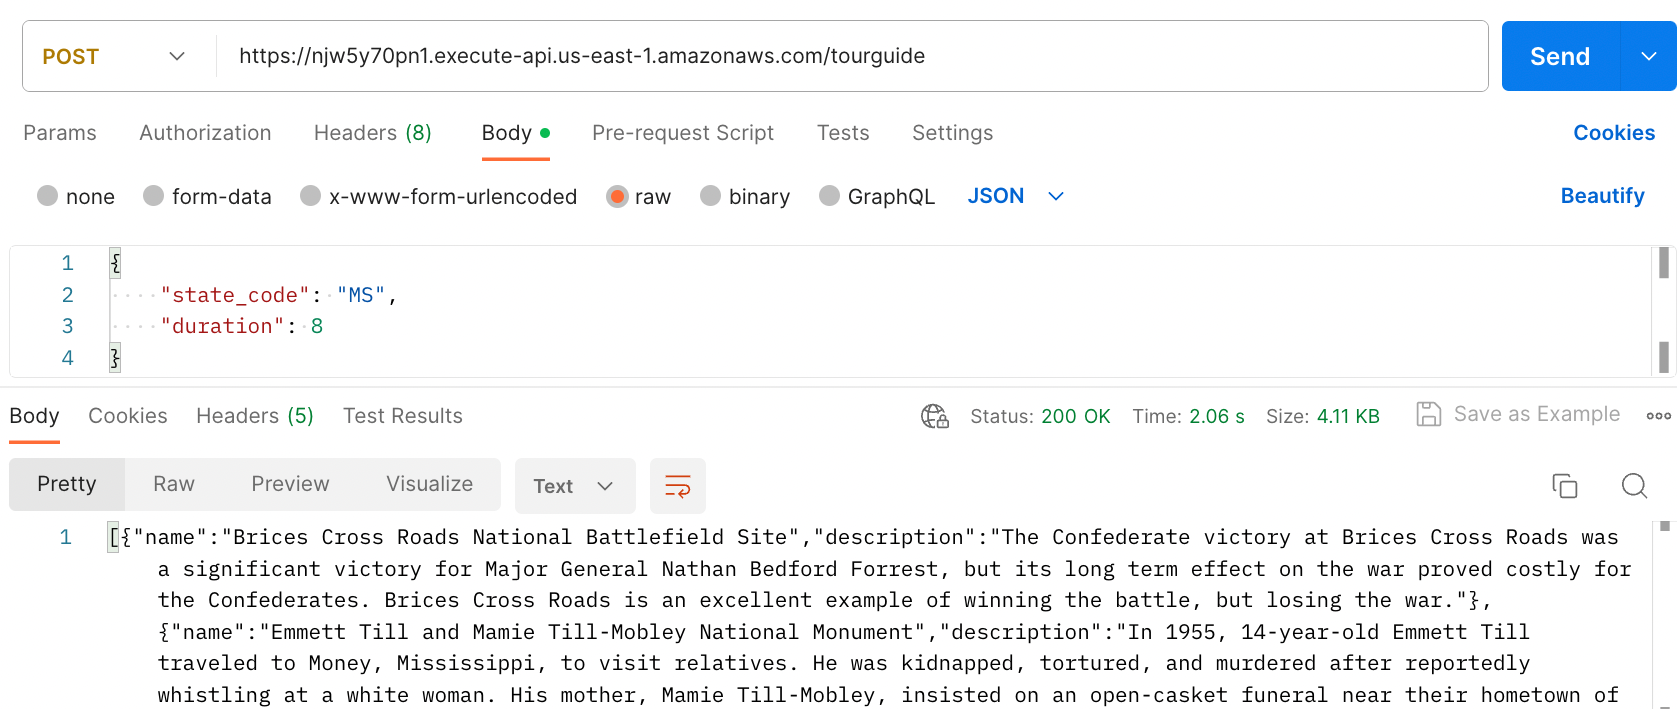 Image showing the response
You can see we have an array of objects, with the name of the park and the description. Exactly what we wanted.
How to prepare our AI prompt
Next, we'll prepare a request to an AI API to enhance our holiday planning recommendations. We'll be using the A2I Jurassic-2 Mid model using Amazon Bedrock to generate engaging descriptions for the recommended activities.
I tend to start relatively simple and refining the prompt as I see how it works. I also wrap my prompt generation in a function. This can get quite large and complex later on, so it’s nicer not having it in the main handler. I often have it in it’s own file!
Lets start with something like this:
const generatePrompt = ({parks,duration}) => {

    const stringListOfParks = parks.map(({name, description}) => {
        return `Park Name: ${name}:
    description: ${description}`}).join(`

    `)

    const prompt = `You are an expert tour guide in the US who focusses on designing holiday itinararies for spending time in the national parks.
    I am going to give you descriptions of multiple parks in the area as well as the duration of the trip.
    Create an itinerary for this trip, outlining what activities can bo done on each day.

    Trip duration = ${duration} days

    Local national parks:
    ${stringListOfParks}
    `;
    return prompt
}
The stringListOfParks function turns the object array into a long string. This might not be necessary but we’ll have to wait and see.
Then we create the AI prompt. We tell the AI who they are supposed to be, what information we’re going to give them, and what we want them to do. To start with this is fine, but over time we can test different changes to our prompt to see what generates the best results.
How to call the AI API
Now that we have a prompt, we can pass this to Amazon Bedrock to handle our prompt. We need to start by importing the AWS SDK and creating the bedrockruntime.
You’ll also need to install the AWS SDK for the bedrock as it’s not currently included in any of the lambda versions:
npm i -S @aws-sdk/client-bedrock-runtime
And we add this code to the top of our Lambda file.
import { BedrockRuntime } from "@aws-sdk/client-bedrock-runtime";
import axios from "axios";

const bedrockruntime = new BedrockRuntime()
We’re also using imports now, which means we need to change our index.js file to an index.mjs. If you did this using TypeScript then you wouldn't have to rename your file.
We need to call the invokeModel command and pass it a set of parameters. I find that it is cleaner to create a separate object for the params than doing it all in one place.
Currently there isn’t an async version of the invokeModel command, so we’ll wrap it in a promise.
const aiPrompt = generatePrompt({parks,duration});

const aiModelId = 'ai21.j2-mid-v1'; // we're using the A2I Jurassic-2 Mid model

const invokeModelParams = {
    body: JSON.stringify({
        prompt: aiPrompt,
        maxTokens: 200,
        temperature: 0.5,
        topP: 0.5, // optional
    }),
    modelId: aiModelId,
    accept: 'application/json',
    contentType: 'application/json'
};

const aiResponse = await new Promise((resolve, reject) => {
    bedrockruntime.invokeModel(invokeModelParams, function(err, data) {
        if (err) {
            reject(err); // an error occurred
        } else {
            resolve(data); // successful response
        }
    });
});

// Extract AI-generated text from the response
const aiResponseJson = JSON.parse(
    new TextDecoder().decode(aiResponse.body)
);
const aiItinerary =  aiResponseJson.completions[0].data.text;

const responseBody = aiItinerary;
const response = {
    statusCode: 200,
    body: responseBody,
};
return response;
You may notice that we’re passing more than just our prompt in the body. That is because we can change a few other things to get a different output.
LLMs work by choosing the next word in the sentence. temperature and topP control whether the model chooses unusual words or sticks to the most likely word.
- Temperature: Closer to 1 means more unusual words will be chosen, closer to 0 chooses more likely words.
- topP: When choosing the next word, limit how many options the AI has to choose from by summing up the probabilities. Numbers closer to 1 mean more unlikely words are included.
In our case we want a relatively creative response but also for things to be correct, so 0.5 is a good starting setting for both. If we were asking it to describe a sci-fi scene we would want to go with temp=0.7 topP=0.8, or if we were asking it to write data processing code we would reduce it to 0.2 as we want an answer that is more likely to be correct.
These are both things that you can change and test to see what values give the best results. Which parameters you pass in also depends on the model.
How to add IAM permissions to call Bedrock
If your Lambda function needs to access AWS resources or services like Amazon Bedrock, we need to make sure to configure the appropriate IAM permissions.
In your serverless.yml file you need to add this to your provider section. This says that this Lambda has permission to use bedrock:InvokeModel.
provider:
  name: aws
  runtime: nodejs18.x
  environment:
    parksApiKey: YOUR API KEY
  iam:
    role:
      statements:
        - Effect: "Allow"
          Action:
            - "bedrock:InvokeModel"
          Resource: "*"
Deploy and test (again)
After integrating the AI API and ensuring the proper IAM permissions, redeploy your Lambda function by running sls deploy. Then we can test it once more to ensure the AI-generated holiday itinerary is working properly.
Using the same request as last time, this is the response I got, and you should get something similar.
Day 1:
- Arrive in Jackson, Mississippi and check into hotel
- Visit Medgar and Myrlie Evers Home National Monument
- Overnight in Jackson
Day 2:
- Drive to Natchez, Mississippi and check into hotel
- Visit Natchez National Historical Park
- Overnight in Natchez
Day 3:
- Drive to Vicksburg, Mississippi and check into hotel
- Visit Vicksburg National Military Park
- Overnight in Vicksburg
Day 4:
- Drive to Tupelo, Mississippi and check into hotel
- Visit Tupelo National Battlefield
- Overnight in Tupelo
Day 5:
- Drive to Corinth, Mississippi and check into hotel
- Visit Shiloh National Military Park
- Overnight in Corinth
Day 6:
- Drive to Jackson, Mississippi and check into hotel
- Visit Brices Cross Roads National Battlefield Site
- Overnight in Jackson
Day 7:
- Drive to Gulf Islands National Seashore and check into hotel
Fixes to the Code
There are few small issues:
- It cuts off half way through day 7 even though we said 8 days.
- The descriptions aren’t very interesting.
How to extend the token limit
The reason that the response was cut off is that we initially passed a maxTokens: 200 in our AI command. This should be a simple fix of increasing this number.
We could set it to a very high number like 10,000 but we still have to pay for all of the tokens generated. Setting it to 10,000 won’t make every response 10,000 tokens long, but having a more sensible limit protects us from having an unexpected AWS bill.
I’m setting mine to 1000. If you want to get fancy you could change this based on the number of days they are traveling for.
How to improve the itinerary
This one is a bit harder. The problems are that it is very bland and it repeats a lot of “drive here and check into the hotel”, “Overnight in Y”.
We can try improving our prompt to get a better result. First, let's explicitly say that it doesn’t need to tell us about the driving or checking into a hotel.
// New content
Do not write about driving. Do not write about checking into hotels. Do not write about where to overnight.
We can also ask for a more descriptive result. I added another line to the prompt:
Give a description of the things they will see and what there is to do in each park.
One trick for redeploying when you have only changed code is function deployments. You can run sls deploy function -f {function name} which in our case is sls deploy function -f aiTourGuide. This is a lot quicker than redeploying the whole app, allowing you to test sooner and therefore itterate quicker.
Failing to improve
Having made this change, I hoped that the result would improve, but it didn’t. I tried about 15 different prompts and they all kept the same structure and ignored my instructions to not talk about hotels, driving, or staying overnight.
Option 2 – change other parameters
With the AI always giving a very similar and boring response, you can start changing other things. To increase the creativity of the AI, increase the temperature. I went with 0.8.
This should get the AI to select more unusual words and create a less structured and more random response.
Unfortunately, the response was almost identical.
Option 3 – change the model
One of the awesome things about using Bedrock is that there are multiple models to use, and switching between them can be very easy.
We’ve been using the Jurassic-2 Mid model until now, but it’s not up to this task. Maybe it is good with much smaller prompts or simpler tasks. For now we can switch to using Jurassic-2 Ultra. The amazing thing is this is just one line of code:
const aiModelId = "ai21.j2-ultra-v1"; // used to be ai21.j2-mid-v1
Because they’re from the same company, they have identical parameters. If you wanted to switch to one of the other models you might have to change a few other options in the body of invokeModelParams.
One thing I do advise with this larger model is increasing the Lambda timeout. By default it is at 6s but sometimes that isn’t enough.
functions:
  aiTourGuide:
    handler: src/functions/aiTourGuide/index.handler
    timeout: 26  # < new config line
    events:
      - httpApi:
          path: /tourguide
          method: post
The Results
With our updated prompt and our new model we get a far better result:
Day 1:
Start your trip by exploring Brices Cross Roads National Battlefield Site. Learn about how the Confederate victory at Brices Cross Roads was a significant victory for Major General Nathan Bedford Forrest, but its long term effect on the war proved costly for the Confederates. Brices Cross Roads is an excellent example of winning the battle, but losing the war.
Day 2:
Today, visit Emmett Till and Mamie Till-Mobley National Monument. In 1955, 14-year-old Emmett Till traveled to Money, Mississippi, to visit relatives. He was kidnapped, tortured, and murdered after reportedly whistling at a white woman. His mother, Mamie Till-Mobley, insisted on an open-casket funeral near their hometown of Chicago. Her brave decision let the world see the racist violence inflicted upon her son and set the Civil Rights Movement into motion.
Day 3:
Gulf Islands National Seashore is the perfect place to visit today. Millions of visitors are drawn to the Gulf of Mexico for Gulf Islands National Seashore's emerald coast waters, magnificent white beaches, fertile marshes and historical landscapes. Come explore with us today!
Day 4:
Medgar and Myrlie Evers Home National Monument is next on the list. Medgar and Myrlie Evers were partners in the civil rights struggle. The assassination of Medgar Evers in the carport of their home on June 12, 1963, was the first murder of a nationally significant leader of the American Civil Rights Movement, and it became a catalyst for passage of the Civil Rights Act of 1964. Myrlie Evers continued to promote issues of racial equality and social justice.
Day 5:
Natchez National Historical Park is a great place to visit today. Discover the history of all the peoples of Natchez, Mississippi, from European settlement, African enslavement, the American cotton economy, to the Civil Rights struggle on the lower Mississippi River.
Day 6:
Today, explore the Natchez Trace National Scenic Trail. The Natchez Trace National Scenic Trail is five sections of hiking trail running roughly parallel to the 444-mile long Natchez Trace Parkway scenic motor road. The foot trails total more than 60 miles and offer opportunities to explore wetlands, swamps, hardwood forest, and the history of the area. For What's Open What's Close visit www.nps.gov/natr/planyourvisit/what-is-open-what-is-closed.htm
Day 7:
The Natchez Trace Parkway is the perfect place to visit today. The Natchez Trace Parkway is a 444-mile recreational road and scenic drive through three states. It roughly follows the "Old Natchez Trace" a historic travel corridor used by American Indians, "Kaintucks," European settlers, slave traders, soldiers, and future presidents. Today, people can enjoy not only a scenic drive but also hiking, biking, horseback riding, and camping along the Parkway.
Day 8:
Finish your trip by exploring Shiloh National Military Park. Visit the sites of the most epic struggle in the Western Theater of the Civil War. Nearly 110,000 American troops clashed in a bloody contest that resulted in 23,746 casualties; more casualties than in all of America's previous wars combined. Explore both the Shiloh and Corinth battlefields to discover the impact of this struggle on the soldiers and on the nation.
I then decided to try it with the Claude Instant models to see how well it did. To do this you do have to change the model parameters passed in, but it isn't too different.
As you can see, this model does about as well as the Jurassic-2 Ultra model, but looking back at the pricing table, it's 10x cheaper for the input tokens and 60% of the price for output tokens.
Based on the descriptions provided, here is an 8-day itinerary focusing on activities in the national parks:
Day 1: Spend the morning at Brices Cross Roads National Battlefield Site learning about the Confederate victory there through wayside exhibits and a short film. In the afternoon, visit Emmett Till and Mamie Till-Mobley National Monument to learn about their story and its impact on the civil rights movement.
Day 2: Dedicate the full day to exploring Gulf Islands National Seashore. Hike or bike along the beautiful coastal trails, beachcomb for seashells, and spot wildlife along the shoreline and in the marshes.
Day 3: Spend the morning touring the preserved Medgar and Myrlie Evers Home National Monument and learning about their civil rights activism. In the afternoon, visit Natchez National Historical Park to discover the diverse history of the Natchez area through historic buildings, walking trails, and exhibits.
Day 4: Enjoy a scenic drive along the Natchez Trace Parkway, stopping at various overlooks for photo opportunities. Consider hiking or biking portions of the adjacent Natchez Trace National Scenic Trail as well for more active exploration.
Day 5: Immerse yourself in the epic Civil War history of Shiloh National Military Park by touring the battlefield sites and learning about the bloody two-day battle that took place there.
Day 6: Spend the morning at Tupelo National Battlefield learning about the 1864 battle that took place in the city. In the afternoon, continue on to Vicksburg National Military Park for an overview film and to tour the extensive battlefields and fortifications.
Day 7: Dedicate another full day to further exploring Vicksburg NMP, such as taking a ranger-led tour or hiking additional trails to discover the nuances of the long siege that took place here.
Day 8: Before departing, consider returning to a favorite park from earlier in the week for additional exploration or to see anything you may have missed initially.
I also tested the Claude v2, which is more advanced but also costs about the same as the Jurassic-2 Ultra model. This didn't make a noticeably better response, so for this use case I would definitely stick with the Anthropic Claude Instant model.
How to Take it to the Next Level
That’s a really good start for such a simple prompt. You could iterate on it, improving it and testing different styles and wording. You could try and find other sources of information to pass into your prompt, as giving it useful information to use in the response is often the best way to improve the results of these models.
How to Use this Process in Other Apps
Through this process, you've learnt to build an app that leverages the power of AI. You can now follow this same process to add AI power to your own AWS apps.
- Find a use case where AI could generate you some content
- Gather some data that will help the AI create a better response.
- Generate the prompt
- Call the
InvokeModelfunction in Bedrock - Deploy and Test your AI function
- Change the Prompt and Parameters to see what results in the best responses
How to Learn More about Serverless
Now that you know how to build AI into your apps, you probably have loads of app ideas.
If you want to learn how to build the rest of that idea then check out my ultimate guide to Serverless or my course which helps you Master Serverless by building 7 real world projects.