
In today's data-driven world, automation is key to streamlining tasks and saving time. In this beginner-friendly tutorial, I'll walk you through the process of automating data exports from a PostgreSQL database and sending them as an email attachment using Python.
This step-by-step guide will help you grasp the fundamentals of working with databases, data manipulation, and email communication, all while automating these processes with a Python script.
Business Context
Imagine you're a part of an organization where your managers expect a weekly report filled with valuable insights. But creating this report is far from a straightforward task.
To get the information you need, you have to manually run ten different database queries, gather the results, and then meticulously compile them into an Excel spreadsheet. It's a time-consuming and error-prone process that can leave you exhausted.
In this scenario, wouldn't it be a game-changer if Python could take the reins and handle this entire process for you?
Picture this: Every week, without any manual intervention, Python seamlessly extracts the required data, compiles it into a neat Excel sheet, and even sends it off to your managers like clockwork.
This tutorial will help you learn how to do this. I'll walk you through the steps to automate this process, making your weekly or monthly reporting a breeze, and freeing you up to focus on more critical tasks.
Table of Contents
- Prerequisites
- How to Set Up Your Virtual Environment
- How to Set Up Your Sample Database
- How to Set Up Logging and Environment Variables
- How to Extract the Data From the Database
- How to Structure the Booking Data with the
BookingInfoClass - How to Convert the Data into an Excel Sheet
- How to Combine the Functionalities
- How to Send an Email with the Bookings Data Report
- How to Test the Flow
- How to Schedule the Application
- Wrapping Up
Prerequisites
Before you get started, make sure you have the following:
- Python installed on your computer. You can download Python from Python.org.
- Basic knowledge of the Python programming language
- Familiarity with sending emails in Python
- PostgreSQL installed on your computer. You can download PostgreSQL from here.
How to Set Up Your Virtual Environment
Before you start coding, you'll need to make sure you have all the necessary tools and libraries installed.
To ensure that you have a clean and isolated environment, you'll create a virtual environment using venv.
Create a project directory and navigate to it in the terminal:
mkdir report-automation
cd report-automation
Create a virtual environment named env using the following command:
python -m venv env
Python now ships with the pre-installed venv library to create virtual environments.
Activate the virtual environment like this:
source env/bin/activate
Note: if you're on Windows, you'll need to use source env/Scripts/activate to activate the environment.
You should see (env) in your terminal prompt, indicating that the virtual environment has been activated.
How to Install the Required Libraries
Now that you've created the virtual environment, you can install the following libraries:
psycopg2: Python adapter for PostgreSQL, enabling Python applications to interact with PostgreSQL databases.pandas: A versatile data manipulation and analysis library for Python, ideal for working with structured data.xlsxwriter: Python module for creating and formatting Excel (XLSX) files, useful for generating reports and spreadsheets.
To install the libraries, run the following command:
pip install psycopg2 pandas xlsxwriter
How to Set Up Your Sample Database
In this section, I will guide you through setting up a demo database named "airlines" that we'll use throughout this tutorial. The database includes three tables: bookings, flights, and airports_data.
I will provide you with an SQL script file named airlines_db.sql that creates the database and populates it with sample data. To set up the database, you will need PostgreSQL installed on your system.
Download and Install the Database
- Download the SQL script file "airlines_db.sql" from here.
- Open your terminal or command prompt.
- Use the following command to install the database. Make sure you have the PostgreSQL command-line tools installed and that you can access the
psqlcommand. Replacepostgreswith your PostgreSQL username if it's different.
psql -f airlines_db.sql -U postgres
This command will execute the SQL script and create the "airlines" database with the bookings, flights, and airports_data tables.
Schema Description
The main schema in the database is bookings. Let's take a closer look at the tables in the "airlines" database:
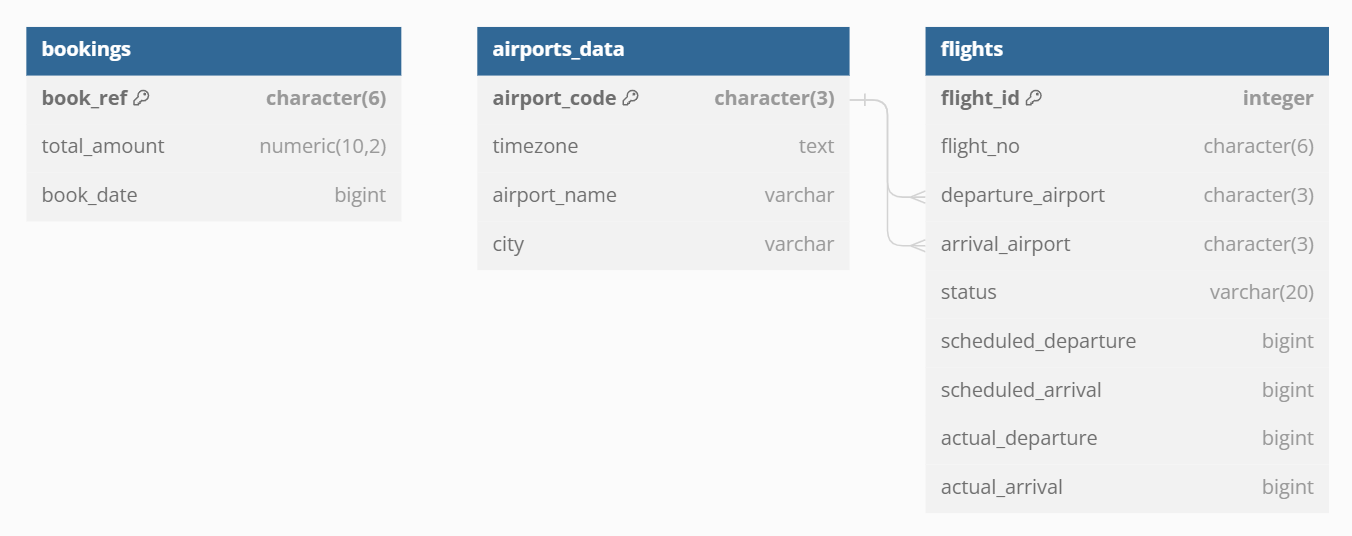 Schema Diagram
Table bookings.bookings
The "bookings" table is designed to store crucial information about bookings made for flights. Each booking is uniquely identified by the book_ref, which is a character(6) field. The total_amount field is a numeric(10,2) type and represents the total cost of the booking.
To track the booking date and time, the table includes a book_date field of type bigint. This table serves as the central repository for booking data and is essential for tracking passenger reservations, costs, and booking dates.
Table bookings.flights
The "flights" table is dedicated to capturing comprehensive details about flights, including information about their statuses, scheduled and actual times of departure and arrival, and other important flight-related data.
The primary key for this table is the flight_id, an integer identifier. Each flight is associated with a specific flight number denoted by the flight_no field, a character(6) type.
To understand the flight's origin and destination, the departure_airport and arrival_airport fields store the departure and arrival airport codes as character(3) types, respectively.
The status field is a character varying(20) that records the flight's status, which must be one of 'On Time,' 'Delayed,' 'Departed,' 'Arrived,' 'Scheduled,' or 'Cancelled.' The table also includes fields for scheduled departure and arrival times (scheduled_departure and scheduled_arrival) and actual departure and arrival times (actual_departure and actual_arrival).
Furthermore, this table establishes two essential foreign keys: flights_arrival_airport_fkey and flights_departure_airport_fkey, which link to the airport_code in the "airports_data" table. This establishes connections between flights and their respective departure and arrival airports.
Table bookings.airports_data
The "airports_data" table serves as a repository for data related to airports and their geographic locations. Each airport is identified by a unique character(3) code stored in the airport_code field, which also serves as the primary key.
The timezone field, of type text, records the specific timezone of the airport, providing essential information for scheduling and operational purposes. The airport_name field is a character varying type that holds the name of the airport. Additionally, the table includes the city field as a character varying type, indicating the city in which the airport is situated.
These details enable the "airports_data" table to provide a comprehensive overview of airport locations and information. This serves as a reference for the "flights" table through the flights_arrival_airport_fkey and flights_departure_airport_fkey foreign keys, facilitating the association between flights and their respective departure and arrival airports.
How to Set Up Logging and Environment Variables
In this section, we'll configure logging to provide informative messages and handle errors throughout the code. We'll also set up environment variables to securely store sensitive information and configuration parameters. These practices enhance code readability, maintainability, and security.
Logging Configuration
We will utilize Python's built-in logging module to configure a logging system. Logging is essential for tracking the execution flow of the code and capturing important information or errors.
The logging.basicConfig method is called to define the format of log messages and set the logging level to INFO.
import logging

logging.basicConfig(
    format="%(asctime)s | %(levelname)s : %(message)s", level=logging.INFO
)
- Format: The
formatparameter specifies the format of log messages. In this case, each log entry includes a timestamp, log level (for example, INFO, ERROR), and the actual log message. - Log Levels: We set the logging level to
INFO, which means the logger will record informational messages. You can also use higher severity levels, such asWARNINGorERROR, for more critical issues.
You can learn more about logging in Python in this tutorial.
How to Manage Environment Variables
We will create a .env file to manage environment variables. Environment variables are used to store sensitive information and configuration settings, allowing us to keep such data separate from the code.
In this case, we set environment variables for email credentials and database connection details.
export EMAIL=
export PASSWORD=
export EMAIL_PORT=587
export SMTP_SERVER=smtp.gmail.com
export DB_HOSTNAME=localhost
export DB_NAME=airlines
export DB_PORT=5432
export DB_USERNAME=postgres
export DB_PASSWORD=postgres
Here's a breakdown of the variables:
- EMAIL: The email address to be used for sending emails.
- PASSWORD: The password associated with the email account.
- EMAIL_PORT: The port for the email server (for example, SMTP server). The default is 587 for secure email transmission (TLS/SSL).
- SMTP_SERVER: The SMTP server address, often specific to the email service provider.
- DB_HOSTNAME: The hostname or IP address of the PostgreSQL database server.
- DB_NAME: The name of the PostgreSQL database.
- DB_PORT: The port number for connecting to the database (default is 5432 for PostgreSQL).
- DB_USERNAME: The username for authenticating with the database.
- DB_PASSWORD: The password for the database user.
Make sure you run source .env to load the environment variables.
By using environment variables, sensitive data like passwords and email credentials can be kept separate from the code, reducing the risk of accidental exposure or unauthorized access. The code can access these variables at runtime, ensuring security and flexibility in configuration.
How to Extract the Data From the Database
Let's start by setting the database configurations.
import logging
import os

logging.basicConfig(
    format="%(asctime)s | %(levelname)s : %(message)s", level=logging.INFO
)

DB_CONFIG = {
    "host": os.environ.get("DB_HOSTNAME"),
    "database": os.environ.get("DB_NAME"),
    "user": os.environ.get("DB_USERNAME"),
    "password": os.environ.get("DB_PASSWORD"),
}
The DB_CONFIG dictionary is used to store the configuration parameters for connecting to the PostgreSQL database. These parameters include the host, database name, username, and password. These values can be set through environment variables.
How to Connect to the Database
Before we extract the data from the database, we need to connect to our database. We will use the psycopg2 library to connect to the PostgreSQL database.
We will start by defining a DataExporter class that will contain methods to extract the database and generate the Excel sheet.
class DataExporter:
    def __init__(self):
        """Initialize the DataExporter with the database configuration."""
        self.db_config = DB_CONFIG
The class constructor initializes the DataExporter with the database configuration stored in the DB_CONFIG dictionary.
Next, let's define a method that connects to the database.
...
import psycopg2

...

class DataExporter:
    def __init__(self):
        """Initialize the DataExporter with the database configuration."""
        self.db_config = DB_CONFIG

    def __connect_to_database(self) -> None:
        """
        Establish a connection to the PostgreSQL database.

        Raises:
            Exception: If a connection to the database cannot be established.
        """
        try:
            self.conn = psycopg2.connect(**self.db_config)
            self.cursor = self.conn.cursor()
            logging.info("Connected to the database")
        except Exception as e:
            logging.error(
                "Failed to connect to the database with error: %s", e)
            raise
The __connect_to_database private method is responsible for establishing a connection to the PostgreSQL database. It uses the psycopg2 library to create a connection and a cursor for executing SQL queries. If the connection fails, it logs an error and raises an exception.
You can learn more about exception handling in Python here.
How to Fetch Data from the Database
Now we'll define another private method that connects to the database and fetches the total number of bookings and the total amount from the database.
from datetime import datetime

class DataExporter:
    ...

    def __fetch_from_database(self, start_timestamp, end_timestamp) -> list | None:
        """
        Fetch booking data from the database for a given time range.

        Args:
            start_timestamp (datetime): The start of the time range.
            end_timestamp (datetime): The end of the time range.

        Returns:
            list: A list containing booking data (num_bookings, total_amount) or None if an error occurs.
        """
        self.__connect_to_database()
        query = f"""
        SELECT COUNT(*) AS num_bookings, SUM(total_amount) AS total_amount
        FROM bookings
        WHERE book_date >= {int(start_timestamp.timestamp()) * 1000} AND book_date <= {int(end_timestamp.timestamp()) * 1000}
        """
        logging.info(
            "Exracting bookings data from database for start timestamp=%s and end_timestamp=%s",
            start_timestamp,
            end_timestamp,
        )
        result = None
        try:
            self.cursor.execute(query)
            result = list(self.cursor.fetchone())
            result.append(
                f'{start_timestamp.strftime("%d %b, %Y")} - {end_timestamp.strftime("%d %b, %Y")}'
            )
            logging.info(
                "Successfully exracted bookings data from database for start timestamp=%s and end_timestamp=%s",
                start_timestamp,
                end_timestamp,
            )
        except Exception as e:
            logging.error(
                "Error occurred while extracting bookings data from database: %s", e
            )
        return result
This private method retrieves booking data from the database for a specified time range.
It takes two datetime objects as arguments, start_timestamp and end_timestamp. It also constructs a SQL query to retrieve the count of bookings and the total booking amount for that time range.
The query is executed, and if it's successful, the method returns the data as a tuple. We convert the tuple into a list and append the timeframe for which data was extracted to the list. If an error occurs during the database interaction, it logs an error and returns None.
Using the above method, you can extract booking data for various timeframes, whether it's for a week, a month, a year, or any custom time range of your choice.
How to Structure the Booking Data with the BookingInfo Class
In this section, we will define a BookingInfo class in booking_info.py, which serves as a structured container for booking data retrieved from the database. The class encapsulates booking-related information, making it easier to work with and present the data.
from decimal import Decimal


class BookingInfo:
    def __init__(self, data_list: list):
        """
        Initialize BookingInfo with data from the database.

        Args:
            data_list (list): A list containing booking data (total_bookings, total_amount, timestamp).

        Note:
            The total_amount is converted to a Decimal type.

        """
        self.__total_bookings, self.__total_amount, self.__timestamp = data_list
        self.__total_amount = Decimal(self.__total_amount) if self.__total_amount else Decimal(0)

    def __str__(self) -> str:
        """
        Return a string representation of BookingInfo.

        Returns:
            str: A string in the format "Total Bookings: X, Total Amount: $Y".

        """
        return f"Total Bookings: {self.__total_bookings}, Total Amount: ${self.__total_amount}"

    def get_total_bookings(self) -> int:
        """
        Get the total number of bookings.

        Returns:
            int: The total number of bookings.

        """
        return self.__total_bookings

    def get_total_amount(self) -> Decimal:
        """
        Get the total booking amount as a Decimal.

        Returns:
            Decimal: The total booking amount.

        """
        return self.__total_amount

    def get_timestamp(self) -> str:
        """
        Get the timestamp associated with the booking data.

        Returns:
            str: The timestamp as a string.

        """
        return self.__timestamp
The BookingInfo class is designed to organize and represent booking data returned from the database. It receives a list of values containing total bookings, total booking amount, and a timestamp as input and converts the total amount to a Decimal type. The class offers methods for accessing and presenting this data in a structured manner.
The constructor of the BookingInfo class takes a data_list as input, which is expected to be a list containing the following elements:
total_bookings: An integer representing the total number of bookings.total_amount: A floating-point value representing the total booking amount.timestamp: A timestamp associated with the booking data.
The __init__ method initializes private instance variables (__total_bookings, __total_amount, and __timestamp) with the values from the data_list. It also converts the __total_amount to a decimal type for precise handling of monetary values.
The __str__ method is implemented to provide a string representation of the BookingInfo object. It returns a string in the format "Total Bookings: X, Total Amount: $Y", where X is the total number of bookings and Y is the total booking amount formatted as dollars.
Getter Methods
The class provides three getter methods to access the encapsulated data:
get_total_bookings(): Returns the total number of bookings as an integer.get_total_amount(): Returns the total booking amount as a Decimal type.get_timestamp(): Returns the timestamp associated with the booking data as a string.
By encapsulating the booking data within the BookingInfo class, the code is more organized, readable, and reusable. This structured approach simplifies the handling of booking information throughout the application, making it more intuitive to work with and present the data.
How to Convert the Data into an Excel Sheet
Now that you can retrieve data from the database for a specific time range, you can also generate an Excel sheet based on the extracted data.
To do this, let's define another private method to create the Excel sheet.
...
import pandas as pd

from booking_info import BookingInfo


...

class DataExporter:

    ...

    def __convert_to_excelsheet(self, data: list, sheet_name: str):
        """
        Convert the fetched data into an Excel sheet.

        Args:
            data (list): A list containing booking data.
            sheet_name (str): Name of the Excel sheet to be created.

        Raises:
            ValueError: If there is an error in converting data to an Excel sheet.
        """
        try:
            booking_info = BookingInfo(data)
            data = {
                "": ["Total Bookings", "Total Amount ($)"],
                booking_info.get_timestamp(): [
                    booking_info.get_total_bookings(),
                    booking_info.get_total_amount(),
                ],
            }
            logging.info("Converting the data into pandas dataframe")
            df = pd.DataFrame(data)
            logging.info("Inserting the data into the excelsheet")
            with pd.ExcelWriter(sheet_name, engine="xlsxwriter") as writer:
                df.to_excel(writer, sheet_name="Sheet1", index=False)
            logging.info("Successfully inserted data into the excelsheet")
        except ValueError as e:
            logging.error("Error converting data into excel: %s", e)
The __convert_to_excelsheet method within the DataExporter class is responsible for structuring and converting extracted booking data into an Excel sheet.
It accepts two input parameters. The first parameter, data, is expected to be a list containing specific booking data. This data includes the total number of bookings, the total booking amount, and a timestamp for which data was extracted. The second parameter, sheet_name, represents the desired name for the Excel sheet that will contain the formatted data.
A key aspect of the method is the structuring of the data. To achieve this, the method initiates the creation of a BookingInfo object, referred to as booking_info. The BookingInfo object provides a structured representation of the booking data, which simplifies the subsequent formatting and presentation.
Following the creation of the booking_info object, a new dictionary called data is generated. This dictionary is designed to structure the data in a format suitable for conversion into an Excel sheet.
The dictionary consists of two key-value pairs:
- The first pair uses an empty string as the key and contains a list with two header values, "Total Bookings" and "Total Amount ($)".
- The second pair uses the timestamp obtained from
booking_info.get_timestamp()as the key and includes a list with two elements: the total number of bookings (booking_info.get_total_bookings()) and the total booking amount (booking_info.get_total_amount()).
This dictionary allows the data to be inserted in the excel sheet as below:
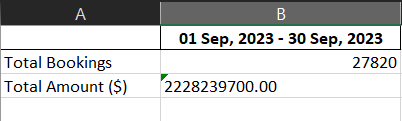 Sample Excel Sheet
Then, the structured data dictionary is converted into a pandas DataFrame, referred to as df. Dataframes are a commonly used data structures for handling tabular data in Python. This step streamlines the manipulation and export of the data for further processing or visualization.
To create the Excel sheet, the code uses the pd.ExcelWriter context manager with the "xlsxwriter" engine. This context manager ensures that the Excel file is appropriately prepared for data insertion. The sheet_name parameter is supplied to specify the name of the sheet within the Excel file.
The data within the DataFrame, df, is then written to the Excel sheet. The to_excel method is used in conjunction with the writer object, and the index parameter is set to False. This specific configuration excludes the default row numbers that are typically included in Excel sheets.
How to Combine the Functionalities
Now let's write a public method that the users can use to extract the data from the database and convert the extracted data into the Excel sheet file.
...


class DataExporter:

    ...

    def generate_excelsheet(
        self,
        start_timestamp: datetime,
        end_timestamp: datetime,
        sheet_name: str = "Bookings Data.xlsx",
    ) -> bool:
        """
        Generate an Excel sheet with booking data for a specified time range.

        Args:
            start_timestamp (datetime): The start of the time range.
            end_timestamp (datetime): The end of the time range.
            sheet_name (str, optional): Name of the Excel sheet to be created. Defaults to "Bookings Data.xlsx".

        Returns:
            bool: True if excelsheet was generated successfully else False

        Note:
            This method logs errors but does not raise exceptions to avoid breaking the workflow.
        """
        data = self.__fetch_from_database(start_timestamp, end_timestamp)
        if data is not None:
            self.__convert_to_excelsheet(data, sheet_name)
            return True
        else:
            logging.error("No data to convert generate excelsheet")
            return False
This method accepts several parameters, including start_timestamp and end_timestamp, which define the beginning and end of the time period for data extraction. There's also an optional sheet_name parameter that allows the user to specify the name of the Excel sheet. By default, the sheet is named "Bookings Data.xlsx" to provide a convenient default option.
Upon execution, the method initiates the data retrieval process by calling the __fetch_from_database method, an internal private method of the class, with the specified time range.
If the data retrieval is successful and data is available, the method proceeds to call the __convert_to_excelsheet method. This structures and formats the data for insertion into the Excel sheet.
If, on the other hand, no data is available for the provided time range, the method logs an error message and returns "False" to indicate that the Excel sheet generation was unsuccessful.
How to Send an Email with the Bookings Data Report
In this section, you will learn how you can use Python to send an email with a bookings data report as an attachment.
Create a mailer.py file and add the following content:
import logging
import os
import smtplib
import ssl

from email import encoders
from email.mime.base import MIMEBase
from email.mime.multipart import MIMEMultipart
from email.mime.text import MIMEText

logging.basicConfig(
    format="%(asctime)s | %(levelname)s : %(message)s", level=logging.INFO
)

SMTP_SERVER = os.environ.get("SMTP_SERVER")
PORT = os.environ.get("EMAIL_PORT")
EMAIL = os.environ.get("EMAIL")
PASSWORD = os.environ.get("PASSWORD")


def send_email(to_email: str, subject: str, attachment_name: str):
    """
    Send an email with an attachment to the specified recipient.

    Args:
        to_email (str): The recipient's email address.
        subject (str): The subject of the email.
        attachment_name (str): The filename of the attachment.

    Note:
        This function assumes that the SMTP server requires TLS encryption.

    Raises:
        smtplib.SMTPException: If there is an issue with sending the email.

    """
    message = MIMEMultipart()
    message["From"] = EMAIL
    message["To"] = to_email
    message["Subject"] = subject
    body = "Hi there\n\nPlease find attached your report.\n\nThanks"

    message.attach(MIMEText(body, "plain"))

    with open(attachment_name, "rb") as file:
        part = MIMEBase(
            "application", "vnd.openxmlformats-officedocument.spreadsheetml.sheet"
        )
        part.set_payload(file.read())

    encoders.encode_base64(part)

    part.add_header(
        "Content-Disposition",
        f"attachment; filename= {attachment_name}",
    )

    logging.info(f"Attaching {attachment_name} to the email")
    message.attach(part)
    text = message.as_string()

    context = ssl.create_default_context()
    with smtplib.SMTP(SMTP_SERVER, PORT) as server:
        logging.info(f"Sending email to {to_email}")
        server.starttls(context=context)
        server.login(EMAIL, PASSWORD)
        server.sendmail(EMAIL, to_email, text)
        logging.info(f"Successfully sent the email to {to_email}")
As usual, we have configured the logger and environment variables in our script.
The core functionality is encapsulated within the send_email function. This function takes three parameters:
to_email: The recipient's email address.subject: The subject of the email.attachment_name: The filename of the attachment, which should be the bookings data report in this context.
Within the function, we construct an email message using the MIMEMultipart class. This message includes the sender's email address, recipient's email address, subject, and a plain text body with a simple message.
The script allows attaching the bookings data report as an attachment. It reads the attachment file, encodes it, and adds it to the email message. This ensures that the recipient can easily access and download the data report from the email.
You can learn how you can add attachments while sending emails using Python here.
The create_default_context function from the ssl library creates a secure SSL context for email communication. Finally, the script connects to the SMTP server, logs in using the sender's email address and password, sends the email, and logs a success message upon successful transmission.
How to Test the Flow
Let's finally test the flow of the application.

In this section, we will automate the monthly reports. Create a main.py file and add the following content:
from exporter import DataExporter
from datetime import datetime
from mailer import send_email

start_timestamp = datetime(2023, 5, 28, 00, 00, 00)  # May 28 2023 00:00:00
end_timestamp = datetime(2023, 8, 20, 23, 59, 59)  # Aug 20 2023 23:59:59

exporter = DataExporter()
if exporter.generate_excelsheet(
        start_timestamp, end_timestamp, sheet_name="Bookings Data.xlsx"):
    send_email("myemail@gmail.com", "Your Report", "Bookings Data.xlsx")
In the above code, we create two timestamp objects, start_timestamp and end_timestamp, to specify a time range. We have the start date set to May 28, 2023 at midnight and the end date set to August 20, 2023 just before midnight.
Next, we create an instance of the DataExporter class, which handles the data export and Excel sheet generation. The generate_excelsheet method of this instance is called with the previously defined timestamps to create a report related to bookings.
Finally, the code sends an email with the generated Excel sheet as an attachment using the send_email function.
How to Schedule the Application
Next, our goal is to automate the report scheduling process. We aim to schedule report deliveries for two distinct scenarios: on every Monday for the previous week's data, and on the 1st day of every month for the previous month's information.
To schedule the execution, you will need to install the schedule library:
pip install schedule
Once the library is installed, here's how you can do automate the monthly and weekly reports:
import schedule
from exporter import DataExporter
from datetime import datetime, timedelta
from mailer import send_email


def main():
    today = datetime.now()
    sheet_name = "Bookings Data.xlsx"

    if today.weekday() == 0:  # Check if it's Monday (0 means Monday)
        # It's Monday, fetch data for the previous week (Monday to Sunday)
        start_timestamp = (today - timedelta(days=7)
                           ).replace(hour=0, minute=0, second=0, microsecond=0)
        end_timestamp = (today - timedelta(days=1)
                         ).replace(hour=23, minute=59, second=59, microsecond=0)
        sheet_name = "Weekly Report.xlsx"
    elif today.day == 29:
        # It's the 1st day of the month, fetch data for the last month
        start_timestamp = (today.replace(day=1) - timedelta(days=1)
                           ).replace(day=1, hour=0, minute=0, second=0, microsecond=0)
        end_timestamp = (today.replace(day=1) - timedelta(days=1)
                         ).replace(hour=23, minute=59, second=59, microsecond=0)
        sheet_name = "Monthly Report.xlsx"

    exporter = DataExporter()
    exporter.generate_excelsheet(
        start_timestamp, end_timestamp, sheet_name)

    send_email("youremail@gmail.com",
               "Your Report", sheet_name)


schedule.every().day.at("00:00").do(main)

while True:
    schedule.run_pending()
The above script uses the schedule library to run the main function daily at midnight. The main function calculates the timestamps for data extraction and Excel sheet generation. After generating the Excel sheet, the script sends it via email to a specified recipient.
If the script runs on a Monday, it sets up to generate a weekly report. It calculates the start_timestamp and end_timestamp for the previous week. The start_timestamp is set to the previous Monday at midnight (00:00:00), and the end_timestamp is set to the previous Sunday just before midnight (23:59:59). The Excel sheet is named "Weekly Report.xlsx."
On the 1st day of the month, the script shifts its focus to generating a monthly report. It calculates the start_timestamp and end_timestamp to encompass the entire previous month. The start_timestamp is set to the first day of the previous month at midnight (00:00:00), while the end_timestamp is set to the last day of the previous month just before midnight (23:59:59). The Excel sheet is named "Monthly Report.xlsx."
Wrapping Up
In this tutorial, you learned how you can leverage Python to automate generating a report and sending it to email recipients. I hope you found the tutorial helpful!
Future Scope
- You can add the email recipients in a database and fetch their list from there instead of hardcoding them in the code itself. This will make the application more configurable.
- You can also use Cron Jobs to automate the execution of the script every day at midnight. In that case, you won't need the
schedulelibrary.
Here's a link to the Github Code Repository.