![Stop [Marketing] E-Mail Bouncebacks! How to Configure SPF, DMARC & DKIM](https://www.freecodecamp.org/news/content/images/size/w2000/2019/06/stop-email-bouncebacks-post-image.jpg)
Setup Requirements:
- Your Domain Name System (DNS) Editor (i.e. GoDaddy Admin that has the email addresses registered)
- 3rd Party e-mail Admin Accounts (e-mail Blast Service [Mailchimp, ConstantContact, etc.], Additional Mail Server you might be using, etc.)
You might be reading this because you want help resolving an error you just received. This error might be stating something about your DMARC records and that the e-mail was not authenticated. And most likely you attempted to e-mail someone with a ‘@gmail.com’ or ‘@yahoo.com’ address or similar free, big e-mail providers which have higher default guidelines than an e-mail server you would set up through your own company.
I was there too and struggled quite some time to get this figured out — not just what you need, but also how to get it done, the right way.
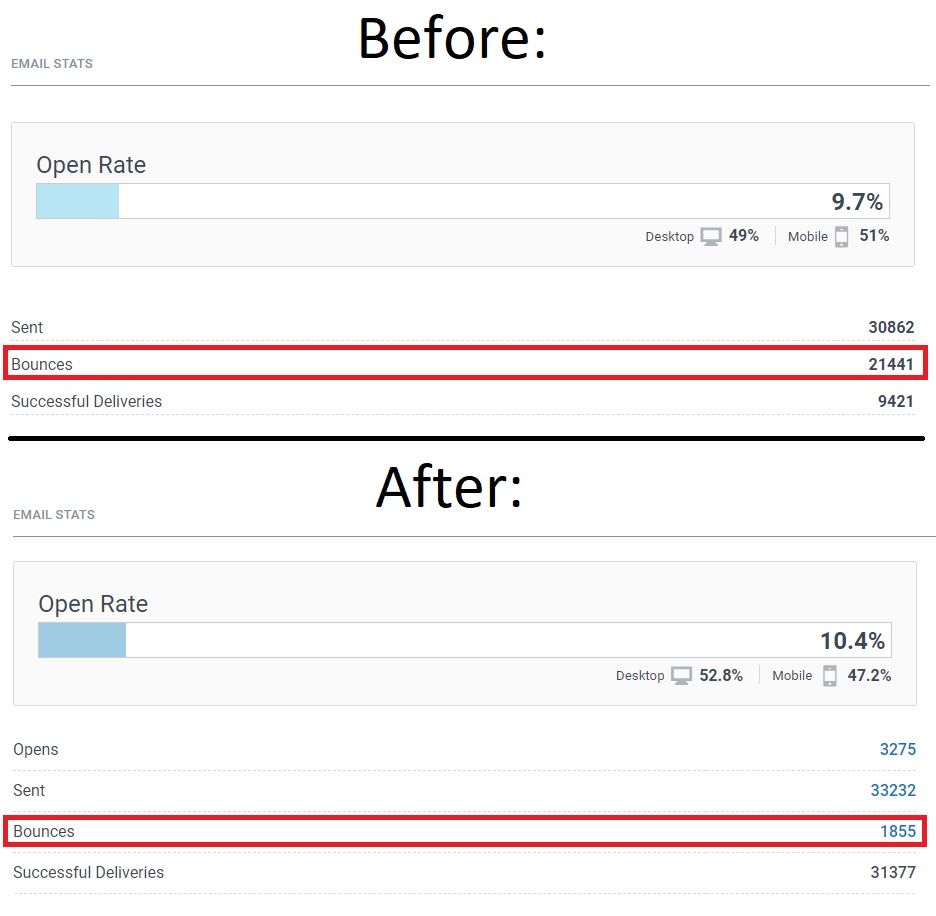
Our Statistics before and after configuring SPF, DMARC & DKIM:
As you will be able to see in the following pictures these implementations show us that:
- Bounce Rate was 70% before implementation, a whole 21441 E-mails that never made it into the subscribers inbox.
- After implementation the Bounce Rate was only 5.6%, down to only 1855 Bouncebacks.
- The bouncebacks are not all just due to security, some e-mails are deleted or the subscriber made a typo (mail.com instead of gmail.com is a typical one).
Enough talk about how important the implementation is - lets get to it!
In order to be 100% compliant in terms of e-mail authentication, you need 3 things configured:
- SPF (Sender Policy Framework): a framework used to prevent e-mail forgery aka Spoofing. Spoofing is when someone is pretending to be sent from your e-mail address.
- DKIM (DomainKeys Identified Mail): This will allow a server to send e-mails in your name while being authenticated to make sure it’s really you. For example, if you use MailChimp or ConstantContact for newsletter blasts and say it’s from ‘john@doecompany.com’, the e-mails will still be sent from MailChimp or ConstantContacts server. However, you verified with your Blast e-mail service that is indeed you and not someone pretending to be you. This is the most important one to set up correctly for businesses, as otherwise there will be a high bounce-back rate!
- DMARC (Domain-based Message Authentication, Reporting, and Conformance): Also an Anti-Spoofing mechanism that will work in conjunction with SPF. Having one or the other is ineffective — you will need both to be properly protected.
DNS Editor / DNS Zone Editor, GoDaddy Screenshot Examples (Login and navigate to your Admin Dashboard first):

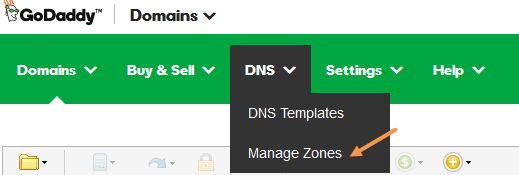
Select the Domain you need to add the DNS entries to in the screen after clicking on Manage Zones.
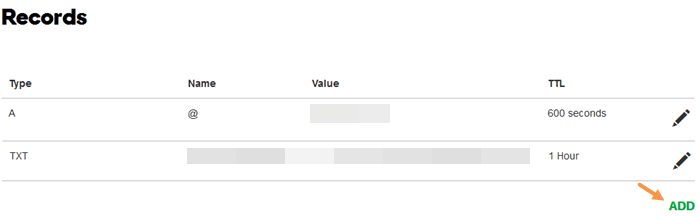
On the bottom of your records on the right-hand side, you will see an ‘Add’ button which will lead to the following dialog menu in which you will enter the SPF, DMARC & DKIM entries each individually:
For other guides for Zone Editors, just go to the knowledge base/support center of your Domain Provider.
Setting up SPF:
The SPF is the easiest to set up. You will need 2 things:
- Your DNS Editor (i.e. GoDaddy Admin Portal)
- The IP address of your e-mail server
After accessing your DNS Editor (also called DNS Zone Editor in CPanel), you want to create a new TXT entry. In this TXT Entry, you should have 3 possible fields: Host, TXT Value / Value & TTL (Time-To-Live). What you will enter in these fields is the following (some details might vary, this is based on a GoDaddy installation):Host: @ TXT Value: v=spf1 +a +mx +ip4:<ip of your e-mail server>~allTTL: 1 Hour
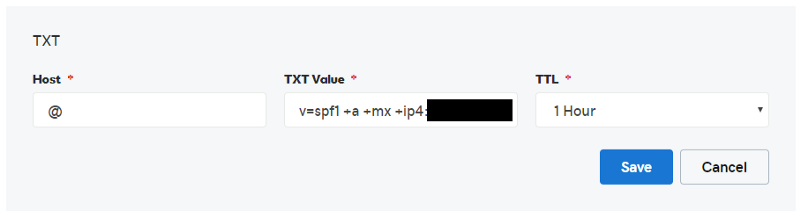
Explanation / Meaning of these settings:
‘@’ is the designation within GoDaddy that refers to the Domain you are working in. So if you are working inside ‘doecompany.com’ you could replace ‘@’ with ‘doecompany.com’ and the result would be the same. However, it is best practice to use the ‘@’ symbol instead in the case of GoDaddy.
<ip of your e-mail server> is the IP of where your e-mails are being sent from. This is not necessarily the same IP that the actual website is hosted on.
+a: Includes A record
+mx: Includes Mail Server record
+ip4: Designates from which IPv4 server
~all: Records outside of the prior declared ones will fail.
TTL = 1 hour (or 3600 seconds): Time-To-Live, or how often this should expire. If you were to change e-mail servers, you would be glad that there is only a maximum gap of 1 hour of not being authenticated.
Setting up DKIM:
This is the most tedious of the three to set up and the most critical one. You will authenticate the 3rd party to send on behalf of your e-mail name, i.e. ‘john@doecompany.com’.
I have 2 DKIMs currently set up:
- For my actual Mail Server which lives on a different server than my actual website (this is more common in Enterprise environments).
- For my e-mail newsletter blast service provider (ConstantContact in this case, it could easily be Mailchimp or someone else in your case).
For both scenarios, your legwork is the same. You will have to contact the e-mail support of your Mail Server or Third Party e-mail sending service and have them install the DKIM on their end, for your account.
This is completely out of your hands and typically takes them 1–2 days to complete this task. Basically what is happening is that they will register and install an RSA of at least 1024-Bit encoding (2048 is better) on their server.
After they got it set up, they will send you a Public Key that you will be using in the next step to set up your DKIM record.
Just like with the SPF & DMARC records you will access your DNS Editor (also called DNS Zone Editor in CPanel), and create a new TXT entry. In this TXT Entry, you should have 3 possible fields: Host, TXT Value / Value & TTL (Time-To-Live). What you will enter in these fields is the following (some details might vary, this is based on a GoDaddy installation with the e-mails being hosted on inmotionhosting.com and ConstantContact as Newsletter service). Remember to make 1 separate entry per DKIM record:Host: <provided by your 3rd party>._domainkeyTXT Value: v=DKIM1; k=rsa; p=<public key>TTL: 1 Hour
Make sure not to leave any spaces after the ‘=’ symbols.
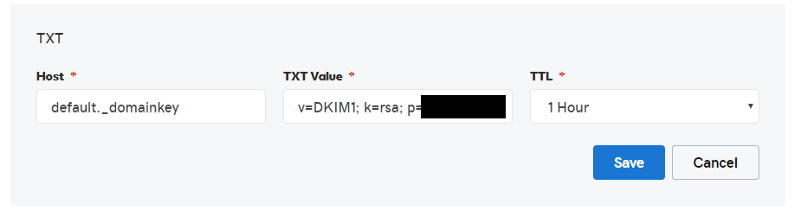
Explanation / Meaning of these settings:
The host can be a name or number and is truly unique to the third party. When an e-mail is being sent on your behalf, that e-mail will have that name or number included in the header. That is the record it will be looking under your domain for.
In layman’s terms and our example, the recipient server would go to ‘doecompany’s DNS records and look if what the 3rd party claims to be true will be there. Only if the public key properly validates with the key on their server, the e-mails will be sent out.
v=DKIM1: Simply specifies the version of DKIM being used to clarify further what to look for.
k=rsa: RSA is the most typical one to use as the Key (k). Your 3rd party might opt-in to use something else. But RSA with a 2048 bit encryption is the most secure option you can have at the moment. 1024 bit is good, too.
p=<public key>: Instead of ‘<public key>’ you would be provided with either a 1024 bit or 2048 bit string of seemingly random text and numbers or other values suited to whatever encryption the 3rd party decided to utilize.
TTL = 1 hour (or 3600 seconds): Time-To-Live, or how often this should expire. If you were to change e-mail servers, you would be glad that there is only a maximum gap of 1 hour of not being authenticated.
Setting up DMARC:
Reminder: In order for the DMARC to do its job, you MUST setup SPF AND DKIM before. Because DMARC verifies SPF & DKIM settings and whether or not the sender suits these settings and is not a spoofer. If SPF & DKIM are not set up, DMARC won’t work and will result in rejected e-mails.
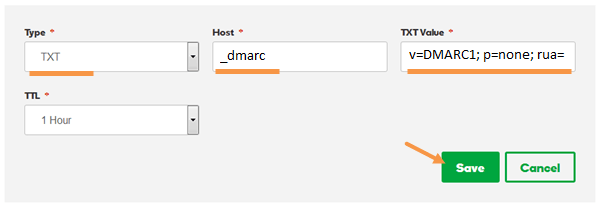
Just like with the SPF records you will access your DNS Editor (also called DNS Zone Editor in CPanel), and create a new TXT entry. In this TXT Entry, you should have 3 possible fields: Host, TXT Value / Value & TTL (Time-To-Live). What you will enter in these fields is the following (some details might vary, this is based on a GoDaddy installation with the e-mails being hosted on inmotionhosting.com):Host: _dmarcTXT Value: v=DMARC1;p=reject;sp=none;adkim=r;aspf=r;pct=100;fo=0;rf=afrf;ri=86400TTL: 1 Hour
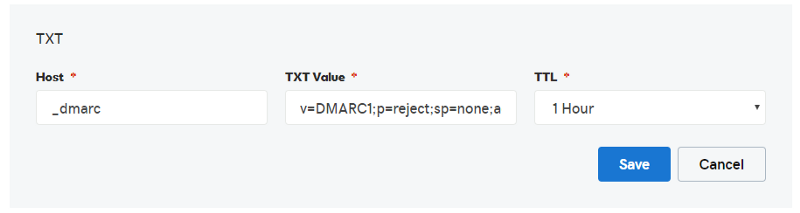
Explanation / Meaning of these settings:
The Host is declared as ‘_dmarc’ because within GoDaddy it will automatically add ‘.johndoe.com’ as a subdomain. This means when an e-mail is being sent out, the DMARC will always be checked under that selector against your domain. If this is not set up properly as ‘_dmarc’, the e-mail servers won’t be able to find your DMARC entry and will automatically fail your e-mail as they believe there is no entry to begin with.
v=DMARC1: Declares the version of the DMARC to clarify what is being used and make authentication more legitimate.
p=reject: E-mails will be rejected from the recipient e-mail server if they don’t match the DMARC records.
sp=none: Do not check if subdomains and the main domain have aligned settings; this is optional.
adkim=r: Whether to be strict (s) or relaxed (r) with the DKIM identifier settings; relaxed is the default.
aspf=r: Whether to be strict (s) or relaxed (r) with the SPF identifier settings; relaxed is the default.
pct=100: 100 percent of e-mails are going to be affected by the DMARC. Integer values between 1 to 100 only. The smaller set would make sense only for testing; should be 100 for security purposes.
fo=0: A DMARC error report is created if SPF & DKIM fail to be authenticated. 0 is the default value. Others are 1, d and s. 1 is if either one fails, to generate a record. d if the signature failed evaluation. s if SPF evaluation failed.
rf=afrf: The formatting for the message failure reports. afrf is the only supported value at the point of this writing.
ri=86400: How many seconds passed between sending the report to the sender. 86400 is default which is 24 hours or 1 day. Many of the major mailbox providers such as Gmail, Yahoo, etc. will send more than one report a day.
TTL = 1 hour (or 3600 seconds): Time-To-Live, or how often this should expire. If you were to change e-mail servers, you would be glad that there is only a maximum gap of 1 hour of not being authenticated.
And that is how you properly authenticate your e-mails. I hope this took some of the mystery and complication out for you. You will be on your way of not getting those troublesome kickbacks from your mailer-daemon anymore!
Author:
Andreas Lopez — https://www.linkedin.com/in/andreaslopez/
Editors:
Stevan Pupavac — https://www.linkedin.com/in/stevan-pupavac/
Frederick Alcantara — https://www.linkedin.com/in/frederick-alcantara/
Sources:
- GoDaddy Screenshots by DMARCanalyzer.com: https://www.dmarcanalyzer.com/dmarc/dmarc-record-setup-guides/dmarc-setup-guide-godaddy/