

Have you looked at interactive dashboards on websites like Stripe and thought, “How can I build something like this myself?”
In this full-stack React and Next.js project, you’ll learn how to build a stunning admin dashboard from front to back.
Our final admin dashboard will allow you to display and search through authenticated users within a users table and show important data using interactive bar and line charts.
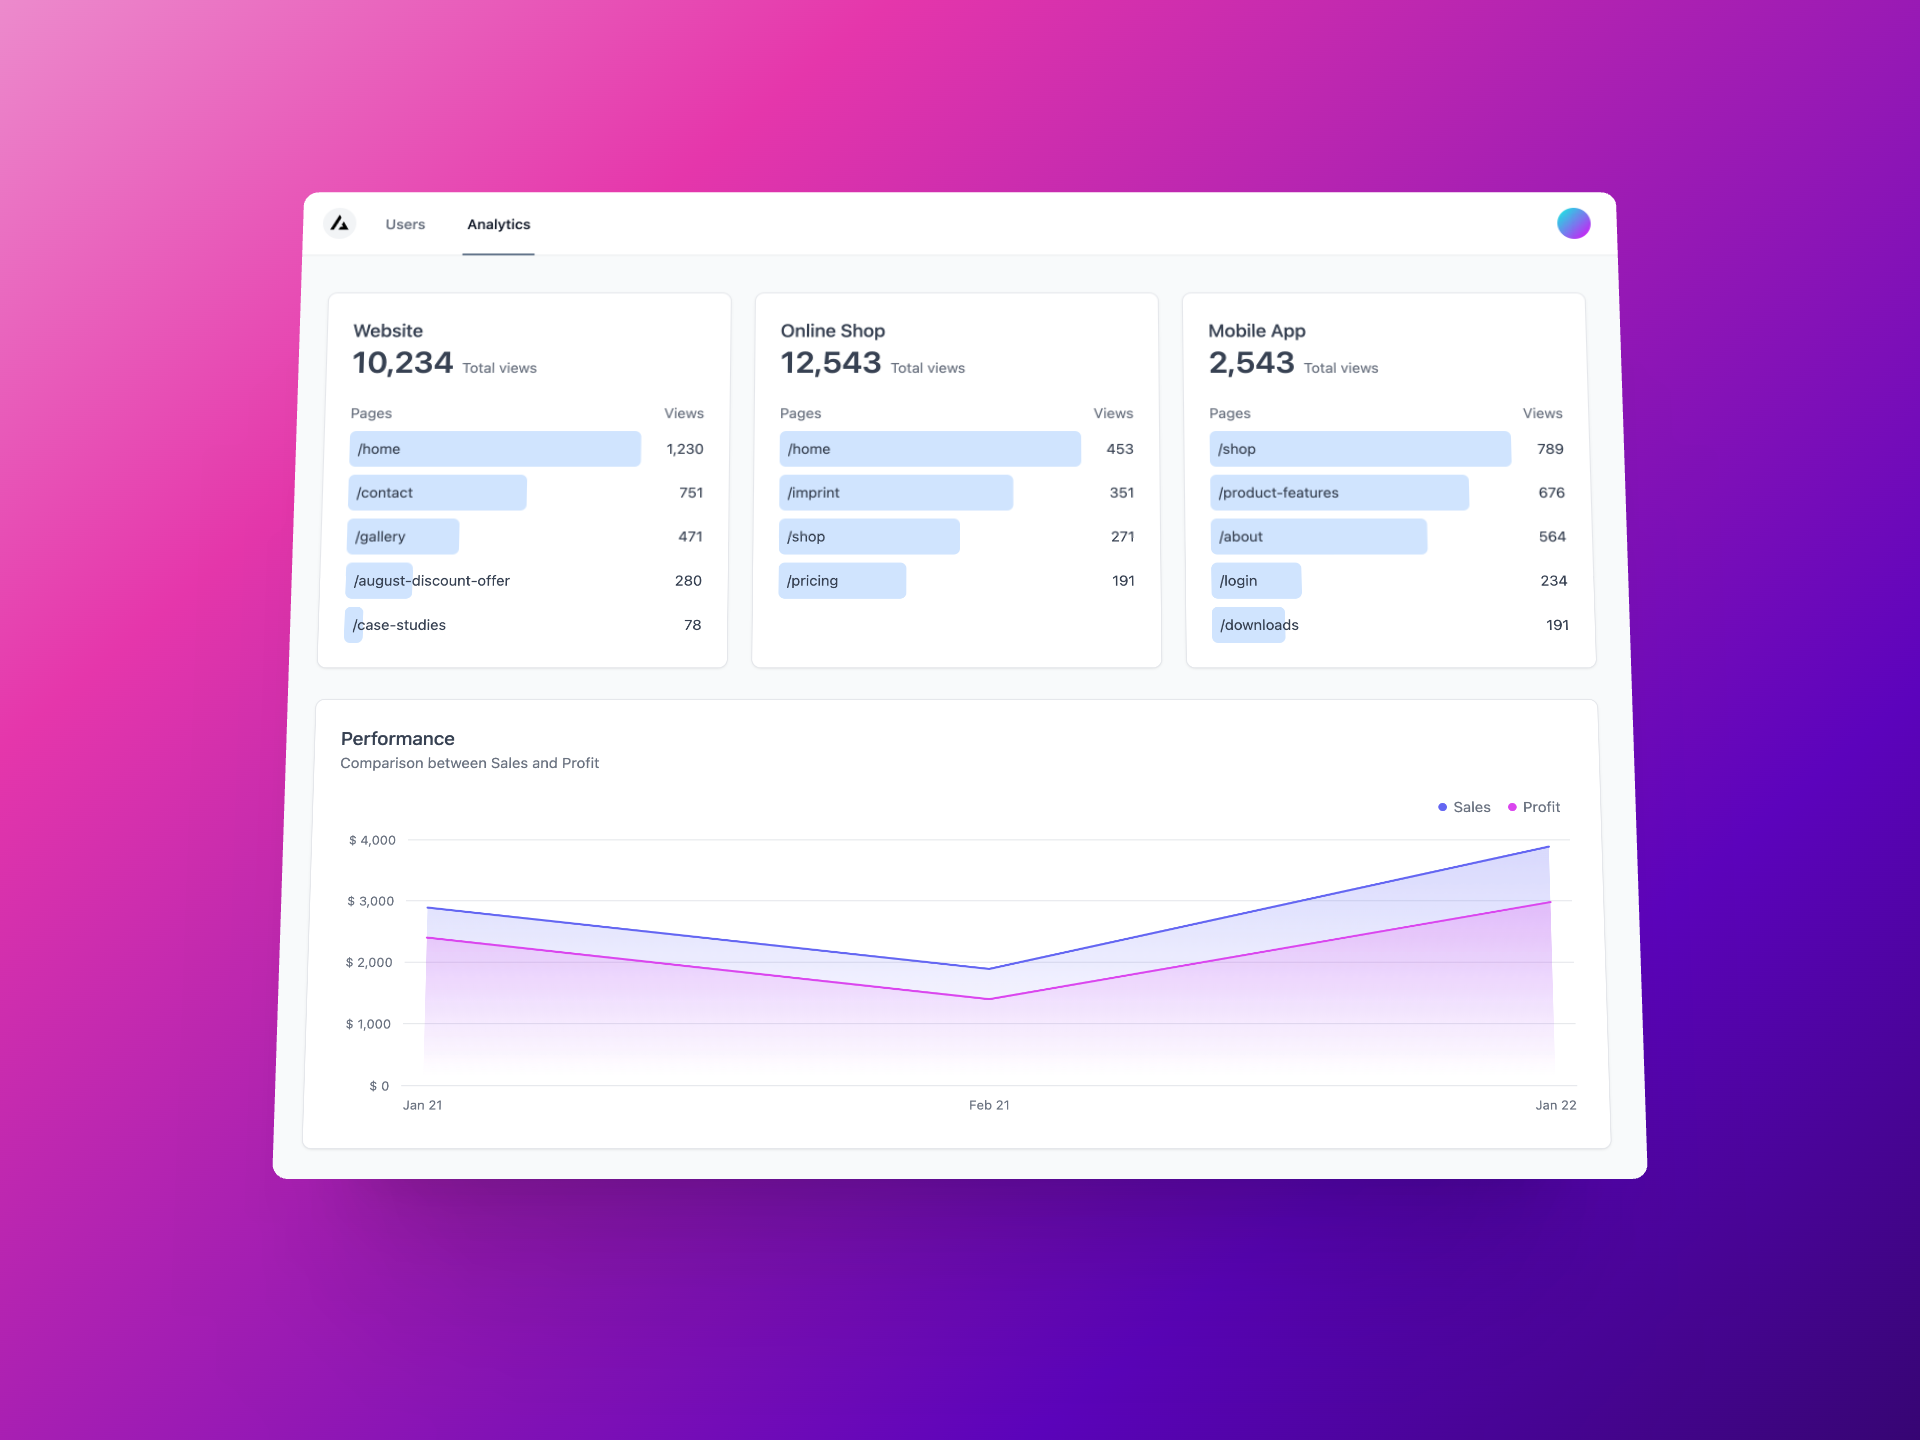 The final version of our admin dashboard
In addition to learning about important Next.js concepts, you’ll become familiar with a bunch of powerful tools, including Prisma, PostgreSQL, Tremor, NextAuth and TailwindCSS.
Table of Contents
- Tools to Install
- Create Postgres Database
- Set Up Prisma Schema
- Use the Prisma Client
- Connect Prisma to NextAuth
- Build the App Navbar
- Display the Account Info
- Protect Routes
- Create the Analytics Page
- Build the Chart Component
- Create Users Table
- Search for Users
- Conclusion
- Become a Pro React Developer
📁 Download the Code
You can grab the starting and final code for the project we're going to build here.
🛠️ Tools to Install
To start building the admin dashboard, you'll need to have:
- Node.js installed on your computer.
- You should also have a code editor, such as Visual Studio Code.
- Finally, you’ll need to have a Github account.
Once you’ve grabbed the starting code and unzipped the start folder, drag it into Visual Studio Code, open up a terminal window and run the command:
npm install
This will install all of your app’s dependencies listed in the package.json file.
After doing that, you can start up your development server by running this command:
npm run dev
You can visit localhost:3000 in your browser to see your app up and running.
📀 How to Create a Postgres Database
The backend of your app will consist of a Postgres database. We'll use Prisma to interact with that database and the authentication service will be NextAuth.
To create a new Postgres database, visit railway.app/new. You can make a PostgreSQL database for free without creating an account.
Once our database is created, click on it, then go to the Variables tab and copy the DATABASE_URL value.
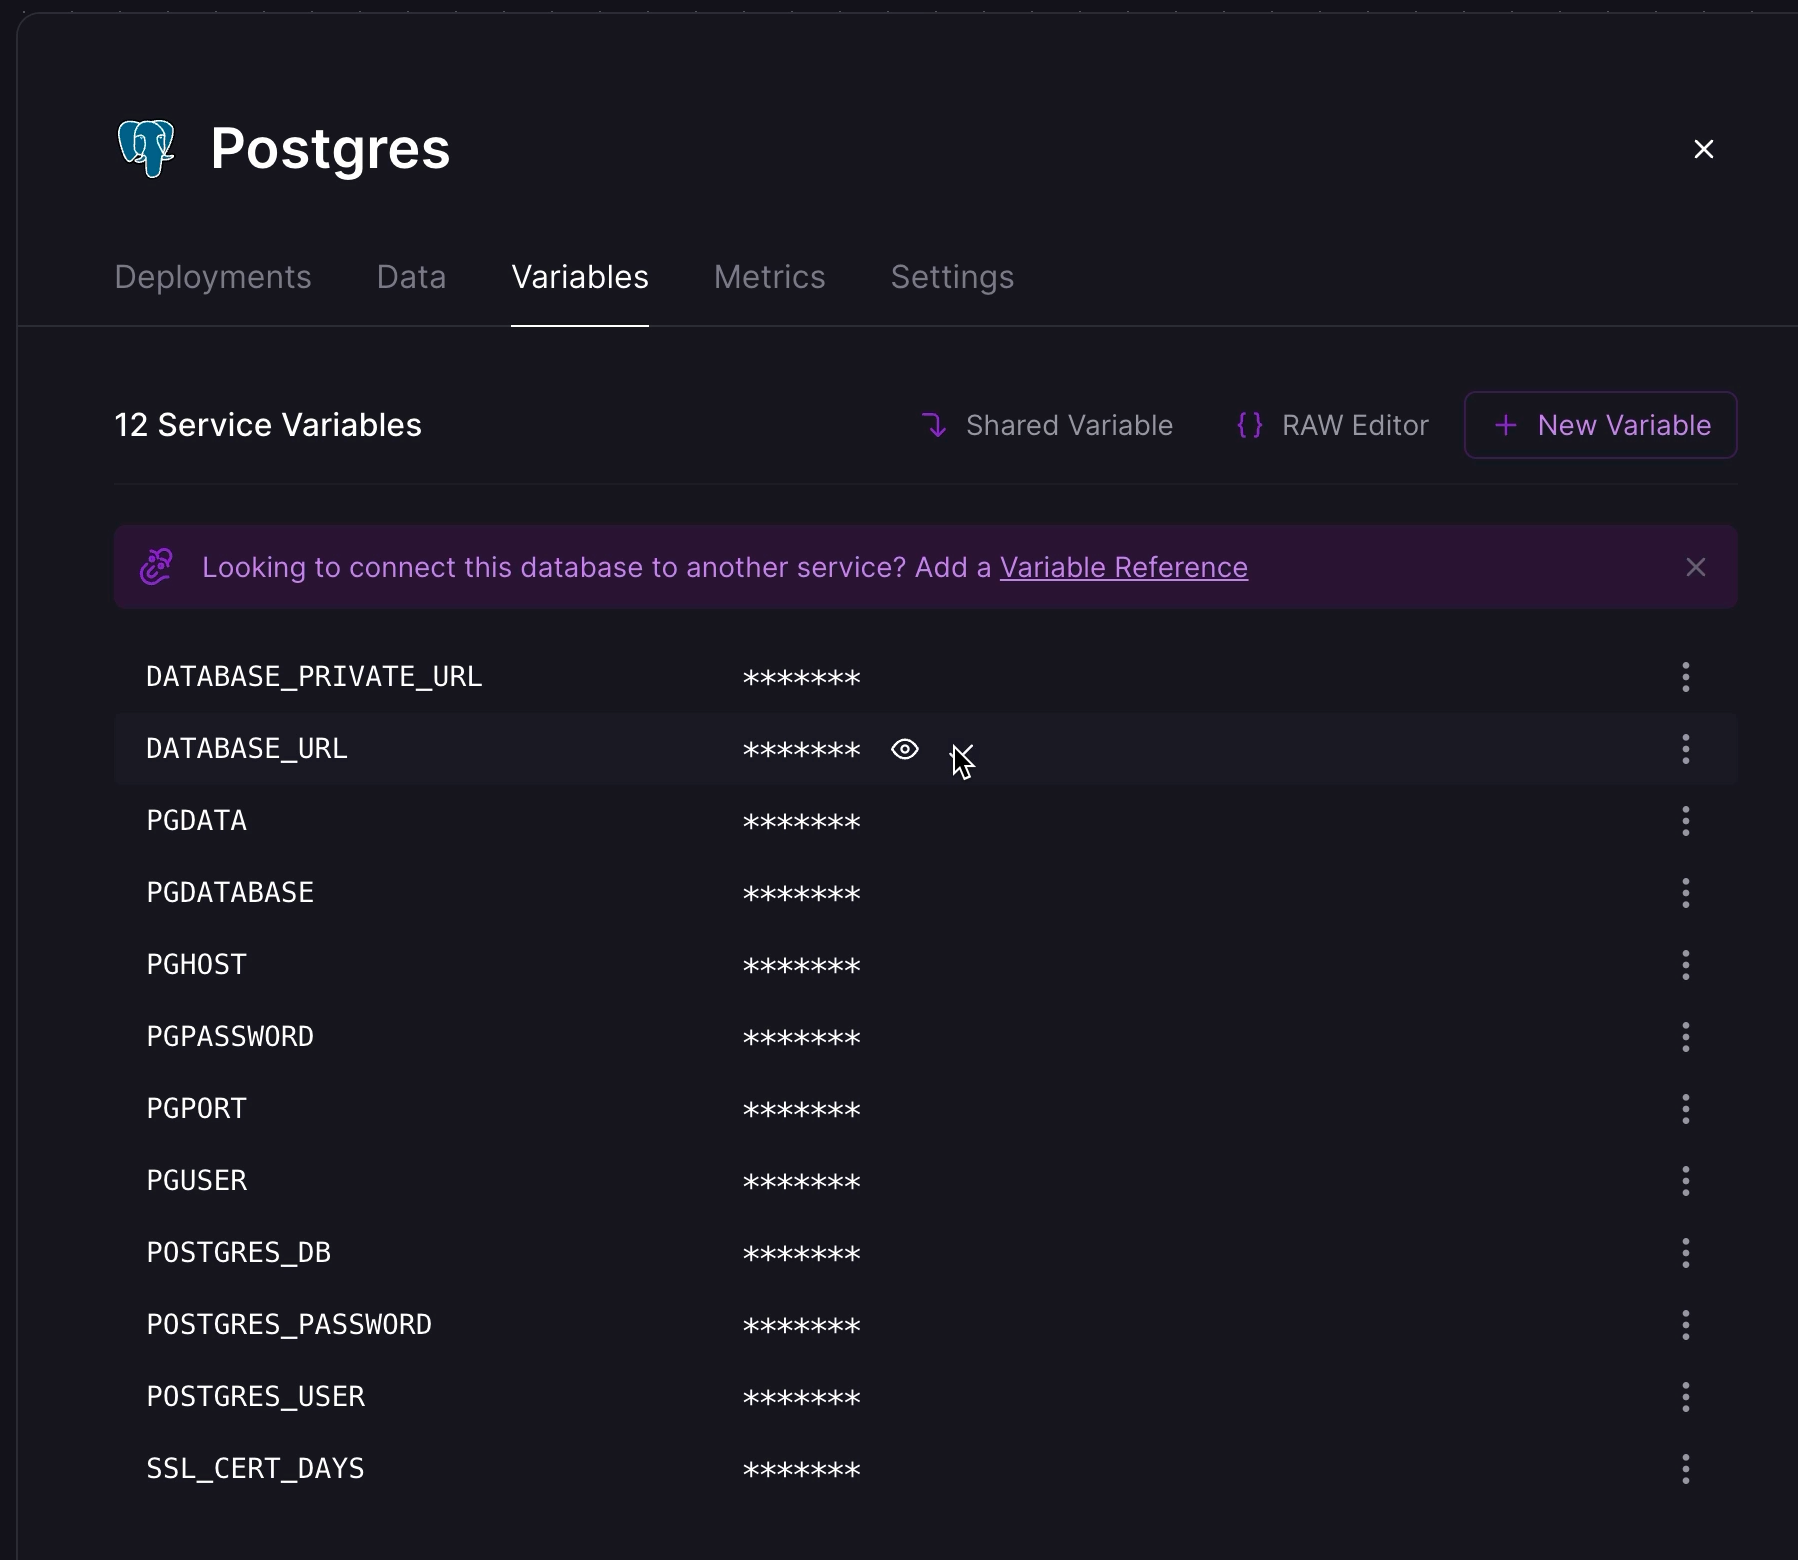 Variables page for Postgres Database on Railway
After that, go to the .env.example file in your project, rename it to .env, and add the database url to the DATABASE_URL environment variable.
✍️ How to Set Up Prisma Schema
Now that we have a fully functional database, you need to connect it with Prisma. Prisma is what we'll use to model all our data. You can see this in the schema.prisma file.
The schema.prisma file, takes care of connecting to the database, setting up a Prisma client, and modelling all your data.
In your terminal, run the command npx prisma db push. This will push your schema to your Railway Postgres database.
This command also generates your Prisma client, which lets you get and change data in your database using Prisma.
How to Use the Prisma Client
Within the lib folder, create a prisma.ts file. In this file, you'll pass the Prisma client to your entire app as a global variable.
// lib/prisma.ts
import { PrismaClient } from "@prisma/client";

declare global {
  var prisma: PrismaClient;
}

const client = globalThis.prisma || new PrismaClient();
if (process.env.NODE_ENV !== "production") globalThis.prisma = client;

export default client;
Now you can simply import client into any file that needs to use Prisma and get data from your database.
🪝How to Connect Prisma to NextAuth
The next step is connecting Prisma to NextAuth, which will be responsible for authenticating our users.
Within the root folder of your project, create a pages folder, which should contain an API folder, which should contain an auth folder. In the auth folder, place the file […nextauth].ts.
Your folder structure should look like this:
pages
 └ api
    └ auth
       └ [...nextauth].ts
This is where you’ll set up NextAuth, which has to be connected to Prisma using the Prisma adapter.
In this file, you can paste in the following code:
// pages/api/auth/[...nextauth].ts
import prisma from "@/lib/prisma";
import { PrismaAdapter } from "@next-auth/prisma-adapter";
import NextAuth, { AuthOptions } from "next-auth";
import GitHub from "next-auth/providers/github";

export const authOptions: AuthOptions = {
  adapter: PrismaAdapter(prisma),
  providers: [
    GitHub({
      clientId: process.env.GITHUB_CLIENT_ID!,
      clientSecret: process.env.GITHUB_CLIENT_SECRET!,
    }),
  ],
  debug: process.env.NODE_ENV === "development",
  secret: process.env.NEXTAUTH_SECRET,
  callbacks: {
    async signIn() {
      return true;
    },
    async redirect() {
      return "/";
    },
  },
};

export default NextAuth(authOptions);
To authenticate users with Github, you’ll use the Github provider, which requires a client ID and client secret.
To retrieve these, you’ll need to log into your Github account and use this link to create a new Github OAuth App.
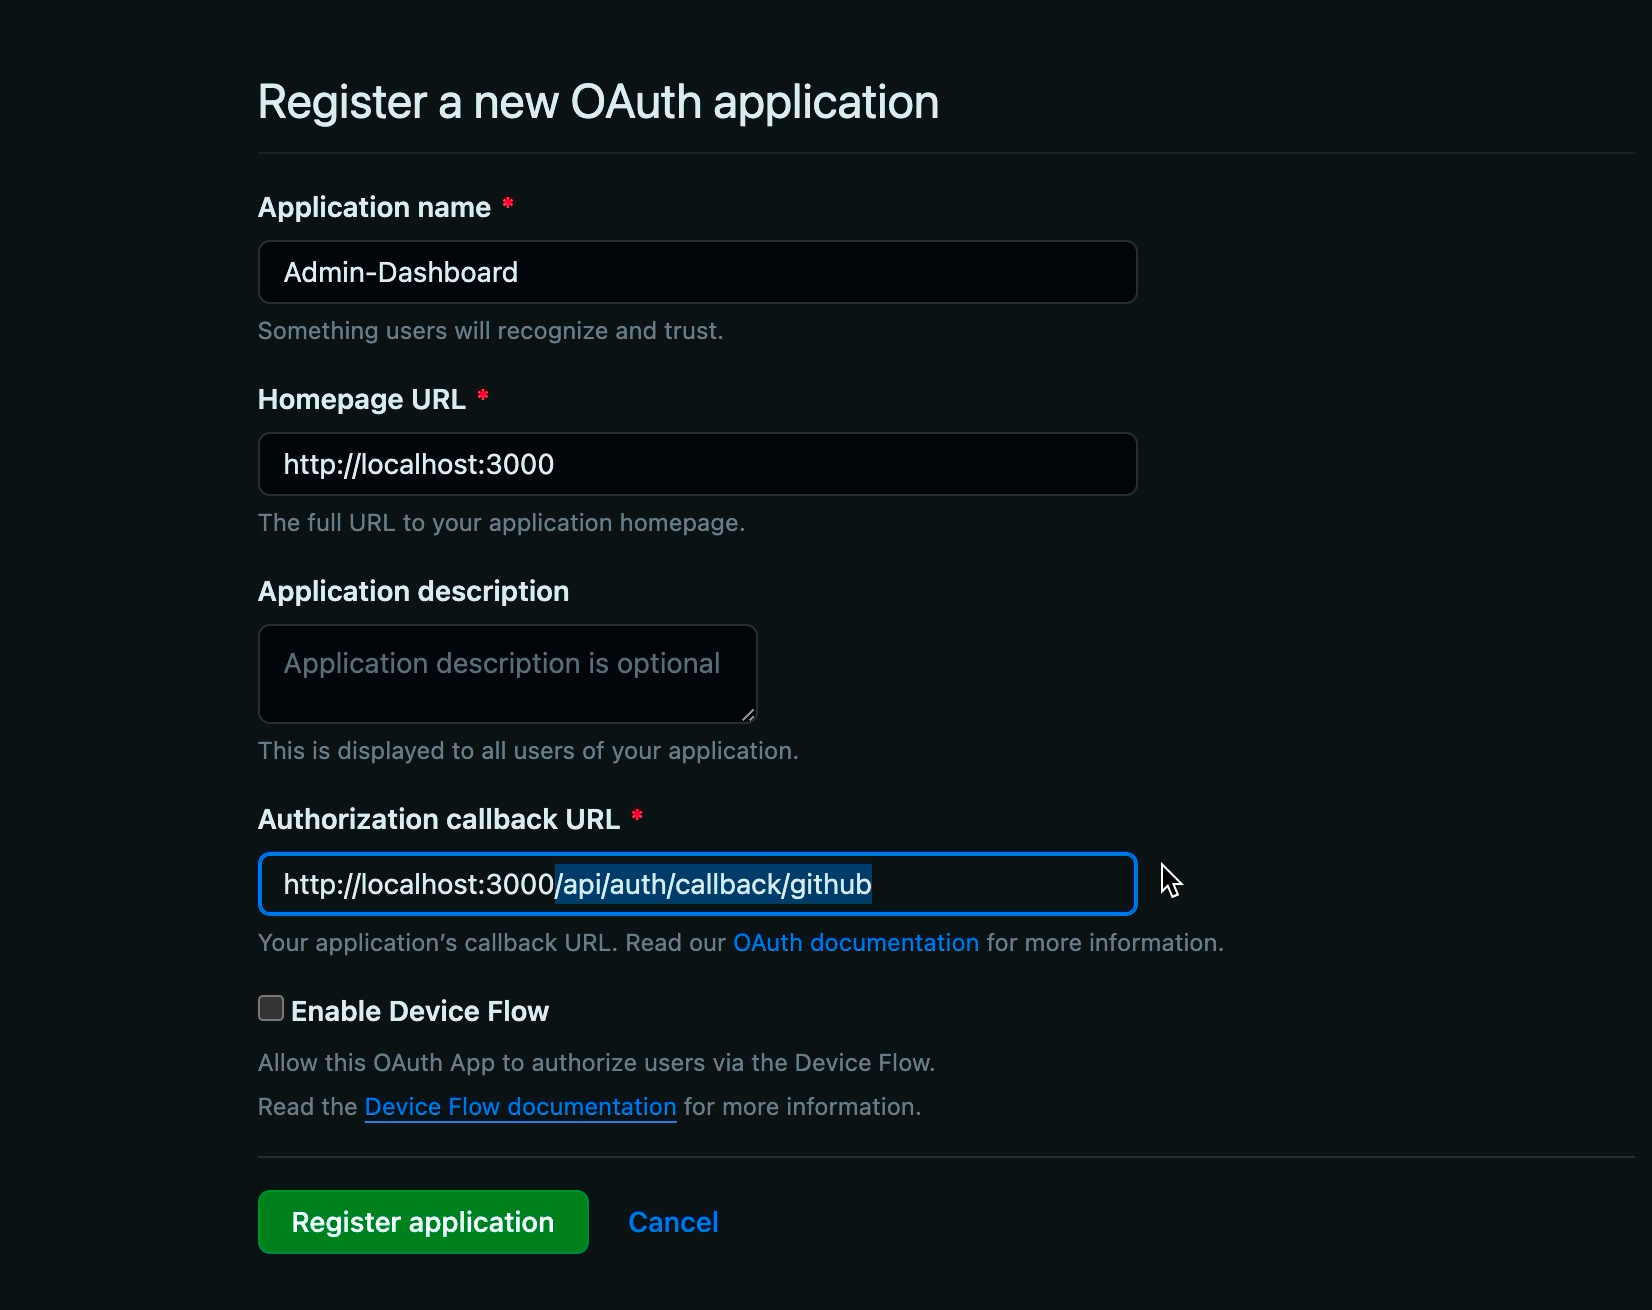 Registering a Github OAuth App
Add a unique application name such as “Admin Dashboard”. The homepage URL will be http://localhost:3000, where your application runs in development. This will be your production URL if you choose to deploy this application.
The callback URL is included in the .env file. The catch-all route we set up allows this callback URL to be used.
Next, register the application to receive your client ID, which you'll set to the GITHUT_CLIENT_ID environment variable. Generate a new client secret, copy it, and include it under GITHUB_CLIENT_SECRET.
Finally, we need a secret. Go back to your .env file. I've included a command to generate a unique string:
openssl rand -hex 32
Run this command in your terminal, then paste the generated string for NEXT_AUTH_SECRET.
With all of the environment variables we have provided, Next Auth is set up successfully and can be used to authenticate users and protect routes throughout our application.
🧭 How to Build the App's Navbar
All of the components in our app are going to be placed in the “components” folder.
Let’s include a Navbar component across every page in the app. To do that, we can add it to the root layout component (layout.tsx in the app folder).
// app/layout.tsx
import Navbar from '@/components/Navbar';
import type { Metadata } from 'next';
import { Inter } from 'next/font/google';
import { Suspense } from 'react';
import './globals.css';

const inter = Inter({ subsets: ['latin'] })

export const metadata: Metadata = {
  title: 'Admin Dashboard',
}

export default function RootLayout({
  children,
}: {
  children: React.ReactNode
}) {
  return (
    <html lang="en">
      <body className={inter.className}>
         <Navbar />
        {children}
      </body>
    </html>
  )
}
Let’s create a sign in link in the Navbar component so users can authenticate themselves.
In Navbar, use a function from NextAuth to initiate the sign-in process. Find the "sign-in" text and implement functionality for both desktop and mobile views.
// components/Navbar.tsx

// ...
<Menu.Item>
  {({ active }) => (
    <button
      className={classNames(
        active ? "bg-gray-100" : "",
        "flex w-full px-4 py-2 text-sm text-gray-700"
      )}
      onClick={() => signIn("github")}
    >
      Sign in
    </button>
  )}
</Menu.Item>
// ...
To use this signIn function, add above the Navbar component:
import { signIn, signOut } from "next-auth/react";
Selecting sign-in should redirect to a GitHub hosted page for users to authenticate themselves. If users are authenticated properly, they’ll navigate back to the home page and will be logged in.
You can check and see if a new user is created after logging by running the command npx prisma studio. The Prisma Studio allows you to view and manage model data, including accounts, sessions, and users.
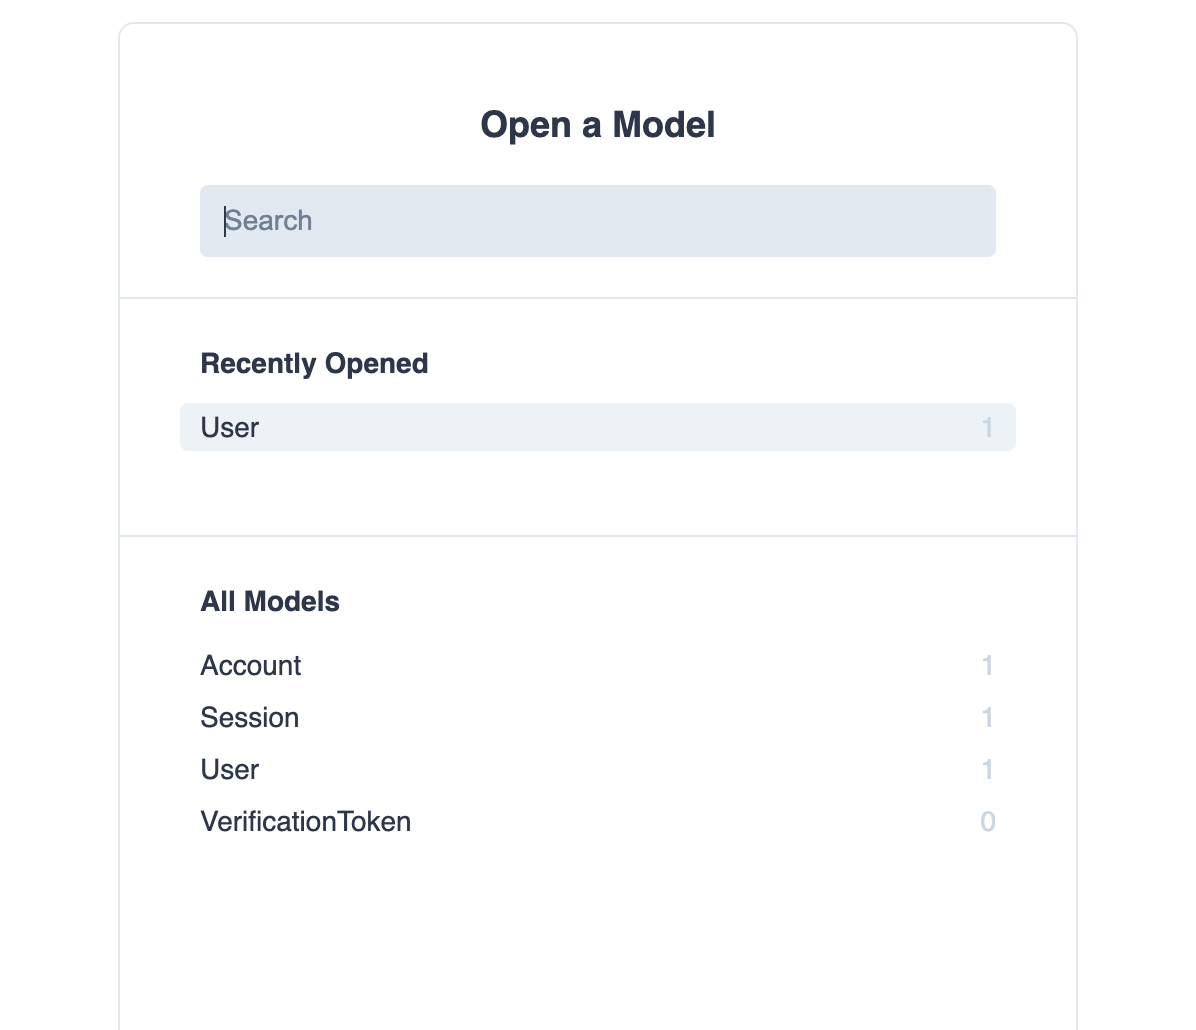 Prisma Studio
How to Display Account Info
The next step is displaying the GitHub account information, like the email and avatar image, in place of the dummy avatar. For this, we need a client component due to certain libraries, such as the headless UI components.
Create a new component in the components folder called Nav.tsx:
// components/Nav.tsx
import Navbar from "@/components/Navbar";
import { authOptions } from "@/pages/api/auth/[...nextauth]";
import { getServerSession } from "next-auth";

export default async function Nav() {
  const session = await getServerSession(authOptions);

  return <Navbar user={session?.user} />;
}
Here, we are getting the current session of the logged in user and passing it to the Navbar component on the user prop.
Within Navbar, we need to receive that prop and declare its type using the type Props.
// components/Navbar.tsx
import { Session } from "next-auth";

type Props = {
  user: Session["user"];
};

export default function Navbar({ user }: Props) {
// ...
Since Nav is now wrapping our Navbar component, replace the Navbar with Nav in your layout.tsx file:
// app/layout.tsx
import Nav from '@/components/Nav';

// ...
export default function RootLayout({
  children,
}: {
  children: React.ReactNode
}) {
  return (
    <html lang="en">
      <body className={inter.className}>
        <Nav />
        {children}
      </body>
    </html>
  )
}
Save all files and log the session within Nav. Refresh the app and check logs for user data. Logging the user in the navbar should display user data in the browser console.
To display the logged-in user data instead of the default avatar, use a ternary statement in the navbar.
If user.image is present, return an image from “next/image” with appropriate classes and attributes.
Also, set the source to user.image, height and width to 32, and alt text to user.name or "avatar" as a fallback.
If the image isn't present or the user isn't authenticated, use the Avvvatars component with the value "U".
// components/Navbar.tsx

// ...
<Menu.Button className="flex rounded-full bg-white text-sm focus:outline-none focus:ring-2 focus:ring-slate-500 focus:ring-offset-2">
  <span className="sr-only">Open user menu</span>
  {user?.image ? (
    <Image
      className="h-8 w-8 rounded-full"
      src={user.image}
      height={32}
      width={32}
      alt={user?.name ?? 'avatar'}
    />
  ) : (
    <Avvvatars value={'U'} />
  )}
</Menu.Button>
// ...
For the menu items component, add the user to the ternary statement, enabling the display of the "sign out" button. Implement an onClick event to call 'sign out' when clicked.
// components/Navbar.tsx

// ...
<Menu.Items className="absolute right-0 z-10 mt-2 w-48 origin-top-right rounded-md bg-white py-1 shadow-lg ring-1 ring-black ring-opacity-5 focus:outline-none">
  {user ? (
    <Menu.Item>
      {({ active }) => (
        <button
          className={classNames(
            active ? "bg-gray-100" : "",
            "flex w-full px-4 py-2 text-sm text-gray-700",
          )}
          onClick={() => signOut()}
        >
          Sign out
        </button>
      )}
    </Menu.Item>
  ) : (
// ...
This approach demonstrates fetching data on the server and passing it to a client component. It's an effective way to handle user data and display it in your application.
🛡️ How to Protect Routes
The final step in authentication is protecting routes. We have a dashboard, a users page (which is the homepage), and an analytics page. The analytics page, which we'll build out, needs to be password-protected so that only authenticated users can access it.
To protect this route, fetch data on the server using the getServerSession function. But to protect the /analytics route, you'll need to create it within the app folder. Add a folder named analytics and within it, a page.tsx file.
We have to protect the AnalyticsPage based on the session status. If there's no authenticated user, we redirect to the login route, which is /api/auth/sign-in.
// app/analytics/page.tsx
import Analytics from "@/components/Analytics";
import { authOptions } from "@/pages/api/auth/[...nextauth]";
import { getServerSession } from "next-auth";
import { redirect } from "next/navigation";

export default async function AnalyticsPage() {
  const session = await getServerSession(authOptions);

  if (!session) {
    redirect("api/auth/signin");
  }

  return <Analytics />;
}
This basic pattern is essential for protecting content in an admin dashboard. With authentication now covered, we can move on to building the user interface.
📈 How to Create the Analytics Page
We'll use a library called Tremor to build graphs and charts on the analytics page. Tremor allows us to create dashboards quickly, although we won't source the dashboard data from our database.
We’ll use the Grid, Title, and Flex components for layout and styling. We'll also use the Metric and Text components from Tremor for displaying stats and labels within a Grid of cards.
// components/Analytics.tsx
"use client";

import Chart from "@/components/Chart";
import { BarList, Card, Flex, Grid, Metric, Text, Title } from "@tremor/react";

const app = [
  { name: "/shop", value: 789 },
  { name: "/product-features", value: 676 },
  { name: "/about", value: 564 },
  { name: "/login", value: 234 },
  { name: "/downloads", value: 191 },
];

const data = [
  {
    category: "Mobile App",
    stat: "2,543",
    data: app,
  },
];

export default function Analytics() {
  return (
    <main className="p-4 md:p-10 mx-auto max-w-7xl">
      <Grid numItemsSm={2} numItemsLg={3} className="gap-6">
        {data.map((item) => (
          <Card key={item.category}>
            <Title>{item.category}</Title>
            <Flex
              justifyContent="start"
              alignItems="baseline"
              className="space-x-2"
            >
              <Metric>{item.stat}</Metric>
              <Text>Total views</Text>
            </Flex>
            <Flex className="mt-6">
              <Text>Pages</Text>
              <Text className="text-right">Views</Text>
            </Flex>
            <BarList
              data={item.data}
              valueFormatter={(number: number) =>
                Intl.NumberFormat("us").format(number).toString()
              }
              className="mt-2"
            />
          </Card>
        ))}
      </Grid>
      <Chart />
    </main>
  );
}
📊 How to Build the Chart Component
After setting up the top grid with bar charts, let’s set up the chart at the bottom using the AreaChart component from Tremor.
The area chart will include data over different months, comparing sales and profit.
// components/Chart.tsx
"use client";

import { Card, AreaChart, Title, Text } from "@tremor/react";

const data = [
  {
    Month: "Jan 21",
    Sales: 2890,
    Profit: 2400,
  },
  {
    Month: "Feb 21",
    Sales: 1890,
    Profit: 1398,
  },
  {
    Month: "Jan 22",
    Sales: 3890,
    Profit: 2980,
  },
];

export default function Chart() {
  return (
    <Card className="mt-8">
      <Title>Performance</Title>
      <Text>Comparison between Sales and Profit</Text>
      <AreaChart
        className="mt-4 h-80"
        data={data}
        categories={["Sales", "Profit"]}
        index="Month"
        colors={["indigo", "fuchsia"]}
        valueFormatter={(number: number) =>
          `$ ${Intl.NumberFormat("us").format(number).toString()}`
        }
        yAxisWidth={60}
      />
    </Card>
  );
}
👥 How to Create the Users Table
Now that we’ve taken care of our analytics page, let's address the users' table.
This table will display users from our Postgres database. We'll fetch and query all users using the Prisma client and show how to search for users by name or other fields.
We’ll begin by making a simple table with the help of Tremor components in the UsersTable component. If you’re familiar with HTML table elements, this should look very familiar to you.
We’re going to make rows for the name, email and created_at values for each of the users and display those values in the table body:
// components/UsersTable.tsx
import { User } from "@prisma/client";
import {
  Table,
  TableBody,
  TableCell,
  TableHead,
  TableHeaderCell,
  TableRow,
} from "@tremor/react";

type Props = {
  users: User[];
};

export default function UsersTable({ users }: Props) {
  return (
    <Table>
      <TableHead>
        <TableRow>
          <TableHeaderCell>Name</TableHeaderCell>
          <TableHeaderCell>Email</TableHeaderCell>
          <TableHeaderCell>Created At</TableHeaderCell>
        </TableRow>
      </TableHead>
      <TableBody>
        {users.map((user) => (
          <TableRow key={user.id}>
            <TableCell>{user.name}</TableCell>
            <TableCell>{user.email}</TableCell>
            <TableCell>
              {new Intl.DateTimeFormat("en-US").format(user.createdAt)}
            </TableCell>
          </TableRow>
        ))}
      </TableBody>
    </Table>
  );
}
🔎 How to Search for Users
To make our table searchable, we’ll go back out to the home page and build the basic UI for the search component.
// components/Search
export default function Search({ query }: Props) {
  return (
    <div className="relative mt-5 max-w-md">
      <label htmlFor="search" className="sr-only">
        Search
      </label>
      <div className="rounded-md shadow-sm">
        <div className="pointer-events-none absolute inset-y-0 left-0 flex items-center pl-3">
          <SearchIcon className="mr-3 h-4 w-4 text-gray-400" />
        </div>
        <input
          type="text"
          name="search"
          autoComplete="off"
          id="search"
          className="h-10 block w-full rounded-md border border-gray-200 pl-9 focus:border-indigo-500 focus:ring-indigo-500 sm:text-sm"
          placeholder="Search by name..."
          onChange={(event) => handleSearch(event.target.value)}
          defaultValue={query}
        />
      </div>
    </div>
  );
}
Since Next.js users server components by default, we can use URL state to initiate queries.
Within a new function called handleSearch, we can update the URL by adding a query parameter called q and set the query that the user typed into the input as the value.
That means that when the user types into the input, the search query will be added to the URL.
// components/Search.tsx
import { usePathname, useRouter } from "next/navigation";
import { useTransition } from "react";

type Props = {
  query?: string;
};

export default function Search({ query }: Props) {
  const router = useRouter();
  const pathname = usePathname();
  const [isPending, startTransition] = useTransition();

  function handleSearch(value: string) {
    const params = new URLSearchParams(window.location.search);

    if (value) {
      params.set("q", value);
    } else {
      params.delete("q");
    }

    startTransition(() => {
      router.replace(`${pathname}?${params.toString()}`);
    });
  }
// ...
Back in our server component, app.tsx, we'll use the search params (which are provided as props in page components) to query our database with Prisma.
We can modify the findMany method to search for users according to name and email using the “where” filter. We can also do it in a case-insensitive way using mode: insensitive.
// app/page.tsx
// ...
type Props = {
  searchParams: {
    q?: string;
  };
};

export default async function Home({ searchParams }: Props) {
  const query = searchParams.q;
  const users = await prisma.user.findMany({
    where: {
      name: {
        contains: query,
        mode: "insensitive",
      },
      email: {
        contains: query,
        mode: "insensitive",
      },
    },
  });
// ...
Finally, we are using the useTransition hook to change the URL in a performant way.
Back in the Search component, you can add a loading spinner to the end of your input to tell the user that we are in the process of changing the URL.
// components/Search.tsx
// ...
  {isPending && (
    <div className="absolute right-0 top-0 bottom-0 flex items-center justify-center">
      <RotateCwIcon className="animate-spin -ml-1 mr-3 h-5 w-5 text-gray-700" />
    </div>
  )}
</div>
This approach demonstrates changing URL state with each keystroke in a performant way, especially important when using server components in Next.js.
Conclusion
In conclusion, building this admin dashboard covers many aspects, from setting up authentication with NextAuth and Prisma to creating a user-friendly interface with Tremor.
These tools and techniques offer a comprehensive way to create flexible and visually appealing dashboards. Feel free to use this admin dashboard in your projects.
Thank you for following along and I hope this guide has been helpful!
🏆 Become a Professional React Developer
Looking for the ultimate resource to learn React from start to finish?
✨ Introducing: The React Bootcamp
The bootcamp features every resource to help you succeed with React:
- 🎬 200+ in-depth videos
- 🕹️ 100+ hands-on React challenges
- 🛠️ 5+ impressive portfolio projects
- 📄 10+ essential React cheat sheets
- 🥾 A complete Next.js bootcamp
- 🖼️ A complete series of animated videos
Click below to try the React Bootcamp for yourself.

Click to get started