

GraphQL is a query language for your API. It simplifies the process of requesting the server by providing convenient ways to query objects.
For instance, if you're using a REST API and you need a list of books, you might hit the GET /books/list endpoint for all books. Then if you need a specific book by ID, you would hit GET /book?id={id}, which means you'll be making multiple requests to the server.
But GraphQL does something called declarative data fetching, where you can ask for what you want and get a predictable result in a single request.
Awesome right? Let's see how it all works.
What we will be learning?
In this article, you'll learn the basics of GraphQL by using the Laravel GraphQL package to build a server that does the following:
- Register users
- Fetch all users
- Get a user by ID
- Fetch all posts
- Fetch all posts with user relationships
- Finally, as a bonus, you'll also learn how to use the super awesome Postman tool to run your query and get a real-time response
Prerequisites
Here are a few things you'll need for this tutorial:
- A local server (XAMPP or WAMP)
- A code editor (Sublime Text, VS Code, or Atom)
- A version control system (Git)
- A dependency Manager (Composer)
- The Laravel GraphQL package
GraphQL Basics
Before we get started, let's go over some GraphQL fundamentals.
What is a GraphQL Schema?
A GraphQL schema describes queries, mutations, and types associated with it:
type User {
    id: ID !
    name : String !
    email : String !
    age : Int
    hobbies: [String]
    created_at : DateTime
    updated_at : DateTime
}
In the code above, the exclamation mark on column names such as id, name, and email means that they are required fields.
You can also define various data types such as Int, String, and so on. You can also include list types and define the data type it should contain like with hobbies.
What are GraphQL Queries?
GraphQL makes it convenient to interact with data on an object. You use methods to ask for specific fields on objects and then get the expected results:
{
  user {
    name
  }
}
{
  "data": {
    "user": {
      "name": "John doe"
    }
  }
}
What are GraphQL Resolvers?
Every time you request data from a GraphQL server, it gets resolved.
Resolvers contain arguments such as an object, args, context, and info. You'll see how resolvers work while building this project.
How to Get Started with GraphQL
Installation
Set up a Laravel environment by running this command in the terminal:
composer create-project laravel/laravel graphql-laravel
If you don't have composer installed, you can get it from here.
Install the open-source graphql-laravel server package:
composer require rebing/graphql-laravel
Once the installation is finished, publish config/graphql.php:
php artisan vendor:publish --provider="Rebing\GraphQL\GraphQLServiceProvider"
And start the development server with php artisan serve:
 The Laravel homepage
How to Create the Migration, Controllers, and Resource
Post
In this section, you'll create a relationship between users and posts.
To do this, you'll need to create models where you define the relationship between the entities, create migrations, and define database schemas.
php artisan make:model Post -mcr
In app/Models/User, create a hasMany relationship between users and posts:
public function posts()
{
    return $this->hasMany(Post::class);
}
And in app/models/Post, define a relationship to map users to posts:
public function user()
{
    return $this->belongsTo(User::class);
}
How to Create the Migration
In this section you'll create the migration.
Laravel already ships with a default User migration. All you need to do now is add a migration for posts:
php artisan make:migration create_post_table
This creates a migration file with the database/migrations direction. Within the migration file, define the schema:
Schema::create('posts', function (Blueprint $table) {
            $table->id();
             $table->integer('user_id')->unsigned();
            $table->string('title');
            $table->text('comment');
            $table->timestamps();
        });
Next, modify the existing .env to name the database and establish a connection:
DB_CONNECTION=mysql
DB_HOST=127.0.0.1
DB_PORT=3306
DB_DATABASE=graphql-laravel
DB_USERNAME=root
DB_PASSWORD=
Run the migrate command to create the User and Post tables:
php artisan migrate
You can generate random records for the User and Post tables using Laravel factories.
Since Laravel ships with a default User factory, you can use that and focus on creating a Post factory.
How to Create a Post Factory
php artisan make:factory PostFactory
Once PostFactory gets created within the database > factories directory, you'll have to define the column names and the fakers you need within the definition method:
use Illuminate\Support\Str;


public function definition()
    {
        return [
            'user_id' => rand(1,5),
            'title' => $this->faker->name(),
            'comment' => $this->faker->realText(180)
        ];
    }
How to Make the Database Seeder
Within the seeder class, create an execution instance for both User and Post factories.
This will create five users and five posts with corresponding user_id's:
public function run()
    {
        \App\Models\User::factory(5)->create();

        \App\Models\Post::factory(5)->create();
    }
Then run the artisan seeder command:
php artisan db:seed
Once you run that command in the terminal, check the database tables (User and Post):
 Post table
 User table
How to Create a User Query
As of the time of writing this article, the Laravel GraphQL package doesn't support creating a scaffold for queries via the terminal.
So add the following to app > GraphQL > Type > UserType.php:
<?php

namespace App\GraphQL\Type;

use App\Models\User;
use GraphQL\Type\Definition\Type;
use Rebing\GraphQL\Support\Type as GraphQLType;

class UserType extends GraphQLType
{
    protected $attributes = [
        'name'          => 'User',
        'description'   => 'A user',
        'model'         => User::class,
    ];

    public function fields(): array
    {
        return [
            'id' => [
                'type' => Type::nonNull(Type::int()),
                'description' => 'The id of the user',
            ],
            'name' => [
                'type' => Type::nonNull(Type::string()),
                'description' => 'The name of user',
            ],
            'email' => [
                'type' => Type::nonNull(Type::string()),
                'description' => 'The email of user'
            ],
        ];
    }
}
In the code snippet above, you add the namespace you need to the User model. You also include a protected $attributes array that describes the model.
You also added a public field function that returns an array.
Within this function, you define the schema to include columns you specified in the user table (id, name, email).
Type::nonNull(Type::string()) is the exclamation mark indicating the required fields and string data type.
How to Add a Type to the Config
Add the UserType to the config file you created earlier: app > config > graphql.php:
'types' => [
        App\GraphQL\Type\UserType::class
    ],
How to Define the User Query
Next, you'll need to define a query that returns the UserType or a list. You also need to specify the arguments you'll use within the resolve method:
<?php

namespace App\GraphQL\Type;

use GraphQL;
use App\Models\User;
use GraphQL\Type\Definition\Type;
use Rebing\GraphQL\Support\Type as GraphQLType;

class UserType extends GraphQLType
{
    protected $attributes = [
        'name'          => 'User',
        'description'   => 'A user',
        'model'         => User::class,
    ];

    public function type(): Type
    {
        return Type::nonNull(Type::listOf(Type::nonNull(GraphQL::type('User'))));
    }

    public function args(): array
    {
        return [
            'id' => [
                'type' => Type::nonNull(Type::int()),
                'description' => 'The id of the user',
            ],
            'name' => [
                'type' => Type::nonNull(Type::string()),
                'description' => 'The name of user',
            ],
            'email' => [
                'type' => Type::nonNull(Type::string()),
                'description' => 'The email of user',
            ]
        ];
    }

    public function resolve($root, $args)
    {
        if (isset($args['id'])) {
            return User::whereId($args['id'])->get();
        }

        if (isset($args['name'])) {
            return User::whereName($args['name'])->get();
        }

        if (isset($args['email'])) {
            return User::whereEmail($args['email'])->get();
        }

        return User::all();
    }
}
In the snippet above, you use the required namespace the package ships with together with App\Models\User.
You also extend the GraphQLType from the Laravel package, and define the attributes as a protected array.
The args method returns an ID, name, and email from the User model.
The resolve method is used to retrieve the data from the database. If there are args, then the if block gets executed and helps you filter based on user requests.
Otherwise, all the data from the User model is retrieved.
How to Add a Query to the Config
Add the following query to the app > config > graphql.php configurations file:
'schemas' => [
        'default' => [
            'query' => [
                App\GraphQL\Query\UsersQuery::class,
            ],
            'mutation' => [
                // ExampleMutation::class,
            ],
            'types' => [
                // ExampleType::class,
            ],
            'middleware' => [],
            'method' => ['get', 'post'],
        ],
    ],
You should now be able to query data from this endpoint: http://localhost:8000/graphql.
And in case you're curious, /graphql is the prefix for the route.
How to Query to Fetch all Users
For this query:
query {
    users {
        id, name , email
    }
}
Here's the expected output with Postman:
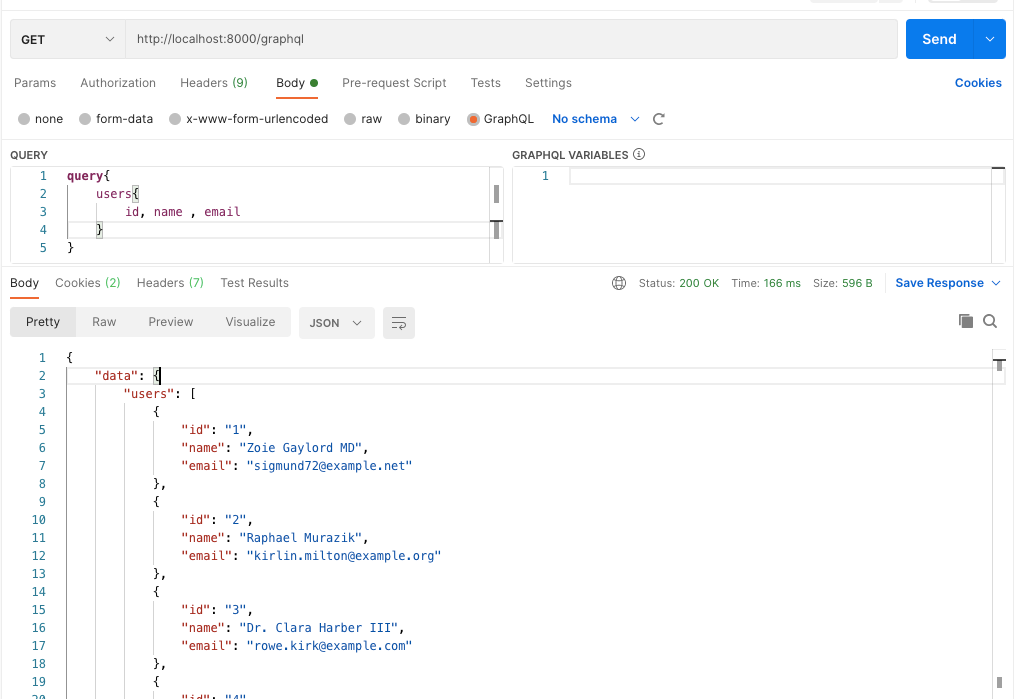 Fetch all Users
How to Create a Post Relationship with the User
Now you need to define a PostType.
This approach follows what you defined earlier for UserType.
Navigate to app > Type > PostType.php and add the following:
<?php

namespace App\GraphQL\Type;

use GraphQL;
use App\Models\Post;
use GraphQL\Type\Definition\Type;
use Rebing\GraphQL\Support\Type as GraphQLType;

class PostType extends GraphQLType
{
    protected $attributes = [
        'name'          => 'Post',
        'description'   => 'A post',
        'model'         => Post::class,
    ];

    public function args(): array
    {
        return [
            'id' => [
                'type' => Type::nonNull(Type::int()),
                'description' => 'The id of the post',
            ],
            'title' => [
                'type' => Type::nonNull(Type::string()),
                'description' => 'The title of post',
            ],
        ];
    }
}
Post follows the specification defined for User. Here you also used the namespace of the query, and also used the Post model.
With the code above, you extend the Query on the PostQuery class and set the $attributes array to be protected. And you have a fields function that returns and array with the ID, title, and comment.
Finally, you have a type within the args function that shows their various data types int or string with a description that tells you what they do at a glance.
How to Create a PostsQuery
Add the following to app > GraphQL > Query > PostsQuery.php:
<?php

namespace App\GraphQL\Query;

use Closure;
use App\Models\Post;
use Rebing\GraphQL\Support\Facades\GraphQL;
use GraphQL\Type\Definition\ResolveInfo;
use GraphQL\Type\Definition\Type;
use Rebing\GraphQL\Support\Query;

class PostsQuery extends Query
{
    protected $attributes = [
        'name' => 'posts',
    ];

    public function type(): Type
    {
        return Type::nonNull(Type::listOf(Type::nonNull(GraphQL::type('Post'))));
    }

    public function args(): array
    {
        return [
            'id' => [
                'name' => 'id',
                'type' => Type::int(),
            ],
            'title' => [
                'name' => 'title',
                'type' => Type::string(),
            ]
        ];
    }

    public function resolve($root, $args)
    {
        if (isset($args['id'])) {
            return Post::whereId($args['id'])->get();
        }

        if (isset($args['title'])) {
            return Post::whereTitle($args['title'])->get();
        }

        return Post::all();
    }
}
In the code above, you use the resolve method to retrieve data from the database like I mentioned earlier.
If there are args, then the if block gets executed and helps you filter based on the user request. Otherwise, all the data from the Post model is returned.
How to Add PostsQuery and PostType to Config
'schemas' => [
        'default' => [
            'query' => [
                App\GraphQL\Query\UsersQuery::class,
                App\GraphQL\Query\PostsQuery::class
            ],
            'mutation' => [
                // ExampleMutation::class,
            ],
            'types' => [
                // ExampleType::class,
            ],
            'middleware' => [],
            'method' => ['get', 'post'],
        ],
    ],
'types' => [
        App\GraphQL\Type\UserType::class,
        App\GraphQL\Type\PostType::class
    ],
Now you can use the following query to get all posts:
query{
    posts{
        id
        user_id
        title
        comment
    }
}
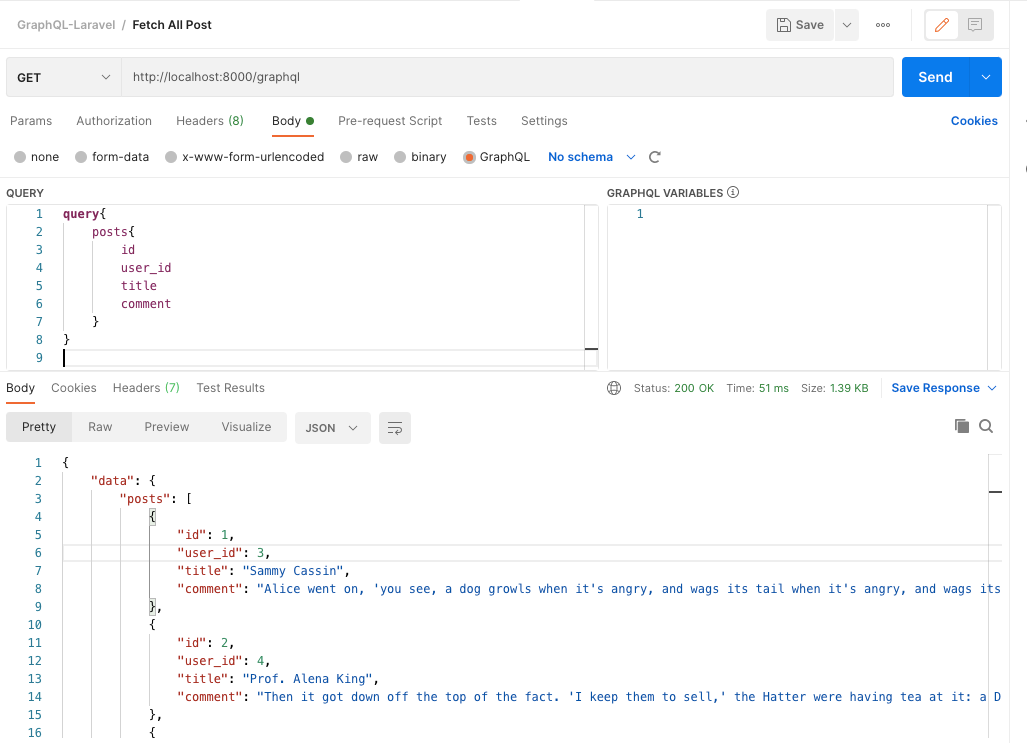 Image of Fetch all post
You can also fetch users with post relationships with this query:
query{
    users{
        id
        name
        posts {
            title
        }
    }
}
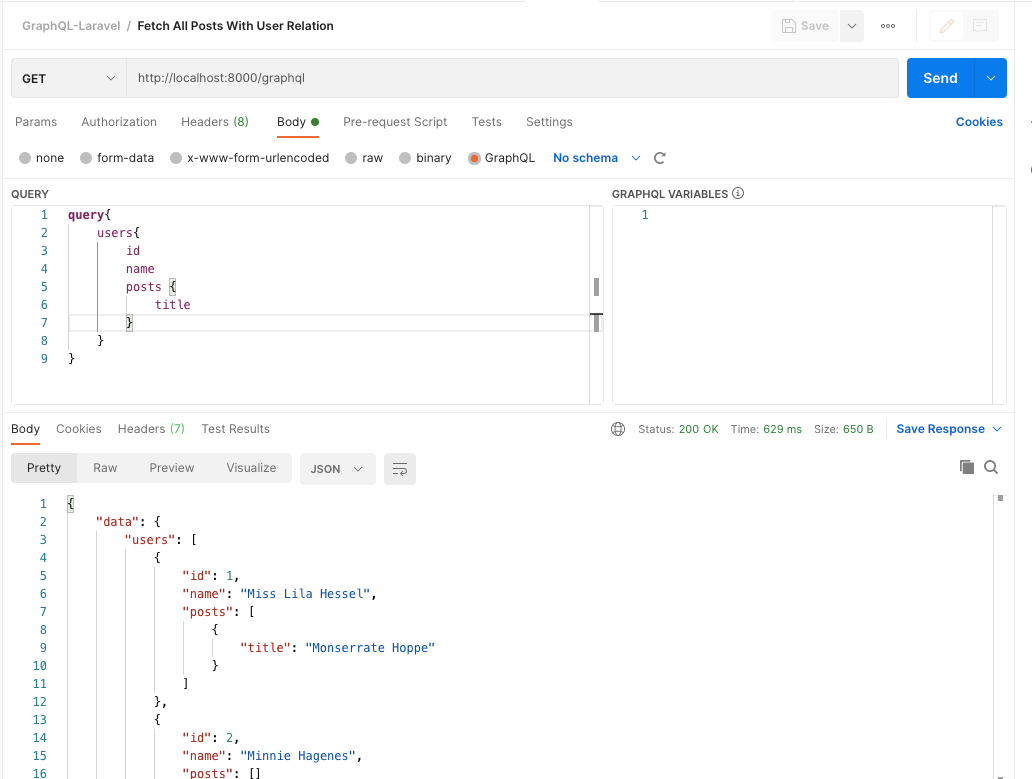 Image to fetch users with post relationship
How to Create a Mutation
Now you'll set up a mutation to create a user. This mutation will help with operations that involve modifying state on the server.
In your case you'll be mutating the state of the server by creating a user.
Create a mutation folder within the app directory, app > Mutation > CreateUserMutation.php.
Then add the following code to CreateUserMutation.php:
<?php

namespace App\GraphQL\Mutation;

use Closure;
use App\Models\User;
use GraphQL;
use GraphQL\Type\Definition\Type;
use GraphQL\Type\Definition\ResolveInfo;
use Rebing\GraphQL\Support\Mutation;

class CreateUserMutation extends Mutation
{
    protected $attributes = [
        'name' => 'users'
    ];

    public function type(): Type
    {
        return Type::nonNull(GraphQL::type('User'));
    }

    public function args(): array
    {
        return [
            'name' => ['
                name' => 'name',
                'type' => Type::nonNull(Type::string()),
            ],
            'email' => ['
                name' => 'email',
                'type' => Type::nonNull(Type::string()),
            ],
            'password' => [
                'name' => 'password',
                'type' => Type::nonNull(Type::string()),
            ]
        ];
    }

    public function resolve($root, $args, $context, ResolveInfo $resolveInfo, Closure $getSelectFields)
    {
        return User::firstOrCreate(
            [   'email' => $args['email']],
            [   'name' => $args['name'],
                'password' => bcrypt($args['password'])
            ]);
    }
}
The resolve method helps users of the application sign up and create their record. resolve accepts args as a parameter and then uses the firstOrCreate method to ensure all users registering have a unique identifier, in this case, their email address.
In the config, you'll also need to include the mutation you just created:
'schemas' => [
        'default' => [
            'query' => [
                App\GraphQL\Query\UsersQuery::class,
                App\GraphQL\Query\PostsQuery::class
            ],
            'mutation' => [
                App\GraphQL\Mutation\CreateUserMutation::class,
            ],
            'types' => [],
            'middleware' => [],
            'method' => ['get', 'post'],
        ],
    ],
And here's how to create a user:
mutation{
    users(name : "John Doe", email : "Johndoe@gmail.com", password : "John1234"){
        id
        name
    }
}
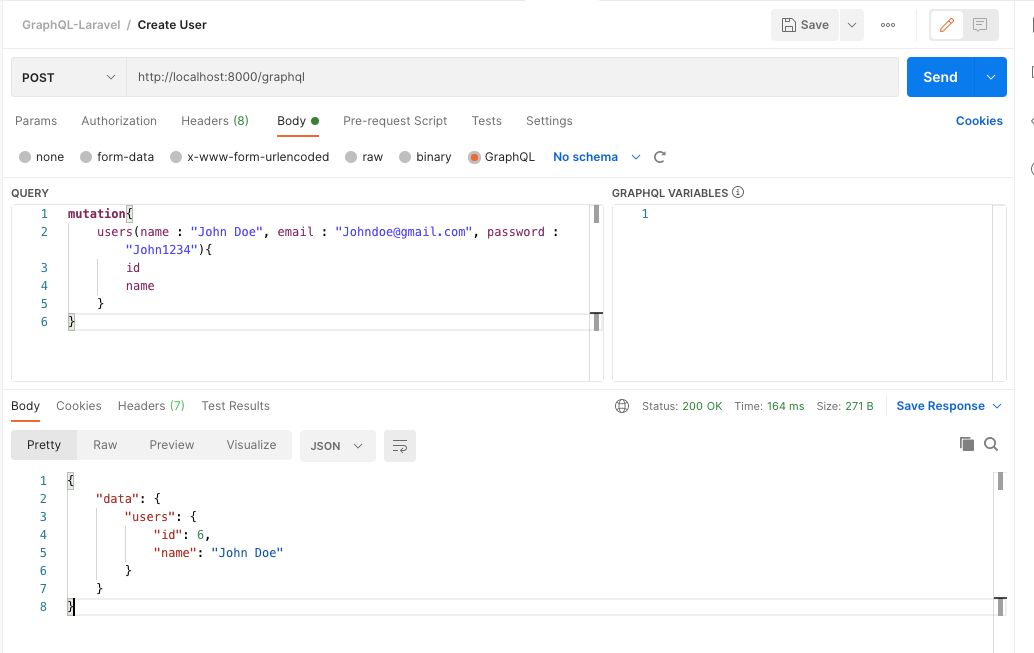 Image of user creation
Conclusion
Congrats! You've successfully built a GraphQL server using Laravel, and ran queries with Postman to get responses. Now that you know the basics of GraphQL, I hope you use it in your projects going forward.
All the code in this tutorial is available on GitHub, which also includes the Postman collection.