

The Laravel framework is one of the most widely used technologies in the web development ecosystem. It's relatively straightforward, and it's easy to use for building websites.
Laravel is built upon PHP, a popular web programming language that’s used in over 75% of websites on the web. So knowing how to use a framework like Laravel can help make you a sought-after developer – and it also makes building websites and applications more seamless.
Nuxt is a Vue.js framework used for building rich and interactive web applications. It lets you choose between different rendering modes depending on the application requirements you want to build. You can choose between building a fully server-rendered app or client-rendered app. Nuxt also offers a mixture of both rendering modes, making applications much more powerful, efficient, and interactive.
In this article, you'll learn how to build full-stack applications using Nuxt and Laravel by building a Book Library App. The app will comprise a library API that we'll build using Laravel and a frontend using Nuxt.
We’ll talk about:
- Installing and setting up Laravel
- Creating database models
- Migrations
- Controllers
- API Testing
- Form Validations
- Data Fetching in Nuxt
And more. Get ready, and let's dive in.
Table of Contents:
- Prerequisites
- How to set up Laravel on your machine
- How to Integrate the Laravel API in the Frontend
- Conclusion
- Resources
Prerequisites
- PHP and Composer are installed on your local machine.
- Node.js is installed on your local machine.
- yarn or npm installed on your local machine (npm comes pre-installed with Node).
- A text editor installed, like VSCode.
- Basic knowledge of HTML, CSS, JavaScript, and the terminal.
- Basic knowledge of PHP, Vue.js, and TypeScript.
How to Set Up Laravel on Your Machine
To begin the Laravel installation, open your terminal and bootstrap a new Laravel project using the command below:
composer create-project laravel/laravel library-api && cd library-api && code .
This command creates a new Laravel project in your directory. cd's into it, and open up VSCode using the code . command. (If you happen to be using a different editor, you can remove that command and open the directory manually).
To test your Laravel server and ensure everything works, let’s test the server by using the php artisan serve command in the terminal. This should make your API available on port 8000 and accessible in your browser.
How to Build the Book Library API
We will be creating a simple CRUD endpoint for our book library, that is the API should be able to achieve the following:
- Create new book entries
- Get a list of all the book entries in the database
- Edit previously added book entries
- Delete book entries from the database
Setting up the database
Laravel comes with a variety of databases you can use during development. By default, it automatically creates a configuration setup for MySQL. But for simplicity, we’ll be making use of a SQLite database in this tutorial.
Open the .env file in your root directory, change the DB_CONNECTION value from mysql to sqlite, and comment the remaining database configurations as you can see below:
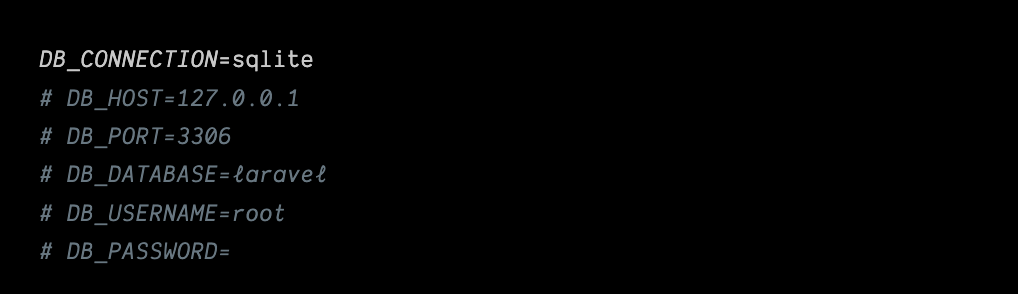
Laravel automatically helps create the SQLite database when the migrations command is run. We’ll do that in a bit after creating our database models.
Creating the Book model
When you're building backend APIs, a model acts as a template that’s used to set up your database tables. It contains high-level instructions for how the tables and columns should be created.
In Laravel, you can use the command below to create a Book model:
php artisan make:model Book -m
This creates your Book model in the app/models directory and also creates a new migration file for you in the database/migrations directory.
Navigate to the migrations directory and open the newly created migrations file. It should be in the format current_date_create_books_table.php like you can see below:

Edit the up function and add the following content:
$table->string('title');
$table->string('author');
$table->string('isbn');
$table->date('published_date');
$table->text('cover_image')->nullable();
$table->foreignIdFor(User::class);
Your migrations file should look like this now:
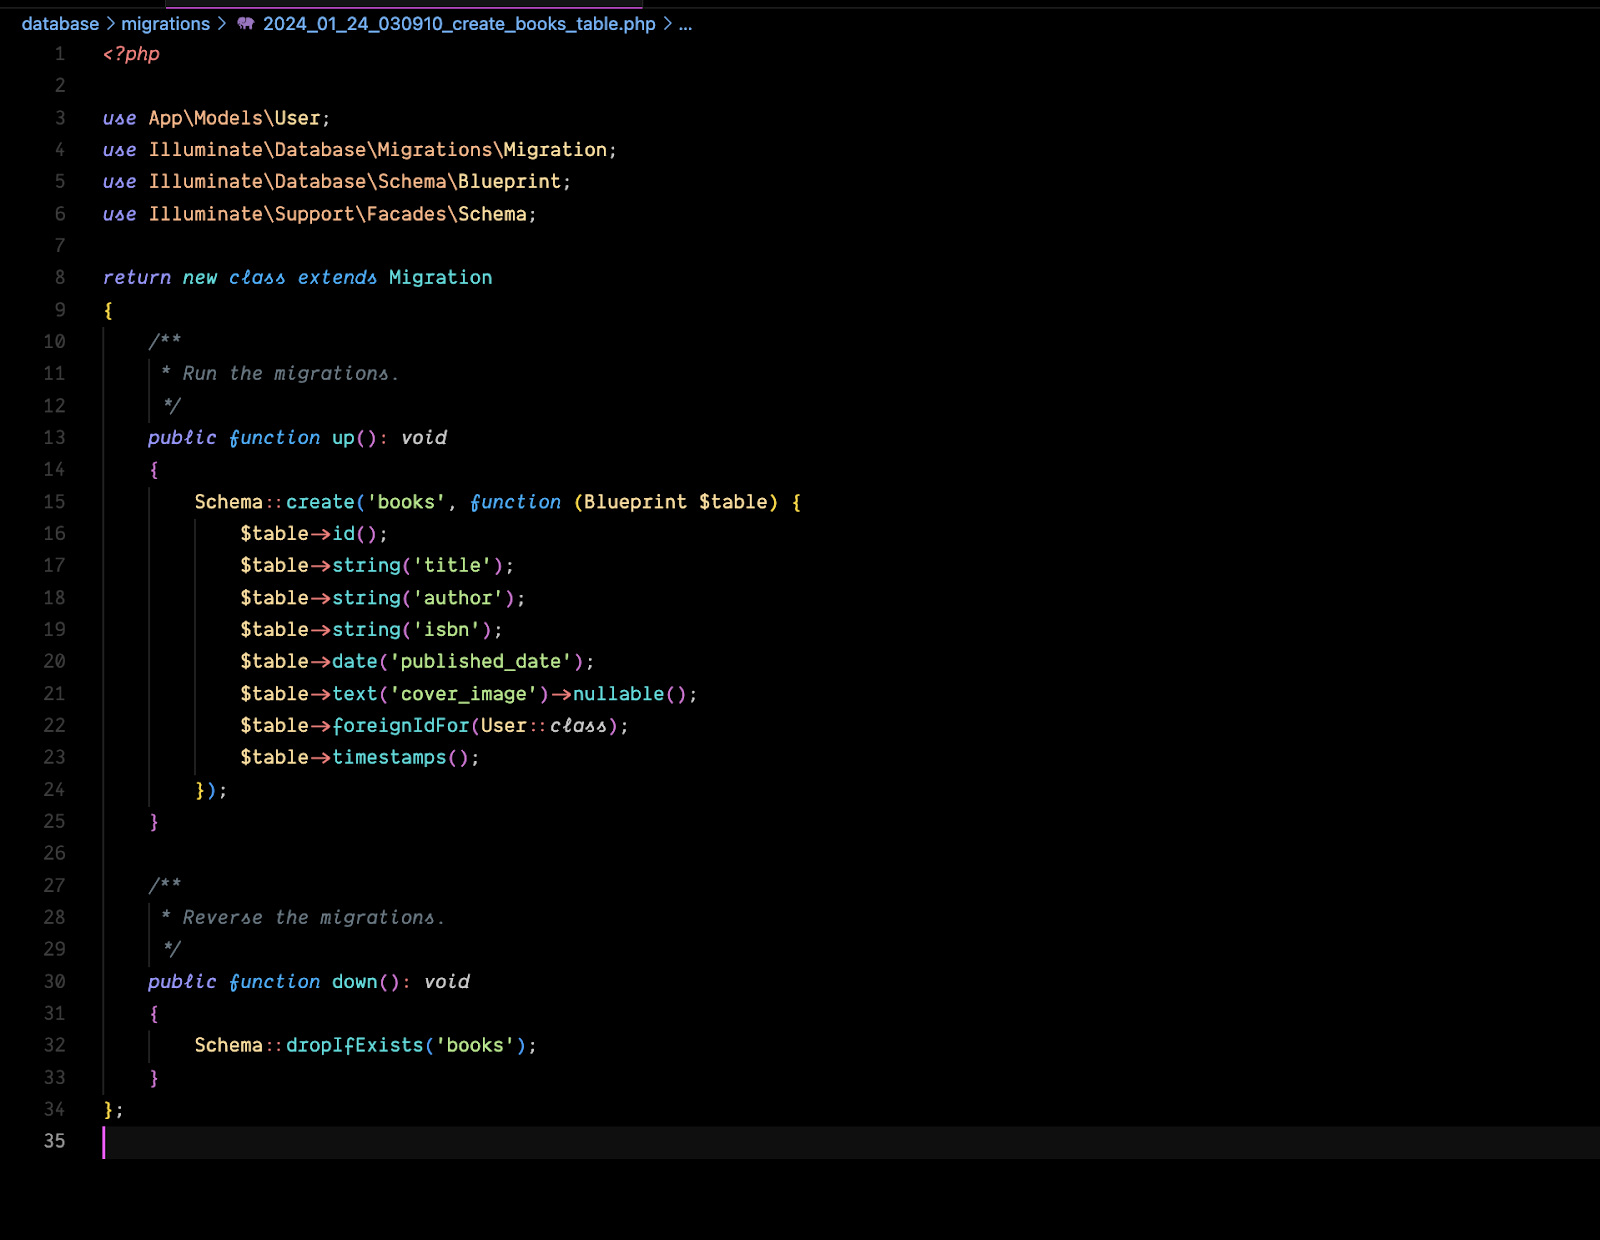
In summary, you added new fields to be created for the Book tables. Title, author, and isbn all have a data type of string, while published_date and cover_image have data types of date and text, respectively.
You also made the cover_image nullable, that is the field can be left out whenever a new book entry is created.
Lastly, you imported the User class and made it a foreign key to your Book table, creating a many-to-one relationship with the User table.
Now, let’s create your tables by running the migrations file with the command below:
php artisan migrate
You should get a prompt in the terminal asking if you want to create your SQLite database before the migrations. Select yes and press enter to proceed with the migrations.
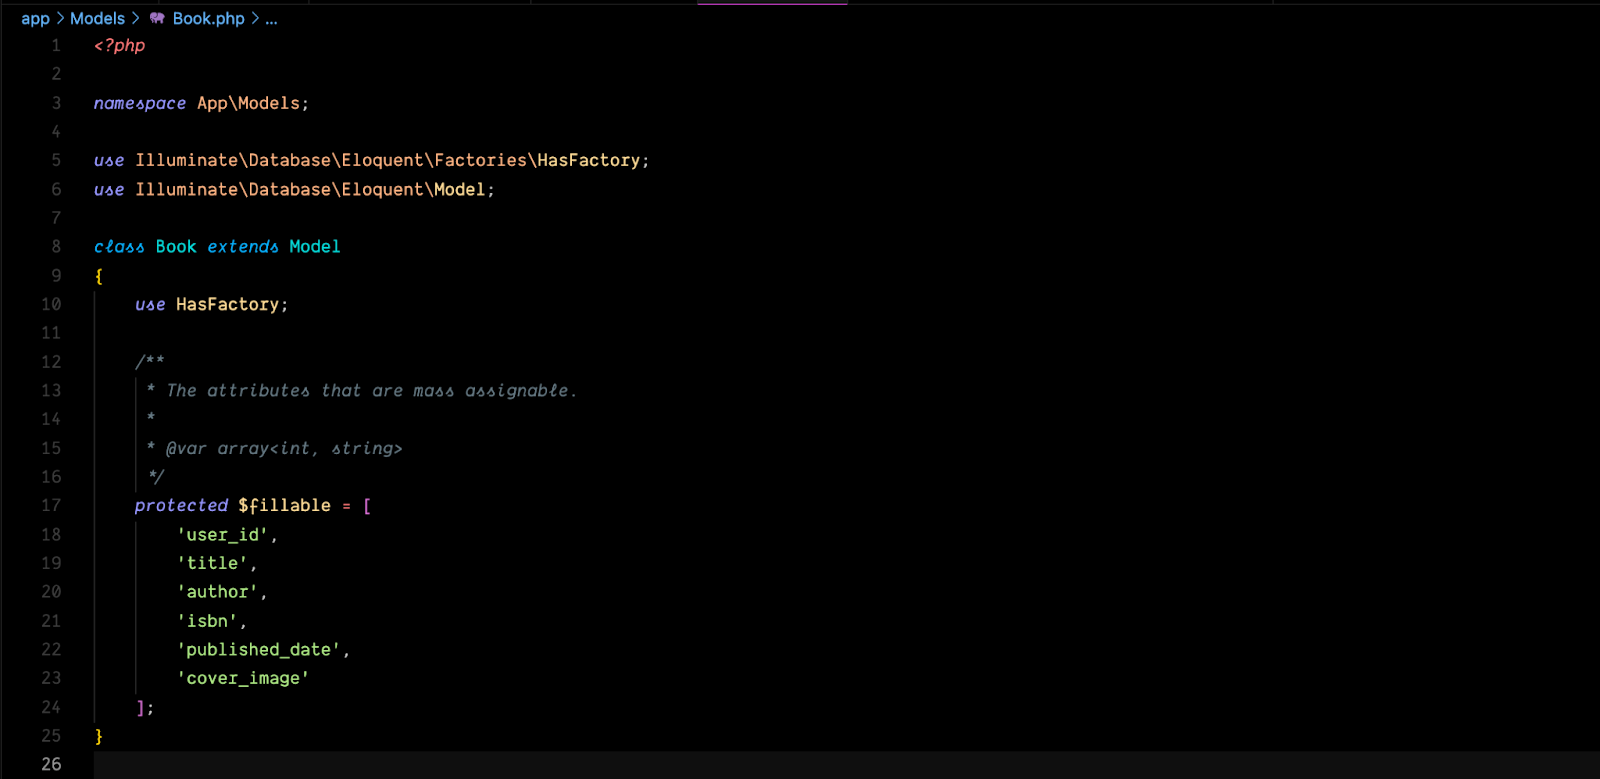
Once the migration has been run successfully, navigate to the Book model and paste in the following code:
 /**
* The attributes that are mass assignable.
*
* @var array<int, string>
*/

protected $fillable = [
    'user_id',
    'title',
    'author',
    'isbn',
    'published_date',
    'cover_image'
];
This will allow mass assignment when passing data into the model (passing the data as a whole instead of individually). Your Book model should look like this now:
Creating the Book controller
The controller is responsible for housing the business logic for any API being created. The implementation logic for how we want to perform any CRUD operations with the library API will live here.
Laravel also provides a command for you to make this easier for developers. Paste the command below in your terminal to create our book controller:
php artisan make:controller BookController
This should be accessible at app\Http\Controllers\BookController.php. Replace the content of your BookController class with the code snippet below:
<?php

namespace App\Http\Controllers;

use App\Models\Book;
use Carbon\Carbon;
use Illuminate\Http\Request;
use Illuminate\Support\Facades\Log;
use Illuminate\Support\Facades\Storage;


class BookController extends Controller
{
    public function store(Request $request)
    {
        $data = $request->validate([
            'title' => 'required|string',
            'author' => 'required|string',
            'isbn' => 'required|string|unique:books',
            'published_date' => 'required|string',
            'cover_image' => 'nullable|image|max:2048',
        ]);

        try {
            $published_date = Carbon::parse($data['published_date'])->toDateString();
            $data['published_date'] = $published_date;
            $data['user_id'] = 1; // Making the assumption the id of the user is 1
        } catch (\Exception $e) {
            return response()->json(['Error' => 'Bad Request'], 400);
        }

        $book = new Book($data);

        if ($request->hasFile('cover_image')) {
            $coverImage = $request->file('cover_image');
            $coverImageName = time() . '.' . $coverImage->getClientOriginalExtension();
            $coverImage->move(public_path('images'), $coverImageName);
            $book->cover_image = $coverImageName;
        }

        $book->save();

        return response()->json(['message' => 'Book added successfully'], 201);
    }

    public function index()
    {
        $books = Book::all();

        return response()->json(['books' => $books], 200);
    }

    public function update(Request $request, $id)
    {
        $book = Book::findOrFail($id);
        $data = $request->all();

        try {
            $published_date = Carbon::parse($data['published_date'])->toDateString();
            $data['published_date'] = $published_date;
            $data['user_id'] = $book->user_id;
        } catch (\Throwable $th) {
            Log::error('Error ', $th);
            return response()->json(['Error' => 'Bad Request'], 400);
        }

        $book->update($data);

        if ($request->hasFile('cover_image')) {
            // Delete the previous cover image if it exists
            if ($book->cover_image) {
                Storage::delete('public/images/' . $book->cover_image);
            }

            $coverImage = $request->file('cover_image');
            $coverImageName = time() . '.' . $coverImage->getClientOriginalExtension();
            $coverImage->storeAs('public/images', $coverImageName);
            $book->cover_image = $coverImageName;
            $book->save();
        }

        return response()->json(['message' => 'Book updated successfully'], 200);
    }

    public function destroy($id)
    {
        $book = Book::findOrFail($id);

        // Delete the cover image if it exists
        if ($book->cover_image) {
            Storage::delete('public/images/' . $book->cover_image);
        }

        $book->delete();

        return response()->json(['message' => 'Book deleted successfully'], 200);
    }
}
Defining the API Routes
Routing is one of the most important parts of building an API. Routes serve as access points through which developers, clients, or any other services can access an API.
The Laravel router allows you to register any routes that correspond to any HTTP verb being requested.
Route::get($uri, $callback);
Route::post($uri, $callback);
Route::put($uri, $callback);
Route::patch($uri, $callback);
Route::delete($uri, $callback);
Route::options($uri, $callback);
Navigate to the routes/api.php file and create the following routes for your API:
Route::post('/books', [BookController::class, 'store']);
Route::get('/books', [BookController::class, 'index']);
Route::put('/books/{id}', [BookController::class, 'update']);
Route::delete('/books/{id}', [BookController::class, 'destroy']);
Testing the API
Now, it’s time to test your API and ensure all your endpoints are accessible and working as expected.
Run the Laravel server using the command below:
php artisan serve
You can test the API using any API client of your choice. We have quite a number of popular options to choose from – Postman, Insomnia, Thunder Client, and so on. I’ll be using Thunder Client here.
We’ll test for all CRUD operations in your API client by confirming if all your objectives for your API are met.
Creating a new book

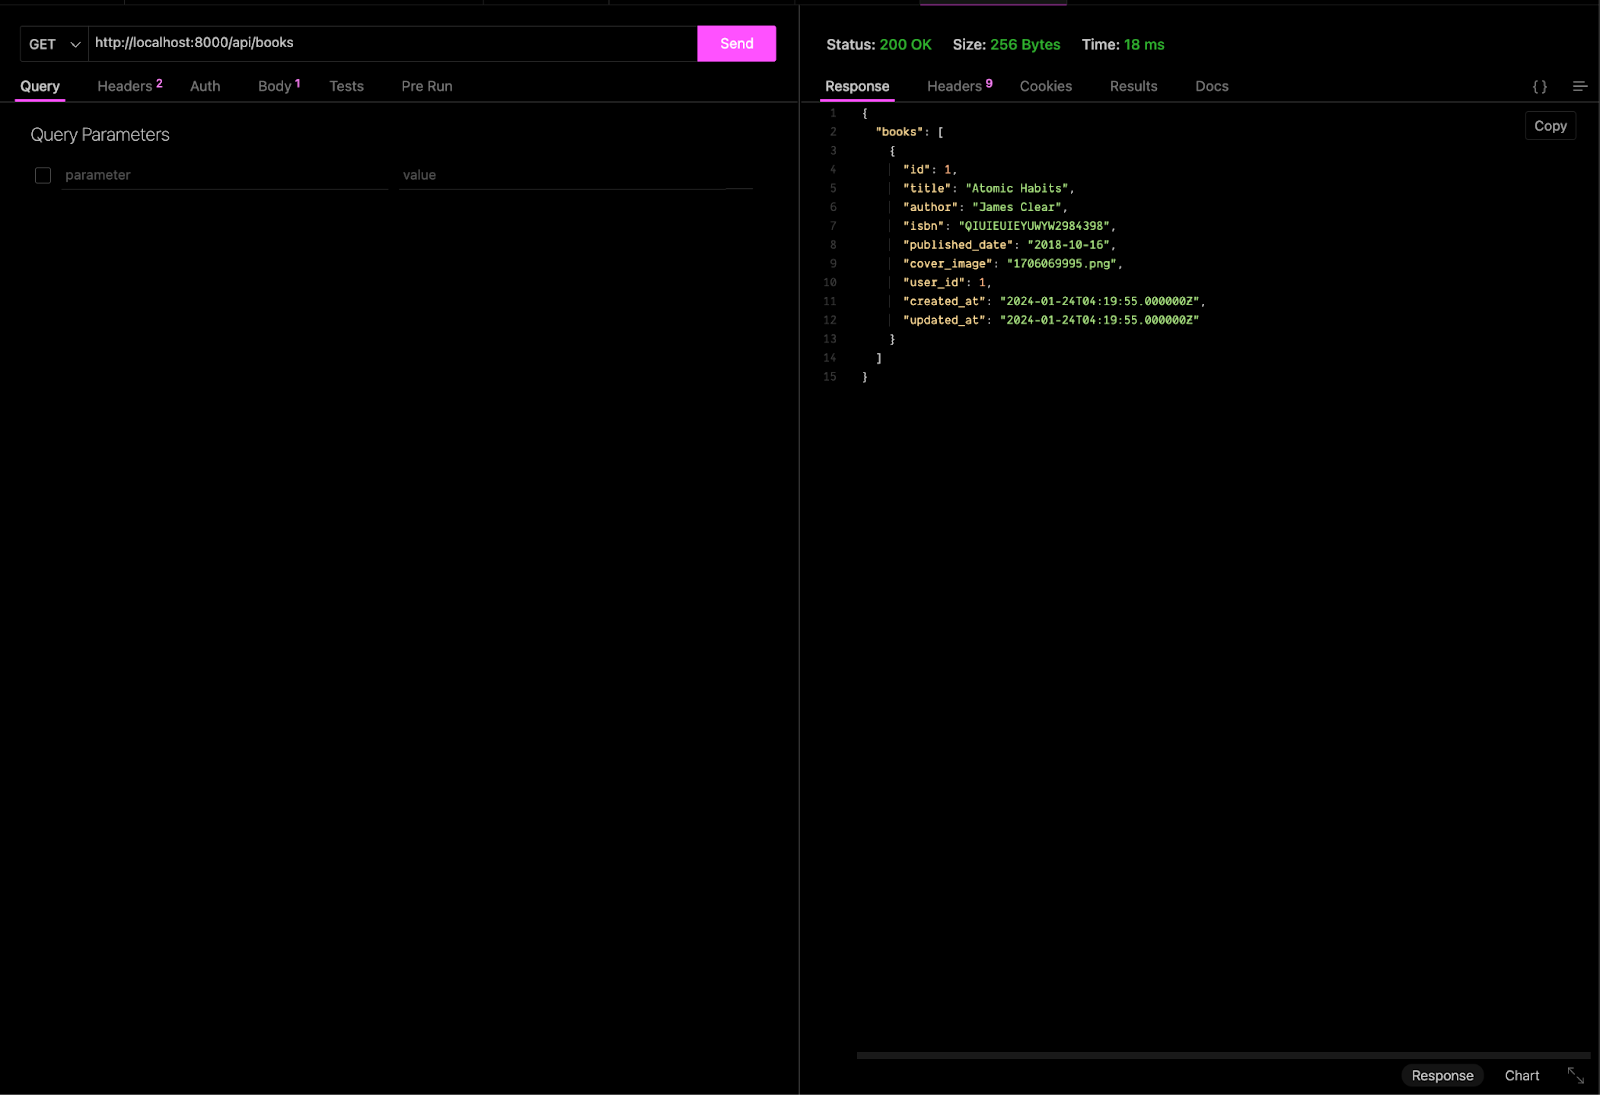
Getting a list of books
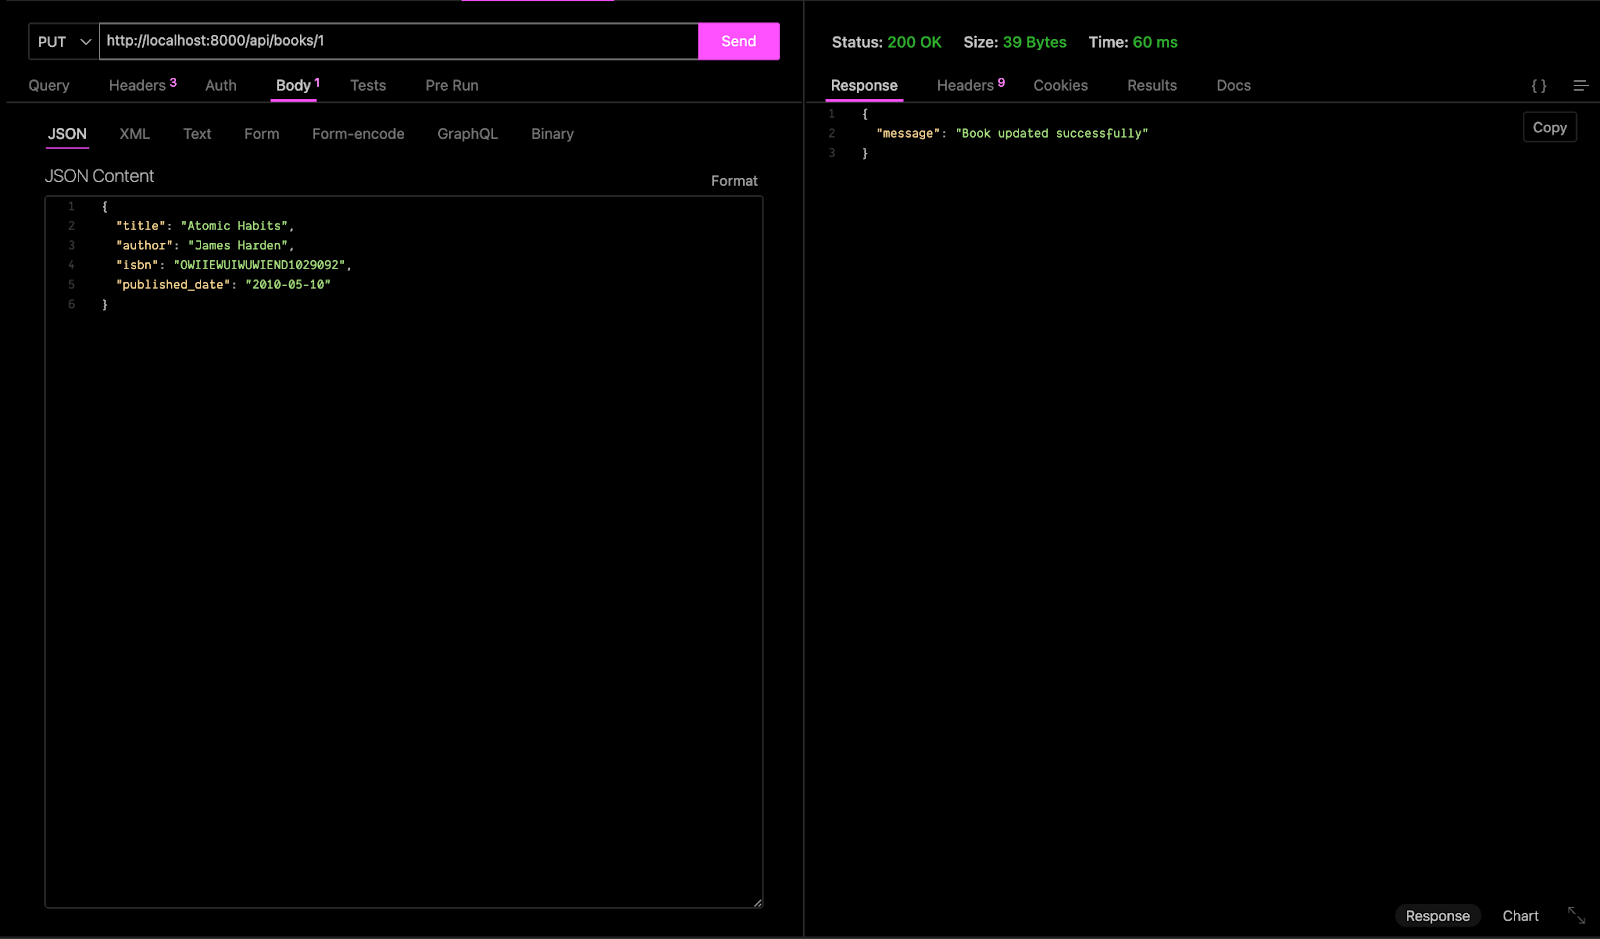
Editing a book
How to Build the Nuxt Frontend
Setting up a new Nuxt app is as simple as running the command below:
npx nuxi@latest init nuxt-library-frontend
Open the newly created project when you’re done installing all the dependencies and start the development server using this command:
npm run dev
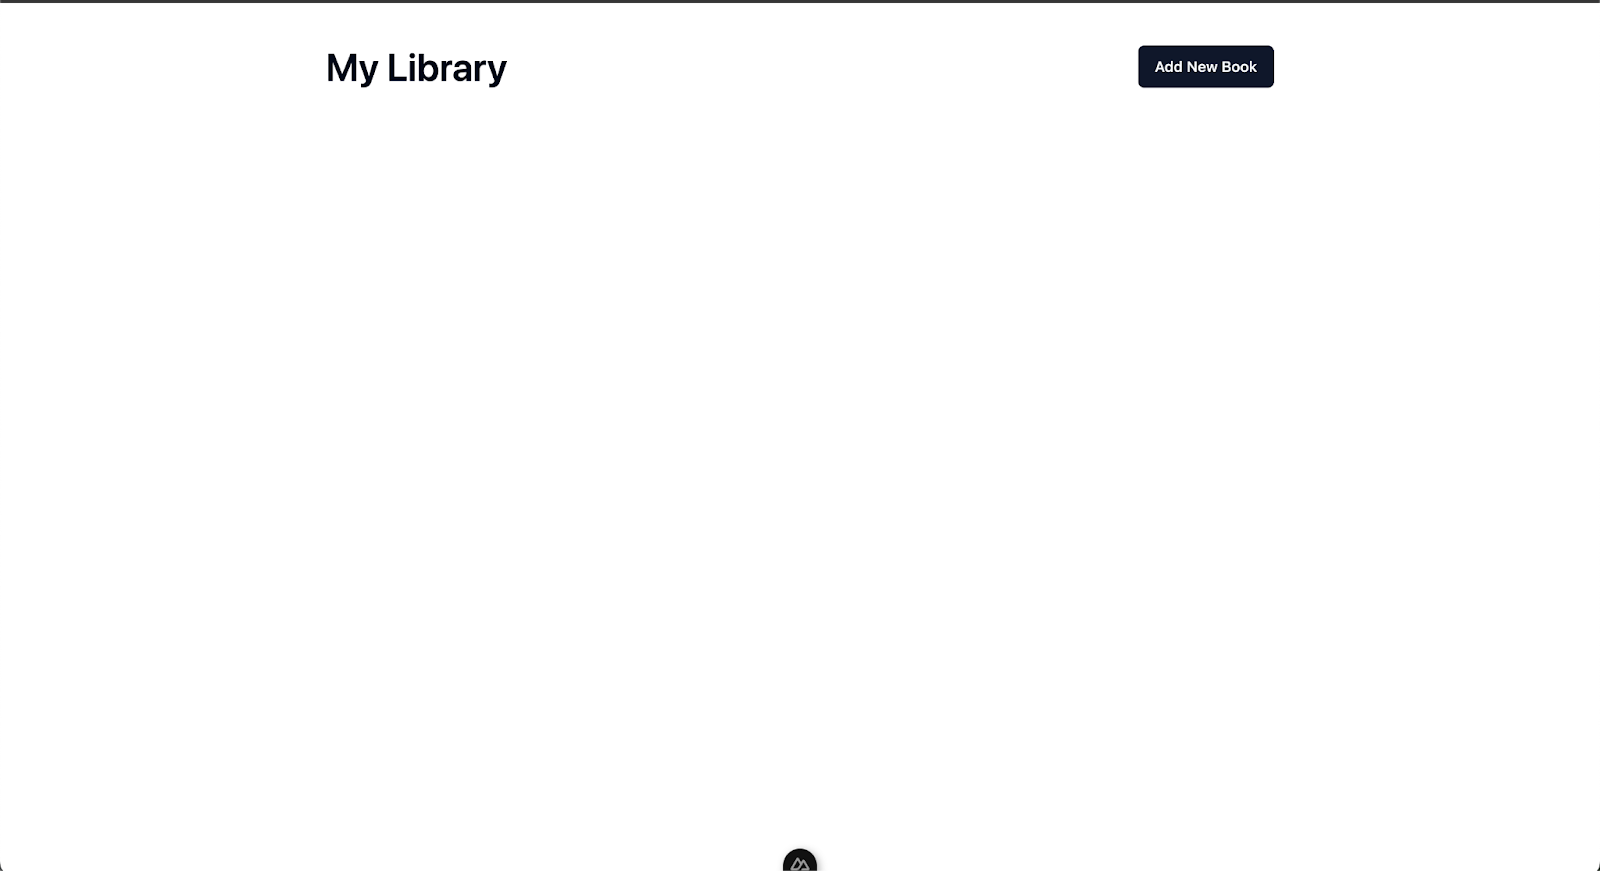
Your Nuxt app should now be accessible on port 3000:
This is what your frontend should look like at the end of the tutorial:
I’ve created some boilerplate code to help with the Nuxt frontend setup. This will enable us to focus on the implementation logic for consuming the Laravel API rather than spending time setting things up and styling.
For knowledge's sake, I created the UI components for the app using shadcn-vue. It consists of an amazing collection of accessible, reusable UI components that you can customize to your taste. Check out the installation steps for more details on how easy it was to set up for the Nuxt app.
It also comes with an installation of the Tailwind CSS utility library that’ll we'll use for styling in this tutorial.
Clone the boilerplate setup from the GitHub repo here so we can get started.
Navigate to pages/index.vue and replace the content of the index page with this:
<template>
 <main class="bg-white p-10 min-h-screen">
   <div class="max-w-4xl mx-auto">
     <header class="flex justify-between items-center mb-20">
       <h1 class="font-semibold text-4xl">My Library</h1>
       <Button>Add New Book</Button>
     </header>


     <div v-if="isLoading">
       <p class="italic text-2xl font-medium text-center">Loading...</p>
     </div>
     <div class="mt-8">
       <div class="flex flex-col gap-8">
         <div class="flex gap-4" v-for="book in books">
           <div
             v-if="book.cover_image"
             class="rounded-lg w-32 h-44 flex items-center justify-center"
           >
             <NuxtImg
               :src="`${API_BASE_URL}/images/${book.cover_image}`"
               :alt="book.title"
               class="w-full h-auto"
             />
           </div>
           <div v-else class="bg-slate-300 rounded-lg w-32 h-44"></div>
           <div class="flex items-center justify-between flex-1">
             <div>
               <h3 class="font-medium text-xl mb-4">{{ book.title }}</h3>
               <p class="mb-2">
                 <span>by:</span>
                 <span class="italic"> {{ book.author }} </span>
               </p>
               <p>
                 <span>Published:</span>
                 {{ book.published_date }}
               </p>
             </div>
             <div class="actions flex gap-4">
               <Button>Edit</Button>
               <Button variant="destructive"> Delete </Button>
             </div>
           </div>
         </div>
       </div>
     </div>
   </div>
 </main>
</template>


<script lang="ts" setup>
import { API_BASE_URL } from "@/utils/constants";
import type { BookProps } from "@/utils/types";


const isLoading = ref(false);
const books = ref<BookProps[]>([]);
</script>
We’ll need to create a new folder called utils in your root project which will contain two files: constants.ts and types.ts. Paste the following code snippet in your constants.ts file:
export const API_BASE_URL = "http://localhost:8000";
And the following in your types.ts:
export interface BookProps {
     id?: number;
     title: string;
     author: string;
     isbn: string;
     published_date: string;
     cover_image?: string;
     user_id?: number;
     created_at?: string;
     updated_at?: string;
}
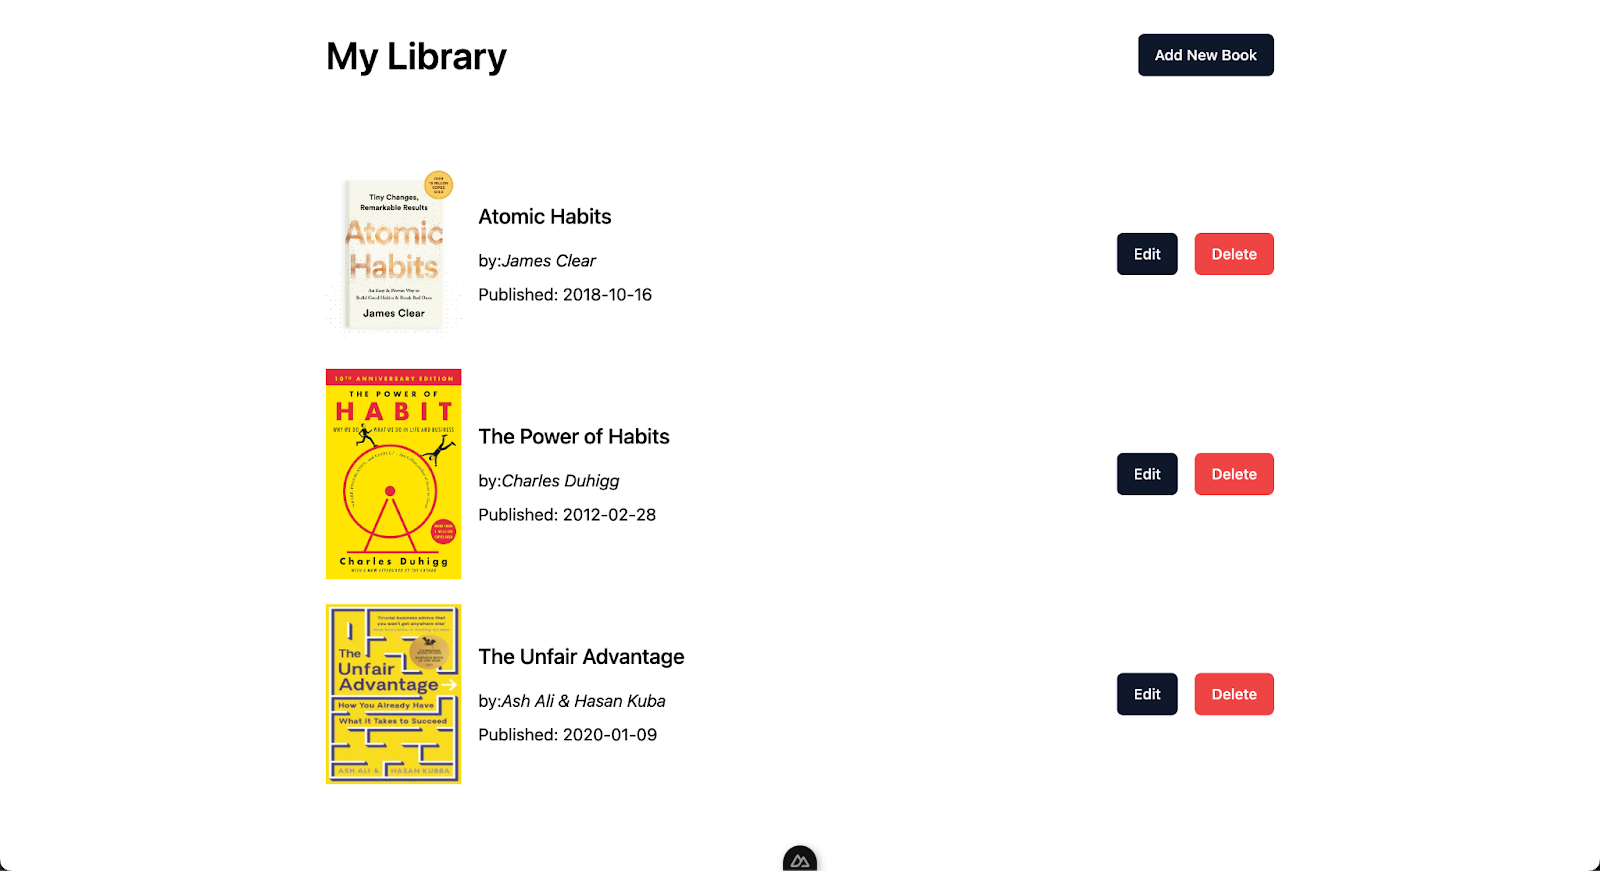
Save the pages/index.vue file. You should be able to see this result in your browser:
Now, we need to create a side drawer and a dialog for adding new books and deleting added books from the database, respectively.
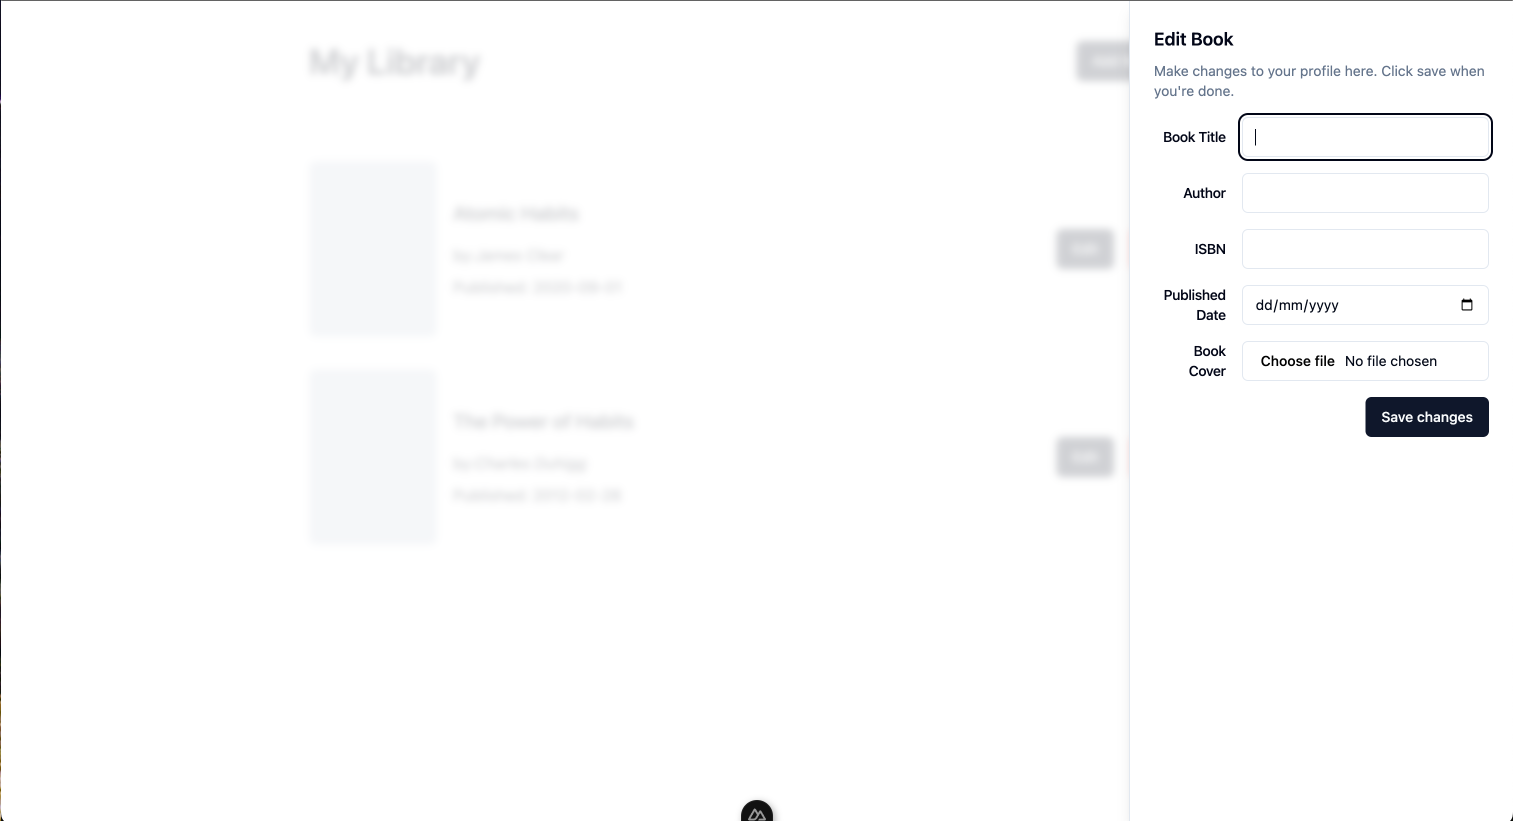
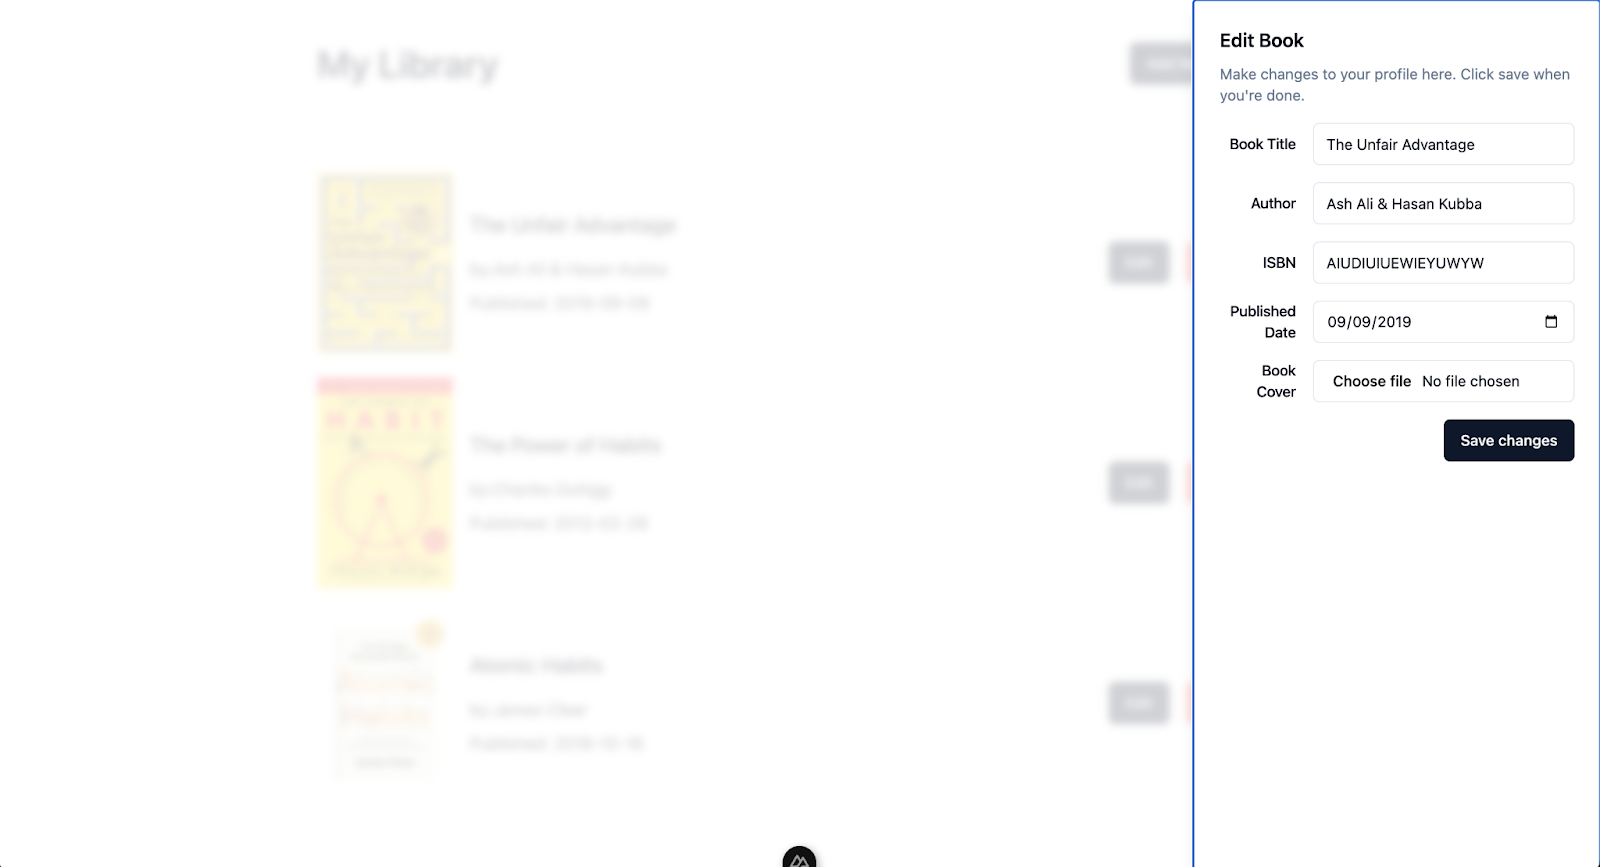
Create a new file called BookDrawer.vue in the component's root and add the following code in there:
<script setup lang="ts">
import type { BookProps } from "@/utils/types";


type PickedProps = "title" | "author" | "isbn" | "published_date";
interface CustomBookProps extends Pick<BookProps, PickedProps> {
 cover_image?: string;
}


const props = defineProps<{ open: boolean; book?: BookProps }>();
const emit = defineEmits(["update:open", "refresh-data"]);


const isSubmitting = ref(false);
let form = reactive<CustomBookProps>({
 title: "",
 author: "",
 isbn: "",
 published_date: "",
 cover_image: undefined,
});


const onFileChange = async (e: any) => {
 form.cover_image = e.target.files[0];
};


const onSubmit = async () => {};


const closeDrawer = (openState: boolean) => emit("update:open", openState);
</script>


<template>
 <Sheet :open="open" @update:open="closeDrawer">
   <SheetContent class="w-full bg-white">
     <SheetHeader>
       <SheetTitle>
         <template v-if="book"> Edit Book </template>
         <template v-else>Add New Book</template>
       </SheetTitle>
       <SheetDescription>
         Make changes to your profile here. Click save when you're done.
       </SheetDescription>
     </SheetHeader>
     <div class="grid gap-4 py-4">
       <div class="grid grid-cols-4 items-center gap-4">
         <Label for="bookTitle" class="text-right"> Book Title </Label>
         <Input
           v-model:model-value="form.title"
           type="text"
           id="bookTitle"
           class="col-span-3"
           required
         />
       </div>
       <div class="grid grid-cols-4 items-center gap-4">
         <Label for="author" class="text-right"> Author </Label>
         <Input
           v-model:model-value="form.author"
           type="text"
           id="author"
           class="col-span-3"
           required
         />
       </div>
       <div class="grid grid-cols-4 items-center gap-4">
         <Label for="isbn" class="text-right"> ISBN </Label>
         <Input
           v-model:model-value="form.isbn"
           type="text"
           id="isbn"
           class="col-span-3"
           required
         />
       </div>
       <div class="grid grid-cols-4 items-center gap-4">
         <Label for="published_date" class="text-right">
           Published Date
         </Label>
         <Input
           v-model:model-value="form.published_date"
           type="date"
           id="published_date"
           class="col-span-3"
           required
         />
       </div>
       <div class="grid grid-cols-4 items-center gap-4">
         <Label for="cover_image" class="text-right"> Book Cover </Label>


         <Input
           type="file"
           @change="onFileChange"
           id="cover_image"
           class="col-span-3"
           required
         />
       </div>
     </div>
     <SheetFooter>
       <Button type="submit" @click="onSubmit">
         <template v-if="isSubmitting">Saving...</template>
         <template v-else> Save changes </template>
       </Button>
     </SheetFooter>
   </SheetContent>
 </Sheet>
</template>
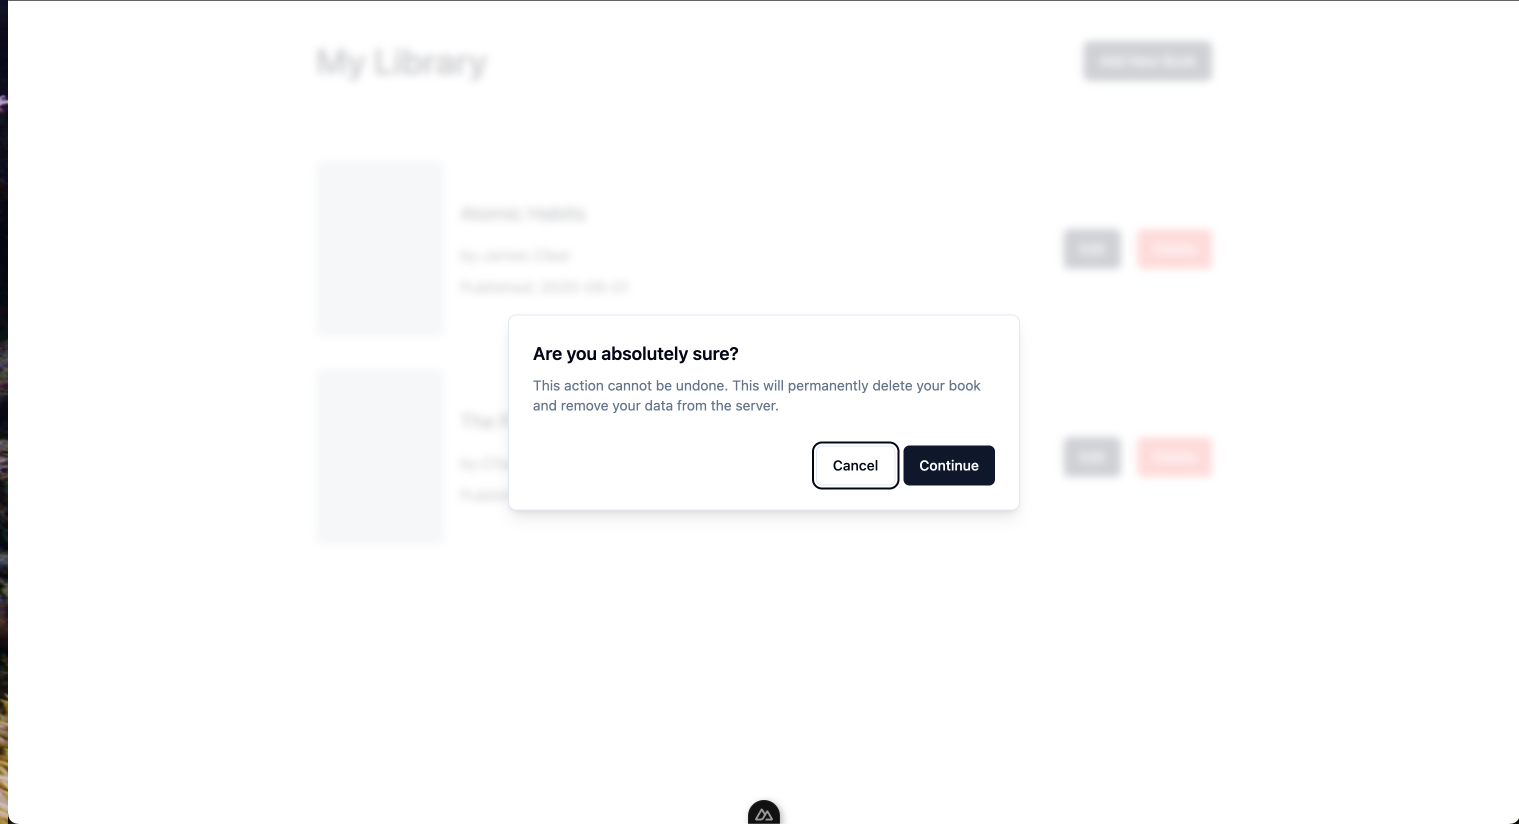
Create another file called DeleteBookDrawer.vue and add the following code content to it:
<script lang="ts" setup>
const emit = defineEmits(["refresh-data", "update:open"]);
const props = defineProps<{ open: boolean; book?: BookProps }>();
</script>


<template>
 <AlertDialog
   :open="open"
   @update:open="(openState) => $emit('update:open', openState)"
 >
   <AlertDialogContent>
     <AlertDialogHeader>
       <AlertDialogTitle>Are you absolutely sure?</AlertDialogTitle>
       <AlertDialogDescription>
         This action cannot be undone. This will permanently delete your book
         and remove your data from the server.
       </AlertDialogDescription>
     </AlertDialogHeader>
     <AlertDialogFooter>
       <AlertDialogCancel @click="$emit('update:open', false)"
         >Cancel</AlertDialogCancel
       >
       <AlertDialogAction>Continue</AlertDialogAction>
     </AlertDialogFooter>
   </AlertDialogContent>
 </AlertDialog>
</template>
Import the newly created files in your index page as you can see below:
<template>
 <main class="bg-white p-10 min-h-screen">
    ...

   <BookDrawerDialog
     v-if="isBookDrawerOpen"
     :open="isBookDrawerOpen"
     @update:open="(open: boolean) => isBookDrawerOpen = open"
     :book="currentBook"
     @refresh-data="fetchBooks"
   />
   <DeleteBookDialog
     v-if="isDeleteBookDialogOpen"
     :open="isDeleteBookDialogOpen"
     @update:open="(open: boolean) => isDeleteBookDialogOpen = open"
     :book="currentBook"
     @refresh-data="fetchBooks"
   />
 </main>
</template>
Now, we need to create a system for opening and closing the drawer and dialog, respectively. We’ll be creating a ref to track the open/closed state for the drawer and dialog components in your index page. Paste the following code content in the script stage to enable that:
<script lang="ts" setup>

...

const currentBook = ref<BookProps>();


const isBookDrawerOpen = ref(false);
const isDeleteBookDialogOpen = ref(false);


const toggleAddBookDrawer = () => {
 isBookDrawerOpen.value = !isBookDrawerOpen.value;
};


const toggleEditBookDrawer = (book: BookProps) => {
 currentBook.value = book;
 isBookDrawerOpen.value = !isBookDrawerOpen.value;
};


const toggleDeleteDialog = (book: BookProps) => {
 currentBook.value = book;
 isDeleteBookDialogOpen.value = !isDeleteBookDialogOpen.value;
};
</script>
Update the Edit and Delete buttons in your index page to include the toggle handler:
    ...

             <div class="actions flex gap-4">
               <Button @click="toggleEditBookDrawer(book)">Edit</Button>
               <Button @click="toggleDeleteDialog(book)" variant="destructive">
                 Delete
               </Button>
             </div>

           ...
Include the toggleAddDrawer in your Add Book button too:
<Button @click="toggleAddBookDrawer">Add New Book</Button>
Save the file changes and view in your browser. You should have the drawer active now:

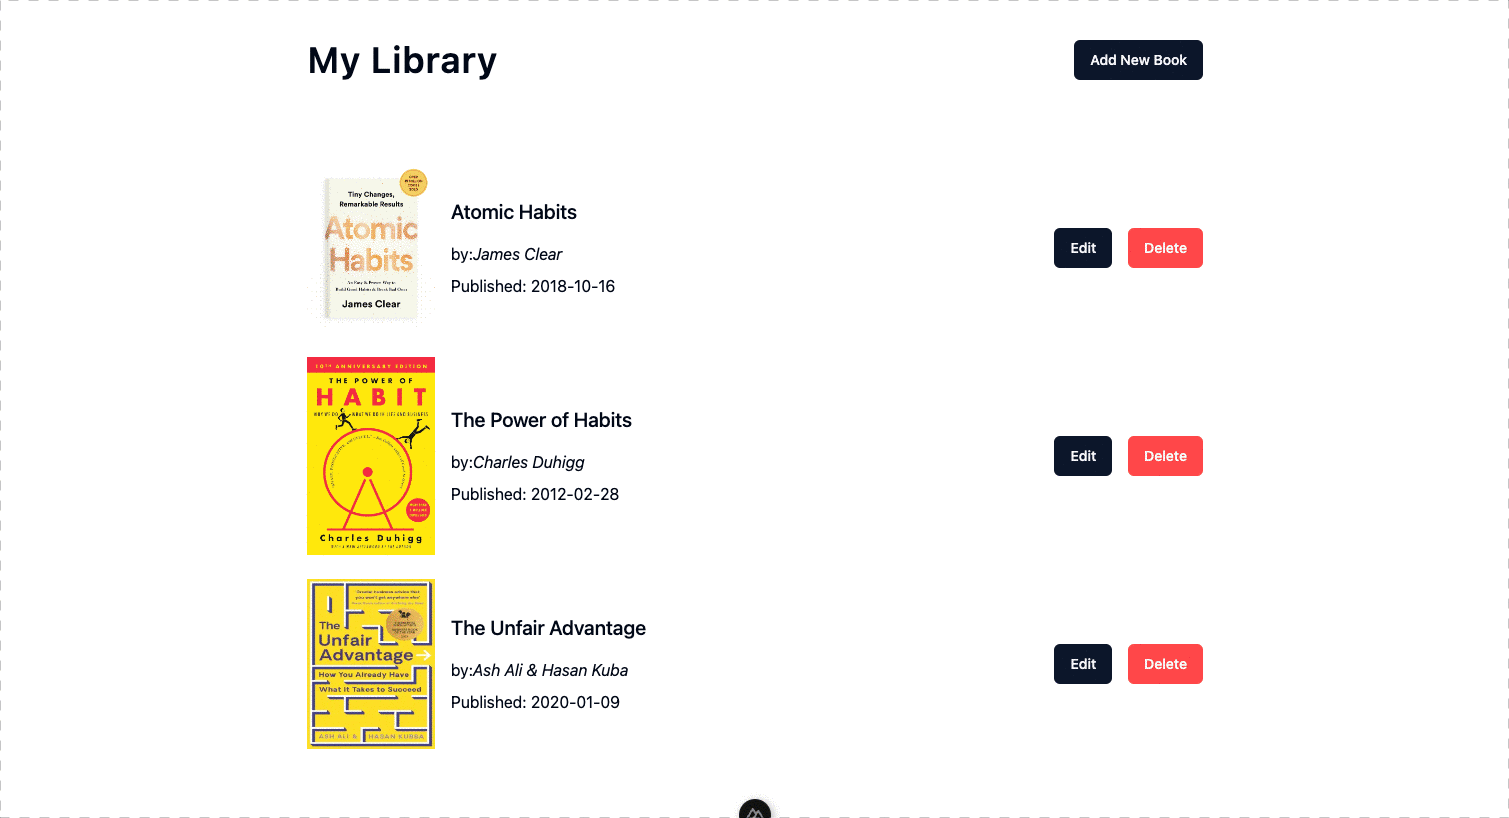
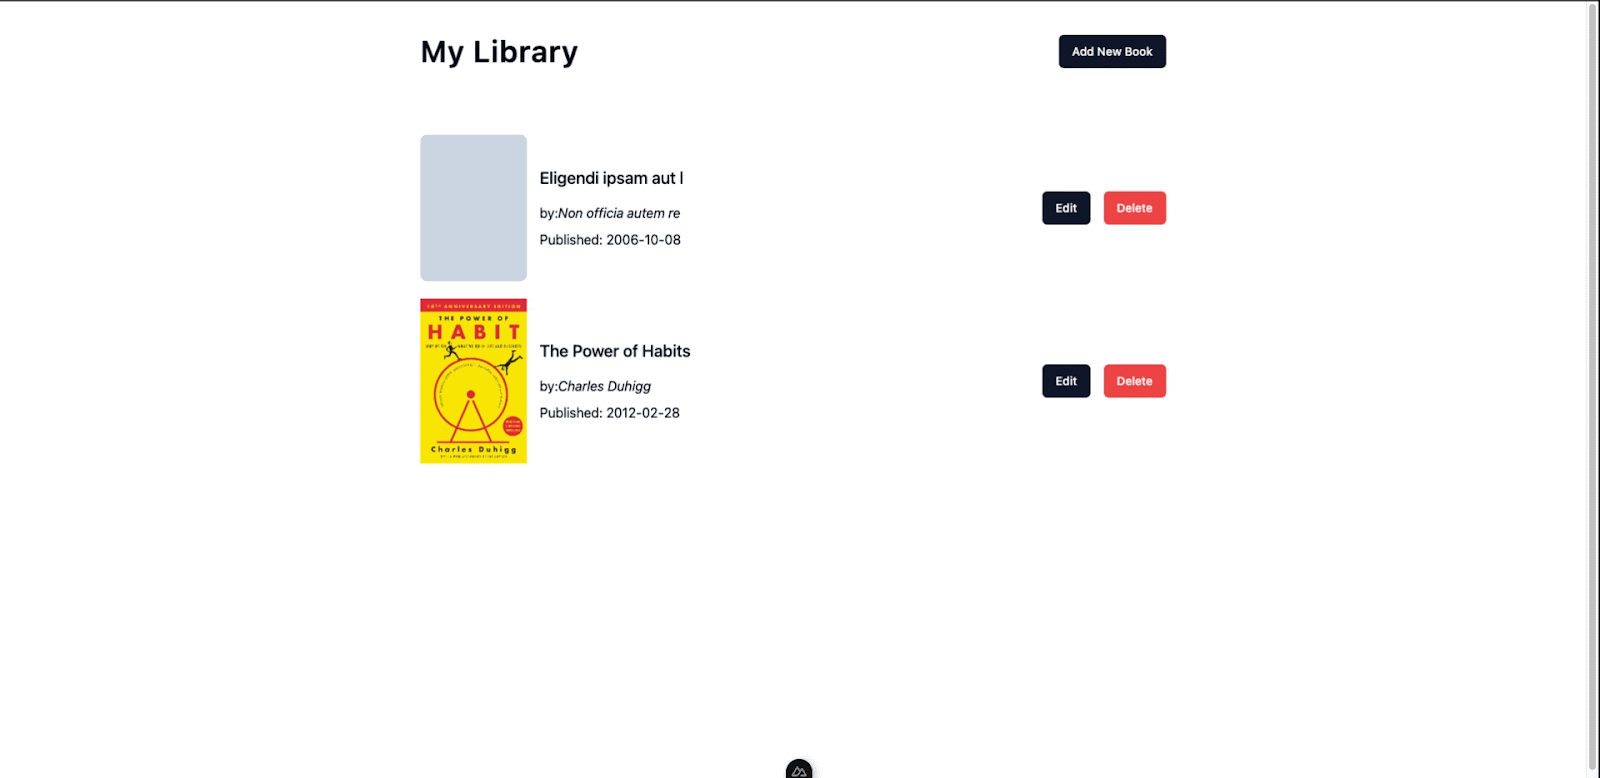
Moving on, we need to be sure the EditDrawer and Delete Dialog work. We’ll create a temporary array of mock book data to test that so you can see the result on your page. Update the value of the books ref to the data you have below (and don’t forget to update the books ref value to an empty array – that is books = ref<BookProps>([])):
const books = ref<BookProps[]>([
     {
       title: "Atomic Habits",
       author: "James Clear",
       isbn: "XYEOUIUEHEJ2902",
       published_date: "2020-09-01",
       cover_image: "",
     },
     {
       title: "The Power of Habits",
       author: "Charles Duhigg",
       isbn: "WIUIQUEWHSDBSD28",
       published_date: "2012-02-28",
       cover_image: "",
     },
]);
Save the changes and check out the EditDrawer and DeleteDialog in action:
How to Integrate the Laravel API in the Frontend
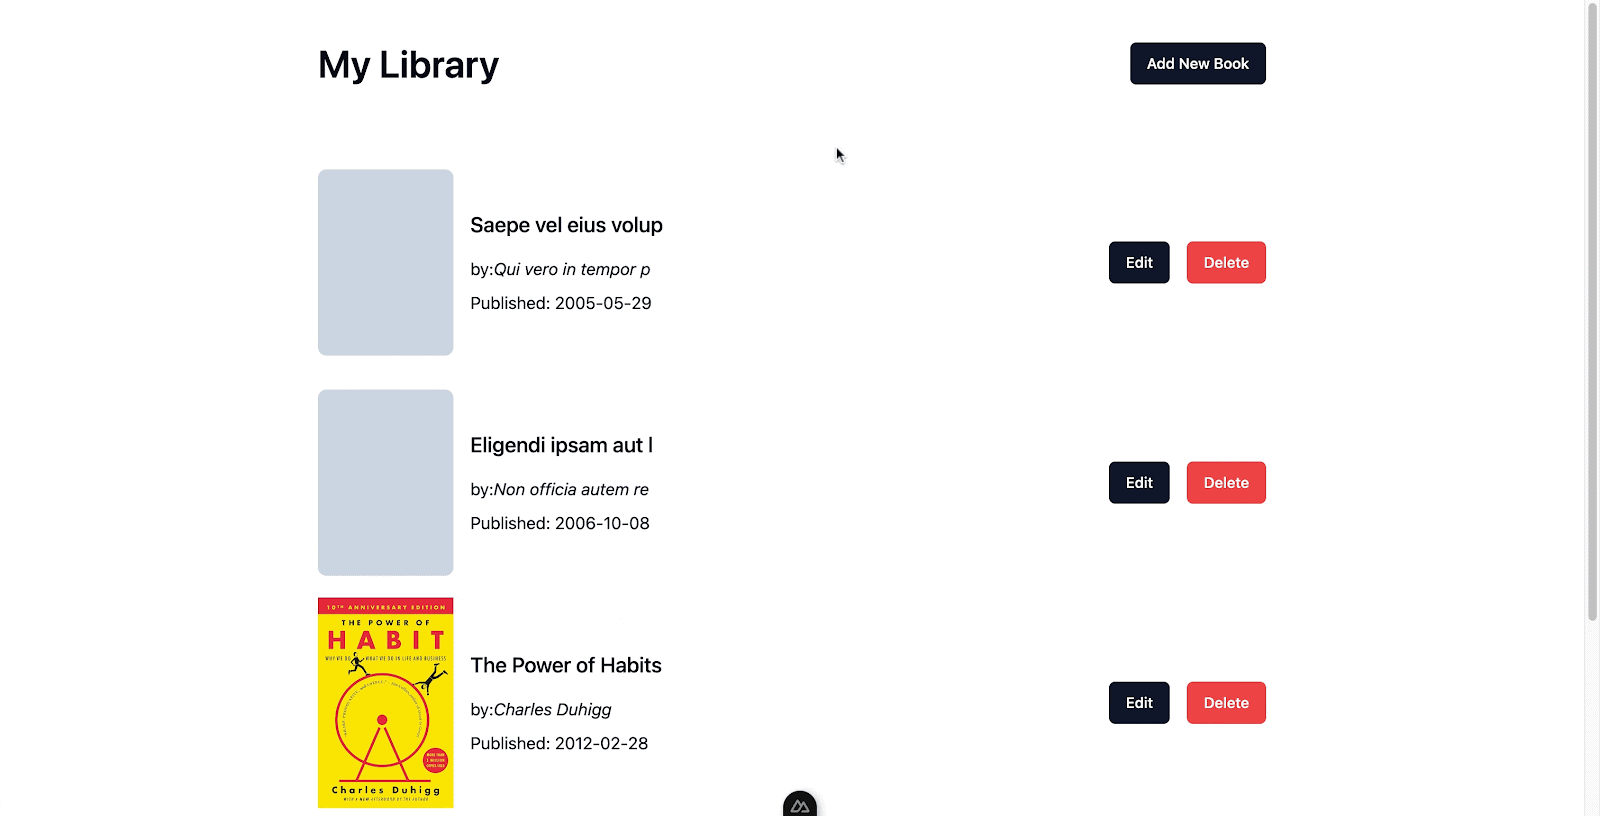
Getting all books in the library
So far, we only have the UI of our frontend working, and the data being displayed is not from the API. To make the app fully dynamic, you'll need to make an HTTP request to the server to get all the data you need for your page.
Update the body of the fetchBooks function in the index page to the following code:
const fetchBooks = async () => {
 try {
   isLoading.value = true;
   const response = await $fetch<{ books: BookProps[] }>(
     `${API_BASE_URL}/api/books`
   );


   books.value = response.books.sort(
     (a, b) =>
       Number(new Date(b.created_at as string)) -
       Number(new Date(a.created_at as string))
   );


 } catch (error) {
   console.log(error);
 } finally {
   isLoading.value = false;
 }
};


onMounted(() => {
 fetchBooks();
});
Basically, you're calling your fetchBooks function when the page mounts using one of the lifecycle hooks available in Vue.js. When the function is called, it executes the instruction you created in the body:
- Set the loading state of the app to true.
- Make a GET HTTP request to the books endpoint of your API and set the response to the books ref you created earlier.
- When the request-response has been completed, set the loading state of the app back to false to indicate to the user the process has been completed.
Save the changes, and you should see the results in the browser:
Creating a new book
For your book creation to be successful, you need to include the logic for creating a book in your BookDrawer. Add the following code in the BookDrawer.vue file:
...

const isSubmitting = ref(false);


const addNewBook = async (data: any) => {
 const response = await $fetch(`${API_BASE_URL}/api/books`, {
   method: "POST",
   body: data,
   headers: {
     Accept: "application/json",
   },
 });
 return response;
};


const onSubmit = async () => {
 try {
   const formData = new FormData();
   Object.keys(form).forEach((key) => {
     // @ts-ignore
     if (form[key]) {
       formData.append(key, form[key as never]);
     }
   });
   isSubmitting.value = true;
   const data = await addNewBook(formData);
   closeDrawer(false);
   emit("refresh-data");
 } catch (error) {
   console.log(error);
 } finally {
   isSubmitting.value = false;
 }
};

...
Similar to the implementation for fetching your books, the only difference here is that you're making a POST HTTP request instead. You use this method whenever you need to mutate data on the server.
Editing a book
Update your BookDrawer with the following code to enable editing of the books that have been added:
<script setup lang="ts">

...

onMounted(() => {
 if (props.book) {
   form = props.book;
 }
});


const editBook = async () => {
 try {
   isSubmitting.value = true;
   const resp = await $fetch(`${API_BASE_URL}/api/books/${props?.book?.id}`, {
     method: "PUT",
     body: formData,
   });
   closeDrawer(false);
   emit("refresh-data");
 } catch (error) {
   console.log(error);
 } finally {
   isSubmitting.value = false;
 }
};

...
</script>
Update the save button with the toggle handler also:
<Button
  type="submit"
  @click="() => (book?.id ? editBook() : onSubmit())"
>
  <template v-if="isSubmitting">Saving...</template>
  <template v-else> Save changes </template>
</Button>
And here's the result:
Deleting a book
Paste the following in the DeleteBookDialog.vue file:
const refreshData = () => emit("refresh-data");
const closeDialog = () => emit("update:open", false);


const deleteBook = async () => {
 await $fetch(`${API_BASE_URL}/api/books/${props?.book?.id}`, {
   method: "DELETE",
 });
 closeDialog();
 refreshData();
};
This works fine also:
Conclusion
Building full-stack web apps with Laravel and Nuxt is a very rewarding experience as you can enjoy the benefits and rewards from the best of both worlds.
Since Laravel is a feature-rich backend framework, it comes with many modules and packages that you can install whenever a feature or implementation needs to be worked on.
And Nuxt, as a Vue framework, gives you the superpower of building single-page applications that are fast, accessible, and responsive, giving end-users a delightful experience.
In this tutorial, we went over how we can build full-stack applications using Nuxt and the Laravel framework. I hope you were able to learn something new and are excited to explore this further. Feel free to reach out if you have any questions or ideas.
The full code for the tutorial can be found in the GitHub repo here.
Resources
- Laravel Docs
- Nuxt Documentation
- Shadcn-vue, ready-made UI components that can be copy-pasted anytime
- Vue Docs