
When it comes to web development, it's hard to ignore React.js. It has been one of the leading user interface libraries for a decade, and it supports a lot of popular frameworks like Next.js in the background.
If you are a React developer, you likely appreciate its component-based architecture, uni-directional data binding, huge community support, and the React team's passion for bringing features in front of developers.
If you are just getting started with React or a beginner at it, that's great – there's a complete React.js roadmap published here on the freeCodeCamp you can check out. And I think you'll find the library a lot easier to learn if you have a solid grip on basic JavaScript foundations.
Irrespective of where you stand with React, the real fun is in building things with it, don't you agree? So I thought of building a simple inventory list to explain a few powerful concepts like complex state management with useReducer.
And while we're doing that, we'll also create a mock API server using JSON Server, we'll use axios to call the API, and finally we'll use the useReducer hook to manage state.
Sounds interesting? Let's do it. If you would also like to check out the video version of this project, here it is: 😊
Table of Contents
- Project Setup with React and TailwindCSS
- How to Setup a Server with JSON Server
- How to Set Up and Use Axios
- How to Use the useReducer Hook from React
- How to Create Actions
- How to Create an Inventory Reducer
- How to Build the Inventory List Component
- How to Use Axios to Fetch Data and Dispatch it to the Reducer
- Let's Complete the JSX Part
- How to Use the Inventory List in the App Component
- Wrapping Up
Project Setup with React and TailwindCSS
Before we do anything else, let's get the project set up. Also, you can follow along with the source code as you read through.
To build this app, we will use React with Vite and TailwindCSS. You can set up these tools by following a few steps from the Vite and TailwindCSS documentation.
But, why not use something that provides everything built together? This will save you time for future React projects as you can use the same infrastructure to create a React projects every time.
Head over to this repository and click on the Use this template button as indicated in the image below. It will help you create a brand new repository out of a template repository with Vite, React, and TailwindCSS configured.
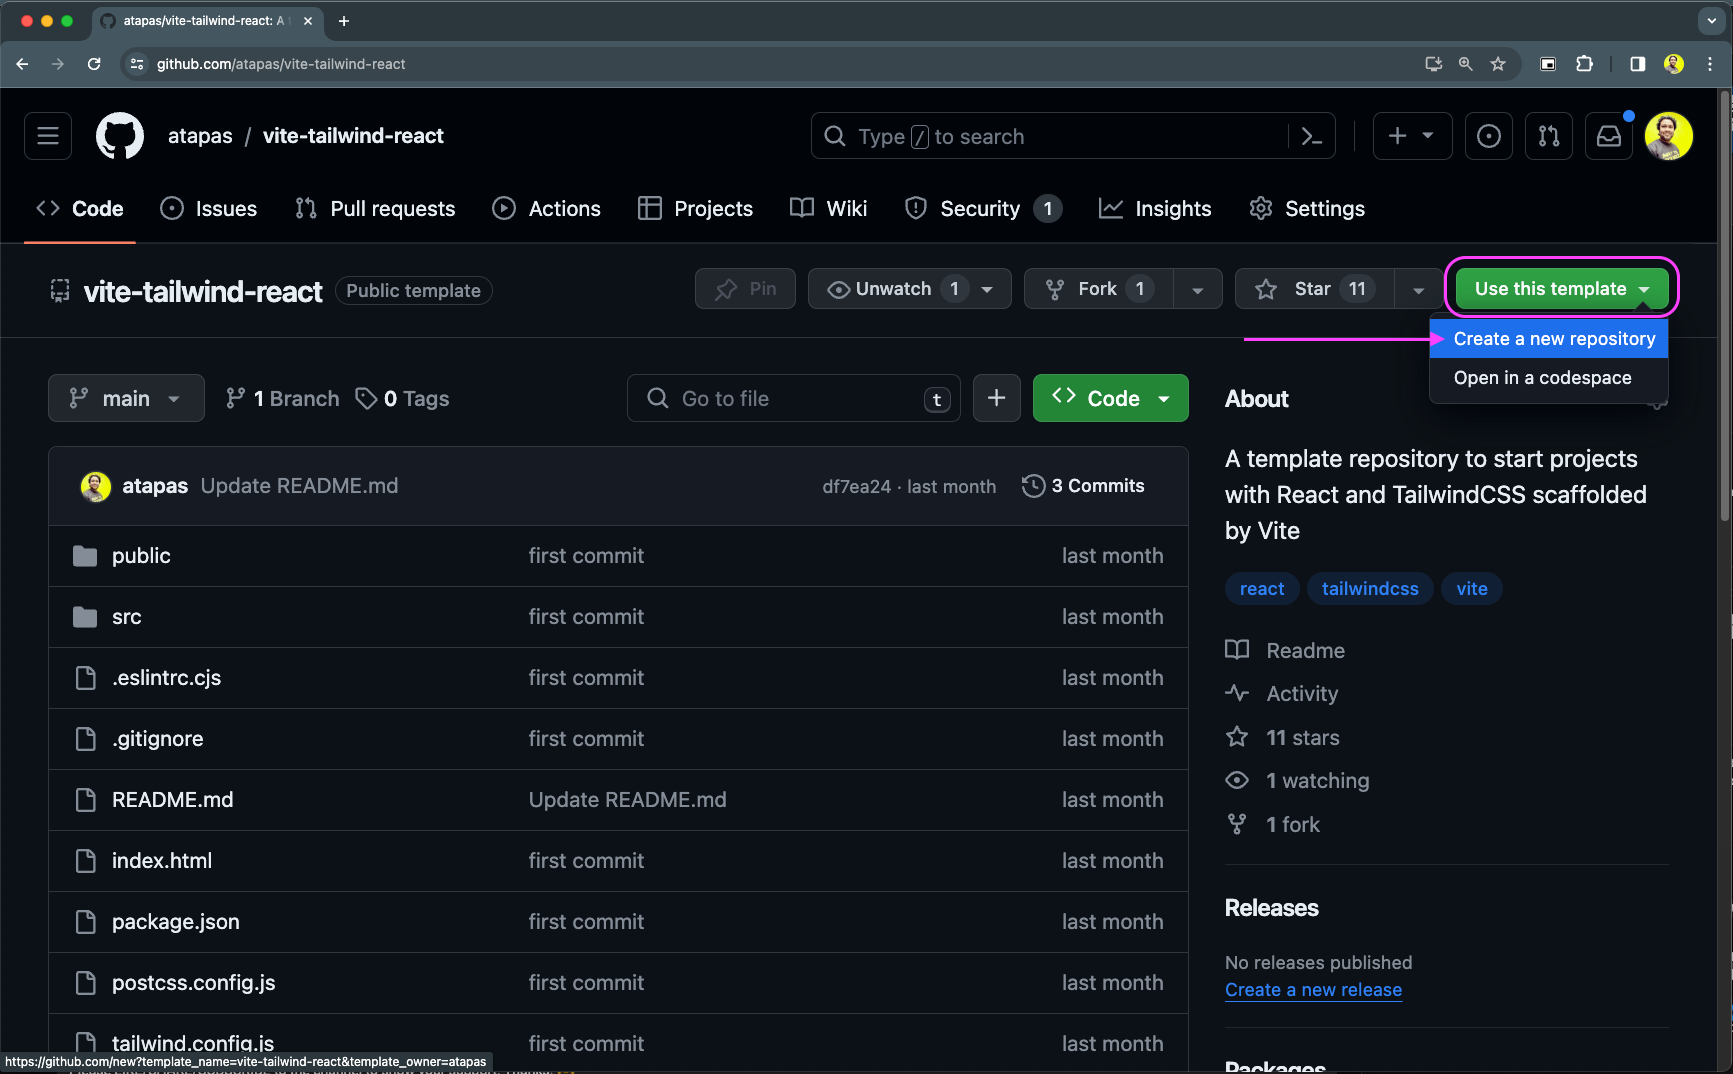 Create a React Project Repository with TailwindCSS and Vite from an Existing Template
Now provide a suitable name to your repository (let's call it inventory-list in this article) along with a description. You may chose to keep the repository private if you wish to, otherwise go ahead and create the repository by clicking on the button at the bottom.
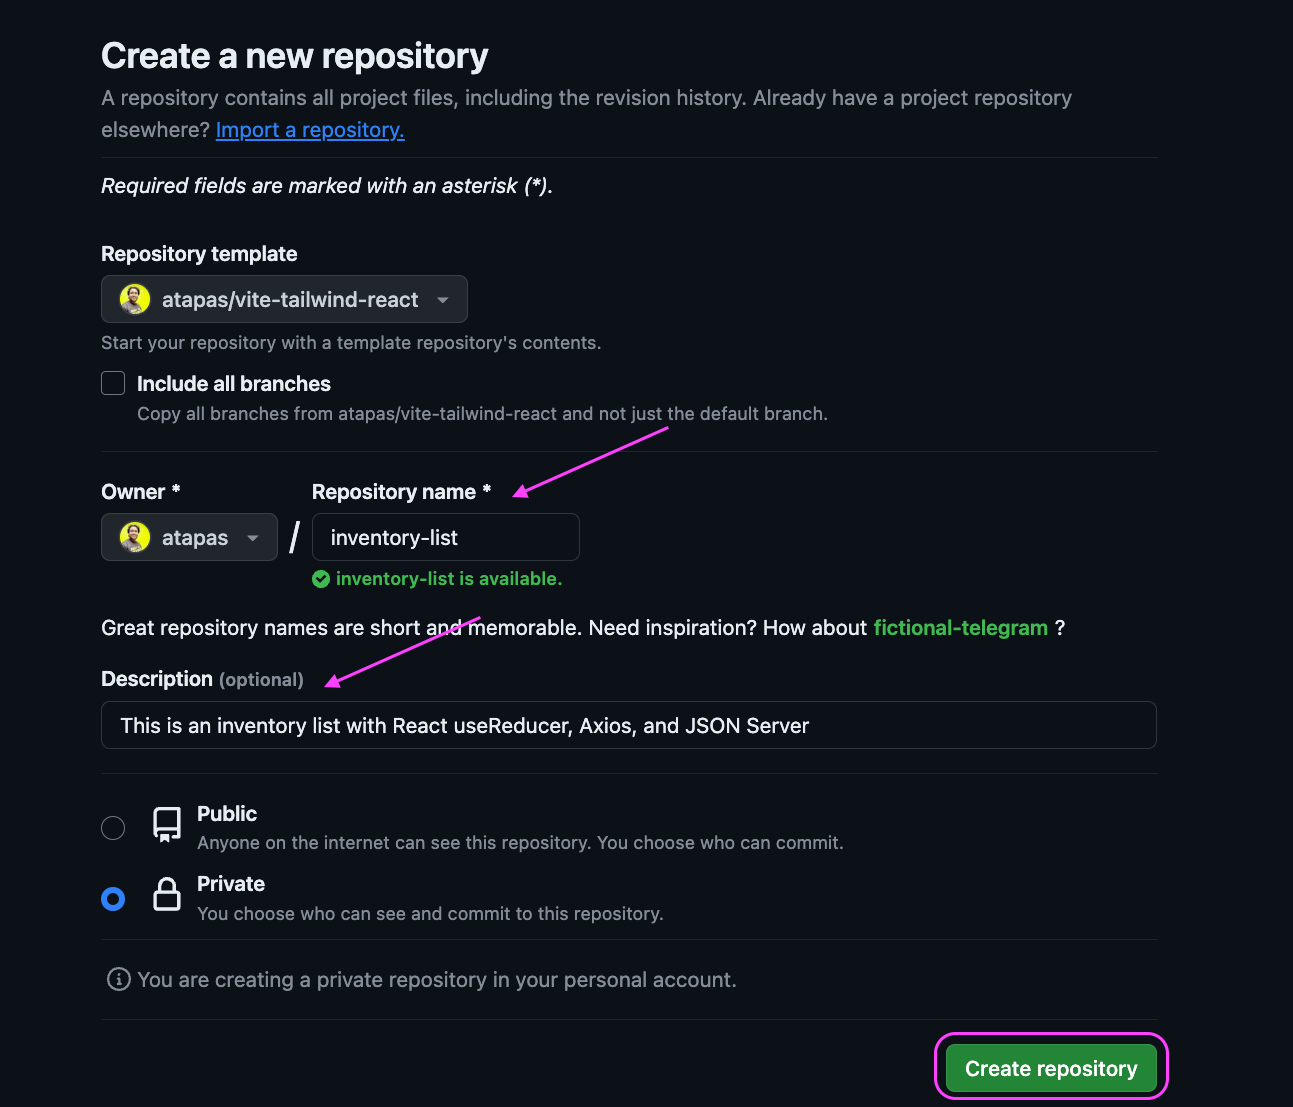 Provide the Details of the New Repository
That's it. You have a repository with all the basic ingredients to get started. Now, go to the command prompt/terminal and clone the newly created repository:
git clone <YOUR NEWLY CREATED REPOSITORY URL>
Change directories to the project directory and install the project dependencies using the following commands:
## Change to the project directory
cd inventory-list

## Install dependencies

## Using NPM
npm install

## Using Yarn
yarn install

## Using PNPM
pnpm install
After the dependencies are installed successfully, execute the following command to run the project on a local server:
## Run the project locally

## Using NPM
npm run dev

## Using Yarn
yarn dev

## Using PNPM
pnpm dev
Now the project should be running locally and should be accessible on the default URL, http://localhost:5173. You can access the URL on yor browser and import the project source code into your favourite code editor (I use VS Code). We are all set to start the coding.
How to Setup a Server with JSON Server
JSON Server is the go-to option when you want to work with fake/mock APIs to serve data of your choice. It is easy to set up and customize to your use case.
Let's set up the JSON Server for our project. The first thing is to install it.
Open a terminal at the root of the project folder and type the following command to install JSON Server:
## Using NPM
npm install json-server

## Using Yarn
yarn add json-server

## Using PNPM
pnpm install json-server
JSON Server uses JSON files as the data sources to perform HTTP operations like GET/POST/PUT/PATCH/DELETE. Create a server/database directory under the src/ directory. Now create a file called data.json under the src/server/database/ with the following content:
{
  "edibles": [
    {
      "id": 1,
      "picture": "🍌",
      "name": "Banana",
      "price": 32,
      "quantity": 200,
      "type": "fruits"
    },
    {
      "id": 2,
      "picture": "🍓",
      "name": "Strawberry",
      "price": 52,
      "quantity": 100,
      "type": "fruits"
    },
    {
      "id": 3,
      "picture": "🍗",
      "name": "Checken",
      "price": 110,
      "quantity": 190,
      "type": "foods",
      "sub-type": "Non-Veg"
    },
    {
      "id": 4,
      "picture": "🥬",
      "name": "Lettuce",
      "price": 12,
      "quantity": 50,
      "type": "Vegetables"
    },
    {
      "id": 5,
      "picture": "🍅",
      "name": "Tomato",
      "price": 31,
      "quantity": 157,
      "type": "Vegetables"
    },
    {
      "id": 6,
      "picture": "🥩",
      "name": "Mutton",
      "price": 325,
      "quantity": 90,
      "type": "Non-Veg"
    },
    {
      "id": 7,
      "picture": "🥕",
      "name": "Carrot",
      "price": 42,
      "quantity": 190,
      "type": "Vegetables"
    }
  ]
}
The data.json file contains an array of edible items. Each of the items in the array has properties like picture, name, price, quantity, and type to show in the inventory list.
The last thing left is to add a script into the package.json file so that we can start the JSON Server easily every time. Open the package.json file and add this line inside the scripts object like this:
"start-server": "json-server --watch ./src/server/database/data.json"
Next, go to the terminal and use the following command to start the JSON Server to serve the API:
## Using NPM
npm run start-server

## Using Yarn
yarn start-server

## Using PNPM
pnpm run start-server
You should see a message like this in your terminal:
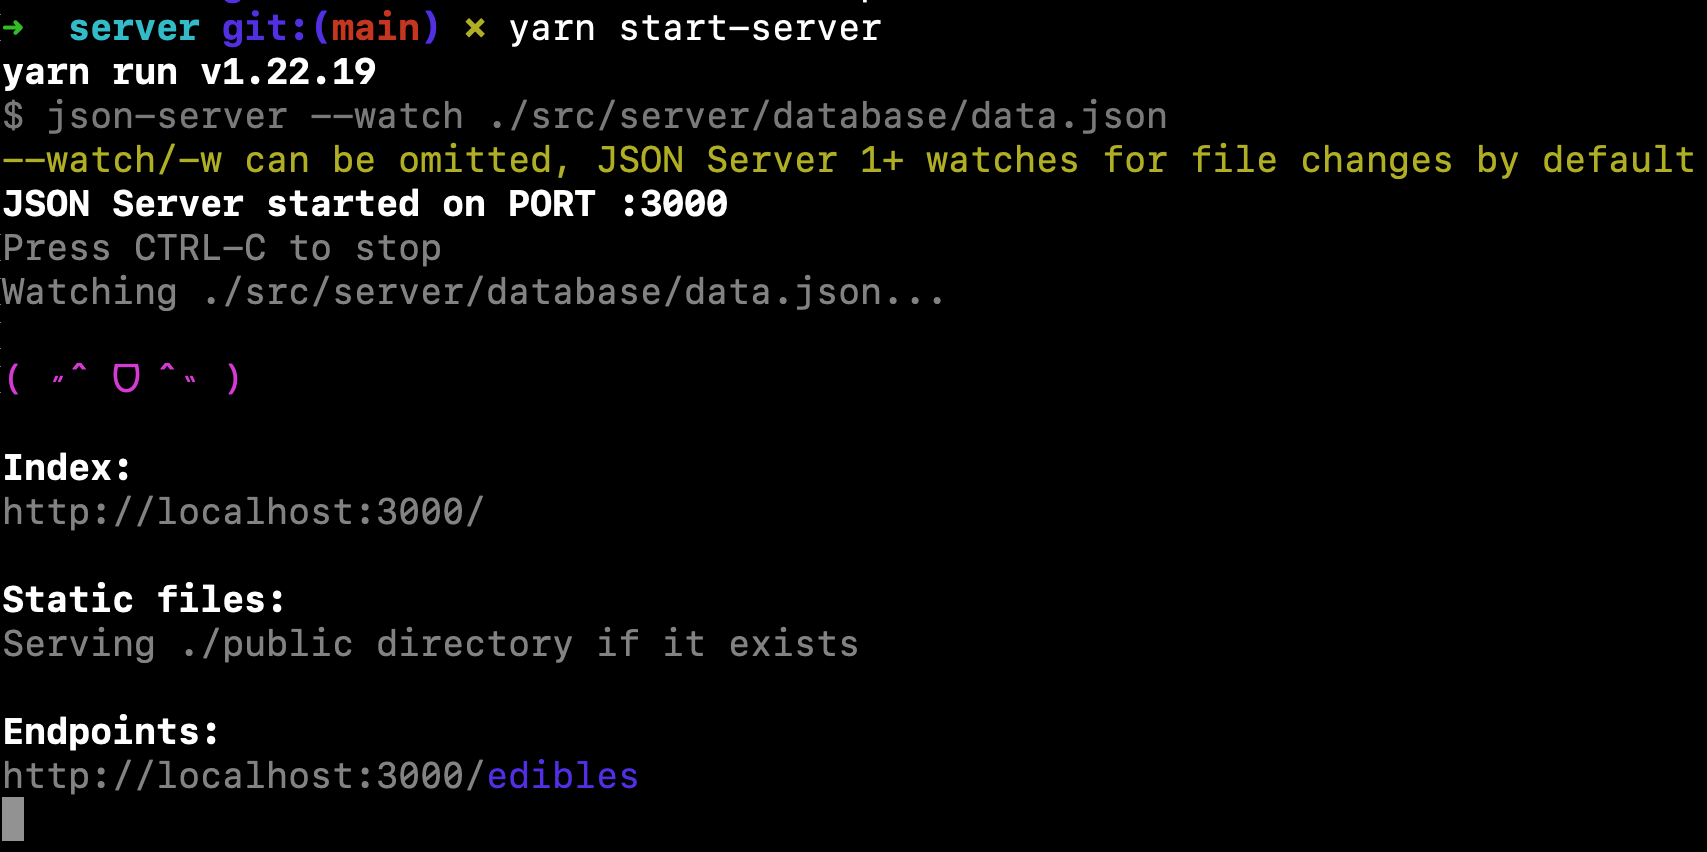 The Output
It indicates that the JSON Server is running locally on localhost:3000 and there is an API endpoint called edibles serves the data. Now you can access the URL http://localhost:3000/edibles from your browser to see the data (fetched by a GET method call):
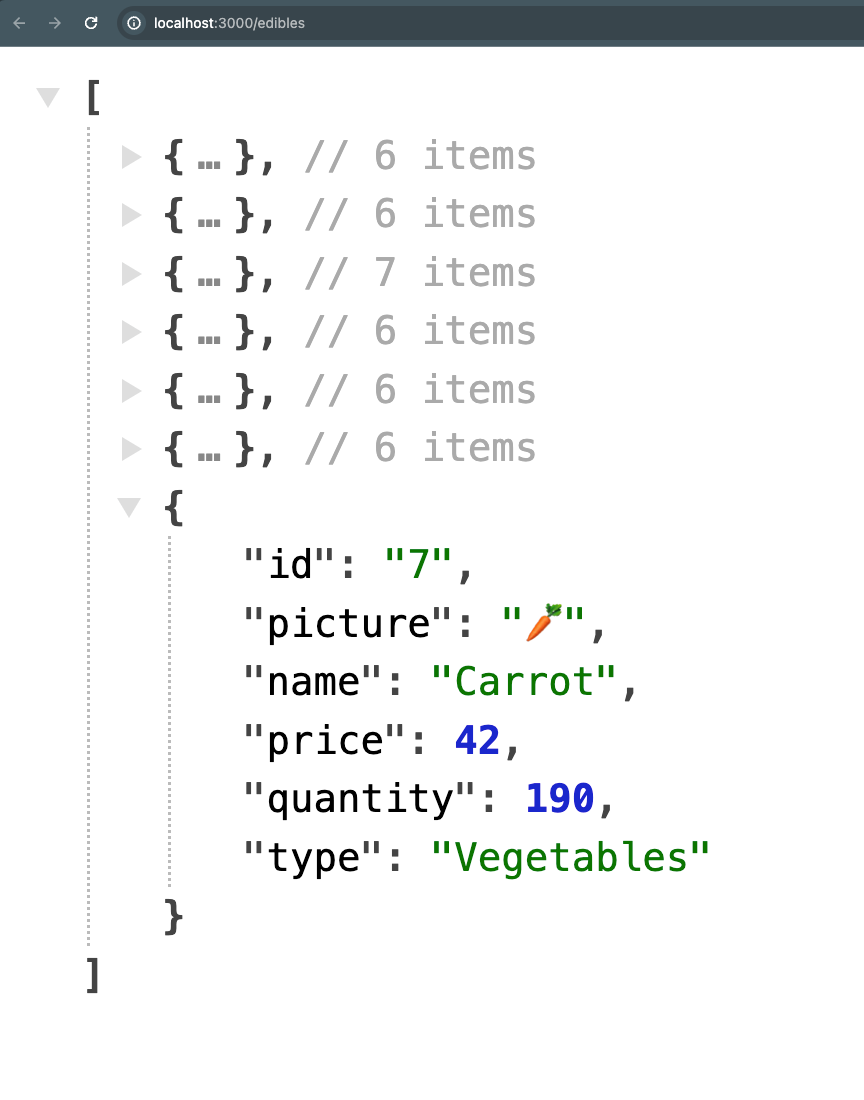 The API Output
Great! Now we have the /edibles API endpoint ready to consume into the React component.
How to Set Up and Use Axios
Axios is an HTTP client that helps us make promise-based asynchronous calls from the browser and Node.js environment. It has a number of useful features that make it one of the most used libraries for asynchronous request-response.
Note that we could have used the fetch Web API from JavaScript instead of Axios in this project. The only reason for using Axios here is to introduce it progressively. In the future articles, you'll learn its usages in handling JWT tokens from a React application. Stay tuned!
Open the terminal at the root of the project folder and use the following command to install Axios:
## Using NPM
npm install axios

## Using Yarn
yarn add axios

## Using PNPM
pnpm install axios
That's it. We will use Axios in a bit after laying out the basic components needed for the inventory list.
How to Use the useReducer Hook from React
React is a user interface library that supports component-based architecture at the core. A component is a single entity that's supposed to perform one task well. Multiple components come together to compose the final user interface.
Often, a component will have its own private data. We call these the states of a component. The value of a state drives the behaviour and appearance of a component. When state changes, the component re-renders to keep itself up-to-date with the latest state value.
The traditional way of handling state in React is with the useState hook. It works great as long as your state changes are trivial. As the state change logic becomes more complex and if you need to manage multiple scenarios around it, useState may make things clumsy. This is where you should think about using the useReducer hook.
useReducer is a standard hook from the React library. It accepts two primary parameters:
initState: the initial state valuereducer: a JavaScript function that holds the state change logic based on an action (or trigger).
The hook returns the following:
- A
state: the current state value. - A
dispatchfunction: a function that tells the respective reducer what to do next, and what data to act on.
The image below explains each of the entities of the useReducer hook. If you want to learn about this hook in a greater depth, feel free to check this out.
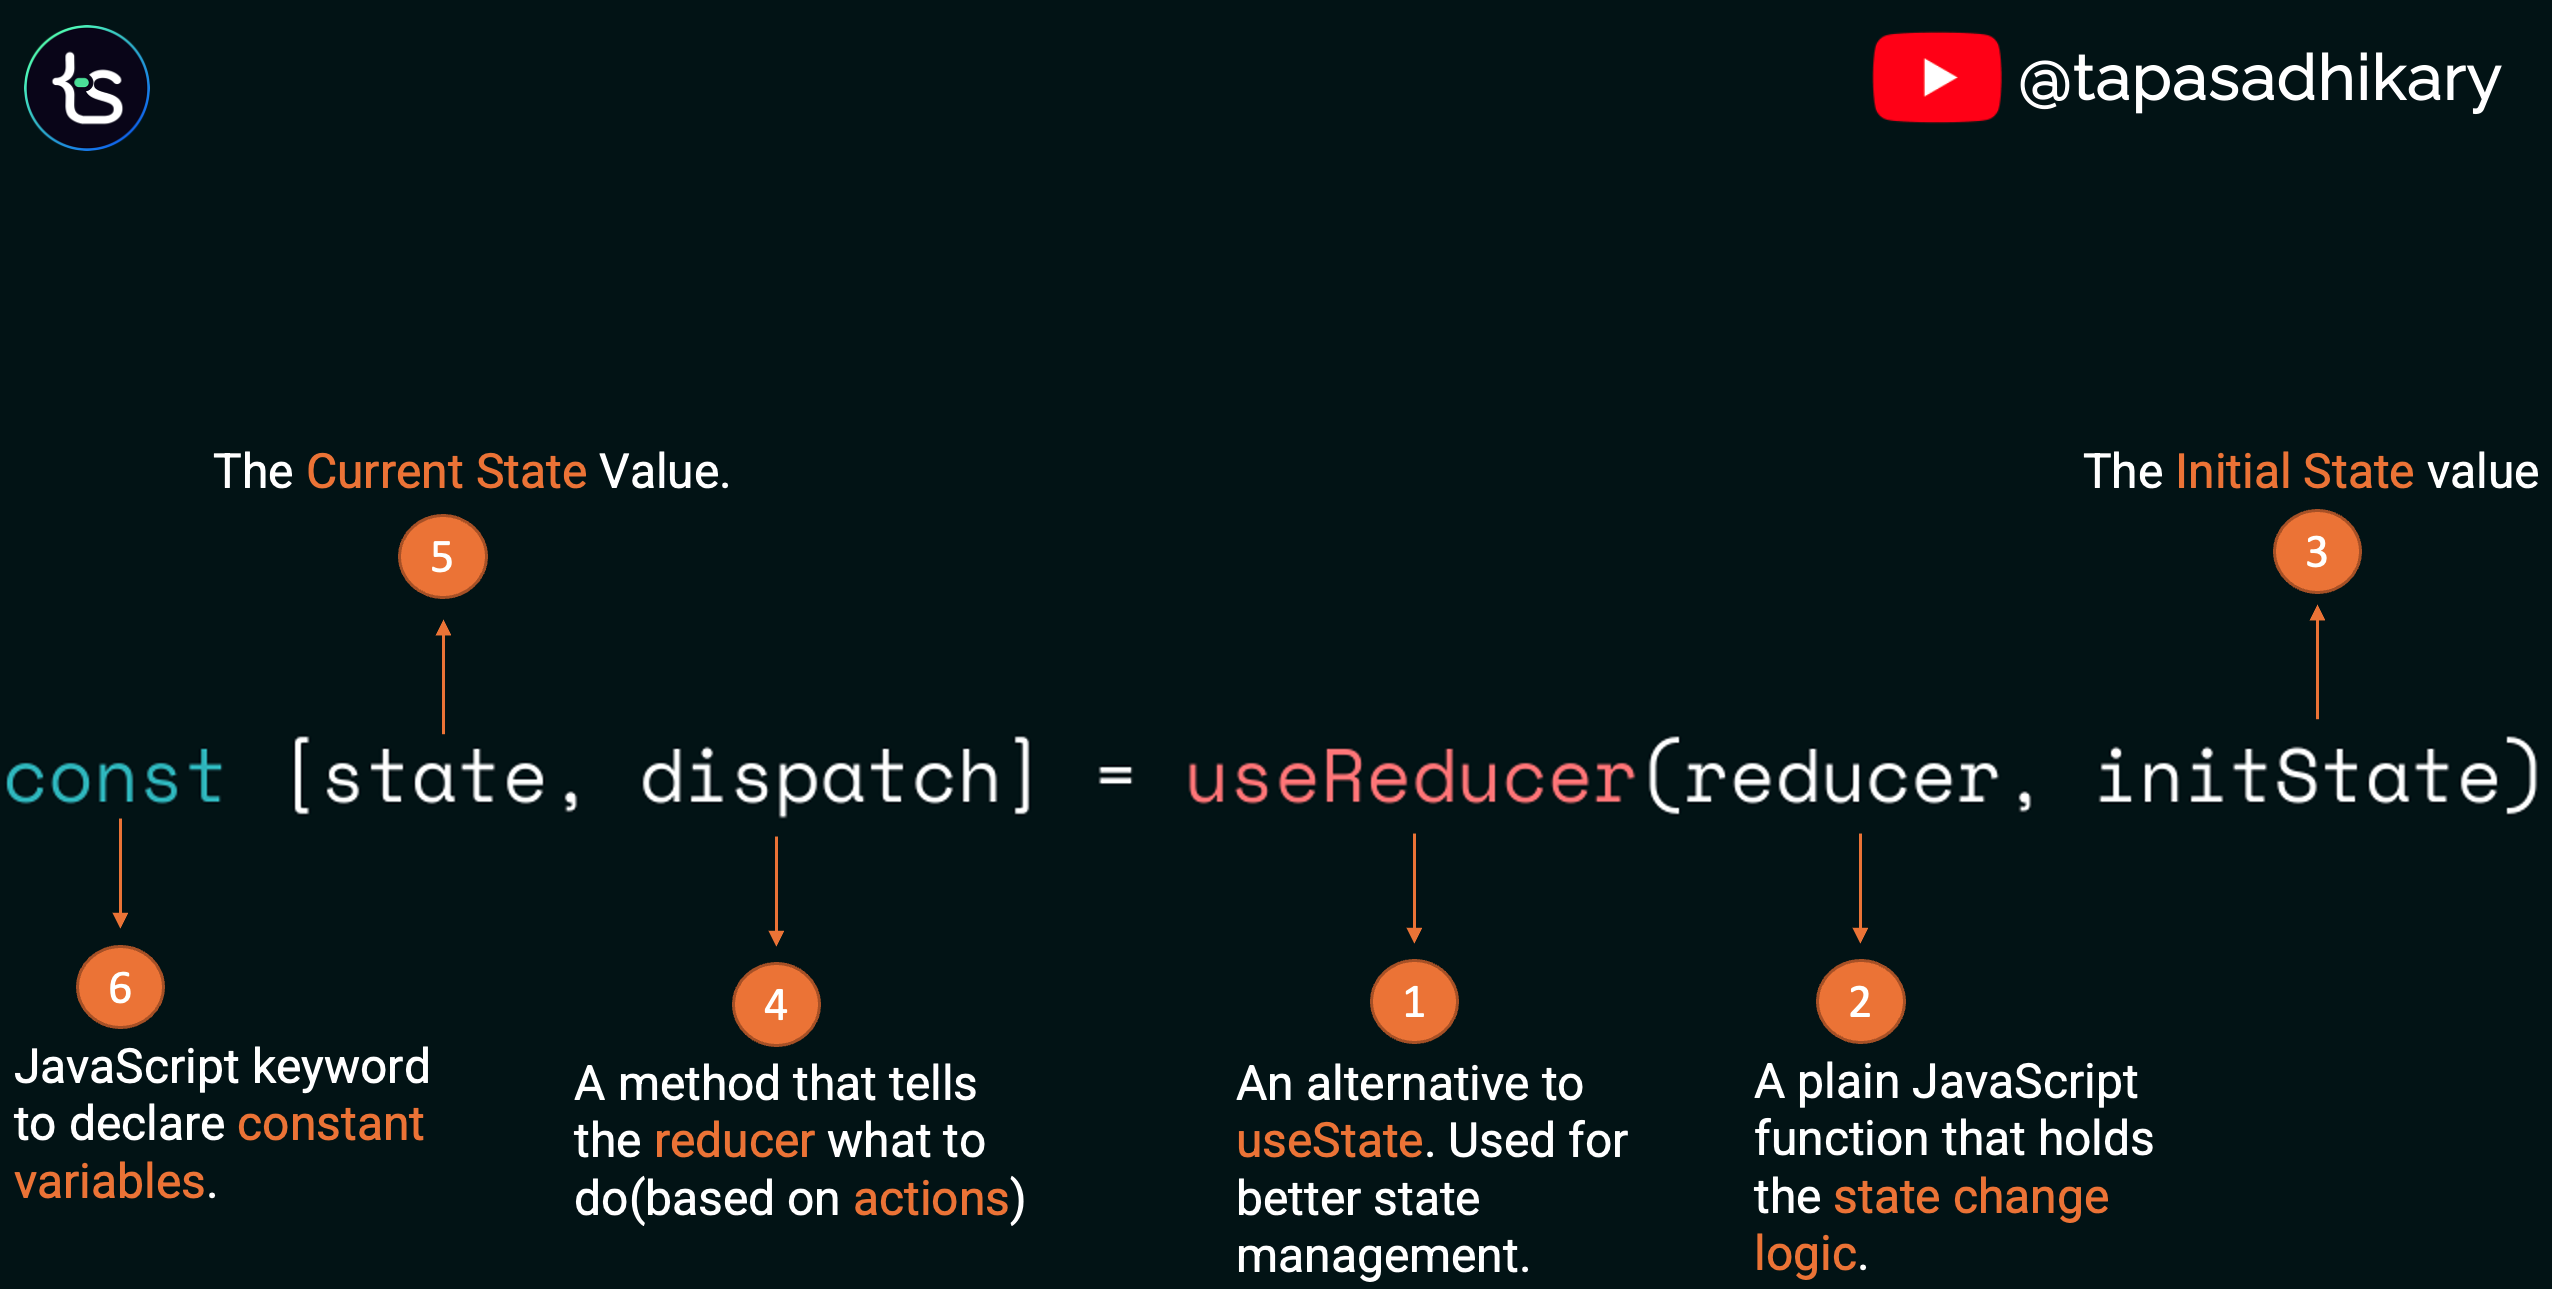 The Anatomy of the useReducer Hook
How to Create Actions
The reducer function is the heart of the useReducer hook. It performs all the necessary logic to keep your application state updated and valid.
But how would the reducer function be aware of its task? Who would tell the reducer function what to do and what kind of data to work on? Here comes actions, an object that contains all the details for the reducer.
We define actions with types that indicate the stages a state change will occur in the reducer function. The same action object may also carry the application data(at times we call it payload) to pass to the reducer function when a component performs a dispatch.
We will now get started by creating some actions. We will define the types here. As our reducer needs to manage the inventory state on a data fetch, data fetch success, and data fetch error, we'll be defining actions for each of those.
Create a directory called actions/ under the src/ directory. Now create a file called index.js under the src/actions/ directory with the following content:
const FETCH_ACTIONS = {
  PROGRESS: 'progress',
  SUCCESS: 'success',
  ERROR: 'error',
}

export { FETCH_ACTIONS };
We have defined three actions, PROGRESS, SUCCESS, and ERROR. Next, let's create the reducer.
How to Create an Inventory Reducer
We need a reducer where we will keep all the state change logic. The same reducer will be passed to the useReducer hook later to get the current state value and dispatch the function to the component.
Create a directory called reducers/ under the src/. Now, create a file called inventoryReducers.js under the src/reducers/ directory.
Our reducer will need the actions because it has to work on state changes based on the actions. So, let's import the actions into the inventoryReducers.js file:
import { FETCH_ACTIONS } from "../actions"
You can define an initial state in the reducer file. The useReducer hook needs a reducer and an initial state to give us the current state value, remember? Let's define an initial state.
We need to show a list of inventory items after getting a successful API response. While we are fetching the list of items by making an API call, we need to manage a loading data state.
In case there is any problem in fetching data, we need to report the error using the error state. So we can create an initial state with all these values as object properties.
Now, create an initialState variable with the following state object value assigned to it:
const initialState = {
  items: [],
  loading: false,
  error: null,
}
Next, let's create the reducer function. Create a function called inventoryReducer with the following code snippet:
const inventoryReducer = (state, action) => {

  switch (action.type) {
    case FETCH_ACTIONS.PROGRESS: {
      return {
        ...state,
        loading: true,
      }
    }

    case FETCH_ACTIONS.SUCCESS: {
      return {
        ...state,
        loading: false,
        items: action.data,
      }
    }

    case FETCH_ACTIONS.ERROR: {
      return {
        ...state,
        loading: false,
        error: action.error,
      }
    }

    default: {
      return state;
    }
  }

}
Let's understand the above code snippet. The inventoryReducer function takes two arguments, state and action. The reducer function works on the state based on the action type. For example,
- When it is a
PROGRESSaction, we want theloadingvalue to be true. - For a
SUCCESSaction, we want to populate theitemswith the data received from the API response along with making theloadingvalue as false. - For an
ERRORaction, we'll provide a value to theerrorproperty of the state.
In any of the cases above, we do not mutate the state directly. Rather, we create a clone (a new reference of it using the ... operator) of the state and then update its properties accordingly. Finally, we return the updated state for each of the actions. If the passed actions do not match any of the given types, we return back the state as it is.
Last, export the inventoryReducer function and the initialState object:
export {inventoryReducer, initialState};
Here is the complete code from the inventoryReducers.js file:
import { FETCH_ACTIONS } from "../actions"

const initialState = {
  items: [],
  loading: false,
  error: null,
}

const inventoryReducer = (state, action) => {

  switch (action.type) {
    case FETCH_ACTIONS.PROGRESS: {
      return {
        ...state,
        loading: true,
      }
    }

    case FETCH_ACTIONS.SUCCESS: {
      return {
        ...state,
        loading: false,
        items: action.data,
      }
    }

    case FETCH_ACTIONS.ERROR: {
      return {
        ...state,
        loading: false,
        error: action.error,
      }
    }

    default: {
      return state;
    }
  }

}

export {inventoryReducer, initialState};
How to Build the Inventory List Component
We will now create the inventory list component where we will use the reducer we created above.
Create a directory called components/ under the src/ directory. Now, create a file called InventoryList.jsx under the stc/components/ directory.
First import the required things like:
- The
useReducerhook where we will use the inventory reducer. - The
useEffecthook to handle the async call with Axios. - The
inventory reducerand theinitial statewe created a few minutes back. - The
actions, as we need them to dispatch. - The
axiosfor making async calls.
import { useReducer, useEffect } from "react";

import { inventoryReducer, initialState } from "../reducers/inventoryReducer";

import { FETCH_ACTIONS } from "../actions";

import axios from "axios";
Now, create a function to define the component:
const InventoryList = () => {

  const [state, dispatch] = useReducer(inventoryReducer, initialState);

  const { items, loading, error} = state;

  return(
    <div className="flex flex-col m-8 w-2/5">

    </div>
  );
};
Here,
- We have used the
useReducerhook. We passed theinventoryReducerand theinitialStateto it as arguments to get the currentstatevalue and thedispatchfunction. - As we know the state object has the
items,loading, anderroras properties, wedestructurethem into our component. We will use them shortly. - The component returns an empty div that we will change as we proceed.
Finally export the component as a default export like this:
export default InventoryList;
How to Use Axios to Fetch Data and Dispatch it to the Reducer
It's data fetching time! Data fetching by making an asynchronous call is a side effect you need to handle in your component. Copy and paste the useEffect code block inside the InventoryList function.
// -- The code above as it is

const InventoryList = () => {

  // --- The code above as it is


  useEffect(() => {
    dispatch({type: FETCH_ACTIONS.PROGRESS});

    const getItems = async () => {
      try{
        let response = await axios.get("http://localhost:3000/edibles");
        if (response.status === 200) {
          dispatch({type: FETCH_ACTIONS.SUCCESS, data: response.data});
        }
      } catch(err){
        console.error(err);
        dispatch({type: FETCH_ACTIONS.ERROR, error: err.message})
      }
    }

    getItems();

  }, []);

  // --- The JSX return statement below as it is
Let's understand the code flow:
- At the start of the
useEffectcallback, we dispatched aPROGRESSaction. It invokes the reducer function with progress action type to turn theloadingproperty value to true. We can use the loading property value in the JSX later to show a loading indicator. - Then we use Axios to make an asynchronous call using the API URL. On receiving the response, we check if it's a success, and in that case we dispatch a
SUCCESSaction along with theitemsdata(remember, payload?) from response. This time the dispatcher will invoke the reducer with the success action to change theitemsandloadingproperties accordingly. - If there is an error, we dispatch an error action with the error message to update the state with the error information in the reducer.
Each time we dispatch an action and update the state, we also get back the latest state value into our component. It's time to use the state value in the JSX to render the inventory item list.
Let's Complete the JSX Part
The JSX part is fairly simple:
// -- The code above as it is

const InventoryList = () => {

  // -- The code above as it is

  return (
    <div className="flex flex-col m-8 w-2/5">
      {
        loading ? (
          <p>Loading...</p>
        ) : error ? (
          <p>{error}</p>
        ) : (
          <ul className="flex flex-col">
            <h2 className="text-3xl my-4">Item List</h2>
            {
              items.map((item) => (
                <li
                  className="flex flex-col p-2 my-2 bg-gray-200 border rounded-md"
                  key={item.id}>
                  <p className='my-2 text-xl'>
                    <strong>{item.name}</strong> {' '} {item.picture} of type <strong>{item.type}</strong>
                    {' '} costs <strong>{item.price}</strong> INR/KG.
                  </p>
                  <p className='mb-2 text-lg'>
                    Available in Stock: <strong>{item.quantity}</strong>
                  </p>

                </li>
              ))
            }

          </ul>
        )
      }

    </div>
  )
}

export default InventoryList;
Here's what's going on in the code:
- We show a
loading...message if the loading property of the state is true. - We show the error message in case there's an error.
- In neither of the cases, we iterate through the inventory items using the map function. Each of the items in the
itemsarray has information like picture, name, price, and more. We show this information in a meaningful way.
Here is the complete code of the InventoryList component:
import { useReducer, useEffect } from "react";
import { inventoryReducer, initialState } from "../reducers/inventoryReducer";
import { FETCH_ACTIONS } from "../actions";

import axios from "axios";

const InventoryList = () => {

  const [state, dispatch] = useReducer(inventoryReducer, initialState);

  const { items, loading, error} = state;

  console.log(items, loading, error);

  useEffect(() => {
    dispatch({type: FETCH_ACTIONS.PROGRESS});

    const getItems = async () => {
      try{
        let response = await axios.get("http://localhost:3000/edibles");
        if (response.status === 200) {
          dispatch({type: FETCH_ACTIONS.SUCCESS, data: response.data});
        }
      } catch(err){
        console.error(err);
        dispatch({type: FETCH_ACTIONS.ERROR, error: err.message})
      }
    }

    getItems();

  }, []);


  return (
    <div className="flex flex-col m-8 w-2/5">
      {
        loading ? (
          <p>Loading...</p>
        ) : error ? (
          <p>{error}</p>
        ) : (
          <ul className="flex flex-col">
            <h2 className="text-3xl my-4">Item List</h2>
            {
              items.map((item) => (
                <li
                  className="flex flex-col p-2 my-2 bg-gray-200 border rounded-md"
                  key={item.id}>
                  <p className='my-2 text-xl'>
                    <strong>{item.name}</strong> {' '} {item.picture} of type <strong>{item.type}</strong>
                    {' '} costs <strong>{item.price}</strong> INR/KG.
                  </p>
                  <p className='mb-2 text-lg'>
                    Available in Stock: <strong>{item.quantity}</strong>
                  </p>

                </li>
              ))
            }

          </ul>
        )
      }

    </div>
  )
}

export default InventoryList
How to Use the Inventory List in the App Component
Now we have to let the App component know about the InventoryList component so that we can render it. Open the App.jsx file and replace its content with the following code snippet:
import InventoryList from "./components/InventoryList"

function App() {

  return (
    <>
      <InventoryList />
    </>
  )
}

export default App
That's it. Make sure your application server is running. Now, access the app on your browser using the following URL http://localhost:5173/.
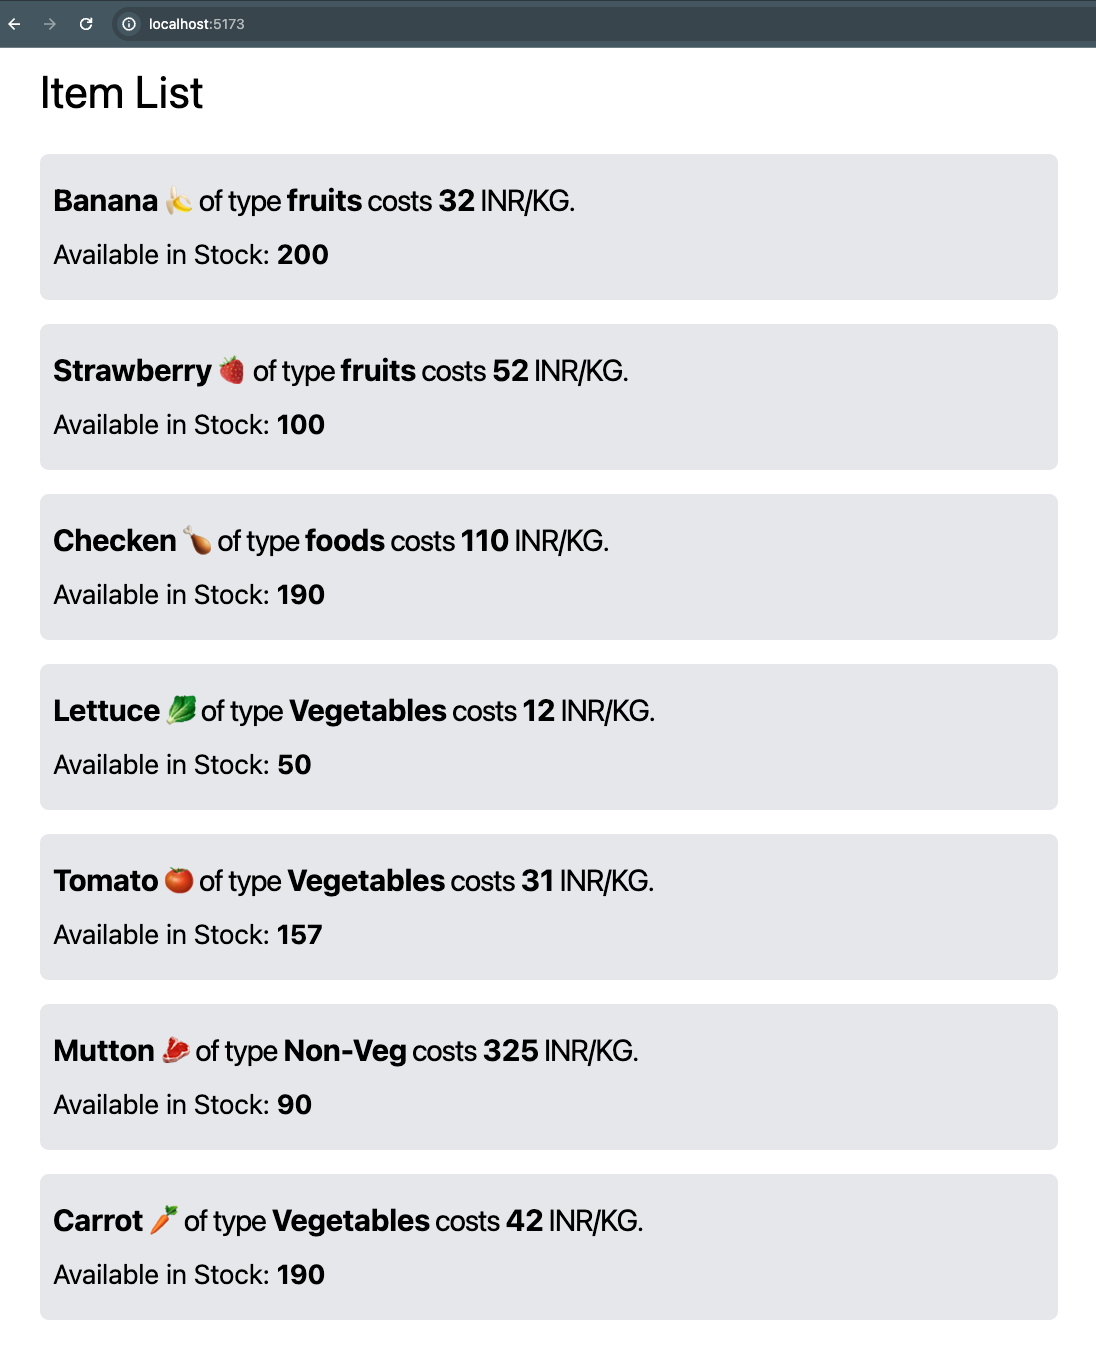 The Final Output - Inventory List
Wrapping Up
I hope you enjoyed building this project and learning more about React. Here is the source code on my GitHub. Please feel free to extend the project by adding features like:
- Adding an item to the inventory
- Editing an item from the inventory
- Deleting an item from the inventory
Hint: You need to create actions for each of these and enhance the reducer function to write state update logic to support these features. I hope you give it a try and if you do so, let me know (my contacts are mentioned below).
That's all for now. I also publish meaningful posts on my GreenRoots Blog, and I think you'll find them helpful, too.
Let's connect.
- I am an educator on my YouTube channel,
tapaScript. Please SUBSCRIBE to the channel if you want to learn JavaScript, ReactJS, Next.js, Node.js, Git, and all about Web Development fundamentally. - Follow me on X (Twitter) or LinkedIn if you don't want to miss the daily dose of Web Development and Programming Tips.
- Find all my public speaking talks here.
- Check out and follow my Open Source work on GitHub.
See you soon with my next article. Until then, please take care of yourself, and stay happy.