

An API is a technology that powers communication between software applications on the internet. API stands for Application Programming Interface, and it is basically a set of rules and protocols that define how different software can interact with each other.
Imagine having two different programs: program A and program B. For these two programs to communicate together, an API is needed, and a set of rules ensure that they know what to expect when they interact with each other.
As a backend developer, your responsibilities involve building server-side applications, handling data storage, and providing the necessary functionalities to do all these through APIs.
There are different types of APIs like REST, GraphQL, gRPC, SOAP, and WebSockets. However, when it comes to web development, one is more popular, and that is the REST API.
In this article, you will learn how to create a CRUD API with Node.js and Express using the REST architecture, and by the end of this article, you should have a fully functional API that is able to perform CRUD operations.
So, let's dive into the world of backend development with Node.js and Express and get started on our journey to building a CRUD API.
Table of Contents
- What is a CRUD API?
- What is Node.js?
- Why Node?
- How to Install Node.js
- What is Express?
- Why do You Need Express?
- Prerequisites
- How to Set Up Your Development Environment
- How to Set up a server for Your CRUD Restful API with Node.js and Express
- CRUD API Example
- How to Create API Routes
- How to Create Your own CRUD API
- How to Create the GET /users Endpoint
- How to Test Your API GET Request
- How to Create the POST /users Endpoint
- How to Test the POST Request
- How to Create the GET /users/:id Endpoint
- How to Test the GET Request
- How to Create the DELETE /users/:id
- How to Test the DELETE Request
- How to Create the PATCH /users/:id Endpoint
- How to Test the PATCH Request
- Wrapping UP
What is a CRUD API?
In web development, CRUD operations are the bread and butter of backend systems. This is because they allow you to "Create", "Read", "Update", and "Delete" data through your API.
Here's a quick overview of the four primary HTTP methods associated with CRUD operations:
- GET: Used for reading or retrieving data from the server.
- POST: Used for creating new data on the server.
- PUT: Used for updating existing data on the server.
- DELETE: Used for removing data from the server.
Virtually every web application interacts with a database to perform these four core operations. Whether it's a social media platform, an e-commerce website, or a weather app, they all rely on creating, reading, updating, and deleting data.
For example, WhatsApp recently added an edit feature to the application, allowing users to make corrections to an already-sent message. That's one part of the CRUD operation in action (updating).
In the context of building a web API, these operations become the backbone of how your application interacts with data. Your API provides endpoints that allow client applications (like web or mobile apps) to perform these operations on the server.
This communication between the client and the server is the essence of web development, and understanding how to create a CRUD API is a crucial skill for a web developer.
What is Node.js?
Node.js is an open-source and cross-platform runtime environment for executing JavaScript code outside of a browser. Quite often, we use it to build back-end services, also called APIs. Node is ideal for building highly scalable, data-intensive and real-time back-end services that power our client applications
Why Node?
- It is one of the most popular choices for building the backend.
- You get to write JavaScript across your entire stack, making it easier to transition from either a frontend developer to a backend developer and vice versa.
- It allows for easy scaling of applications, making it a good choice for large-scale professional projects.
- It is fast and non-blocking. This is because of the asynchronous event-driven nature of Node.js.
- Node.js has a vibrant community and a rich ecosystem of packages and libraries.
How to Install Node.js
Installation steps:
- Download the Mac/Windows installer from the Node.js website.
- Choose the Long-Term Support (LTS) version that’s shown on the left
- After downloading, install/run the installer, and then follow the prompts. (You will have to click the NEXT button a bunch of times and accept the default installation settings
- To confirm that Node has been successfully installed, open your terminal and run the command. (For Windows, you might need to restart your command before running it.)
node –version
What is Express?
Express is a fast, unopinionated, and minimalist web backend or server-side web framework for Node.js. Basically, it gives you the ability to build your APIs how you want them, with less code.
It is a framework built on top of Node.js that allows you to create your Backend with ease. You can use Express in combination with frontend frameworks like React, Angular, or Vue to build full-stack applications.
Why do You Need Express?
- It makes building web applications with Node.js much easier.
- It is extremely light, fast and free.
- It is used for both server-rendered apps as well as API/Microservices.
- It is the most popular Node.
- It gives you full control over requests and responses.
Prerequisites
To follow along, you'll need to have the following:
See the complete code for this tutorial on Github.
How to Set Up Your Development Environment
Before diving into creating your API, let's go through the process of creating a basic server on your local computer.
Here are the steps to follow:
Step #1 – Create Directory
Create a directory/folder on your computer. Open the folder in a code editor
Step #2 – Create index.js File
Create an index.js file inside the folder using this command:
touch index.js
Step #3 – Initialize NPM
Initialize NPM inside the folder by running this command in your terminal:
npm init -y
The command will create a package.json file with default values.
Step #5 – Install Express
Use the command below to install Express.js
npm install express
After installing Express, go to the package.json file and include “type”: “module”. This declaration will tell Node that this project will be using ES6 module syntax (import/export) instead of common.js, which is the default in Node.

type:module
How to Set up a server for Your CRUD Restful API with Node.js and Express
To create a CRUD restful API, you first need to set up your server. You can do this by following these steps:
Step #1 – Write your Server Application Code inside the index.js file
Basically, a server code will look like this:
import express from 'express';
import bodyParser from ‘body-parser

const app = express();
const PORT = 5000

app.use(bodyParser.json());

app.listen(PORT, () => console.log(`Server running on port: http://localhost:${PORT}`));
Here's an explanation for the code above:
- In the first line, we imported
expressfrom the Express module that we installed. - The
bodyParsercomes with Express, and it allows us to take in the incoming POST request body. - Next, we created an
appusing theexpressobject. - We then specified the port for the application – it was set to 5000 (if you get an error using this port, it might be that the port is currently being used by a different app, so you can either change your port or stop the other app from using the port).
- Next, we specified that JSON data will be used in the application.
- Once that was created, we used the
listenmethod on theappto make our application listen for incoming requests. The method accepts two things: the PORT, which is where we would be listening for requests from our client side, and a callback function that will be triggered when our server is set up.
Step #2 – Start the Server
Now you can start your server by running this command. If you used a different file, replace index.js with the file name where the server is located.
node index.js
Now your server should be running on port 5000. You can verify that your server is running on your terminal
Step #3 – Install Nodemon (Optional)
At the moment, anytime you make changes to your server file, you will need to restart the server before your changes can reflect (you can try it and see). So to take care of this challenge, you can use Nodemon. Run the command to install it:
npm install nodemon
To use Nodemon, head over to your package.json file and set up a script. Replace your start script with this instead:
"start": "nodemon index.js"
Note that index.js is the file where the server code is written.
Now you can start your server by running this command:
npm start
With this code, we've set up a server that listens on port 5000 and prints a message when it starts. But this is just the beginning because our server needs to do much more.
Let's explore how to handle API requests next.
CRUD API Example
Let's start by defining the API routes for each CRUD operation. These routes will serve as the entry points for your API, and they will map to specific actions we want to perform on our data.
In our case, these actions are creating, reading, updating, and deleting data.
How to Create API Routes
When the port (http://localhost:5000/) is opened in a browser, you will get an error.
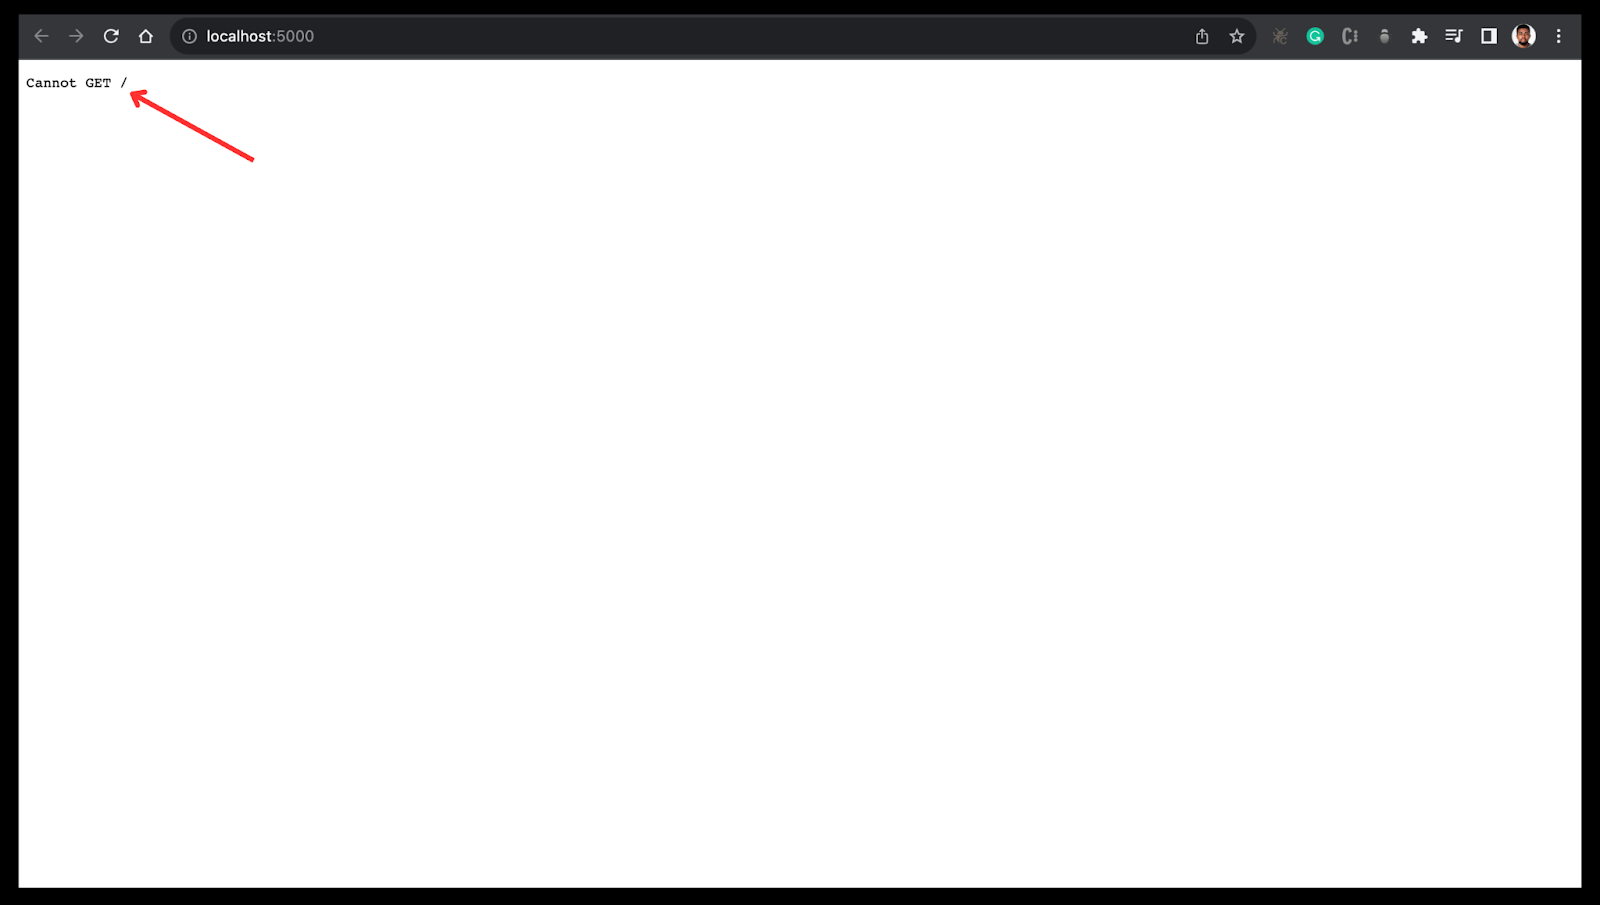
This is because Node.js and Express are all about routing, and we don't any routes yet.
You can define API routes using the app.get(), app.post(), app.put(), and app.delete() methods in your Express application (in the index.js file).
Here's how to create a route to handle GET requests using the app.get() function:
app.get('/', (req, res)
The app.get() function accepts two parameters. The first is used to specify the path (in this case, it is '/').
The next parameter is a callback function where you define what happens when the GET request is called. The function also has two parameters: the request body (req), which can contain information such as the request query string, parameters, body, and HTTP headers. While the response object (res) contains the information you want to send
Here is the complete code:
import express from 'express';
import bodyParser from 'body-parser'
const app = express();
const PORT = 5000;
app.use(bodyParser.json());
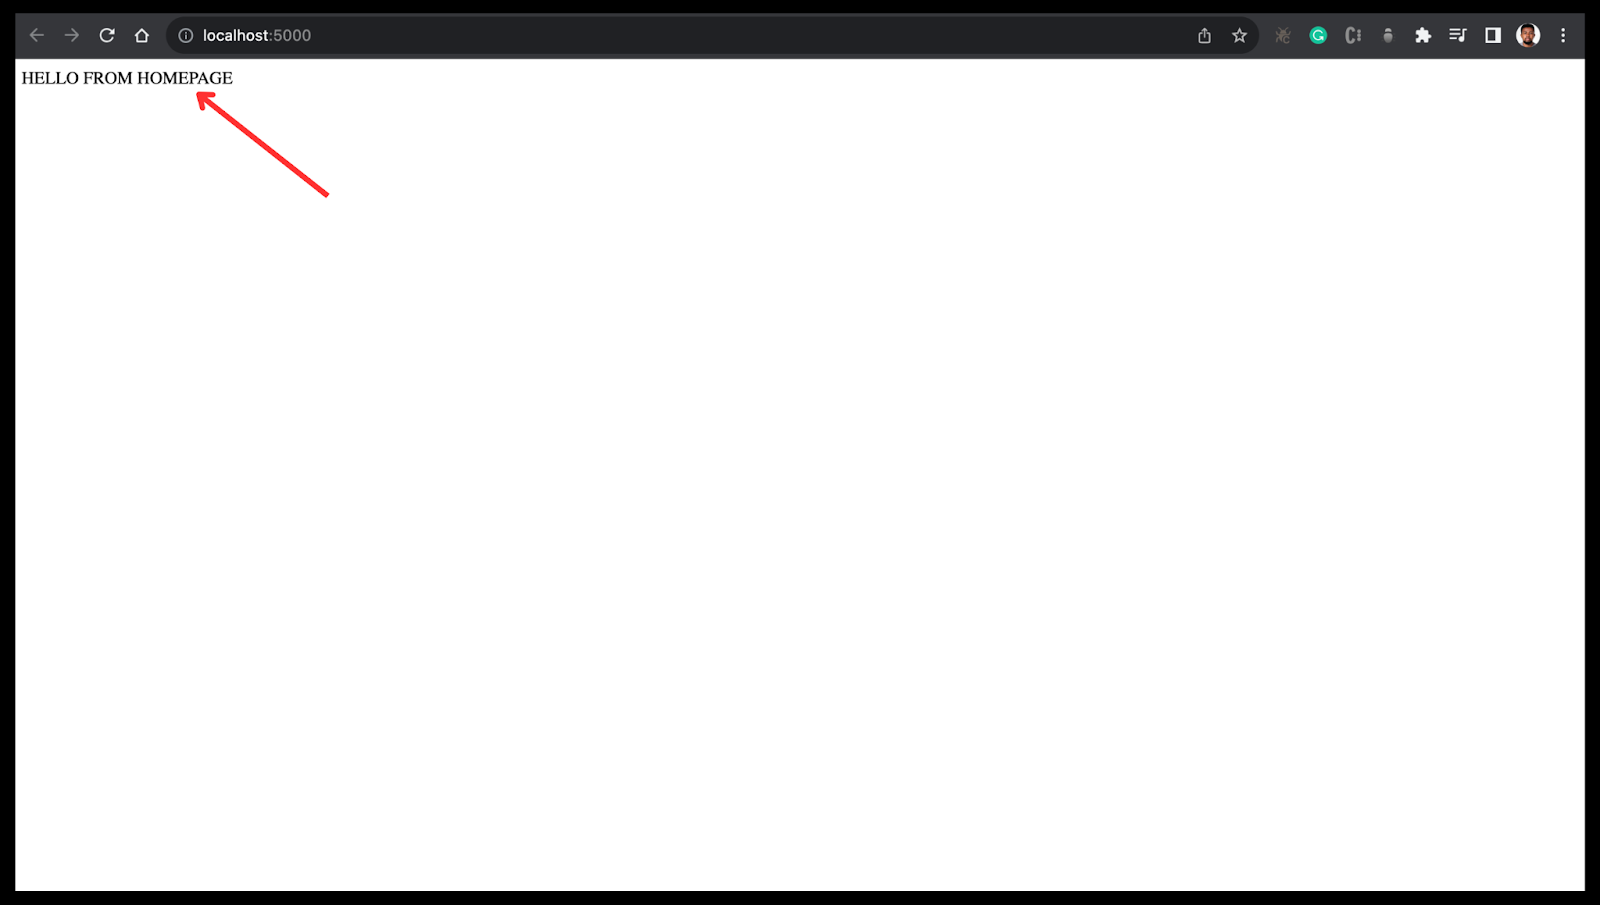
app.get('/', (req, res) => {
console.log('[GET ROUTE]');
res.send('HELLO FROM HOMEPAGE');
})
app.listen(PORT, () => console.log(`Server running on port: http://localhost:${PORT}`));
When you head back to http://localhost:5000/ and refresh it, you shouldn’t get an error anymore.
How to Create Your own CRUD API
For this API, you will be handling a set of users. Handling users in a database is a great example because it is a common use case in most applications.
Here are the API endpoints you will be creating:
- GET /users - find all users
- POST /users - creates a user
- GET /users/:id - finds a specific user
- DELETE /users/:id - deletes a specific user
- PATCH /users/:id - updates a specific user.
How to Create the GET /users Endpoint
Reading data is one of the most common operations in an API. In this example, you will be getting the list of all the users in your mock database. This information will be presented in JSON format.
To define a route to retrieve users' data from the database, follow these steps:
- Create a new folder called routes
- Create a new file called users.js inside the routes folder.
- Write the code to set up the GET router.
import express from 'express';
const router = express.Router();

// Mock database
const users = [
  {
    first_name: 'John',
    last_name: 'Doe',
    email: 'johndoe@example.com',
  },
  {
    first_name: 'Alice',
    last_name: 'Smith',
    email: 'alicesmith@example.com',
  },
];

// Getting the list of users from the mock database
router.get('/', (req, res) => {
    res.send(users);
})

export default router
In this code snippet:
import express from 'express';imports the Express.js frameworkconst router = express.Router();creates a fresh router instance, stored in the variable router.- The
usersvariable serves as the mock database containing an array of users. - The
router.get()function sets up a route that responds to HTTP GET requests. - The second part of the code
(req, res) => { ... }is a callback function. It gets executed when a request is made to the GET route. - Inside the callback function, we used
res.send(users)to send a response back to the client. In this example, we're sending theusersvariable as the response. So when a user hits the GET URL, the server responds by sending the data inside theusersvariable in JSON format to the client.
Save your changes in the users.js file. Then do the following in the index.js file:
import your user routes from user.js:
import userRoutes from './routes/users.js'
Use the app.use method, and specify the path and router handler:
app.use('/users', userRoutes);
When a user visits http://localhost:5000/users, the router is triggered. It effectively acts as a filter, determining when a specific set of routes should be applied.
Here is the complete code for the index.js file:
import express from 'express';
import bodyParser from 'body-parser'
const app = express();
import userRoutes from './routes/users.js'

const PORT = 5000;

app.use(bodyParser.json());

app.use('/users', userRoutes);

app.get('/', (req, res) => res.send('HELLO FROM HOMEPAGE'))

app.get('/', (req, res));

app.listen(PORT, () => console.log(`Server running on port: http://localhost:${PORT}`));
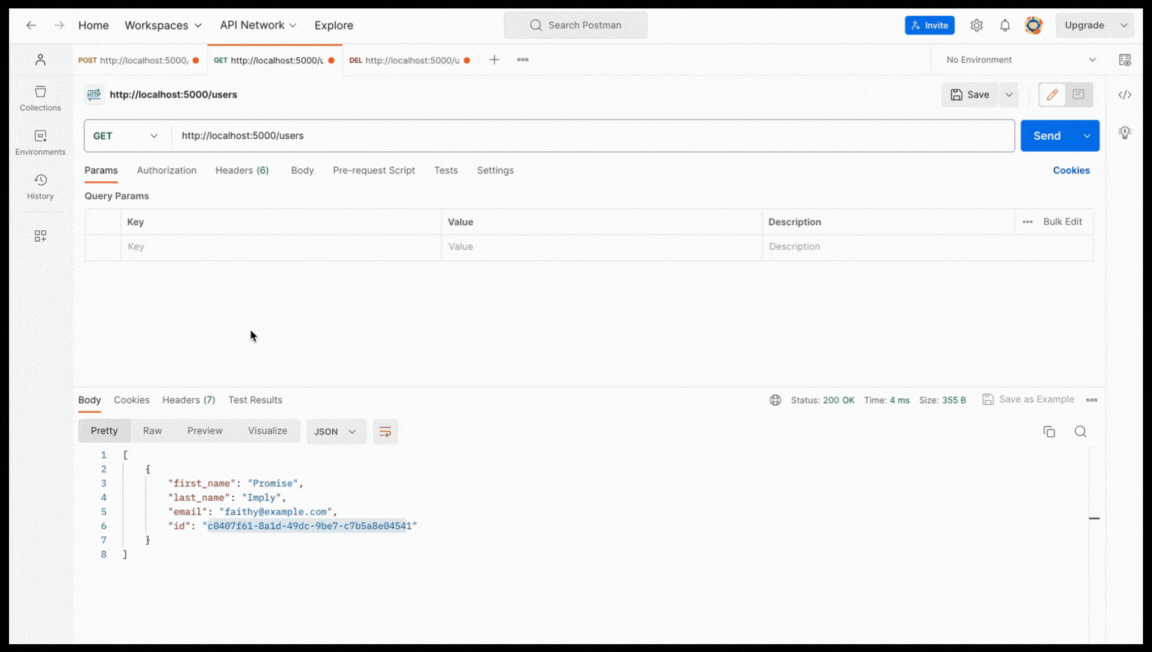
How to Test Your API GET Request
You can use either a browser (browsers can only be used to perform GET requests) or Postman to test the GET request.
So copy your API URL, http://localhost:5000/users, and paste it either on Postman or in your browser. If you are using Postman, you will first need to make a GET request, then paste your API URL, and then click on send. After that, you will see the list of users in your Postman console.

How to Create the POST /users Endpoint
You can use the POST request to add data to your database. It accepts input from the client and stores it in the database. To create data in our API, we'll define a route that accepts POST requests and saves the data to the mock database you have set up.
But before that, you'll need the UUID package. Use this command to install it:
npm install uuid
This package will help generate a unique ID for each user you will be creating. This will be useful when you are implementing the GET, DELETE, and PATCH user by ID requests, where you will need a way to identify a specific user.
So in the users.js file, do the following:
Import the uuid package:
import { v4 as uuidv4 } from 'uuid';
Secondly, you'll have to implement the code for the POST request.
Here is what it looks like:
router.post('/', (req, res) => {
    const user = req.body;

    users.push({ ...user, id: uuidv4() });

    res.send(`${user.first_name} has been added to the Database`);
})
In the code snippet:
- The
router.post()function sets up a route that responds to HTTP POST requests. This means that when a client sends a POST request to the root URL of your application, this route will be triggered. - Within the callback function
(req, res) => { ... }, we access thereqobject, which represents the incoming request made by the client. Specifically, we're interested in thereq.bodyproperty. This property contains the data (first name, last name, and email) that the client will send as part of the POST request's body. - With
const user = req.bodywe extract this data fromreq.bodyand store it in theuservariable. - Next, we added the
userdata to an array calledusers. To ensure each user has a unique identifier, we generate a universally unique identifier (UUID) using a function likeuuidv4()and include it as id in the user object. This helps in keeping user records distinct and identifiable. - Finally, we used
res.send()to send a response back to the client. In this case, we're sending a simple message notifying the client that the user has been successfully added to the database. The message includes the user's first name for a personalized touch.
Here is the complete code
import express from 'express';
import { v4 as uuidv4 } from 'uuid';

const router = express.Router();

const users = [];

// Adding users to our mock database

router.post('/', (req, res) => {
    const user = req.body;

    users.push({ ...user, id: uuidv4() });

    res.send(`${user.first_name} has been added to the Database`);
})

export default router
How to Test the POST Request
Here are the steps to follow to make a POST request on Postman:
- Go to Postman
- Open a new request tab
- Select "POST" from the list of available HTTP methods
- In the URL field, enter the full URL where you want to send the POST request (http://localhost:5000/users)
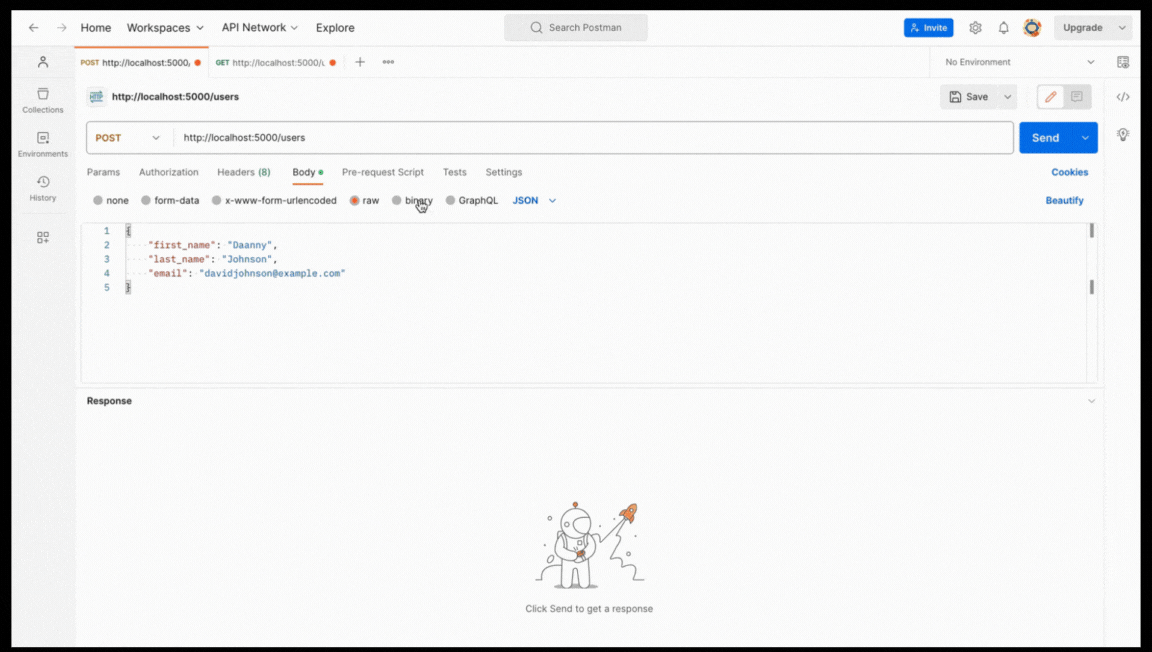
- Click on the "Body" tab in the request window.
- Choose the format in which you want to send your POST data (choose JSON).
- Enter the data you want to send in the request body. This data should match the format expected by the server.
- Finally, click on “Send”
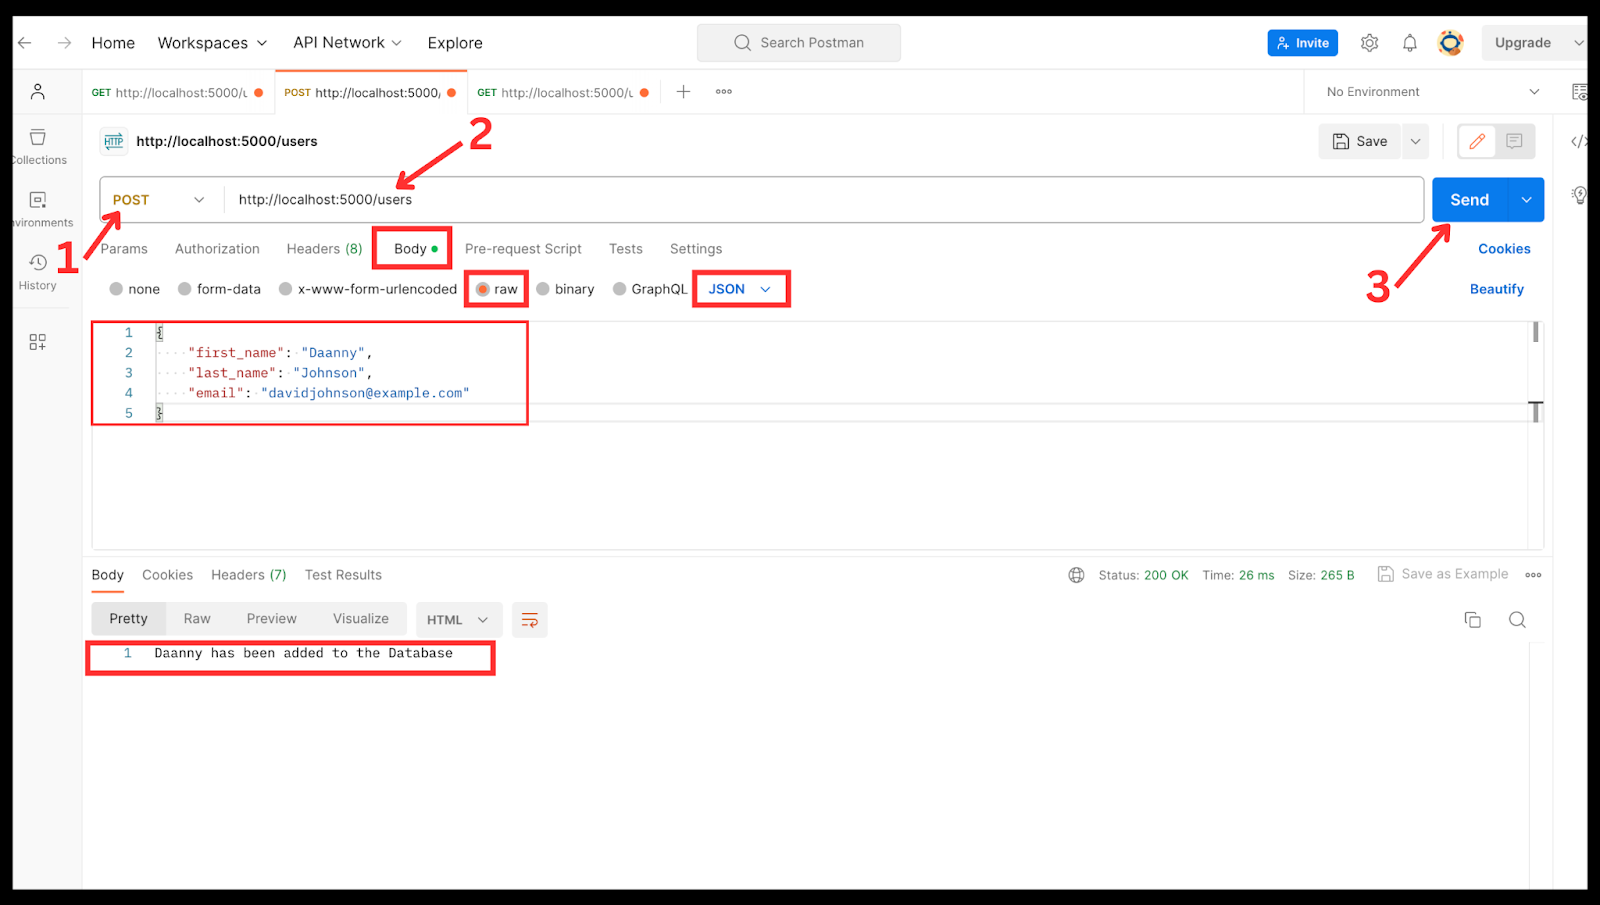
If it is successful, you will get a response saying, “Daanny has been added to the database."
To confirm if it has been added, make a GET request, and you should see the new user added to your database. (Note: This user information will be lost when your server restarts since it’s not saved to an actual database).
How to Create the GET /users/:id Endpoint
Fetching specific data based on a unique identifier, such as a user ID, is a common operation. It's often essential for building features like user profiles or retrieving individual records from a database.
In this section, you’ll explore how to use this endpoint (users/:id) to retrieve user information based on a provided user ID.
Let's get started!
router.get('/:id', (req, res) => {
    const { id } = req.params;

    const foundUser = users.find((user) => user.id === id)

    res.send(foundUser)
});
Here's what this code snippet does:
- The
router.get()function sets up a route that responds to HTTP GET requests. In this example, we've defined a route with ('/:id'). The :id part is a route parameter, which allows us to capture a dynamic value from the URL. In this case, it represents the user ID we want to retrieve. - Within the callback function
(req, res) => { ... }, we can access thereqobject, which represents the incoming request made by the client. Specifically, we're interested inreq.params, which holds the values of route parameters. In this case, we destructureidfromreq.params, effectively extracting the user ID from the URL. For example, if a client makes a GET request to /users/123, the id will be '123'. - We used the
.find()method to search through this data based on the user ID (id) captured from the URL. This method attempts to find a user whose ID matches the provided id. - Once we located the user data (if it exists), we send it as the response using
res.send(foundUser). ThefoundUservariable contains the user object that matches the requested ID.
How to Test the GET Request
In testing the API, follow these steps:
- Go to your POST request tab and make as many requests as you want to add a new user to the database.
- Go to your GET request tab and make a request to see the list of users you have added

- Copy the id of any of the users on the list
- Create a new GET request tab, copy in the base API URL, and add the id of any of the users to it. It should be in a format like this: http://localhost:5000/users/734a9e75-b3f5-415f-82fb-79b4fdf1a593
- Click on “Send”. If it’s successful, you will see the user information of the user id you used for the request

How to Create the DELETE /users/:id
Sometimes, it's necessary to remove user accounts or specific records from a database for various reasons, such as account deactivation.
Here, you will explore how to use this endpoint to delete user data based on a provided user ID.
To delete data, we'll define a route that accepts DELETE requests and removes the data from the database.
See the code to delete a user from a database below
router.delete('/:id', (req, res) => {
  const { id } = req.params;

  users = users.filter((user) => user.id !== id)

  res.send(`${id} deleted successfully from database`);
});
Here's what this code does:
- The
router.delete()function sets up a route that responds to HTTP DELETE requests. In this example, we've defined a route with ('/:id'), where :id is a route parameter. It captures a dynamic value from the URL, representing the user ID we want to delete. - In the callback function
(req, res) => { ... }, we can access thereqobject, which represents the incoming request made by the client. Specifically, we're interested inreq.params, which holds the values of route parameters. Here, we destructure id fromreq.params, extracting the user ID from the URL. For instance, if a client sends a DELETE request to /users/123, id will be '123'. - Assuming that we have an array or database (users) containing user data, we employ the
.filter()method to create a new array that excludes the user with the matching ID (id). This effectively removes the user from the data store. - After successfully deleting the user, we send a response back to the client using
res.send(). The response contains a message confirming the deletion, including the user's ID that was deleted from the database.
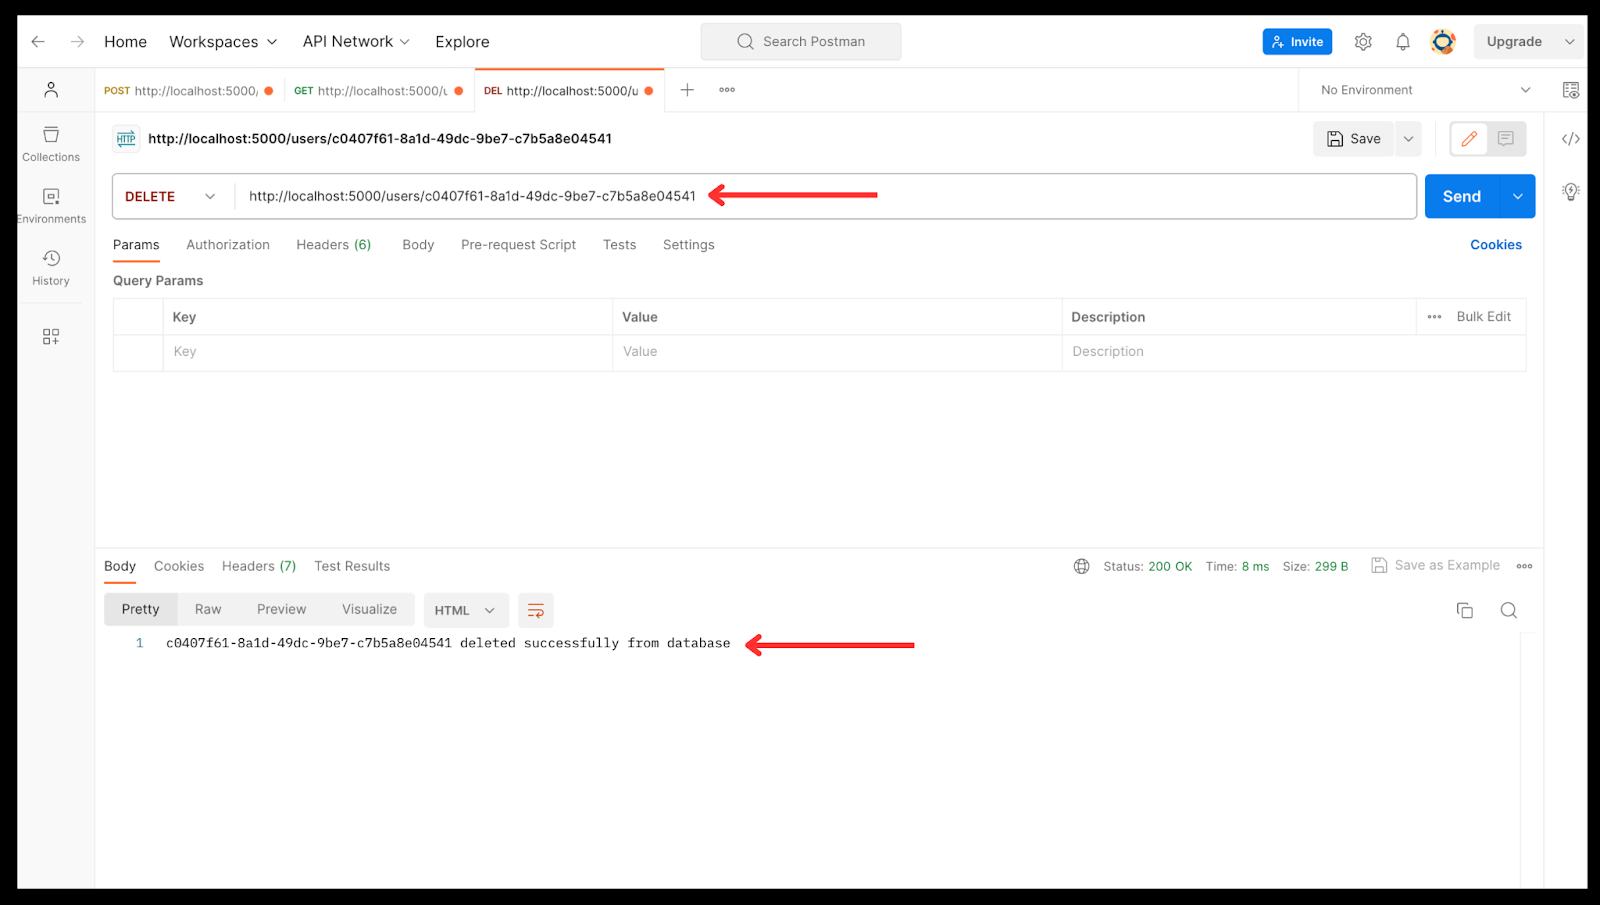
How to Test the DELETE Request
Here are the steps to delete a user from the database on Postman:
- Go to Postman
- Open a new request tab
- Select "DELETE" from the list of available HTTP methods
- Enter the URL. It should contain the id of the user you want to delete (for example: http://localhost:5000/users/734a9e75-b3f5-415f-82fb-79b4fdf1a593). If you don’t have a user in your database, you will need to create one and copy the id.
- Click on “Send”.
How to Create the PATCH /users/:id Endpoint
There are times when you don't need to update an entire resource or object. Instead, you'd want to make partial modifications or adjustments. This is where the HTTP PATCH request comes into play.
For example, after creating a new user, you can change either the first name, last name, or email of that user using the PATCH request. Let’s see how to do that.
router.patch('/:id', (req, res) => {
  const { id } = req.params;

  const { first_name, last_name, email} = req.body;

  const user = users.find((user) => user.id === id)

  if(first_name) user.first_name = first_name;
  if(last_name) user.last_name = last_name;
  if(email) user.email = email;

  res.send(`User with the ${id} has been updated`)

});
Here's what this code snippet accomplishes:
- The
router.patch()function sets up a route that responds to HTTP PATCH requests. In this example, we've defined a route with ('/:id'), where :id is a route parameter. It captures the dynamic value from the URL, representing the user ID we want to update. - Within the callback function
(req, res) => { ... }, we can access thereqobject, which represents the incoming request made by the client. Specifically, we're interested inreq.params, which hold the values of route parameters (id in this case), andreq.body, which contains the data to be updated. - Next, we used
.find()to locate the user object with the matching ID (id). Once found, we can proceed to modify the user's data based on the content ofreq.body. We also checked if first_name, last_name, or email properties exist inreq.body. If they do, we can update the corresponding properties of the user object with the new values. This allows us to make selective changes to the user's data without affecting other attributes. - After successfully applying the requested modifications, we send a response back to the client using
res.send(). The response includes a message confirming the successful update of the user data, along with the user's ID.
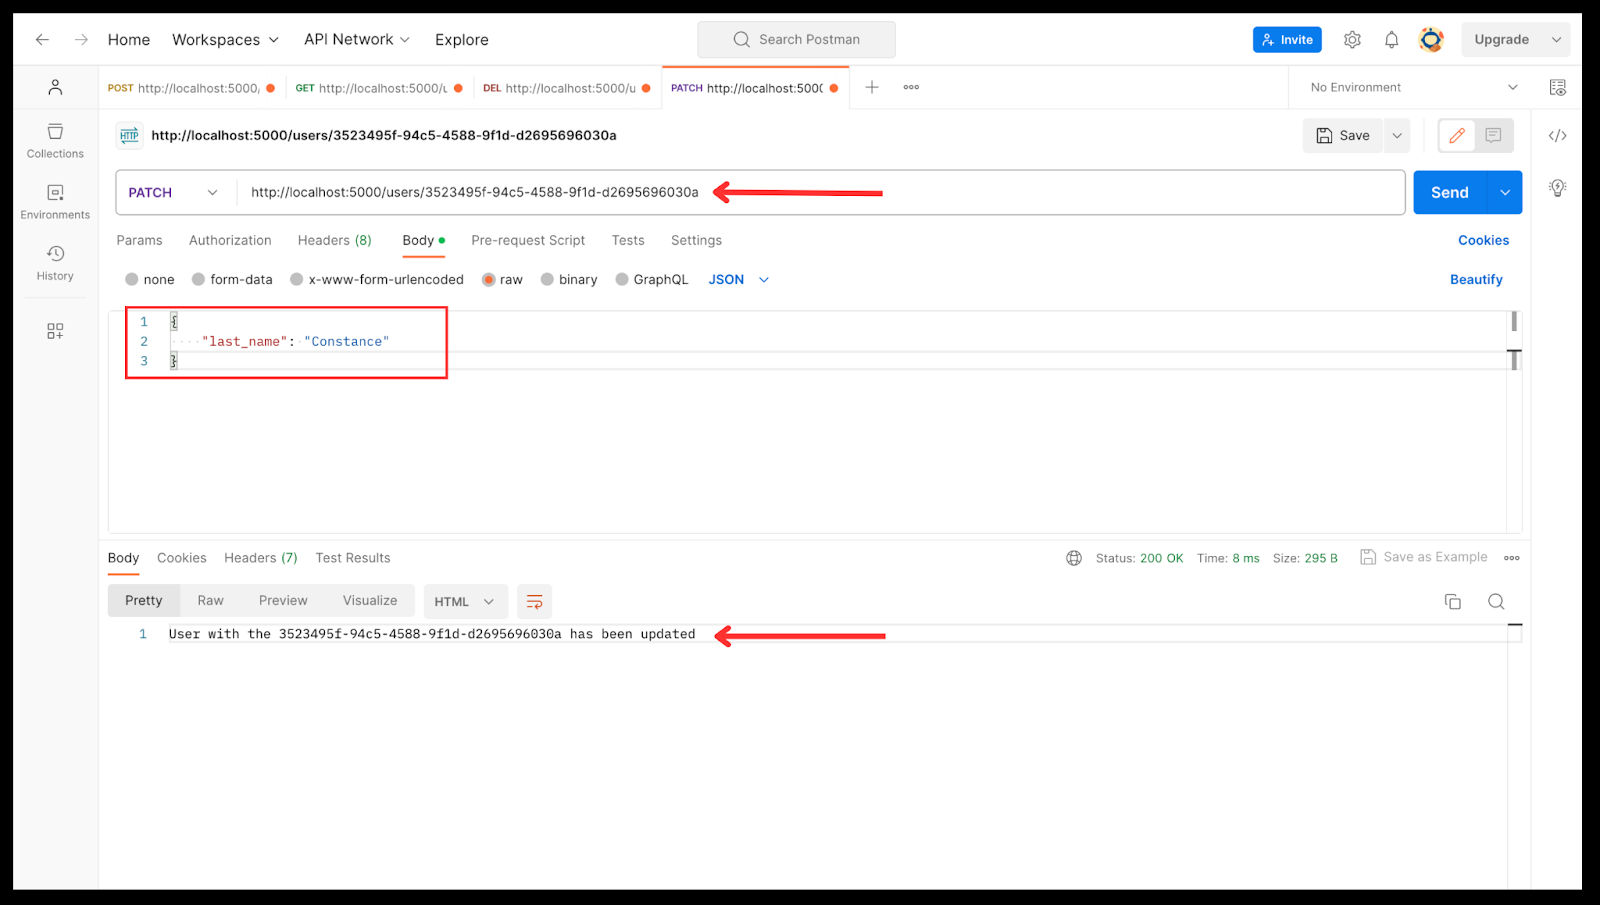
How to Test the PATCH Request
Follow these steps to make a PATCH request in Postman:
- Go to Postman
- Open a new request tab
- Select "PATCH" from the list of available HTTP methods
- Enter URL; the URL will contain the id of the user you want to delete (for example: http://localhost:5000/users/734a9e75-b3f5-415f-82fb-79b4fdf1a593). If you don’t have a user in your database, you will need to create one and copy the id.
- Click on the "Body" tab in the request window and choose the format in which you want to send your PATCH data (for example: JSON, form-data, x-www-form-urlencoded).
- Enter the data you want to send in the request body. This data should only include the specific changes you want to make to the resource.
- Then click the "Send" button. Postman will send the PATCH request to the specified URL with the provided data.
Wrapping Up
APIs are the linchpin connecting various software components and enabling them to work together seamlessly. They allow them to communicate, share data, and perform tasks. In the context of web development, APIs enable the web to function as we know it today.
In this tutorial, we explored backend development by creating a CRUD API with Node.js and Express. We covered various concepts, like how to set up a development environment, create a server with Express and Node.js, and most importantly, how to handle CRUD operations and test your API using Postman.
While we've covered fundamental aspects of API creation in this tutorial, there is still a vast landscape of knowledge to explore as regards to APIs. These include how to secure your API by adding authentication, how to use middleware, database interaction, API deployment, and a lot more.