

In this in-depth tutorial, we'll build a full stack recipe app from scratch, using React, Node.js, Postgres and the Spoonacular API. We'll cover features such as:
- Building an API server in Node
- Integrating securely with a 3rd party API
- Interacting with a Postgres database using Prisma
- Making API requests from React
- Creating reusable components
- Working with pagination
- Working with UI elements such as tabs, image grids, modals and styling
Let's dive in.
Table of Contents
- Prerequisites
- GitHub Repositories
- Video Tutorial
- Project Architecture
- How to Setup the Backend
- How to Setup the Database and Prisma
- How to Get and Secure a Spoonacular API Key
- How to Create the Search Endpoint
- How to Setup the Frontend
- How to Call the Search API and Display Results on the Frontend
- How to Create the Search Input and Recipe Card Component
- How to Build the Pagination and View More Functionality
- How to Build the Recipe Summary Modal Component
- How to Create Endpoints to Get/Create/Delete Favorite Recipes
- How to Add Favorites Functionality to the Frontend
- How to Adding CSS/Styling
- Conclusion
Prerequisites
Since we will be focusing on how to build a project, there are a few prerequisites that will be needed to get the most out of this tutorial:
- Some knowledge about web development concepts (frontend, backend, databases, API's, REST).
- Some knowledge of JavaScript (variables, functions, objects, arrays, and so on).
- Basic understanding on React (how to create components, add styles, work with state).
- Basic understanding on Node.js/Express (working with APIs).
GitHub Repositories
Completed Code
You can find the completed code on GitHub by clicking here, or clone the repo:
git clone git@github.com:chrisblakely01/react-node-recipe-app.git
Starter Code
If you want to save some time and skip the initial setup, you can find the starter code here. This has a skeleton frontend/backend project already setup, as well as the basic layout and CSS. Or clone the repo:
git clone git@github.com:chrisblakely01/react-node-recipe-app-starter.git
Video Tutorial
If you'd like to learn from the video version as well, here it is:
Project Architecture
Here's a diagram that illustrates how the various components of our app will interact with each other:
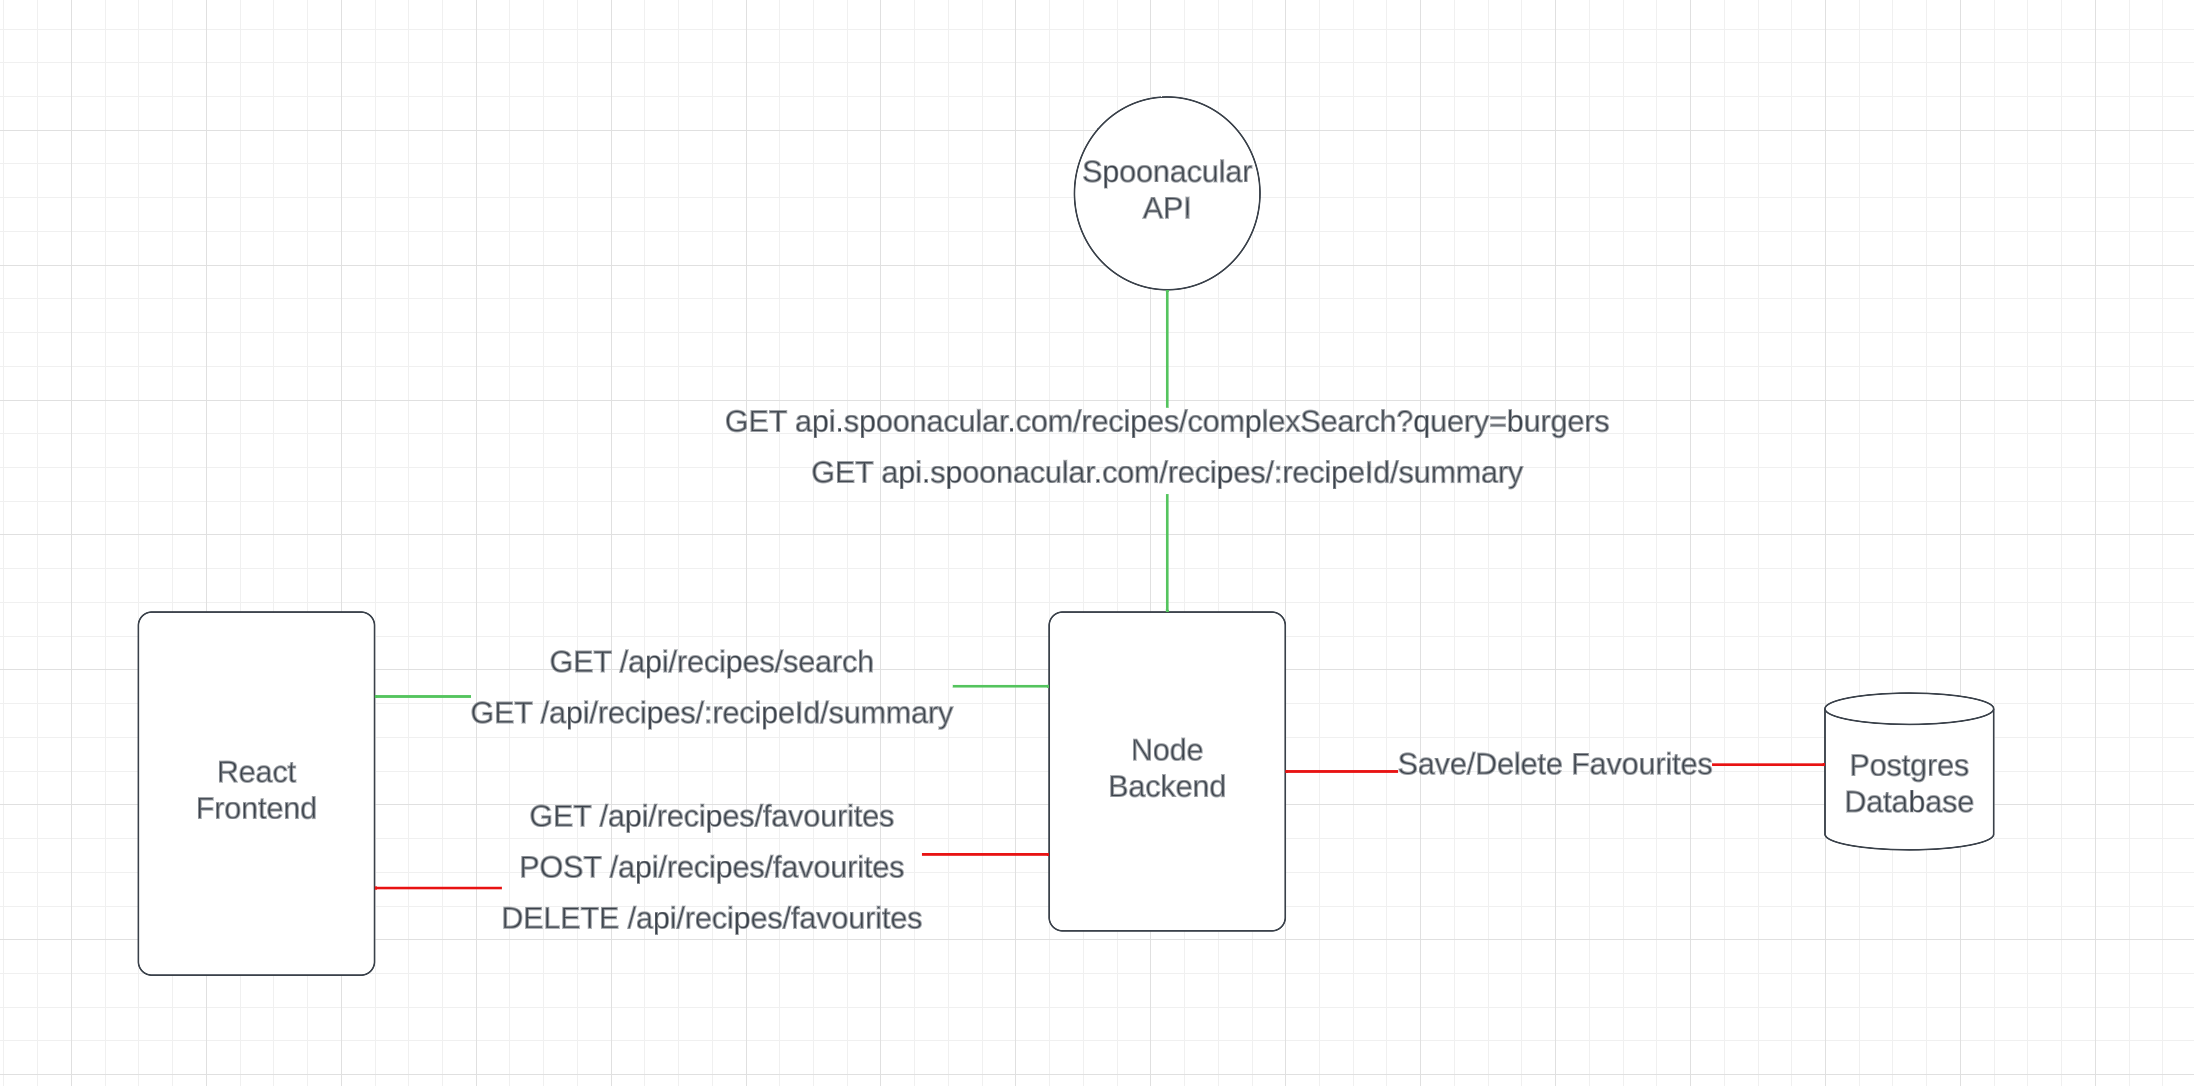 Diagram illustrating the various components of the app
We will have a React front end and a Node backend. These two will communicate through specific endpoints. We will establish five endpoints, all housed within our backend.
We can categorize these endpoints into two distinct groups. The first group will cater to recipe searches. It will invoke the recipe API and return the results based on a given search query. Our front end will initiate a call to our backend, which will then relay the search request to the recipe API.
We choose not to call the recipe API directly from our front end because it requires an API key—a form of authentication similar to a password. Exposing this key in our front end code could lead to unauthorized access if someone delves into the code through their browser to retrieve the API key.
It's a more secure practice to house the API key on our backend within environment variables. From there, we can call the recipe API and then transmit the response back to our front end.
This approach aligns with common practices in production environments. It also offers the flexibility to modify the data on the backend, if necessary, before sending it back to the front end. And it enhances performance, as the UI will not have to manage multiple API requests to and from the recipe API.
That's the essence of how our search functionality will operate. We'll also have several endpoints to add, create, and delete favorites. These favorites will be stored in our own database, providing a clear picture of what we aim to build.
How to Setup the Backend
In this tutorial, we will walk through the process of building a full-stack recipe application. We'll set up the backend, create the frontend, and link it to a database. We will also connect to a recipe API using an API key.
If you prefer to skip the setup, a starter code is available on CodeCoyotes, which includes some basic setup and CSS. But you'll still need to create a database and obtain an API key.
Let’s start by setting up our workspace:
Step 1: Setup Your Workspace
Start by opening Visual Studio Code (or your preferred code editor). Create a new folder named recipe-app on your desktop or another location. Then drag this folder into the Visual Studio Code window to open it.
Your folder structure should now look like this:
recipe-app
Step 2: Setup the Backend
In the recipe-app folder, create another folder named backend.
Navigate to View -> Terminal in Visual Studio Code to open a terminal. Change your directory to the backend folder using the command cd backend.
Type npm init to initialize a new npm package, then hit Enter to move through the prompts. For the entry point, type ./src/index.ts and hit Enter.
Your folder structure should now look like this:
recipe-app
|-- backend
    |-- package.json
Step 3: Install the Dependencies
First, install the necessary dependencies using the following command:
npm install express prisma @prisma/client cors
Now, install the development dependencies:
npm install --save-dev ts-node typescript nodemon @types/cors @types/express @types/node
Your folder structure should now look like this:
recipe-app
|-- backend
    |-- node_modules
    |-- package.json
    |-- package-lock.json
Step 4: Setup Your Backend Code
In the backend folder, create a new folder named src. Inside src, create a file named index.ts.
Add the following code to index.ts:
import express from "express";
import cors from "cors";

const app = express();

app.use(express.json());
app.use(cors());

app.get("/api/recipe/search", async (req, res) => {
  res.json({ message: "success" });
});

app.listen(5000, () => {
  console.log("Server running on localhost:5000");
});
Step 5: Add the Start Script
First, open package.json in the backend folder. In the scripts section, replace the test script with a start script as follows:
"scripts": {
    "start": "npx nodemon ./src/index.ts"
}
Step 6: Run Your Backend
In the terminal, ensure you are in the backend folder, then type npm start to run your backend server.
Then open a browser and go to http://localhost:5000/api/recipe/search. You should see a response with the message success.
Congratulations! You have successfully set up and run your backend server. In the next part of this tutorial, we will focus on setting up the frontend and connecting to a database.
How to Setup the Database and Prisma
In this section, we'll focus on setting up a Postgres database using ElephantSQL and integrating Prisma to interact with our database effortlessly. Let's jump right in!
Step 1: Set Up the ElephantSQL Database
Start by navigating to ElephantSQL. Click on "Get a managed database today," followed by selecting the "Tiny Turtle" plan for a free instance.
Sign in or create an account to proceed to the "Create new instance" page.
Then enter a name for your database (for example, recipe-app-db), keep the plan on the free tier, and choose a region closest to you.
Click on "Review," verify the details, and then click on "Create instance."
Step 2: Retrieve the Database Credentials
Once your instance is created, click on it to view the details.
Locate and copy the URL under the "Details" section. This URL contains the credentials needed to connect to your database.
Step 3: Create an Environment File
Now, return to your code editor and open the backend folder.
Create a new file named .env. Inside the .env file, add the following line:
DATABASE_URL=<Your-Copied-Database-URL>
Replace <Your-Copied-Database-URL> with the URL you copied from ElephantSQL.
Step 4: Integrate Prisma
Stop your server if it's running by pressing Ctrl + C (or Cmd + C on Mac) in the terminal.
In the terminal, ensure you are in the backend directory, and type the following command to initialize Prisma:
npx prisma init
This command will create a new folder named prisma with a file named schema.prisma.
Step 5: Verify Prisma Integration
Now, open prisma/schema.prisma to ensure your DATABASE_URL has been detected correctly.
Start your server again with the command npm start. Then navigate to http://localhost:5000/api/recipe/search in your browser to ensure your API still works and returns the success message.
Your folder structure should now include the Prisma folder and look like this:
recipe-app
|-- backend
    |-- prisma
        |-- schema.prisma
    |-- .env
    |-- ...
How to Get and Secure a Spoonacular API Key
Step 1: Obtain an API Key from Spoonacular
To do this, navigate to Spoonacular and click on "Start Now." Sign up for an account and proceed to the dashboard.
Within the dashboard, click on “Profile” on the left-hand side, and find the section related to API keys. Generate a new API key, and copy it to your clipboard.
Step 2: Store the API Key Securely
Now, return to your code editor and open the .env file in the backend folder.
Add a new environment variable to store your API key as follows:
API_KEY=<Your-Copied-API-Key>
Replace <Your-Copied-API-Key> with the API key you copied from Spoonacular.
Step 3: Install and Setup Thunder Client
In Visual Studio Code, navigate to the extensions tab (square icon on the sidebar), and search for Thunder Client.
Install Thunder Client by clicking on the Install button. Once installed, you will see a new icon (a purple thunderbolt) on the sidebar.
Step 4: Test the API Key with Thunder Client
Now click on the Thunder Client icon, then click on “New Request.”
Copy the endpoint URL for searching recipes from Spoonacular's documentation. It should look something like this: https://api.spoonacular.com/recipes/complexSearch.
Paste this URL into the URL bar in Thunder Client.
Under the query tab, add two new parameters:
apiKeywith the value of your API key.querywith a value ofburgersor any other term you wish to search for.
Then hit "Send" to issue the request and observe the response. You should see a list of recipes related to the term you searched for, indicating that your API key and endpoint are working correctly.
How to Create the Search Endpoint
Step 1: Setup a New File for Recipe API Logic
First, navigate to your backend/src folder and create a new file named recipe-api.ts.
In recipe-api.ts, initiate a constant to store your API key from the environment variables:
const API_KEY = process.env.API_KEY;
Step 2: Create the searchRecipes Function
In recipe-api.ts, define a new asynchronous function searchRecipes that takes in a searchTerm and a page as parameters:
export const searchRecipes = async (searchTerm: string, page: number) => {
  if (!API_KEY) {
    throw new Error("API key not found");
  }

  const baseURL = "https://api.spoonacular.com/recipes/complexSearch";
  const url = new URL(baseURL);

  const queryParams = {
    apiKey: API_KEY,
    query: searchTerm,
    number: 10,
    offset: (page - 1) * 10,
  };

  url.search = new URLSearchParams(queryParams).toString();

  try {
    const searchResponse = await fetch(url.toString());
    const resultsJson = await searchResponse.json();
    return resultsJson;
  } catch (error) {
    console.error(error);
  }
};
Step 3: Import and Use searchRecipes in index.ts
Now, navigate back to index.ts in the backend/src folder.
Import the searchRecipes function from recipe-api.ts at the top of your file:
import * as RecipeAPI from "./recipe-api";
Locate the endpoint where you wish to utilize the searchRecipes function, and modify it to call searchRecipes with the appropriate arguments, then return the results:
app.get("/api/recipe/search", async (req, res) => {
  const searchTerm = req.query.searchTerm as string;
  const page = parseInt(req.query.page as string);

  const results = await recipeAPI.searchRecipes(searchTerm, page);
  return res.json(results);
});
Step 4: Test Your Endpoint
Now you can restart your server by stopping it (Ctrl + C or Cmd + C on Mac) and then running npm start.
Test your endpoint by sending a GET request with the appropriate query parameters. For example, navigate to http://localhost:5000/api/recipe/search?searchTerm=burgers&page=1 in your browser or use a REST client like Postman or Thunder Client.
You should now see a list of recipes returned in response to your request, indicating that your backend logic for calling the Recipe API and returning the results is functioning as expected.
How to Setup the Frontend
Before you get started on this section, make sure you're in the top-level directory of your project, which in this case is named recipe-app.
Step 1: Create a React App with Vite
Start by opening a terminal and ensuring you're in the top-level folder (recipe-app).
Then run the following command to install the latest version of Vite:
npm install vite@latest --save-dev
Now, initiate a new React project with Vite by running:
npx create-vite frontend --template react-ts
This command creates a new folder named frontend, sets it up as a React project, and specifies TypeScript as the language.
Step 2: Navigate to Your New React App
Change your directory to the frontend folder:
cd frontend
Then install any necessary dependencies:
npm install
Step 3: Start the Development Server
You can start the development server with the following command:
npm run dev
Your default web browser should now open displaying the initial setup of your React app, which includes a counter example.
Step 4: Clean Up and Personalize Your React App
Now you can head back to your code editor and navigate to frontend/src. Delete the index.css file as it won't be needed.
In main.tsx, remove the import statement for index.css.
Now, open App.tsx. Here, you'll see code for a counter. Delete all the content inside App.tsx.
Let’s start fresh by adding the following code to App.tsx:
// src/App.tsx
const App = () => {
  return <div>Hello from Recipe App</div>;
};

export default App;
Save App.tsx and check your browser to see the updated text: "Hello from Recipe App".
Step 5: Setup Your Stylesheet
Go to src and open App.css. Delete all the pre-filled styles but keep the .root class definition empty for now.
Add a font-family property to the .root class:
/* src/App.css */
.root {
  font-family: Helvetica, Arial, sans-serif;
}
Then head back to App.tsx and import your stylesheet:
// src/App.tsx
import "./App.css";

const App = () => {
  // ...
};
Then save App.tsx and check your browser to see the updated font.
Now you have a clean slate to start building out the frontend of your recipe app with React and TypeScript, using Vite as your build tool. As you progress, you can now start adding components, routing, and state management to build out your application's UI and functionality.
How to Call the Search API and Display Results on the Frontend
Now we are going to fetch data from an API and display the results on the UI. The API response is structured as follows:
{
  "results": [
    {
      "id": 650235,
      "title": "Loaded Turkey Burgers",
      "image": "https://spoonacular.com/recipeImages/650235-312x231.jpg",
      "imageType": "jpg"
    }
    // ... other recipes
  ],
  "offset": 10,
  "number": 10,
  "totalResults": 50
}
Each recipe object contains an id, title, image, and imageType. We will map through the results array and display each recipe on our UI.
Step 1: Setup State
In your App.tsx, setup state to store the searchTerm and recipes.
import React, { useState } from "react";

const App = () => {
  const [searchTerm, setSearchTerm] = useState("");
  const [recipes, setRecipes] = useState([]);

  // ... rest of your component
};
Step 2: Fetch Data from the API
Create a new file API.ts and set up a function to make the API call.
// src/API.ts
const searchRecipes = async (searchTerm: string, page: number) => {
  const baseURL = new URL("http://localhost:5000/api/recipes/search");
  baseURL.searchParams.append("searchTerm", searchTerm);
  baseURL.searchParams.append("page", page.toString());

  const response = await fetch(baseURL.toString());

  if (!response.ok) {
    throw new Error(`HTTP Error: ${response.status}`);
  }

  return response.json();
};

export { searchRecipes };
Step 3: Create a Handler Function
Back in App.tsx, import the searchRecipes function and create a handler function to be called when the form is submitted.
import React, { useState, FormEvent } from "react";
import { searchRecipes } from "./API";

const App = () => {
  // ... previous state setup

  const handleSearchSubmit = async (event: FormEvent) => {
    event.preventDefault();

    try {
      const { results } = await searchRecipes(searchTerm, 1);
      setRecipes(results);
    } catch (error) {
      console.error(error);
    }
  };

  // ... rest of your component
};
Step 4: Display the Data
Display the recipes data in your component's return statement.
const App = () => {
  // ... previous code

  return (
    <div>
      <form onSubmit={handleSearchSubmit}>
        <button type="submit">Submit</button>
      </form>
      {recipes.map((recipe) => (
        <div key={recipe.id}>
          Recipe Image Location: {recipe.image}
          <br />
          Recipe Title: {recipe.title}
        </div>
      ))}
    </div>
  );
};

export default App;
Step 5: Define the Recipe Type
Define a Recipe interface in a new file named types.ts.
// src/types.ts
export interface Recipe {
  id: number;
  title: string;
  image: string;
  imageType: string;
}
Back in App.tsx, import the Recipe interface and use it to type your state and map function.
import React, { useState, FormEvent } from 'react';
import { searchRecipes } from './API';
import { Recipe } from './types';

const App = () => {
  const [searchTerm, setSearchTerm] = useState('');
  const [recipes, setRecipes] = useState<Recipe[]>([]);

  // ... rest of your code

  return (
    <div>
      {/* ... rest of your return statement */}
      {recipes.map((recipe: Recipe) => (
        {/* ... rest of your map function */}
      ))}
    </div>
  );
};

export default App;
Step 6: Test Your Setup
Now, start both your frontend and backend servers. Open your browser, navigate to your app, and try submitting a search. You should see the recipes data displayed on the screen.
# In one terminal
cd frontend
npm run dev

# In another terminal
cd backend
npm start
This setup should now fetch and display recipe data based on the hardcoded searchTerm of "burgers". In a real-world scenario, you'd replace the hardcoded searchTerm with a dynamic value from a user input field.
How to Create the Search Input and Recipe Card Component
Step 1: Setup Your Project
Start by setting up a new React project or navigate to your existing project directory.
npx create-react-app recipe-search-ui
cd recipe-search-ui
Step 2: Create State Hooks for User Input and Data
In your src folder, create a new file named App.tsx and import the necessary dependencies:
import React, { useState, FormEvent } from "react";

function App() {
  const [searchTerm, setSearchTerm] = useState < string > "";
  const [recipes, setRecipes] = useState < Array < any >> [];

  // ... rest of the code
}

export default App;
Here, we have set up two state hooks: one for capturing the user's search term and another for holding the recipe data returned from the backend.
Step 3: Build a Form to Capture User Input
Within the App component, build a form with an input field and a submit button. We'll also create a function to handle the form submission, which will trigger the API call.
function App() {
  // ... rest of the code

  const handleSearchSubmit = async (event: FormEvent) => {
    event.preventDefault();
    // ... API call logic
  };

  return (
    <div>
      <form onSubmit={handleSearchSubmit}>
        <input
          type="text"
          required
          placeholder="Enter a search term"
          value={searchTerm}
          onChange={(event) => setSearchTerm(event.target.value)}
        />
        <button type="submit">Submit</button>
      </form>
      {/* ... rest of the code */}
    </div>
  );
}
Now, users can enter their search term, and upon form submission, handleSearchSubmit will be triggered.
Step 4: Fetch Recipe Data from the Backend
In the handleSearchSubmit function, use the fetch API to send a request to your backend, capture the returned data, and update the recipes state.
const handleSearchSubmit = async (event: FormEvent) => {
  event.preventDefault();
  try {
    const response = await fetch(
      `http://localhost:5000/api/recipes/search?searchTerm=${searchTerm}`
    );
    if (!response.ok) {
      throw new Error(`HTTP error! status: ${response.status}`);
    }
    const data = await response.json();
    setRecipes(data.results);
  } catch (error) {
    console.error(error);
  }
};
Step 5: Display Recipe Data
Create a new folder named components in your src directory. Inside this folder, create a file named RecipeCard.tsx. This component will display individual recipe data.
import { Recipe } from "../types";

interface Props {
  recipe: Recipe;
}

const RecipeCard = ({ recipe }: Props) => {
  return (
    <div className="recipe-card">
      <img src={recipe.image}></img>
      <div className="recipe-card-title">
        <h3>{recipe.title}</h3>
      </div>
    </div>
  );
};

export default RecipeCard;
Now, go back to App.tsx and import RecipeCard. Map over the recipes state to display each recipe using the RecipeCard component.
import RecipeCard from "./components/RecipeCard";

// ... rest of the code

return (
  <div>
    {/* ... rest of the code */}
    {recipes.map((recipe) => (
      <RecipeCard key={recipe.id} recipe={recipe} />
    ))}
  </div>
);
Now, when you submit a search term, the UI will display a list of recipe cards containing the images and titles of the recipes returned from the backend.
Step 6: Test Your UI
Run your React app, enter a search term such as "pasta" or "burgers", and submit the form. You should see a list of recipe cards displaying the relevant recipes from the backend.
npm start
Navigate to http://localhost:3000 in your browser and try out your new recipe search UI!
How to Build the Pagination and View More Functionality
Step 1: Backend Pagination
We added a page query parameter in the search endpoint. The page value is used to calculate the offset for the recipe data fetched from the database or external API.
Step 2: Add "View More" Button to the UI
Navigate to your App.tsx file. Scroll down to the JSX code where you map through the recipes array and add a "View More" button below it.
// ... other code
{
  recipes.map((recipe) => <RecipeCard key={recipe.id} recipe={recipe} />);
}
<button className="view-more" onClick={handleViewMoreClick}>
  View More
</button>;
// ... other code
Step 3: Create a useRef Hook to Store the Current Page Number
Above your component's return statement, create a useRef hook to keep track of the current page number without causing re-renders.
// ... other code
const pageNumber = useRef(1);
// ... other code
Step 4: Implement the handleViewMoreClick Function
Define a function called handleViewMoreClick to handle the logic for loading more recipes.
// ... other code
const handleViewMoreClick = async () => {
  try {
    const nextPage = pageNumber.current + 1;
    const nextRecipes = await api.searchRecipes(searchTerm, nextPage);
    setRecipes((prevRecipes) => [...prevRecipes, ...nextRecipes.results]);
    pageNumber.current = nextPage;
  } catch (error) {
    console.error(error);
  }
};
// ... other code
Step 5: Reset Page Number on New Search
Modify your handleSearchSubmit function to reset the page number back to 1 whenever a new search term is entered.
// ... other code
const handleSearchSubmit = async (event: FormEvent) => {
  // ... other code
  setRecipes(recipes.results);
  pageNumber.current = 1;
};
// ... other code
Step 6: Test Your Implementation
Run your app and perform a search. Click the "View More" button to load more results. Change the search term and ensure that the page number resets, and you get a fresh list of recipes.
npm start
Now, as you search for recipes and click "View More," you should see additional recipes being loaded and displayed in the UI.
How to Build the Recipe Summary Modal Component
I'll walk you through this process step-by-step. We'll create a model that displays a recipe summary using a specific endpoint from the provided API.
Step 1: Understanding the Recipe Summary Endpoint
You can understand where the summary data comes from by looking at your API documentation. The endpoint you need is called Summarize Recipe. This endpoint requires a recipe ID to generate a summary.
Step 2: Setup Backend Endpoint
Create a backend endpoint that interfaces with the Summarize Recipe endpoint.
// In your backend, create an endpoint to fetch recipe summary
// File: recipe-api.ts
export const getRecipeSummary = async (recipeId: string) => {
  if (!apiKey) {
    throw new Error("API key not found");
  }

  const url = new URL(
    `https://api.spoonacular.com/recipes/${recipeId}/summary`
  );
  const params = { apiKey: apiKey };
  url.search = new URLSearchParams(params).toString();

  const response = await fetch(url.toString());
  const json = await response.json();
  return json;
};
Step 3: Create a Backend Route
Create a route in your backend to handle requests to your new endpoint.
// File: index.ts
app.get("/api/recipe/:recipeId/summary", async (req, res) => {
  const recipeId = req.params.recipeId;
  const result = await recipeSummary(recipeId);
  res.json(result);
});
Step 4: Create the Recipe Modal Component
Create a React component for the recipe modal. We will use the useEffect hook to call the backend endpoint we just created, and store the Recipe Summary data in state.
First add a type for RecipeSummary to types.ts
export interface RecipeSummary {
  id: number;
  title: string;
  summary: string;
}
// File: RecipeModal.tsx
import React, { useState, useEffect } from "react";
import { RecipeSummary } from "../types";
interface Props {
recipeId: string;
onClose: () => void;
}
const RecipeModal: React.FC<Props> = ({ recipeId, onClose }) => {
const [recipeSummary, setRecipeSummary] =
(useState < RecipeSummary) | (null > null);
useEffect(() => {
const fetchRecipeSummary = async () => {
try {
const summary = await getRecipeSummary(recipeId);
setRecipeSummary(summary);
} catch (error) {
console.error(error);
}
};
fetchRecipeSummary();
}, [recipeId]);
return (
<div className="overlay">
<div className="modal">
<div className="modal-content">
<div className="modal-header">
<h2>{recipeSummary?.title}</h2>
<span className="close-button" onClick={onClose}>
×
</span>
</div>
<p dangerouslySetInnerHTML={{ __html: recipeSummary?.summary }} />
</div>
</div>
</div>
);
};
export default RecipeModal;
Step 5: Style the Modal
Add the following CSS to style the modal:
/* File: app.css */
.overlay {
  position: fixed;
  top: 0;
  left: 0;
  width: 100%;
  height: 100%;
  background-color: rgba(0, 0, 0, 0.7);
  z-index: 1;
}

.modal {
  position: fixed;
  top: 50%;
  left: 50%;
  transform: translate(-50%, -50%);
  z-index: 2;
  background-color: white;
  padding: 2em;
  border-radius: 4px;
  max-width: 500px;
}

.modal-header {
  display: flex;
  flex-direction: row;
  align-items: center;
  justify-content: space-between;
}
Step 6: Render and Handle Modal Interactions
Modify your main component to handle rendering and interactions with the modal.
// File: App.tsx
const App: React.FC = () => {
  const [selectedRecipe, setSelectedRecipe] =
    (useState < Recipe) | (undefined > undefined);

  return (
    <div className="App">
      {/* Other components and logic */}
      {selectedRecipe && (
        <RecipeModal
          recipeId={selectedRecipe.id.toString()}
          onClose={() => setSelectedRecipe(undefined)}
        />
      )}
    </div>
  );
};

export default App;
Now, when a user clicks on a recipe, the modal will appear displaying the summary of the selected recipe. The modal can be closed by clicking the close button, which will set the selectedRecipe back to undefined, hiding the modal.
How to Create Endpoints to Get/Create/Delete Favorite Recipes
Step 1: Setup the Database
First, we need to extend our database schema to include a table for storing favorite recipes by their IDs.
First, navigate to the Prisma folder within the backend directory of your project. Then open the schema.prisma file.
Define a new model for favorite recipes as follows:
model FavoriteRecipe {
  id        Int    @id @default(autoincrement())
  recipeId  Int    @unique
}
Step 2: Synchronize the Database Schema
Now, let's synchronize the updated schema with our database.
cd backend
npx prisma db push
Step 3: Setup the Endpoints
We need to set up endpoints in our Node backend to handle creating, viewing, and deleting favorites. We'll use the prismaClient to help us perform crud operations on the database.
First, we'll create a new post endpoint like this:
// In backend/index.ts
import { PrismaClient } from "@prisma/client";

const prismaClient = new PrismaClient();

app.post("/api/recipes/favorite", async (req, res) => {
  const { recipeId } = req.body;
  try {
    const favoriteRecipe = await prismaClient.favoriteRecipe.create({
      data: { recipeId },
    });
    res.status(201).json(favoriteRecipe);
  } catch (error) {
    console.error(error);
    res.status(500).json({ error: "Oops, something went wrong." });
  }
});
Next, we'll create the View endpoint. To do that, create a utility function to fetch recipe details by IDs:
// In backend/src/recipe-api.ts
export const getFavoriteRecipesByIds = async (ids: string[]) => {
  if (!apiKey) {
    throw new Error("API Key not found");
  }
  const url = new URL("https://api.spoonacular.com/recipes/informationBulk");
  url.search = new URLSearchParams({
    apiKey: apiKey,
    ids: ids.join(","),
  }).toString();

  const response = await fetch(url);
  const json = await response.json();
  return { results: json };
};
Now, create the endpoint to fetch all favorite recipes:
// In backend/index.ts
import { getFavoriteRecipesByIds } from "./src/recipe-api";

app.get("/api/recipes/favorite", async (req, res) => {
  try {
    const favoriteRecipes = await prismaClient.favoriteRecipe.findMany();
    const recipeIds = favoriteRecipes.map((recipe) =>
      recipe.recipeId.toString()
    );
    const favorites = await getFavoriteRecipesByIds(recipeIds);
    res.json(favorites);
  } catch (error) {
    console.error(error);
    res.status(500).json({ error: "Oops, something went wrong." });
  }
});
Next up is the Delete endpoint:
// In backend/index.ts
app.delete("/api/recipes/favorite", async (req, res) => {
  const { recipeId } = req.body;
  try {
    await prismaClient.favoriteRecipe.delete({
      where: { recipeId },
    });
    res.status(204).send();
  } catch (error) {
    console.error(error);
    res.status(500).json({ error: "Oops, something went wrong." });
  }
});
Step 4: Test the Endpoints
You can use tools like Postman or Thunder Client to test the endpoints. Make sure to adjust the request method and URL accordingly, and provide the necessary request body or parameters.
- Creating a Favorite: POST request to
/api/recipes/favoritewithrecipeIdin the body. - Viewing Favorites: GET request to
/api/recipes/favorite. - Deleting a Favorite: DELETE request to
/api/recipes/favoritewithrecipeIdin the body.
Step 5: Verify the Database
Check the favoriteRecipes table in your ElephantSQL database to verify the actions performed through the endpoints.
How to Add Favorites Functionality to the Frontend
Step 1: Setup the Tab Functionality
Next, we'll look at how to integrate these endpoints on the frontend. We'll start by setting up tabs for 'Search' and 'Favorites' in our app.
First, define a new state to keep track of the selected tab.
import React, { useState } from "react";

type Tabs = "search" | "favorites";

function App() {
  const [selectedTab, setSelectedTab] = useState < Tabs > "search";

  // Rest of your code...
}
Step 2: Render Tabs
Now you'll render tabs in your JSX, and handle tab switching with the onClick event. This makes each <h1> element is clickable, and saves the tab the user clicked on in state. This helps conditionally render different UI elements depending on their selection.
// Inside your JSX...
<div className="tabs">
  <h1 onClick={() => setSelectedTab("search")}>Recipe Search</h1>
  <h1 onClick={() => setSelectedTab("favorites")}>Favorites</h1>
</div>
Step 3: Conditional Rendering
Based on the selected tab, you want to conditionally render either the search component or the favorites component. This will show/hide either the "search section" or the "favourites" section depending on the selectedTab state variable.
{selectedTab === 'search' && (
  // search component code...
)}
{selectedTab === 'favorites' && (
  // favorites component code...
)}
Step 4: Fetch Favorite Recipes
Next we need to populate the Favorite recipes tab with our favourite recipes. We want to do this when the App loads, for a quick user experience.
To do this, fetch the favorite recipes from the backend when the app loads using the useEffect hook, and store the fetched favorite recipes in a new state.
// api.ts
export const getFavouriteRecipes = async () => {
  const url = new URL("http://localhost:5000/api/recipes/favourite");
  const response = await fetch(url);

  if (!response.ok) {
    throw new Error(`HTTP error! Status: ${response.status}`);
  }
  return response.json();
};
//App.tsx
import React, { useEffect, useState } from "react";

// ... Rest of your imports and code

function App() {
  // ... Rest of your state declarations

  const [favoriteRecipes, setFavoriteRecipes] = useState([]);

  useEffect(() => {
    const fetchFavoriteRecipes = async () => {
      try {
        const favouriteRecipes = await api.getFavouriteRecipes();
        setFavouriteRecipes(favouriteRecipes.results);
      } catch (error) {
        console.error(error);
      }
    };

    fetchFavoriteRecipes();
  }, []);

  // ... Rest of your code
}
Step 5: Render Favorite Recipes
Now you need to render the favorite recipes in the 'Favorites' tab.
{selectedTab === 'favorites' && (
  <div>
    {favoriteRecipes.map(recipe => (
      // Render each favorite recipe card...
    ))}
  </div>
)}
Step 6: Add a Heart Icon
Next we'll add a way for the user to add and remove favorites. We'll do this by adding a "heart" icon to each card.
Before diving into the code, ensure you are in the correct directory by navigating to your project's front-end directory in your terminal. Install the necessary package for icons by running:
npm install react-icons
Step 7: Import the Icon
Open the RecipeCard component, and import the heart icon at the top of your file:
import { AiOutlineHeart } from "react-icons/ai";
Step 8: Insert the icon
In the RecipeCard component, add the heart icon within a span element just above the h3 tag:
<span onClick={handleFavoriteClick}>
  <AiOutlineHeart size={25} />
</span>
Step 9: Add CSS Styling
In your App.css file, add the following CSS to style the icon and ensure it appears on the same line as the title. Using flex and align-items means the icon and title will be aligned nicely beneath the image:
.recipe-card-title {
  display: flex;
  align-items: center;
  gap: 0.5rem;
}
Step 10: Create an Add Favourite Event Handler
In App.tsx, create an event handler for favoriting a recipe. This is what will get called when the user clicks the heart icon on an recipe that hasn't yet been favorited:
const addfavoriteRecipe = async (recipe) => {
  try {
    await API.addFavoriteRecipe(recipe);
    setFavoriteRecipes([...favoriteRecipes, recipe]);
  } catch (error) {
    console.log(error);
  }
};
Step 11: API Logic
In a new file called API.ts, create a function to handle the API call to save a favorite recipe. This will call our endpoint which we created earlier in the backend:
export const addFavoriteRecipe = async (recipe) => {
  const body = {
    recipeId: recipe.id,
  };
  const response = await fetch("http://localhost:5000/api/recipes/favourite", {
    method: "POST",
    headers: {
      "Content-Type": "application/json",
    },
    body: JSON.stringify(body),
  });
  if (!response.ok) {
    throw new Error("Failed to save favorite");
  }
};
Step 12: Hook Up the Event Handler
Pass the event handler to the RecipeCard component:
<RecipeCard
  //.. other props
  onFavoriteButtonClick={favoriteRecipe}
/>
Step 13: Create the Remove Favorite Event Handler
Similarly, create an event handler for un-favoriting a recipe in App.tsx:
const removeFavoriteRecipe = async (recipe) => {
  try {
    await API.removeFavoriteRecipe(recipe);
    const updatedRecipes = favoriteRecipes.filter(
      (favRecipe) => favRecipe.id !== recipe.id
    );
    setFavoriteRecipes(updatedRecipes);
  } catch (error) {
    console.log(error);
  }
};
Step 14: API Logic
In API.ts, create a function to handle the API call to remove a favorite recipe. Again, this will call the backend API to remove a recipe which we created earlier:
export const removeFavoriteRecipe = async (recipe) => {
  const body = {
    recipeID: recipe.id,
  };
  const response = await fetch("http://localhost:5000/api/recipes/favourite", {
    method: "DELETE",
    headers: {
      "Content-Type": "application/json",
    },
    body: JSON.stringify(body),
  });
  if (!response.ok) {
    throw new Error("Failed to remove favorite");
  }
};
Step 15: Conditional Event Handler
Depending on if the user is "favoriting" or "unfavoriting" a recipe, we want to conditionally call either addFavoriteRecipe or removeFavoriteRecipe based on the favorited state:
<RecipeCard
  //.. other props
  onFavoriteButtonClick={isFavorite ? removeFavoriteRecipe : favoriteRecipe}
/>
Step 16: Determine the Favorited State
Before we can display the heart icon a favorited/non-favorited state, we need to know if the recipe is already a or not.
To do this, we determine whether a recipe is favorited by checking if it exists in the favoriteRecipes state array. Pass this information to RecipeCard:
const isFavorite = favoriteRecipes.some(
  (favRecipe) => favRecipe.id === recipe.id
);
<RecipeCard
  // ...other props
  isFavorite={isFavorite}
/>;
Step 17: Display the Favorited State
In RecipeCard, conditionally render a filled or outlined heart icon based on the isFavorite prop:
{
  isFavorite ? (
    <AiFillHeart size={25} color="red" />
  ) : (
    <AiOutlineHeart size={25} />
  );
}
How to Add CSS/Styling
Step 1: Prepare the Hero Image
We've added some basic styling so far, so lets complete the CSS so that our app looks polished!
Firstly obtain an image from a source like Pexels or any other image repository. This will be used in the Hero section of our app at the top, and will have our title overlaid on it. Ensure the image has a horizontal orientation for better handling of aspect ratios.
Place the image in the public folder of your project.
project-folder
│
└───public
    │   hero-image.jpeg
Step 2: Structure the Header
Open app.tsx and locate the JSX markup. Add a className of app-container to the top div element.
Inside the app-container div, add a new div with a className of header. Within the header div, add an img element with a src attribute pointing to your image, and a div element with a className of title containing the app's title.
<div className="app-container">
  <div className="header">
    <img src="/hero-image.jpeg" alt="Hero" />
    <div className="title">My Recipe App</div>
  </div>
  {/* ...rest of your code */}
</div>
Step 3: Style the Header
Open app.css and scroll to the top. Add the following CSS to style the app-container, header, img, and title elements. This makes the title appear on top of the image, with a translucent background:
.app-container {
  display: flex;
  flex-direction: column;
  gap: 2em;
}

.header {
  position: relative;
}

.header img {
  width: 100%;
  height: 500px;
  object-fit: cover;
  object-position: center;
  opacity: 0.5;
  border-radius: 1em;
}

.title {
  position: absolute;
  top: 50%;
  left: 50%;
  transform: translate(-50%, -50%);
  color: white;
  font-size: 2em;
  text-align: center;
  background-color: black;
  opacity: 0.8;
  padding: 0.5em 1.5em 0.5em 1.5em;
}
Step 4: Adjust the Layout
Add padding to the body element and use a media query to add margins on larger screens. We do this so our app doesn't appear to narrow on mobile devices. When the screen size reaches 768px, the media query will kick in and add margin to the left and right of our app, so that the app doesn't appear too wide.
body {
  padding: 5em 0;
  height: 100vh;
  background-color: #f0f0f0; /* or any color you prefer */
}

@media (min-width: 768px) {
  body {
    margin-left: 10em;
    margin-right: 10em;
  }
}
Step 5: Style Tabs Underline
Currently its not clear which tab the user has selected. What we want to do is add an orange underline to the selected tab. To do this, we can use a combination of CSS classes and conditional rendering.
Within app.tsx, locate your h1 elements representing tabs, and dynamically apply a className of tab-active based on the selected tab.
<h1 className={selectedTab === 'search' ? 'tab-active' : ''}>Search</h1>
<h1 className={selectedTab === 'favorites' ? 'tab-active' : ''}>Favorites</h1>
In app.css, define the tab-active class:
.tab-active {
  border-bottom: 4px solid orange; /* or any color you prefer */
  padding-bottom: 0.5em;
}
Step 6: Style the Search Bar
We want our search bar to take up the width of the container, and we want to add an icon instead of the search button, which makes our UI more interesting.
In app.tsx, locate the form element within the Search tab. Replace the text "Submit" in the button element with an icon from a library like React Icons.
<button>
  <AiOutlineSearch size={40} />
</button>
In app.css, style the form, input, and button elements:
form {
  display: flex;
  background-color: white;
  align-items: center;
}

input {
  padding: 0.5em;
  font-size: 2em;
  flex: 1;
  border: none;
}

input:focus {
  outline: none;
}

button {
  background-color: white;
  border: none;
  cursor: pointer;
}
Step 7: Implement a Responsive Recipe Card Grid
Currently our Recipe Cards are stacked horizontally. We'll use CSS grid to make the recipe cards appear in a grid layout, which will also make things more responsive.
Within app.tsx, create a new div with a className of recipe-grid just above where you map over your recipes, and place the logic to rendering the recipes inside this div.
<div className="recipe-grid">
  {recipes.map((recipe) => {
    const isFavourite = favouriteRecipes.some((favRecipe) => favRecipe.id === recipe.id);

    return (
      <RecipeCard
        key={recipe.id}
        recipe={recipe}
        onFavouriteButtonClick={isFavourite ? removeFavouriteRecipe : addFavouriteRecipe}
        onClick={() => setSelectedRecipe(recipe)}
        isFavourite={isFavourite}
      />
    );
  })}
</div>
In app.css, style the recipe-grid and recipe-card elements:
.recipe-grid {
  display: grid;
  grid-template-columns: repeat(auto-fill, minmax(400px, 1fr));
  gap: 2em;
}

.recipe-card {
  display: flex;
  flex-direction: column;
  justify-content: space-evenly;
  background-color: white;
  padding: 1em;
  box-shadow: 0 4px 12px rgba(0, 0, 0, 0.1);
  position: relative;
  cursor: pointer;
  gap: 1.5em;
}

.recipe-card h3 {
  font-size: 1.5em;
  margin: 0;
  white-space: nowrap;
  overflow: hidden;
  text-overflow: ellipsis;
}
Step 8: Final Touches
Style the "View More" button to make sure it matches the style of our app, and is centered beneath our recipe grid:
.view-more-button {
  font-size: 1.5em;
  padding: 1em;
  font-weight: bold;
  margin: auto;
}
Conclusion
Congrats on making it to the end! Hopefully you've learned a few things about full stack development using React and Node.
If you enjoyed this project, you can find more at CodeCoyotes.com, where you can also send me a message if you need to get in contact.
Thanks for reading, see you in the next one!