

In this JavaScript game tutorial, you'll learn how to create a modern version of the 1991 classic game Gorillas using plain JavaScript and the HTML canvas element.
In this game, two gorillas throw explosive bananas at each other, and the first one to hit the other one wins the game.
We'll build out the whole game from scratch here. First, you'll learn how to draw on a canvas element with JavaScript. You'll see how to draw the background, the buildings, the gorillas, and the bomb. We won't use any images here – we'll draw everything using code.
Then we'll add some interactions and add event handlers. We'll also cover how to aim, how to animate the bomb across the sky, and how to detect if the bomb hit the other gorilla, or a building.
Throughout the tutorial, we'll be using plain JavaScript. To get the most out of this tutorial, you should have a basic understanding of JavaScript. But even if you are a beginner, you can still follow along and learn as you go.
In this article, we'll simplify a couple of steps. For more detail, you can also watch the extended tutorial on YouTube. In the YouTube version, we also cover how to make the buildings destructible, how to animate the hand of the gorilla to follow the drag movement while aiming, have nicer graphics, and we add AI logic, so you can play against the computer.
If you got stuck, you can also find the final source code of the game we are about to create on GitHub.
Table of Contents:
- Background on the Game
- Project Setup
- Overview of the Game Logic
- How to Draw the Scene
- How to Turn the Coordinate System Upside Down
- How to Draw the Game Elements
- How to Fit the Size of the City to the Browser Window
- How the Gorilla Can Throw the Bomb
- How to Animate the Incoming Bomb
- Next Steps
Background on the Game
Gorillas is a game from 1991. In this game, two gorillas are standing on the top of randomly generated buildings and take turns throwing explosive bananas at each other.
In each round, the players set the angle and velocity of the throw, and keep refining it, until they hit the other gorilla. The flying banana bomb is affected by gravity and the wind.
 The original Gorillas game from 1991 (source: retrogames.cz)
We are going to implement a modern version of this game. The original game did not support a mouse. Every round, the players had to type in the angle and the velocity with a keyboard. We are going to implement it with mouse support, and nicer graphics.
You can try out the extended version of the game on CodePen. Give it a try before we get into it.
Project Setup
To implement this game, we are going to have a simple HTML, CSS, and JavaScript file. You can break down the JavaScript logic into multiple files if you want, but for the sake of simplicity, we have everything in one place.
Because we're using plain JavaScript and don’t use any libraries and third-party tools, we don’t need any compilers or builders. We can run things directly in the browser.
To simplify the process, I recommend installing the Live Server VS Code extension. With this extension installed, you can simply right-click the HTML file and select ‘Open with Live Server’. This will run a live version of the game in the browser.
This means we don’t have to hit refresh in the browser every time we make a change in the code. It’s enough that we save the changes in the file and the browser will refresh automatically.
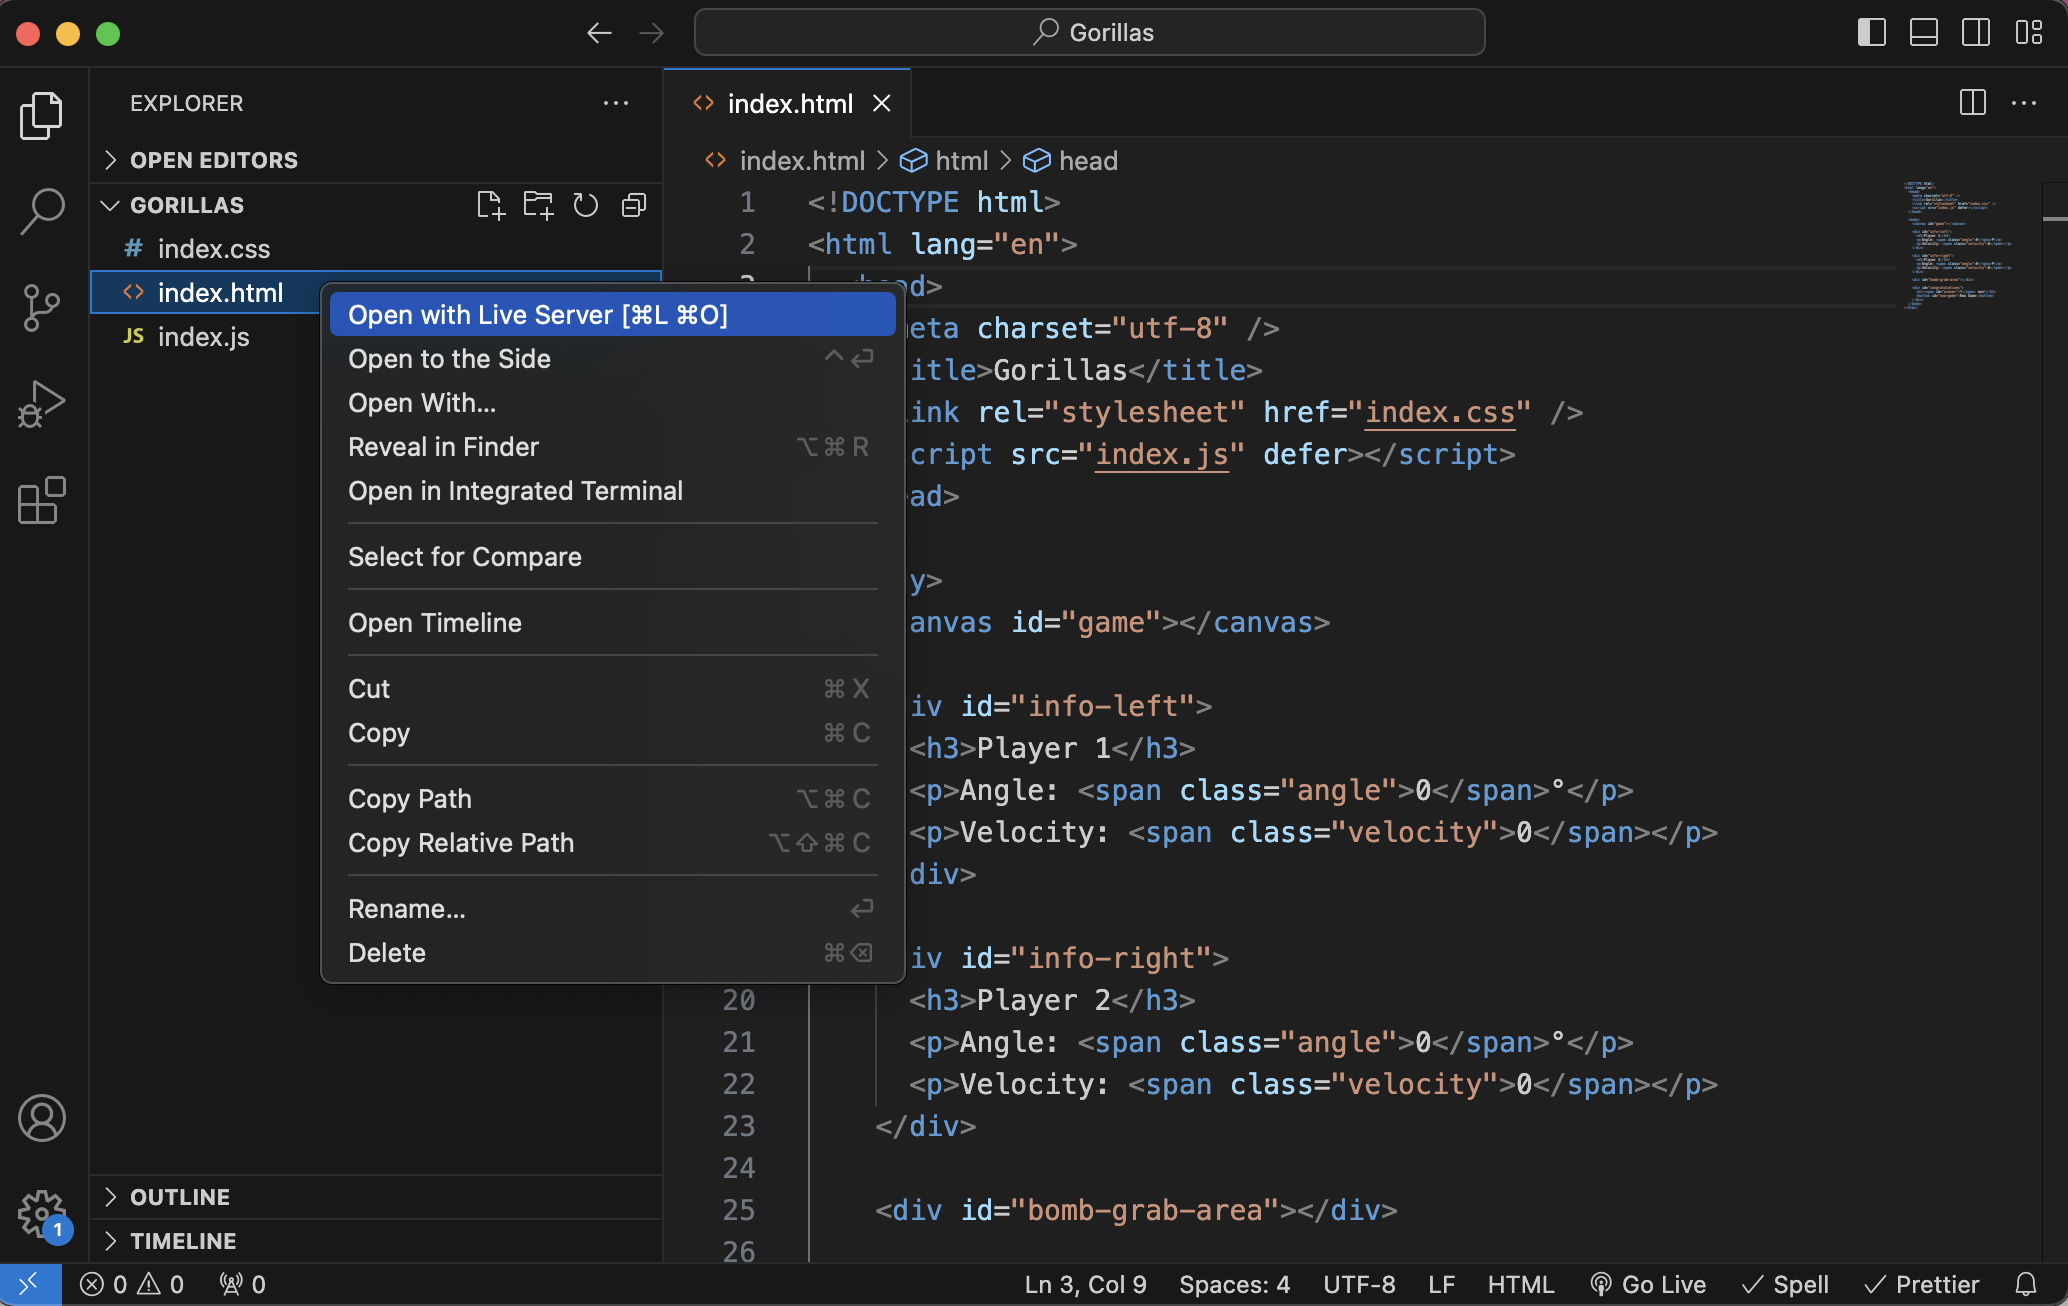 Running the game with the Live Server VS Code extension
Overview of the Game Logic
Before we get to the details, let's walk through the main parts of the game.
The game is driven by the game state. This is a JavaScript object that serves as metadata for the game. From the size of buildings to the current position of the bomb, it includes many things.
The game state includes things like whose turn it is, are we aiming now, or is the bomb already flying in the air? And so on. These are all variables that we need to keep track of. When we draw the game scene, we'll draw it based on the game state.
Then we have the draw function. This function will draw almost everything we have on the screen. It paints the background, the buildings, the gorillas, and the banana bombs. This function paints the entire screen from top to bottom every time we call it.
We are going to add event handling to aim the bombs and we'll implement the throwBomb function that kicks off the animation loop. The animate function moves the bombs across the sky.
This function will be responsible for calculating the exact position of the bomb as it flies through the air at every animation cycle. On top of that, it also has to figure out when the movement ends. With every movement, we check if we hit a building or an enemy, or if the bomb got off-screen. We’ll add hit detection as well.
Now let's walk through our initial files.
The initial HTML file
Our initial HTML file will be very simple. In the header, we'll add a link to our stylesheet and our JavaScript file. Note that I’m using the defer keyword to make sure the script only executes once the rest of the document is parsed.
In the body, we'll add a canvas element. We are going to paint on this element with JavaScript. Almost everything we can see on the screen will be in this canvas element. Here's the code:
<!DOCTYPE html>
<html lang="en">
  <head>
    <meta charset="utf-8" />
    <title>Gorillas</title>
    <link rel="stylesheet" href="index.css" />
    <script src="index.js" defer></script>
  </head>
  <body>
    <canvas id="game"></canvas>
  </body>
</html>
Later we are going to add more things into this file. We'll add info panels to show the angle and velocity of the current throw. But for now, that’s all we have.
The initial CSS file
Initially, our CSS is also very simple. We can’t style anything inside the canvas element, so here we only style the other elements we have.
body {
  margin: 0;
  padding: 0;
}
Later, when we add more elements in HTML, we will also update this file. For now, let’s make sure that our canvas can fit the whole screen. By default, browsers tend to add a little margin or padding around the body. Let’s remove that.
The Main Parts of Our JavaScript File
Most of the logic will be in our JavaScript file. Let's walk through the main parts of this file, and define a few placeholder functions:
- We declare the game
stateobject and a bunch of utility variables. This will contain the metadata of our game. For now, it's an empty object. We will initialize its value when we get to thenewGamefunction. - Then we have references to every HTML element that we need to access from JavaScript. For now, we only have a reference to the
<canvas>element. We access this element by ID. - We initialize the game state and paint the scene by calling the
newGamefunction. This is the only top-level function call. This function is responsible for both initializing the game and resetting it. - We define the
drawfunction that draws the whole scene on the canvas element based on the game state. We will draw the background, the buildings, the gorillas, and the bomb. - We set up event handlers for the
mousedown,mousemove, andmouseupevents. We are going to use these for aiming. - The
mouseupevent will trigger thethrowBombfunction that kicks off the main animation loop. Theanimatefunction will manipulate the state in every animation cycle and call thedrawfunction to update the screen.
// The state of the game
let state = {};
// ...

// References to HTML elements
const canvas = document.getElementById("game");
// ...

newGame();

function newGame() {
  // Initialize game state
  state = {
    // ...
  };

  // ...

  draw();
}

function draw() {
  // ...
}

// Event handlers
// ...

function throwBomb() {
  // ...
}

function animate(timestamp) {
  // ...
}
We will have a couple more utility functions, but they are less important. We'll discuss them as we go.
Game Phases
In the next step, we'll set up our initial game state. Before we get to the different parts of the state, let's talk about one of its most important properties: the game phase property.
 The three game phases: the
 aiming phase, the in flight phase, and the celebrating phase
The game has three different phases. The game starts in the aiming phase, when the bomb is in the hand of a gorilla and the event handlers are active. Then once you throw the bomb, the game moves on to the in flight phase. In this phase, the event handlers are deactivated and the animate function moves the bomb across the sky. We also add hit detection to know when should we stop the animation.
These two game phases repeat each other over and over again, until one of the gorillas hits the other. Once we hit the enemy, the game moves on to the celebrating phase. We draw a winning gorilla, show the congratulations screen, and a button to restart the game.
How to initialize the Game
The game is initialized by the newGame function. This resets the game state, generates a new level, and calls the draw function to draw the whole scene.
Let’s walk through what we have initially in the state object:
- First, we have the game
phaseproperty that can be eitheraiming,in flight, orcelebrating. - Then, the
currentPlayerproperty tells us whose turn it is – the player on the left or the player on the right. - The
bombobject describes the bomb’s current position and its velocity. Its initial position has to be aligned with the second building so we only set it once the level is generated. - The
buildingsarray defines the position and size of the buildings that appear on the screen. We generate the metadata of the buildings with a utility function that we'll discuss later.
// The state of the game
let state = {};

. . .

newGame();

function newGame() {
  // Initialize game state
  state = {
    phase: "aiming", // aiming | in flight | celebrating
    currentPlayer: 1,
    bomb: {
      x: undefined,
      y: undefined,
      velocity: { x: 0, y: 0 },
    },
    buildings: generateBuildings(),
  };

  initializeBombPosition();

  draw();
}
We'll discuss the utility functions used above (generateBuildings and initializeBombPosition) in the next chapter as we draw the buildings and the bomb. For now, let's just add some placeholder functions to make sure we don't get an error from JavaScript.
function generateBuildings() {
  // ...
}

function initializeBombPosition() {
  // ...
}
Now that we have a skeleton of our application and we've initialized some of the states, let’s switch gears and start drawing on the canvas as we fill in the missing pieces of the state.
How to Draw the Scene
The draw function paints the whole canvas based on the state. It draws the background and the buildings, draws the gorillas, and draws the bomb. The function can also draw different gorilla variations depending on the state. The gorilla looks different while aiming, celebrating, or waiting for impact.
We will use this function both for painting the initial scene and throughout our main animation loop.
For the initial paint, some of the features we cover here won't be necessary. For instance, we'll also cover how to draw the celebrating gorilla, while we'll only see that once the game is over. But we'll still cover it because this way we won’t have to get back to this function once we start animating the state.
Everything we draw in this function is based on the state, and it doesn't matter to the function if the game is in the initial state, or if we are further into the game.
We defined a <canvas> element in HTML. How do we paint things on it?
. . .

<body>
  <canvas id="game"></canvas>
</body>

. . .
In JavaScript first, we get the canvas element by ID. Then we set the size of the canvas to fill the whole browser window. And finally, we get its drawing context.
This is a built-in API with many methods and properties that we can use to draw on the canvas. Let's see a few examples of how to use this API.
. . .

// The canvas element and its drawing context
const canvas = document.getElementById("game");
canvas.width = window.innerWidth;
canvas.height = window.innerHeight;
const ctx = canvas.getContext("2d");

. . .

function draw() {
  // ...
}

. . .
Example: Drawing a Rectangle
Let’s look at a few quick examples. These are not part of our game yet, they'll just serve as an introduction.
The most basic thing we can do is to fill a rectangle.
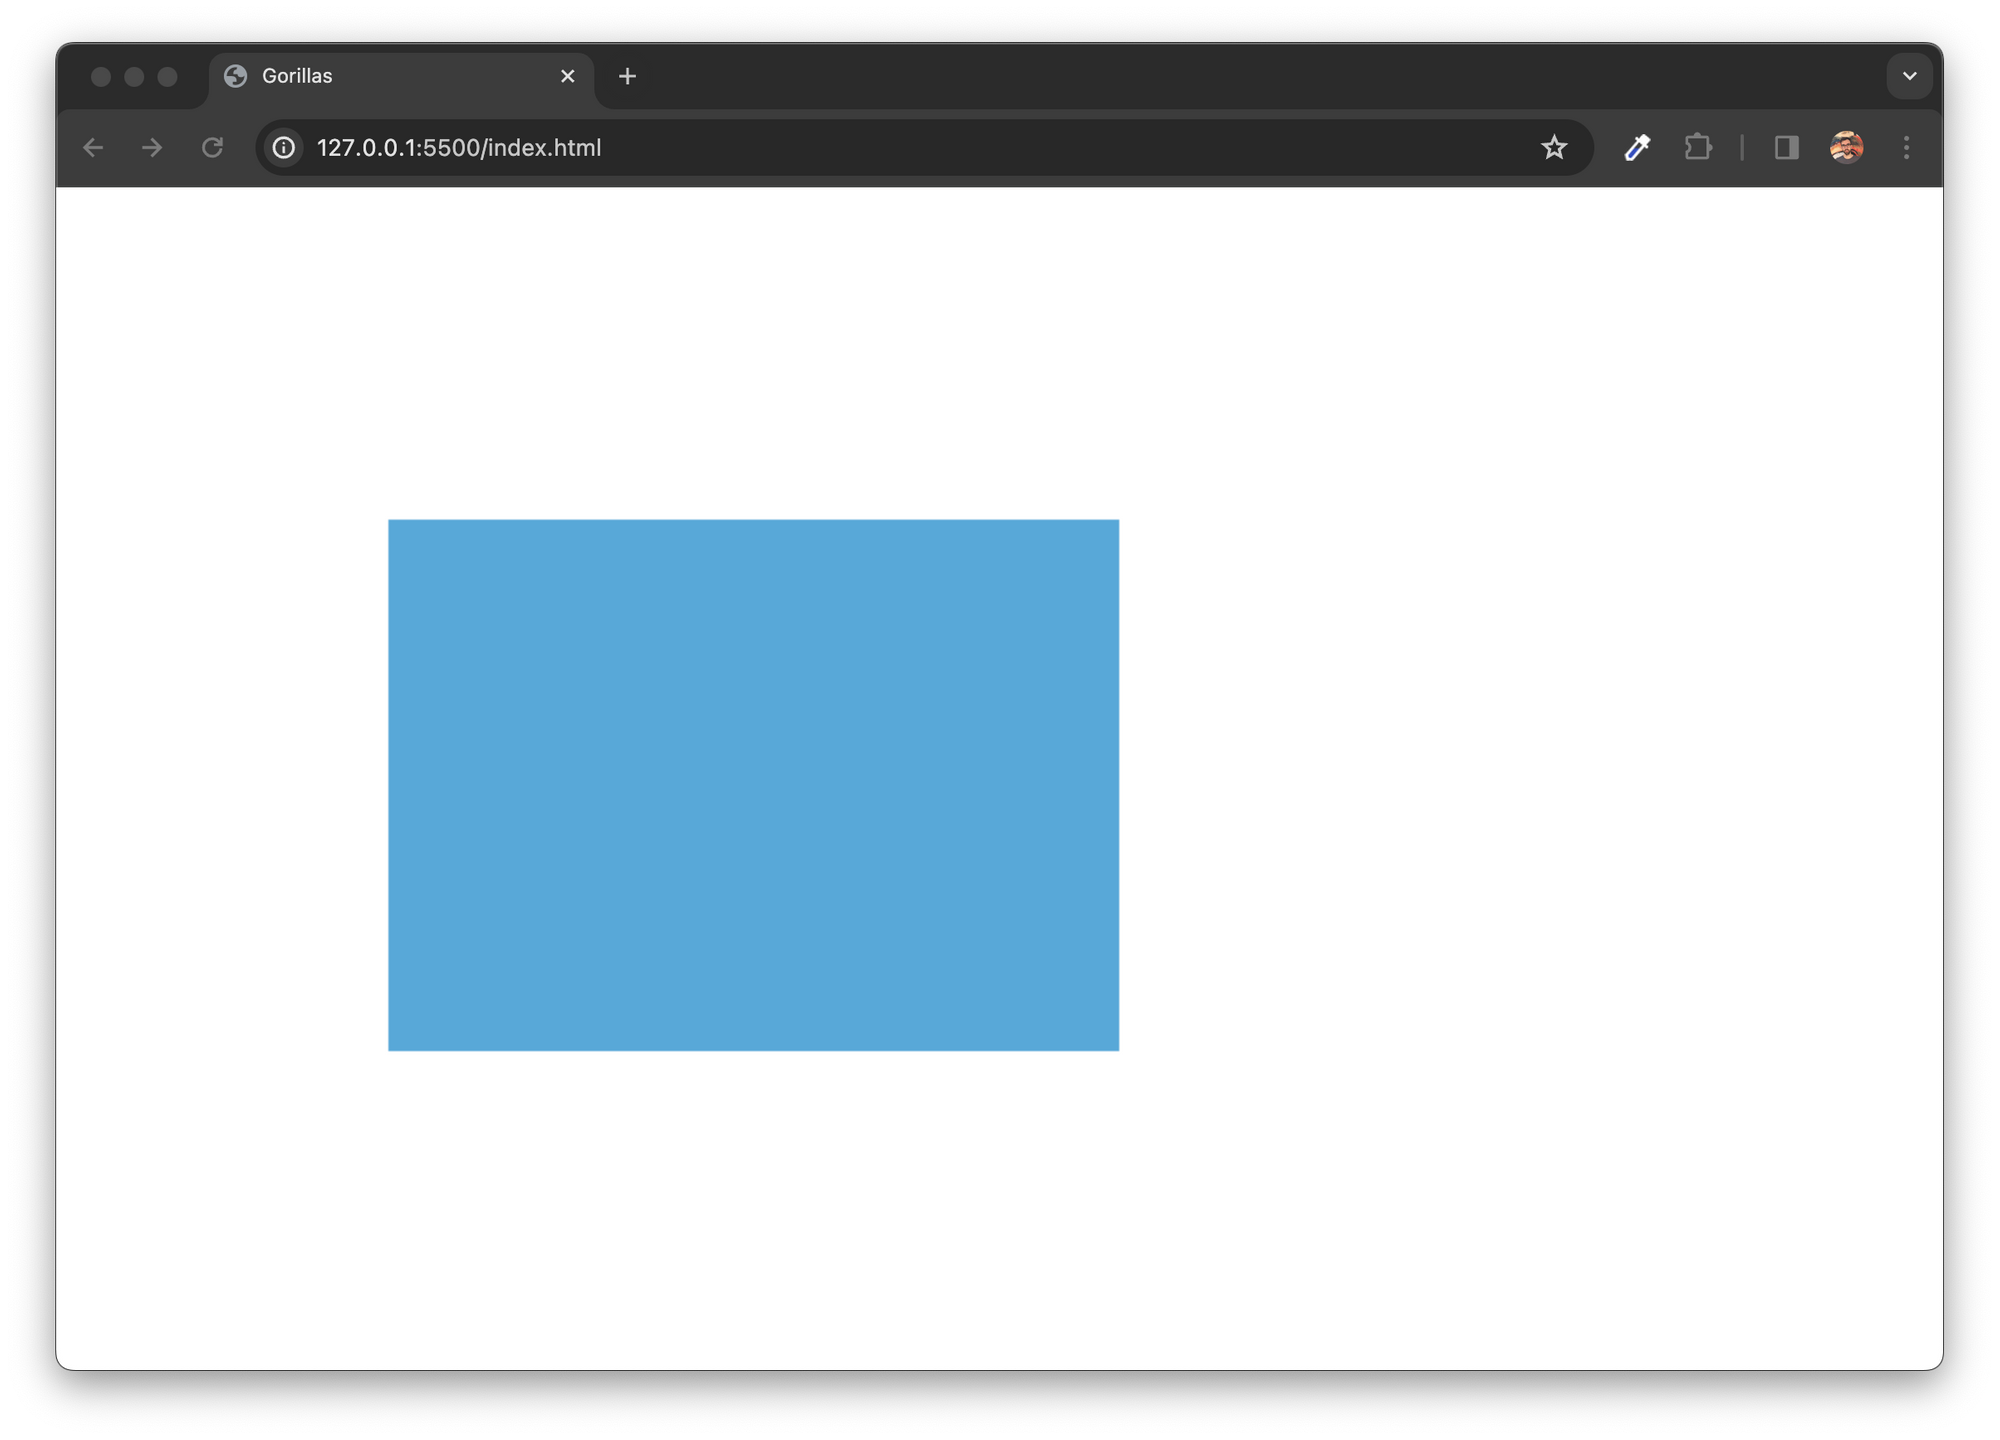 Using the
 fillRect method to fill a rectangle
const canvas = document.getElementById("game");
canvas.width = window.innerWidth;
canvas.height = window.innerHeight;
const ctx = canvas.getContext("2d");

ctx.fillStyle = "#58A8D8";

ctx.fillRect(200, 200, 440, 320);
With the fillRect method, we specify the top left coordinate of our rectangle (200, 200), and we set its width and height (440, 320).
By default, the fill color is going to be black. We can change it by setting the fillStyle property.
The way canvas works is that we have to set up drawing parameters before we paint, and not the other way around. It’s not like we paint a rectangle, and then we can change its color. Once something is on the canvas, it stays as it is.
You can think of it like a real canvas, where you also pick the color with your brush before you start painting with it. Then once you've painted something you can either cover it, by painting something over it, or you can try to clear the canvas. But you can’t change existing parts, really. That’s why we set the color here up front and not afterward.
We are going to draw rectangles to fill the background and to show the buildings.
 The background and the buildings are simple rectangles
Example: Filling a Path
We can of course draw more complicated shapes as well. We can define a path, like this:
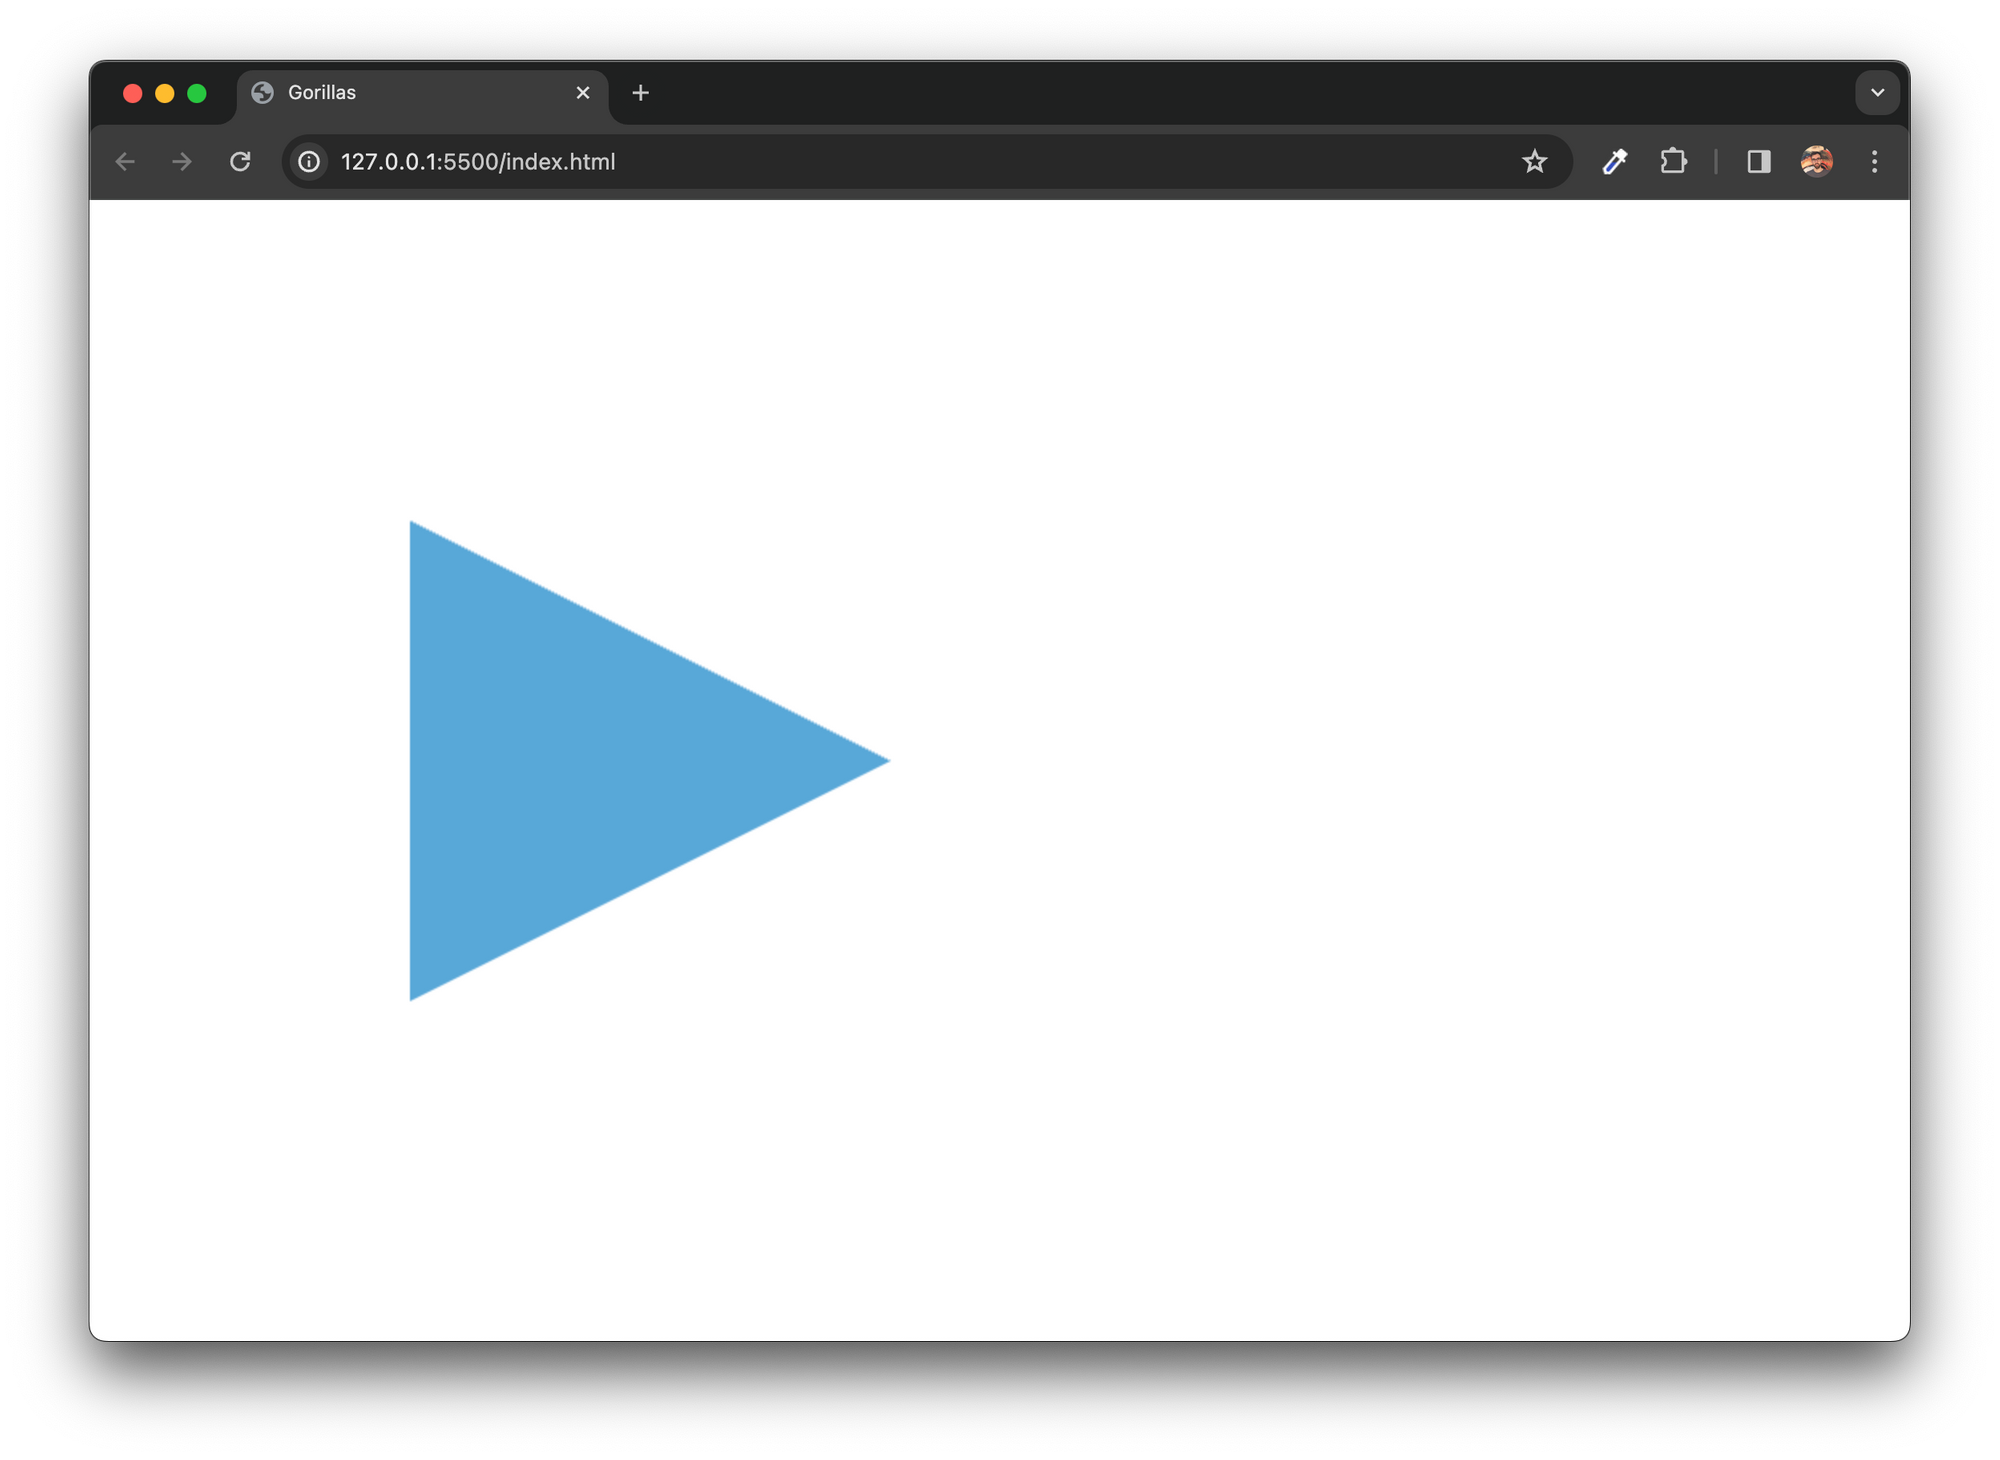 Filling a path
const canvas = document.getElementById("game");
canvas.width = window.innerWidth;
canvas.height = window.innerHeight;
const ctx = canvas.getContext("2d");

ctx.fillStyle = "#58A8D8";

ctx.beginPath();
ctx.moveTo(200, 200);
ctx.lineTo(500, 350);
ctx.lineTo(200, 500);
ctx.fill();
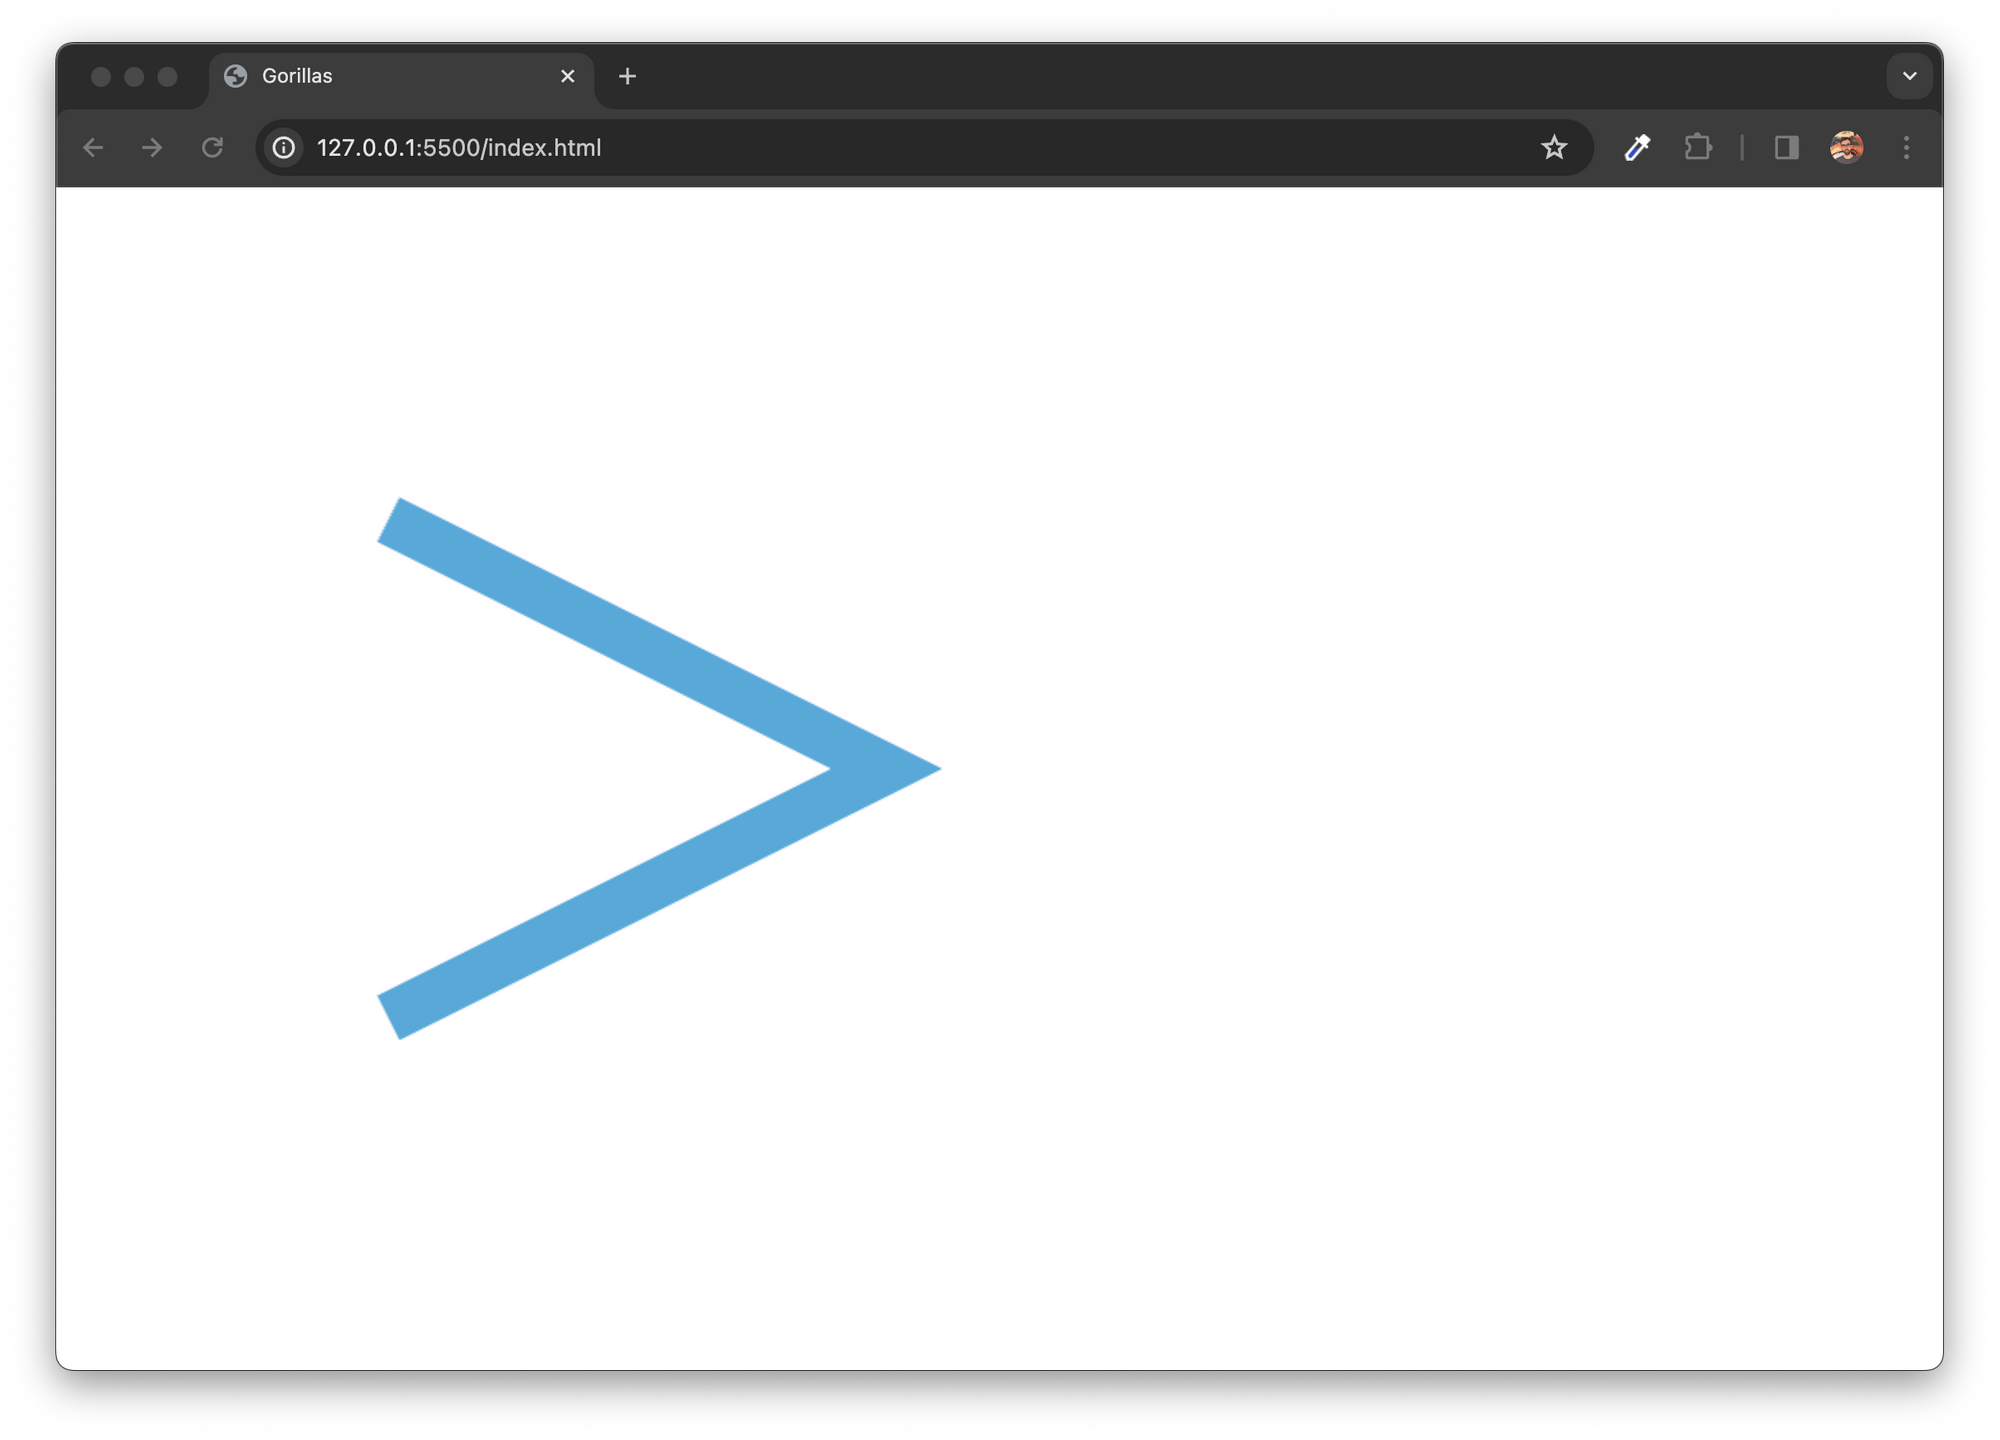
Paths start with the beginPath method and end with either calling the fill or the stroke method – or both. In between, we build the path by calling path-building methods.
In this example, we draw a triangle. We move to the 300,300 coordinate with the moveTo method. Then we call the lineTo method to move to the right side of our shape. And then we continue the path, by calling the lineTo method again to 300,400.
None of this would be visible if we didn’t end with the fill method to fill the path we just built.
We are going to fill paths to draw our gorilla and our bomb.
 We will use paths to draw the main body of the gorilla
Example: Drawing a Stroke
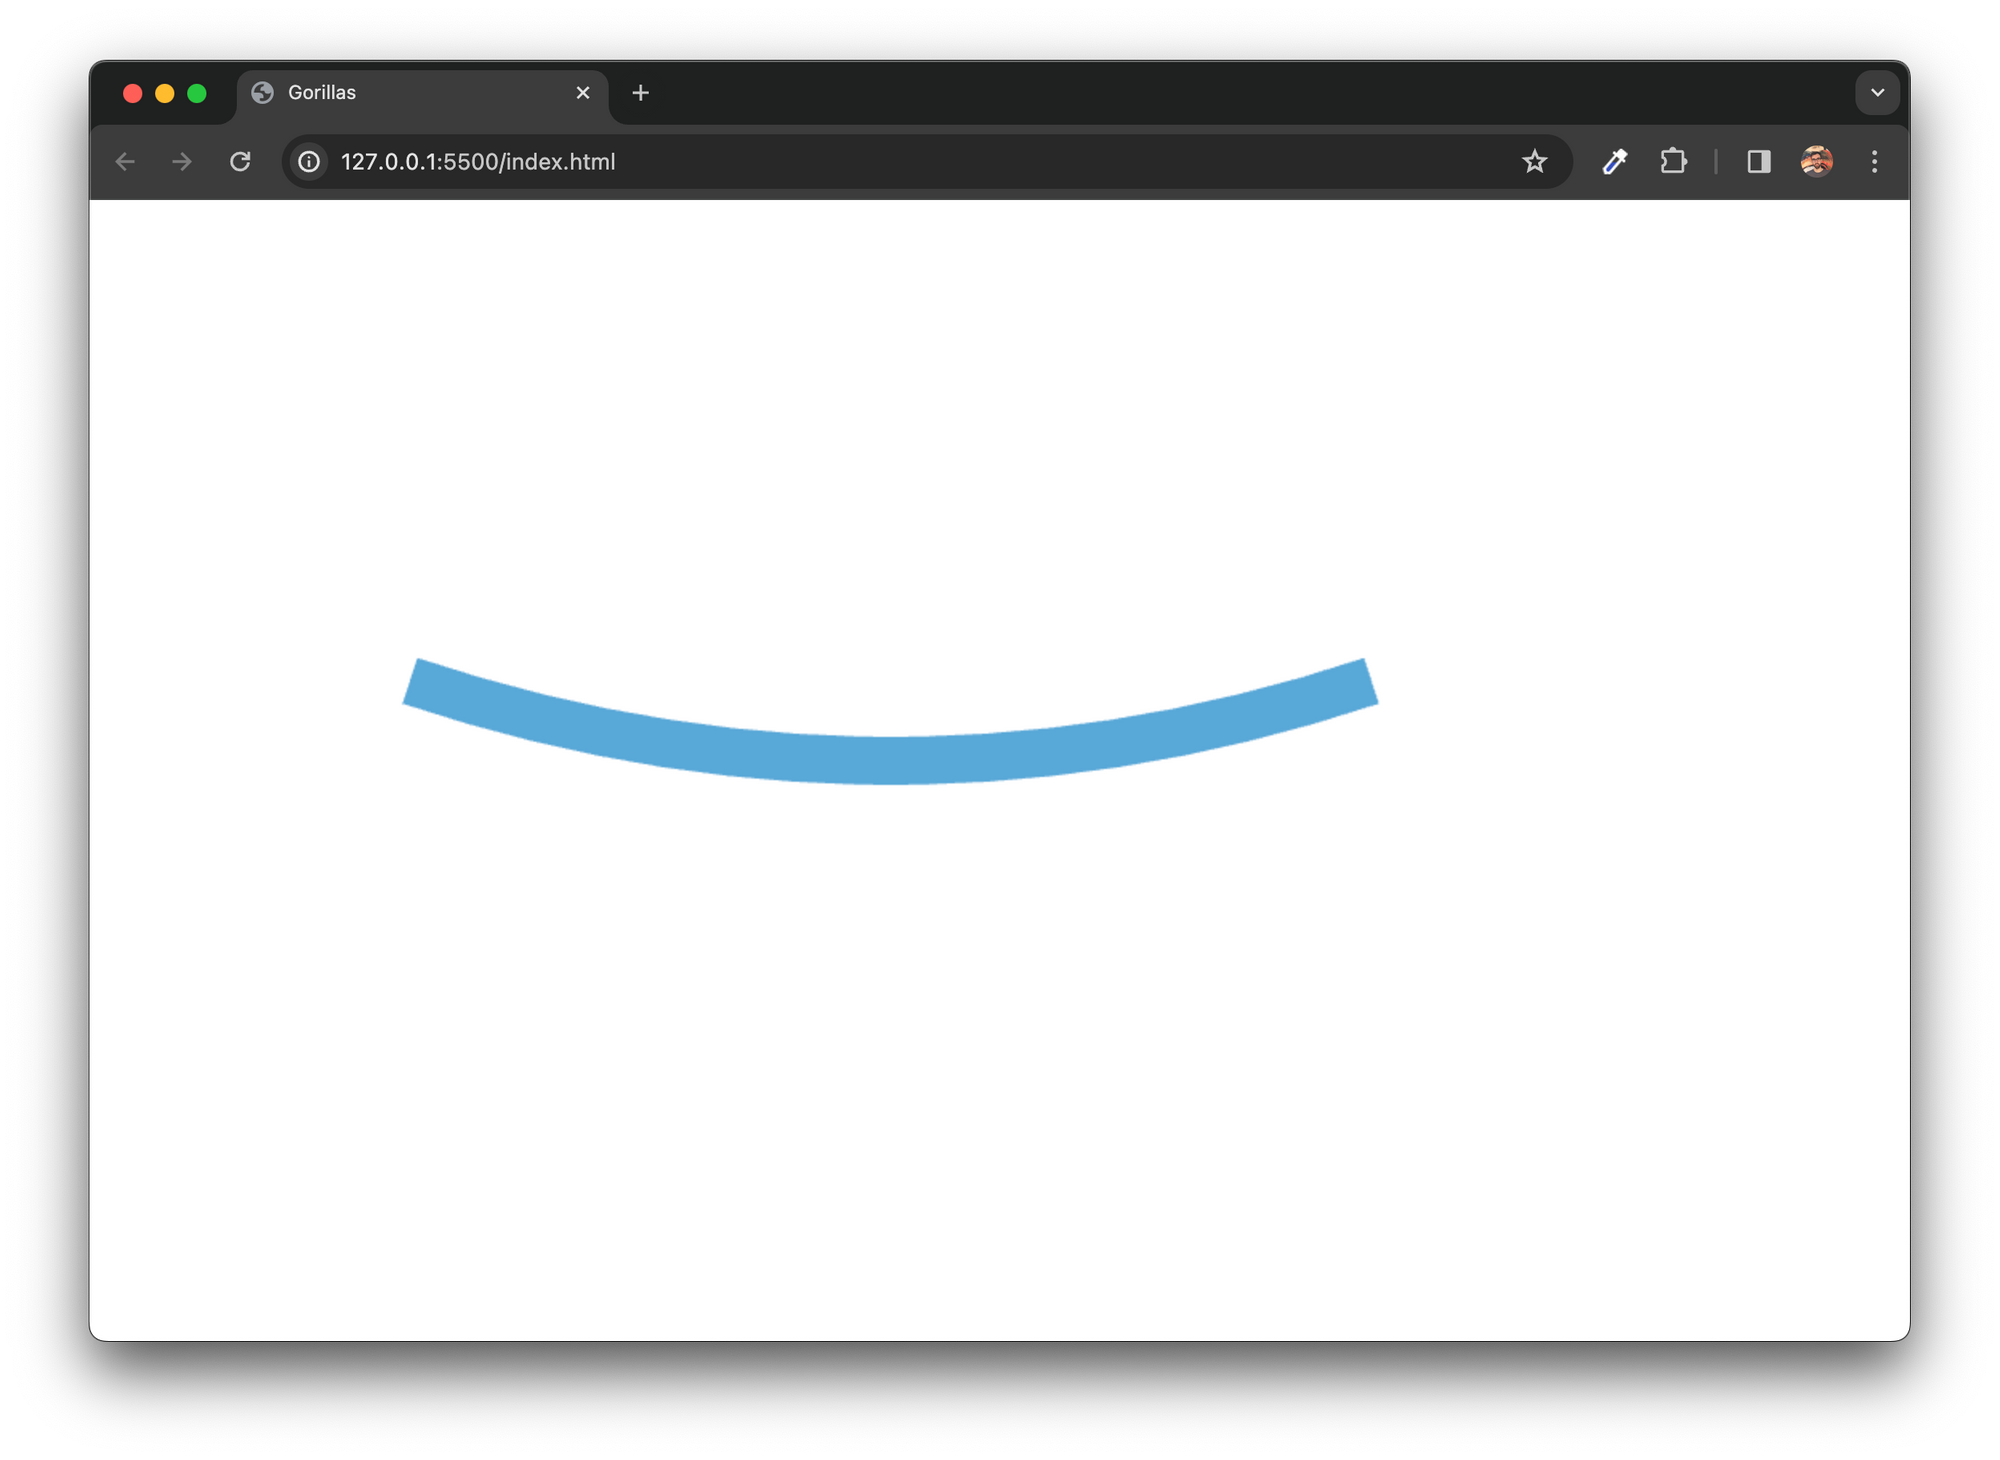
In a very similar way, we can also draw a line. Here, we'll start with the beginPath method again. We'll also build up the shape with a moveTo and two lineTo methods. The coordinates here are the same. But in the end, we don’t call the fill but the stroke method. This, instead of filling the shape, will draw the line we built.
 Drawing a stroke
const canvas = document.getElementById("game");
canvas.width = window.innerWidth;
canvas.height = window.innerHeight;
const ctx = canvas.getContext("2d");

ctx.strokeStyle = "#58A8D8";
ctx.lineWidth = 30;

ctx.beginPath();
ctx.moveTo(200, 200);
ctx.lineTo(500, 350);
ctx.lineTo(200, 500);
ctx.stroke();
Strokes have different styling properties. Instead of the fillStyle property, we set strokeStyle. To this property – and also to fillStyle – we can assign any color value that is valid in CSS. To set the line width we use the lineWidth property.
We can also build more complex paths. In the example below, we draw a curve. We are going to cover this in a bit more detail when we draw the arms of the gorillas.
 Drawing a curve
const canvas = document.getElementById("game");
canvas.width = window.innerWidth;
canvas.height = window.innerHeight;
const ctx = canvas.getContext("2d");

ctx.strokeStyle = "#58A8D8";
ctx.lineWidth = 30;

ctx.beginPath();
ctx.moveTo(200, 300);
ctx.quadraticCurveTo(500, 400, 800, 300);
ctx.stroke();
We are going to use the stroke method to draw the arms and the face of the gorilla.
 We use the
 stroke method to draw the arms and the face of the gorilla
Now that we're finished with this introduction, let’s go back to our game and see what’s inside the draw function.
How to Turn the Coordinate System Upside Down
When we use canvas, we have a coordinate system with the origin at the top-left corner of the browser window that grows to the right and downwards. This is aligned with how websites work in general. Things go from left to right and top to bottom. This is the default, but we can change this.
 The default coordinate system
When we talk about games, it is more convenient to go from the bottom to the top. For instance, when we draw buildings, they can start at the bottom, and we don’t have to figure out where the bottom of the window is.
We can use the translate method to shift the entire coordinate system to the bottom-left corner. We just need to move the coordinate system down along the Y-axis by the size of the browser window.
Once we do this, the Y-coordinate is still growing downwards. We can flip it using the scale method. Setting a negative number for the vertical direction will flip the entire coordinate system upside down.
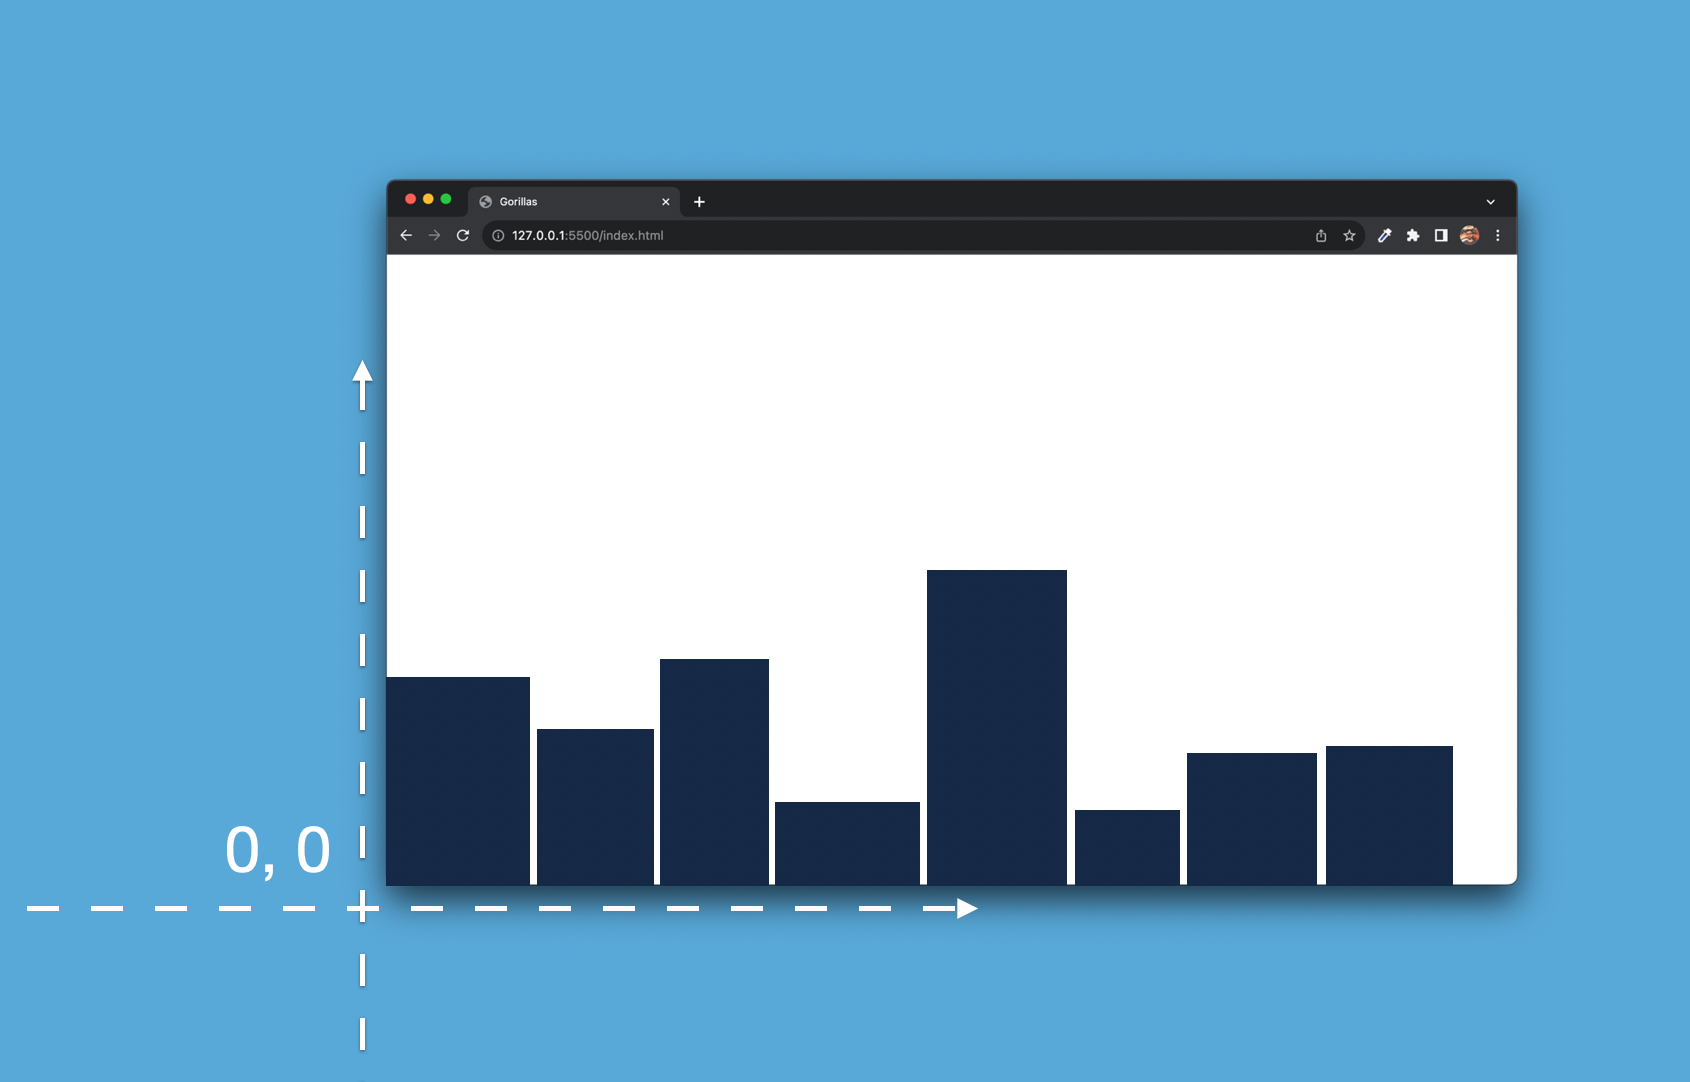 The coordinate system upside down
// The canvas element and its drawing context
const canvas = document.getElementById("game");
canvas.width = window.innerWidth;
canvas.height = window.innerHeight;
const ctx = canvas.getContext("2d");

. . .

function draw() {
  ctx.save();
  // Flip coordinate system upside down
  ctx.translate(0, window.innerHeight);
  ctx.scale(1, -1);

  // Draw scene
  drawBackground();
  drawBuildings();
  drawGorilla(1);
  drawGorilla(2);
  drawBomb();

  // Restore transformation
  ctx.restore();
}
Now let's implement the draw function. One of the first things we do is calling the translate and the scale methods to flip the coordinate system upside down.
We have to do this before we paint anything on the canvas because the translate and scale methods do not actually move anything on the canvas. If we painted anything on the canvas before, it would stay as it was.
Technically these methods change the transformation matrix. You can think of it as changing the coordinate system. Anything we paint after these methods will be painted according to this new coordinate system.
We also need to restore these transformations once we draw by calling the restore method. The restore method comes in a pair with the save method. save serves as a checkpoint that the restore method can get back to.
It's a common practice to start a drawing block by calling the save method and ending it with the restore method when we use transformations in between.
We need to call these two functions because the translate and scale methods accumulate. We are going to call the draw function multiple times. Without the save and restore methods, the coordinate system would keep on moving downwards each time we call the draw function, and it would eventually get completely off-screen.
Drawing the entire scene includes many parts. We'll break it down into separate draw functions. Now let’s start drawing by implementing these functions:
function drawBackground() {
  // ...
}

function drawBuildings() {
  // ...
}

function drawGorilla(player) {
  // ...
}

function drawBomb() {
  // ...
}
How to Draw the Game Elements
How to draw the background
When we draw on a canvas, the order matters. We'll start with the background, then we'll go layer by layer. In our case, the background is a simple rectangle.
 The background sky
function drawBackground() {
  ctx.fillStyle = "#58A8D8";
  ctx.fillRect(0, 0, window.innerWidth, window.innerHeight);
}
We draw this rectangle the same way we did it in our introduction. First, we set the fill style, then we draw a rectangle with the fillRect method. Here we set the starting coordinates in the corner and set the size to fill the whole browser window.
We could also add a moon to the sky. Unfortunately, there's no fill circle method that would easily do this, so we'll skip it for now. On CodePen you can find a version that also draws a moon in the drawBackground function.
How to draw the buildings
Drawing the buildings has two parts. First, we need to generate metadata for the buildings when we initialize the level. Then we implement the drawBuildings function that paints the buildings based on this metadata.
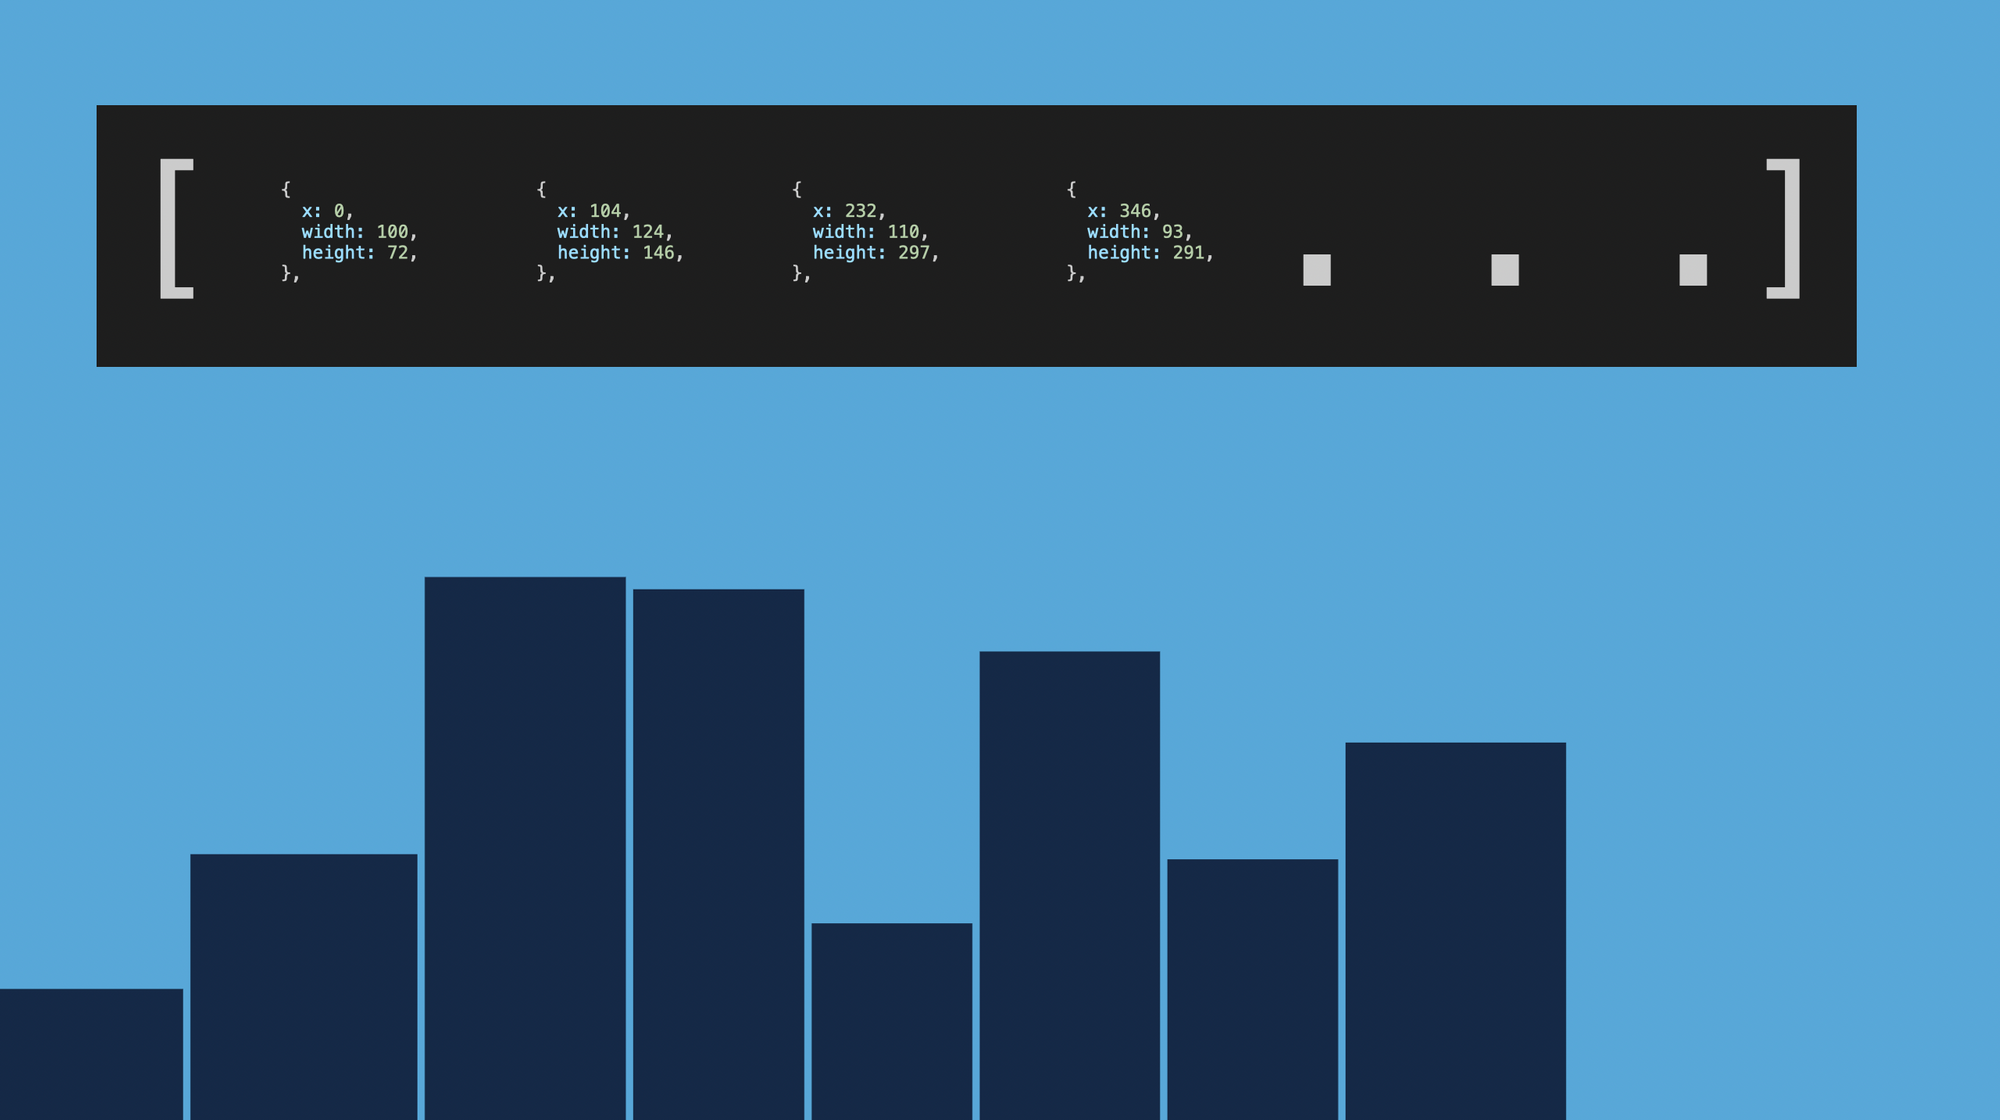 The buildings and their metadata
Buildings Metadata
In the newGame function, we called the generateBuildings function to initialize the buildings property in our game state. We haven't implemented this function yet.
  . . .

  state = {
    phase: "aiming", // aiming | in flight | celebrating
    currentPlayer: 1,
    bomb: {
      x: undefined,
      y: undefined,
      velocity: { x: 0, y: 0 },
    },
    buildings: generateBuildings(),
  };

  . . .
Let's see how this function works. Each building is defined by its x position, its width, and its height.
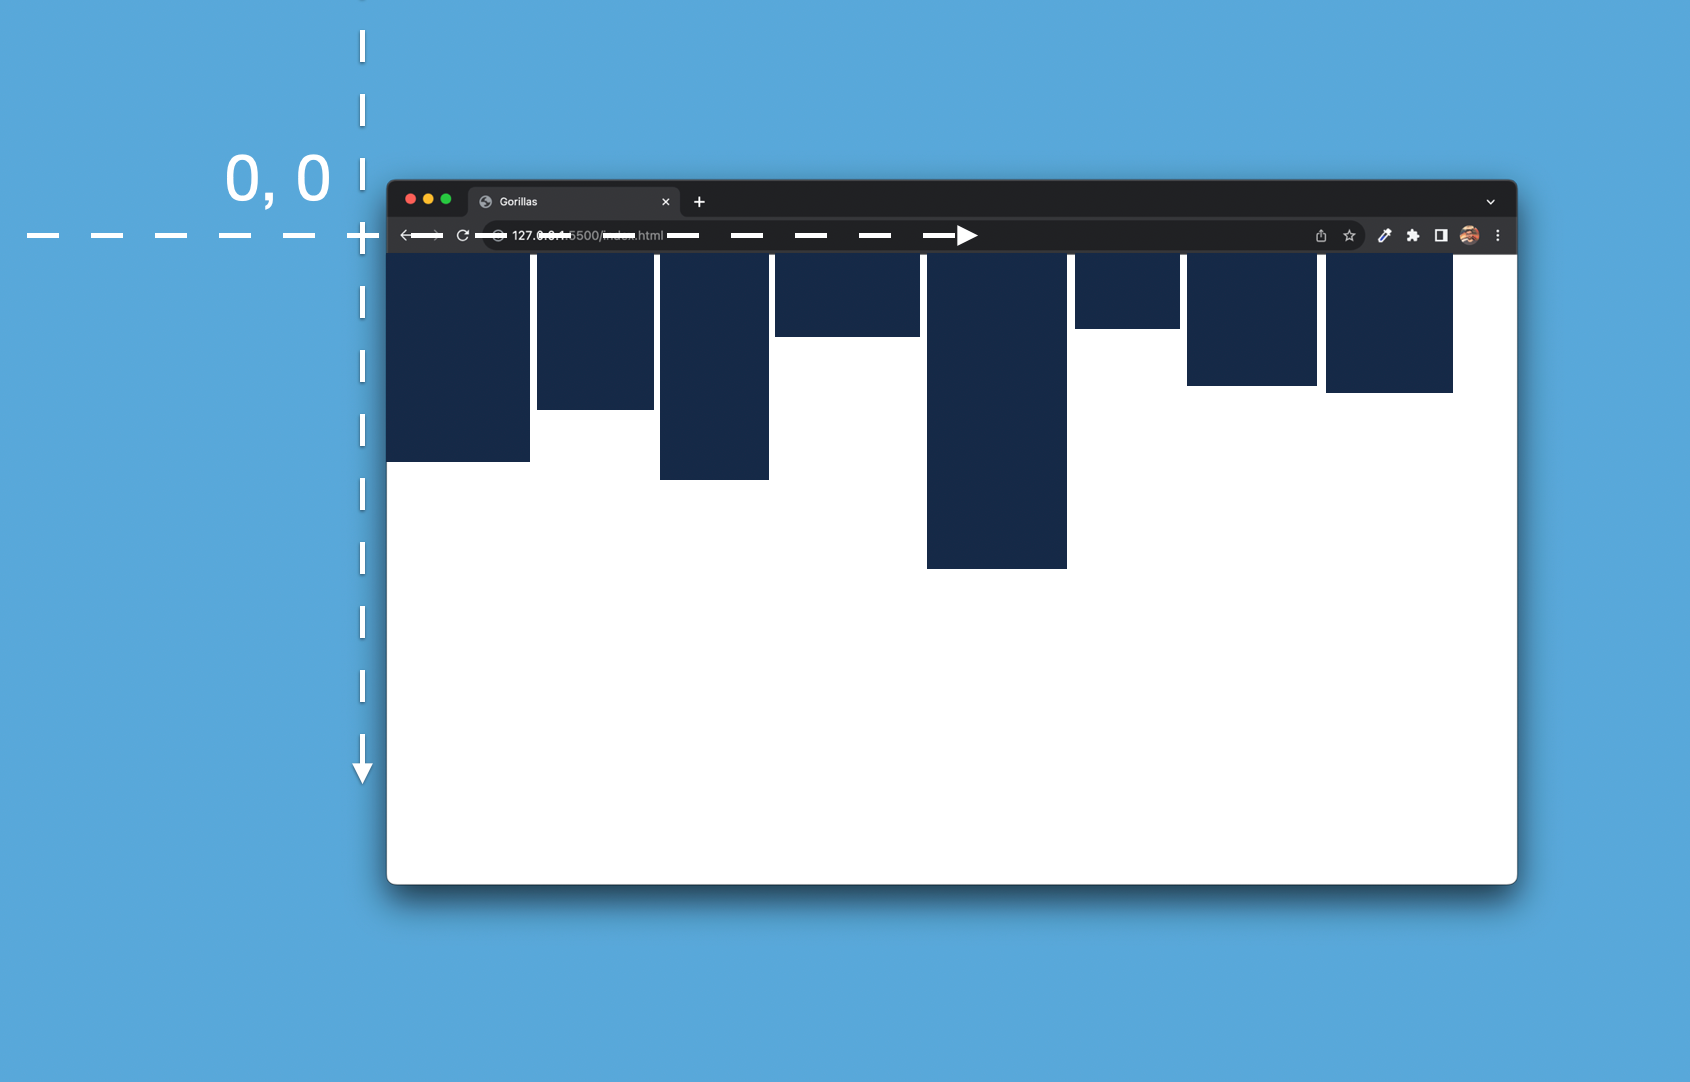
The x coordinate is always aligned to the previous building. We check where the previous building ends, and we add a little gap. In case there is no previous building – because we're adding the first one – then we start at the beginning of the screen at 0.
function generateBuildings() {
  const buildings = [];
  for (let index = 0; index < 8; index++) {
    const previousBuilding = buildings[index - 1];

    const x = previousBuilding
      ? previousBuilding.x + previousBuilding.width + 4
      : 0;

    const minWidth = 80;
    const maxWidth = 130;
    const width = minWidth + Math.random() * (maxWidth - minWidth);

    const platformWithGorilla = index === 1 || index === 6;

    const minHeight = 40;
    const maxHeight = 300;
    const minHeightGorilla = 30;
    const maxHeightGorilla = 150;

    const height = platformWithGorilla
      ? minHeightGorilla + Math.random() * (maxHeightGorilla - minHeightGorilla)
      : minHeight + Math.random() * (maxHeight - minHeight);

    buildings.push({ x, width, height });
  }
  return buildings;
}
Then the function generates a random building width within a predefined range. We set the minimum and maximum width, and pick a random number in between.
We generate a random building height in a similar way with one difference: the height of a building also depends on whether a gorilla is standing on top of it or not.
If a gorilla is standing on top of the building, then the height range is smaller. We want to have relatively higher buildings in between the two gorillas so that they can’t just see each other in a straight line.
We'll know if a gorilla is standing on the building because they always stand on top of the same buildings. The second one from the left, and the second to last. If the building index matches these positions, we set the height based on a different range.
Then we push these three values as an object into the buildings array, and at the final line we return this array from the function. This will set be buildings array in our game state.
How to draw the the buildings
Now that we have the metadata for the buildings, we can draw them on the screen.
The drawBuildings function is a very simple one. We iterate over the array we just generated and draw a simple rectangle for each. We use the same fillRect method we used to draw the sky. We call this function with the attributes of the building (the Y position is 0 because the building starts at the bottom of the screen).
function drawBuildings() {
  state.buildings.forEach((building) => {
    ctx.fillStyle = "#152A47";
    ctx.fillRect(building.x, 0, building.width, building.height);
  });
}
Once we are done with this, we should see a line of buildings. The metadata is regenerated every time we start the game. Every time we refresh the browser window, we see a different background.
 Randomly generated buildings
How to draw the gorillas
Drawing the gorillas is one of the most complicated and most fun parts of this game. Finally, we are not just drawing rectangles – we're drawing paths.
 The different variations of the gorillas
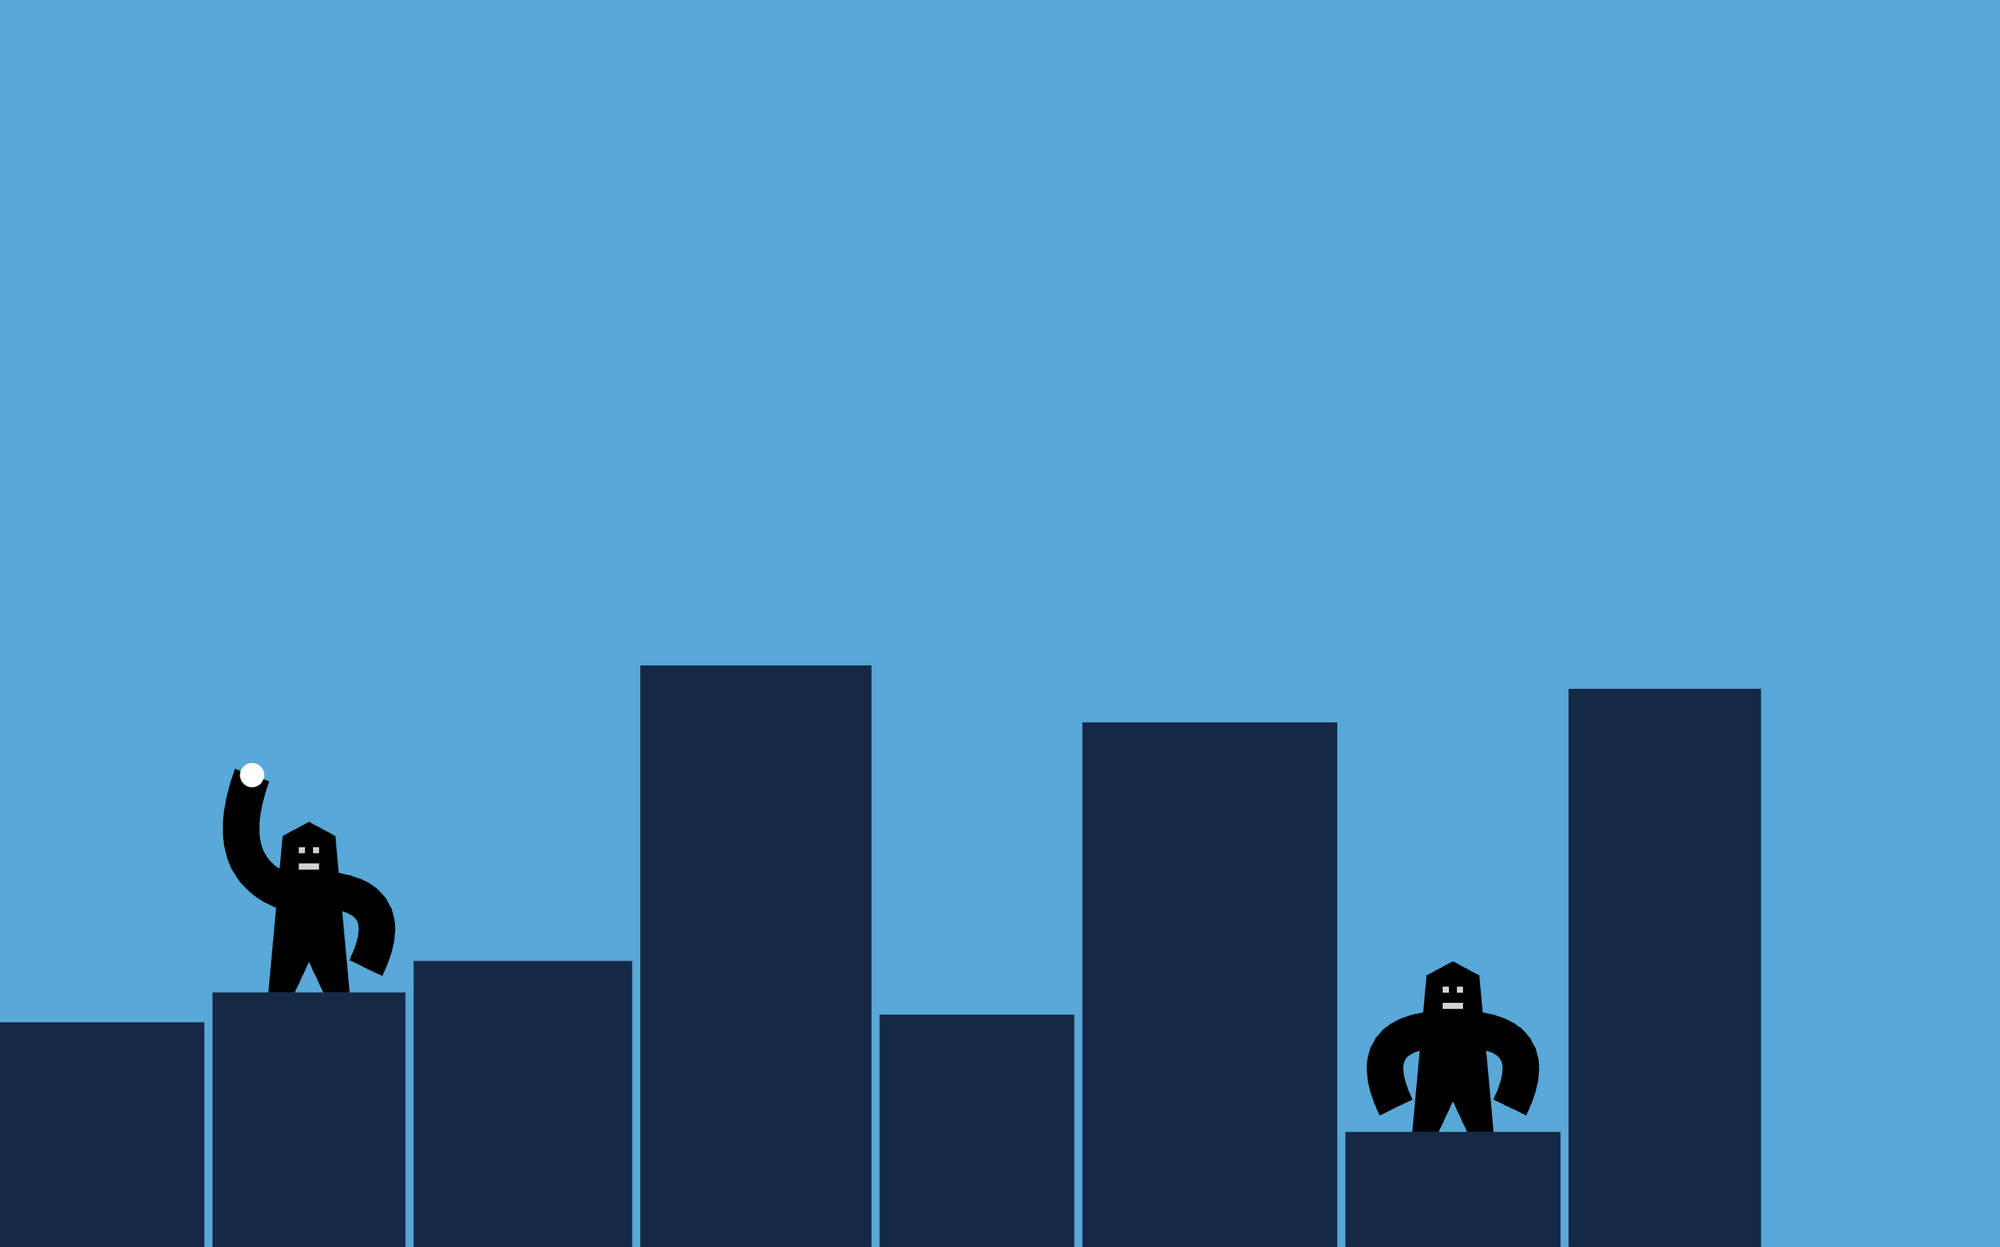
Gorillas also have different variations depending on the game state. The gorilla looks different while aiming, waiting for the incoming bomb, and celebrating after a successful hit.
In the draw function, we call the drawGorilla function twice. We draw two gorillas: one on the second rooftop and one on the second to last rooftop. They are mostly identical, but they mirror each other while aiming. When the left one is aiming, it raises its left hand, and when the right one is aiming, it raises its right hand.
function draw() {
  ctx.save();
  // Flip coordinate system upside down
  ctx.translate(0, window.innerHeight);
  ctx.scale(1, -1);

  // Draw scene
  drawBackground();
  drawBuildings();
  drawGorilla(1);
  drawGorilla(2);
  drawBomb();

  // Restore transformation
  ctx.restore();
}
We'll break down drawing the gorilla into multiple steps as well. We'll use different functions to draw the main body, to draw the arms, and to draw the face of the gorilla.
To make things easier, we'll translate our coordinate system again. We translate the coordinate system to the middle of the rooftop the gorilla stands on. This way we can draw both gorillas the same way. We only need to translate the origin of our coordinate system to a different building.
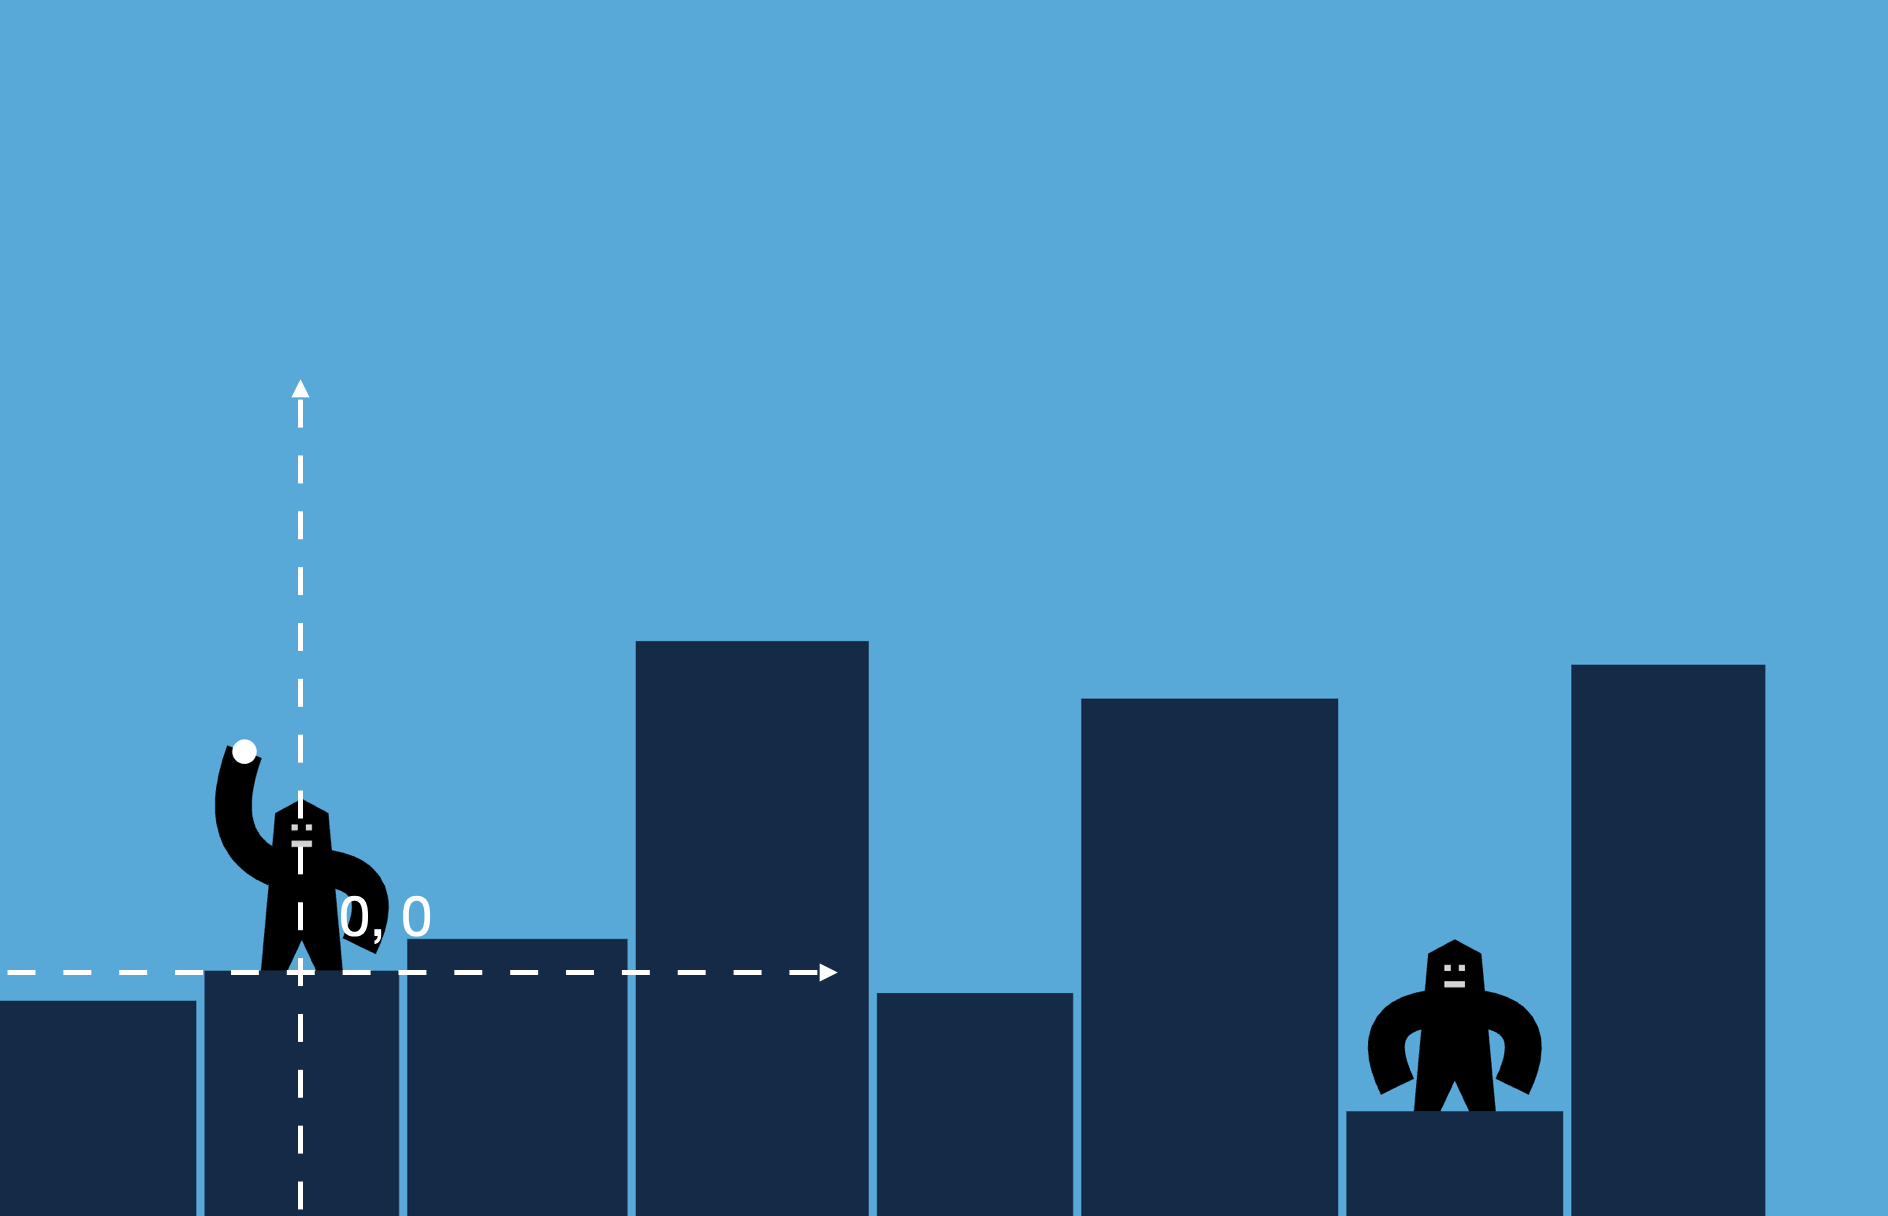 Moving the origin of the coordinate system to the top of the building the gorilla stands on
As an argument, the drawGorilla function receives which player are we currently drawing. To draw the gorilla one on the left, we translate to the top of the second building, and to draw the one on the right we translate to the top of the second to last building.
function drawGorilla(player) {
  ctx.save();
  const building =
    player === 1
      ? state.buildings.at(1) // Second building
      : state.buildings.at(-2); // Second last building

  ctx.translate(building.x + building.width / 2, building.height);

  drawGorillaBody();
  drawGorillaLeftArm(player);
  drawGorillaRightArm(player);
  drawGorillaFace();

  ctx.restore();
}
Because we're using the translate method, this function starts with saving the current coordinate system and ends with restoring it.
Now let's look into the functions that draw the different parts of a gorilla.
function drawGorillaBody() {
  // ...
}

function drawGorillaLeftArm(player) {
  // ...
}

function drawGorillaRightArm(player) {
  // ...
}

function drawGorillaFace() {
  // ...
}
How to draw the body of the gorilla
We draw the body of the gorilla as a path. We drew a path in our introduction to drawing on a canvas. We use the moveTo and a bunch of lineTo methods to draw the main part of the gorilla.
We set the fill style to black, and then we begin a path. We move to a coordinate in the middle and then we draw straight lines to draw the silhouette of the gorilla. Once we're finished, we fill the shape with the fill method.
 The body, the head, and the legs of the gorilla. The image on the right shows the path we're filling.
function drawGorillaBody() {
  ctx.fillStyle = "black";

  ctx.beginPath();

  // Starting Position
  ctx.moveTo(0, 15);

  // Left Leg
  ctx.lineTo(-7, 0);
  ctx.lineTo(-20, 0);

  // Main Body
  ctx.lineTo(-13, 77);
  ctx.lineTo(0, 84);
  ctx.lineTo(13, 77);

  // Right Leg
  ctx.lineTo(20, 0);
  ctx.lineTo(7, 0);

  ctx.fill();
}
In case you are wondering how I came up with these coordinates, I actually started with an initial sketch with pen and paper. I tried to estimate the coordinates, tried them with code, and then adjusted them until they started getting the right shape. Of course, you might have other methods as well.
How to draw the arms of the gorilla
While the body was a relatively simple part of the gorilla, the hands are a bit more complicated. They come in different variations and we draw them as a curve.
Let’s start with the left arm. The main part of this is actually only two lines. We'll use the moveTo method to move to the shoulder of the gorilla, then from there, we'll draw the arm as a quadratic curve with the quadraticCurveTo method.
A quadratic curve is a simple curve with one control point. As the curve goes from the starting point (which we'll set with moveTo), the curve bends towards this control point (set as the first two arguments of the quadraticCurveTo method) as it reaches its end position (set as the last two arguments).
 The different coordaintes of a curve
function drawGorillaLeftArm(player) {
  ctx.strokeStyle = "black";
  ctx.lineWidth = 18;

  ctx.beginPath();
  ctx.moveTo(-13, 50);

  if (
    (state.phase === "aiming" && state.currentPlayer === 1 && player === 1) ||
    (state.phase === "celebrating" && state.currentPlayer === player)
  ) {
    ctx.quadraticCurveTo(-44, 63, -28, 107);
  } else {
    ctx.quadraticCurveTo(-44, 45, -28, 12);
  }

  ctx.stroke();
}
What makes this function complicated is that it has two variations of the same curve. By default, the hands go down next to the body (second case above).
If we are in the aiming phase, the currentPlayer is player number 1, and we are drawing player 1, then the left hand goes up (first case above). The left hand also goes up in case the we draw the celebrating gorilla (also first case above).
In these cases, we start the from the same point (the curve starts with the same moveTo method), but we set different coordinates for the control point and end point of the curve.
We draw the hands as strokes. So instead of ending the path with the fill method, we use the stroke method instead.
We also set it up differently. Instead of using the fillStyle property, here we set the color with strokeStyle and give thickness to the arm with the lineWidth property.
 The different arm variations of the gorillas in
 aiming, in flight, and celebrating phase
Drawing the right arm is the same, except the horizontal coordinates and some conditions are flipped. We could merge these two functions, but for clarity, I kept them separate.
function drawGorillaRightArm(player) {
  ctx.strokeStyle = "black";
  ctx.lineWidth = 18;

  ctx.beginPath();
  ctx.moveTo(+13, 50);

  if (
    (state.phase === "aiming" && state.currentPlayer === 2 && player === 2) ||
    (state.phase === "celebrating" && state.currentPlayer === player)
  ) {
    ctx.quadraticCurveTo(+44, 63, +28, 107);
  } else {
    ctx.quadraticCurveTo(+44, 45, +28, 12);
  }

  ctx.stroke();
}
As a result, our gorillas should start to gain shape. They still don’t have a face, but they have hands now. And to reflect our game state, the one on the left has his hands up, preparing to throw the bomb.
You can test our solution by changing the game state. You can change the currentPlayer and the game phase properties to see the different variations.
How to draw the face of the gorilla
The face of the gorilla comes together from a few straight lines. We'll draw the two eyes and the mouth as a straight line. For each, we'll use pair of moveTo and a lineTo method. Because each line segment uses the same strokeStyle and lineWidth, we can draw them as one single path.
 The finished gorillas
function drawGorillaFace() {
  ctx.strokeStyle = "lightgray";
  ctx.lineWidth = 3;

  ctx.beginPath();

  // Left Eye
  ctx.moveTo(-5, 70);
  ctx.lineTo(-2, 70);

  // Right Eye
  ctx.moveTo(2, 70);
  ctx.lineTo(5, 70);

  // Mouth
  ctx.moveTo(-5, 62);
  ctx.lineTo(5, 62);

  ctx.stroke();
}
With this, we have our finished gorillas with all the variations. There’s only one thing that’s missing from the screen: the banana bomb.
How to draw the bomb
Now we'll draw the bomb. The bomb is going to be a simple circle. But before we get to draw it, first we have to figure out where it is.
How to initialize the bomb’s position
If we look back at our newGame function, we can see that the metadata of the bomb has a position and a velocity. The position so far is still undefined. Before we get to drawing the bomb, first let’s figure out its position.
function newGame() {
  // Initialize game state
  state = {
    phase: "aiming", // aiming | in flight | celebrating
    currentPlayer: 1,
    bomb: {
      x: undefined,
      y: undefined,
      velocity: { x: 0, y: 0 },
    },
    buildings: generateBuildings(),
  };

  initializeBombPosition();

  draw();
}
At the end of the newGame function, we also call the initializeBombPosition function before drawing the scene. Let’s implement this function.
The initializeBombPosition places the bomb in the hand of the gorilla that throws the bomb this turn. We have to call this function after we generate our building metadata because the bomb’s position depends on the position of the gorilla, and that depends on the building it stands on.
First, we look up which building we need to align with. If it’s the first player’s turn, then the bomb has to be in the left hand of the gorilla on the left. And if it’s the second player’s turn, then it has to be in the right hand of the gorilla on the right.
First, we'll calculate the midpoint of the rooftop we need (gorillaX and gorillaY), then offset the position to match the left or right hand of the gorilla.
 Calculating the position of the bomb
function initializeBombPosition() {
  const building =
    state.currentPlayer === 1
      ? state.buildings.at(1) // Second building
      : state.buildings.at(-2); // Second last building

  const gorillaX = building.x + building.width / 2;
  const gorillaY = building.height;

  const gorillaHandOffsetX = state.currentPlayer === 1 ? -28 : 28;
  const gorillaHandOffsetY = 107;

  state.bomb.x = gorillaX + gorillaHandOffsetX;
  state.bomb.y = gorillaY + gorillaHandOffsetY;
  state.bomb.velocity.x = 0;
  state.bomb.velocity.y = 0;
}
We'll also initialize the velocity again here. Later we are going to call this function at the beginning of every turn and then we need it to initialize these values.
How to draw the bomb
Now that the bomb is in the right place, let’s draw it. Unfortunately, we don’t have a simple fill circle method, as we have in the case of rectangles. We have to draw an arc instead.
An arc method can be called as part of a path. We'll start with the beginPath method and end with the fill method.
The arc method has a lot of properties. This might look a bit scary, but we only need to focus on the first 3 when drawing circles:
- The first two arguments are
xandy, the center coordinates of the arc. We'll set them to match the position of the bomb that we know from thestate. - The third argument is the
radius. Here we'll set it to 6. - Then the last two arguments are the
startAngleand theendAngleof the arc in radians. Because here we want to have a full circle and not an arc, we'll start with 0 and end at a full circle. A full circle in radians is two times Pi.
If these last two properties are confusing, don't worry about it. What's important is that when we draw circles, they are always 0 and 2 * Math.Pi.
function drawBomb() {
  ctx.fillStyle = "white";
  ctx.beginPath();
  ctx.arc(state.bomb.x, state.bomb.y, 6, 0, 2 * Math.PI);
  ctx.fill();
}
 The final scene with the bomb in place
Now we have everything on the screen. We drew the background, the buildings, the gorillas, and the bomb. But things are not centered on the screen. Let’s fix that.
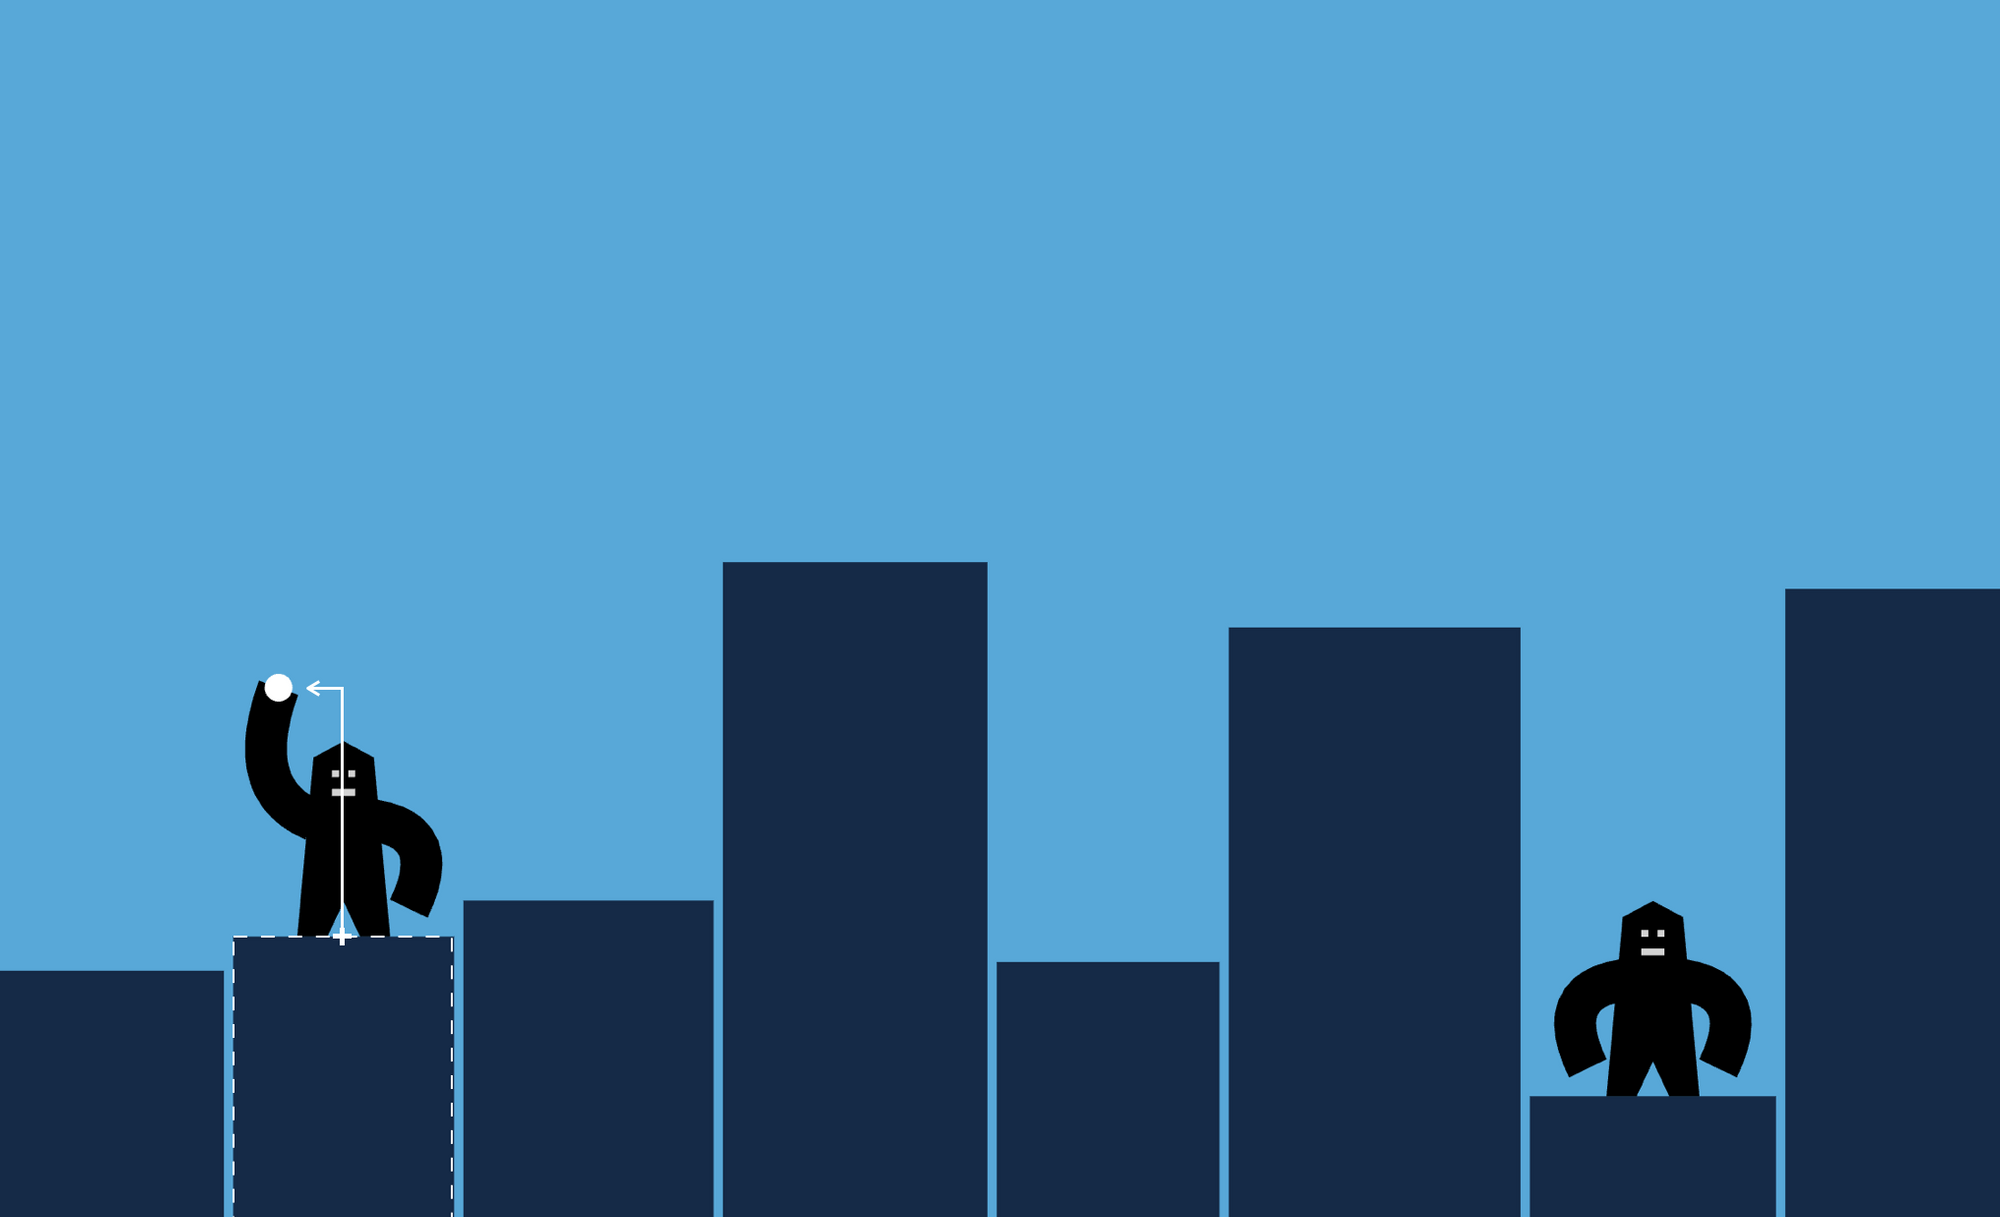
How to Fit the Size of the City to the Browser Window
So far, we've aligned everything to the left side of the screen. Because the size of the buildings is random, the entire size of the city might be shorter or wider than the size of the browser window. It could even happen that we don’t see the second gorilla because it’s entirely off-screen. Or if the browser window is too wide, then we have a huge gap on the right side of the window.
To fix this, let’s match the size of the city with the width of the browser window.
To do this, let’s add a scale property to our state. In the newGame function, let’s add the scale property to the state object, and call a new function named calculateScale to set its value. This function call has to come after we generate our buildings because the scaling depends on the size of the city. It also has to come before we initialize the bomb position, because later that will depend on the scaling.
function newGame() {
  // Initialize game state
  state = {
    scale: 1,
    phase: "aiming", // aiming | in flight | celebrating
    currentPlayer: 1,
    bomb: {
      x: undefined,
      y: undefined,
      velocity: { x: 0, y: 0 },
    },
    buildings: generateBuildings(),
  };

  calculateScale();

  initializeBombPosition();

  draw();
}
The calculateScale function is relatively simple. We calculate the total width of the city and divide the inner width of the browser window by this value. This will give us a ratio. It will tell how the width of our city relates to the width of the browser window.
 Calculating the ratio between the size of the city and the size of the browser window
function calculateScale() {
  const lastBuilding = state.buildings.at(-1);
  const totalWidthOfTheCity = lastBuilding.x + lastBuilding.width;

  state.scale = window.innerWidth / totalWidthOfTheCity;
}
Then we have to use this new scale property at a few places. The most important is to change the scaling of the entire game in the draw function.
At the beginning of this function – where we flip the coordinate system – now we have another scale method call that applies this scaling. Because this is at the beginning of the draw function, everything we draw after this will be scaled.
function draw() {
  ctx.save();
  // Flip coordinate system upside down
  ctx.translate(0, window.innerHeight);
  ctx.scale(1, -1);
  ctx.scale(state.scale, state.scale);

  // Draw scene
  drawBackground();
  drawBuildings();
  drawGorilla(1);
  drawGorilla(2);
  drawBomb();

  // Restore transformation
  ctx.restore();
}
And finally, we need to adjust how we draw our background. Earlier when we drew the background, we filled the entire screen by setting its width and height based on the window’s innerWidth and innerHeight properties. Now as everything is scaled, they don’t match the size of the browser window anymore. Whenever we use these properties, we need to adjust them by our scaling factor.
function drawBackground() {
  ctx.fillStyle = "#58A8D8";
  ctx.fillRect(
    0,
    0,
    window.innerWidth / state.scale,
    window.innerHeight / state.scale
  );
}
 Matching the size of the city to the size of the browser window
How to resize the window
Now the 8 buildings we drew fit nicely with the size of our screen – but what happens if we resize the window? We are going to have the same problems we had before.
As a finishing touch, let’s handle the window resize event. This event handler resizes the canvas element to fit the new window size, recalculates the scaling, readjusts the position of the bomb, and redraws the entire scene based on the new scaling.
Readjusting the bomb position does not make a difference yet, but later we will update this function and it will rely on the new scaling.
window.addEventListener("resize", () => {
  canvas.width = window.innerWidth;
  canvas.height = window.innerHeight;
  calculateScale();
  initializeBombPosition();
  draw();
});
So far we've just drawn a static scene. It’s time to make things interactive.
How the Gorilla Can Throw the Bomb
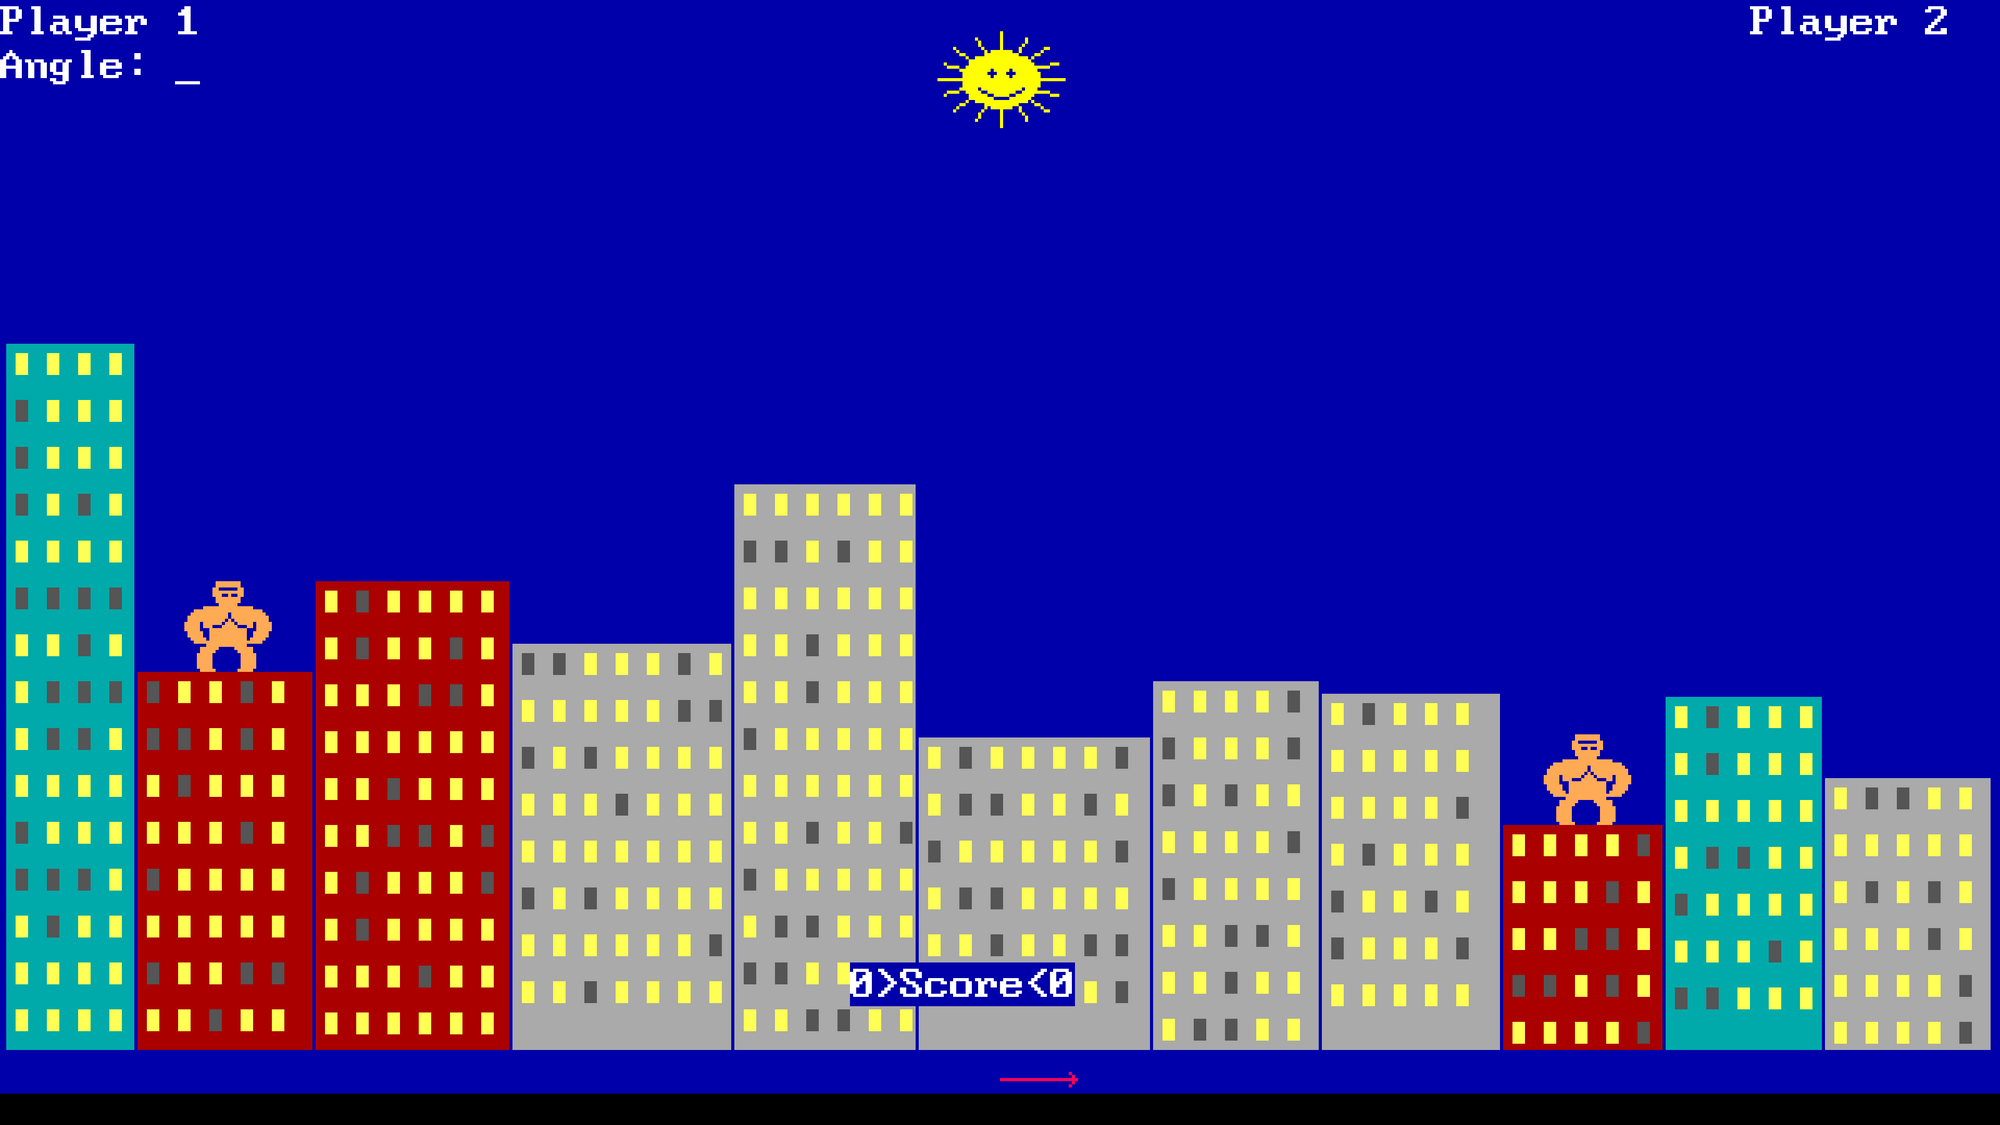
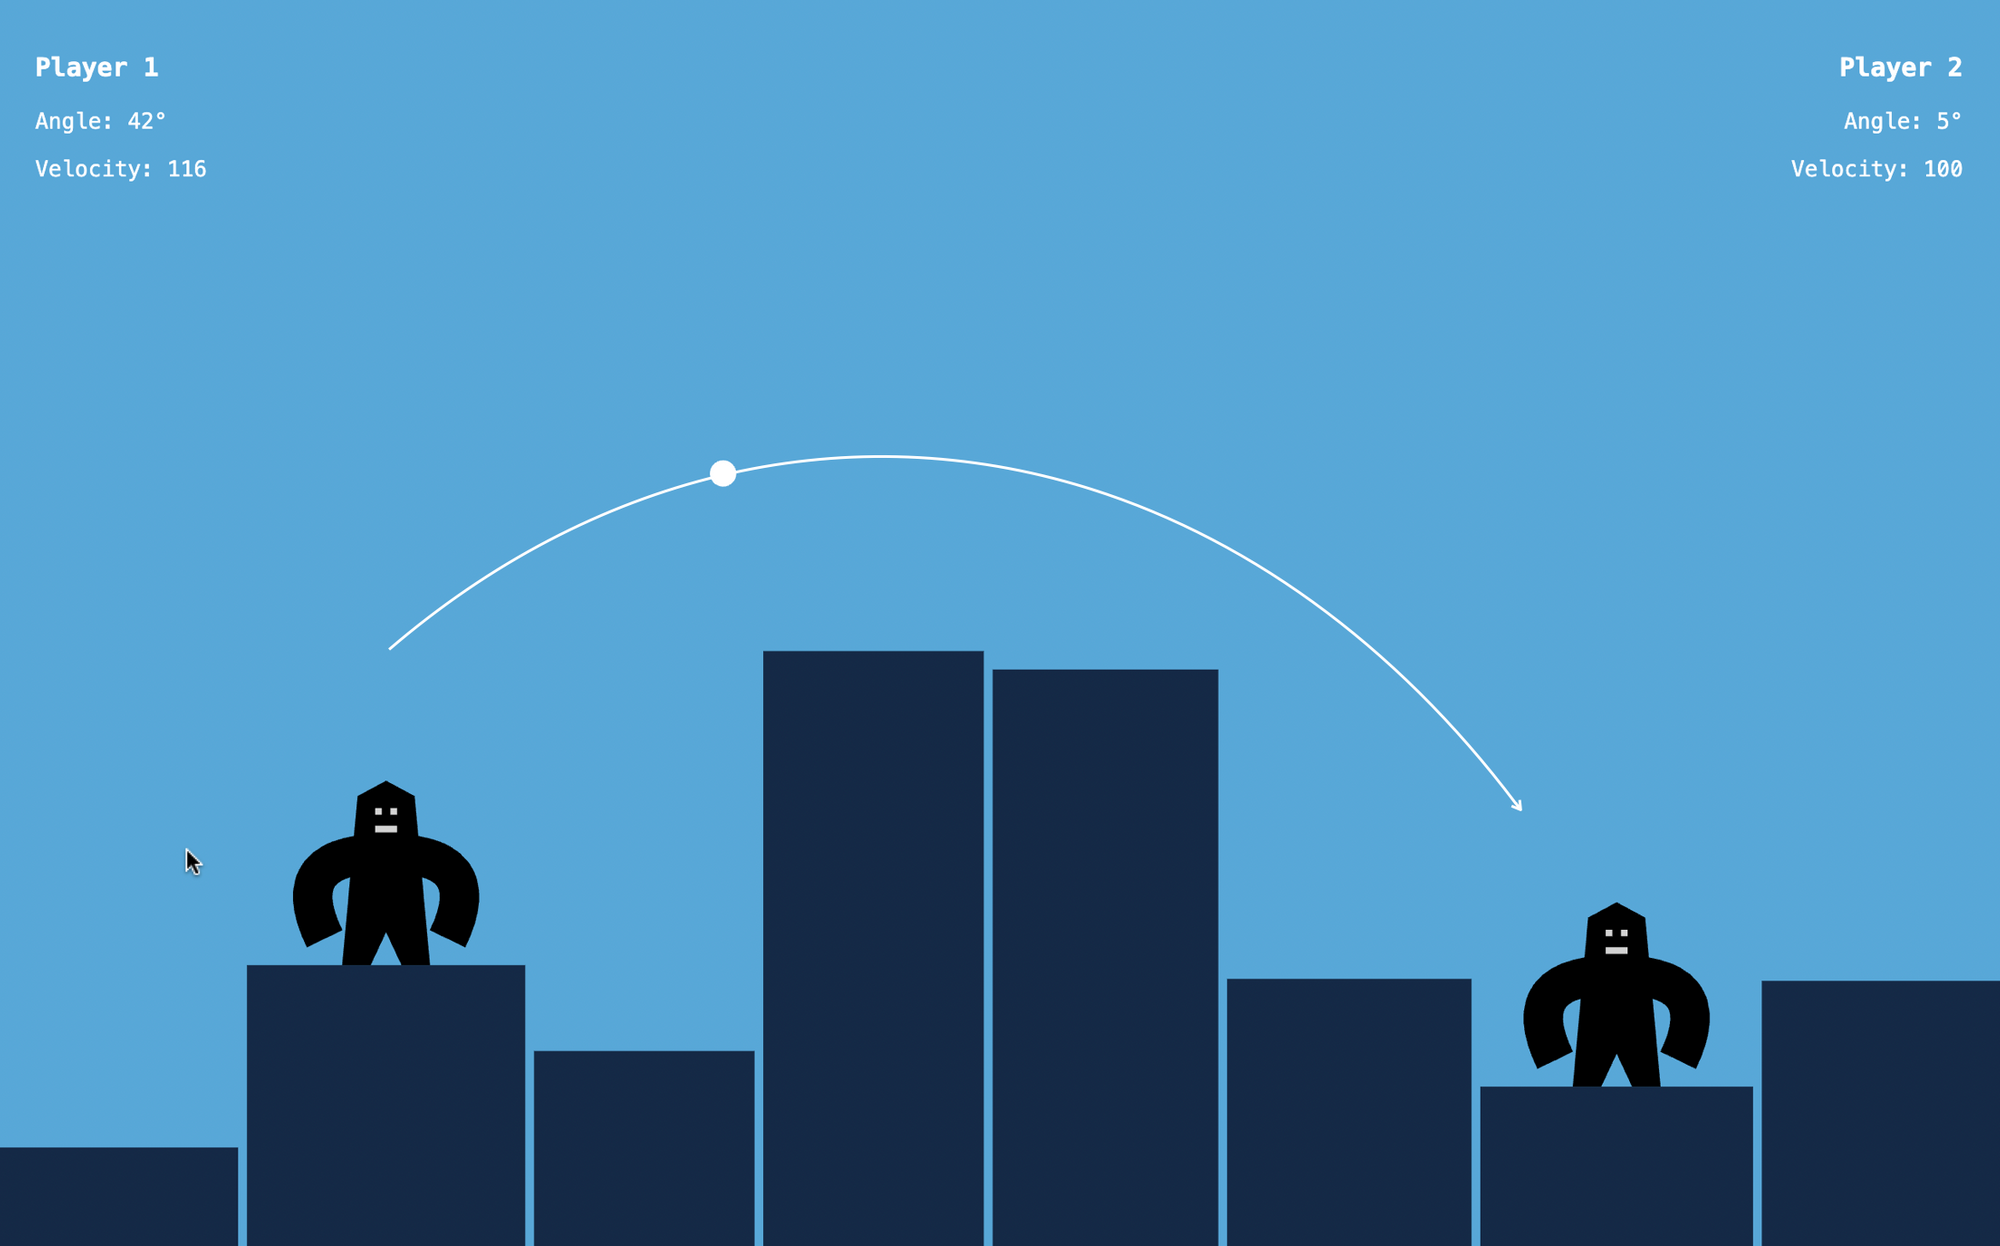
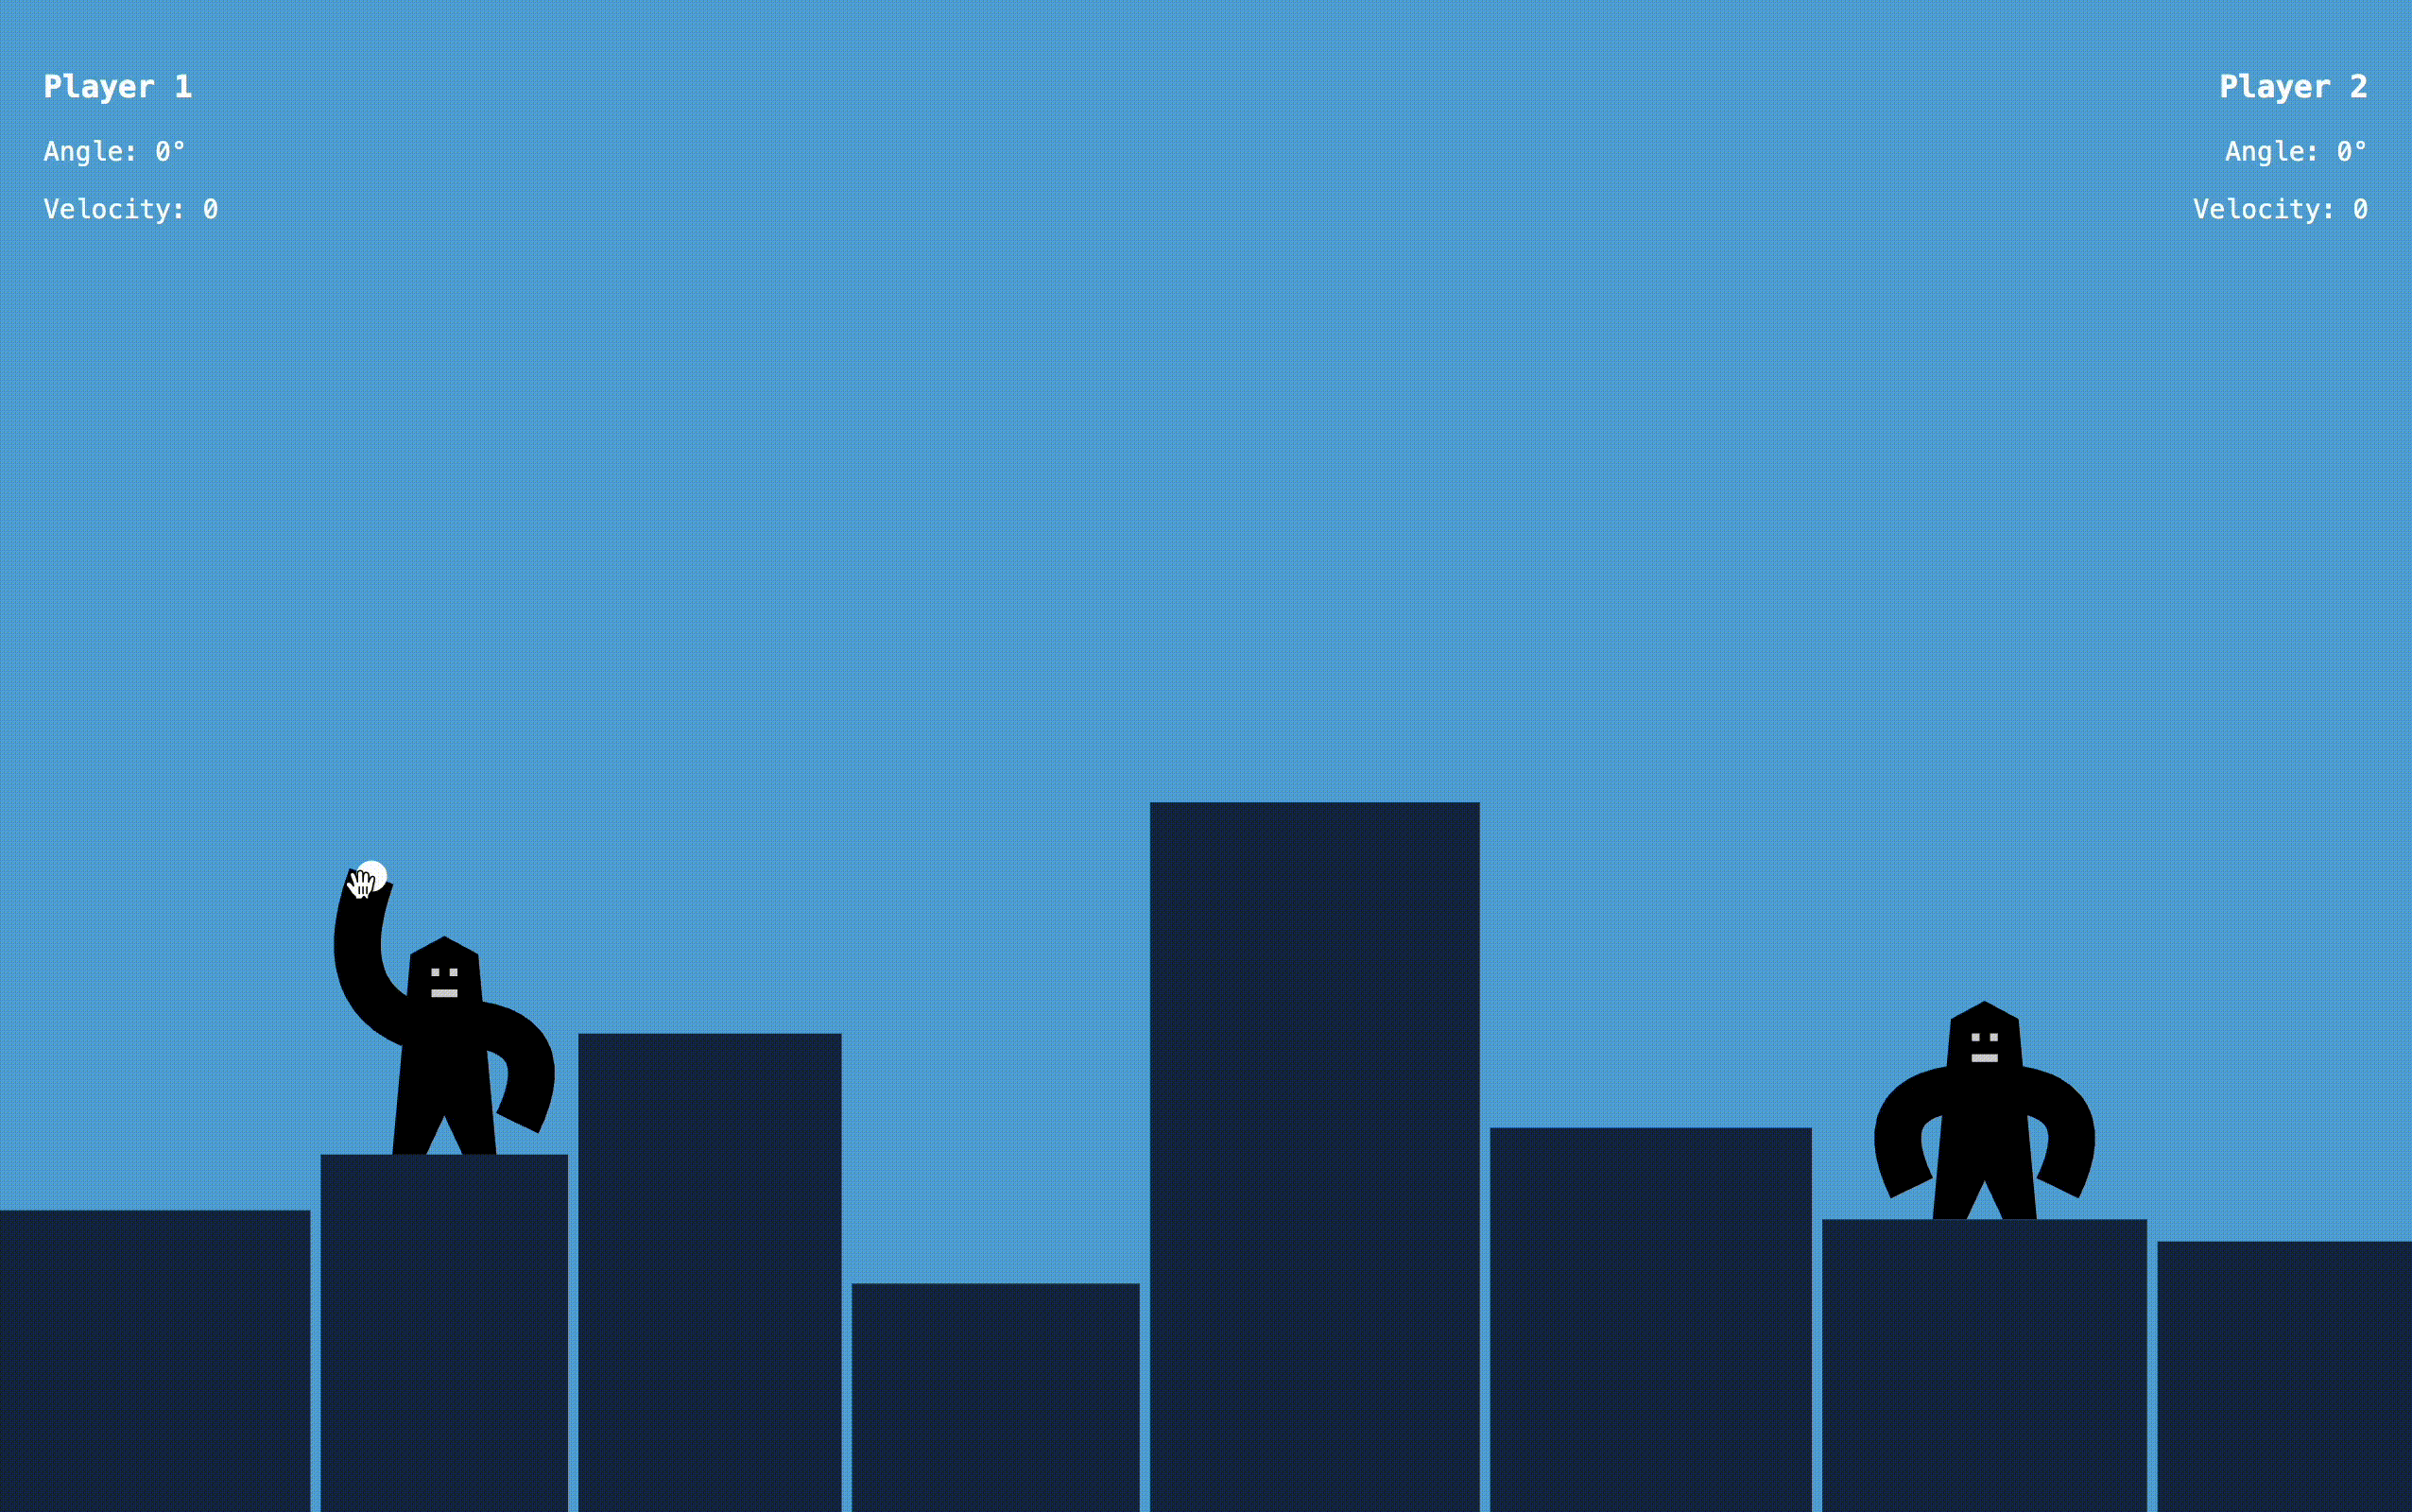
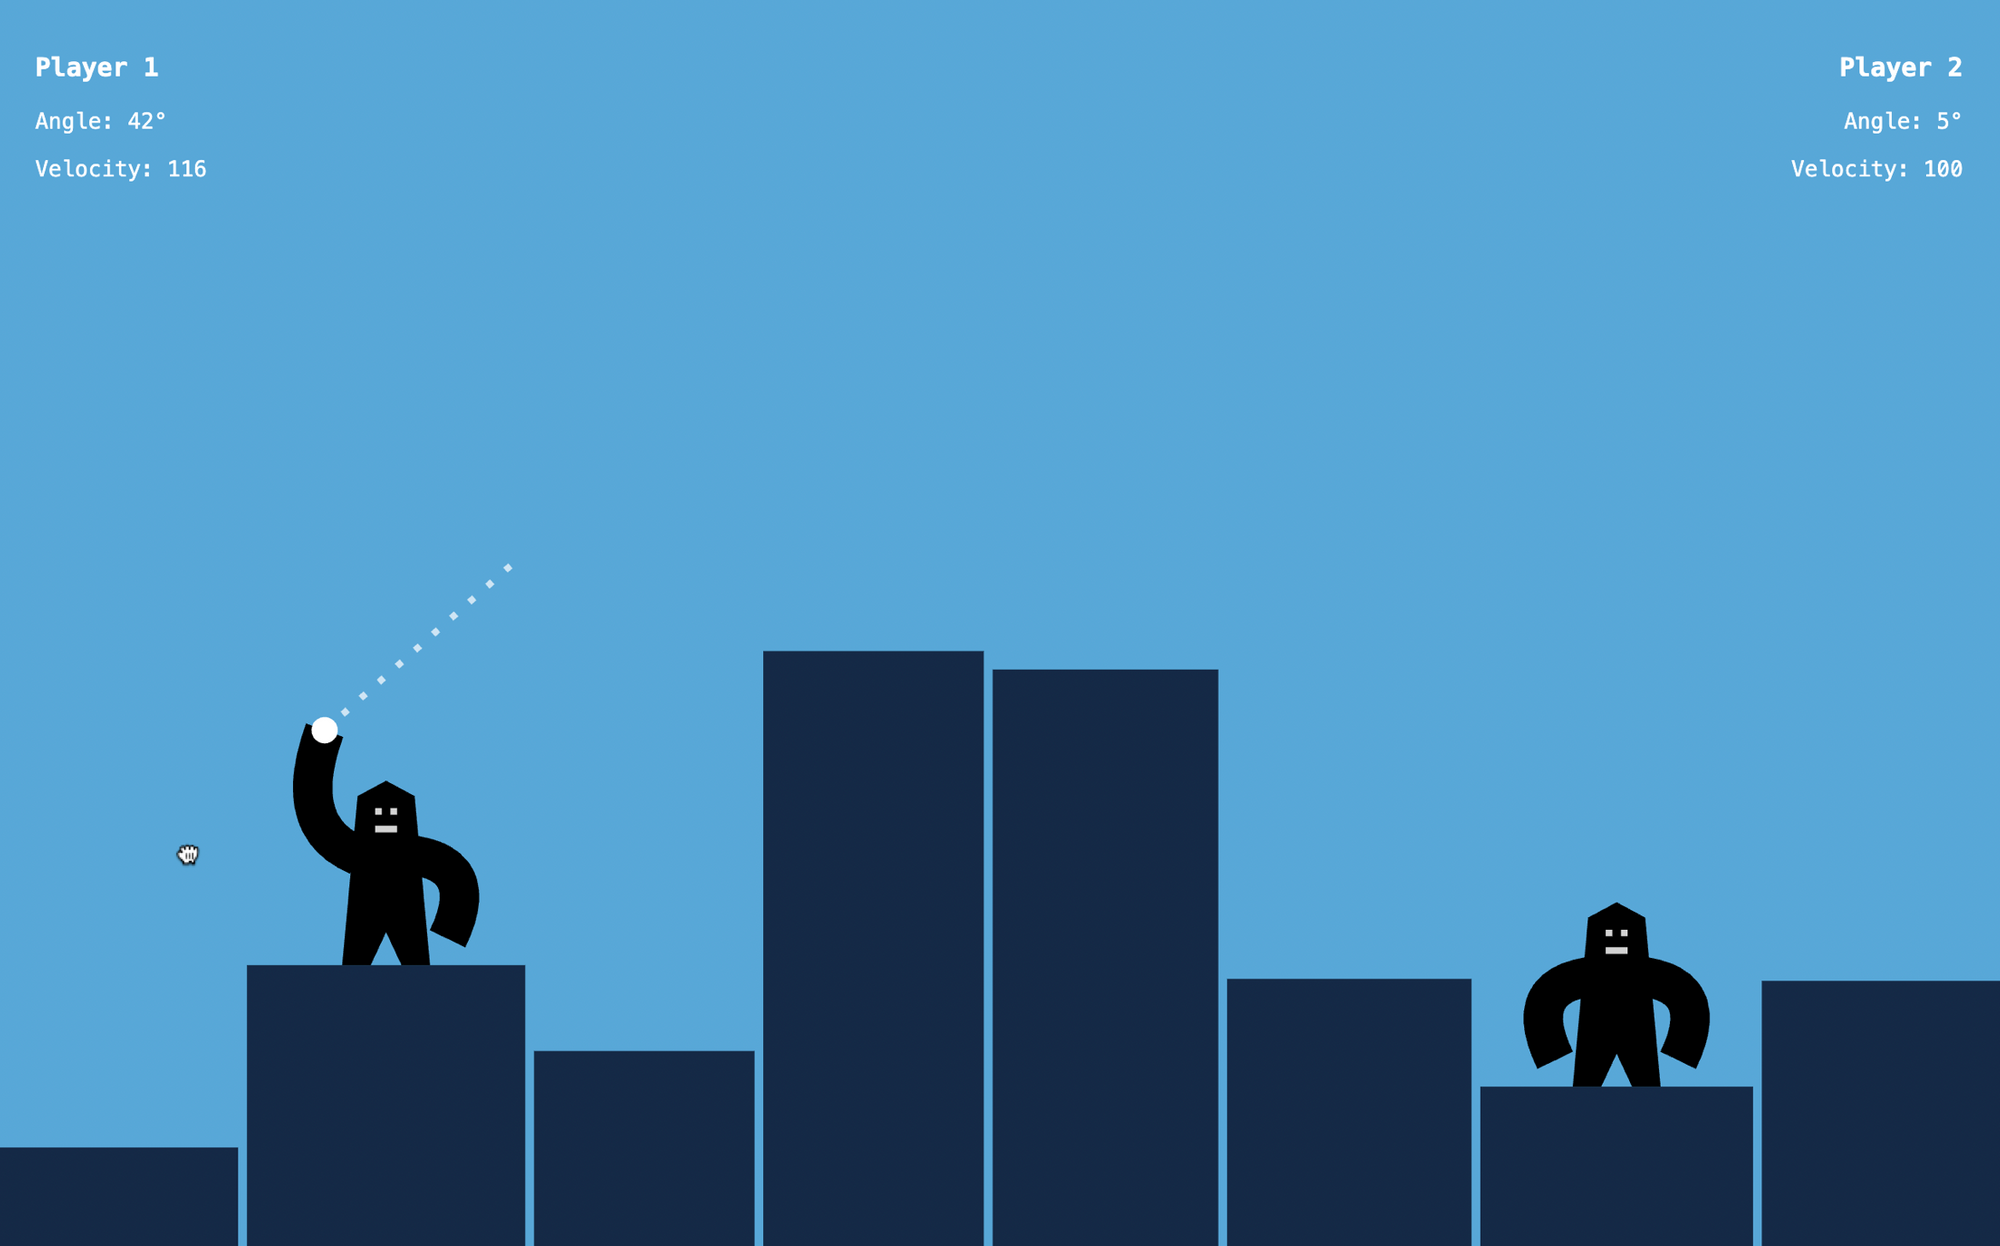
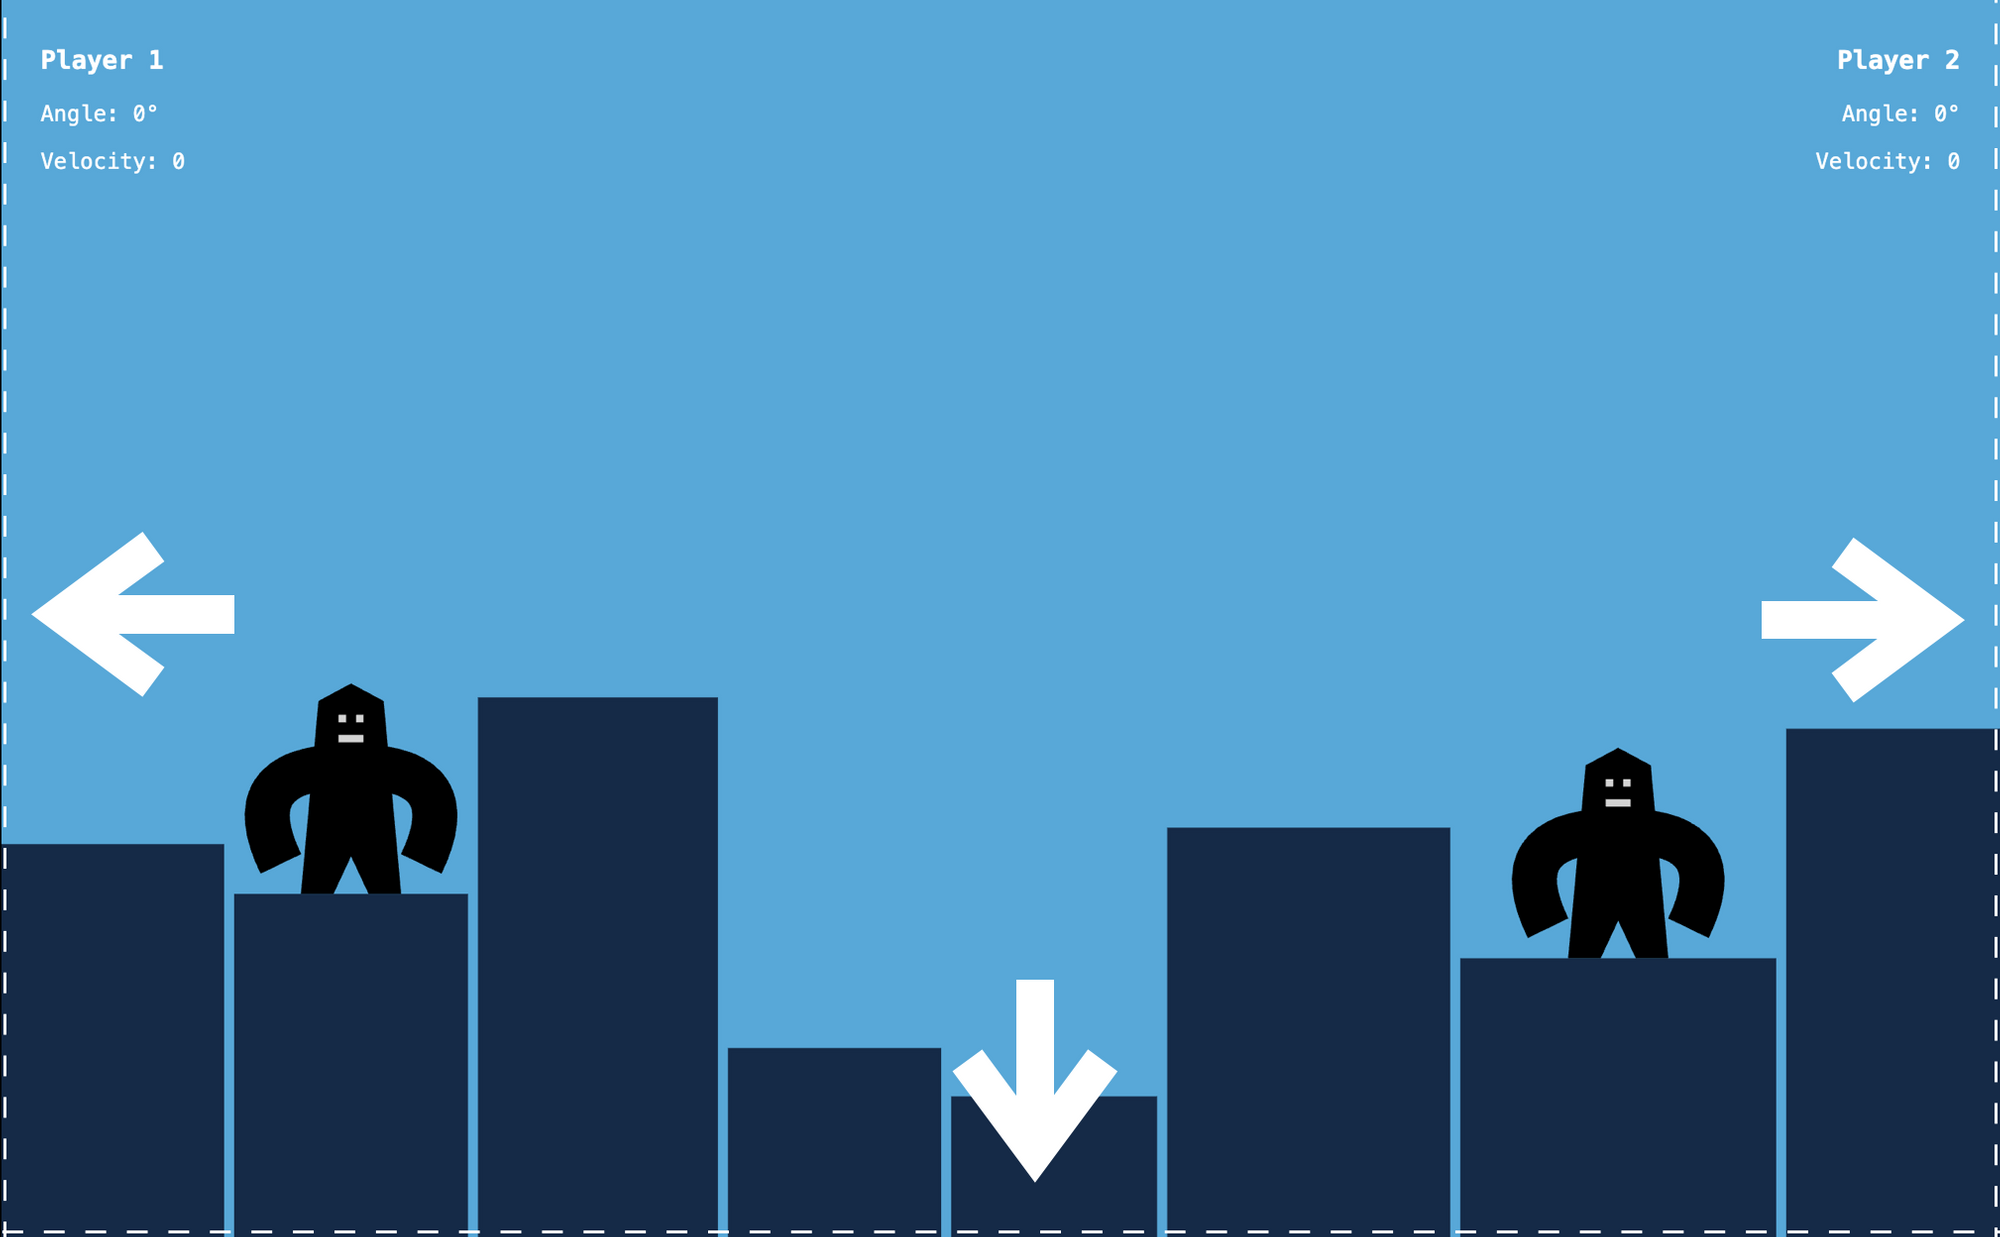
Throwing the bomb has two different parts. First, we have to aim. We grab the bomb with the mouse and drag it to set the throwing angle and the velocity. While dragging, we need to display the angle and velocity in info panels at the top of the screen. We'll also paint the throw trajectory on the screen. This is the aiming phase.
 The
The aiming phase
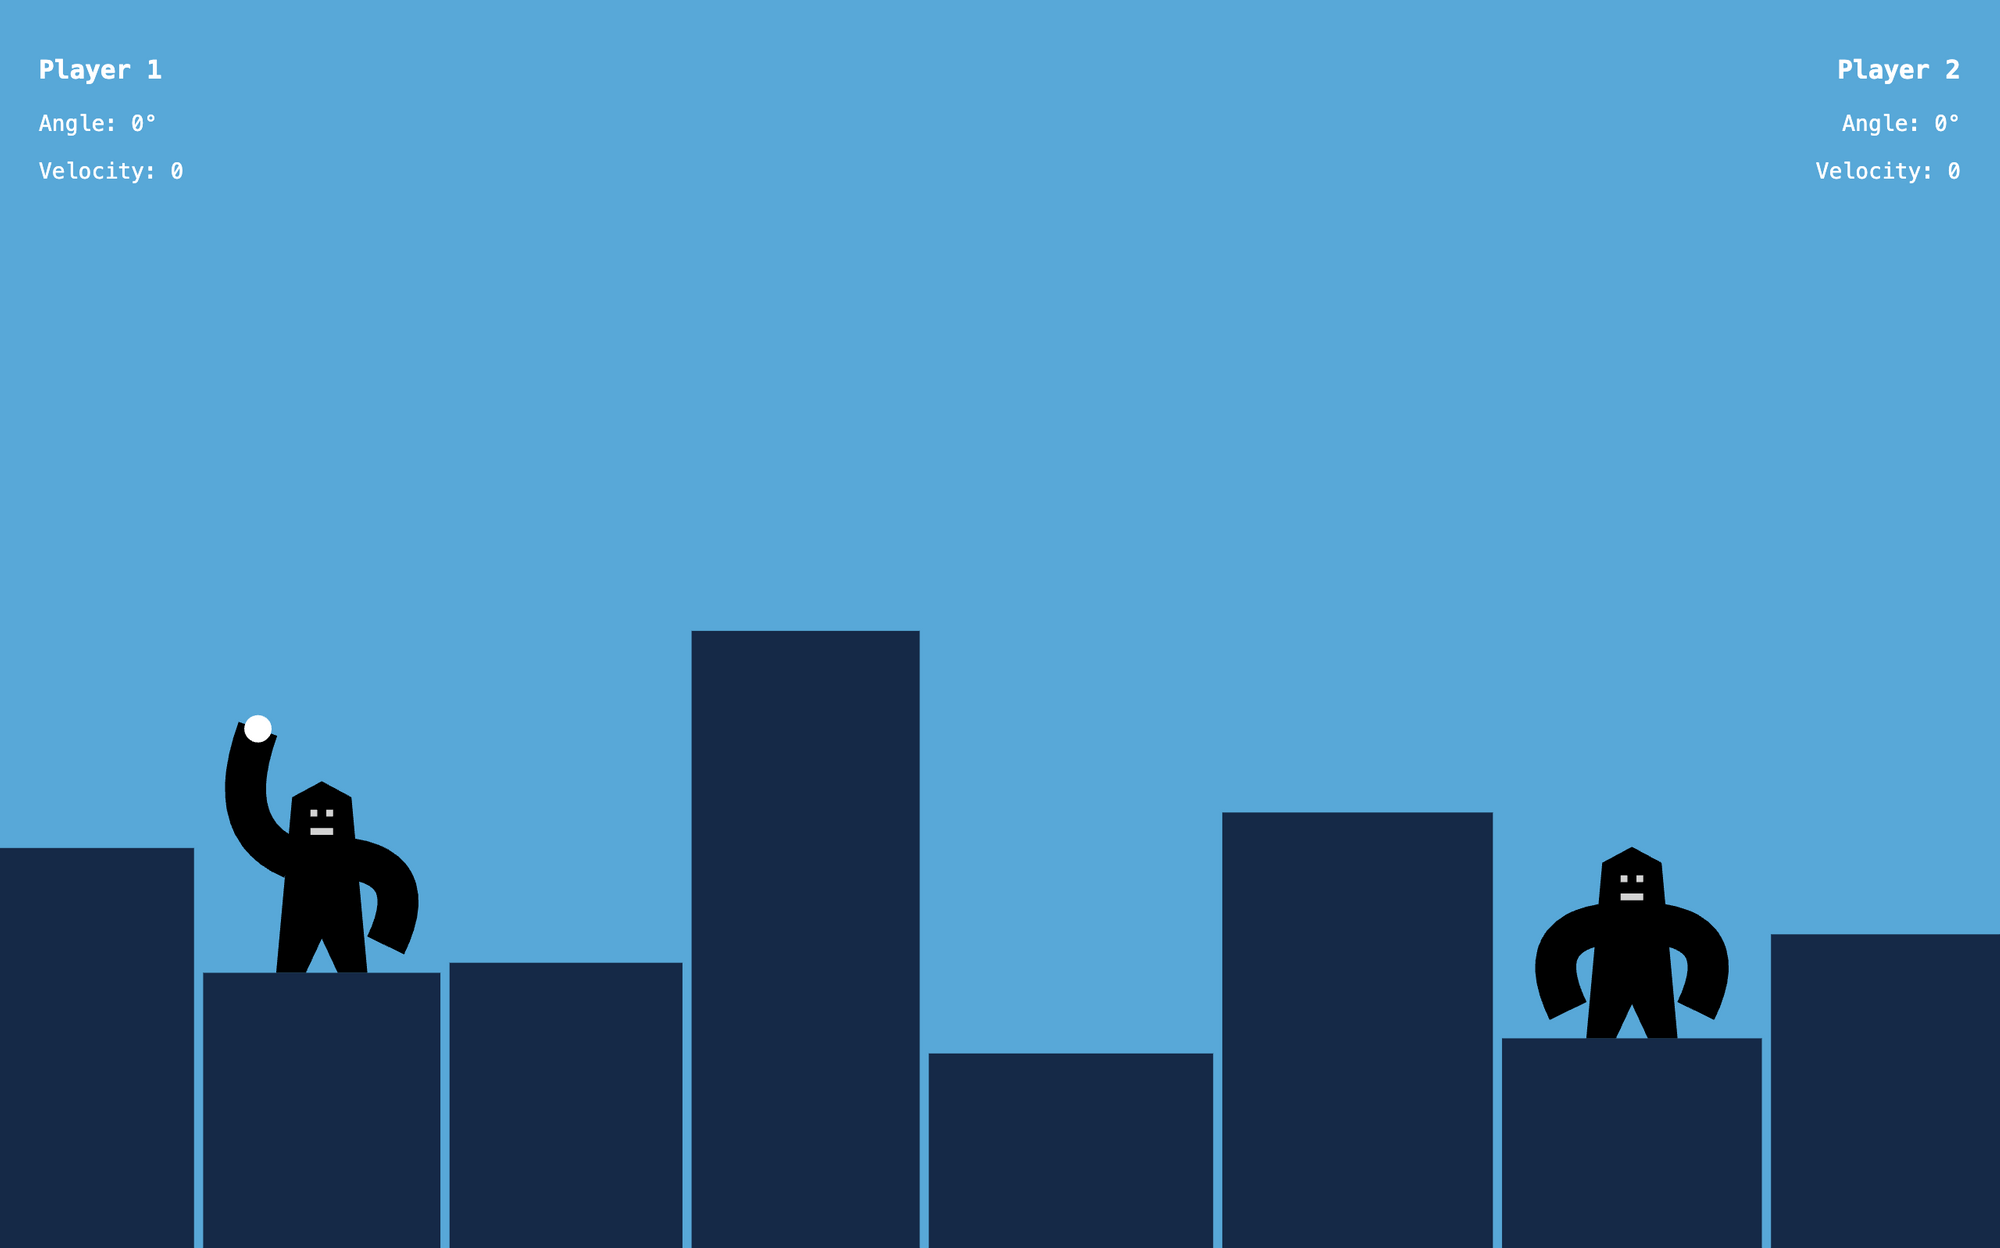
Then once we release the mouse, the bomb flies across the sky. We are going to have an animation loop that moves the bomb across the sky. This is the in flight phase.
 The
The in flight phase
In this phase, this animation loop will also include hit detection. We need to know if the bomb hit the enemy, a building, or went out of the screen. If we hit a building, or the bomb goes off-screen, we switch players and get back to the aiming phase again. If we hit the enemy, then we get to the celebrating phase. We then draw the celebrating variant of the current player’s gorilla and we show the congratulations screen.
 The
The celebrating phase
Now let’s go through these parts in detail.
How to aim
In the aiming phase, we can drag the bomb to set its angle and velocity – like we throw a bird in Angry Birds. We are going to set up event handlers for this.
 Aiming
While aiming, we are going to show the current angle and velocity at the top-left or the top-right corner of the screen (depending on the player). We are also going to draw the throw trajectory on the screen to show in which direction the bomb will fly.
Info panels showing the angle and the velocity
In the original 1991 game, we had to type in the angle and velocity with the keyboard, as it had no mouse support. Here, we are going to aim with the mouse – but we still add the same UI elements on the screen. We'll update these fields as we are moving the mouse while dragging.
 Info panels in the top left and top right corner of the screen
We'll add these info panels in HTML. We could draw these text fields on the canvas as well, but it might be easier to use plain old HTML and CSS.
We'll add two divs, one for player 1 and one for player 2. Both include a header with the player number. We'll also add two paragraphs for the angle and the velocity. The info panels must come after the canvas element because otherwise, the canvas would cover them.
<!DOCTYPE html>
<html lang="en">
  <head>
    <meta charset="utf-8" />
    <title>Gorillas</title>
    <link rel="stylesheet" href="index.css" />
    <script src="index.js" defer></script>
  </head>
  <body>
    <canvas id="game"></canvas>

    <div id="info-left">
      <h3>Player 1</h3>
      <p>Angle: <span class="angle">0</span>°</p>
      <p>Velocity: <span class="velocity">0</span></p>
    </div>

    <div id="info-right">
      <h3>Player 2</h3>
      <p>Angle: <span class="angle">0</span>°</p>
      <p>Velocity: <span class="velocity">0</span></p>
    </div>
  </body>
</html>
We'll assign two different IDs and appropriate class names. We'll use these names both for styling and for accessing these elements in JavaScript.
In the CSS, we'll move these panels into position and set some styling for the texts. We also want to ensure the user cannot select the text on the screen. Otherwise, you might end up accidentally selecting these text fields while aiming.
body {
  margin: 0;
  padding: 0;
  font-family: monospace;
  font-size: 14px;
  color: white;
  user-select: none;
  -webkit-user-select: none;
}
#info-left {
  position: absolute;
  top: 20px;
  left: 25px;
}
#info-right {
  position: absolute;
  top: 20px;
  right: 25px;
  text-align: right;
}
Then finally, in JavaScript we'll add some references to angle and velocity fields somewhere at the beginning of our file.
. . .

// Left info panel
const angle1DOM = document.querySelector("#info-left .angle");
const velocity1DOM = document.querySelector("#info-left .velocity");

// Right info panel
const angle2DOM = document.querySelector("#info-right .angle");
const velocity2DOM = document.querySelector("#info-right .velocity");

. . .
When we add event handling, we'll update the content of these elements with the mouse movement. For now, let's just leave it like that.
The grab area of the bomb
We are going to set up event handlers to drag the bomb. But what can we even drag? The whole canvas element is one single element. We could attach an event handler to it, but then we could start dragging the bomb by clicking anywhere on the screen. We don’t want that.
 The grab area of the bomb
Instead, we define another element in HTML that will serve as the grab area. We add the bomb-grab-area element. This is not going to include the bomb that we see on screen – that is already part of the canvas – but it will be an invisible area around it, serving as an event target.
  . . .

  <body>
    <canvas id="game"></canvas>

    <div id="info-left">
      <h3>Player 1</h3>
      <p>Angle: <span class="angle">0</span>°</p>
      <p>Velocity: <span class="velocity">0</span></p>
    </div>

    <div id="info-right">
      <h3>Player 2</h3>
      <p>Angle: <span class="angle">0</span>°</p>
      <p>Velocity: <span class="velocity">0</span></p>
    </div>

    <div id="bomb-grab-area"></div>
  </body>

  . . .
We'll also add some styling to it with CSS. We want it to have an absolute position and to be an invisible circle with a slightly bigger radius than the bomb (so it’s easier to grab it). We can set the exact position in JavaScript.
We'll also change the cursor once the mouse is on top of it to grab. While this element is invisible, you can still notice that your mouse is at the right place by the changing cursor.
. . .

#bomb-grab-area {
  position: absolute;
  width: 30px;
  height: 30px;
  border-radius: 50%;
  background-color: transparent;
  cursor: grab;
}
Then finally in JavaScript, we need to do two things before we set up event handling. First, get a reference to it somewhere at the beginning of the file.
. . .

// The bomb's grab area
const bombGrabAreaDOM = document.getElementById("bomb-grab-area");

. . .
Then we need to move it to the correct position. We already have a function that initializes the bomb position on the canvas. We can extend the initializeBombPosition function to position this HTML element as well.
We'll move the grab area to the same place as the bomb on the screen, but its coordinates are a bit different. The content of the canvas is scaled, but any other HTML element is not. We need to adjust the coordinates by the scaling. Also, note that we'll set the grabAreaRadius variable to be half of the size we defined for this element in CSS.
function initializeBombPosition() {
  const building =
    state.currentPlayer === 1
      ? state.buildings.at(1) // Second building
      : state.buildings.at(-2); // Second last building

  const gorillaX = building.x + building.width / 2;
  const gorillaY = building.height;

  const gorillaHandOffsetX = state.currentPlayer === 1 ? -28 : 28;
  const gorillaHandOffsetY = 107;

  state.bomb.x = gorillaX + gorillaHandOffsetX;
  state.bomb.y = gorillaY + gorillaHandOffsetY;
  state.bomb.velocity.x = 0;
  state.bomb.velocity.y = 0;

  // Initialize the position of the grab area in HTML
  const grabAreaRadius = 15;
  const left = state.bomb.x * state.scale - grabAreaRadius;
  const bottom = state.bomb.y * state.scale - grabAreaRadius;
  bombGrabAreaDOM.style.left = `${left}px`;
  bombGrabAreaDOM.style.bottom = `${bottom}px`;
}
Once we've added this, we won’t see any difference on the screen, because this item is invisible. But once we hover over the bomb, we'll see that the cursor changes to grab.
Event handling
Now with everything set up, we can finally set up the event handling. This is going to be a simple drag-and-drop implementation where we listen to the mousedown, mousemove, and mouseup events.
First, we'll set up some top-level variables somewhere at the beginning of the file. We have a boolean variable that tells us if we are currently dragging or not, and two variables that tell us where the drag started, in case we are dragging.
. . .

let isDragging = false;
let dragStartX = undefined;
let dragStartY = undefined;

. . .
We add the first event handler for the mousedown event on the grab area of the bomb. Being able to set this event handler is the reason we added the bomb-grab-area element earlier.
This event handler only does anything if we are in the aiming phase. If that is true, we set the isDragging variable to true, save the current mouse position, and set the mouse cursor permanently to grabbing (so that the cursor stays as grabbing even if we leave the grab area).
bombGrabAreaDOM.addEventListener("mousedown", function (e) {
  if (state.phase === "aiming") {
    isDragging = true;

    dragStartX = e.clientX;
    dragStartY = e.clientY;

    document.body.style.cursor = "grabbing";
  }
});
Then we'll add an event handler for the mousemove event. Note that now the event target is not the grab area of the bomb, but the window object. This is because while we are dragging we can easily move the mouse outside the grab area – or even outside the browser window – and we still want this event handler to work.
This event handler first checks if we are currently dragging. If not, then it doesn’t do anything. If we are dragging, then it calculates the delta of the mouse position since the mousedown event and sets it as the velocity of the bomb.
window.addEventListener("mousemove", function (e) {
  if (isDragging) {
    let deltaX = e.clientX - dragStartX;
    let deltaY = e.clientY - dragStartY;

    state.bomb.velocity.x = -deltaX;
    state.bomb.velocity.y = +deltaY;
    setInfo(deltaX, deltaY);

    draw();
  }
});
When we release the mouse, we want the bomb to move the opposite way as we drag the mouse, so we need to set the horizontal and vertical velocity with a negative sign. But then with a double twist, we switch back the vertical velocity (the Y coordinate), to have a positive sign because we flipped the coordinate system.
Event handlers still assume that the coordinate system grows downwards. Within the canvas, it goes in the opposite direction.
This event handler also calls a utility function to show the angle and the velocity at the info panels we just added in HTML. Then we call the draw function again. For now, calling the draw function here does not change anything on the screen, but soon we will update the drawBomb function to draw the throwing trajectory.
The setInfo button updates the UI elements we defined in HTML. We already have references to these elements at the top of our file, so here we only need to update their content as we drag the bomb.
. . .

// Left info panel
const angle1DOM = document.querySelector("#info-left .angle");
const velocity1DOM = document.querySelector("#info-left .velocity");

// Right info panel
const angle2DOM = document.querySelector("#info-right .angle");
const velocity2DOM = document.querySelector("#info-right .velocity");

. . .
But there is a bit of a complication. From the mousemove event, we got the vertical and horizontal components of the velocity. But on the UI we want to display the angle and the total velocity of the throw. We need to use some trigonometry to calculate these values.
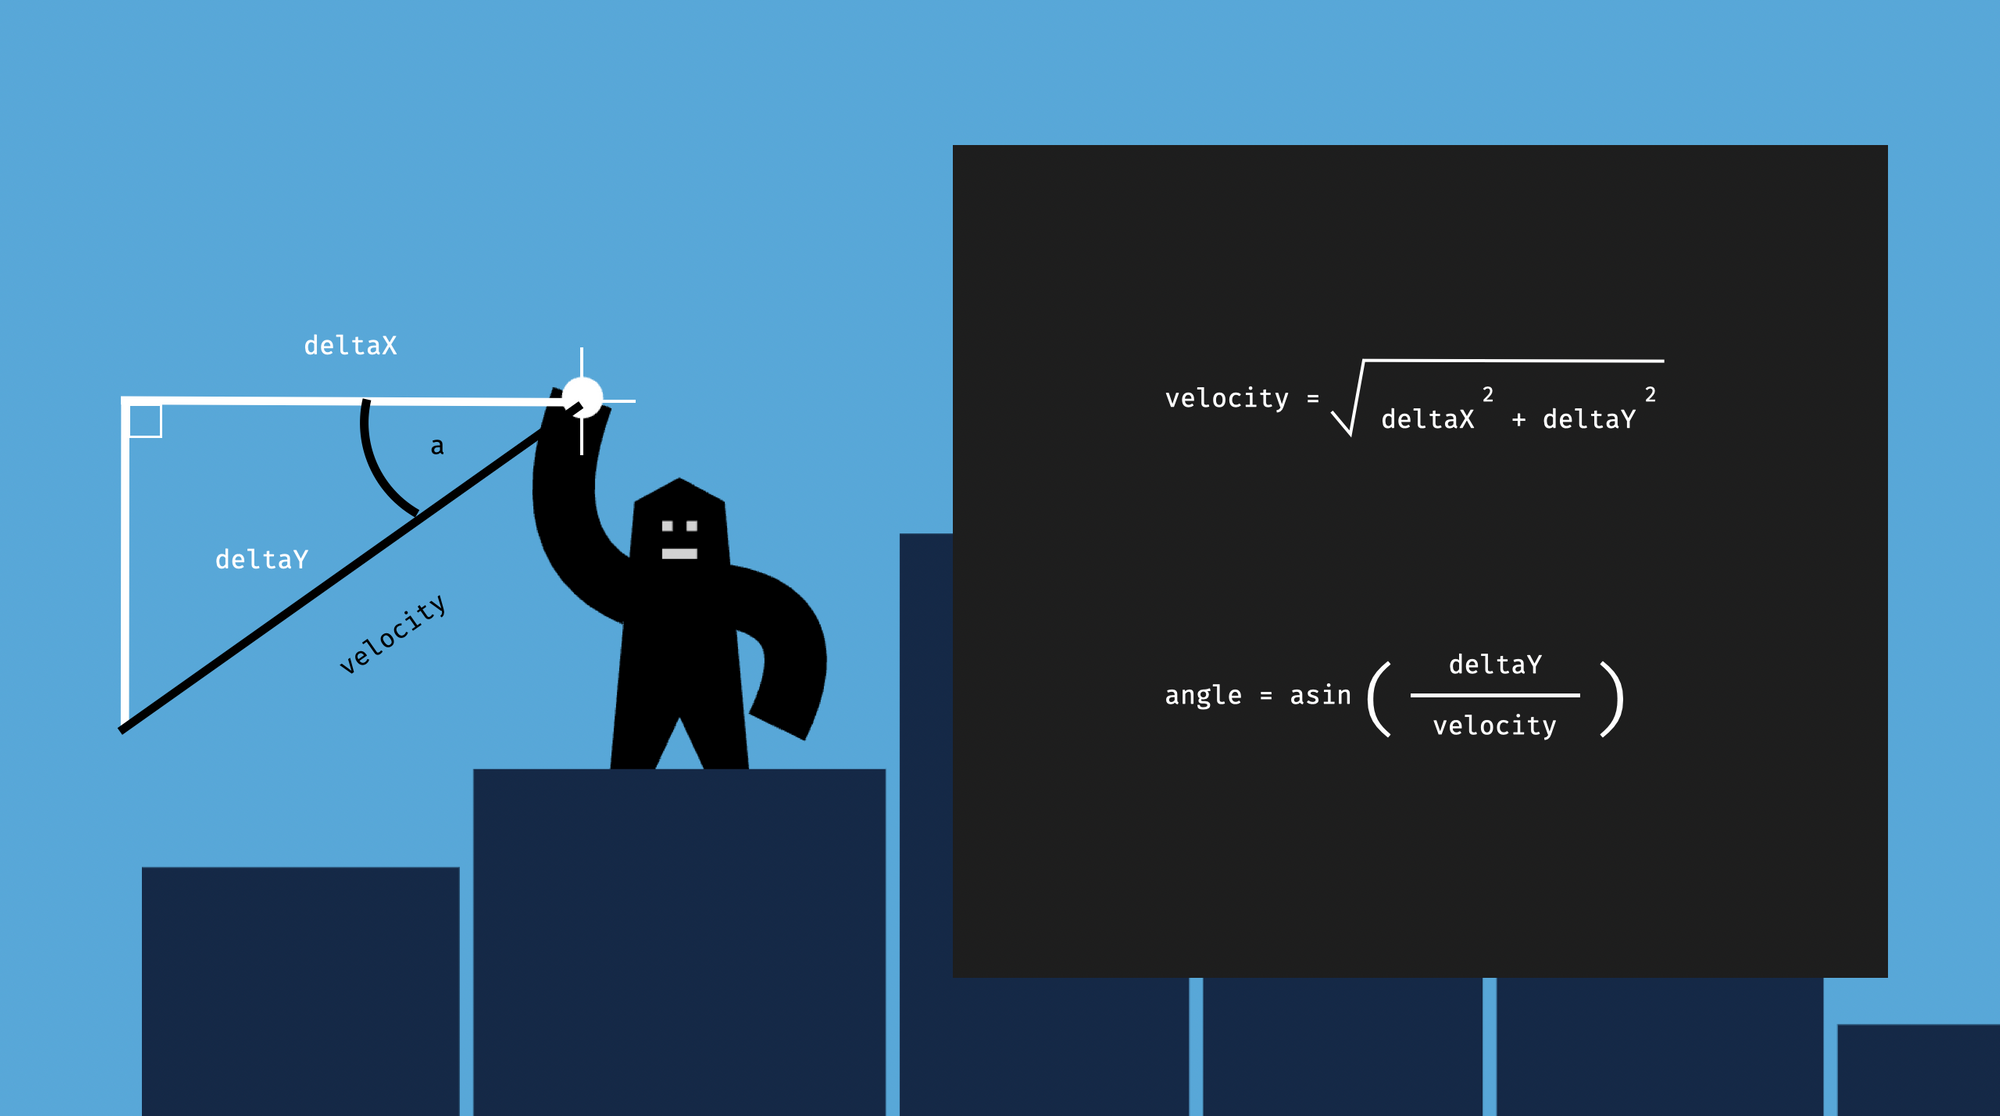 Calculating the total
 velocity and the angle from the horizontal and verical movement of the mouse
For the velocity, we'll calculate the hypotenuse of an imaginary triangle made up of the horizontal and vertical components of the velocity. For the angle, we'll use the arc sine function (the inverse of the sine function). We'll also make sure to update the correct info panel depending on whose turn it is, and we'll round the values.
function setInfo(deltaX, deltaY) {
  const hypotenuse = Math.sqrt(deltaX ** 2 + deltaY ** 2);
  const angleInRadians = Math.asin(deltaY / hypotenuse);
  const angleInDegrees = (angleInRadians / Math.PI) * 180;

  if (state.currentPlayer === 1) {
    angle1DOM.innerText = Math.round(angleInDegrees);
    velocity1DOM.innerText = Math.round(hypotenuse);
  } else {
    angle2DOM.innerText = Math.round(angleInDegrees);
    velocity2DOM.innerText = Math.round(hypotenuse);
  }
}
At this point, while the scene should stay the same as it is, the values in the left info panel should update as we drag.
Finally, we'll add the event handler for the mouseup event, again on the window object. It only does anything if we are currently dragging. Then it notes that we are not dragging anymore, changes the cursor back to default, and calls the throwBomb function.
window.addEventListener("mouseup", function () {
  if (isDragging) {
    isDragging = false;

    document.body.style.cursor = "default";

    throwBomb();
  }
});
The throwBomb function switches the game phase to in flight and kicks off the animation of the bomb. We are going to cover this function in the next chapter, but before we get there, let's update one more thing.
How to draw the throw trajectory
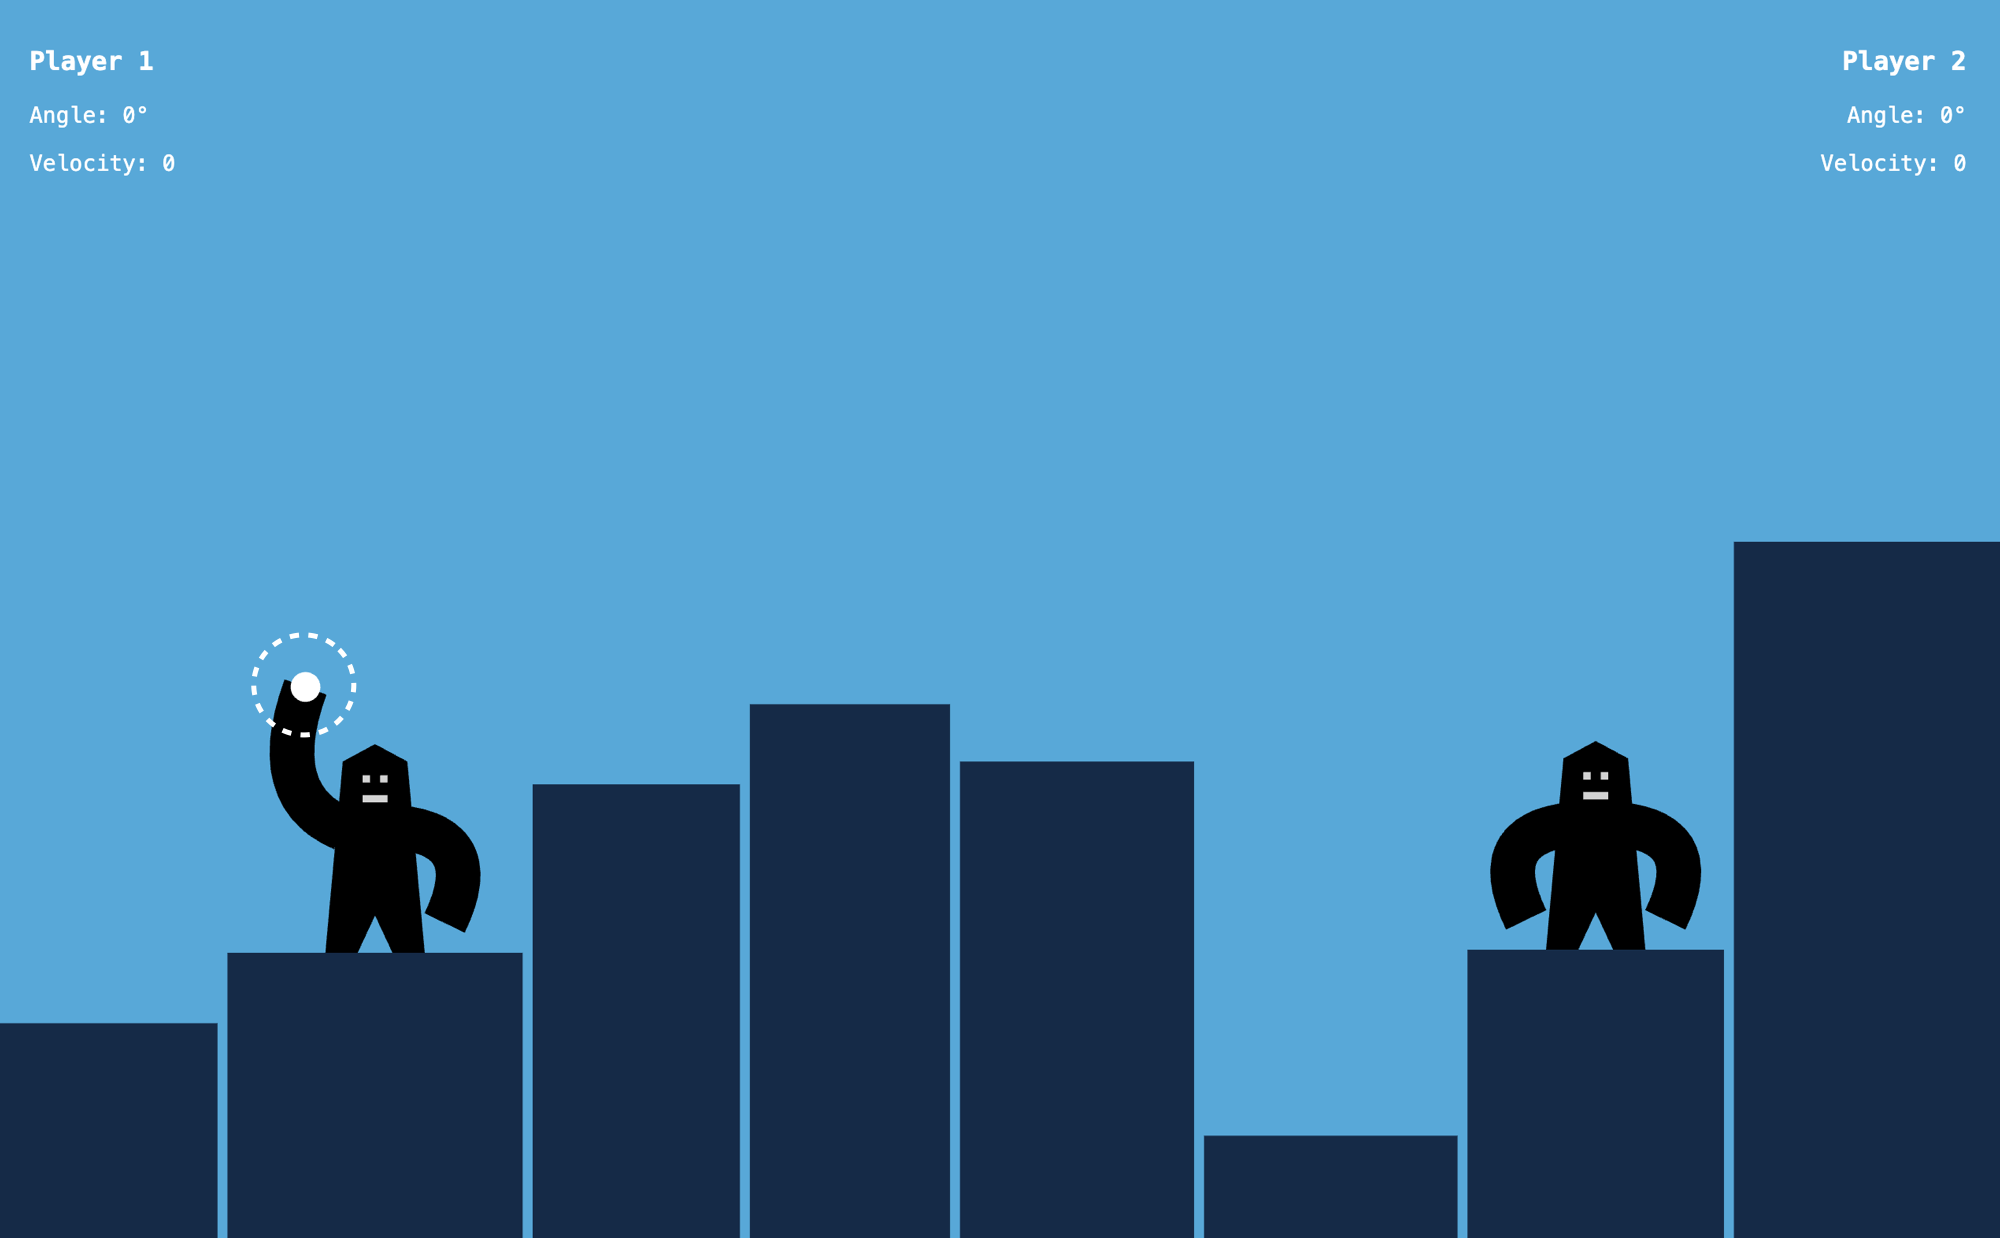
While we are aiming, we can also draw the throwing trajectory. The throwing trajectory is the visualized form of the velocity and the angle.
 The throwing trajectory shows the angle and velocity in a visual form
To do this, let’s go back to the drawBomb function and make some changes. If we are in the aiming phase, we'll draw a straight line from the center of the bomb to the velocity.
function drawBomb() {
  // Draw throwing trajectory
  if (state.phase === "aiming") {
    ctx.strokeStyle = "rgba(255, 255, 255, 0.7)";
    ctx.setLineDash([3, 8]);
    ctx.lineWidth = 3;

    ctx.beginPath();
    ctx.moveTo(state.bomb.x, state.bomb.y);
    ctx.lineTo(
      state.bomb.x + state.bomb.velocity.x,
      state.bomb.y + state.bomb.velocity.y
    );
    ctx.stroke();
  }

  // Draw circle
  ctx.fillStyle = "white";
  ctx.beginPath();
  ctx.arc(state.bomb.x, state.bomb.y, 6, 0, 2 * Math.PI);
  ctx.fill();
}
We'll draw this line as a path, as we did before. We'll start it with the beginPath method and end it with the stroke method. In between we'll use the moveTo and the lineTo method.
There’s one new thing here though: the setLineDash method. With this setting, we can draw a dotted line. We'll set that after every 3 pixels of line, and we want to have 8 pixels of gap. The 3-pixel dash matches the lineWidth, so the dashes will look like dots.
Now we've finished everything about the aiming phase. It’s time to throw the bomb.
How to Animate the Incoming Bomb
Once we release the mouse after the aim, the bomb flies across the sky. We'll add an animation loop that moves the bomb, calculates its position with every animation cycle, and checks if we hit something.
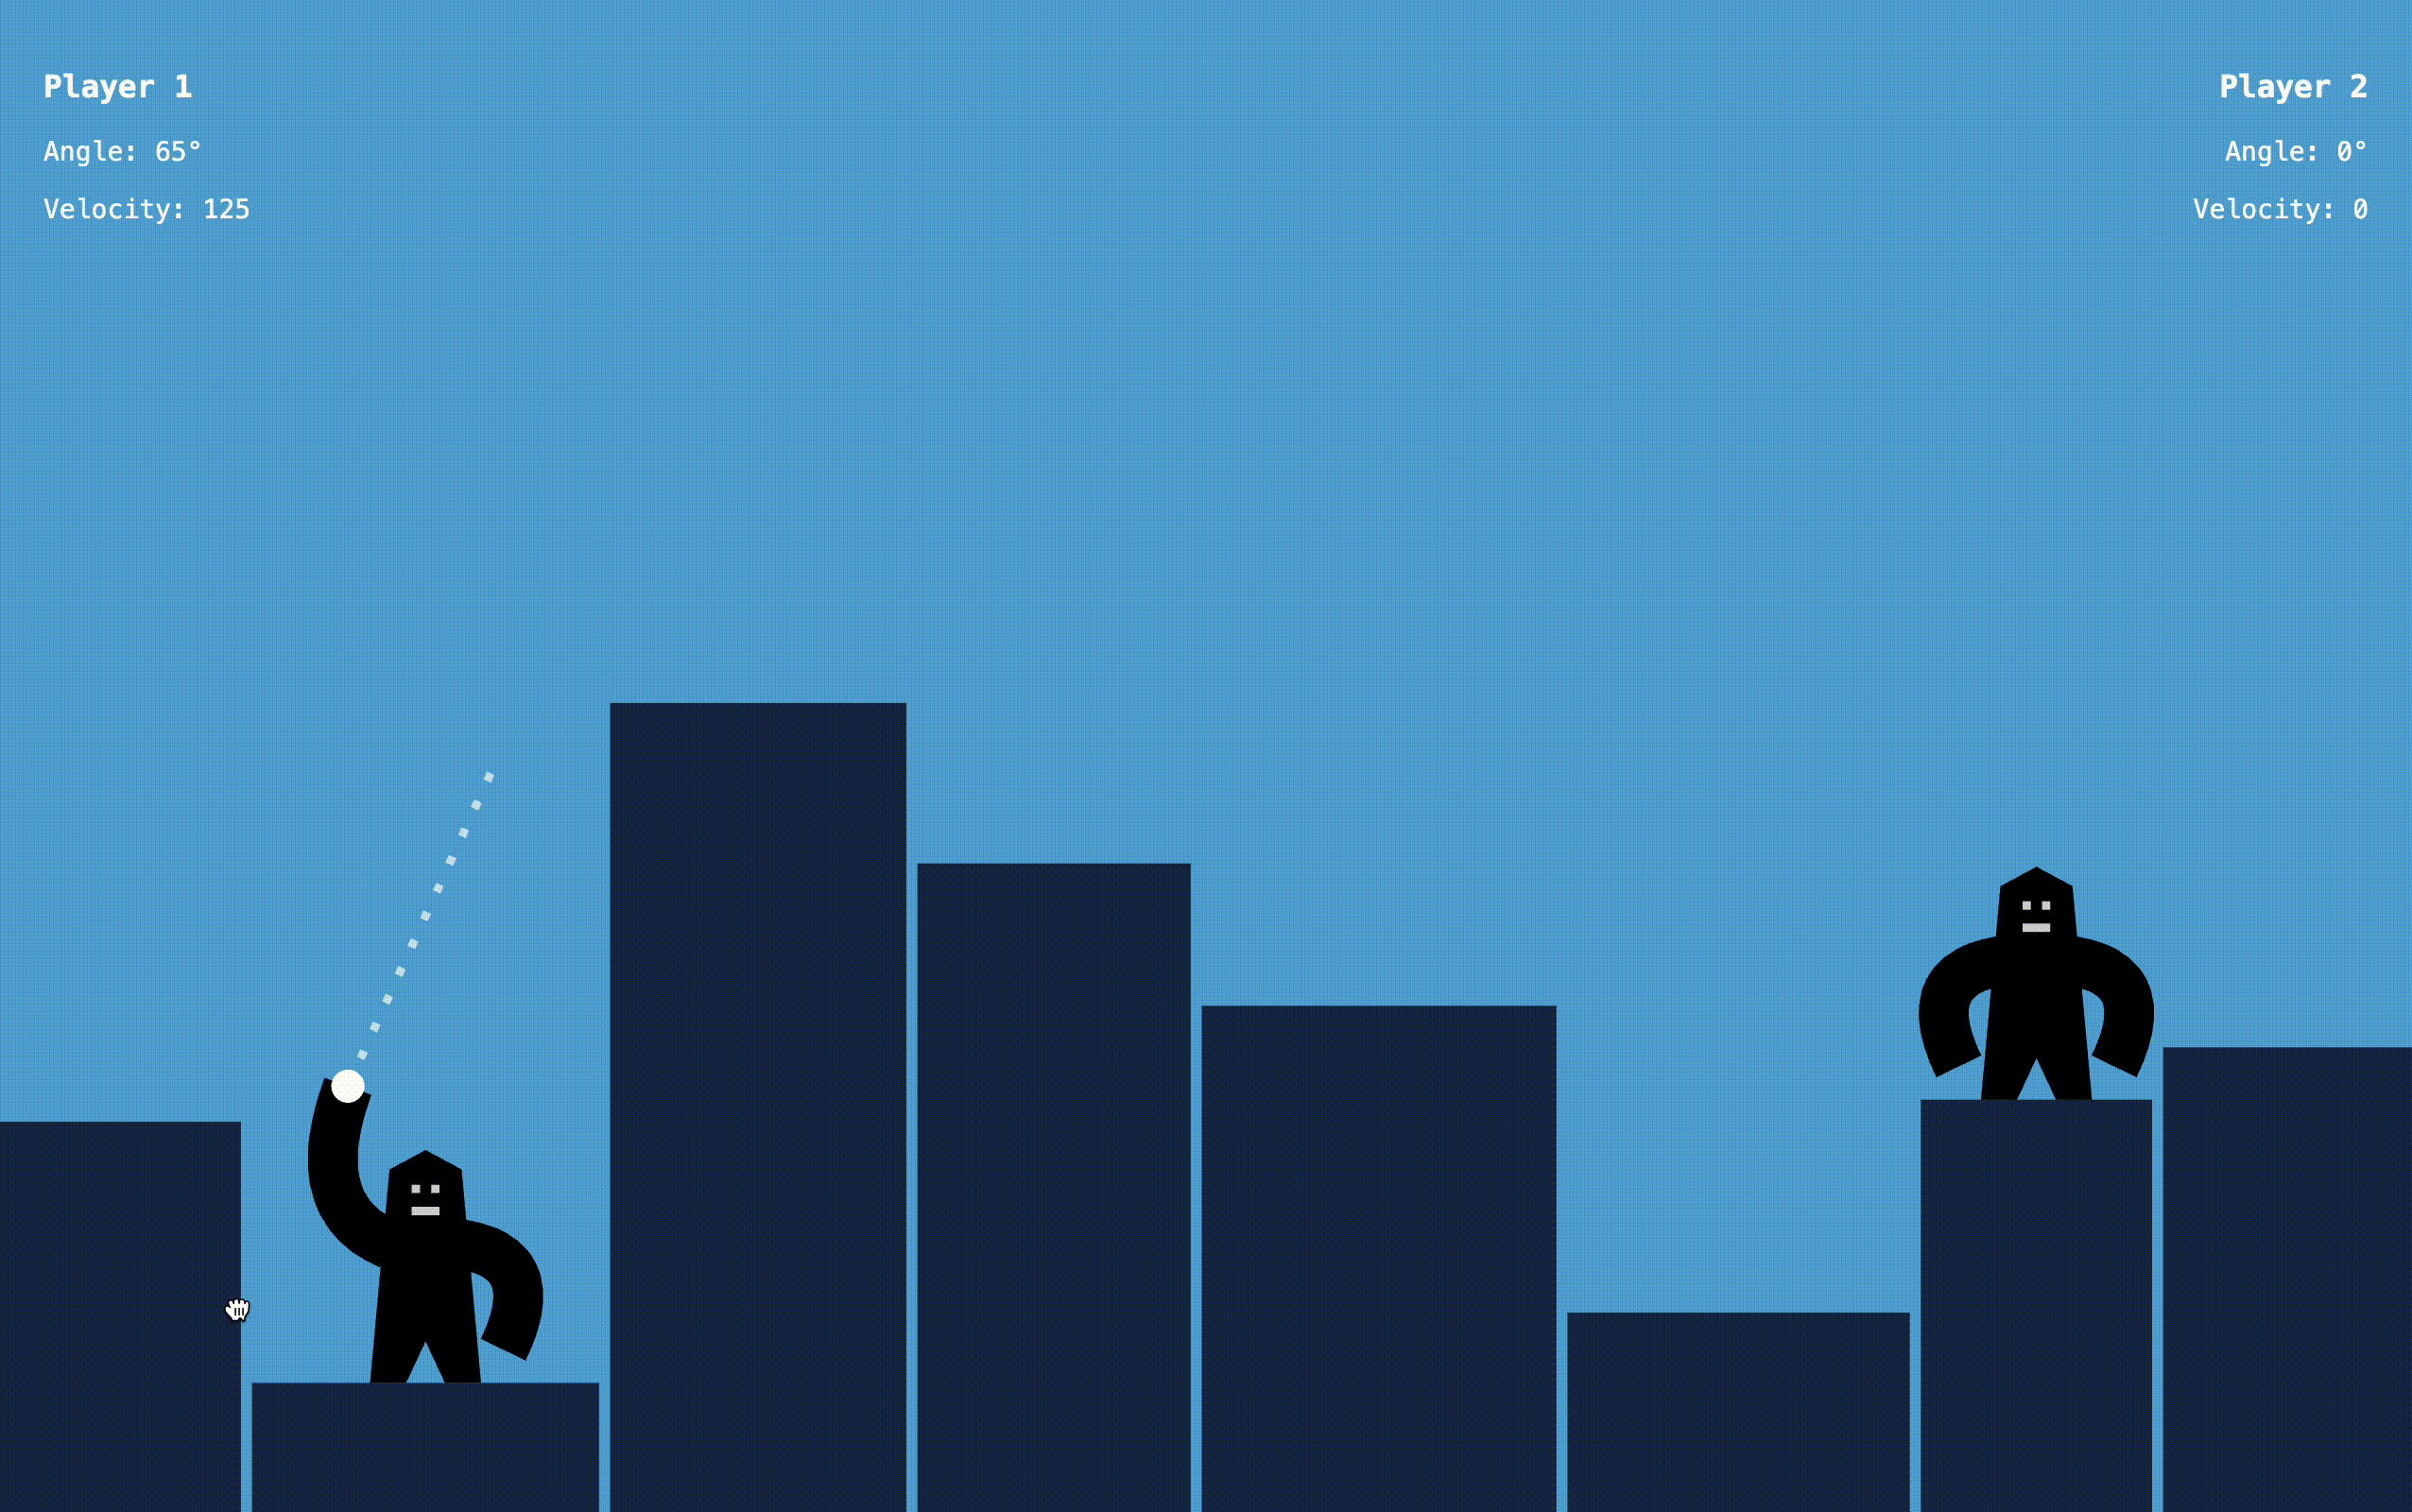 Animating the bomb
Earlier, we saw that the event handler of the mouseup event ends with calling the throwBomb function. Let's implement this function.
This function first kicks off the in flight phase. Then it resets the previousAnimationTimestamp variable. This is a new utility variable needed for the animation loop. We'll cover it in a second. Then we start the animation loop, by calling requestAnimationFrame with the animate function as an argument. Let’s dig deeper into this animate function.
. . .

let previousAnimationTimestamp = undefined;

. . .

function throwBomb() {
  state.phase = "in flight";
  previousAnimationTimestamp = undefined;
  requestAnimationFrame(animate);
}
The animation loop
The animate function moves the bomb and calls the draw function to repaint the screen over and over again until we hit the enemy, a building, or the bomb goes off the screen.
By calling this function with requestAnimationFrame the way you see below, the animate function will run around 60 times every second. The constant repainting of the screen will appear as a continuous animation. Because this function is running so frequently, we're only moving the bomb little by little each time.
 The animation loop
This function keeps track of how much time has passed since its last call. We are going to use this information to precisely calculate how much should we move the bomb.
Functions invoked with the requestAnimationFrame function receive the current timestamp as an attribute. At the end of every cycle, we save this timestamp value into the previousAnimationTimestamp variable, so that in the next cycle we can calculate how much time has passed between two cycles. In the code below, this is the elapsedTime variable.
The first cycle is an exception because, at that point, we didn’t have a previous cycle yet. At the beginning of each throw, the value of previousAnimationTimestamp is undefined (we made sure it's undefined in the throwBomb function). In this case, we skip a render and we'll only render the scene on the second cycle, where we already have all the values we need. This is the part at the very beginning of the animate function.
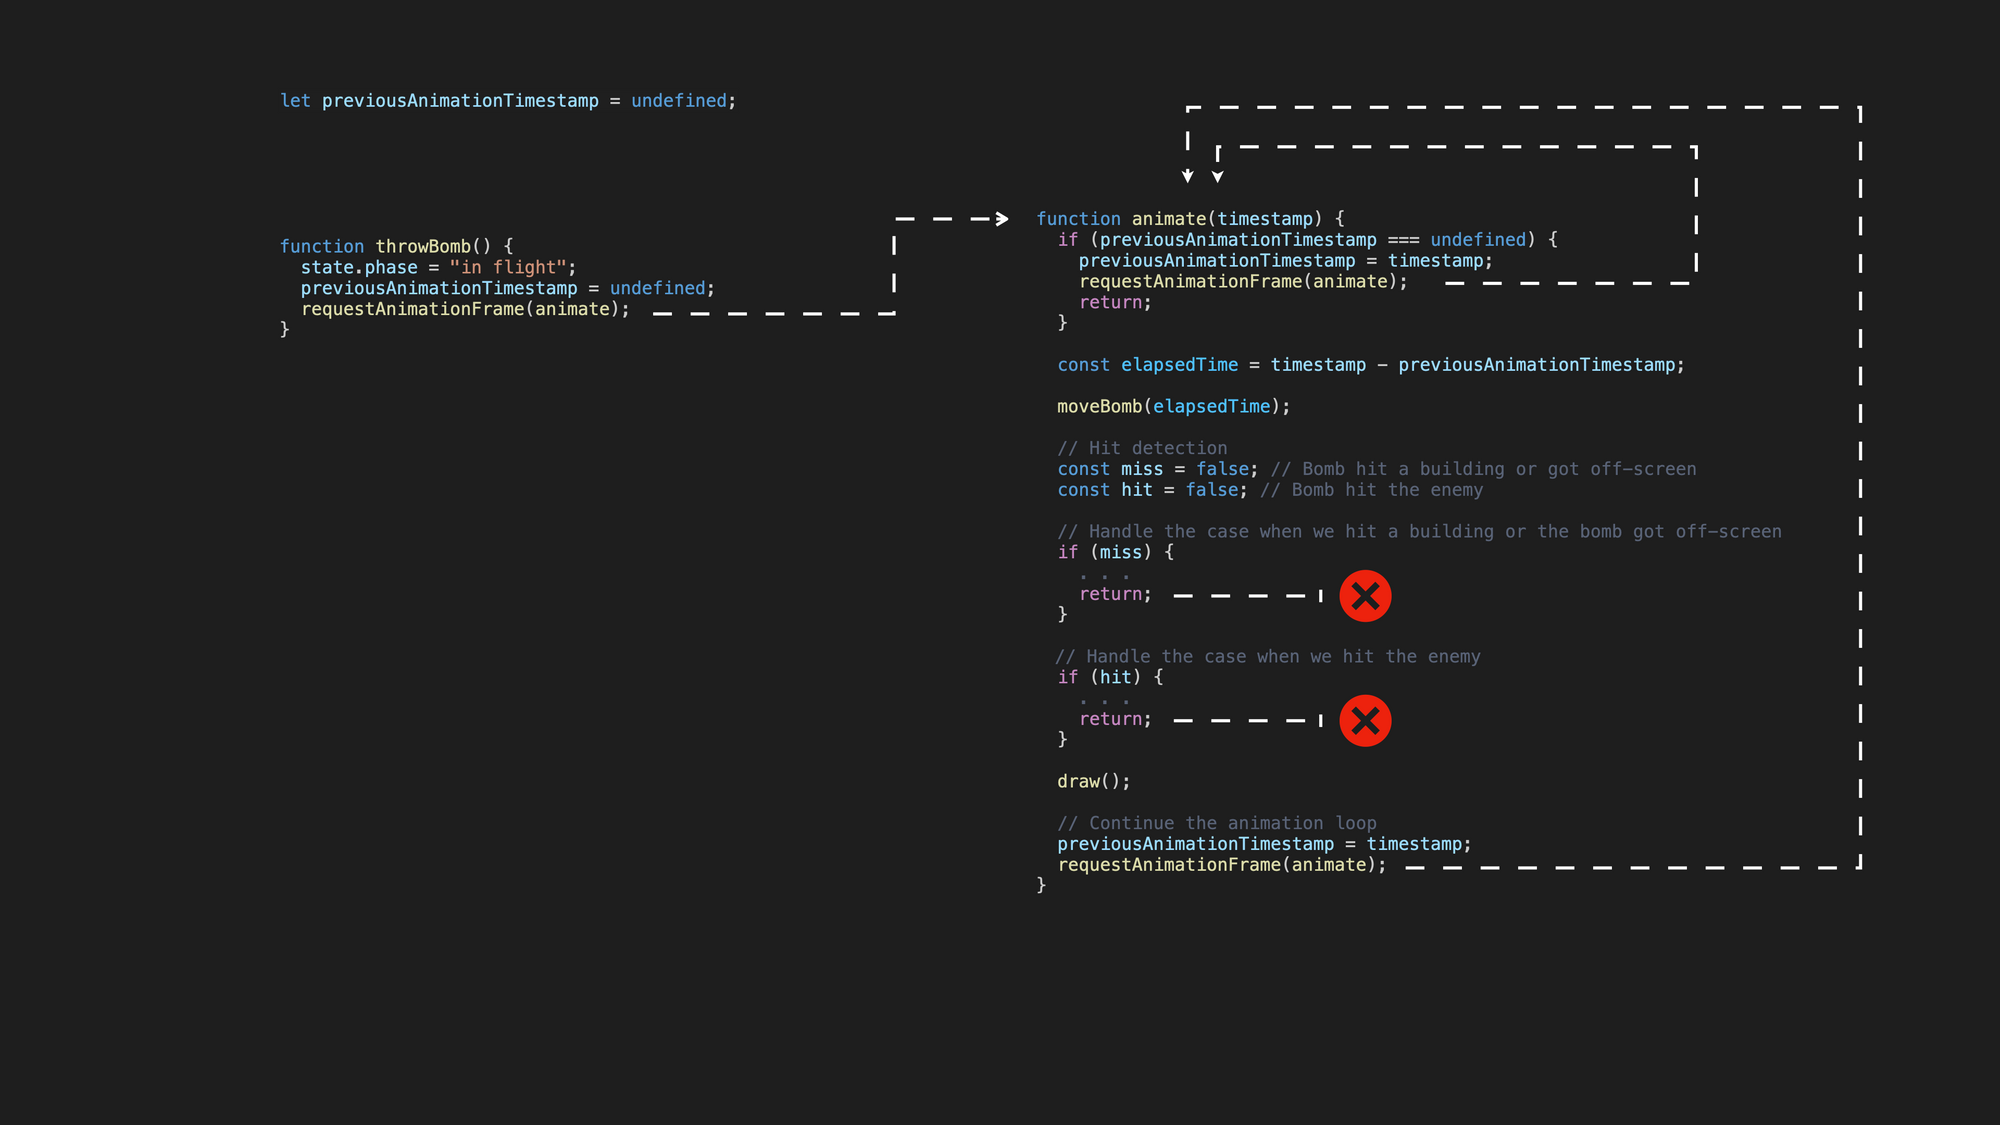
function animate(timestamp) {
  if (previousAnimationTimestamp === undefined) {
    previousAnimationTimestamp = timestamp;
    requestAnimationFrame(animate);
    return;
  }
  const elapsedTime = timestamp - previousAnimationTimestamp;

  moveBomb(elapsedTime);

  // Hit detection
  let miss = false; // Bomb hit a building or got out of the screen
  let hit = false; // Bomb hit the enemy

  // Handle the case when we hit a building or the bomb got off-screen
  if (miss) {
    // ...
    return;
  } // Handle the case when we hit the enemy
  if (hit) {
    // ...
    return;
  }

  draw();

  // Continue the animation loop
  previousAnimationTimestamp = timestamp;
  requestAnimationFrame(animate);
}
Inside the function, we are going to move the bomb every cycle by calling the moveBomb function. We'll pass on the elapsedTime variable so it can precisely calculate by how much should it move the bomb.
In every cycle, we also detect if we hit an enemy, or if we missed and the bomb hit a building or got off screen. If none of that happens, then we need to repaint the scene and request another animation frame to continue the animation loop. But if we missed the enemy or got a hit, then we'll stop the animation loop by returning from the function. By returning early from the function, we never reach the last line, which would trigger the next animation cycle. The loop stops.
How to move the bomb
We move the bomb by calling the moveBomb function in the animation loop. This function calculates the new x and y position of the bomb in every cycle.
The new x and y values are calculated based on the velocity. But the vertical and horizontal velocity can be a relatively high number.
We don’t want the bomb to cross the screen with lightning speed, so to slow down the movement we'll multiply the values by a very small number. This multiplier also takes into consideration the elapsed time, so the animation will look consistent even if the animation cycles are not triggered at equal intervals.
With every cycle, the velocity of the bomb is also adjusted by gravity. We'll gradually increase the motion of the bomb towards the ground. We'll also adjust the vertical velocity by a small constant that also depends on the time passed.
function moveBomb(elapsedTime) {
  const multiplier = elapsedTime / 200; // Adjust trajectory by gravity

  state.bomb.velocity.y -= 20 * multiplier; // Calculate new position

  state.bomb.x += state.bomb.velocity.x * multiplier;
  state.bomb.y += state.bomb.velocity.y * multiplier;
}
Hit detection
Our animation loop keeps moving the bomb to infinity. But once we hit a building, the enemy, or the bomb got off-screen, we should stop this motion.
We need to detect these cases and handle them appropriately. If the bomb gets off-screen or we hit a building we should move on to the next player and get back to the aiming phase. In case we hit the enemy, we should move on to the celebrating phase and announce the winner.
In all these cases, we can stop the loop by returning early from the animate function. In these cases, the animate function does not reach its last line which would trigger another animation cycle.
How to improve hit detection precision
While we already slowed down the movement of the bomb to have a nice animation on screen, the bomb can still be a bit too fast for hit detection.
When the bomb is in flight, it can move by more than 10 pixels at a time. If we do hit detections only once per animation cycle, then we are completely blind to what happens during these 10-pixel movements. The bomb can easily go through parts of the gorilla without us noticing that we should have had a hit, or go through the corner of a building without any impact.
 We need to break down each animation cycle into multiple segments to improve hit detection
To solve this, we are not only going to do hit detection once per every animation cycle, but multiple times. We'll break down every movement into smaller segments, and with every tiny movement, we need to check if we have a hit.
We'll still render the scene once per animation cycle, but before calling the draw function, we'll break down the movement into 10 segments with a loop.
 Break down movement and hit detection to 10 segments in each animation cycle
If we break down each animation cycle into ten segments, that also means that now we call the moveBomb function ten times more. We need to slow it down even more. Because this function moves the bomb according to the time passed, it’s enough if we divide its time attribute also by ten.
This way the bomb moves across the sky with the same speed, but we have ten times more precision with hit detection. In the example below, we wrap calling the moveBomb function and the hit detection logic into a for loop.
function animate(timestamp) {
  if (!previousAnimationTimestamp) {
    previousAnimationTimestamp = timestamp;
    requestAnimationFrame(animate);
    return;
  }

  const elapsedTime = timestamp - previousAnimationTimestamp;

  const hitDetectionPrecision = 10;
  for (let i = 0; i < hitDetectionPrecision; i++) {
    moveBomb(elapsedTime / hitDetectionPrecision);

    // Hit detection
    const miss = checkFrameHit() || checkBuildingHit();
    const hit = checkGorillaHit();

    // Handle the case when we hit a building or the bomb got off-screen
    if (miss) {
      // ...
      return;
    }

    // Handle the case when we hit the enemy
    if (hit) {
      // ...
      return;
    }
  }

  draw();

  // Continue the animation loop
  previousAnimationTimestamp = timestamp;
  requestAnimationFrame(animate);
}
In the example above we've also introduced some utility functions for hit detection. In the next steps let’s implement these functions.
function checkFrameHit() {
  // ...
}

function checkBuildingHit() {
  // ...
}

function checkGorillaHit() {
  // ...
}
How to detect if the bomb is off the screen
We've missed the target if we reach the edge of the screen or if we hit a building. Checking if we've reached the edge of the screen is a very easy thing to do.
 Checking if the bomb went off-screen
We only need to check if the bomb went out on the left side, the bottom, or the right side of the screen. If the bomb goes through the top of the screen, that’s okay. Gravity will eventually pull it back.
Note that because of the scaling, the right side of the screen is not the same as the window’s innerWidth value. We have to adjust that by the scaling factor.
function checkFrameHit() {
  if (
    state.bomb.y < 0 ||
    state.bomb.x < 0 ||
    state.bomb.x > window.innerWidth / state.scale
  ) {
    return true; // The bomb is off-screen
  }
}
If the bomb went out of the screen, we return true to signal to the animate function that we can stop the animation loop.
How to detect if the bomb hit a building
We also miss the target if the bomb hits a building. We can iterate over the buildings array and check if any side of the bomb is within the rectangle of the building. We need to check that:
- The right side of the bomb is on the right of the left side of the building,
- The left side of the bomb is on the left of the right side of the building,
- And that the bottom of the bomb is below the top of the building.
 Detecting if the bomb hit a building
function checkBuildingHit() {
  for (let i = 0; i < state.buildings.length; i++) {
    const building = state.buildings[i];
    if (
      state.bomb.x + 4 > building.x &&
      state.bomb.x - 4 < building.x + building.width &&
      state.bomb.y - 4 < 0 + building.height
    ) {
      return true; // Building hit
    }
  }
}
If all this is true, then we know that the bomb hit the building. If we get a hit, the function ends with returning true. This will also signal to the animate function that we can stop the animation loop.
How to detect if the bomb hit the enemy
Now that we can detect if the bomb went off-screen and we have hit detection for buildings, it’s time to detect if we hit the enemy.
We are going to have a different approach this time. Detecting if we got a hit with traditional geometric calculations would be much more complicated, because the gorillas are not built with basic rectangles and circles.
 Screenshot of the game once we hit the enemy
Instead, we can use the isPointInPath method that conveniently tells us if a point – in this case, the center of the bomb – is within a path.
This method tells us if a point is within the current or previous path. So before calling the method, we need to recreate the gorilla. The gorilla is not only one single path, so we have to test against the most relevant path, the main body of the gorilla.
Conveniently – and with some smart planning – we already have a function that paints the body of the gorilla as a single path. We call the drawGorillaBody function right before isPointInPath. But the drawGorillaBody function paints with coordinates relative to the rooftop of a building, so before calling it, we need to translate the coordinate system.
Depending on the current player, we'll calculate which building the enemy stands on, and translate the coordinate system to top of that. Because of this translation, we also use the save and restore methods.
function checkGorillaHit() {
  const enemyPlayer = state.currentPlayer === 1 ? 2 : 1;
  const enemyBuilding =
    enemyPlayer === 1
      ? state.buildings.at(1) // Second building
      : state.buildings.at(-2); // Second last building

  ctx.save();

  ctx.translate(
    enemyBuilding.x + enemyBuilding.width / 2,
    enemyBuilding.height
  );

  drawGorillaBody();
  let hit = ctx.isPointInPath(state.bomb.x, state.bomb.y);

  drawGorillaLeftArm(enemyPlayer);
  hit ||= ctx.isPointInStroke(state.bomb.x, state.bomb.y);

  drawGorillaRightArm(enemyPlayer);
  hit ||= ctx.isPointInStroke(state.bomb.x, state.bomb.y);

  ctx.restore();

  return hit;
}
Similarly, we can also detect if we hit one of the arms of the gorilla. The arms are drawn as a stroke, so in this case instead of isPointInPath we'll use the isPointInStroke method. This detection would not have worked if we did not increase the hit detection precision earlier, because the bomb could easily jump over the arm.
With this function, we have every piece of the hit detection. The animation loop stops in case we hit a building, the enemy, or the bomb gets off-screen. It’s time to handle what’s next in these cases.
How to handle the result of hit detection
Once we have proper hit detection, it's time to finally handle the cases when we hit a building, the enemy, or the bomb goes off-screen. We'll update the animate function one last time. The only thing new below is the code block of the two if statements inside the loop.
If we hit the edge of the screen or a building, that means we've missed the target. In this case, we'll switch players and get back to the aiming phase. We'll also re-initialize the bomb position to move it to the new player’s hand.
 Once we've missed the enemy, we switch players
Then we'll simply call the draw function to handle the rest. The beauty of this structure is that we only need to change the game state and the draw function can repaint the whole scene according to it.
Then we'll return from the animate function to stop the animation loop. The event handlers are active again (because we are back in the aiming phase), and the next player can take a shot.
function animate(timestamp) {
  if (!previousAnimationTimestamp) {
    previousAnimationTimestamp = timestamp;
    requestAnimationFrame(animate);
    return;
  }

  const elapsedTime = timestamp - previousAnimationTimestamp;

  const hitDetectionPrecision = 10;
  for (let i = 0; i < hitDetectionPrecision; i++) {
    moveBomb(elapsedTime / hitDetectionPrecision); // Hit detection

    const miss = checkFrameHit() || checkBuildingHit();
    const hit = checkGorillaHit();

    // Handle the case when we hit a building or the bomb got off-screen
    if (miss) {
      state.currentPlayer = state.currentPlayer === 1 ? 2 : 1; // Switch players
      state.phase = "aiming";
      initializeBombPosition();
      draw();
      return;
    }

    // Handle the case when we hit the enemy
    if (hit) {
      state.phase = "celebrating";
      announceWinner();
      draw();
      return;
    }
  }

  draw();

  // Continue the animation loop
  previousAnimationTimestamp = timestamp;
  requestAnimationFrame(animate);
}
If we hit the enemy, we need to switch to the celebrating phase. We'll announce the winner with a function that we are about to cover in the next section. Then we repaint the scene with a celebrating gorilla and return to stop the animation loop.
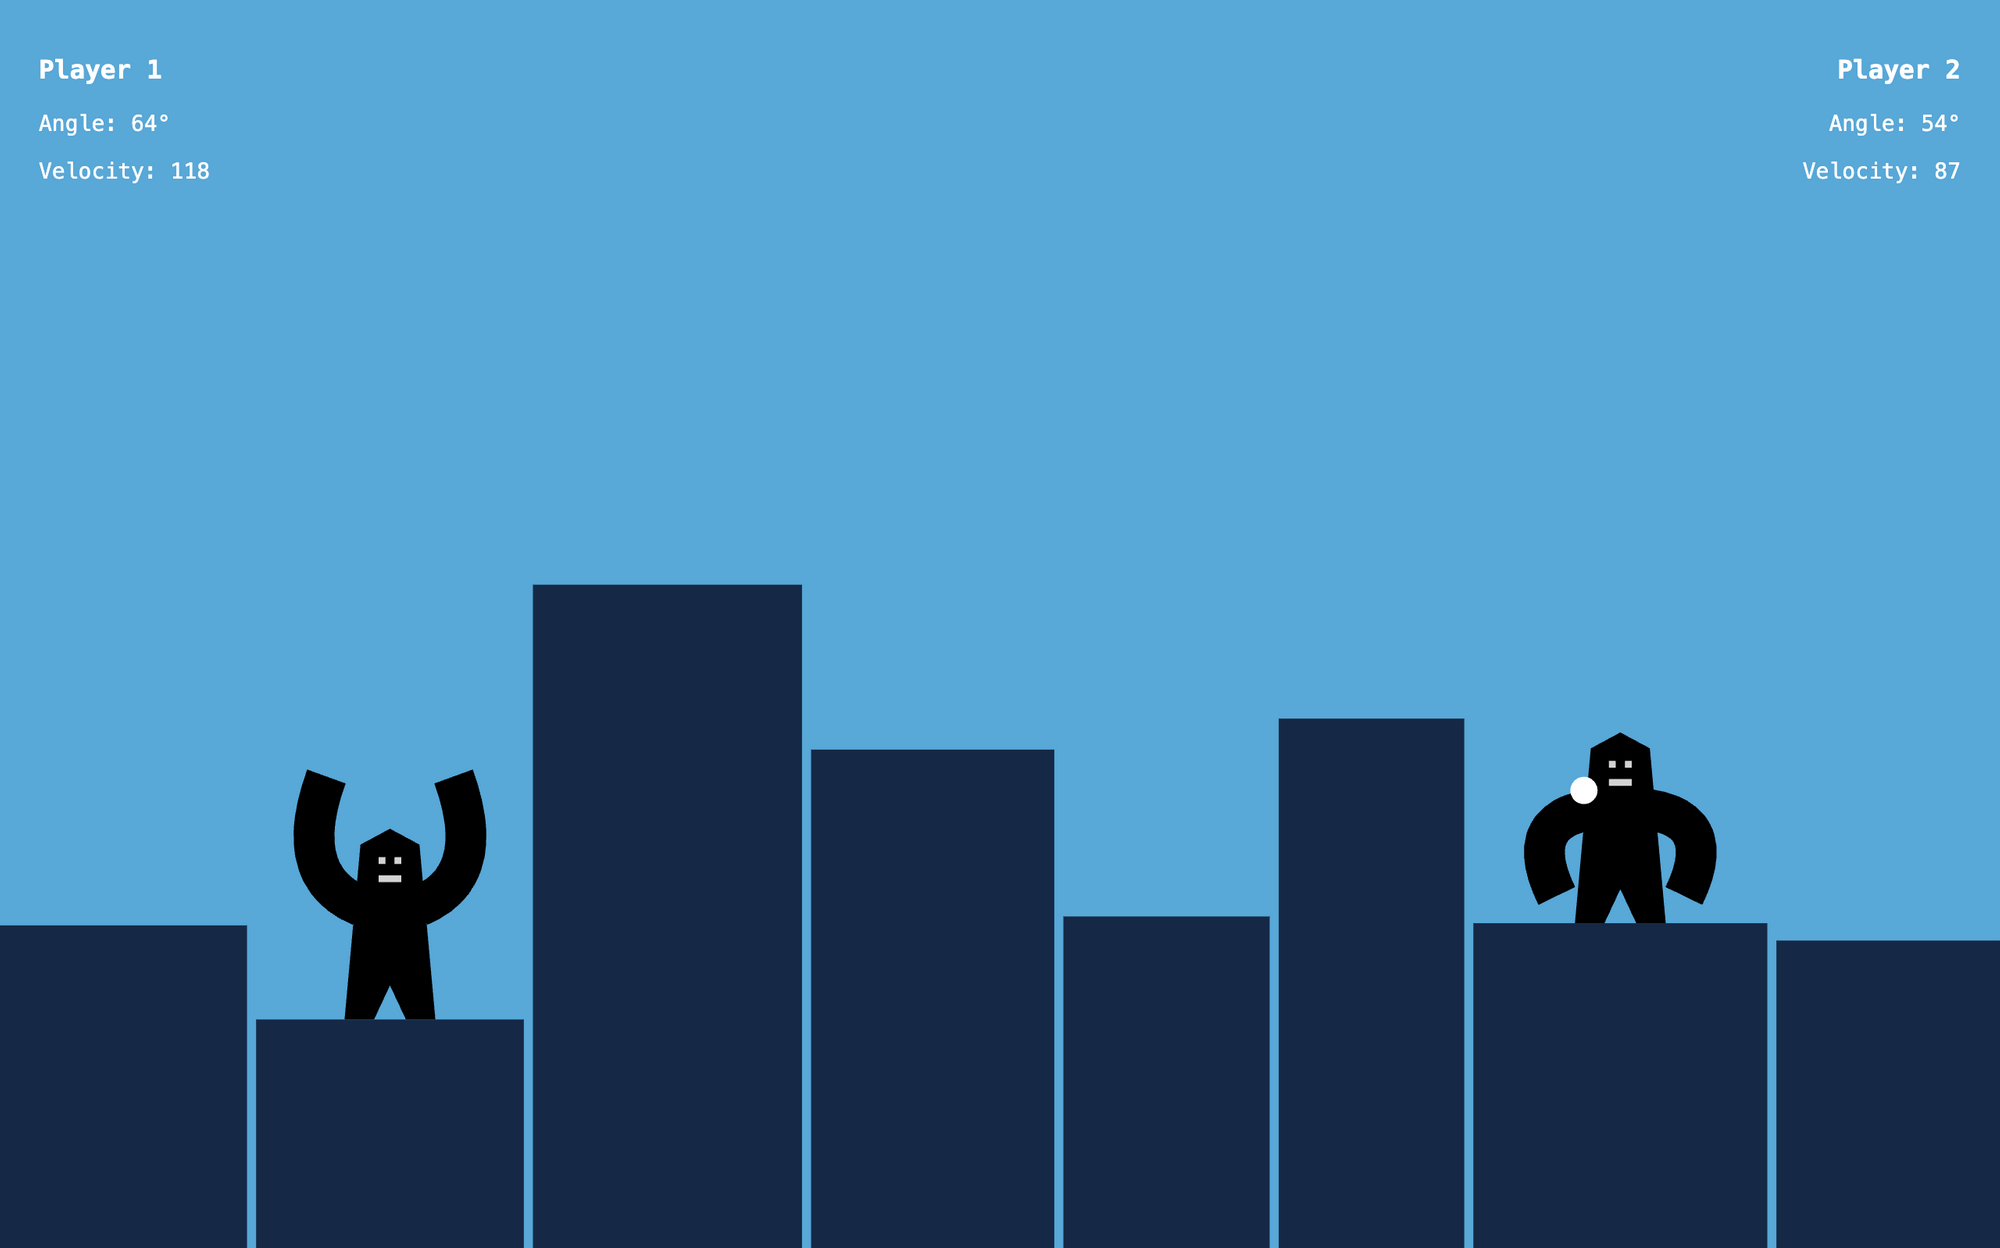 Once we hit the enemy the
 draw function repaints the scene with a celebrating gorilla
To make sure our code does not throw an error, let's add a placeholder for the announceWinner function.
function announceWinner() {
    // ...
}
How to announce the winner
Once we hit the enemy, we should announce the winner. For this, we'll add another info panel in HTML that includes who won the game and a restart button. At the bottom of the now-finished HTML file, you can find the congratulations panel.
 The
The congratulations panel announcing the winner
<!DOCTYPE html>
<html lang="en">
  <head>
    <meta charset="utf-8" />
    <title>Gorillas</title>
    <link rel="stylesheet" href="index.css" />
    <script src="index.js" defer></script>
  </head>
  <body>
    <canvas id="game"></canvas>

    <div id="info-left">
      <h3>Player 1</h3>
      <p>Angle: <span class="angle">0</span>°</p>
      <p>Velocity: <span class="velocity">0</span></p>
    </div>

    <div id="info-right">
      <h3>Player 2</h3>
      <p>Angle: <span class="angle">0</span>°</p>
      <p>Velocity: <span class="velocity">0</span></p>
    </div>

    <div id="bomb-grab-area"></div>

    <div id="congratulations">
      <h1><span id="winner">?</span> won!</h1>
      <button id="new-game">New Game</button>
    </div>
  </body>
</html>
This panel is hidden by default and it only shows up at the end of the game. When it shows up, it should be in the middle of the screen. We'll update our CSS file according to this.
Note that we added display: flex to the body element with a few more properties to center everything on the screen. Then we set position: absolute for the congratulations element and hide it by default.
body {
  margin: 0;
  padding: 0;
  font-family: monospace;
  font-size: 14px;
  color: white;
  user-select: none;
  -webkit-user-select: none;
  display: flex;
  justify-content: center;
  align-items: center;
}

#info-left {
  position: absolute;
  top: 20px;
  left: 25px;
}

#info-right {
  position: absolute;
  top: 20px;
  right: 25px;
  text-align: right;
}

#bomb-grab-area {
  position: absolute;
  width: 30px;
  height: 30px;
  border-radius: 50%;
  background-color: transparent;
  cursor: grab;
}

#congratulations {
  position: absolute;
  visibility: hidden;
}
Then finally we can use this panel to announce the winner once the game ends in JavaScript. We already call the announceWinner function in our animate function so it’s time to implement it.
First, somewhere at the beginning of the file, we'll set up some references for the congratulations panel itself and the winner field.
. . .

// Congratulations panel
const congratulationsDOM = document.getElementById("congratulations");
const winnerDOM = document.getElementById("winner");

. . .
Then in the announceWinner function, we'll set the content of the winner field to say the current player and show the congratulations panel.
function announceWinner() {
  winnerDOM.innerText = `Player ${state.currentPlayer}`;
  congratulationsDOM.style.visibility = "visible";
}
With this piece, we finally can play the game until the end. We can aim, the bomb flies across the sky, and the gorillas take turns until one of them wins the game. The only missing piece is resetting the game for another round.
How to reset for another round
As a final finishing touch, let’s add an event handler for the 'New Game' button on our congratulations panel to be able to reset the game. We've already added a button with the ID new-game in our HTML.
In JavaScript first, we'll create a reference to this button and then add an event handler for it. This event handler simply calls the newGame function.
. . .

// Congratulations panel
const congratulationsDOM = document.getElementById("congratulations");
const winnerDOM = document.getElementById("winner");
const newGameButtonDOM = document.getElementById("new-game");

. . .

newGameButtonDOM.addEventListener("click", newGame);
The newGame function should reset everything and generate a new level so we can start a new game. At this point, though, our newGame function does not reset everything. It does not reset the HTML elements we introduced in the meantime.
As a very last step, we'll make sure that the congratulations element is hidden once we start a new game, and reset the angle and velocity values in the left and right info panels to 0.
function newGame() {
  // Initialize game state
  state = {
    scale: 1,
    phase: "aiming", // aiming | in flight | celebrating
    currentPlayer: 1,
    bomb: {
      x: undefined,
      y: undefined,
      velocity: { x: 0, y: 0 },
    },
    buildings: generateBuildings(),
  };

  calculateScale();

  initializeBombPosition();

  // Reset HTML elements
  congratulationsDOM.style.visibility = "hidden";
  angle1DOM.innerText = 0;
  velocity1DOM.innerText = 0;
  angle2DOM.innerText = 0;
  velocity2DOM.innerText = 0;

  draw();
}
Next Steps
While we now have a full two-player game, we can do a lot more. On YouTube I also cover how to make the buildings destructible, how to animate the hand of the gorilla to follow the drag movement while aiming, and we spend more time adding detailed graphics. There's also a whole chapter on how to add computer logic to the game, so that you can play against the computer.
Check it out to learn more: