By M. S. Farzan
I'm a tabletop game developer, and am continually looking for ways to digitize game experiences. In this tutorial, we're going to build a multiplayer card game using Phaser 3, Express, and Socket.IO.
In terms of prerequisites, you'll want to make sure that you have Node/NPM and Git installed and configured on your machine. Some experience with JavaScript would be helpful, and you may want to run through the basic Phaser tutorial before tackling this one.
Major kudos to Scott Westover for his tutorial on the topic, Kal_Torak and the Phaser community for answering all my questions, and my good friend Mike for helping me conceptualize the architecture of this project.
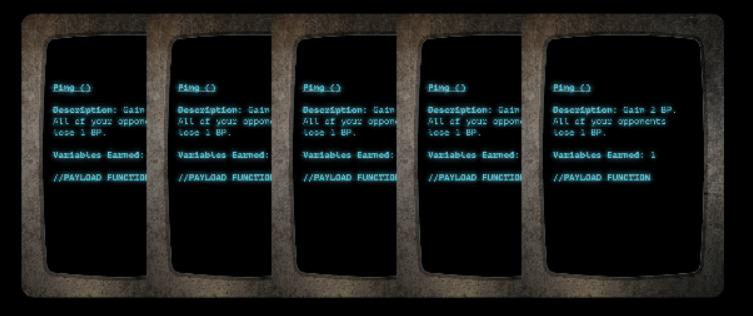
Note: we'll be using assets and colors from my tabletop card game, Entromancy: Hacker Battles. If you prefer, you can use your own images (or even Phaser rectangles) and colors, and you can access the entire project code on GitHub.
If you'd prefer a more visual tutorial, you can also follow along with the companion video to this article:
Let's get started!
The Game
Our simple card game will feature a Phaser client that will handle most of the game logic and doing things like dealing cards, providing drag-and-drop functionality, and so on.
On the back end, we'll spin up an Express server that will utilize Socket.IO to communicate between clients and make it so that when one player plays a card, it shows up in another player's client, and vice-versa.
Our goal for this project is to create a basic framework for a multiplayer card game that you can build upon and adjust to suit your own game's logic.
First, let's tackle the client!
The Client
To scaffold our client, we're going to clone the semi-official Phaser 3 Webpack Project Template on GitHub.
Open your favorite command line interface and create a new folder:
mkdir multiplayer-card-project
cd multiplayer-card-project
Clone the git project:
git clone https://github.com/photonstorm/phaser3-project-template.git
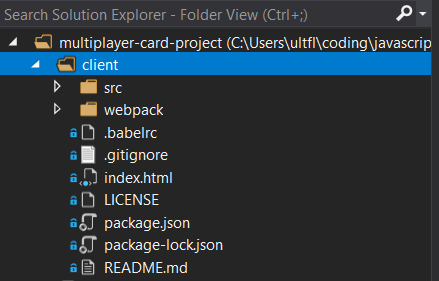
This command will download the template in a folder called "phaser3-project-template" within /multiplayer-card-project. If you want to follow along with our tutorial's file structure, go ahead and change that template folder's name to "client."
Navigate into that new directory and install all dependencies:
cd client
npm install
Your project folder structure should look something like this:
Before we muck with the files, let's go back to our CLI and enter the following command in the /client folder:
npm start
Our Phaser template utilizes Webpack to spin up a local server that in turn serves up a simple game app in our browser (usually at http://localhost:8080). Neat!
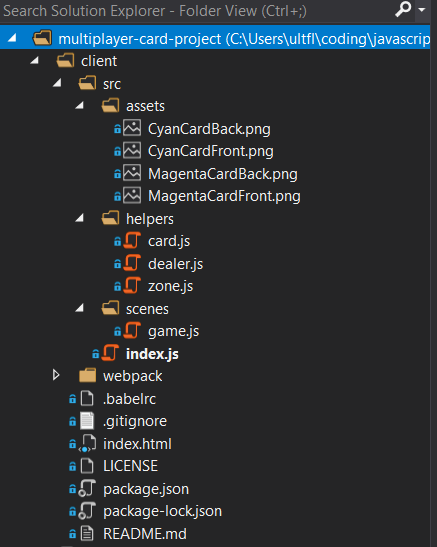
Let's open our project in your favorite code editor and make some changes to fit our card game. Delete everything in /client/src/assets and replace them with the card images from GitHub.
In the /client/src directory, add a folder called "scenes" and another called "helpers."
In /client/src/scenes, add an empty file called "game.js".
In /client/src/helpers, add three empty files: "card.js", "dealer.js", and "zone.js".
Your project structure should now look like this:
Cool! Your client might be throwing you errors because we deleted some things, but not to worry. Open /src/index.js, which is the main entry point to our front end app. Enter the following code:
import Phaser from "phaser";
import Game from "./scenes/game";

const config = {
    type: Phaser.AUTO,
    parent: "phaser-example",
    width: 1280,
    height: 780,
    scene: [
        Game
    ]
};

const game = new Phaser.Game(config);
All we've done here is restructure the boilerplate to utilize Phaser's "scene" system so that we can separate our game scenes rather than try to cram everything in one file. Scenes can be useful if you're creating multiple game worlds, building things like instruction screens, or generally trying to keep things tidy.
Let's move to /src/scenes/game.js and write some code:
export default class Game extends Phaser.Scene {
    constructor() {
        super({
            key: 'Game'
        });
    }

    preload() {
        this.load.image('cyanCardFront', 'src/assets/CyanCardFront.png');
        this.load.image('cyanCardBack', 'src/assets/CyanCardBack.png');
        this.load.image('magentaCardFront', 'src/assets/MagentaCardFront.png');
        this.load.image('magentaCardBack', 'src/assets/MagentaCardBack.png');
    }

    create() {
        this.dealText = this.add.text(75, 350, ['DEAL CARDS']).setFontSize(18).setFontFamily('Trebuchet MS').setColor('#00ffff').setInteractive();
    }

    update() {

    }
}
We're taking advantage of ES6 classes to create a new Game scene, which incorporates preload(), create() and update() functions.
preload() is used to...well...preload any assets that we'll be using for our game.
create() is run when the game starts up, and where we'll be establishing much of our user interface and game logic.
update() is called once per frame, and we won't be making use of it in our tutorial (but it may be useful in your own game depending on its requirements).
Within the create() function, we've created a bit of text that says "DEAL CARDS" and set it to be interactive:

Very cool. Let's create a bit of placeholder code to understand how we want this whole thing to work once it's up and running. Add the following to your create() function:
        let self = this;

        this.card = this.add.image(300, 300, 'cyanCardFront').setScale(0.3, 0.3).setInteractive();
        this.input.setDraggable(this.card);

        this.dealCards = () => {

        }

        this.dealText.on('pointerdown', function () {
            self.dealCards();
        })

        this.dealText.on('pointerover', function () {
            self.dealText.setColor('#ff69b4');
        })

        this.dealText.on('pointerout', function () {
            self.dealText.setColor('#00ffff');
        })

        this.input.on('drag', function (pointer, gameObject, dragX, dragY) {
            gameObject.x = dragX;
            gameObject.y = dragY;
        })
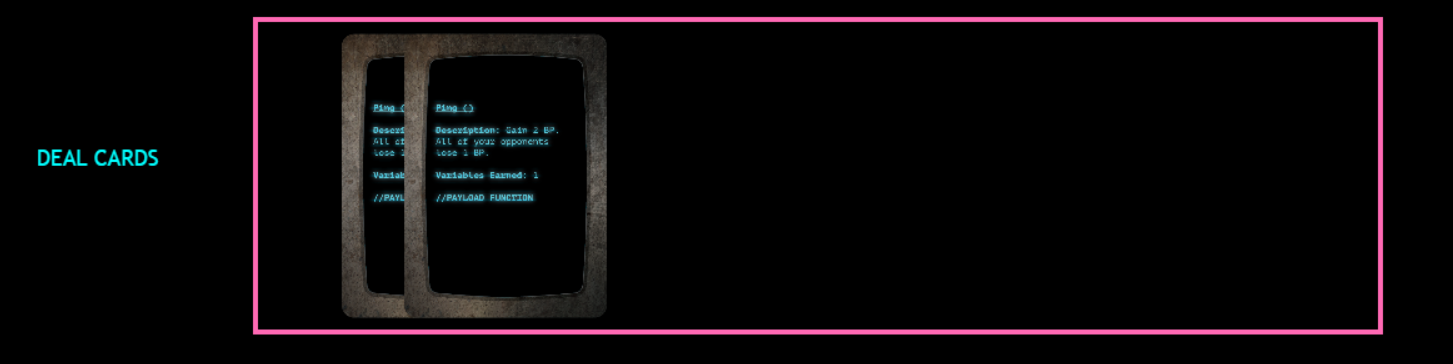
We've added a lot of structure, but not much has happened. Now, when our mouse hovers over the "DEAL CARDS" text, it's highlighted in cyberpunk hot pink, and there's a random card on our screen:
We've placed the image at the (x, y) coordinates of (300, 300), set its scale to be a bit smaller, and made it interactive and draggable. We've also added a little bit of logic to determine what should happen when dragged: it should follow the (x, y) coordinates of our mouse.
We've also created an empty dealCards() function that will be called when we click on our "DEAL CARDS" text. Additionally, we've saved "this" - meaning the scene in which we're currently working - into a variable called "self" so that we can use it throughout our functions without worrying about scope.
Our Game scene is going to get messy fast if we don't start moving things around, so let's delete the code block that begins with "this.card" and move to /src/helpers/card.js to write:
export default class Card {
    constructor(scene) {
        this.render = (x, y, sprite) => {
            let card = scene.add.image(x, y, sprite).setScale(0.3, 0.3).setInteractive();
            scene.input.setDraggable(card);
            return card;
        }
    }
}
We've created a new class that accepts a scene as a parameter, and features a render() function that accepts (x, y) coordinates and a sprite. Now, we can call this function from elsewhere and pass it the necessary parameters to create cards.
Let's import the card at the top of our Game scene:
import Card from '../helpers/card';
And enter the following code within our empty dealCards() function:
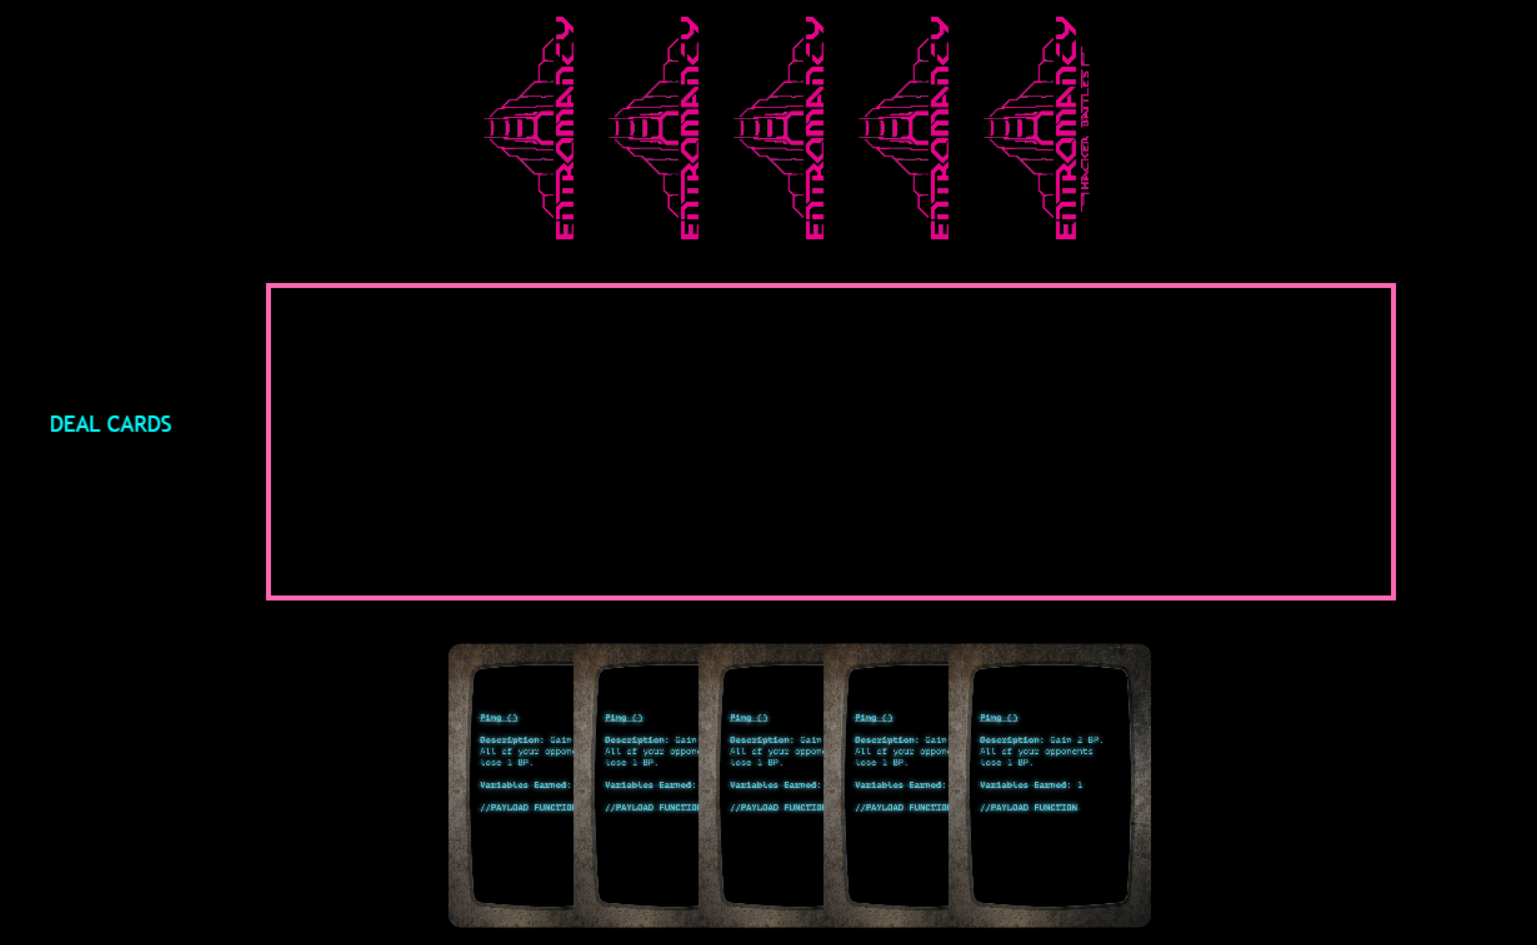
        this.dealCards = () => {
            for (let i = 0; i < 5; i++) {
                let playerCard = new Card(this);
                playerCard.render(475 + (i * 100), 650, 'cyanCardFront');
            }
        }
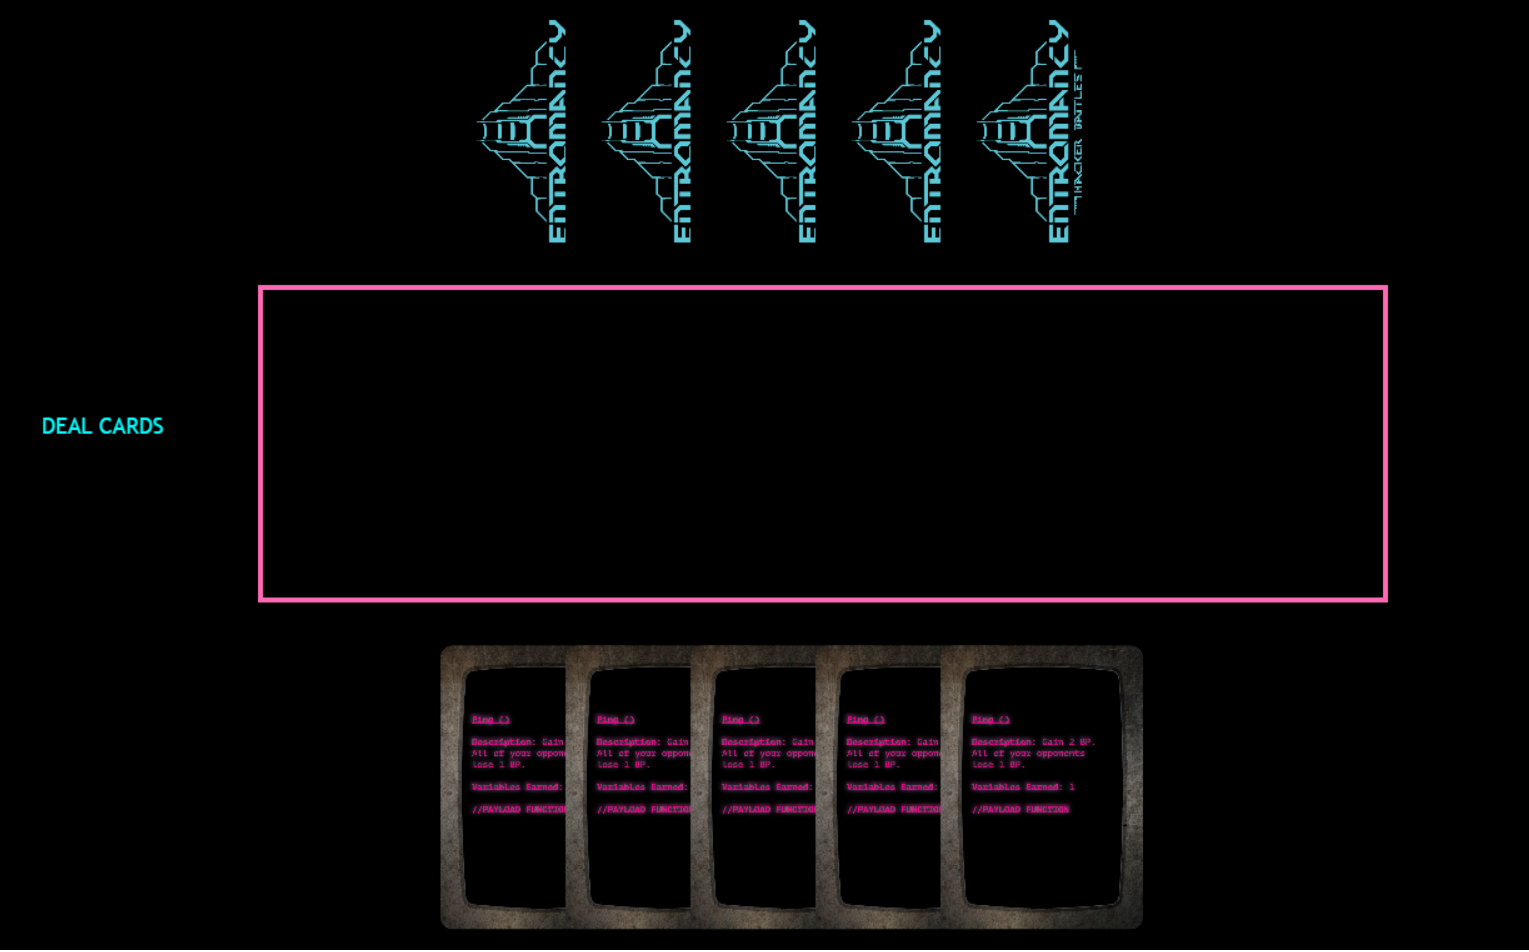
When we click on the "DEAL CARDS" button, we now iterate through a for loop that creates cards and renders them sequentially on screen:
NICE. We can drag those cards around the screen, but it might be nice to limit where they can be dropped to support our game logic.
Let's move over to /src/helpers/zone.js and add a new class:
export default class Zone {
    constructor(scene) {
        this.renderZone = () => {
            let dropZone = scene.add.zone(700, 375, 900, 250).setRectangleDropZone(900, 250);
            dropZone.setData({ cards: 0 });
            return dropZone;
        };
        this.renderOutline = (dropZone) => {
            let dropZoneOutline = scene.add.graphics();
            dropZoneOutline.lineStyle(4, 0xff69b4);
            dropZoneOutline.strokeRect(dropZone.x - dropZone.input.hitArea.width / 2, dropZone.y - dropZone.input.hitArea.height / 2, dropZone.input.hitArea.width, dropZone.input.hitArea.height)
        }
    }
}
Phaser has built-in dropzones that allow us to dictate where game objects can be dropped, and we've set up one here and provided it with an outline. We've also added a tiny bit of data called "cards" to the dropzone that we'll use later.
Let's import our new zone into the Game scene:
import Zone from '../helpers/zone';
And call it in within the create() function:
        this.zone = new Zone(this);
        this.dropZone = this.zone.renderZone();
        this.outline = this.zone.renderOutline(this.dropZone);
Not too shabby!
We need to add a bit of logic to determine how cards should be dropped into the zone. Let's do that below the "this.input.on('drag')" function:
        this.input.on('dragstart', function (pointer, gameObject) {
            gameObject.setTint(0xff69b4);
            self.children.bringToTop(gameObject);
        })

        this.input.on('dragend', function (pointer, gameObject, dropped) {
            gameObject.setTint();
            if (!dropped) {
                gameObject.x = gameObject.input.dragStartX;
                gameObject.y = gameObject.input.dragStartY;
            }
        })

        this.input.on('drop', function (pointer, gameObject, dropZone) {
            dropZone.data.values.cards++;
            gameObject.x = (dropZone.x - 350) + (dropZone.data.values.cards * 50);
            gameObject.y = dropZone.y;
            gameObject.disableInteractive();
        })
Starting at the bottom of the code, when a card is dropped, we increment the "cards" data value on the dropzone, and assign the (x, y) coordinates of the card to the dropzone based on how many cards are already on it. We also disable interactivity on cards after they're dropped so that they can't be retracted:
We've also made it so that our cards have a different tint when dragged, and if they're not dropped over the dropzone, they'll return to their starting positions.
Although our client isn't quite complete, we've done as much as we can before implementing the back end. We can now deal cards, drag them around the screen, and drop them in a dropzone. But to move forward, we'll need to set up a server than can coordinate our multiplayer functionality.
The Server
Let's open up a new command line at our root directory (above /client) and type:
npm init
npm install --save express socket.io nodemon
We've initialized a new package.json and installed Express, Socket.IO, and Nodemon (which will watch our server and restart it upon changes).
In our code editor, let's change the "scripts" section of our package.json to say:
  "scripts": {
    "start": "nodemon server.js"
  },
Excellent. We're ready to put our server together! Create an empty file called "server.js" in our root directory and enter the following code:
const server = require('express')();
const http = require('http').createServer(server);
const io = require('socket.io')(http);

io.on('connection', function (socket) {
    console.log('A user connected: ' + socket.id);

    socket.on('disconnect', function () {
        console.log('A user disconnected: ' + socket.id);
    });
});

http.listen(3000, function () {
    console.log('Server started!');
});
We're importing Express and Socket.IO, asking for the server to listen on port 3000. When a client connects to or disconnects from that port, we'll log the event to the console with the client's socket id.
Open a new command line interface and start the server:
npm run start
Our server should now be running on localhost:3000, and Nodemon will watch our back end files for any changes. Not much else will happen except for the console log that the "Server started!"
In our other open command line interface, let's navigate back to our /client directory and install the client version of Socket.IO:
cd client
npm install --save socket.io-client
We can now import it in our Game scene:
import io from 'socket.io-client';
Great! We've just about wired up our front and back ends. All we need to do is write some code in the create() function:
        this.socket = io('http://localhost:3000');

        this.socket.on('connect', function () {
            console.log('Connected!');
        });
We're initializing a new "socket" variable that points to our local port 3000 and logs to the browser console upon connection.
Open and close a couple of browsers at http://localhost:8080 (where our Phaser client is being served) and you should see the following in your command line interface:
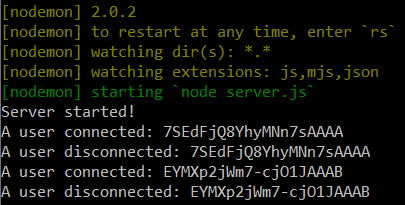
YAY. Let's start adding logic to our server.js file that will serve the needs of our card game. Replace the existing code with the following:
const server = require('express')();
const http = require('http').createServer(server);
const io = require('socket.io')(http);
let players = [];

io.on('connection', function (socket) {
    console.log('A user connected: ' + socket.id);

    players.push(socket.id);

    if (players.length === 1) {
        io.emit('isPlayerA');
    };

    socket.on('dealCards', function () {
        io.emit('dealCards');
    });

    socket.on('cardPlayed', function (gameObject, isPlayerA) {
        io.emit('cardPlayed', gameObject, isPlayerA);
    });

    socket.on('disconnect', function () {
        console.log('A user disconnected: ' + socket.id);
        players = players.filter(player => player !== socket.id);
    });
});

http.listen(3000, function () {
    console.log('Server started!');
});
We've initialized an empty array called "players" and add a socket id to it every time a client connects to the server, while also deleting the socket id upon disconnection.
If a client is the first to connect to the server, we ask Socket.IO to "emit" an event that they're going to be Player A. Subsequently, when the server receives an event called "dealCards" or "cardPlayed", it should emit back to the clients that they should update accordingly.
Believe it or not, that's all the code we need to get our server working! Let's turn our attention back to the Game scene. Right at the top of the create() function, type the following:
        this.isPlayerA = false;
        this.opponentCards = [];
Under the code block that starts with "this.socket.on(connect)", write:
        this.socket.on('isPlayerA', function () {
            self.isPlayerA = true;
        })
Now, if our client is the first to connect to the server, the server will emit an event that tells the client that it will be Player A. The client socket receives that event and turns our "isPlayerA" boolean from false to true.
Note: from this point forward, you may need to reload your browser page (set to http://localhost:8080), rather than having Webpack do it automatically for you, for the client to correctly disconnect from and reconnect to the server.
We need to reconfigure our dealCards() logic to support the multiplayer aspect of our game, given that we want the client to deal us a certain set of cards that may be different from our opponent's. Additionally, we want to render the backs of our opponent's cards on our screen, and vice versa.
We'll move to the empty /src/helpers/dealer.js file, import card.js, and create a new class:
import Card from './card';
export default class Dealer {
constructor(scene) {
this.dealCards = () => {
let playerSprite;
let opponentSprite;
if (scene.isPlayerA) {
playerSprite = 'cyanCardFront';
opponentSprite = 'magentaCardBack';
} else {
playerSprite = 'magentaCardFront';
opponentSprite = 'cyanCardBack';
};
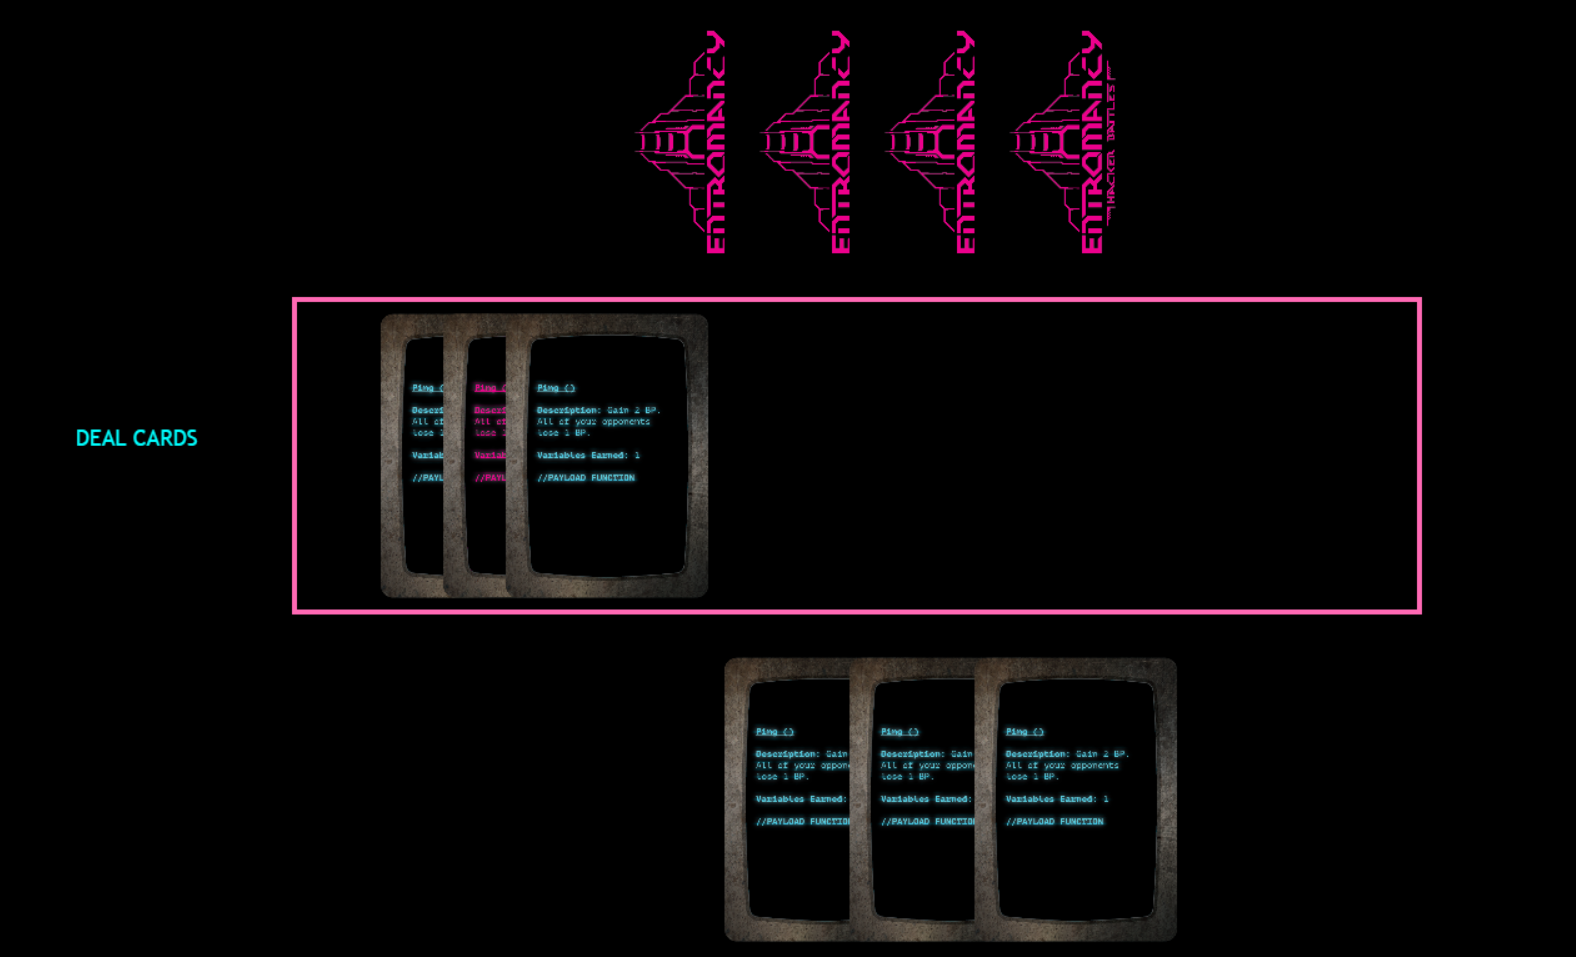
for (let i = 0; i < 5; i++) {
let playerCard = new Card(scene);
playerCard.render(475 + (i * 100), 650, playerSprite);
let opponentCard = new Card(scene);
scene.opponentCards.push(opponentCard.render(475 + (i * 100), 125, opponentSprite).disableInteractive());
}
}
}
}
With this new class, we're checking whether the client is Player A, and determining what sprites should be used in either case.
Then, we deal cards to our client, while rendering the backs of our opponent's cards at the top the screen and adding them to the opponentCards array that we initialized in our Game scene.
In /src/scenes/game.js, import the Dealer:
import Dealer from '../helpers/dealer';
Then replace our dealCards() function with:
this.dealer = new Dealer(this);
Under code block that begins with "this.socket.on('isPlayerA')", add the following:
        this.socket.on('dealCards', function () {
            self.dealer.dealCards();
            self.dealText.disableInteractive();
        })
We also need to update our dealText function to match these changes:
        this.dealText.on('pointerdown', function () {
            self.socket.emit("dealCards");
        })
Phew! We've created a new Dealer class that will handle dealing cards to us and rendering our opponent's cards to the screen. When the client socket receives the "dealcards" event from the server, it will call the dealCards() function from this new class, and disable the dealText so that we can't just keep generating cards for no reason.
Finally, we've changed the dealText functionality so that when it's pressed, the client emits an event to the server that we want to deal cards, which ties everything together.
Fire up two separate browsers pointed to http://localhost:8080 and hit "DEAL CARDS" on one of them. You should see different sprites on either screen:

Note again that if you're having issues with this step, you may have to close one of your browsers and reload the first one to ensure that both clients have disconnected from the server, which should be logged to your command line console.
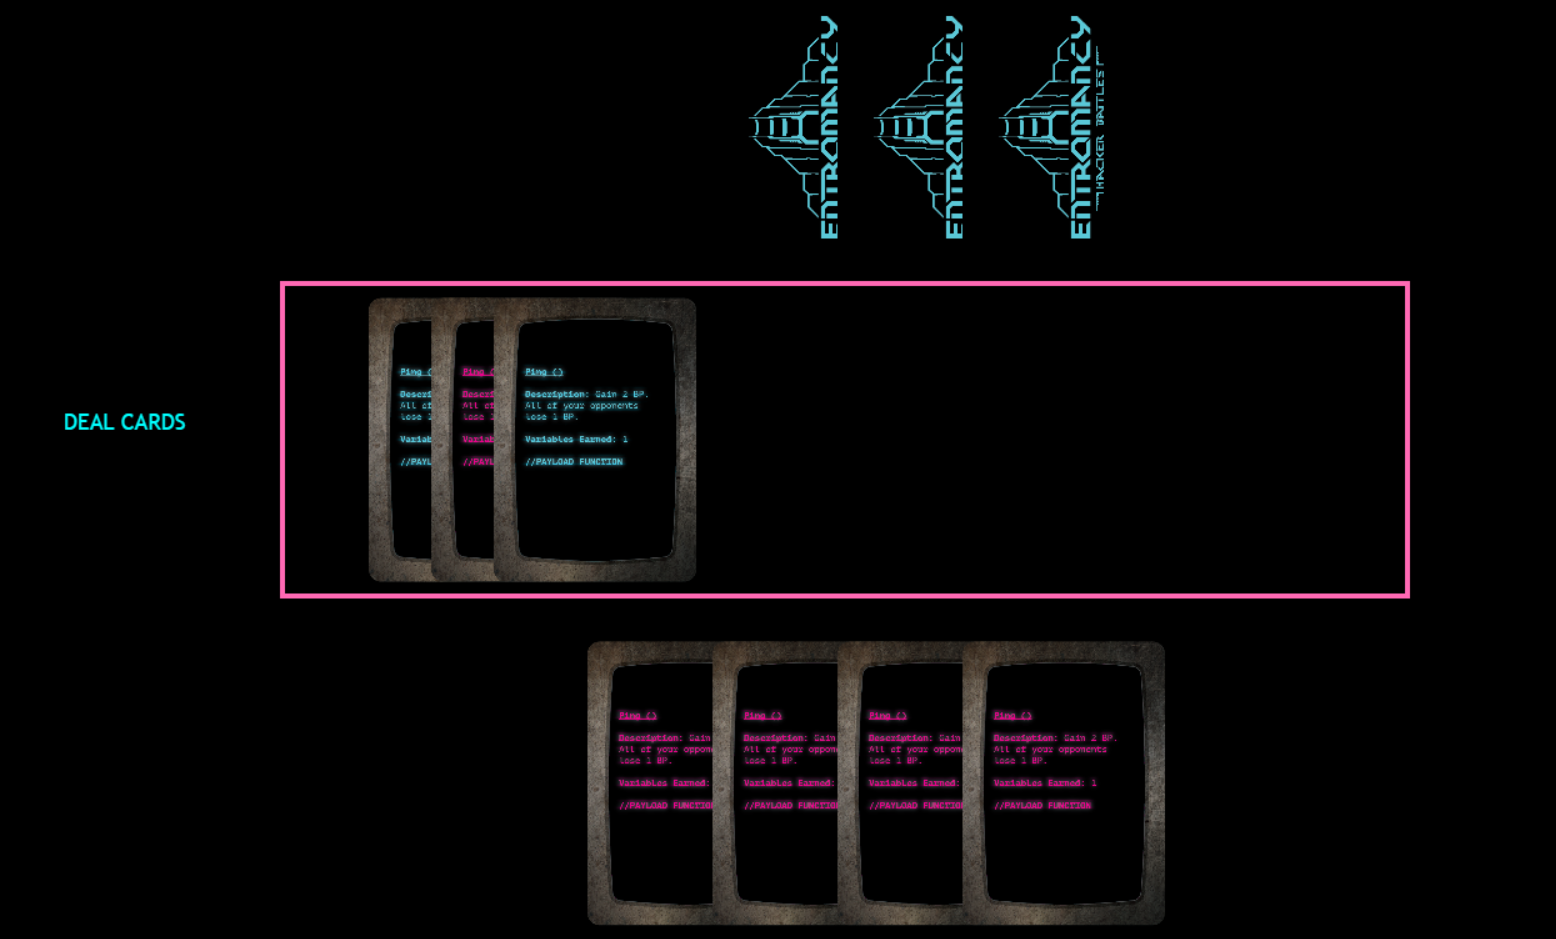
We still need to figure out how to render our dropped cards in our opponent's client, and vice-versa. We can do all of that in our game scene! Update the code block that begins with "this.input.on('drop')" with one line at the end:
        this.input.on('drop', function (pointer, gameObject, dropZone) {
            dropZone.data.values.cards++;
            gameObject.x = (dropZone.x - 350) + (dropZone.data.values.cards * 50);
            gameObject.y = dropZone.y;
            gameObject.disableInteractive();
            self.socket.emit('cardPlayed', gameObject, self.isPlayerA);
        })
When a card is dropped in our client, the socket will emit an event called "cardPlayed", passing the details of the game object and the client's isPlayerA boolean (which could be true or false, depending on whether the client was the first to connect to the server).
Recall that, in our server code, Socket.IO simply receives the "cardPlayed" event and emits the same event back up to all of the clients, passing the same information about the game object and isPlayerA from the client that initiated the event.
Let's write what should happen when a client receives a "cardPlayed" event from the server, below the "this.socket.on('dealCards')" code block:
         this.socket.on('cardPlayed', function (gameObject, isPlayerA) {
            if (isPlayerA !== self.isPlayerA) {
                let sprite = gameObject.textureKey;
                self.opponentCards.shift().destroy();
                self.dropZone.data.values.cards++;
                let card = new Card(self);
                card.render(((self.dropZone.x - 350) + (self.dropZone.data.values.cards * 50)), (self.dropZone.y), sprite).disableInteractive();
            }
        })
The code block first compares the isPlayerA boolean it receives from the server against the client's own isPlayerA, which is a check to determine whether the client that is receiving the event is the same one that generated it.
Let's think that through a bit further, as it exposes a key component to how our client - server relationship works, using Socket.IO as the connector.
Suppose that Client A connects to the server first, and is told through the "isPlayerA" event that it should change its isPlayerA boolean to true. That's going to determine what kind of cards it generates when a user clicks "DEAL CARDS" through that client.
If Client B connects to the server second, it's never told to alter its isPlayerA boolean, which stays false. That will also determine what kind of cards it generates.
When Client A drops a card, it emits a "cardPlayed" event to the server, passing information about the card that was dropped, and its isPlayerA boolean, which is true. The server then relays all that information back up to all clients with its own "cardPlayed" event.
Client A receives that event from the server, and notes that the isPlayerA boolean from the server is true, which means that the event was generated by Client A itself. Nothing special happens.
Client B receives the same event from the server, and notes that the isPlayerA boolean from the server is true, although Client B's own isPlayerA is false. Because of this difference, it executes the rest of the code block.
The ensuing code stores the "texturekey" - basically, the image - of the game object that it receives from the server into a variable called "sprite". It destroys one of the opponent card backs that are rendered at the top of the screen, and increments the "cards" data value in the dropzone so that we can keep placing cards from left to right.
The code then generates a new card in the dropzone that uses the sprite variable to create the same card that was dropped in the other client (if you had data attached to that game object, you could use a similar approach to attach it here as well).
Your final /src/scenes/game.js code should look like this:
import io from 'socket.io-client';
import Card from '../helpers/card';
import Dealer from "../helpers/dealer";
import Zone from '../helpers/zone';

export default class Game extends Phaser.Scene {
    constructor() {
        super({
            key: 'Game'
        });
    }

    preload() {
        this.load.image('cyanCardFront', 'src/assets/CyanCardFront.png');
        this.load.image('cyanCardBack', 'src/assets/CyanCardBack.png');
        this.load.image('magentaCardFront', 'src/assets/magentaCardFront.png');
        this.load.image('magentaCardBack', 'src/assets/magentaCardBack.png');
    }

    create() {
        this.isPlayerA = false;
        this.opponentCards = [];

        this.zone = new Zone(this);
        this.dropZone = this.zone.renderZone();
        this.outline = this.zone.renderOutline(this.dropZone);

        this.dealer = new Dealer(this);

        let self = this;

        this.socket = io('http://localhost:3000');

        this.socket.on('connect', function () {
            console.log('Connected!');
        });

        this.socket.on('isPlayerA', function () {
            self.isPlayerA = true;
        })

        this.socket.on('dealCards', function () {
            self.dealer.dealCards();
            self.dealText.disableInteractive();
        })

        this.socket.on('cardPlayed', function (gameObject, isPlayerA) {
            if (isPlayerA !== self.isPlayerA) {
                let sprite = gameObject.textureKey;
                self.opponentCards.shift().destroy();
                self.dropZone.data.values.cards++;
                let card = new Card(self);
                card.render(((self.dropZone.x - 350) + (self.dropZone.data.values.cards * 50)), (self.dropZone.y), sprite).disableInteractive();
            }
        })

        this.dealText = this.add.text(75, 350, ['DEAL CARDS']).setFontSize(18).setFontFamily('Trebuchet MS').setColor('#00ffff').setInteractive();

        this.dealText.on('pointerdown', function () {
            self.socket.emit("dealCards");
        })

        this.dealText.on('pointerover', function () {
            self.dealText.setColor('#ff69b4');
        })

        this.dealText.on('pointerout', function () {
            self.dealText.setColor('#00ffff');
        })

        this.input.on('drag', function (pointer, gameObject, dragX, dragY) {
            gameObject.x = dragX;
            gameObject.y = dragY;
        })

        this.input.on('dragstart', function (pointer, gameObject) {
            gameObject.setTint(0xff69b4);
            self.children.bringToTop(gameObject);
        })

        this.input.on('dragend', function (pointer, gameObject, dropped) {
            gameObject.setTint();
            if (!dropped) {
                gameObject.x = gameObject.input.dragStartX;
                gameObject.y = gameObject.input.dragStartY;
            }
        })

        this.input.on('drop', function (pointer, gameObject, dropZone) {
            dropZone.data.values.cards++;
            gameObject.x = (dropZone.x - 350) + (dropZone.data.values.cards * 50);
            gameObject.y = dropZone.y;
            gameObject.disableInteractive();
            self.socket.emit('cardPlayed', gameObject, self.isPlayerA);
        })
    }

    update() {

    }
}
Save everything, open two browsers, and hit "DEAL CARDS". When you drag and drop a card in one client, it should appear in the dropzone of the other, while also deleting a card back, signifying that a card has been played:
That's it! You should now have a functional template for your multiplayer card game, which you can use to add your own cards, art, and game logic.
One first step could be to add to your Dealer class by making it shuffle an array of cards and return a random one (hint: check out Phaser.Math.RND.shuffle([array])).
Happy coding!
If you enjoyed this article, please consider checking out my games and books, subscribing to my YouTube channel, or joining the Entromancy Discord.
M. S. Farzan, Ph.D. has written and worked for high-profile video game companies and editorial websites such as Electronic Arts, Perfect World Entertainment, Modus Games, and MMORPG.com, and has served as the Community Manager for games like Dungeons & Dragons Neverwinter and Mass Effect: Andromeda. He is the Creative Director and Lead Game Designer of Entromancy: A Cyberpunk Fantasy RPG and author of The Nightpath Trilogy. Find M. S. Farzan on Twitter @sominator.