
By Jake Lumetta
This tutorial is a follow-up to my previous tutorial on how to build a serverless CMS-powered Vue.js application, and shows you how to build a serverless CMS-powered Angular app.

Angular, developed and maintained by Google engineers, has found a place across dynamic web applications and is an increasingly in-demand language. It’s a robust and comprehensive language for front-end development that is unit-testing ready, making it the language of choice for many developers. Angular simplifies the front-end development experience by extending HTML’s syntax to allow you to quickly create content management capability.
Because of Angular’s simplicity, developers are increasingly taking advantage of it to add CMS capability to websites.
For Wordpress users, one popular way to integrate content management capability is to work with the wp-api-angular library that allows you to interact with the Wordpress API and Angular applications. If you’re using Wordpress as a CMS platform, using Angular and the Wordpress API can decrease load times for content on your page.
For those not using Wordpress, there’s a new breed of API-based CMSs that greatly simplify things. We’ll discuss one example here.
In this article, we’ll use ButterCMS as an alternative to Wordpress and an example of a SaaS-based headless CMS that provides a hosted CMS dashboard and content API that you query from your Angular application. This means you don’t need to spin up any new infrastructure to add CMS to your Angular app.
This tutorial will demonstrate how to build a CMS-powered Angular application that has marketing pages (customer case studies), a blog, and FAQ, all powered via API. No servers needed!
Installation
First, you’ll get started by installing the Angular cli.
npm install -g @angular/cli
Setup a new Angular project using Angular cli. By default, angular-cli uses CSS style, so adding the —-style=scss flag tells Angular CLI to use SCSS instead.
ng new hello-buttercms-project --style=scsscd hello-buttercms-project
Install Angular Material and Angular Material related packages.
npm install --save @angular/material @angular/cdknpm install --save @angular/animations
Install ButterCMS. Run this in your command line:
npm install buttercms --save
Butter can also be loaded using a CDN:
<script src="https://cdnjs.buttercms.com/buttercms-1.1.1.min.js"></script>
Quickly get started
Open the project in your code editor of choice. Under src/app, create a directory called _services
We’ll create a file called butterCMS.service.js. This allows you to have your API Token in one place and not accidentally alter it.
import * as Butter from 'buttercms';
export const butterService = Butter('b60a008584313ed21803780bc9208557b3b49fbb');
You’ll import this file into any component where you want to use ButterCMS.
For a Quickstart, go to src/app/hello-you/hello-you.component.ts and import butterService
import {butterService} from '../_services';
Inside the HelloYouComponent, create methods:
fetchPosts() { butter.post.list({ page: 1, page_size: 10 }) .then((res) => { console.log(‘Content from ButterCMS’) console.log(res) })}
Now call this method when the component is loaded by adding it to the OnInit lifecycle hook:
ngOnInit() { this.fetchPosts();}
This API request fetches a sample blog post. Your account comes with one example post which you’ll see in the response. If you get a response, it means you’re now able to connect to the API.
Add marketing pages
Setting up CMS-powered Pages is a three-step process:
- Define the Page Type
- Create a page
- Integrate into your applicaton
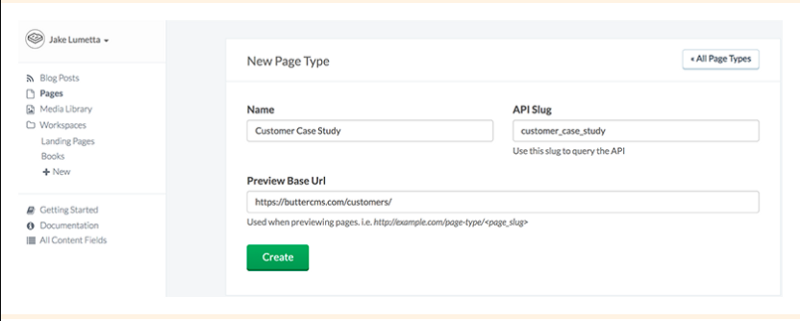
Define Page
First, create a Page Type to represent your Customer Case Study pages. Next, define the fields you want for your customer case studies. With your Page Type defined, you can now create the first case study page. Specify the name and URL of the page, and then populate the content of the page.
With your page defined, the ButterCMS API will return it in JSON format like this:
{ "data": { "slug": "acme-co", "fields": { "facebook_open_graph_title": "Acme Co loves ButterCMS", "seo_title": "Acme Co Customer Case Study", "headline": "Acme Co saved 200% on Anvil costs with ButterCMS", "testimonial": "<p>We’ve been able to make anvils faster than ever before! — <em>Chief Anvil Maker</em></p>\r\n<p><img src=\"https://cdn.buttercms.com/NiA3IIP3Ssurz5eNJ15a\" alt=\"\" caption=\"false\" width=\"249\" height=\"249\" /></p>", "customer_logo": "https://cdn.buttercms.com/c8oSTGcwQDC5I58km5WV", } } }
This guide uses the Angular framework and Angular CLI to generate all the components and package our application.
Let’s get to the code.
Create new project
ng new buttercms-project --style=scsscd buttercms-projectnpm install --save @angular/material @angular/cdknpm install --save @angular/animationsnpm install -S buttercmsng serve
Your localhost:4200 should be ready to serve your Angular page.
Create typescript to export ButterCMS service
Under src/app create a directory called _services. Create a file called butterCMS.service.js.
import * as Butter from 'buttercms';export const butterService = Butter('your_api_token');
Update the component routes
These components are generated by Angular CLI using:
ng g component <my-new-component>
Under src/app create a file called app-routing.module.ts
import {NgModule} from '@angular/core';import {RouterModule, Routes} from '@angular/router';import {CustomerComponent} from './customer/listing/customer.listing.component';import {FaqComponent} from './faq/faq.component';import {BlogPostComponent} from './blog-post/listing/blog-post.component';import {HomeComponent} from './home/home.component';import {CustomerDetailsComponent} from './customer/details/customer.details.component';import {BlogPostDetailsComponent} from './blog-post/details/blog-post.details.component';import {FeedComponent} from './feed/feed.component';import {HelloYouComponent} from './hello-you/hello-you.component';
const appRoutes: Routes = [ {path: 'customer', component: CustomerComponent}, {path: 'customer/:slug', component: CustomerDetailsComponent}, {path: 'faq', component: FaqComponent}, {path: 'blog', component: BlogPostComponent}, {path: 'blog/:slug', component: BlogPostDetailsComponent}, {path: 'rss', component: FeedComponent}, {path: 'hello-you', component: HelloYouComponent}, {path: 'home', component: HomeComponent}, {path: '**', redirectTo: 'home'}];
@NgModule({ imports: [RouterModule.forRoot(appRoutes)], exports: [RouterModule]})export class AppRoutingModule {}
Set up the Customer List page
Under apps/customer type: ng g component
In the file apps/customer/listing/customer.listing.component.ts :
- Import
butterService - In
OnInithook, usebutterServiceto get the list of customers - Store results in pages variable and markup (HTML) will be updated with the data
import {Component, OnInit} from '@angular/core';import {butterService} from '../../_services';
@Component({ selector: 'app-customer', templateUrl: './customer.listing.component.html', styleUrls: ['./customer.listing.component.scss']})
export class CustomerComponent implements OnInit { public pages: any[]; constructor() { }
ngOnInit() { butterService.page.list(‘customer_case_study’) .then((res) => { this.pages = res.data.data; }); }}
Display the results in customer.listing.component.html
<mat-card> <mat-card-title class="page-title">;Customers</mat-card-title> <mat-divider></mat-divider> <mat-card-content class="page-body"> <mat-card *ngFor="let page of pages"> <mat-card-title> <div class="container"> <a [routerLink]="[page.slug]"> <div fxLayout="row" fxLayout.xs="column" fxFlex class="content"> <div class="blocks"> <img src="{{page.fields.customer_logo}}" alt="{{page.fields.seotitle}}" height="64" width="64"/> </div> <div class="blocks"> {{page.fields.headline}} </div> </div> </a> </div> </mat-card-title> </mat-card></mat-card-content><mat-divider></mat-divider><mat-card-footer> <div class="page-footer"> <mat-icon>whatshot</mat-icon> </div></mat-card-footer></mat-card>
Set up the Customer Detail page
Under apps/customer, type ng g component details .
apps/customer/details/customer.details.component.ts
Create customer page
- Import
butterService - In
OnInithook, usebutterServiceto get the customer page given the slug in the URL path - Store results in page variable and markup (HTML) will be updated with the customer data
import {Component, OnInit} from '@angular/core';import {Observable} from 'rxjs/Observable';import {ActivatedRoute} from '@angular/router';import {butterService} from '../../_services';import {map, take} from 'rxjs/operators';
@Component({ selector: 'app-customer-details', templateUrl: './customer.details.component.html', styleUrls: ['./customer.details.component.scss']})
export class CustomerDetailsComponent implements OnInit { constructor(protected route: ActivatedRoute) { }
protected slug$: Observable<string>; public page: any;
ngOnInit() { this.slug$ = this.route.paramMap .pipe( map(params => (params.get('slug'))) );
this.slug$.pipe( take(1)) .subscribe(slug => { butterService.page.retrieve('customer_case_study', slug) .then((res) => { this.page = res.data.data; }).catch((res) => { console.log(res); }); }); } }
Display the results in customer.details.component.html
<mat-card> <div class="container"> <div fxLayout="column" class="details"> <div class="blocks"> <img src="{{page.fields.customer_logo}}" alt="" height="124" width="124"/> </div>
<h1 class="blocks"> {{page.fields.headline}} </h1> <h3 class="is-size-3">Testimonials</h3> <div [innerHTML]="page.fields.testimonial"></div> <div [innerHTML]="page.fields.body"></div> </div> </div></mat-card>
You can now navigate to the Customer Page via the list of all Customer Pages or directly via URL.
Add a knowledge base
Set up content fields
Let’s suppose you want to add a CMS to a static FAQ page with a title and a list of questions with answers.
Making your content dynamic with Butter is a two-step process:
- Setup custom content fields in Butter
- Integrate the fields into your application
To setup custom content fields, first sign in to the Butter dashboard.
Create a new workspace or click on an existing one. Workspaces let you organize content fields in a friendly way for content editors and have no effect on development or the API. For example, a real-estate website might have a workspace called “Properties” and another called “About Page”.

Once you’re in a workspace click the button to create a new content field. Choose the “Object” type and name the field “FAQ Headline.”
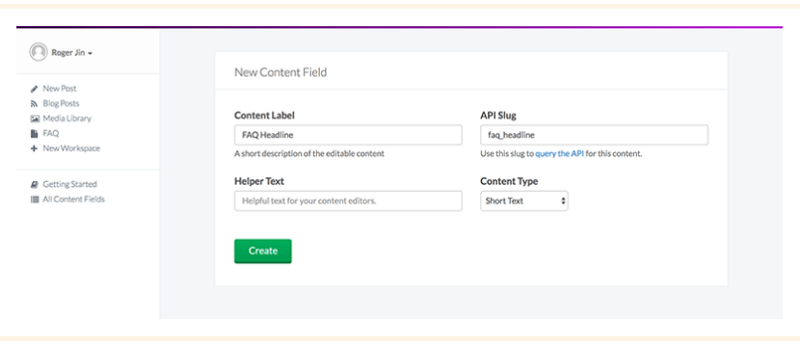
After saving, add another field, but this time choose the “Collection” type and name the field FAQ Items .
On the next screen, setup two properties for items in the collection.
Now go back to your workspace and update your heading and FAQ items.
Integrate your app
Create FAQ Component
Under apps type: ng g component faq
apps/faq/faq.component.ts
Set up onInit hook to load FAQ
import {Component, OnInit} from '@angular/core';import {butterService} from '../_services';
@Component({ selector: 'app-faq', templateUrl: './faq.component.html', styleUrls: ['./faq.component.scss']})
export class FaqComponent implements OnInit { constructor() {}
public faq: any = { items: [], title: 'FAQ' };
ngOnInit() { butterService.content.retrieve(['faq_headline', 'faq_items']) .then((res) => { console.log(res.data.data); this.faq.title = res.data.data.faq_headline; this.faq.items = res.data.data.faq_items; }); }}
Display the result
<mat-card> <mat-card-title class="page-title"></mat-card-title> <mat-divider></mat-divider> <mat-card-content class="page-body"> <mat-card *ngFor="let item of faq.items"> <mat-card-content> <h3>; {{item.question}} </h3> <div> {{item.answer}} </div> </mat-card-content> <;/mat-card> </mat-card-content> <mat-divider></mat-divider> <mat-card-footer> <div class="page-footer"> <mat-icon>whatshot</mat-icon> </div> </mat-card-footer> </mat-card>
The values entered in the Butter dashboard will immediately update the content in our app.
Blogging
To display posts, you need to create a /blog route in your app and fetch blog posts from the Butter API, as well as a /blog/:slug route to handle individual posts.
See the API reference for additional options such as filtering by category or author. The response also includes some metadata we’ll use for pagination.
Set up Blog Homepage
Under apps/blog-post, type: ng g component listing .
apps/blog-post/listing/blog-post.listing.component.ts
Update component to get all posts:
- Import
butterService - Get all post
onInit
import {Component, OnInit} from '@angular/core';import {butterService} from '../../_services';
@Component({ selector: 'app-blog-post', templateUrl: './blog-post.component.html', styleUrls: ['./blog-post.component.scss']})export class BlogPostComponent implements OnInit { public posts: any[];
constructor() { }
ngOnInit() { butterService.post.list({ page: 1, page_size: 10}).then((res) => { console.log(res.data) this.posts = res.data.data; }); }}
Display the result:
<mat-card> <mat-card-title class="page-title">Blog Posts</mat-card-title>; <mat-divider></mat-divider> <mat-card-content class="page-body"> <mat-card *ngFor=”let post of posts”> <mat-card-title>
<a [routerLink]="[post.slug]"> <div class="container">; <div fxLayout="row" fxLayout.xs="column" fxFlex class="content"> <div class="blocks"> <img *ngIf="post.featured_image" src="{{post.featured_image}}" height="64" width="64"/>; </div> <div class="blocks"> {{post.title}} <;/div> </div>; </div> <div class="container"> <div fxLayout="column" class="summary"> <div [innerHTML]="post.summary"></div> </div> </div> </a> </mat-card-title></mat-card></mat-card-content><mat-divider></mat-divider>
<mat-card-footer> <div class="page-footer"> <mat-icon>whatshot</mat-icon> </div> </mat-card-footer></mat-card>
Set up Blog Post page
Under apps/blog-post, type: ng g component details
apps/blog-post/details/blog-post.details.component.ts
To show a single post:
- Import
butterService - In
OnInithook, usebutterServiceto get the blog-post post given the slug in the URL path - Store results in post variable and markup (HTML) will be updated with the customer data
import {Component, OnInit, ViewEncapsulation} from '@angular/core';import {Observable} from 'rxjs/Observable';import {ActivatedRoute} from '@angular/router';import {butterService} from '../../_services';import {map, take} from 'rxjs/operators';
@Component({ selector: 'app-blog-post-details', templateUrl: './blog-post.details.component.html', styleUrls: ['./blog-post.details.component.scss'], encapsulation: ViewEncapsulation.None})
export class BlogPostDetailsComponent implements OnInit {
constructor(protected route: ActivatedRoute) { }
protected slug$: Observable<string>; public post = { meta: null, data: null};
ngOnInit() { this.slug$ = this.route.paramMap .pipe( map(params => (params.get('slug'))) );
this.slug$.pipe( take(1)) .subscribe(slug => { butterService.post.retrieve(slug) .then((res) => { this.post = res.data; }).catch((res) => { console.log(res); }); }); }}
Display the result:
<mat-card> <div class="container"> <div fxLayout="column" class="blog-details"> <div class="container"> <div fxLayout="row"> <h1 class="blocks"> {{post.data.title}} </h1> <div *ngIf="post.meta.previous_post"><a [routerLink]="post.meta.previous_post"><</a></div> <div *ngIf="post.meta.next_post">;<a [routerLink]="post.meta.next_post">></a></div> </div>; <;h4> {{post.data.author.first_name}} {{post.data.author.last_name}} </h4> <div class="post-body" [innerHTML]="post.data.body"></div> </div> </div> </div></mat-card>
Now your app has a working blog that can be updated easily in the ButterCMS dashboard.
Categories, tags, and authors
Use Butter’s APIs for categories, tags, and authors to feature and filter content on your blog.
List all categories and get posts by category
Call these methods on the onInit() lifecycle hook:
methods: { ... getCategories() { butter.category.list() .then((res) => { console.log('List of Categories:') console.log(res.data.data) }) }, getPostsByCategory() { butter.category.retrieve('example-category', { include: 'recent_posts' }) .then((res) => { console.log('Posts with specific category:') console.log(res) }) } }, created() { ... this.getCategories() this.getPostsByCategory()}
getCategories() { butter.category.list() .then((res) => { console.log(‘List of Categories:’) console.log(res.data.data) }) }, getPostsByCategory() { butter.category.retrieve(‘example-category’, { include: ‘recent_posts’ }) .then((res) => { console.log(‘Posts with specific category:’) console.log(res) }) }},created() { … this.getCategories() this.getPostsByCategory()}
Wrap up
Congrats, you’ve successfully turned your static Angular application into a CMS-powered app using content APIs and thereby maintaining a serverless architecture. Your development team can take advantage of the time-saving aspects of Angular, and you’ve saved even more time by using a serverless CMS.
If you’ve enjoyed this article, please help it spread by clapping below! For more content like this, follow us on Twitter and subscribe to our blog.
And if you want to add a blog or Angular CMS to your website without messing around with Wordpress, you should try Butter CMS.