

In this article, you'll build a task manager application that has some artificial intelligence capabilities and is voice-enabled, sortable, and searchable.
As an extra, the application will have dark mode support that respects the users' system preferences.
The application will be able to create, read, update and delete (CRUD) tasks as well as the ability to view a given task.
You'll build this application using Appwrite as a backend, React on the frontend, Typescript for type safety and Tailwind CSS for styling.
Table of Contents
- Prerequisites
- What is Appwrite?
- How to Set Up the Appwrite Backend
- How to Set up the React Frontend
- How to Connect to the Appwrite Project
- How to Build the Task Manager Application
- How to Set up Routing with React Router V6
- How to Create the Form Component
- How to Set up Form to Create Task
- How to Make the Tasks Editable
- How to Enable Viewing of Tasks
- How to Auto Generate Descriptions with Vercel's AI SDK
- Voice-enable the Application with the React Speech Recognition Package
- How to Add Search Functionality to the Application
- How to Add Ability to Sort Tasks via Due Date and Priority
- Bonus: Add Dark Mode Support
- Notes
- Limitations
Prerequisites
You will need the following to be able to build along with this article:
- Basic programming knowledge
- Basic understanding of React, Typescript and Tailwind
- An Appwrite account
- And a text editor to code along
What is Appwrite?
Appwrite is an open source Backend-as-a-Service (BaaS) platform. A BaaS is a cloud service that packages backend tasks that are typically needed for most applications.
Appwrite offers both a managed database, authentication, functions and storage services and the ability to self-host the entire platform on your own.
Appwrite recently announced a host of new features that makes developers building on their platform lives more straightforward. You can read on that here.
How to Set Up the Appwrite Backend
Before starting to build the application and interacting with Appwrite, you'll need an Appwrite account and to set up the project.
Once you have the account ready, you will need to create an organization, then create a project within that organization. You can name the project "Tasks App" or any other name you see fit.
Note: Appwrite cloud restricts you to one organization per account on the hobby/free plan. If you already had an organization, you can go straight to creating a project within your existing organization.
In your Tasks App project, add a web platform and follow the prompts. For the hostname, add "localhost" for now. This is to allow the frontend to bypass CORS when interacting with the Appwrite backend.
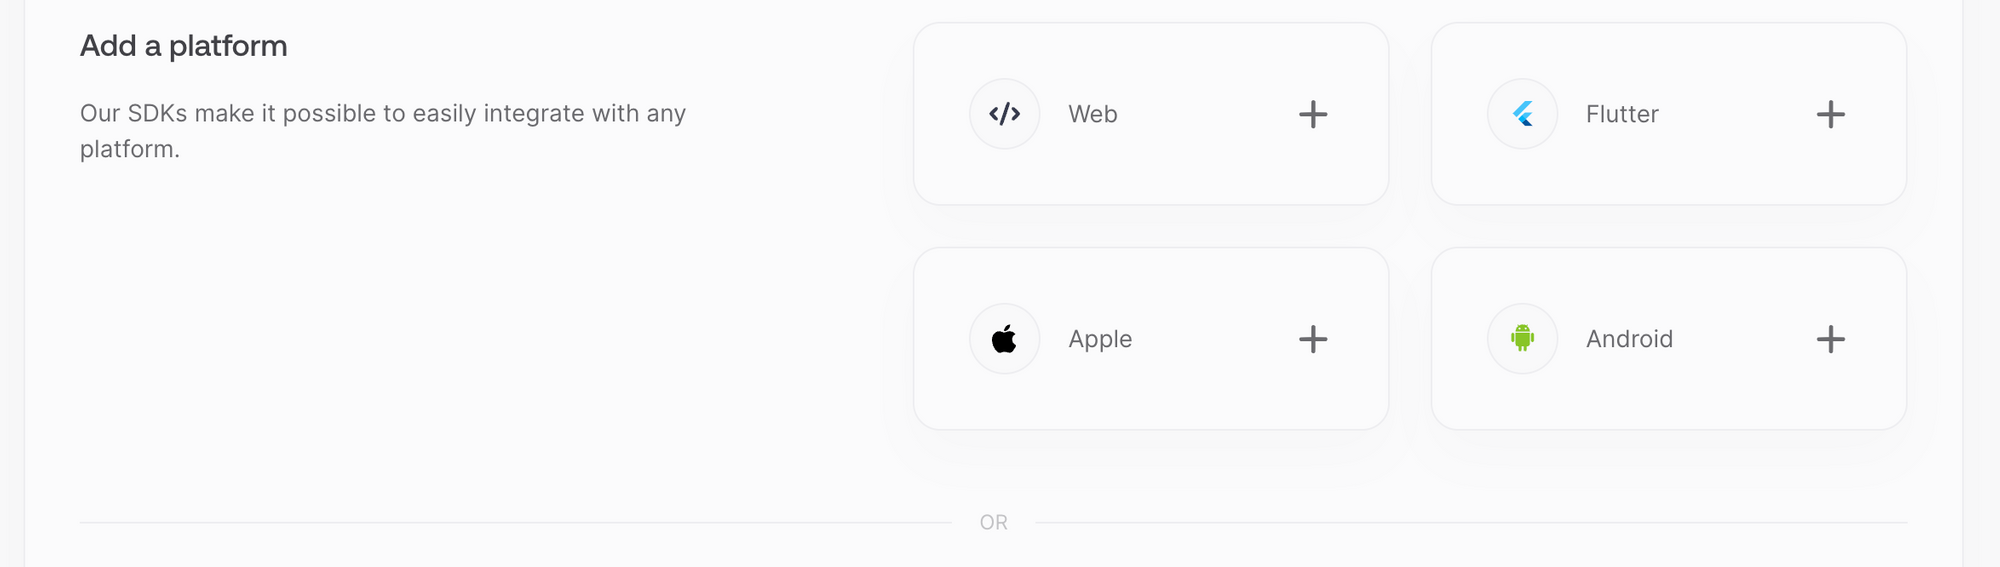 A picture of the Appwrite Console showing the "Add a platform" section
Copy the installation instructions as you complete setting up the web platform for the project. Keep these safe, you will need them when setting up the frontend.
You should now be in the Appwrite cloud console. Click on the "Databases" on the left sidebar. Then click on the pink "Create database" button. Name your database and leave the autogenerated ID as is.
Now, click on the "Create collection" button, name your collection "tasks" and leave the autogenerated ID as is. Now, click on the grey "Create attribute" button as shown below:
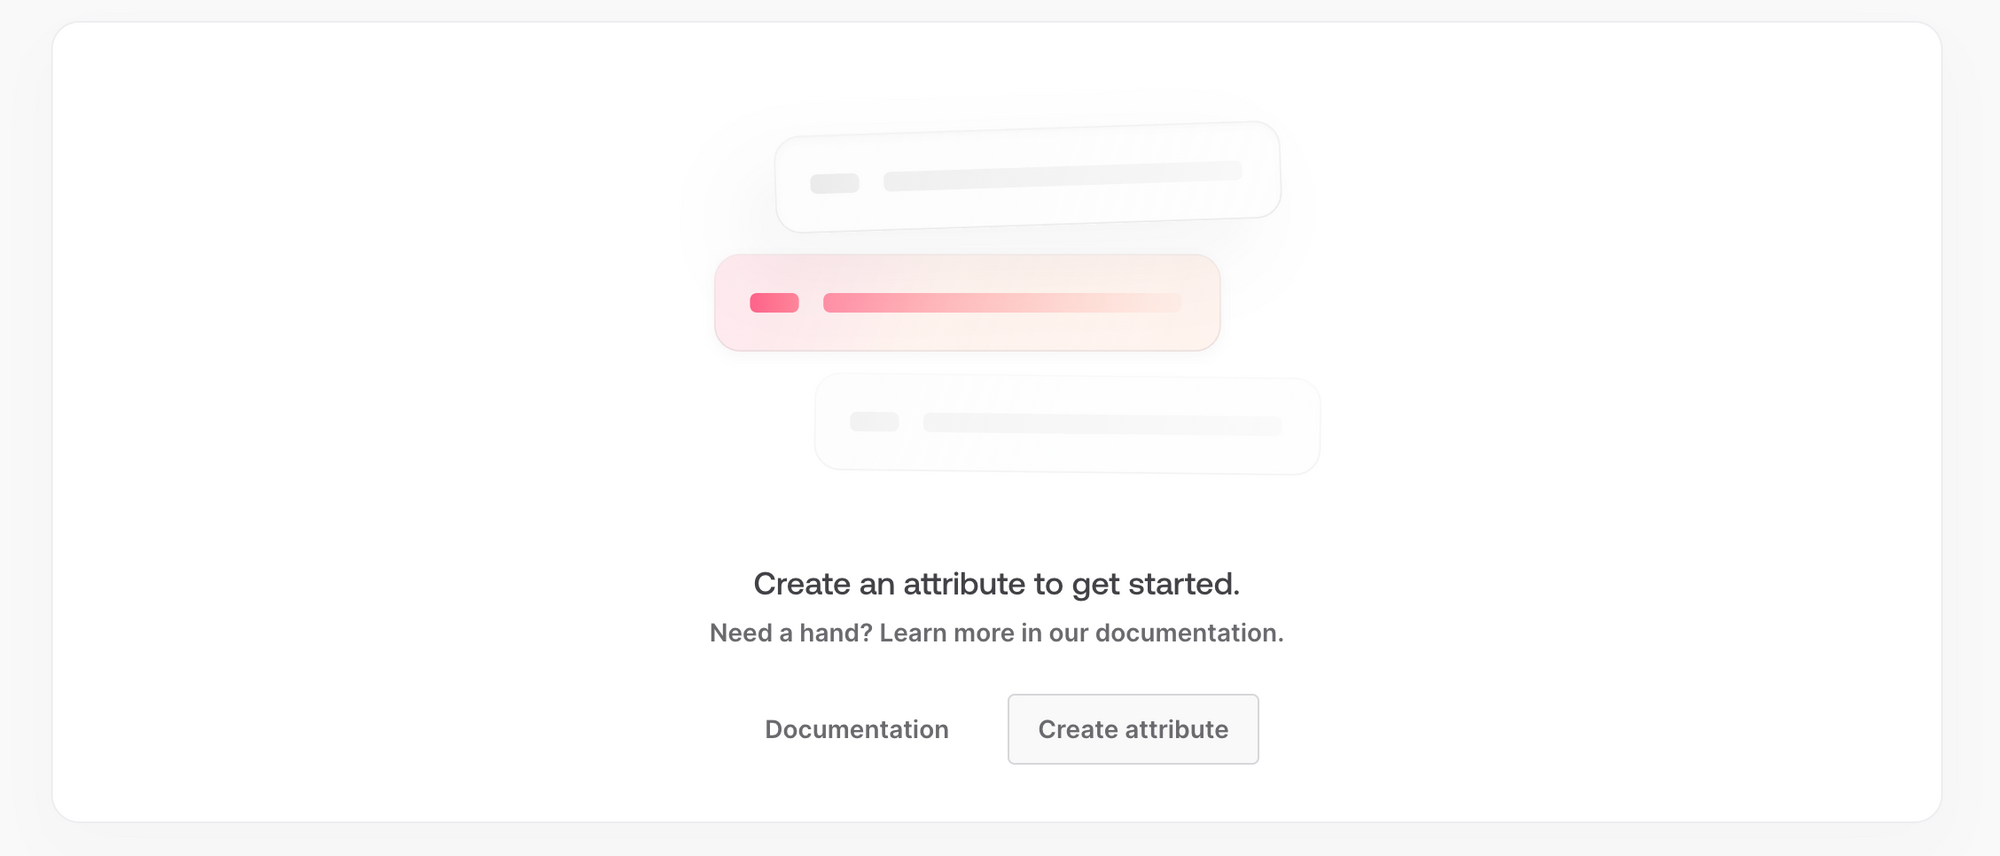 A picture of the Appwrite Console showing the "Create attribute" button
Add the following attributes:
- title of type String, give it a size of 49 and make it required
- description of type String, give it a size of 200
- due_date of type Datetime, make it required
- done of type Boolean, give it a default of False
- priority of type String, give it a size of 10
Finally, you need to set permissions in order for your React frontend to interact with Appwrite services. In this case, allow any one to have access. This is not ideal for production and you can read more about Appwrite permissions here.
Go to the console, click on databases, then your task database and then your tasks collection, then click on settings and scroll down to permissions. Add permissions for "Any" role and give them full CRUD access.
You are now ready to start setting up the frontend and to connect it to the Appwrite project you just completed prepping.
How to Set up the React Frontend
Open your text editor to your preferred location. Then open the integrated terminal and run the following command to create a Vite-based application:
//taskwrite is the name of the application
npm create vite@latest taskwrite
Choose React and then plain Typescript when prompted. This will create a React application with Typescript already set up for you.
Change folders into the newly created "taskwrite" one by running cd taskwrite from the terminal. Run the following command in the same terminal window to add Tailwind to the application:
npm install -D tailwindcss postcss autoprefixer
npx tailwindcss init -p
Then in your tailwind.config.js file which is in the root of the Taskwrite application, replace the "content" key with content: ["./index.html", "./src/**/*.{js,ts,jsx,tsx}"],. The file should look like this:
/** @type {import('tailwindcss').Config} */
export default {
    content: ["./index.html", "./src/**/*.{js,ts,jsx,tsx}"],
    theme: {
        extend: {},
    },
    plugins: [],
};
This tells Tailwind that it should look for its classes in the index.html file at the root and in files within the src folder that end with either .js, .ts, .jsx or .tsx extensions.
Then open the src folder and delete the "App.css" file. Open the index.css file and replace its contents with the following:
@import url('https://fonts.googleapis.com/css2?family=Inter:wght@100..900&family=Quicksand:wght@300..700&display=swap');
@tailwind base;
@tailwind components;
@tailwind utilities;

@layer base {
    :root{
        --base-bg: #ffffff;
        --btn-bg-primary: #be185d;
        --btn-bg-primary-hover: #9d174d;
        --btn-icon-main: #1e293b;
        --btn-bg-ok: #4ade80;
        --btn-bg-light-ok: #bbf7d0;
        --btn-bg-light: #e5e7eb;
        --low-priority: #facc15;
        --medium-priority: #fb923c;
        --high-priority: #f87171;
        --text-error: #dc2626;
        --text-ok: #16a34a;
        --text-main: #262626;
        --border-container: #9ca3af;
        --border-input: #1e293b;
        --border-error: #dc2626;
    }

    body{
        background-color: var(--base-bg);
        color: var(--text-main);
    }

    #date::-webkit-calendar-picker-indicator {
        background-color: var(--btn-bg-light);
    }
}
This adds some custom css variables to the application. The variables map to Tailwind colors.
Next, paste the following into the tailwind.config.js at the root of the application:
/** @type {import('tailwindcss').Config} */
export default {
    content: ["./index.html", "./src/**/*.{js,ts,jsx,tsx}"],
    theme: {
        extend: {
            textColor: {
                error: "var(--text-error)",
                ok: "var(--text-ok)",
                main: "var(--text-main)",
                iconColor: "var(--btn-icon-main)",
            },
            backgroundColor: {
                base: "var(--base-bg)",
                primary: "var(--btn-bg-primary)",
                primaryHover: "var(--btn-bg-primary-hover)",
                ok: "var(--btn-bg-ok)",
                lightOk: "var(--btn-bg-light-ok)",
                light: "var(--btn-bg-light)",
                lowPriority: "var(--low-priority)",
                mediumPriority: "var(--medium-priority)",
                highPriority: "var(--high-priority)",
            },
            borderColor: {
                container: "var(--border-container)",
                input: "var(--border-input)",
                error: "var(--border-error)",
            },
        },
    },
    plugins: [],
};
This ties the CSS variables to the tailwind config and makes them available to use in our application.
Now Taskwrite is set up with React, Typescript and Tailwind.
How to Connect to the Appwrite Project
Firstly, you need to add the Appwrite dependency to the React application. Run the following command in the terminal window to do that: npm i appwrite.
Next thing is to set up the Appwrite keys we need as environment variables. In the .gitignore file at the root of the application, add *.env at the top of the file then save. This will ensure that the .env file you'll create is not added to version control.
Now, create a .env file at the root of the React application and paste the following variables in it:
//replace the right hand side of the equal sign with the correct values from your Appwrite project.
VITE_APPWRITE_URL=YOUR-APPWRITE-API-ENDPOINT
VITE_APPWRITE_PROJ_ID=YOUR-APPWRITE-PROJECT-ID
You can get the necessary values in your Appwrite console. Click on the settings tab at the bottom of the left sidebar and copy API credentials.
Next, create a utils folder in the src folder of the React application. Add a file called appwrite.ts within it and paste the following config information:
import { Client, Databases } from "appwrite";

export const client = new Client();

client
    .setEndpoint(import.meta.env.VITE_APPWRITE_URL)
    .setProject(import.meta.env.VITE_APPWRITE_PROJ_ID);

export const databases = new Databases(client);

export { ID } from "appwrite";
You are ready to test that the React application is connected to the Appwrite project. Replace everything in the App.tsx file within the src folder with the following code:
import { client } from "./utils/appwrite";

const App = () => {
    console.log("Appwrite", client);
    return <div className="text-purple-500 text-center font-bold text-      5xl">App</div>;
};

export default App;
Then open an integrated terminal window and run the following command: npm run dev. This will run your React application at this URL: http://localhost:5173/. Open the URL in a browser window and open the browser console.
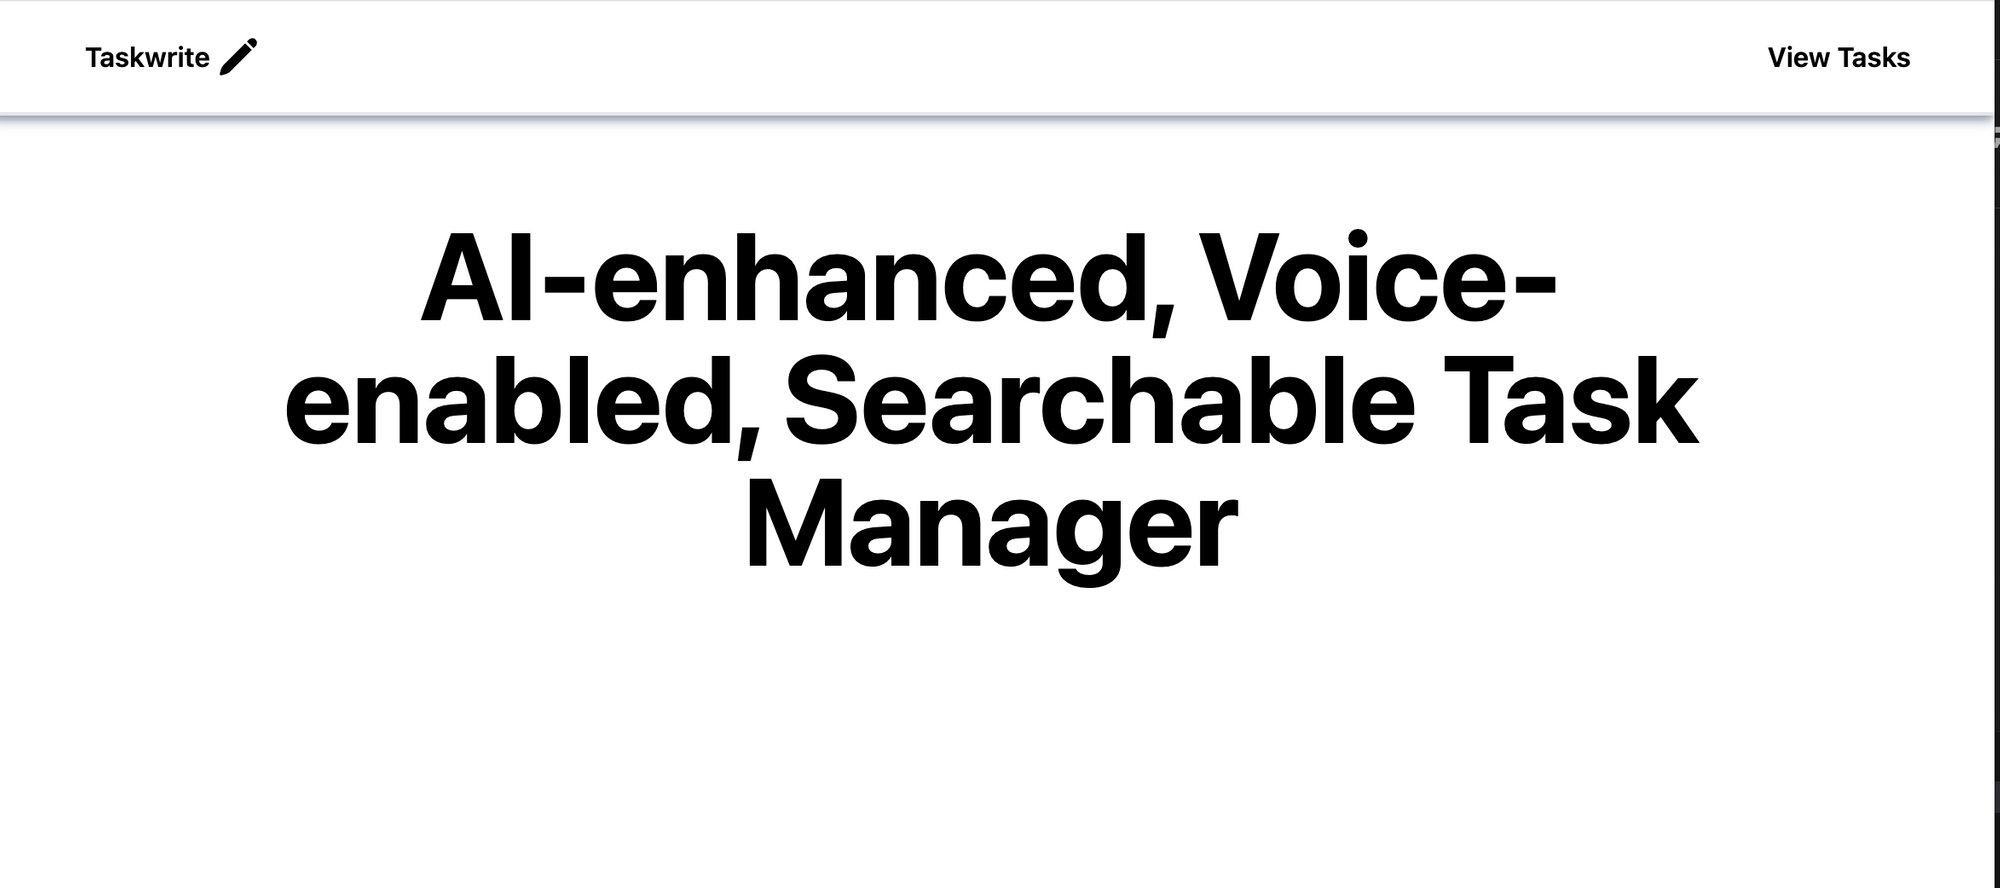
You should see a large purple text "App" in the center of the screen and the Appwrite client logged in the console like so:
 The web app running in the browser
Now you need to grab the database ID and the collection ID from the Appwrite console. Click on the databases tab on the left sidebar, hover on the database ID value and click to copy it.
Go back to your .env file and add an entry like so:
//replace the right hand side of the equal sign with the correct values from your Appwrite project.
VITE_APPWRITE_URL=YOUR-APPWRITE-API-ENDPOINT
VITE_APPWRITE_PROJ_ID=YOUR-APPWRITE-PROJECT-ID
//new entry below
VITE_APPWRITE_DB_ID=YOUR-APPWRITE-DB-ID
Lastly, go back to the console and click through the database to get to the collections. Hover and copy collection ID like before, then add it just below the database ID in your env file like so:
VITE_APPWRITE_DB_ID=YOUR-APPWRITE-DB-ID
VITE_APPWRITE_COLLECTION_ID=YOUR-APPWRITE-COLLECTION-ID
With that, the set up part of building Taskwrite is complete.
How to Build the Task Manager Application
To make it easier to work with Typescript, you will need to add interfaces that correspond with the shape of the Appwrite database response.
In your src folder, create a folder called models and in it, create a file called interface.ts. Paste the following in the file:
import { Models } from "appwrite";

export interface IPayload {
    title: string;
    description: string;
    due_date: Date;
    priority?: string;
    done?: boolean;
}

export interface ITask extends Models.Document {
    title: string;
    description: string;
    due_date: Date;
    priority?: string;
    done: boolean;
}
Here, you are defining an interface called "IPayload" with the same attributes as the task we defined in the Appwrite project. Then you are defining another interface called "ITask" that extends the built in base Model from Appwrite.
This means that ITask has both the attributes of the task we defined before and the built in base attributes that Appwrite collections come with.
Next, in your utils folder add a file called db.ts and paste the following in it:
import { ID, databases } from "./appwrite";
import { IPayload } from "../models/interface";

const dbID: string = import.meta.env.VITE_APPWRITE_DB_ID;
const collectionID: string = import.meta.env.VITE_APPWRITE_COLLECTION_ID;

const createDocument = async (payload: IPayload) => {
    const res = await databases.createDocument(dbID, collectionID, ID.unique(), {
        ...payload,
    });

    return res;
};

const readDocuments = async () => {
    const res = await databases.listDocuments(dbID, collectionID);

    return res;
};

const updateDocument = async (payload: IPayload, id: string) => {
    const res = await databases.updateDocument(dbID, collectionID, id, {
        ...payload,
    });

    return res;
};
const deleteDocument = async (id: string) => {
    const res = await databases.deleteDocument(dbID, collectionID, id);

    return res;
};

export { createDocument, readDocuments, updateDocument, deleteDocument };
This file defines four functions corresponding with the CRUD operations. The naming of the functions map to which operation it performs. For all functions, you pass the collection and database IDs so that Appwrite knows which resources to operate on.
To create a task on the Appwrite database, you pass an object with the shape of a task to the function and ask it to create a unique ID for each new task it creates.
To update a task, you pass it a task object similar to create but we also pass it the unique ID of the task to be updated.
To read all tasks from the Appwrite, you call the "listDocuments" function and to delete a task you pass the ID corresponding to the task to be deleted.
How to Set Up Routing with React Router V6
The Taskwrite application will have two routes and a navigation menu to help with that. To add navigation, open an integrated terminal and run the following command to install the React Router library: npm i react-router-dom.
Now, go to the main.tsx file in the src folder and paste the following in it:
import React from "react";
import ReactDOM from "react-dom/client";
import { BrowserRouter } from "react-router-dom";
import App from "./App.tsx";
import "./index.css";

ReactDOM.createRoot(document.getElementById("root")!).render(
    <React.StrictMode>
        <BrowserRouter>
            <App />
        </BrowserRouter>
    </React.StrictMode>
);
Then go to the App.tsx file in src folder and paste the following in it:
import "./index.css";
import { Route, Routes } from "react-router-dom";
import Task from "./routes/Task";
import Index from "./routes/Index";
import Navbar from "./components/Navbar";

function App() {
    return (
        <>
            <Navbar/>
            <Routes>
                <Route path="/" element={<Index />} />
                <Route path="/tasks" element={<Task />} />
            </Routes>
        </>
    );
}

export default App;
You now need to create the referenced component above. In the src folder, create a folder called routes and within it create two files called Index.tsx and Task.tsx.
In Index.tsx, paste the following:
const Index = () => {
    return (
        <main className="container mx-auto">
            <section className="max-w-5xl mx-auto m-12 p-16">
                <h1 className="text-4xl md:text-7xl font-bold text-center py-3 mb-16">
                    AI-enhanced, Voice-enabled, Searchable Task Manager
                </h1>
            </section>
        </main>
    );
};

export default Index;
And in Task.tsx, paste the following:
const Task = () => {
    return (
        <main className="container mx-auto">
            <section className="max-w-5xl mx-auto m-12 p-16">
                <h1 className="text-4xl md:text-7xl font-bold text-center py-3 mb-16">
                    Your Tasks
                </h1>
            </section>
        </main>
    );
};

export default Task;
Now, create a components folder in the src folder and add a file within it called Navbar.tsx. Paste the following in that file:
import { Link, useNavigate } from "react-router-dom";
import { PencilIcon } from "@heroicons/react/24/solid";
import Button from "./Button";

const Navbar = () => {
    const navigate = useNavigate();

    return (
        <nav className="py-4 border-b-2 border-container shadow-md shadow-gray-400 w-full fixed top-0 bg-base">
            <ul className="flex items-center justify-between  w-11/12 mx-auto">
                <Link to="/">
                    <Button
                        content={{
                            text: "Taskwrite",
                            icon: PencilIcon,
                        }}
                        textClasses="font-semibold text-main"
                        iconClasses="text-main"
                    />
                </Link>
                </Link>
                <div className="flex items-center justify-between gap-6">
                    <Link
                        to="/tasks"
                        className="font-semibold hover:scale-105 transition duration-300 ease-in-out"
                    >
                        View Tasks
                    </Link>
                </div>
            </ul>
        </nav>
    );
};

export default Navbar;
This file contains navigation menu that switches between the two pages. You will need to create the Button component referenced above and add the Hero icons package.
In an integrated terminal, run the following to add Hero icons: npm i @heroicons/react . Next, add a new file called Button.tsx in the components folder. Paste the following within that file:
import { ReactNode } from "react";

interface ButtonProps {
    extraBtnClasses?: string;
    textColor?: string;
    handleClick?: (e: React.MouseEvent<HTMLButtonElement>) => void;
    title?: string;
    disable?: boolean;
    type?: "button" | "submit" | "reset";
    children: ReactNode;
}

function Button({
    extraBtnClasses,
    textColor,
    handleClick,
    title,
    disable,
    type = "button",
    children,
}: ButtonProps) {
    const handleClickProp = type === "submit" ? undefined : handleClick;

    return (
        <button
            type={type}
            title={title ?? ""}
            onClick={handleClickProp}
            disabled={disable}
            className={`flex gap-2 items-center text-iconColor ${extraBtnClasses} ${
                textColor ?? ""
            } rounded-md px-2 py-1 hover:scale-105 transition duration-300 ease-in-out`}
        >
            {children}
        </button>
    );
}

export default Button;
This file describes a shared button component and defines the props that it will accept.
Go back and fix any import errors and re-run the application by running npm run dev, you should see something like this:
 app running with npm run dev command
How to Create the Form Component
Add a new file called AddTask.tsx in the components folder and paste the following into it:
import { useState } from "react";
import Select from "./Select";
import Button from "./Button";

const AddTask = () => {
    const [titleVal, setTitleVal] = useState("");
    const [textAreaVal, setTextAreaVal] = useState("");
    const [dueDate, setDueDate] = useState(new Date());

    const priorityArray = ["low", "medium", "high"];

    const [priority, setPriority] = useState(priorityArray[0]);

    return (
        <form id="form" className="m-8">
            <div className="flex flex-col mb-6">
                <label htmlFor="title">Task Title</label>
                <input
                    type="text"
                    id="title"
                    placeholder="Title of your task"
                    value={titleVal}
                    onChange={(e) => setTitleVal(e.target.value)}
                    className="bg-inherit border rounded-sm p-2 focus:outline-none focus:ring-1 border-input focus:ring-slate-900"
                />
            </div>
            <div className="flex flex-col mb-6">
                <label htmlFor="description" className="mb-1">
                    Task Description
                </label>
                <textarea
                    id="description"
                    placeholder="Describe your task"
                    maxLength={200}
                    value={textAreaVal}
                    onChange={(e) => setTextAreaVal(e.target.value)}
                    className="bg-inherit border rounded-sm p-2 h-32 resize-none focus:outline-none focus:ring-1 border-input focus:ring-slate-900"
                />
            </div>
            <div className="flex flex-col mb-6">
                <label htmlFor="description" className="mb-1">
                    Task Priority
                </label>
                <Select
                    defaultSelectValue={priority}
                    selectOptions={priorityArray}
                    handleSelectChange={(e) => setPriority(e.target.value)}
                />
            </div>
            <div className="flex flex-col mb-6">
                <label htmlFor="description" className="mb-1">
                    Task Due Date
                </label>
                <input
                    type="date"
                    id="date"
                    value={dueDate!.toISOString().split("T")[0]}
                    min={new Date().toISOString().split("T")[0]}
                    onChange={(e) => setDueDate(new Date(e.target.value))}
                    className="bg-inherit border rounded-sm border-input p-2 focus:outline-none focus:ring-1 focus:ring-slate-900 invalid:focus:ring-red-600"
                />
            </div>
            <Button
                type="submit"
                content={{
                    text: "Add Task",
                }}
                extraBtnClasses="bg-pink-700 justify-center text-white font-semibold px-4 py-2 outline-1 hover:bg-pink-800 focus:ring-1 focus:ring-pink-800 w-full"
            />
        </form>
    );
};

export default AddTask;
Now create a new file in components called Select.tsx, paste the following in it:
import { useState } from "react";

interface SelectProps {
    defaultSelectValue: string;
    selectOptions: string[];
    handleSelectChange: (e: React.ChangeEvent<HTMLSelectElement>) => void;
}

const Select = ({
    defaultSelectValue,
    handleSelectChange,
    selectOptions,
}: SelectProps) => {
    const [selectVal, setSelectVal] = useState(defaultSelectValue);
    return (
        <select
            value={selectVal}
            onChange={(e) => {
                setSelectVal(e.target.value);
                handleSelectChange(e);
            }}
            className="bg-inherit border rounded-sm border-input p-2 focus:outline-none focus:ring-1 focus:ring-slate-900 cursor-pointer"
        >
            {selectOptions.map((option) => (
                <option key={option} value={option}>
                    {option.charAt(0).toUpperCase() + option.slice(1)}
                </option>
            ))}
        </select>
    );
};

export default Select;
This defines a Select component and its props. The Select component props are a function for handling change, an array of options and the default value it should display.
Now, import the AddTask component in the Index.tsx file between the h1 tags like so:
import AddTask from "../components/AddTask";

const Index = () => {
    return (
        <main className="container mx-auto">
            <section className="max-w-5xl mx-auto m-12 p-16">
                <h1 className="text-4xl md:text-7xl font-bold text-center py-3 mb-16">
                    AI-enhanced, Voice-enabled, Searchable Task Manager
                </h1>
                <AddTask />
            </section>
        </main>
    );
};

export default Index;
Your application should now display the form:
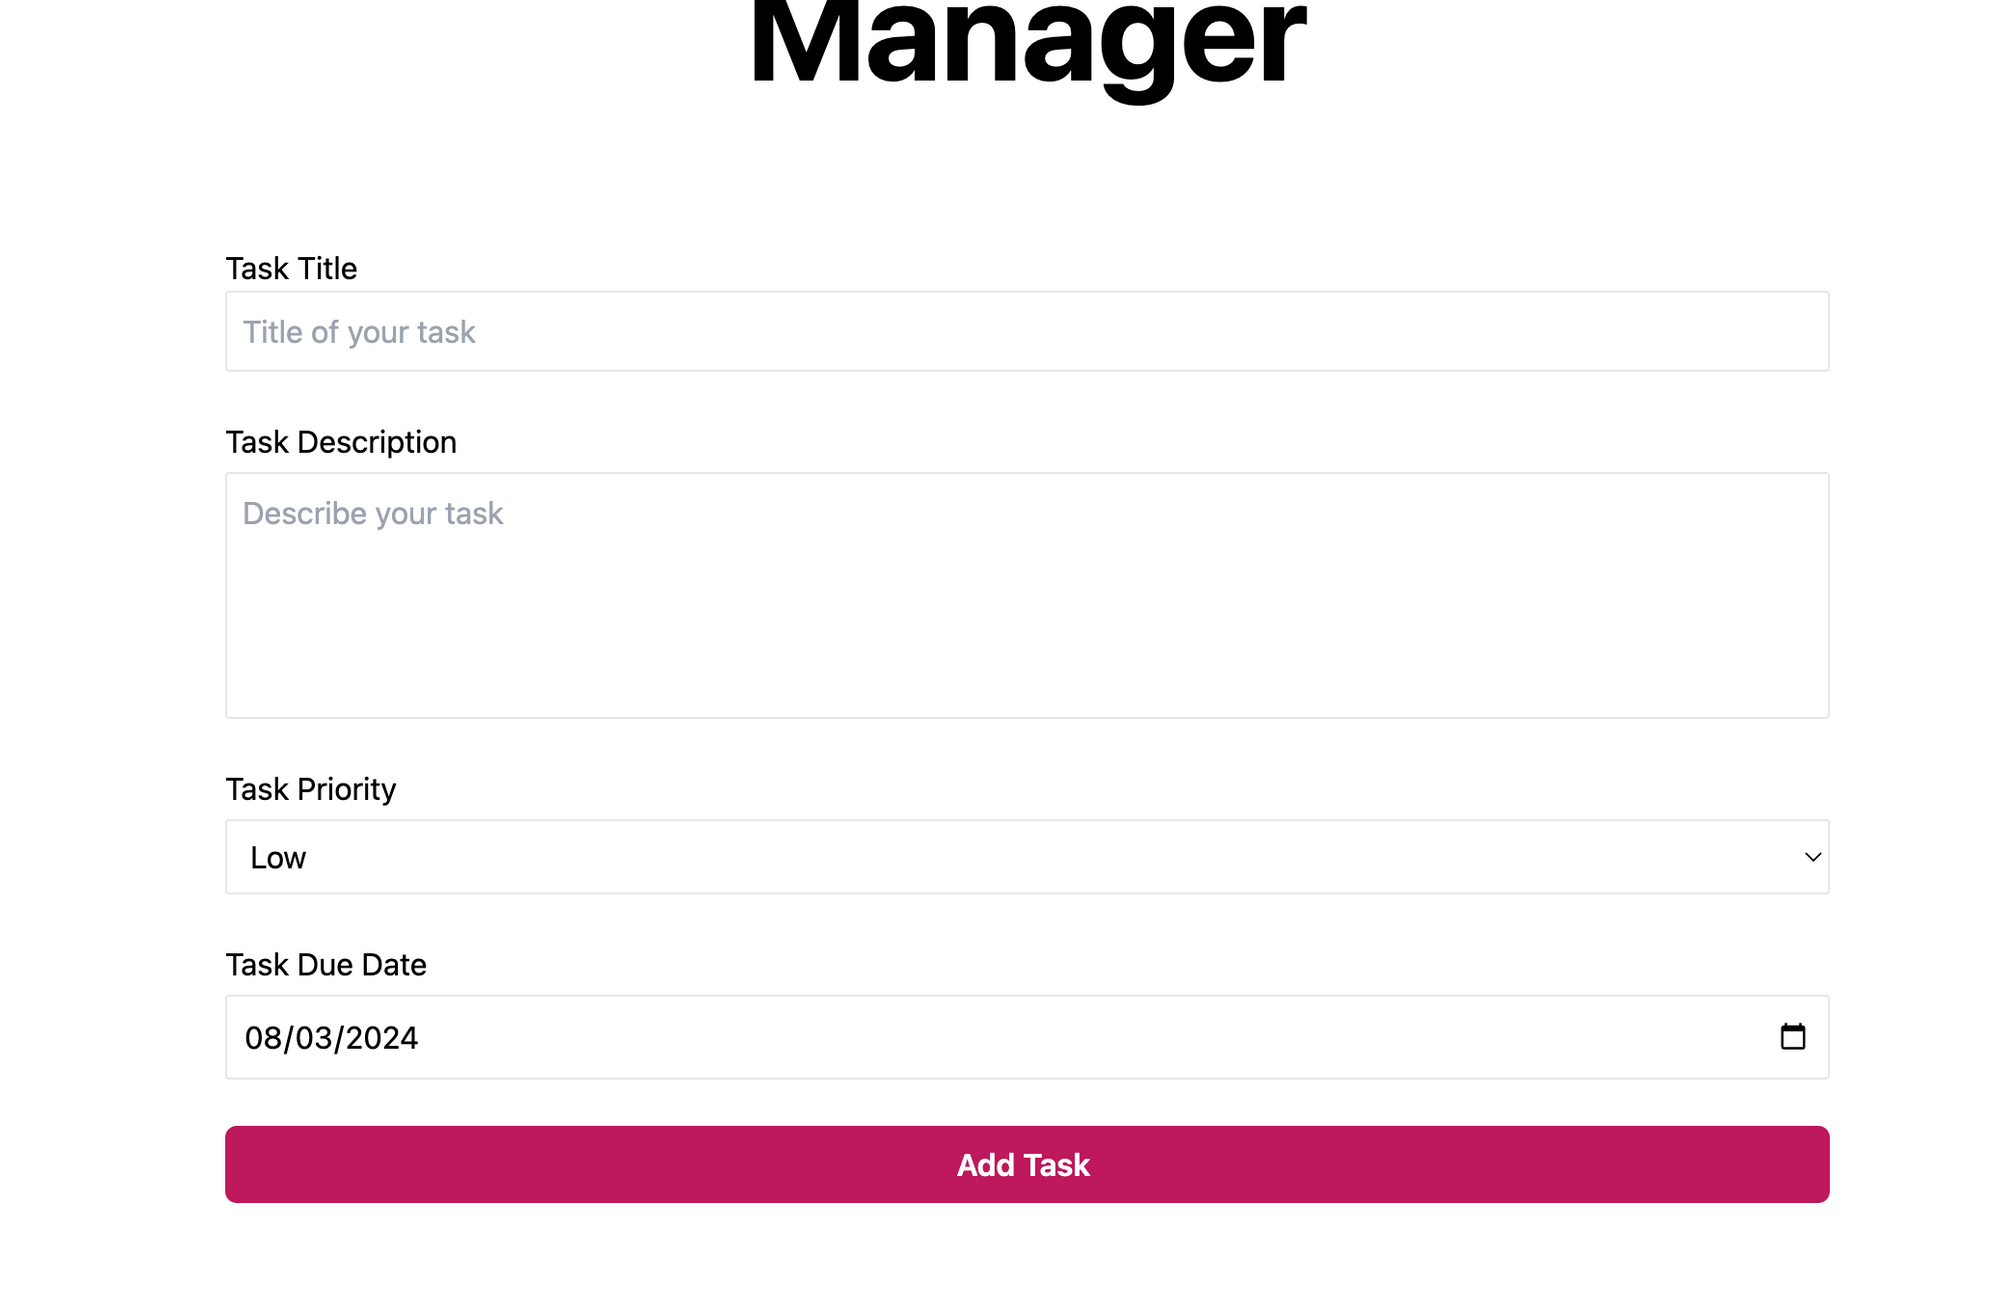 task app form
How to Set Up Form to Create Task
To make the form functional, you need to hook it up to a submit function that will call the create function defined in the db.ts file.
Additionally, you will need to validate the form to avoid sending bad data and having Appwrite send errors back to the React application.
In the AddTask component file, paste the following code above the return statement and below the setPriority useState:
const [priority, setPriority] = useState(priorityArray[0]);

//paste here
const navigate = useNavigate();

const [isSubmitting, setIsSubmitting] = useState(false);
const [titleValidationError, setTitleValidationError] = useState("");

    const handleTitleChange = (e: React.ChangeEvent<HTMLInputElement>) => {
        setTitleVal(e.target.value);

        if (e.target.value.trim() !== "") {
            setTitleValidationError("");
        }
    };

    const handleSubmitTask = async (e: React.FormEvent<HTMLFormElement>) => {
        e.preventDefault();
        setIsSubmitting(true);

        try {
            if (!titleVal) {
                setTitleValidationError("Please provide at least a title for the task");
                setTimeout(() => setTitleValidationError(""), 2000);
                setIsSubmitting(false);
                return;
            }

            if (titleVal.length > 49) {
                setTitleValidationError(
                    "Title too long. It can only be 49 characters long"
                );
                setTimeout(() => setTitleValidationError(""), 2000);
                setIsSubmitting(false);
                return;
            }

            const payload: IPayload = {
                title: titleVal,
                description: textAreaVal,
                due_date: dueDate,
                priority: priority,
            };

            await createDocument(payload);

            // reset form
            setTitleVal("");
            setTextAreaVal("");
            setDueDate(new Date());
            setPriority(priorityArray[0]);
            setTitleValidationError("");
            setIsSubmitting(false);
            navigate("/tasks");
        } catch (error) {
            console.error("Error in handleSubmitTask:", error);
            setIsSubmitting(false);
        }
    };

    return (
    //rest of the code unchanged below
Then replace the return statement with the following code:
return (
<form id="form" onSubmit={handleSubmitTask} className="m-8">
    <div className="flex flex-col mb-6">
        <label htmlFor="title">Task Title</label>
        <input
            type="text"
            id="title"
            placeholder="Title of your task"
            value={titleVal}
            onChange={handleTitleChange}
            className={`bg-inherit border rounded-sm p-2 focus:outline-none                         focus:ring-1 ${
                    titleValidationError
                    ? "border-error focus:ring-red-500 invalid:focus:ring-red-                         600"
                    : "border-input focus:ring-slate-900"
            }`}
        />
        {titleValidationError && (
        <span className="text-error mt-1">{titleValidationError}</span>
        )}
    </div>
    <div className="flex flex-col mb-6">
        <label htmlFor="description" className="mb-1">
            Task Description
        </label>
        <textarea
            id="description"
            placeholder="Describe your task"
            maxLength={200}
            value={textAreaVal}
            onChange={(e) => setTextAreaVal(e.target.value)}
            className={`bg-inherit border rounded-sm p-2 h-32 resize-none                             focus:outline-none focus:ring-1 ${
                        textAreaVal.length > 197
                        ? "border-error focus:ring-red-500 invalid:focus:ring-                             red-600"
                        : "border-input focus:ring-slate-900"
                }`}
        />
        {textAreaVal.length > 197 && (
        <span className="text-error mt-1">
            Warning description getting too long. Can only be 200 characters
        </span>
        )}
    </div>
    <div className="flex flex-col mb-6">
        <label htmlFor="description" className="mb-1">
            Task Priority
        </label>
        <Select
            defaultSelectValue={priority}
            selectOptions={priorityArray}
            handleSelectChange={(e) => setPriority(e.target.value)}
        />
    </div>
    <div className="flex flex-col mb-6">
        <label htmlFor="description" className="mb-1">
            Task Due Date
        </label>
        <input
            type="date"
            id="date"
            value={dueDate!.toISOString().split("T")[0]}
            min={new Date().toISOString().split("T")[0]}
            onChange={(e) => setDueDate(new Date(e.target.value))}
                className="bg-inherit border rounded-sm border-input p-2                                      focus:outline-none focus:ring-1 focus:ring-slate-                               900 invalid:focus:ring-red-600"
        />
    </div>
    <Button
        type="submit"
        disable={isSubmitting}
        extraBtnClasses="bg-primary justify-center text-white font-semibold px-4 py-2 outline-1 hover:bg-primaryHover focus:ring-1 focus:ring-pink-800 w-full"
    >
        <span>
            Add Task
        </span>
    </Button>
</form>
);
Fix import errors and your application should now be validating title and description as well as creating the task then sending you to the "/tasks" route. You can check the Appwrite console to confirm that the task has been created.
How Set Up Read and Delete Tasks
Open the Task.jsx file in the routes folder within src folder, and add the following code above the return like so:
const [tasks, setTasks] = useState<ITask[]>([]);
const [tasksError, setTasksError] = useState("");

useEffect(() => {
        getTasks()
        .then((res) => {
        setTasks(res.reverse());
        })
        .catch((err) => {
        console.error(err);
        setTasksError("Error fetching tasks, please try again");
        });
    }, []);

return (
//rest of code
Here, the file is setting some local state using useState to hold the tasks and set any potential task related errors.
Now replace the code in the return with the following code:
<main className="container mx-auto">
    <section className="max-w-5xl mx-auto m-12 p-16">
        <h1 className="text-4xl md:text-7xl font-bold text-center py-3 mb-16">
        Your Tasks
        </h1>
        {tasksError ? (
            <span className="m-8 text-error">{tasksError}</span>
        ) : (
            <div className="flex flex-col md:flex-row justify-between">
                <div className="flex-1">
                    <h3 className="text-2xl font-bold m-8">Pending Tasks</h3>
                    <div>
                         {tasks
                             .filter((task) => !task.done)
                             .map((task) => (
                                <TaskItem key={task.$id} task={task} />
                         ))}
                    </div>
                </div>
                <div className="flex-1">
                    <h3 className="text-2xl font-bold m-8">Completed Tasks</h3>
                    <div>
                        {tasks
                            .filter((task) => task.done)
                            .map((task) => (
                                <TaskItem key={task.$id} task={task} />
                        ))}
                    </div>
                </div>
            </div>
        )}
    </section>
</main>
You now need to create the getTasks() function and the TaskItem component. In the components folder, create a file called TaskItem.tsx and paste the following code in it:
interface TaskItemProps {
    task: ITask;
}
function TaskItem({ task }: TaskItemProps) {
    return (
    <>
        <div className="m-8 cursor-pointer border border-container rounded-md p-4 hover:shadow-lg transition duration-300 ease-in-out max-h-96">
            <section
            key={task.$id}
            className="flex flex-col justify-between gap-2 my-4 h-full"
            >
            <section className="flex gap-4 items-center justify-between flex-wrap">
                {task.priority && (
                <span>
                    <span className="font-medium">Priority: </span>
                        <span
                            className={`${
                            task.priority === "low"
                            ? "bg-lowPriority text-iconColor"
                            : task.priority === "medium"
                            ? "bg-mediumPriority text-iconColor"
                            : "bg-highPriority text-iconColor"
                            } py-1 px-2 rounded-md`}
                        >
                            {task.priority}
                        </span>
                </span>
                )}
                <div className="flex gap-2 py-1 ml-auto">
                    <Button
                        handleClick={() => handleEdit(task)}
                        extraBtnClasses="bg-ok"
                    >
                        <span className="font-medium">Edit</span>
                        <PencilSquareIcon height={25} className="hidden lg:flex" />
                    </Button>
                    <Button
                        handleClick={(e) => handleDelete(e, task.$id)}
                        extraBtnClasses="bg-highPriority"
                    >
                        <span className="font-medium">Delete</span>
                        <TrashIcon height={25} className="hidden lg:flex" />
                    </Button>
                </div>
            </section>
            <section className="">
                <h2 className="text-xl font-medium py-2 break-words">
                    {task.title}
                </h2>
                <p className="py-1 mb-4 min-h-16 break-words">
                    {task.description.length > 70
                        ? task.description.substring(0, 70) + "..."
                        : task.description}
                </p>
                <span className="font-extralight mt-2">
                    <span className="font-medium">Due on: </span>
                        <span className="underline">{`${new Date(
                            task.due_date
                        ).toLocaleDateString()}`}
                    </span>
                </span>
                </section>
                <section className="flex justify-between">
                    {task.done ? (
                        <span className="items-center text-ok font-bol ml-auto">
                            Completed
                        </span>
                    ) : (
                    <div className="flex items-center ml-auto hover:scale-105 transition duration-300 ease-in-out">
                        <label htmlFor="done" className="mr-2 font-light">
                            Mark as complete
                        </label>
                        <input
                            type="checkbox"
                            checked={isDone}
                            onClick={(e) => e.stopPropagation()}
                            onChange={(e) => {
                            setIsDone(e.target.checked);
                            handleCheckbox(task, task.$id, e);
                        }}
                            className="size-5 accent-pink-600 rounded-sm"
                    />
                </div>
                )}
                </section>
            </section>
        </div>
    </>
    );
}
export default TaskItem;
This gives the file some markup to display. It divides the page into two columns, one for the pending tasks and one for the completed tasks, and it handles responsiveness of the page.
In order to get rid of the errors, paste the following code just before the return statement like so:
function TaskItem({ task }: TaskItemProps) {

//paste here
const [isDone, setIsDone] = useState(false);

const handleDelete = async (
        currentTaskId: string
    ) => {
        try {
            await deleteDocument(currentTaskId);
        } catch (error) {
            console.error(error);
        }
};

const handleCheckbox = async (
        currentTask: IPayload,
        id: string,
        checkedVal: boolean
    ) => {
        if (!checkedVal) return;

        const payload: IPayload = {
        title: currentTask.title,
        description: currentTask.description,
        due_date: currentTask.due_date,
        priority: currentTask.priority,
        done: checkedVal,
        };

        try {
            await updateDocument(payload, id);
        } catch (error) {
            console.error(error);
        }
};

//rest of code below untouched
return (
......
This adds the ability to delete a task item and the ability to mark it as complete.
Create a new file in the utils folder and call it shared.ts. This file will house any function that will be called in more than two places in the application.
The getTasks function is one such repetitive function, so it will be placed in the shared.ts file. Paste the following code into it:
import { readDocuments } from "./db";
import { ITask } from "../models/interface";

export const getTasks = async () => {
    const { documents } = await readDocuments();

    return documents as ITask[];
};
This defines the function and returns an array of ITasks. Go back to the Task.tsx file and fix any import errors.
Run the application and you should see something like this:
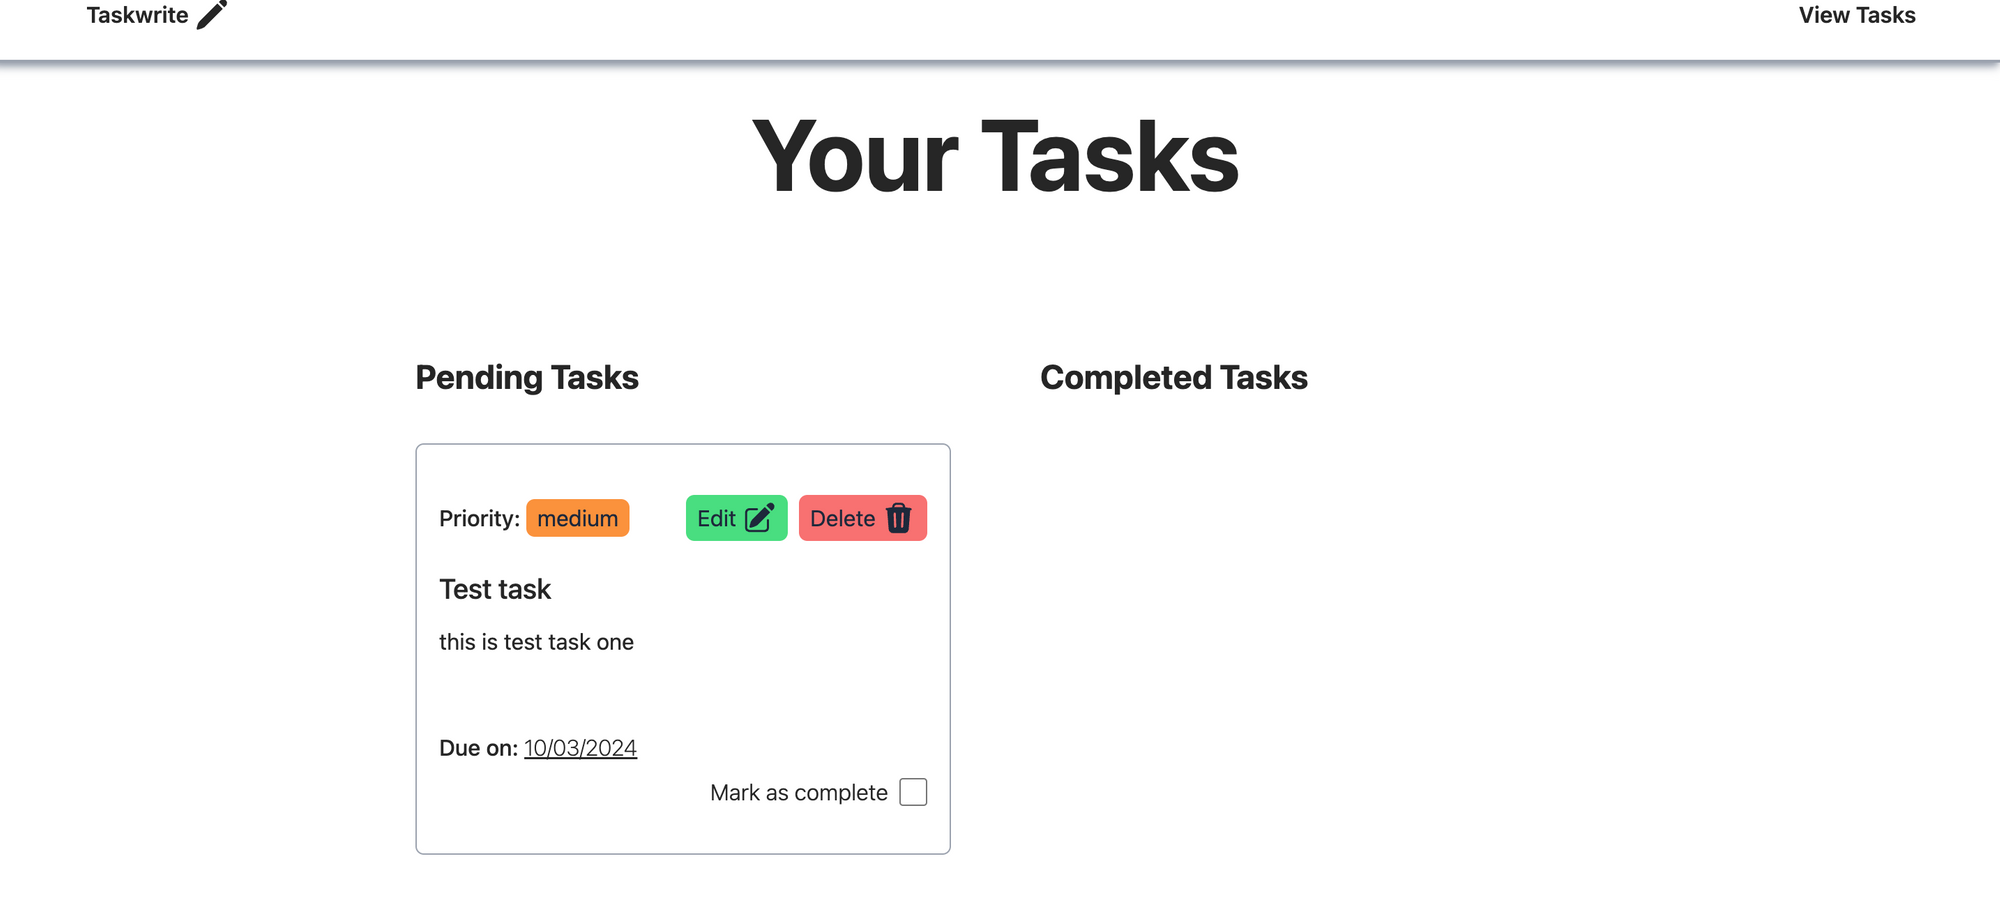 your pending and completed tasks displayed in the browser
The task can be deleted or marked as complete but you won't see an update on the UI until the page is refreshed. To fix that, go back to the TaskItem file and paste the following code below the isDone useState and above the handleDelete function:
const [isDone, setIsDone] = useState(false);

//paste here
const updateTasks = async () => {
    try {
        const allTasks = await getTasks();
        if (setTasks) setTasks(allTasks.reverse());
    } catch (error) {
        console.error(error);
    }
};

//rest of code below remains as is
const handleDelete = async (
Update TaskItem props interface and the TaskItem function like so:
interface TaskItemProps {
    task: ITask;
    setTasks?: (tasks: ITask[]) => void;
}

function TaskItem({ task, setTasks }: TaskItemProps) {
//rest of code below
    const [isDone, setIsDone] = useState(false);
This gives a setter function that resets the tasks array as a prop to the TaskItem component.
Adjust the handleDelete and handleCheckbox functions in the TaskItem component to include the updateTasks function you added above. it should read like this:
const handleDelete = async (
    e: React.MouseEvent<HTMLButtonElement>,
    currentTaskId: string
) => {
    try {
        await deleteDocument(currentTaskId);
        updateTasks();
    } catch (error) {
        console.error(error);
    }
};

const handleCheckbox = async (
    currentTask: IPayload,
    id: string,
    e: React.ChangeEvent<HTMLInputElement>
    ) => {

    const payload: IPayload = {
        title: currentTask.title,
        description: currentTask.description,
        due_date: currentTask.due_date,
        priority: currentTask.priority,
        done: e.target.checked,
    };

    try {
        await updateDocument(payload, id);
        updateTasks();
    } catch (error) {
        console.error(error);
    }
};
Go back to the Task.tsx file and pass setTasks to the TaskItem component like so: <TaskItem key={task.$id} task={task} setTasks={setTasks} />. Now, the UI updates without needing to manually refresh the page.
How to Make the Tasks Editable
In order to edit a task, you will need to pass a function to the edit button in the TaskItem component.
Paste the following code in the TaskItem.tsx file between the updateTasks and handleDelete functions like so:
//paste below updateTasks
const handleEdit = async (
    currentTask: ITask
) => {
    navigate("/", { state: { task: currentTask } });
};

//rest of code untouched below
Add this line right above the isDone useState: const navigate = useNavigate();.
In the same file, find the edit button and pass the handleEdit function to it. Also, wrap it in a condition that checks if the task is done such that the button is only displayed in the case that the task is not marked as complete. Like so:
{!task.done && (
    <Button
        handleClick={() => handleEdit(task)}
        extraBtnClasses="bg-ok"
    >
        <span className="font-medium">Edit</span>
        <PencilSquareIcon height={25} className="hidden lg:flex" />
    </Button>
)
The AddTask component has to be adjusted to handle editing a task and the Index.tsx file needs to be updated to handle the task to be edited being passed to it via the navigate handleEdit function.
First, go to the AddTask file and add some prop definitions directly below the import statements, then pass the new props to the component like so:
import....

// pass a task and an isEdit boolean
// if isEdit is true, then the form will be populated with the task's data
interface ITaskFormProps {
    task: ITask | null;
    isEdit?: boolean;
    setTasks?: (tasks: ITask[]) => void;
}

//pass component props
const AddTask = ({ task, isEdit, setTasks }: ITaskFormProps) => {
//code untouched below
Adjust the due date and priority useStates to read like below:
const [dueDate, setDueDate] = useState(
    isEdit && task?.due_date ? new Date(task.due_date) : new Date()
);

const [priority, setPriority] = useState(
    isEdit && task?.priority ? task?.priority : priorityArray[0]
);
Add a useEffect below the useStates like so:
const [titleValidationError, setTitleValidationError] = useState("");

//paste below useState statements
useEffect(() => {
    if (isEdit && task) {
        setTitleVal(task.title);
        setTextAreaVal(task.description);
    } else {
        setTitleVal("");
    }
}, [isEdit, task]);
In the handleSubmit function within the same AddTask file, delete this line: await createDocument(payload); and replace with the below:
if (isEdit && task) {
    await updateDocument(payload, task!.$id);
    const allTasks = await getTasks();
    if (setTasks) return setTasks(allTasks.reverse());
} else {
    await createDocument(payload);
}
Now replace the Button component at the bottom of the file just above the form closing tag with this:
<Button
    type="submit"
    disable={isSubmitting}
    extraBtnClasses="bg-primary justify-center text-white font-semibold px-4 py-2 outline-1 hover:bg-primaryHover focus:ring-1 focus:ring-pink-800 w-full"
>
    <span>
        {isSubmitting ? "Submitting..." : task ? "Edit Task" : "Add Task"}
    </span>
</Button>
//unchanged code below
</form>
    );
};

export default AddTask;
This sets the text on the button depending on whether the form is submitting, creating a new task or updating an exisiting task.
Go to the Index.tsx file in the routes folder and paste the following above the return statement:
const Index = () => {
    //paste here
    const location = useLocation();
    const navigate = useNavigate();

    const taskFromState: ITask = location.state?.task;

    const [taskToEdit] = useState<ITask | null>(taskFromState ?? null);

    useEffect(() => {
        if (taskFromState) {
            navigate(location.pathname, {});
        }
    }, [taskFromState, location.pathname, navigate]);

    //below code remains unchanged
    return (....
Here, the file gets the task passed to it from the "/tasks" route and sets it to local state. Then the useEffect nullies the passed task so that the form is reset on refresh.
In the Index.tsx file replace the AddTask component with this line: <AddTask task={taskToEdit} isEdit={taskToEdit ? true : false} />.
Run your application and you should be able to click on the edit button, be navigated back to the "/" route, have the form pre-filled with the task details, be able to edit some of the fields and be redirected back to "/tasks" once you click on the "Edit Task" button.
How to Enable Viewing of Tasks
The application now creates, reads, updates and deletes tasks. All that is left on that is the ability to view a particular task.
Go to the TaskItem file, add the following to the interface TaskItemProps: isViewTask: boolean; handleViewTask?: (e: React.MouseEvent<HTMLDivElement>) => void;.
Add them as props to the TaskItem component and set isViewTask to a default of false like so:
function TaskItem({
    task,
    setTasks,
    isViewTask = false,
    handleViewTask,
}: TaskItemProps) {
    //rest of code below unchanged
    const navigate = useNavigate();
Replace the paragraph tag that displays the task description within the return of the component with this markup:
<p className="py-1 mb-4 min-h-16 break-words">
    {task.description.length > 70 && !isViewTask
        ? task.description.substring(0, 70) + "..."
        : task.description
    }
</p>
The change introduced will ensure that the full description is visible if isViewTask is set to true.
On the div tag just below the return in the same component, add an onClick handler like so:
return (
<>
    <div
        className="m-8 cursor-pointer border border-container rounded-md p-4                        hover:shadow-lg transition duration-300 ease-in-out max-h-                       96"
        onClick={handleViewTask}
    >
//rest unchanged code
...
Back in the Task.tsx file, paste the following just above the useEffect:
const handleViewTask = (
    e: React.MouseEvent<HTMLDivElement>,
    activeTask: ITask
) => {
    setIsViewTask(true);
    setSelectedTask(activeTask);
};

//unchanged code below
useEffect(...
Add the following useState functions above the handleViewTask function, below the other useStates:
const [tasksError, setTasksError] = useState("");
//paste here
const [isViewTask, setIsViewTask] = useState(false);
const [selectedTask, setSelectedTask] = useState<ITask>();

//code below unchanged
const handleViewTask = (...
Now paste the following code within the return statement in the same file, just above the h1 tag displaying "Your Tasks" text:
return (
<main className="container mx-auto">
    <section className="max-w-5xl mx-auto m-12 p-16">
        //paste here
        {isViewTask && selectedTask && (
            <Dialog key={selectedTask.$id} setIsViewTask={setIsViewTask}>
                <TaskItem
                    task={selectedTask}
                    handleViewTask={() => handleViewTask(selectedTask!)}
                    isViewTask={isViewTask}
                />
            </Dialog>
        )}
        <h1 className="text-4xl md:text-7xl font-bold text-center py-3 mb-16">
        Your Tasks
        </h1>
        //rest of code below remains unchanged
You will need to create the Dialog component. Create a new file in the components folder and call it Dialog.tsx, then paste the following in it:
import { XMarkIcon } from "@heroicons/react/24/solid";
import { ReactNode, useState } from "react";
import { ITask } from "../models/interface";
import Button from "./Button";

interface DialogProps {
    setIsViewTask?: (isViewTask: boolean) => void;
    children: ReactNode;
}

function Dialog({ setIsViewTask, children }: DialogProps) {
    const [isOpen, setIsOpen] = useState(true);

    const closeModal = () => {
        if (setIsViewTask) setIsViewTask(false);
        setIsOpen(false);
    };
    return (
        <dialog
            open={isOpen}
            id="modal"
            style={{
            backgroundColor: "var(--base-bg)",
            color: "var(--text-main)",
            }}
            className={`${
                isOpen ? "opacity-100" : "opacity-0 pointer-events-none"
                } transition-opacity duration-300 ease-in-out fixed inset-0                      backdrop-filter backdrop-blur-md backdrop-brightness-50 w-4/6                      border border-container rounded-md max-h-[80vh] overflow-y-auto                 text-main`}
        >
        <Button
            handleClick={closeModal}
            content={{ text: "Close", icon: XMarkIcon }}
            extraBtnClasses="ml-auto text-main font-medium hover:text-error"
        />
        <div className="max-h-[80vh] overflow-y-auto">{children}</div>
        </dialog>
    );
    }

export default Dialog;
Here, the file defined a Dialog component that takes in some props, displays a button and the children it receives from props.
Finally, replace the two TaskItem components in the tasks.filter... function within the return statement of the Task.tsx file with the following:
{tasks
    .filter((task) => !task.done)
    .map((task) => (
        <TaskItem
            key={task.$id}
            task={task}
            setTasks={setTasks}
            handleViewTask={() => handleViewTask(task)}
            isViewTask={isViewTask}
        />
))}
You should be able to click on the task items and have the dialog pop up with the details of the task.
However, if you try to delete the item you will notice that it opens the dialog while deleting it. To fix that, adjust the handleDelete function in the TaskItem.tsx file to read like this:
const handleDelete = async (
    e: React.MouseEvent<HTMLButtonElement>,
    currentTaskId: string
) => {
    e.stopPropagation();
    try {
        await deleteDocument(currentTaskId);
        if (isViewTask) {
            navigate(0);
        } else {
            updateTasks();
        }
    } catch (error) {
        console.error(error);
    }
};
You've added e.stopPropagation() to stop the event from bubbling up to the parent and potentially interfering with the click to open the dialog.
You've also added a check after deleting the task to see if the task is being viewed, in which case we refresh the page via the navigate(0) to force the UI to update to the proper state. If not, it proceeds to call updateTasks() to refresh the state.
You will notice the same issue when you try to mark the task as complete in which the dialog pops up. To fix this, adjust the checkbox input to include this line: onClick={(e) => e.stopPropagation()}.
The new line stops the event from bubbling up to the parent div. It is added to the onClick instead of the onChange because the event it is trying to intercept is of type onClick. The input should read like this:
<label htmlFor="done" className="mr-2 font-light">
    Mark as complete
</label>
<input
    type="checkbox"
    checked={isDone}
    onClick={(e) => e.stopPropagation()}
    onChange={(e) => {
    setIsDone(e.target.checked);
    handleCheckbox(task, task.$id, e);
    }}
    className="size-5 accent-pink-600 rounded-sm"
/>
At this point, the React application is responsive, can CRUD the Appwrite database and the user can view individual tasks.
How to Auto Generate Descriptions with Vercel's AI SDK
To enhance the application and its' user experience, you can add the ability to auto generate descriptions for the tasks using AI.
To get started, open an integrated terminal and run the following command: npm i ai. This adds the Vercel AI SDK to the React application.
Next, run this command in the terminal: npm i @huggingface/inference to add Hugging Face support. The application will use Hugging Face because you need to pay to get programmatic access to OpenAI.
Create a new file in the utils folder, call it ai.ts and paste the following in it:
import { HfInference } from "@huggingface/inference";
import { HuggingFaceStream, StreamingTextResponse } from "ai";

// Create a new HuggingFace Inference instance
const Hf = new HfInference(import.meta.env.VITE_HUGGINGFACE_KEY);

// IMPORTANT! Set the runtime to edge
export const runtime = "edge";

export const callAI = async (prompt: string) => {
    const response = Hf.textGenerationStream({
        model: "OpenAssistant/oasst-sft-4-pythia-12b-epoch-3.5",
        inputs: `<|prompter|>${prompt}<|endoftext|><|assistant|>`,
        parameters: {
            max_new_tokens: 150,
            // @ts-ignore
            typical_p: 0.2,
            repetition_penalty: 1,
            truncate: 1000,
            return_full_text: false,
        },
    });

    // Convert the response into a friendly text-stream
    const stream = HuggingFaceStream(response);

    // Respond with the stream
    return new StreamingTextResponse(stream);
};
This boilerplate creates an instance of Hugging Face, creates a function that takes in a prompt, passes that prompt to the textGenerationStream function. Then it converts the response to a stream and to a text stream.
You will need to add a Hugging Face access token. You can genrate one at this address. You will need an account before you can access it.
Once you have token, open the env file and add to it the following line
//replace with your actual token
VITE_HUGGINGFACE_KEY=YOUR-HF-ACCESS-TOKEN
Open the AddTask.tsx file and paste the following button just above the closing div tag of the div containing the textarea input:
{textAreaVal.length > 197 && (
    <span className="text-error mt-1">
        Warning description getting too long. Can only be 200 characters
    </span>
)}
//paste here
<Button
    handleClick={generateDesc}
    disable={isGenerating}
    extraBtnClasses="bg-light mt-2 w-fit ml-auto"
>
    <span>Generate description</span>
    <SparklesIcon height={20} />
</Button>
//rest of below code unchanged
</div>
Define generateDesc function just above the return statement in the AddTask file like so:
const generateDesc = async () => {
    setTextAreaVal("");

    if (!titleVal) {
    alert("Please provide a title for the task");
    return;
    }

    setIsGenerating(true);

    const prompt = `Provide a description for this task: ${titleVal}. Keep the description to a maximum of 30 words`;

    try {
        const res = await callAI(prompt);
        const responseText = await res.text();

        setIsGenerating(false);

        //create a typing effect
        responseText.split("").forEach((char, index) => {
        setTimeout(() => {
        setTextAreaVal((prevText) => prevText + char);
        }, index * 32);
        });
    } catch (error) {
        console.log("ERROR HUGGING FACE API: " + error);
    }
};
The function checks that the title is not empty and uses the title to create a prompt to pass on the Hugging Face helper. The response from the call is saved to local state. A simple typing effect is created as the textarea is populated with the response.
Next, add this useState: const [isGenerating, setIsGenerating] = useState(false); to the other useStates in the AddTask component.
Replace the textarea input in the same component with the following:
<textarea
    id="description"
    placeholder="Describe your task"
    maxLength={200}
    value={isGenerating ? "generating..." : textAreaVal}
    onChange={(e) => setTextAreaVal(e.target.value)}
    className={`bg-inherit border rounded-sm p-2 h-32 resize-none          focus:outline-none focus:ring-1 ${
    textAreaVal.length > 197
    ? "border-error focus:ring-red-500 invalid:focus:ring-red-600"
    : "border-input focus:ring-slate-900"
    }`}
/>
On checking the application, you should see the button and be able to generate a description for the title of a task as below:
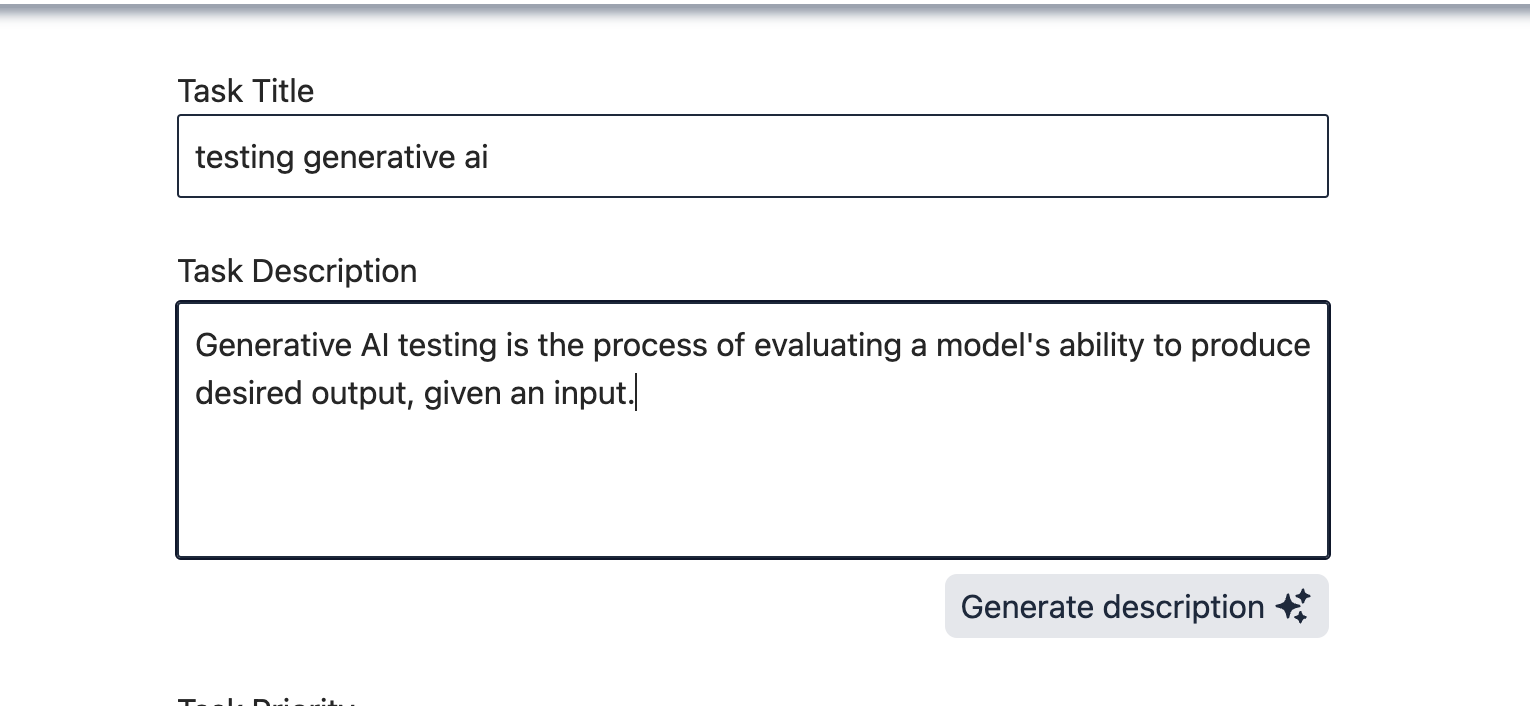 ai-enhanced task description
Voice-enable the Application with the React Speech Recognition Package
First, you need to add the dependency and its Typescript helper by running the following commands in an integrated terminal window: npm i react-speech-recognition and npm i @types/react-speech-recognition.
Additionally, run the following command to get the dependency to work properly: npm i regenerator-runtime.
Create a hooks folder within the src folder. Create a file within it called useSpeechToTextHelper.ts and paste the following in it:
import "regenerator-runtime/runtime";
import { useState } from "react";
import { useSpeechRecognition } from "react-speech-recognition";

export function useSpeechToTextHelper() {
    const [error, setError] = useState("");

    const {
        transcript,
        listening,
        resetTranscript,
        browserSupportsSpeechRecognition,
    } = useSpeechRecognition();

    if (!browserSupportsSpeechRecognition) {
        setError("Browser doesn't support speech recognition.");
    }

    return {
        error,
        listening,
        transcript,
        resetTranscript,
    };
}
This hook exposes some built in helper functions from React Speech Recognition, handles the case that the browser does not support the relevant web APIs and returns some of that data.
Create a new file in the components folder called Speaker.tsx. Paste the following code into it:
import { useSpeechToTextHelper } from "../hooks/useSpeechToTextHelper";
import { MicrophoneIcon, XCircleIcon } from "@heroicons/react/24/solid";
import Button from "./Button";
import SpeechRecognition from "react-speech-recognition";

interface SpeakerProps {
handleClear: (e: React.MouseEvent<HTMLButtonElement>) => void;
}

function Speaker({ handleClear }: SpeakerProps) {
    const { listening, error } = useSpeechToTextHelper();

    const handleSpeech = () => {
        SpeechRecognition.startListening();
    };

    return (
    <div>
        {error && <div>{error}</div>}
        <div className="flex gap-2 py-1 items-center text-center justify-center">
            <span className="font-medium">{listening ? "Mic on" : "Mic off"}</span>
            <Button
                handleClick={handleSpeech}
                extraBtnClasses="bg-lightOk"
                title="Start"
            >
                <MicrophoneIcon height={25} />
            </Button>
            <Button
                handleClick={handleClear}
                extraBtnClasses="bg-light"
                type="reset"
                title="Reset"
            >
                <XCircleIcon height={25} />
            </Button>
        </div>
    </div>
    );
}

export default Speaker;
This components accepts a function to clear the voice input as a prop, uses the helper hook, defines a function to handle the actual speech, handles potential error state and displays a button for handling the speech and another for clearing the voice transcript.
In the AddTask file, delete the label for title and replace it with the following markup:
<div className="flex flex-row justify-between items-center">
    <label htmlFor="title">Task Title</label>
    <Speaker handleClear={clearTranscript} />
</div>
This adds the Speaker component and wraps both the label and the Speaker component in a representational div in order to maintain the form layout.
Add the clearTranscript function just above the handleSubmit function like so:
const handleTitleChange = (e: React.ChangeEvent<HTMLInputElement>) => {
    setTitleVal(e.target.value);

    if (e.target.value.trim() !== "") {
        setTitleValidationError("");
    }
};

//paste here
const clearTranscript = () => {
    resetTranscript();
};
//below code is unchanged
const handleSubmitTask = asyc....
Next in the same AddTask component, add the following:
const AddTask = ({ task, isEdit, setTasks }: ITaskFormProps) => {
    const navigate = useNavigate();
    //paste here
    const { transcript, resetTranscript } = useSpeechToTextHelper();
    //rest remains unchanged
Replace the useEffect in the file with this new one:
useEffect(() => {
    if (isEdit && task && !transcript) {
        setTitleVal(task.title);
        setTextAreaVal(task.description);
    } else {
        setTitleVal(transcript || "");
    }
}, [isEdit, task, transcript]);
Your application should now support creating titles for the tasks via voice inputs. And should look something like this:
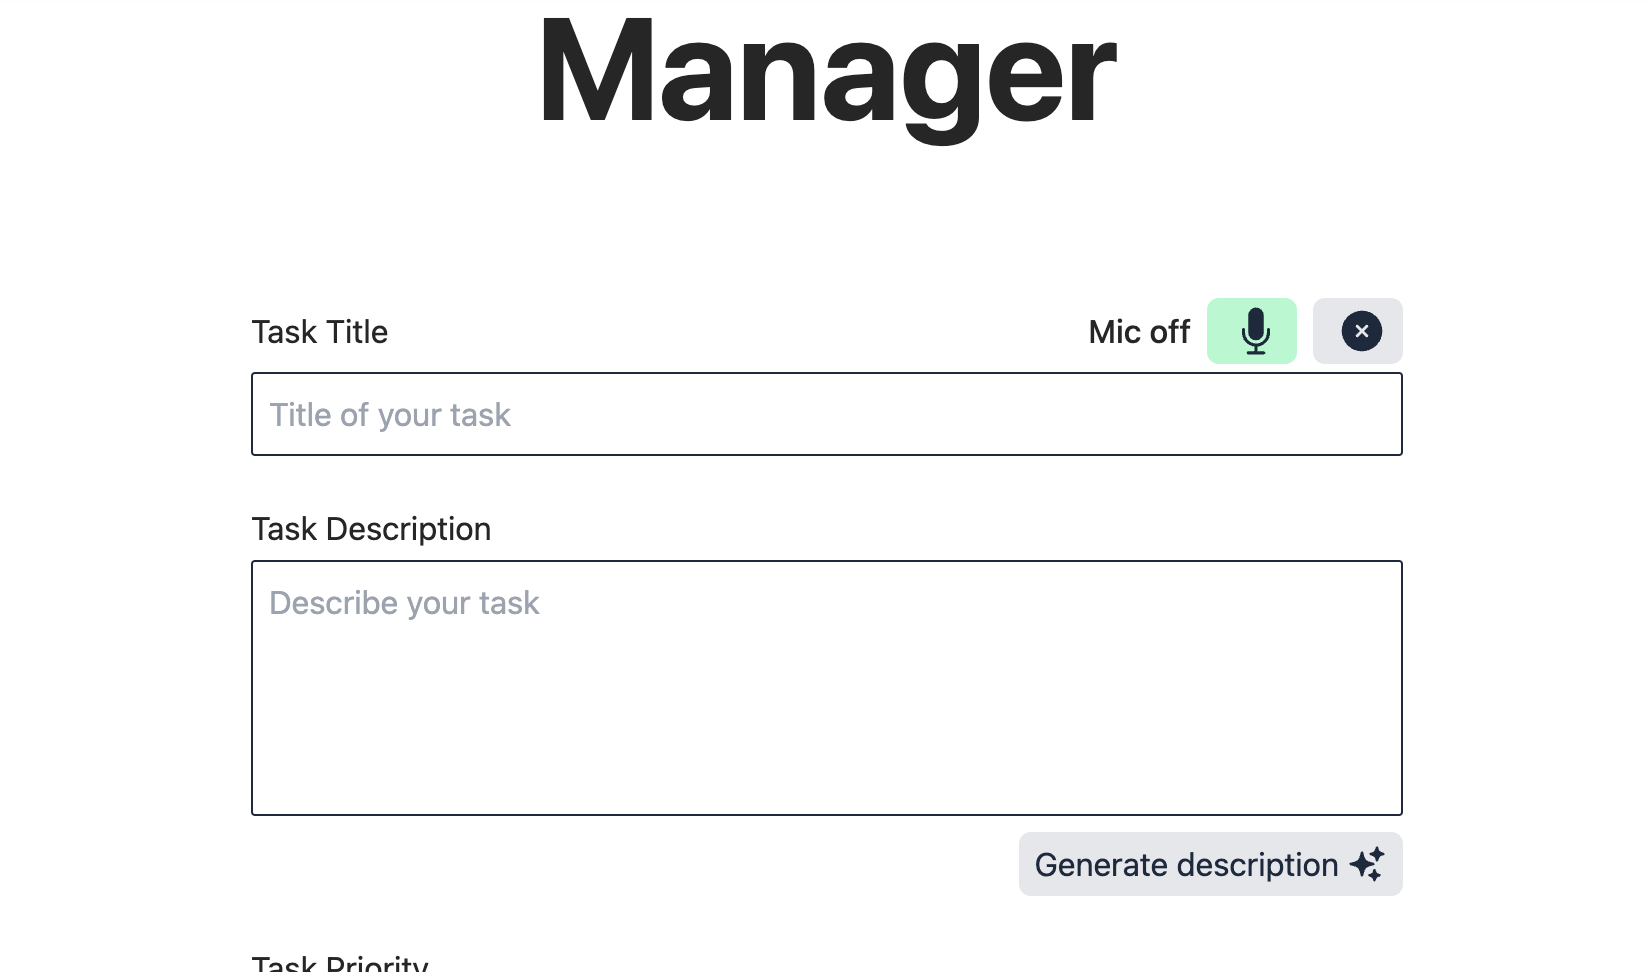 voice input functionality added to the form
How to Add Search Functionality to the Application
To increase ease of use, it is useful to have some search functionality in the application.
To start, open up the Appwrite console. Click into your collections, click on Indexes tab then click on the "Create index" button.
Leave the index key as is, select FullText in the index type dropdown. Add title attribute and create the index. Repeat the process for the description attribute.
In your application, open db.ts file in utils folder and paste the following function just above the export keyword, then add it to the list of exports:
const searchTasks = async (searchTerm: string) => {
    const resTitle = await databases.listDocuments(dbID, collectionID, [
                        Query.search("title", searchTerm),
                    ]);
    const resDesc = await databases.listDocuments(dbID, collectionID, [
                        Query.search("description", searchTerm),
                     ]);
    const res = [...resTitle.documents, ...resDesc.documents];

    return res;
};

export {
    createDocument,
    readDocuments,
    updateDocument,
    deleteDocument,
    searchTasks,
};
Create a new file in the components folder, calll it Search.tsx. Paste the following into it:
import { FormEvent, useState } from "react";
import { ITask } from "../models/interface";
import Dialog from "./Dialog";
import TaskItem from "./TaskItem";
import Button from "./Button";
import { searchTasks } from "../utils/db";

const Search = () => {
const [searchTerm, setSearchTerm] = useState("");
const [isSearching, setIsSearching] = useState(false);
const [searchedTasks, setSearchedTasks] = useState<ITask[]>([]);
const [error, setError] = useState("");

    return (
        <div className="flex flex-col w-full md:w-1/2">
            <form
                className="flex flex-col md:flex-row items-start md:items-center gap-2"
                onSubmit={handleSubmit}
            >
                {searchedTasks.length > 0 && (
                    <Dialog setSearchedTasks={setSearchedTasks}>
                        {searchedTasks.map((task: ITask) => (
                            <TaskItem key={task.$id} task={task} isViewTask={true} />
                        ))}
                    </Dialog>
                )}
            <input
                aria-roledescription="search"
                type="text"
                id="search"
                placeholder="search your tasks..."
                value={searchTerm}
                onChange={(e) => setSearchTerm(e.target.value)}
                className={`bg-inherit w-5/6 border rounded-md p-2 focus:outline-none focus:ring-1 ${
                error
                ? "border-error focus:ring-red-500 invalid:focus:ring-red-600"
                : "border-input focus:ring-slate-900"
                }`}
            />
            <Button
            type="submit"
            extraBtnClasses="bg-primary text-white hover:bg-primaryHover font-medium text-main py-2"
            >
                <span>{isSearching ? "Searching..." : "Search"}</span>
            </Button>
            </form>
            <span className="text-error font-medium mt-1">{error}</span>
        </div>
    );
};

export default Search;
The new Search component creates some local state and returns a form with an input and search button. It also opens the dialog when it has search results.
Add this handleSubmit function above the return statement like so:
const handleSubmit = async (e: FormEvent<HTMLFormElement>) => {
    e.preventDefault();
    if (!searchTerm) {
        setError("No search term entered");
        setTimeout(() => {
        setError("");
        }, 3000);
        return;
    }

    setIsSearching(true);

    const res = await searchTasks(searchTerm);
    console.log("res search: ", res);
    if (res.length === 0) {
        setIsSearching(false);
        setError("No task found");
        setTimeout(() => {
        setSearchTerm("");
        setError("");
        }, 3000);
        return;
    }
    setIsSearching(false);
    setSearchedTasks(res as ITask[]);
};
This function sets an error if no search term is received, then it attempts to call the database search function passing it the search term. If successful it sets the tasks to local state and if not, it catches the error.
Click into the dialog component and replace its props with the following, then pass the setSearchedTasks to it like so:
interface DialogProps {
    setIsViewTask?: (isViewTask: boolean) => void;
    setSearchedTasks?: (tasks: ITask[]) => void;
    children: ReactNode;
}

function Dialog({ setIsViewTask, setSearchedTasks, children }: DialogProps) {...
Replace the closeModal function in the dialog component with this snippet:
const closeModal = () => {
    if (setIsViewTask) setIsViewTask(false);
    //this is the new line
    if (setSearchedTasks) setSearchedTasks([]);
    setIsOpen(false);
};
Go back into the Task.tsx file and paste this below the h1 tag that displays the "Your Tasks" text:
<h1 className="text-4xl md:text-7xl font-bold text-center py-3 mb-16">
Your Tasks
</h1>
//paste here
<div className="m-8 flex flex-col-reverse md:flex-row gap-8 items-start                     md:items-center md:justify-between">
    <Search />
    <Button
        handleClick={() => navigate("/")}
        extraBtnClasses="bg-primary text-white font-medium py-2 hover:bg-    primaryHover ml-auto"
    >
        <span>Add Task</span>
        <PlusIcon height={25} className="hidden md:flex" />
    </Button>
</div>
//rest of code stays unchanged
This adds the search component and a button that takes you back to the Index page when clicked.
Add the following within the Task component just below the useStates:
const [selectedTask, setSelectedTask] = useState<ITask>();
//paste here
const navigate = useNavigate();
//all below remain unchanged
const handleSelectChange = (e: React.ChangeEvent<HTMLSelectElement>)
You can now test your search functionality. It works but has one bug: if the search term is present in the both the title and the description we get back two search results.
To fix that, modify the searchTasks function in db.ts to filter out duplicate tasks by IDs like so:
const searchTasks = async (searchTerm: string) => {
    const resTitle = await databases.listDocuments(dbID, collectionID, [
        Query.search("title", searchTerm),
    ]);
    const resDesc = await databases.listDocuments(dbID, collectionID, [
        Query.search("description", searchTerm),
    ]);

    const res = [...resTitle.documents, ...resDesc.documents];

    // remove duplicate tasks
    const uniqueRes = res.filter(
        (task, index, self) => index === self.findIndex((t) => t.$id ===                  task.$id)
    );

    return uniqueRes;
};
Now your search should work as expected and should look like this:
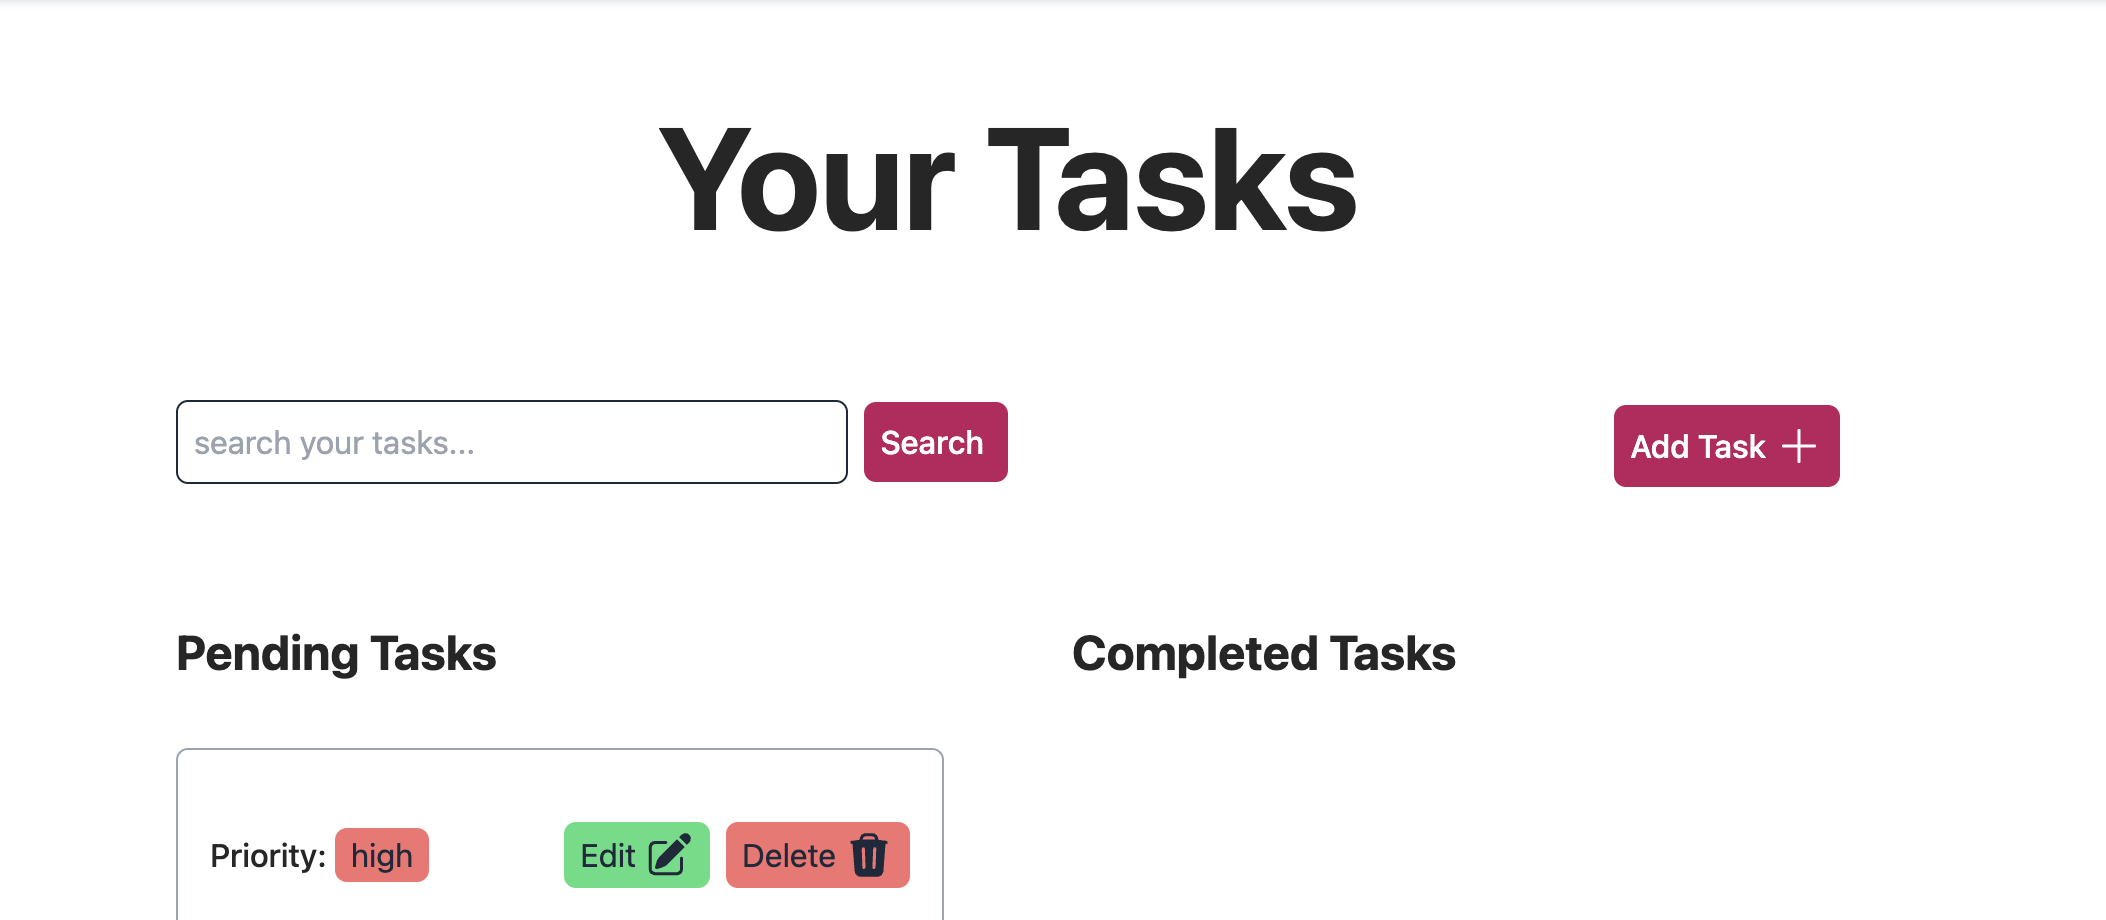 your pending and completed tasks displayed in the browser
How to Add Ability to Sort Tasks via Due Date and Priority
The application will only sort the pending tasks as it makes the most sense. It will sort by due date from the earliest date to the latest and vice versa. It will also sort by priority from lowest to highest and vice versa.
To get started, paste the following in the Tasks.tsx file right below the h3 tag with the "Pending Tasks" text like so:
<h3 className="text-2xl font-bold m-8">Pending Tasks</h3>
//paste here
<div className="m-8 flex items-start lg:items-center gap-1 justify-between flex-col lg:flex-row">
    <span className="font-medium">Sort Tasks by: </span>
    <Select
        defaultSelectValue={selectArray[0]}
        handleSelectChange={handleSelectChange}
        selectOptions={selectArray}
    />
</div>
Then paste the following array that will contain the options for select component above. Paste it right above handleViewTask function like so:
const navigate = useNavigate();
//paste here
const selectArray = [
    "priority - (low - high)",
    "priority - (high - low)",
    "due date - (earliest - latest)",
    "due date - (latest - earliest)",
];
//rest remains unchanged
const handleViewTask = (...
Add the handleSelectChange and the sort functions above the selectArray, like so:
const sortByPriority = (tasksList: ITask[], isAsc: boolean): ITask[] => {
    const priorityOrder: { [key: string]: number } = {
    low: 1,
    medium: 2,
    high: 3,
    };

    return [...tasksList].sort((a, b) => {
    const priorityA = priorityOrder[a.priority!.toLowerCase()];
    const priorityB = priorityOrder[b.priority!.toLowerCase()];
    return isAsc ? priorityA - priorityB : priorityB - priorityA;
    });
};

const handleSelectChange = async (
    e: React.ChangeEvent<HTMLSelectElement>
) => {
    const selectedOption = e.target.value;
    const doneTasks = tasks.filter((task) => task.done);

    switch (selectedOption) {
        case "priority - (low - high)":
        case "priority - (high - low)": {
            const isAsc = selectedOption === "priority - (low - high)";
            const sortedTasks = sortByPriority(tasks, isAsc);
            setTasks([...doneTasks, ...sortedTasks.filter((task) =>                           !task.done)]);
            break;
        }
        case "due date - (earliest - latest)":
        case "due date - (latest - earliest)": {
            const isEarliestToLatest =
            selectedOption === "due date - (earliest - latest)";
            const dueDateResult = await sortByDueDate(isEarliestToLatest);
            const sortedTasks = dueDateResult.documents as ITask[];
            setTasks([...doneTasks, ...sortedTasks.filter((task) =>                            !task.done)]);
            break;
        }
        default:
            break;
        }
};

//below remains unchanged
const selectArray = .....
The sortByPriority function creates an object whose keys map to the priority array and gives them numerical values. This makes it easier to sort as it is hard to tell which string is higher priority without that.
The handleSelectChange function picks out the selected option and filters the tasks to get the completed ones. It does matching logic in the switch statements, calling sortByPriority for the cases where the user is trying to do that and it calls sortByDueDate for the rest of the cases.
sortByDueDate is defined in the db.ts file. Open it and paste the following at the bottom of the file above the exports. Then add it to the exports list like so:
const sortByDueDate = async (isEarliestToLatest: boolean) => {
    const orderQuery = isEarliestToLatest
        ? Query.orderAsc("due_date")
        : Query.orderDesc("due_date");
    const res = await databases.listDocuments(dbID, collectionID,              [orderQuery]);
    return res;
};

export {
    createDocument,
    readDocuments,
    updateDocument,
    deleteDocument,
    searchTasks,
    sortByDueDate,
};
This function leverages Appwrites' Query methods to sort the date string according to the Boolean that is passed to it.
Going back to your application, run it to test the sorting functionality. The application should be sorted and the sorting should only apply to the pending tasks.
Bonus: How to Add Dark Mode Support
The last thing left is to add Dark Mode support that respects the users' systems setting.
For this, open the tailwind.config.ts file and replace its contents with the following:
/** @type {import('tailwindcss').Config} */
export default {
    content: ["./index.html", "./src/**/*.{js,ts,jsx,tsx}"],
    darkMode: "selector",
    theme: {
        extend: {
            textColor: {
                error: "var(--text-error)",
                ok: "var(--text-ok)",
                main: "var(--text-main)",
                iconColor: "var(--btn-icon-main)",
            },
            backgroundColor: {
                base: "var(--base-bg)",
                primary: "var(--btn-bg-primary)",
                primaryHover: "var(--btn-bg-primary-hover)",
                ok: "var(--btn-bg-ok)",
                lightOk: "var(--btn-bg-light-ok)",
                light: "var(--btn-bg-light)",
                lowPriority: "var(--low-priority)",
                mediumPriority: "var(--medium-priority)",
                highPriority: "var(--high-priority)",
            },
            borderColor: {
                container: "var(--border-container)",
                input: "var(--border-input)",
                error: "var(--border-error)",
            },
        },
    },
    plugins: [],
};
This extends the tailwind preset colors and ties the CSS variables that were set in the index.css file to the Tailwind config.
In the index.css file, add this dark class below the date class like so:
#date::-webkit-calendar-picker-indicator {
    background-color: var(--btn-bg-light);
}
//paste here
.dark{
    --base-bg: #262626;
    --text-main: #ffffff;
    --text-error: #fca5a5;
    --text-ok: #86efac;
    --border-input: #e2e8f0;
    --border-error: #fca5a5;
}
This changes some of the CSS variables values when the dark class is applied.
Now, open the navbar file in the components folder and replace its contents with the following:
const Navbar = () => {
    const navigate = useNavigate();

    const themeArray = ["light", "dark", "system"];
    const [theme, setTheme] = useState(() => {
        return localStorage.getItem("theme") || themeArray[2];
    });

    const applyTheme = (selectedTheme: string) => {
        const isDarkModePreferred = window.matchMedia(
            "(prefers-color-scheme: dark)"
            ).matches;

        document.documentElement.classList.remove("light", "dark");
        document.documentElement.classList.add(selectedTheme);

        if (selectedTheme === "system") {
        document.documentElement.classList.toggle("dark", isDarkModePreferred);
        document.documentElement.classList.toggle("light",                  !isDarkModePreferred);
        }
    };

    const handleSelectTheme = (e: React.ChangeEvent<HTMLSelectElement>) => {
        const selectedTheme = e.target.value;
        setTheme(selectedTheme);

        // Store the selected theme in localStorage
        localStorage.setItem("theme", selectedTheme);
    };

    useEffect(() => {
        applyTheme(theme);
    }, [theme]);

    return (
        <nav className="py-4 border-b-2 border-container shadow-md shadow-gray-400 w-full fixed top-0 bg-base">
            <ul className="flex items-center justify-between  w-11/12 mx-auto">
                <Link to="/">
                    <Button>
                        <span className="font-semibold text-main">Taskwrite</span>
                        <PencilIcon height={20} className="text-main" />
                    </Button>
                </Link>
                <div className="flex items-center justify-between gap-6">
                <Link
                    to="/tasks"
                    className="font-semibold hover:scale-105 transition duration-300 ease-in-out"
                >
                    View Tasks
                </Link>
                <div className="flex gap-2 items-center">
                    <span className="font-semibold"> Theme: </span>
                    <Select
                        defaultSelectValue={theme}
                        selectOptions={themeArray}
                        handleSelectChange={handleSelectTheme}
                    />
                </div>
                </div>
            </ul>
        </nav>
    );
};

export default Navbar;
Your application should now have a select in the navigation menu that successfully toggles between dark and light themes while defaulting to the system preferences when set to "System".
It should look like so:
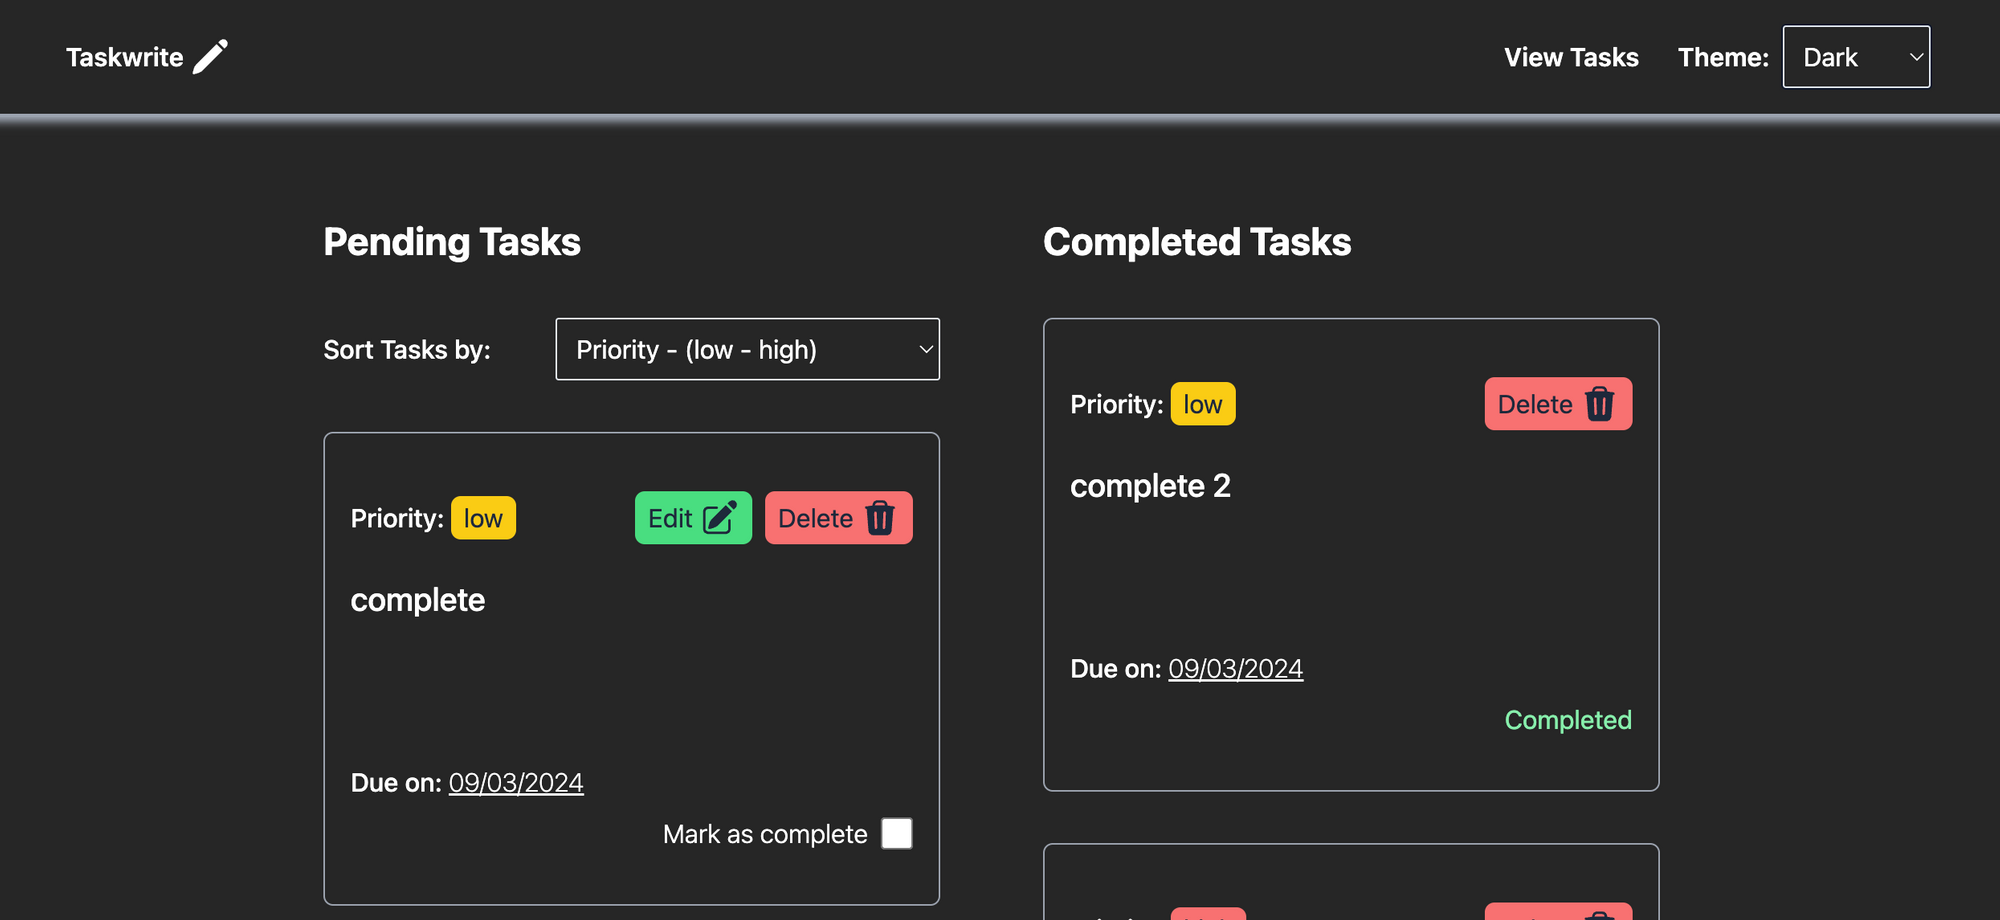 Taskwrite complete interface and functionalities
And Taskwrite is complete! You have successfully built a task manager application that is AI-enhanced, voice-enabled, searchable and sortable using React and Appwrite.
Notes
Appwrite recently announced some new features that would greatly simplify the search functionality above but, at the time of writing, these changes were not rolled out to their cloud offering.
The application could be further simplified by using state management solutions and this will be added to it in subsequent articles.
The application is live here.
Limitations
The following are some known limitations and issues with this application:
- The navigation menu is not responsive
- The application has no tests written
- The permissions set for Appwrite are permissive and not recommended for production environments
- The application could leverage Appwrites' Realtime capabilites for a smoother experience
- The application could do with push notifications to remind the user when the task due date is coming up
That said, the application is going to continue being improved and worked on. You can follow along with that on GitHub. All contributions and improvements on the codebase are welcome. Please star the repository while you are at it.