

This post will help you to learn how to deploy your React applications to production. We are going to use Docker and NGINX to secure API keys and proxy requests to prevent Cross-Origin Resource Sharing (CORS) violations.
You can find the code and video in the summary at the end.
What You'll Learn in This Article
In every project lifecycle, the time comes to publish it, and it is not always that obvious how to do so. The production environment is different than the development one, and users will not take any extra steps to run it. Most web apps consume some sort of APIs, and often, they are hosted on a different server.
In this case, as a developer, we need to solve Cross-Origin Resource Sharing (CORS) issues. Too often, we end up building a backend even though it is not necessary. I believe that developers should keep their applications simple, and cut out all redundant pieces.
In this article, I would like to show you how I prepare my React apps to deploy them to production.
I could build a trivial React example app but it wouldn't be very helpful. So I decided to hook my app into a real API provided by FED St. Louis. The API requires an access key to retrieve data, and endpoints are protected against cross domain requests — no external web app will be able to directly consume data.
Take note: If you application relies on server-side rendering this is not the right deployment strategy. You can get inspired but you will still need some sort of backend.
Prerequisites
It is critical to have some basic knowledge of how to build React apps. You should also know some Docker fundamentals before you follow the instructions in this article.
If you miss anything, don't worry! Just check out this amazing article and YouTube tutorial on FreeCodeCamp:
- A Beginner-Friendly Introduction to Containers, VMs and Docker by @iam_preethi
- Create React App Crash Course
How to Build an Example React App
I bootstrapped a simple web app using create-react-app. The only job the app has is displaying a line chart with a representation of the GDP of the United States.

The app retrieves data only from the following API:
https://api.stlouisfed.org/fred/series/observations?series_id=GDPCA&frequency=a&observation_start=1999-04-15&observation_end=2021-01-01&file_type=json&api_key=abcdefghijklmnopqrstuvwxyz123456
Here are the parameters:
series_id- The id for a series. TheGDPCAstands for the "Real GDP".frequency- The aggregation of the data. Theastands for annual.observation_start- The start of the observation period.observation_end- The end of the observation period.file_type- The format of the data. Default isxml.api_key- The access key required to retrieve any data from this API. You can request one here.
You can find more details in the documentation.
Life isn't always perfect, and the API design is not ideal. It requires the developer to pass the access key and expected output of the data as URL parameters.
Passing the output as a parameter is not a problem for us because it only adds some noise - but the leaking API key is. Imagine if somebody intercepts them and abuses the API to perform some prohibited action. We don't want to risk it.
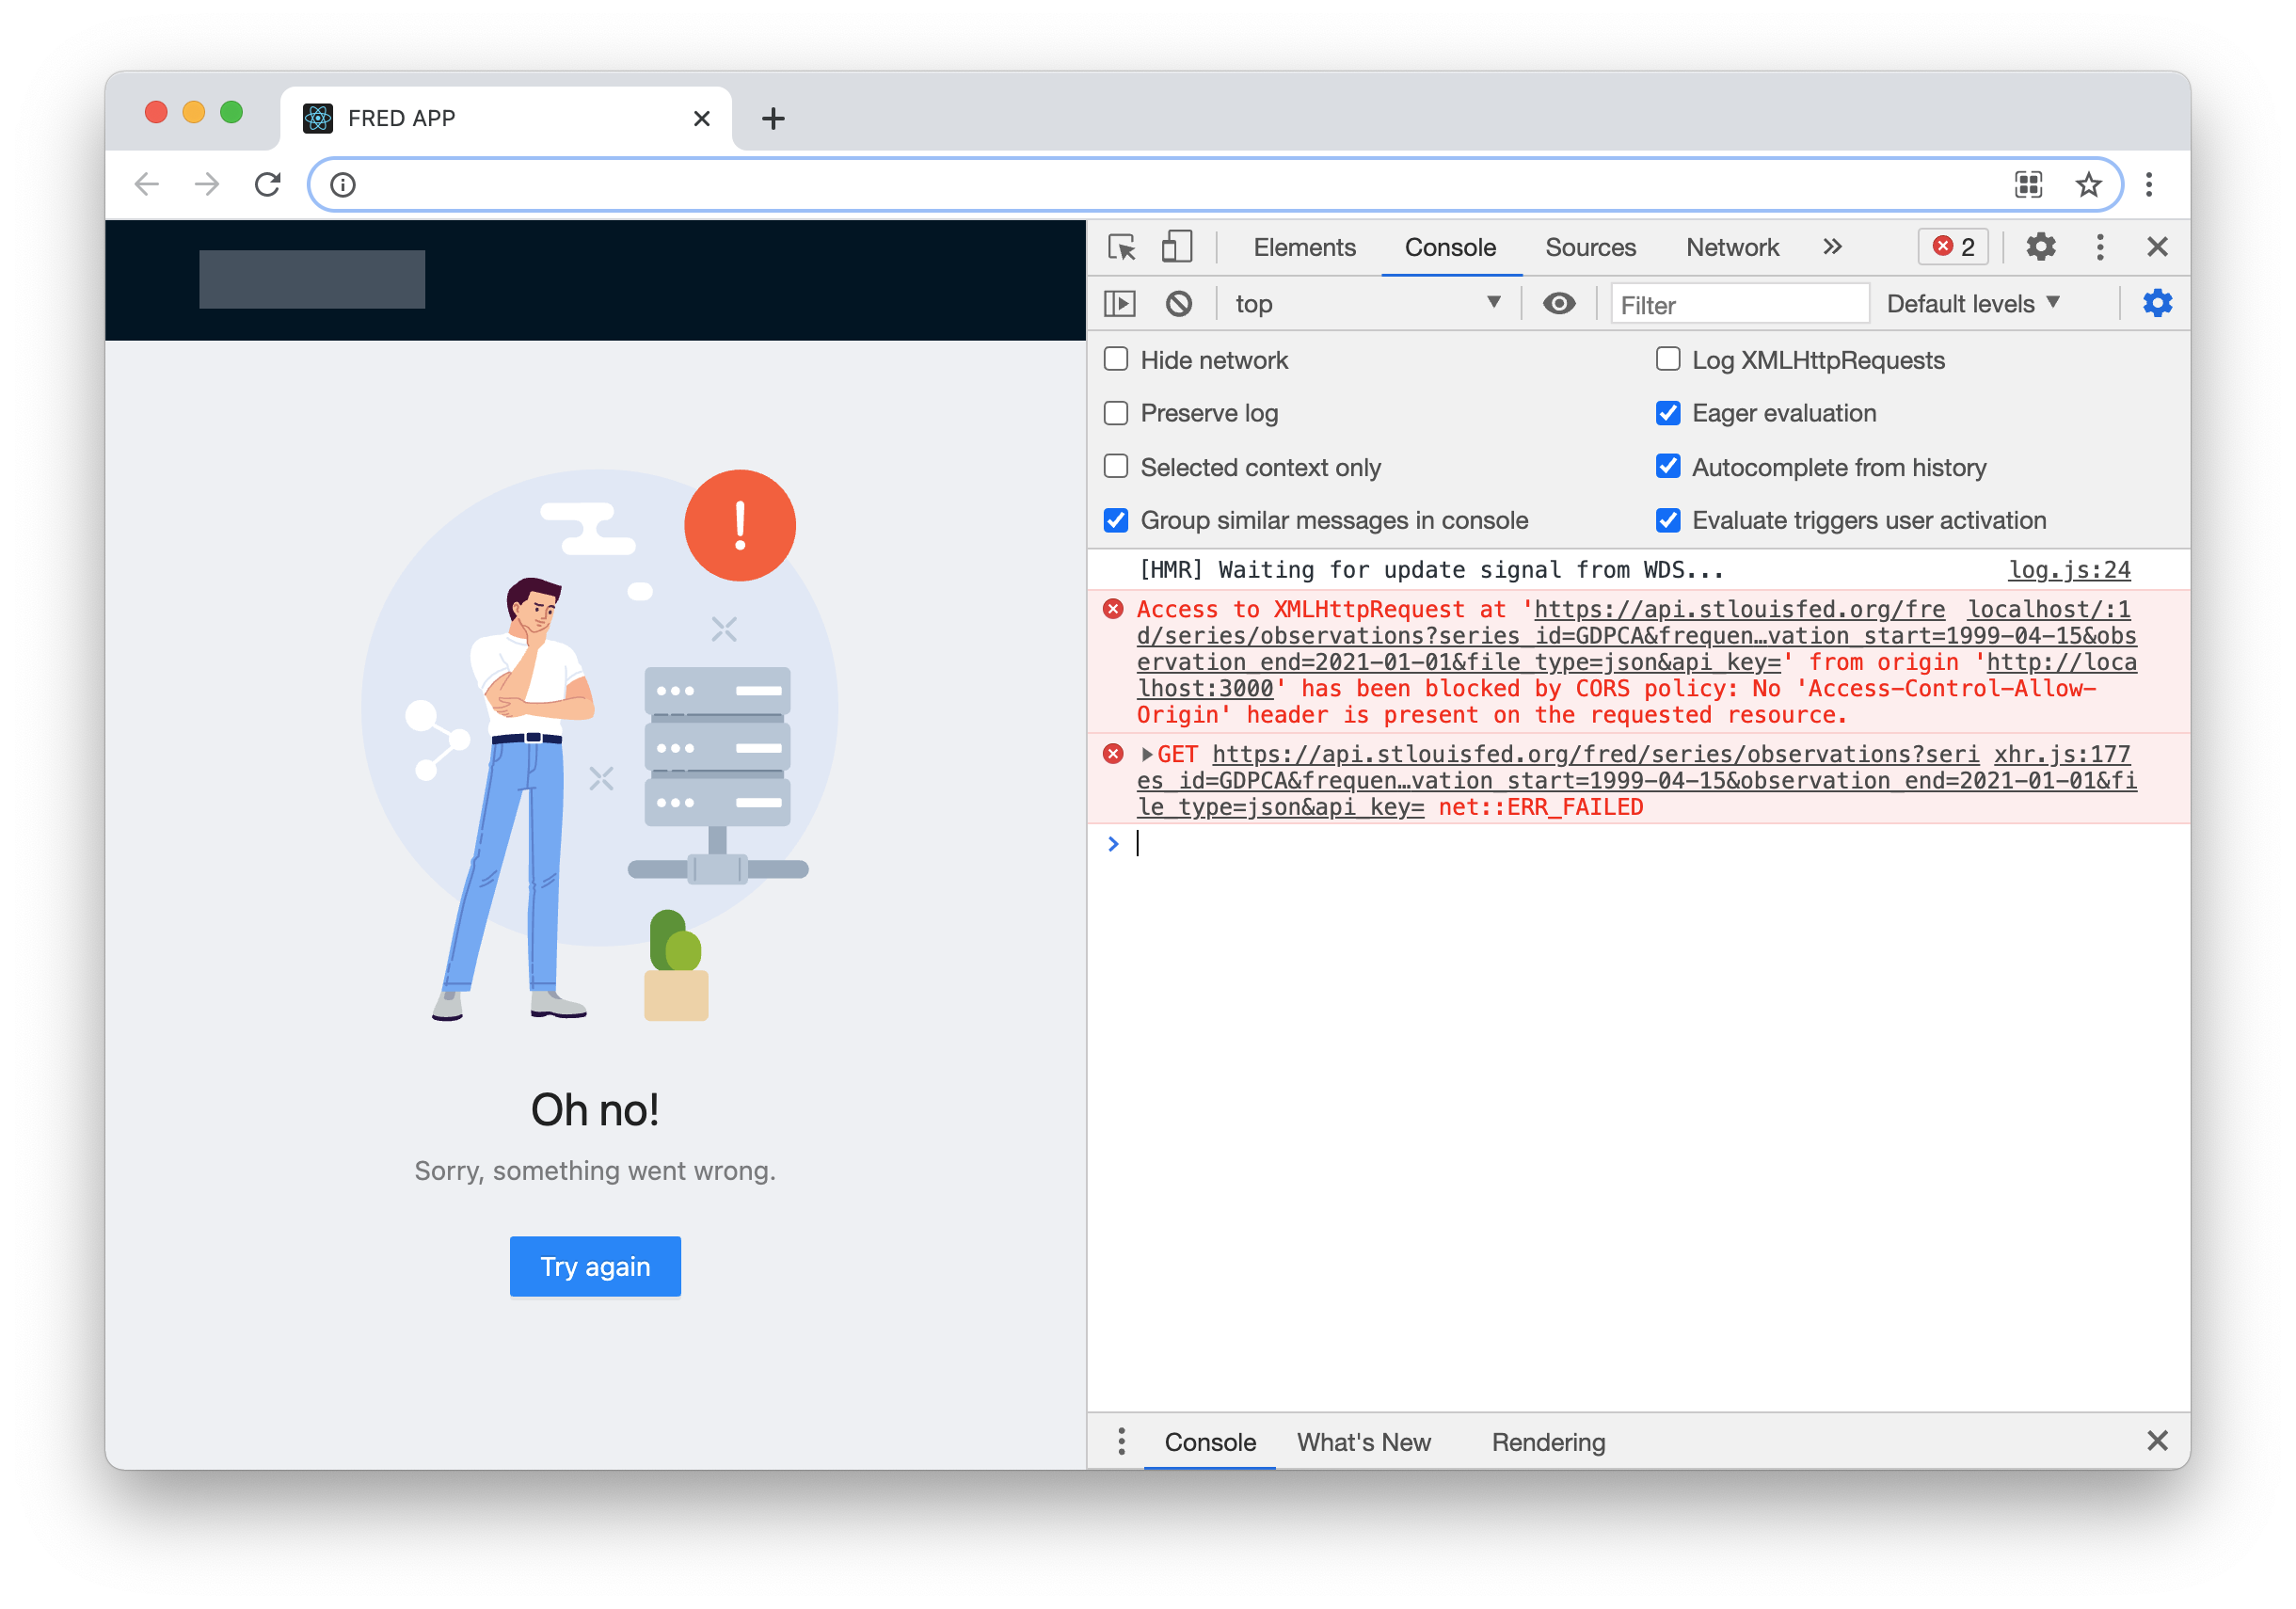
Let's assume for a moment that the API keys are not a problem. Still, it isn't possible to take advantage of this API. The FRED API is protected against cross-domain requests so that we will get the following errors if we try to call it from an external domain:
Many developers would suggest building middleware (a backend) to proxy requests to the API and filter sensitive data. They would say they might need to add new features in the future, and to a certain degree, it is a fair approach.
But I prefer to build my apps in a more YAGNI way (You Ain't Gonna Need It). So that I'm going to avoid build the backend until it is necessary - in our case I will not build it at all.
Let's use NGINX!
I am a big fan of NGINX because it brings simplicity with it. NGINX has all you need to prepare a production-grade web server such as HTTP2, compression, TLS, and many other features.
The most important thing is that we can achieve all this by defining a few lines of configuration. Just take a look at the snippet below:
...

http {
    ...

    server {
        ...

        location /api {
            set         $args   $args&&file_type=json&api_key=abcdefghijklmnopqrstuvwxyz123456;
            proxy_pass  https://api.stlouisfed.org/fred/series;
        }
    }
}
Those 4 lines are all I needed to hide our API key and suppress the CORS errors. Literally! From now on, all HTTP requests to /api will be proxied to FRED API, and only our apps will be able to consume the API. All external requests will face CORS errors.
To get rid of clutter, I replaced all default content of the file with
...(three dots). You can find the full version on my GitHub or video (links below).
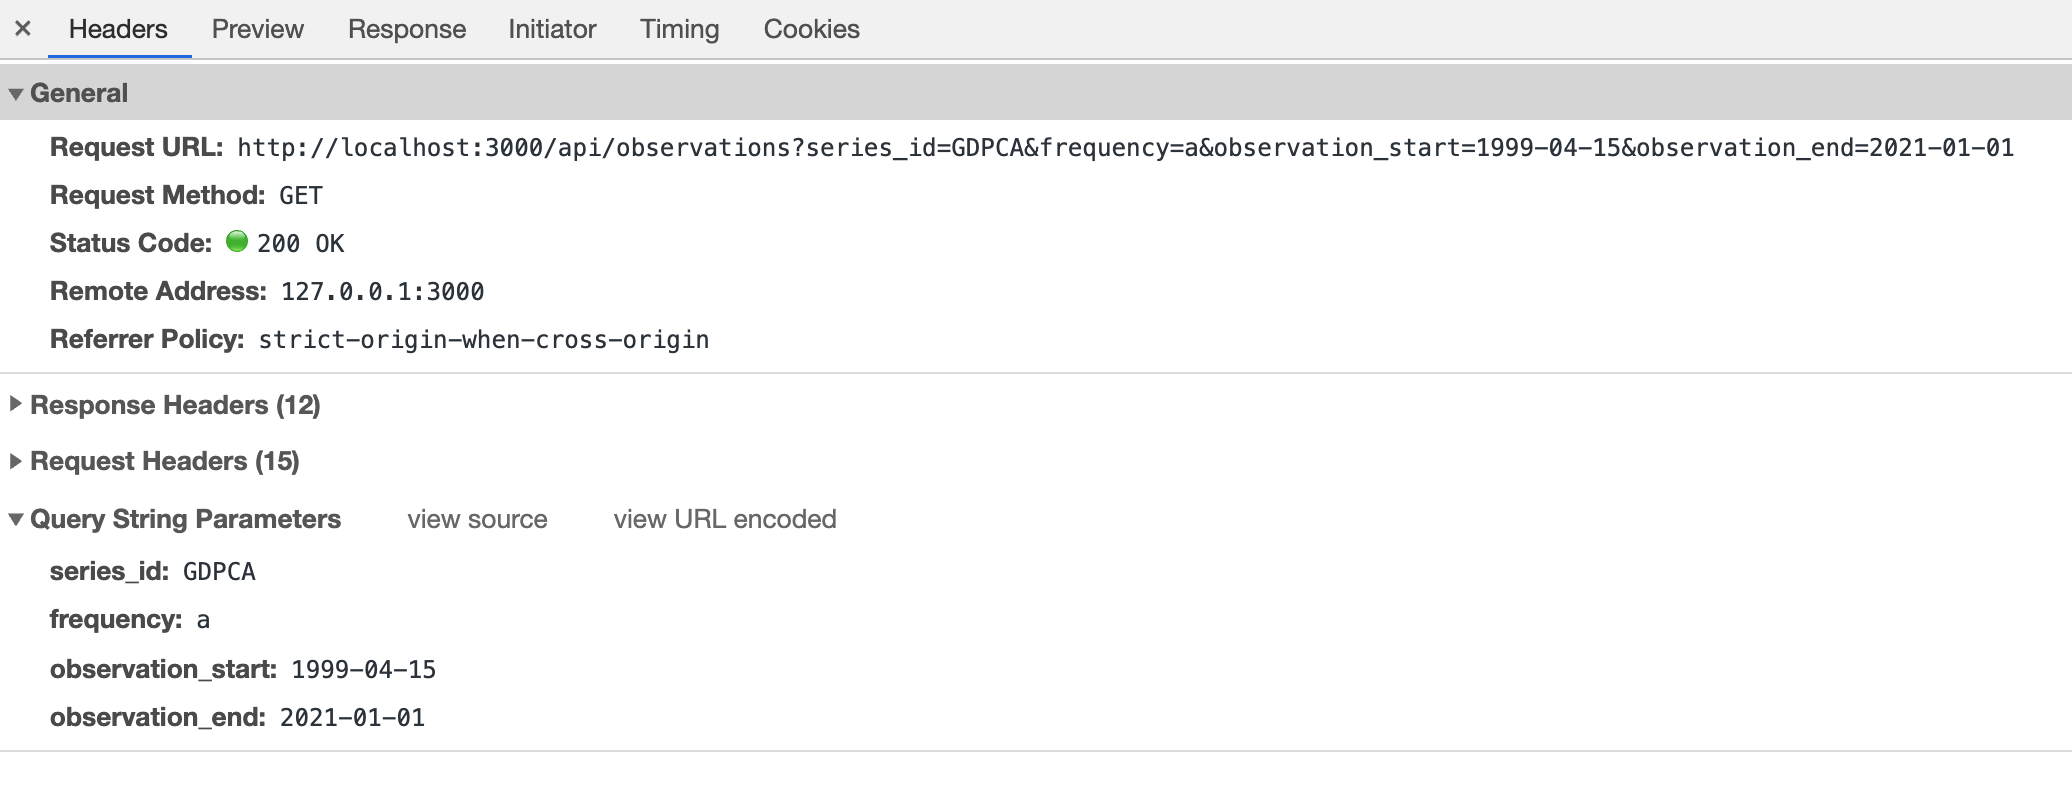
And this is how our endpoint looks:
/api/observations?series_id=GDPCA&frequency=a&observation_start=1999-04-15&observation_end=2021-01-01
We need to pass neither the api_key nor file_type parameters to retrieve data. And nobody can read the access key from the URL, so it is safe.
Docker loves NGINX
The most convenient way to run NGINX in the cloud is to use Docker. For this part, I assume that you know what Docker is (but if not please read the article linked in the prerequisites).
We just need to create a Dockerfile with the following contents:
FROM nginx

COPY container /
COPY build /usr/share/nginx/html
And now, only three more steps are needed to run the FRED APP:
- Build the React application. This process generates the
build/directory containing static files. - Build the Docker image. It will create a runnable Docker image.
- Publish the Docker image to some repository or run it on the local machine.
For now, let's try to run it on our machine.
$ yarn install
$ yarn build
$ docker build -t msokola/fred-app:latest .
$ docker run -p 8081:80 -it msokola/fred-app:latest
The 8081 is a port on your machine. It means the app will be available under the following URL: http://localhost:8081.
After opening this URL in the browser you should see logs like this in your terminal:
0.0.0.1 - - [11/Mar/2021:18:57:50 +0000] "GET / HTTP/1.1" 200 1556 "-" "Mozilla/5.0 (Macintosh; Intel Mac OS X 11_2_0) AppleWebKit/537.36 (KHTML, like Gecko) Chrome/88.0.4324.192 Safari/537.36" "-"
...
0.0.0.1 - - [11/Mar/2021:18:57:51 +0000] "GET /api/observations?series_id=GDPCA&frequency=a&observation_start=1999-04-15&observation_end=2021-01-01 HTTP/1.1" 200 404 "http://localhost:8081/" "Mozilla/5.0 (Macintosh; Intel Mac OS X 11_2_0) AppleWebKit/537.36 (KHTML, like Gecko) Chrome/88.0.4324.192 Safari/537.36" "-"
Pay attention to those 200s as they stand for HTTP status OK. If you see a 400 next to the API request it means something is wrong with your API key. The 304 is also fine (it means the data was cached).
How to Deploy the Container on AWS
The container is working, so we can deploy it. In this part of the article, I am going to show you how to run your application in Amazon Web Services (AWS).
AWS is one of the most popular cloud platforms. If you want to use Microsoft Azure or any other platform, the steps will be similar but the syntax of the commands will differ.
Take note: I recorded a YouTube video so you can watch me going through the complete deployment process. If you get stuck or encounter any issues, you can check if we have the same results at each step. If you want to watch the video, click here or you can find it embedded in the Summary below.
1. Install AWS CLI tools
Before we get started you will need to install the AWS CLI tools, so you can invoke commands on your cloud.
AWS offers installation wizards for all operating systems, so I am going to skip this section. After a successful installation you have to login by typing the following command:
$ aws configure
AWS Access Key ID [None]: AKIAIOSFODNN7EXAMPLE
AWS Secret Access Key [None]: wJalrXUtnFEMI/K7MDENG/bPxRfiCYEXAMPLEKEY
Default region name [None]: us-east-2
Default output format [None]: json
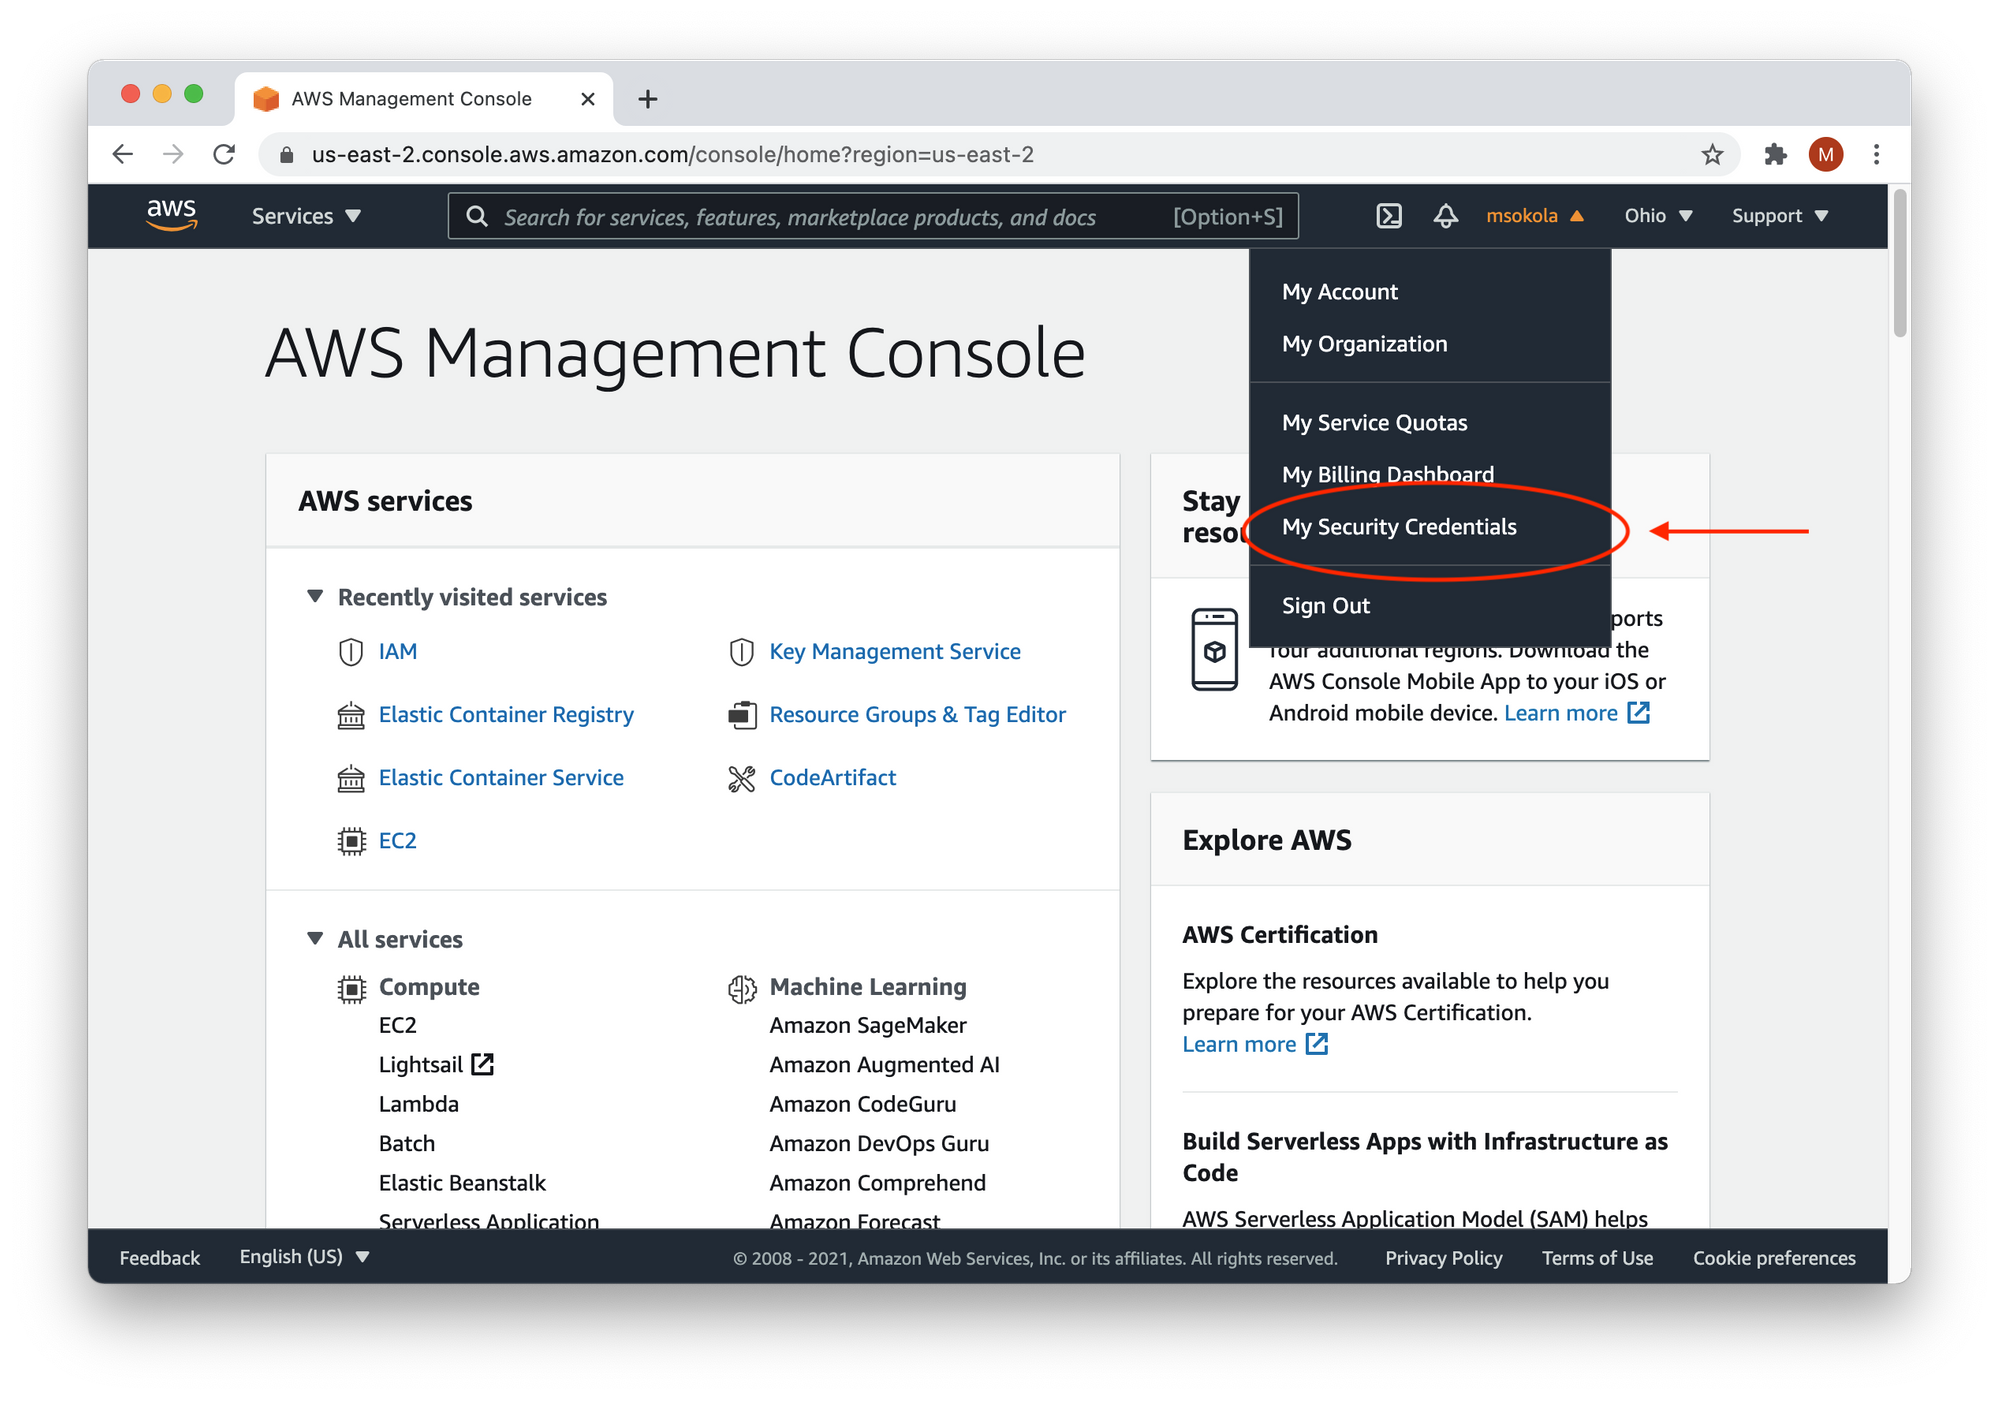
To generate access keys, you need to log in to your AWS Console. There, click on your username, and select "My Security Credentials".
2. Create a new Elastic Container Registry (ECR)
Once the CLI tools are set up, we will need to create a space where we can store the executables of our application. We use Docker, so our executables will be Docker images which we will run on virtual machines.
AWS offers a dedicated service for storing images called the Elastic Container Registry. The following command will create one for us:
aws ecr create-repository --repository-name react-to-aws --region us-east-2
Here are the parameters:
ecr- The acronyms of "Elastic Container Registry".repository-name- The name of our registry. Please have in mind we will be referring to this name later.region- The region code. You can find a region closest to your location to reduce latency. Here's a list of all regions.
You can find more details in the documentation.
And here's the expected output:
{
    "repository": {
        "repositoryArn": "arn:aws:ecr:us-east-2:1234567890:repository/react-to-aws2",
        "registryId": "1234567890",
        "repositoryName": "react-to-aws",
        "repositoryUri": "1234567890.dkr.ecr.us-east-2.amazonaws.com/react-to-aws2",
        "createdAt": "2021-03-16T22:50:23+04:00",
        "imageTagMutability": "MUTABLE",
        "imageScanningConfiguration": {
            "scanOnPush": false
        },
        "encryptionConfiguration": {
            "encryptionType": "AES256"
        }
    }
}
3. Push Docker Images to the Cloud
In this step, we are going to push our Docker images into the cloud. We can do it by copying the push commands from our AWS Console.
Let's open AWS Console in the browser, and click on Elastic Container Registry from the "All Services - Containers" list. If you didn't change your region you can just click here. You are going to see the full list of your repositories:

Now you need to select the react-to-aws repository, and then "View push commands" from the menu (marked with red circles in the image above). You are going to see the following window:

You need to copy all commands from the modal into your terminal. Do not copy commands from the snippet below because it won't work.
$ aws ecr get-login-password --region us-east-2 | docker login --username AWS --password-stdin 123456789.dkr.ecr.us-east-2.amazonaws.com
Login Succeeded

$ docker build -t react-to-aws .
[+] Building 0.6s (8/8) FINISHED
...

$ docker tag react-to-aws:latest 123465789.dkr.ecr.us-east-2.amazonaws.com/react-to-aws:latest

$ docker push 123456789.dkr.ecr.us-east-2.amazonaws.com/react-to-aws:latest
The push refers to repository [123456789.dkr.ecr.us-east-2.amazonaws.com/react-to-aws:latest]
...
latest: digest: sha256:3921262a91fd85d2fccab1d7dbe7adcff84f405a3dd9c0e510a20d744e6c3f74 size: 1988
Now you can close the modal, and click on the name of the repository (react-to-aws) to browse the list of available images. You should see the following screen:
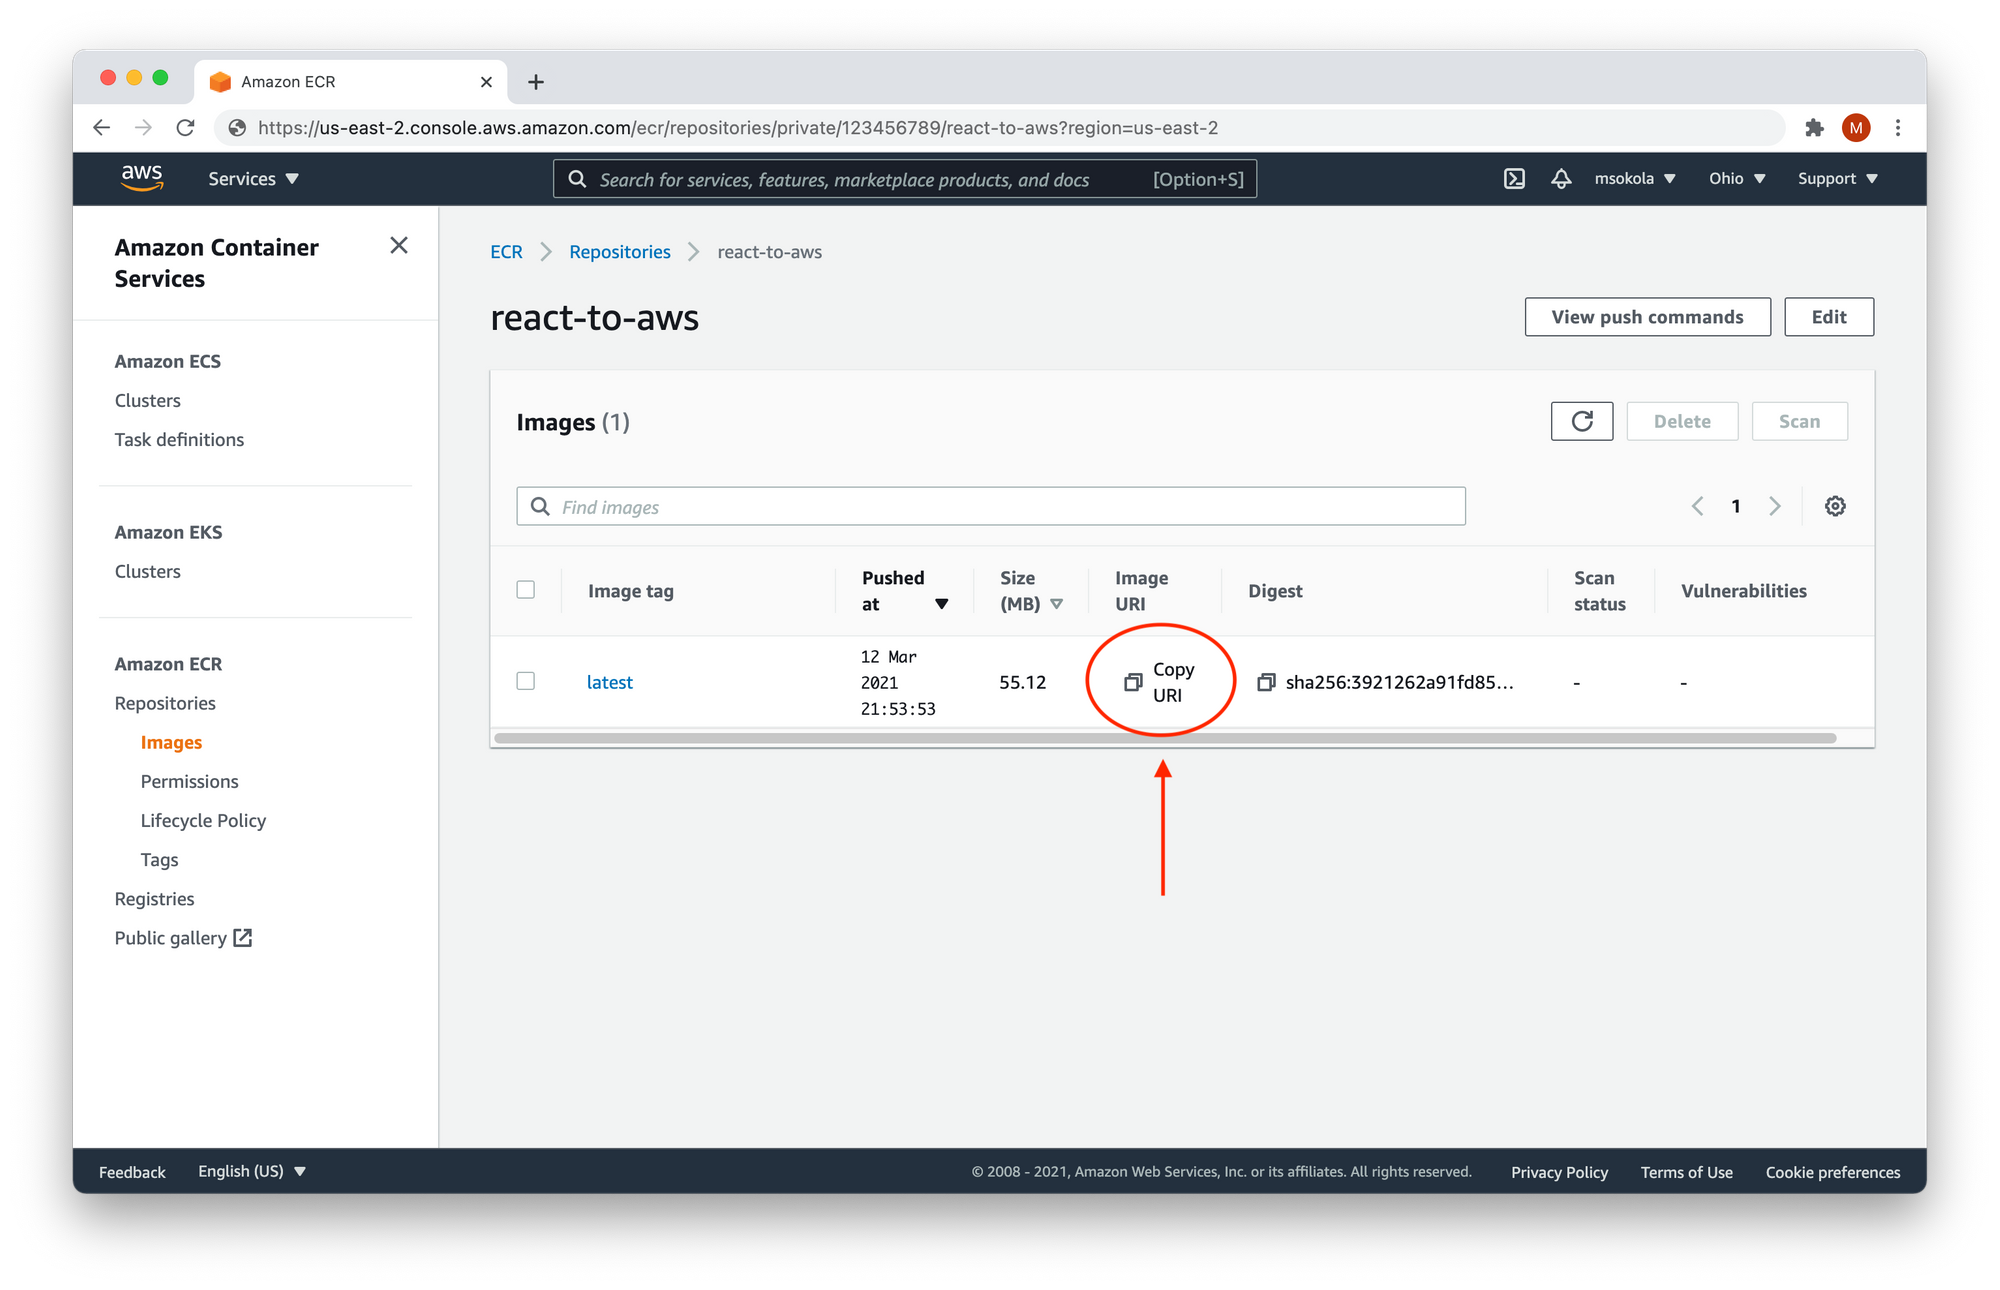
Your application is in the repository, ready for deployment! Now click on "Copy URI" and keep the content of your clipboard (paste it in some notepad or text file), as we will need to run it!
4. Configure the Application
Our image is available in the cloud, so now we need to configure it.
Virtual machines don't know how to execute your image to ensure it works well. We must define some instructions such as open ports, environment variables, and so on. AWS calls it task definition.
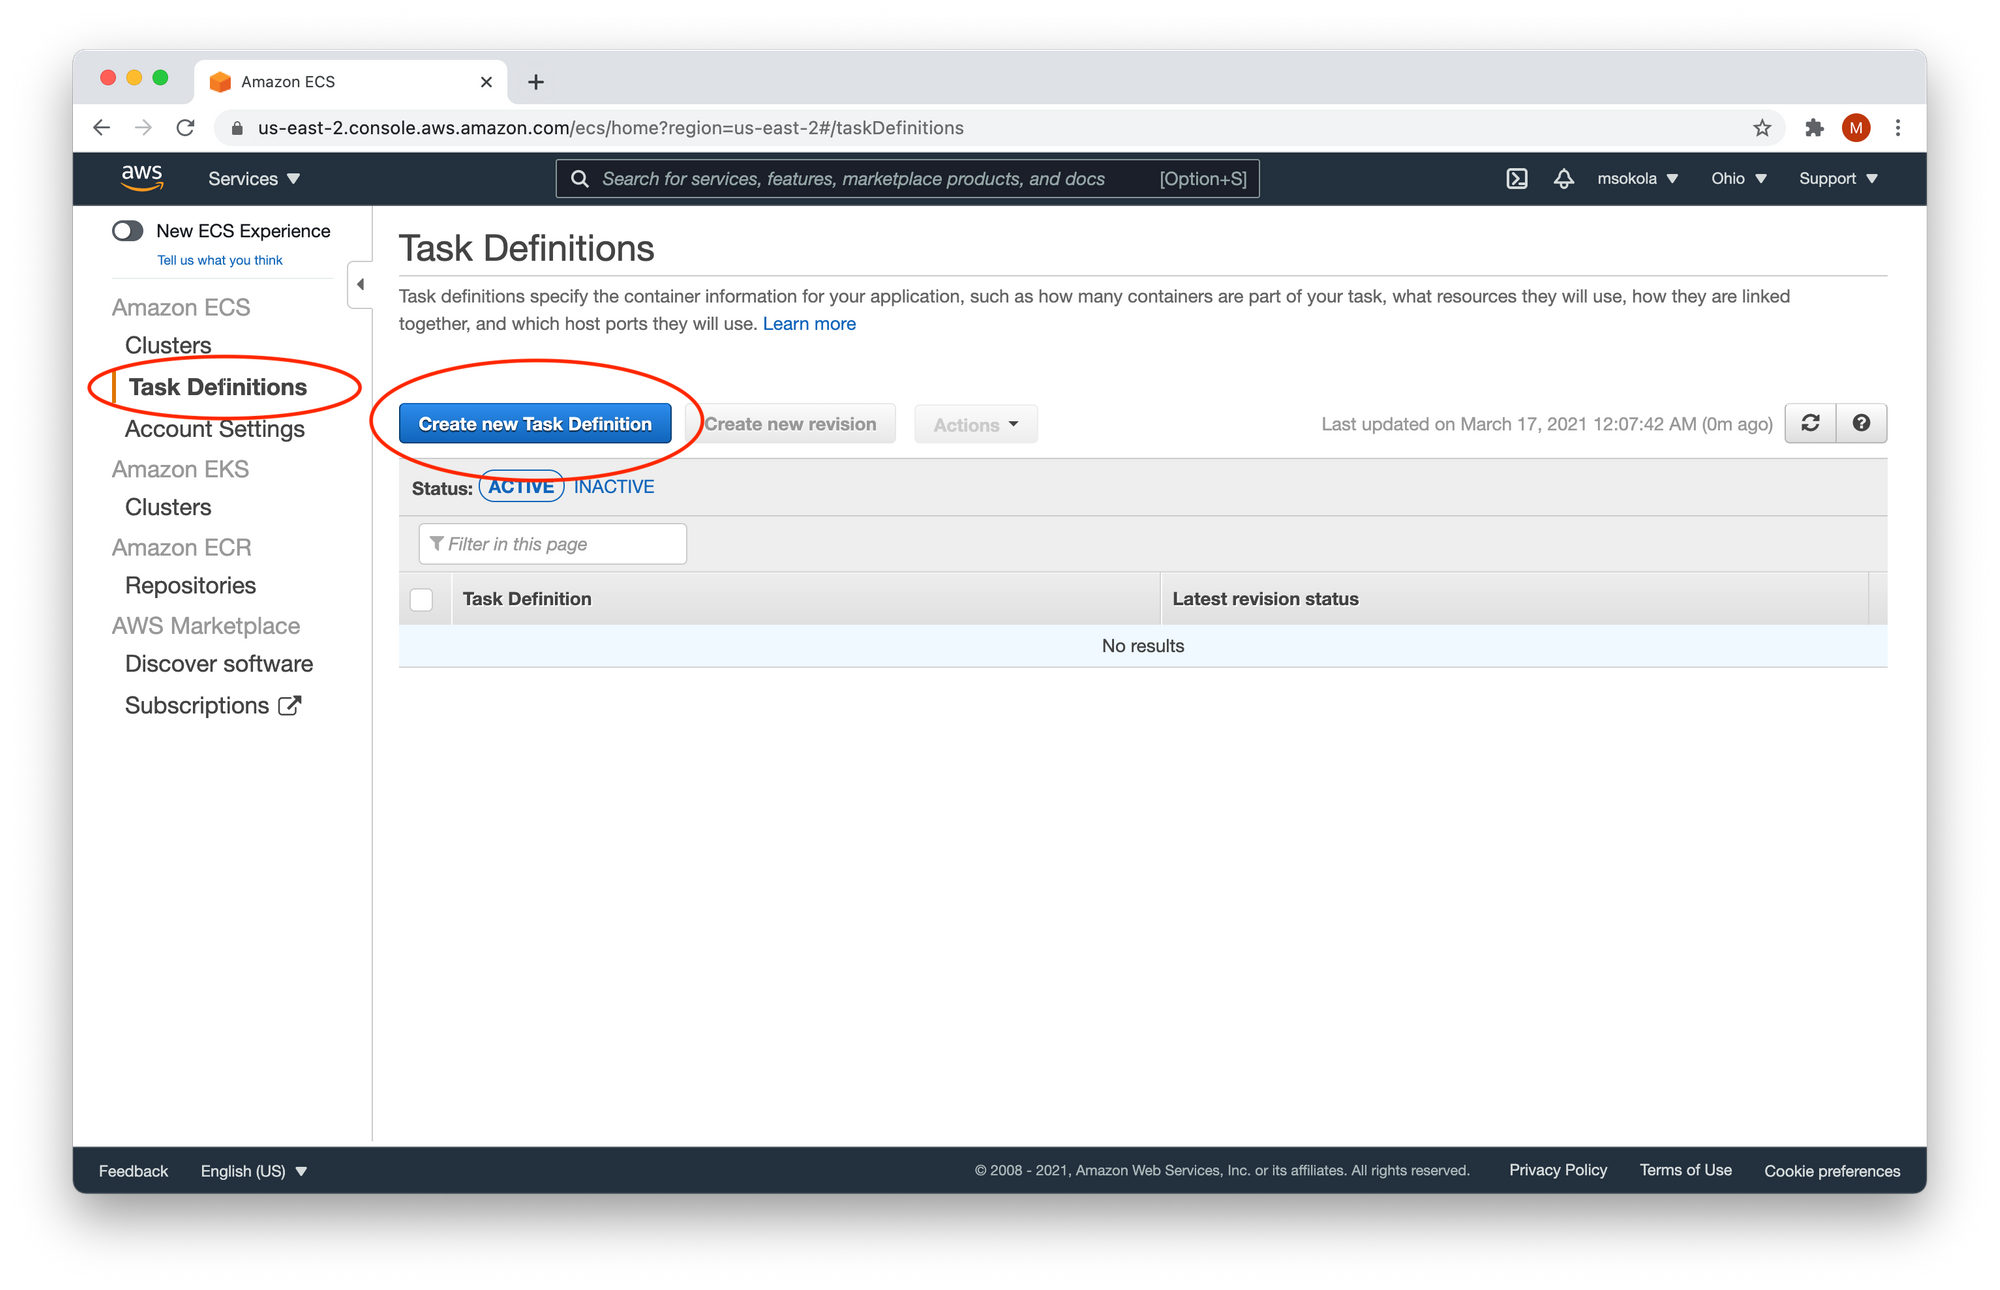
Open AWS Console, and click on Elastic Container Service (ECS) from the "All Services - Containers" list. If you didn't change your region you can click here.
Now select Task Definitions, and click on "Create new Task Definition" as marked in the image below:
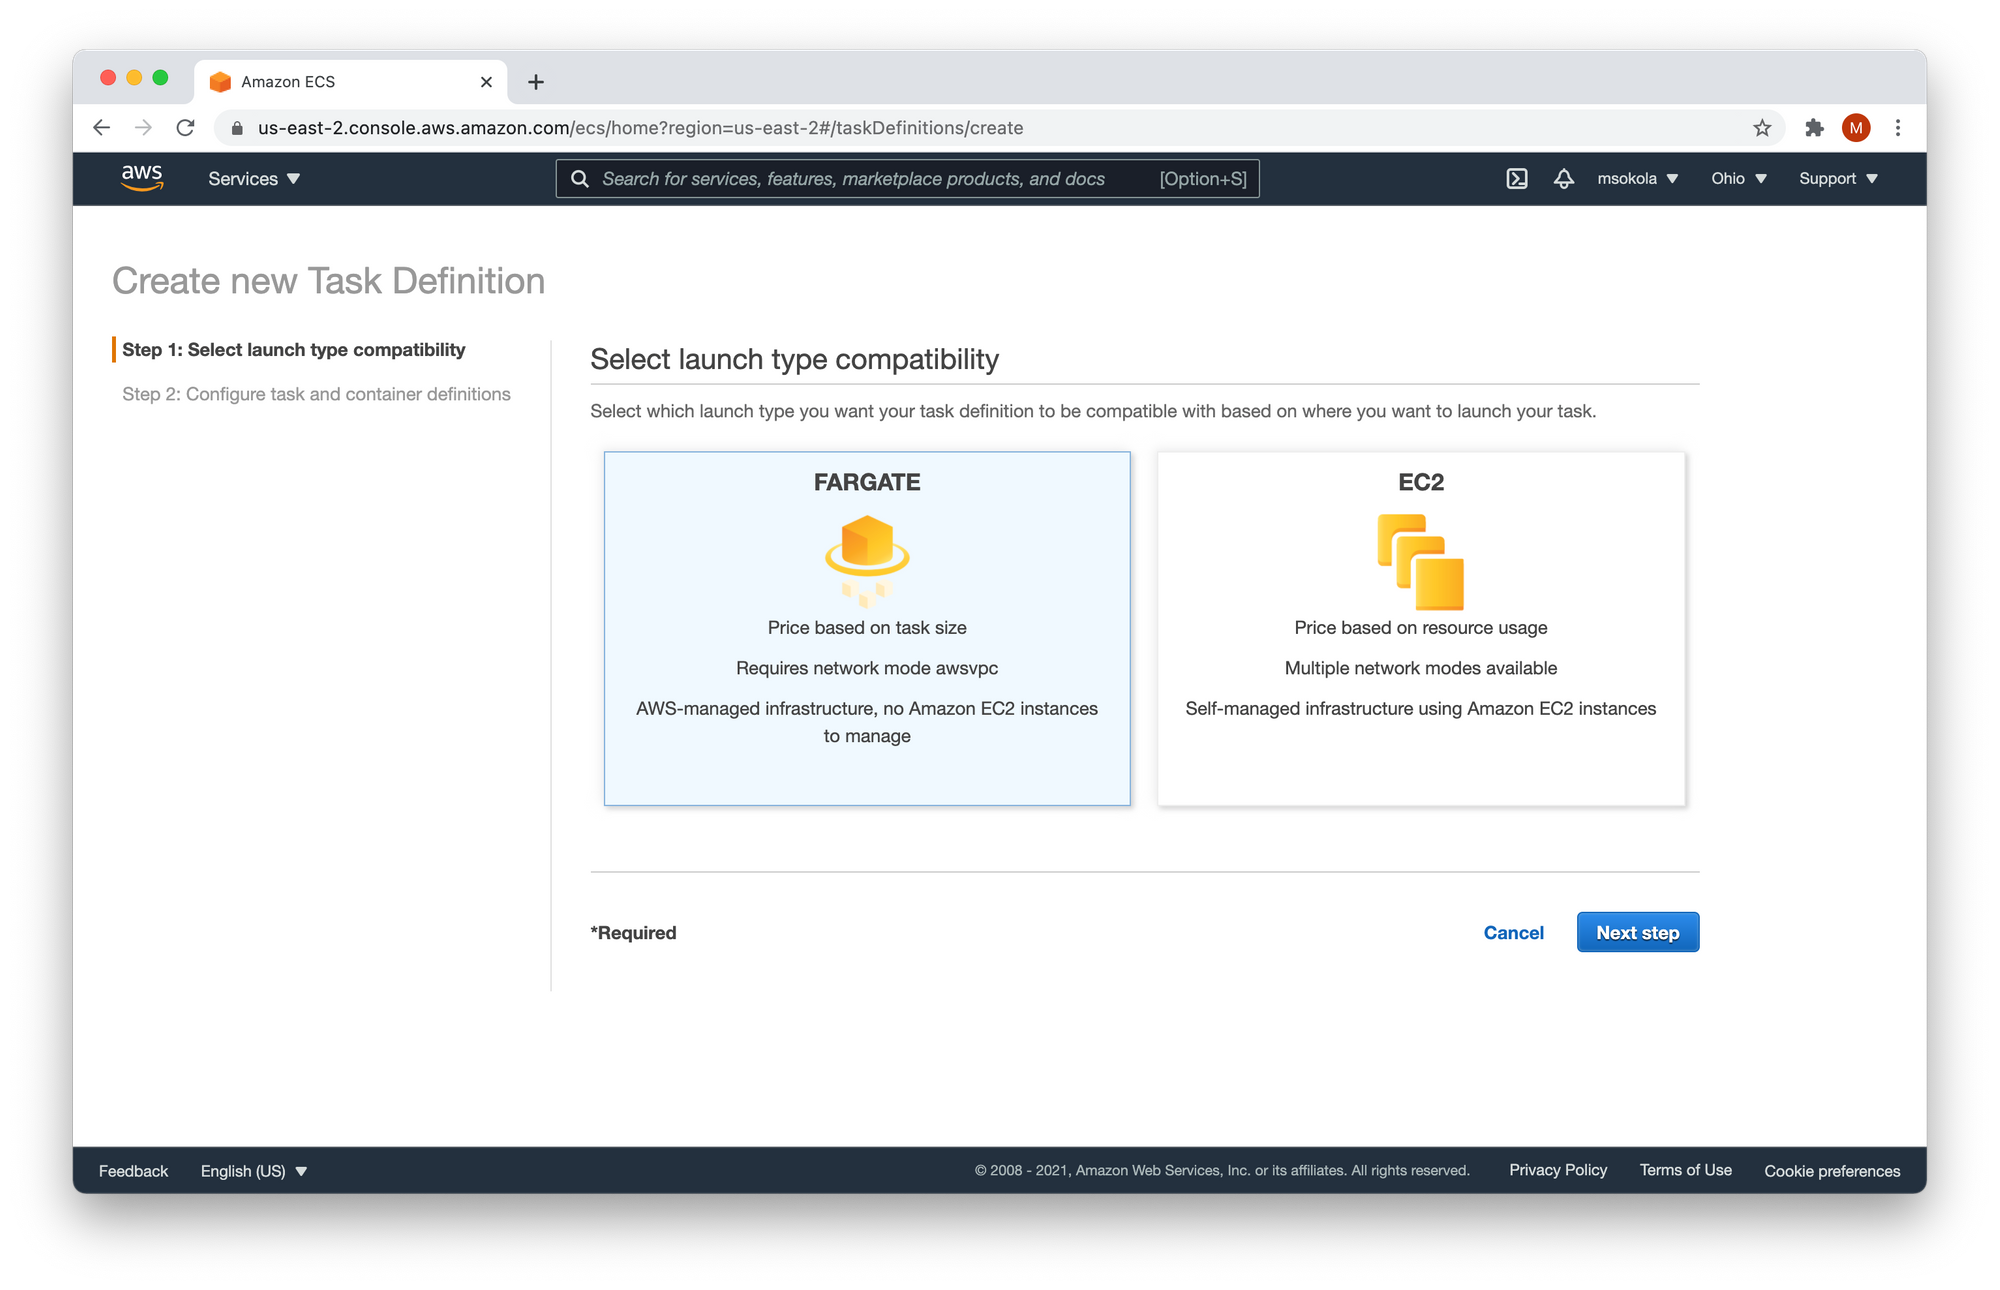
We have two options for running our task: FARGATE and EC2. Choose FARGATE, and click "Next step".
In the next step, you need to fill out the form with the following values:
- Task Definition Name -
react-to-aws-task. - Task Role -
none. - Task memory (GB) -
0.5GB(the smallest). - Task CPU (vCPU) -
0.25 vCPU(the smallest).
Once you've reached the "Container Definitions" section click "Add container":
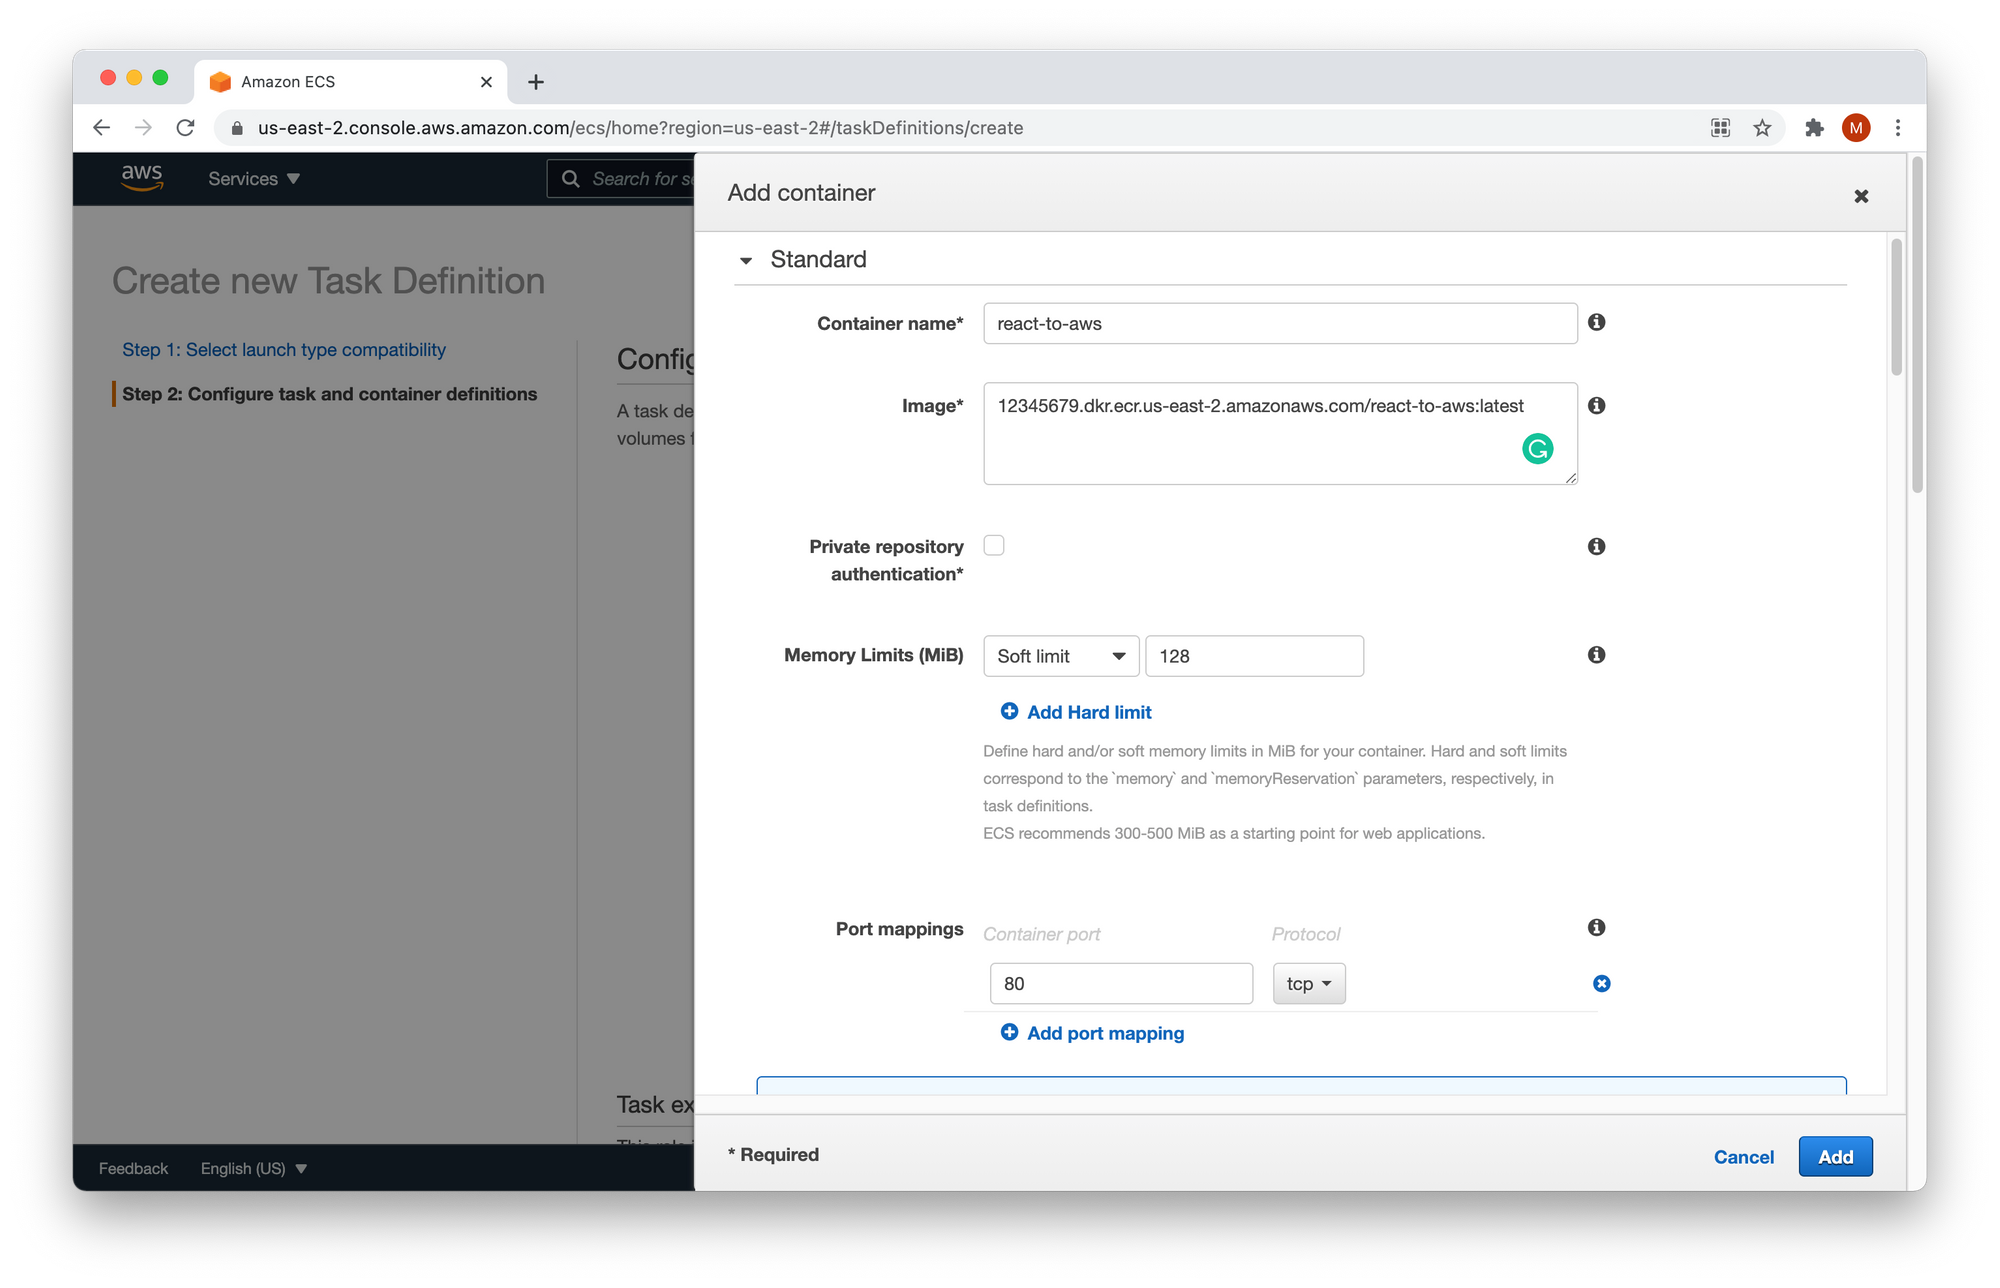
Fill out the form with the following values:
- Container Name -
react-to-aws. - Image - The URI from the step 4. You've pasted it somewhere.
- Memory Limits (MiB)-
Soft limit128. - Port mappings -
80- the HTTP port.
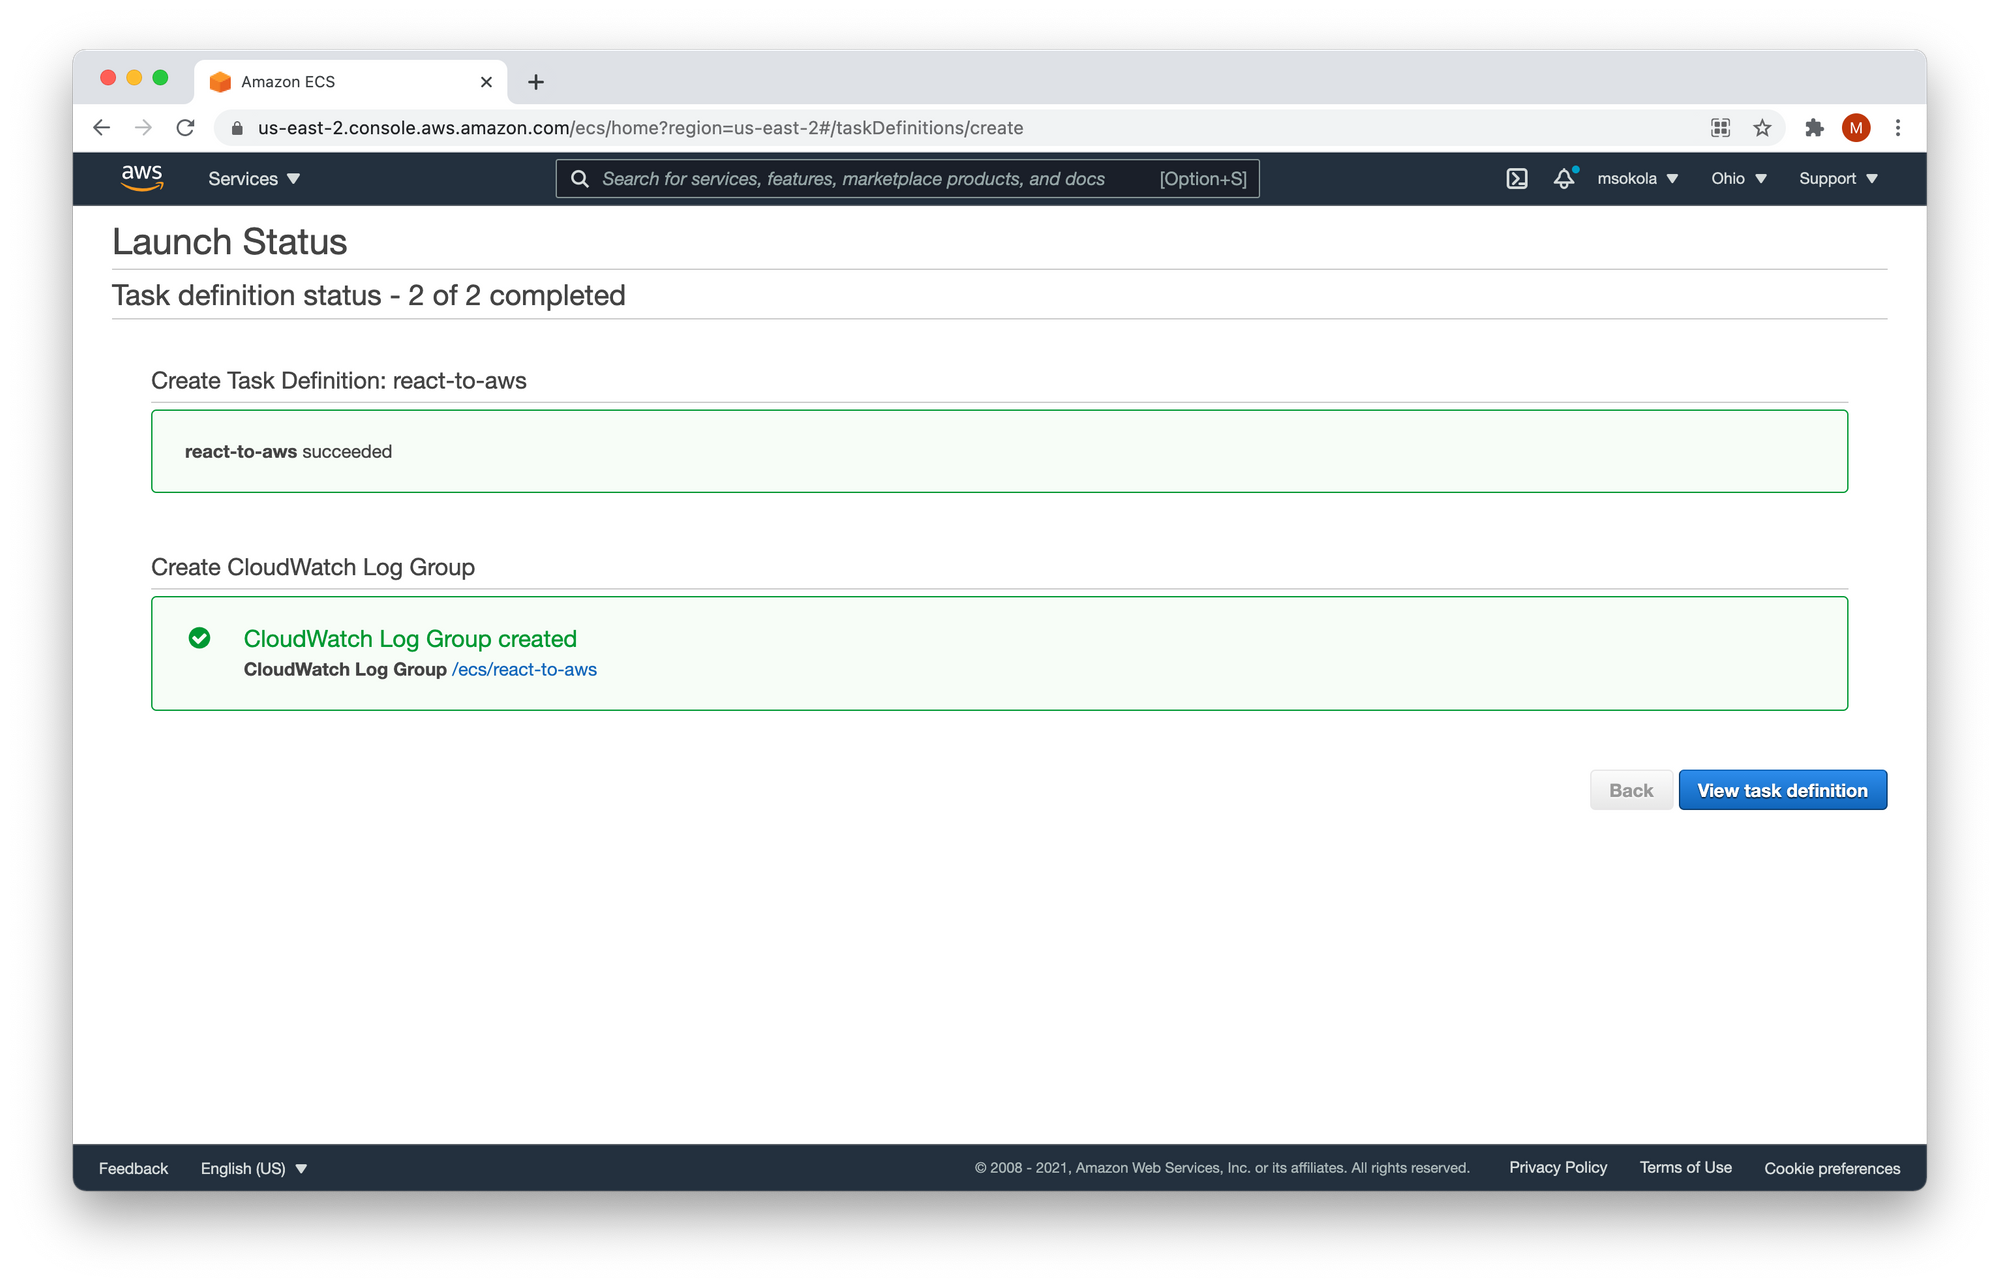
Other options aren't relevant for us. Now click on the "Add" button to add a container, and finish the task definition by clicking Create. You should see the following screen, and click on "View task definition".
5. Let's run it!
Finally, we can create a cluster, so we can run our application in the cloud. You need to select "Clusters" from the menu on the left-hand side, and "Create Cluster". As shown in the image below:
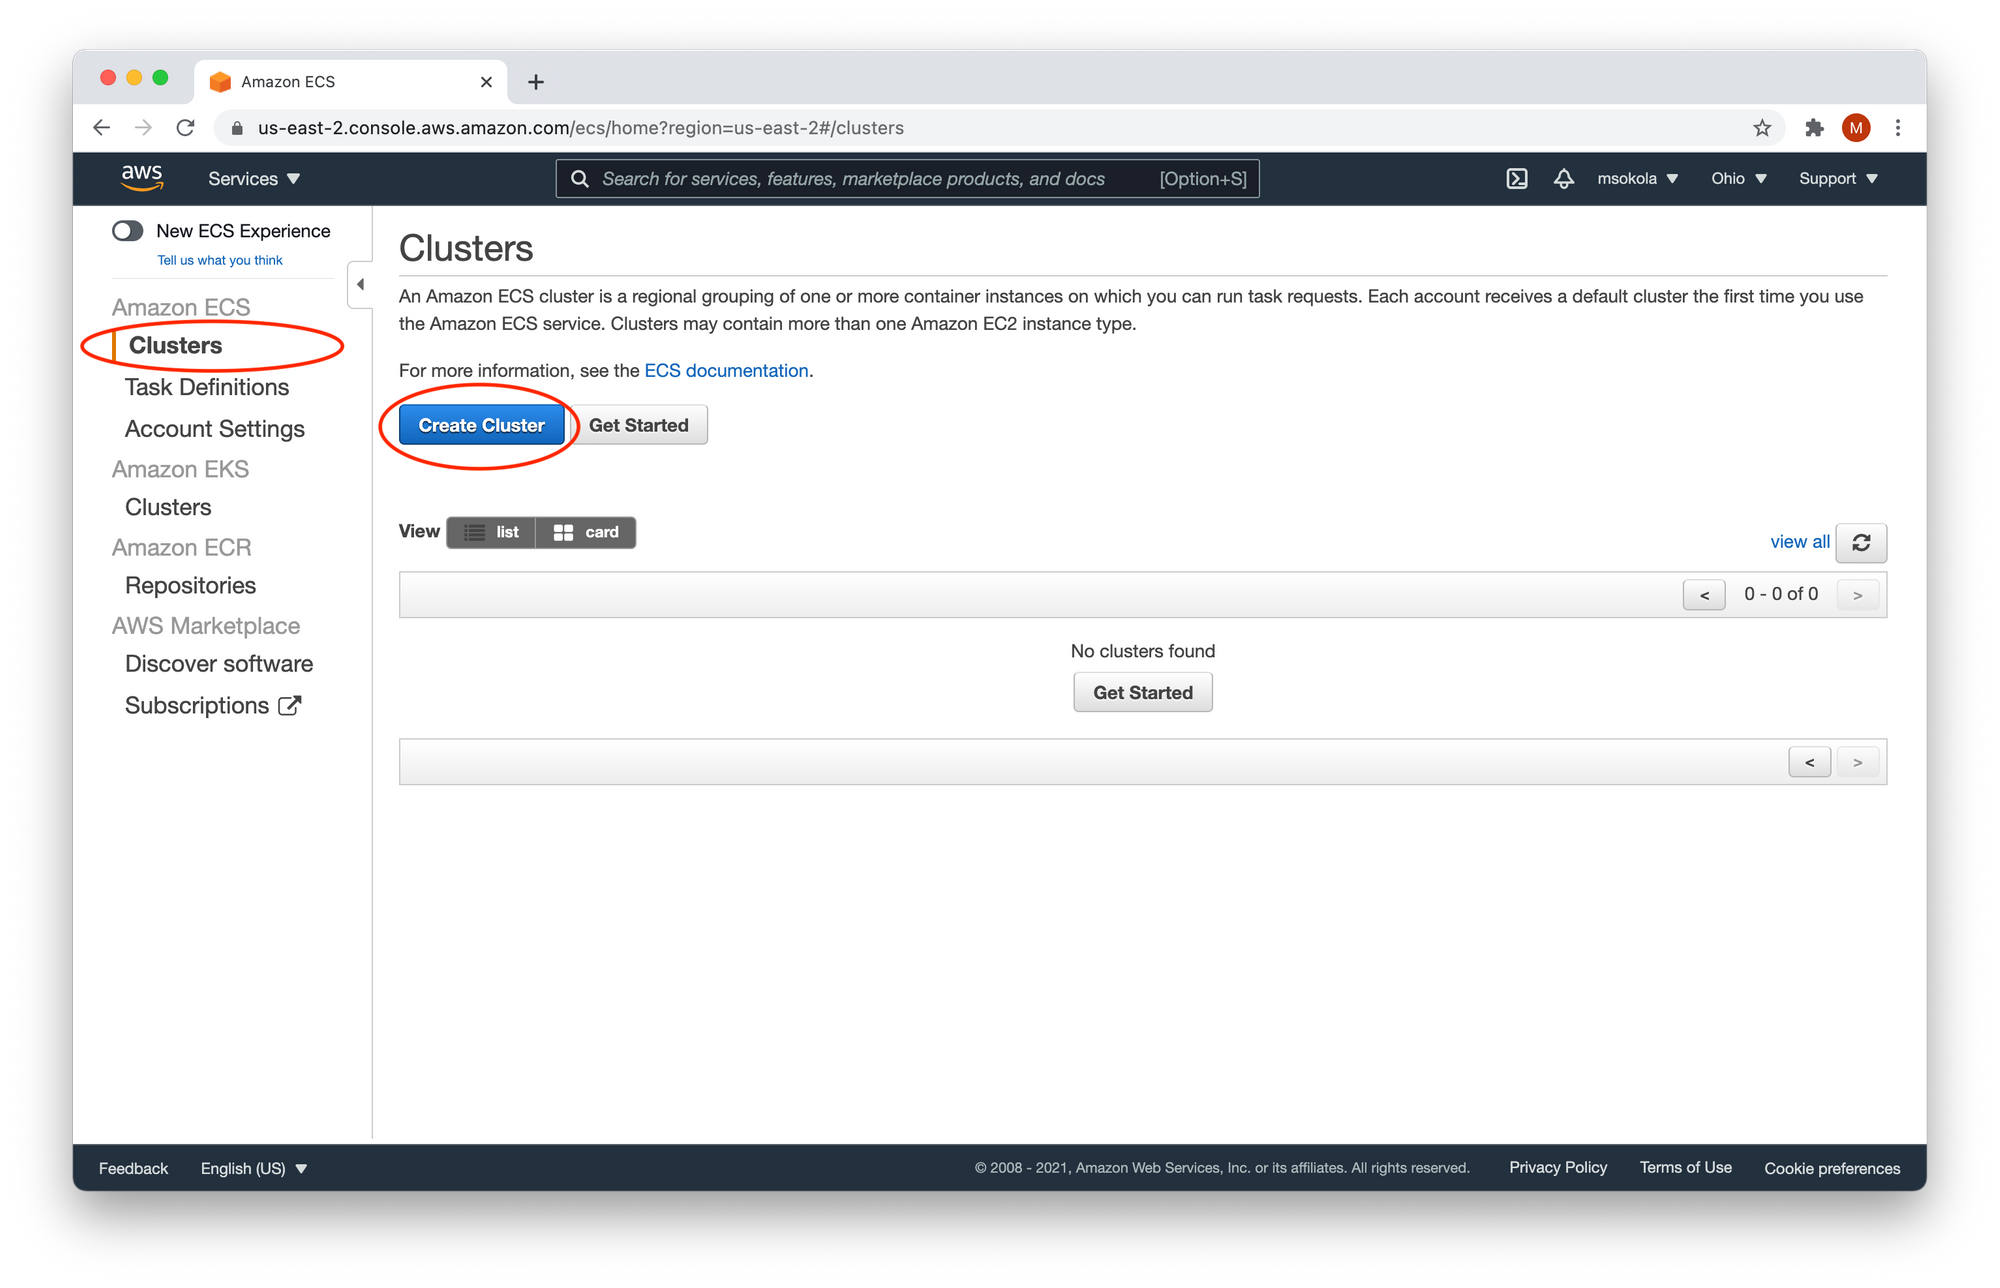
Now we have three options: Networking only, EC2 Linux + Networking, and EC2 Windows + Networking. Choose the first one - Networking only, and click on "Next step". You should see the following screen:
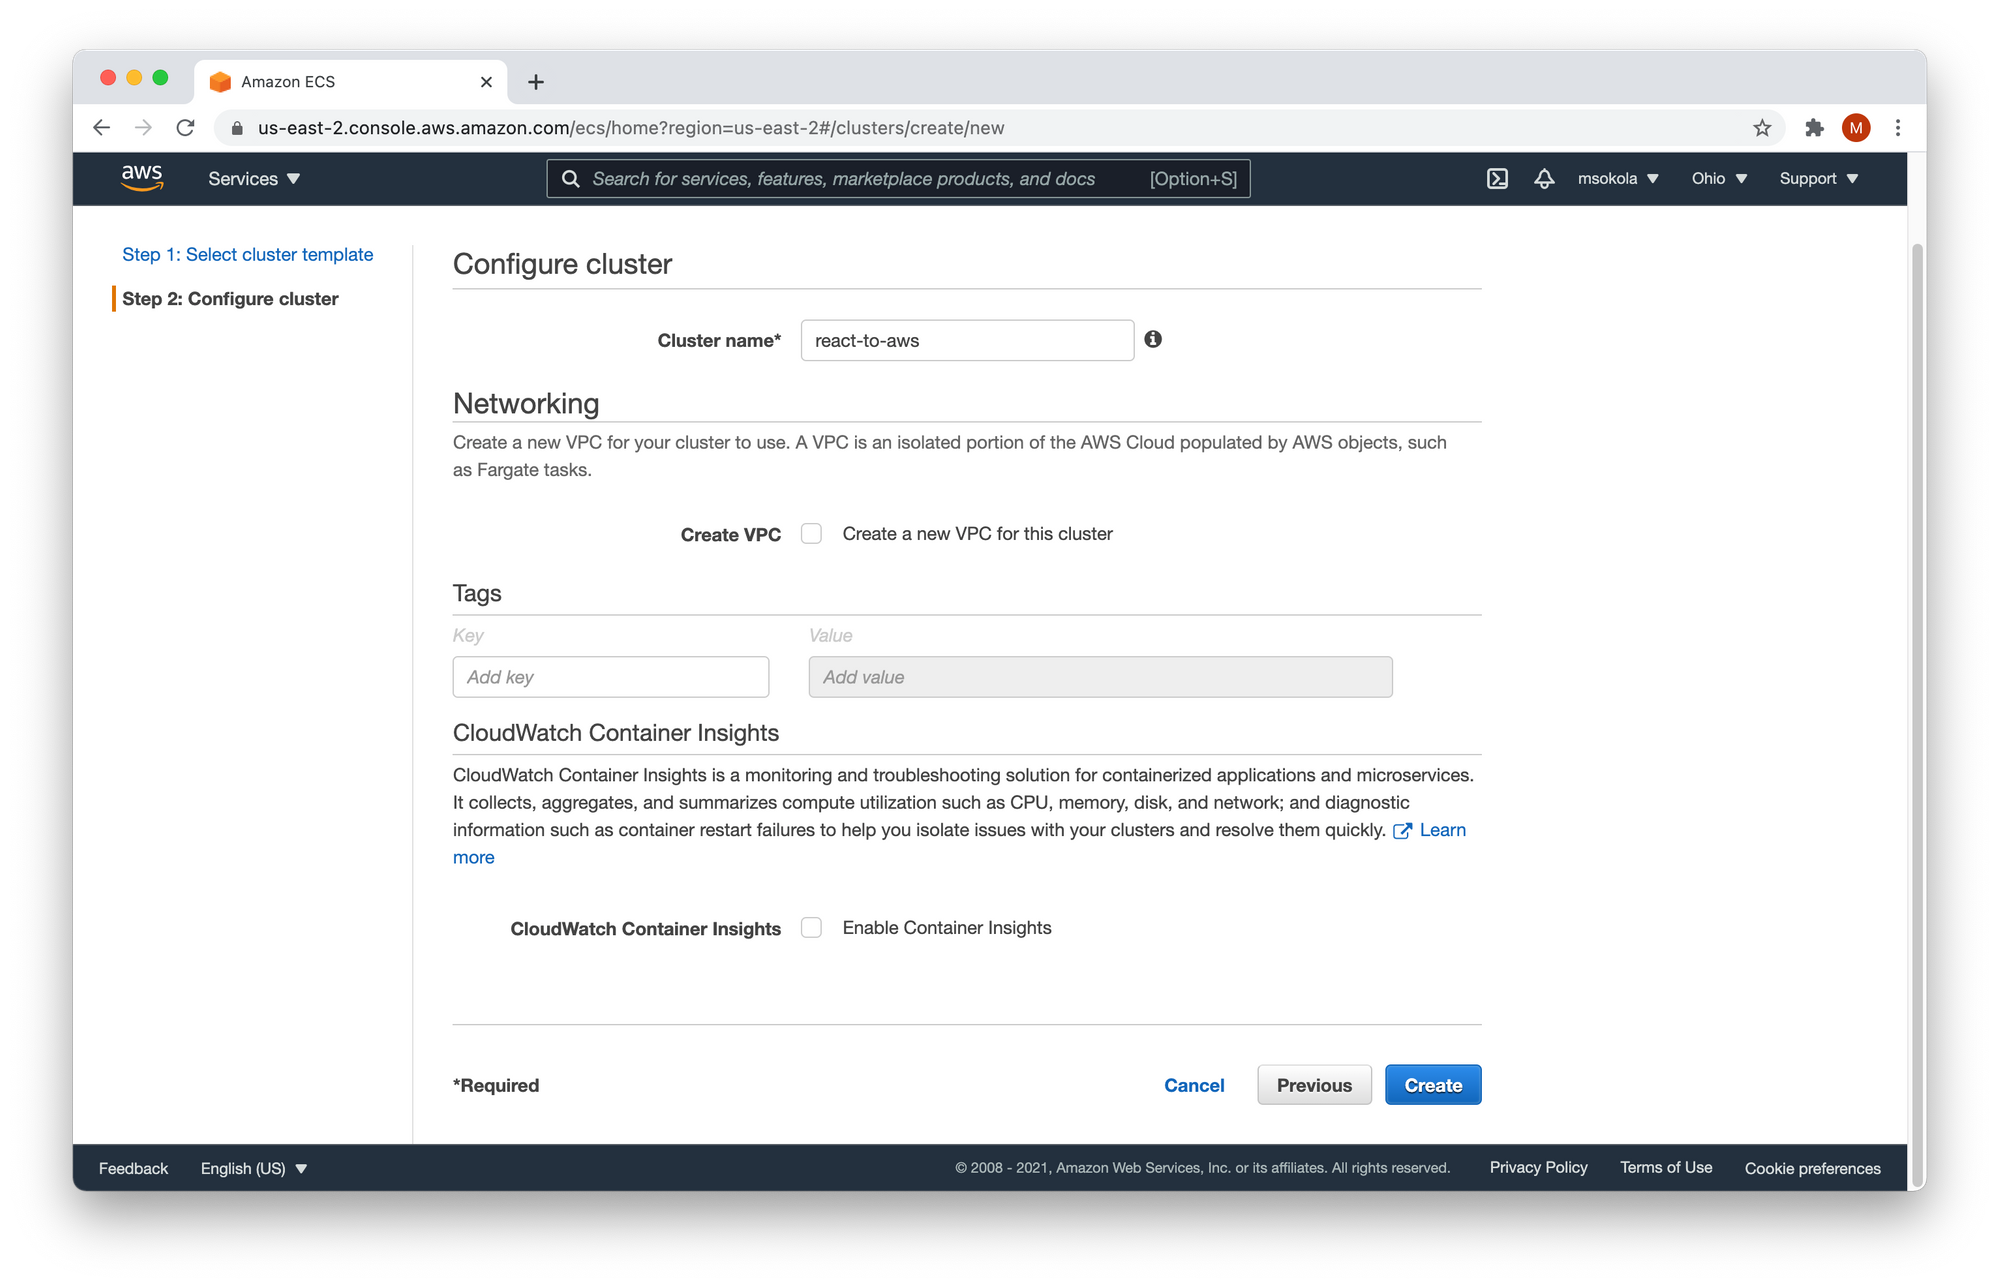
Enter the cluster name react-to-aws, and click on the "Create" button. You should see a successful lunch status. It looks similar to the screen we got once our task definition was created. Now click on "View Cluster".
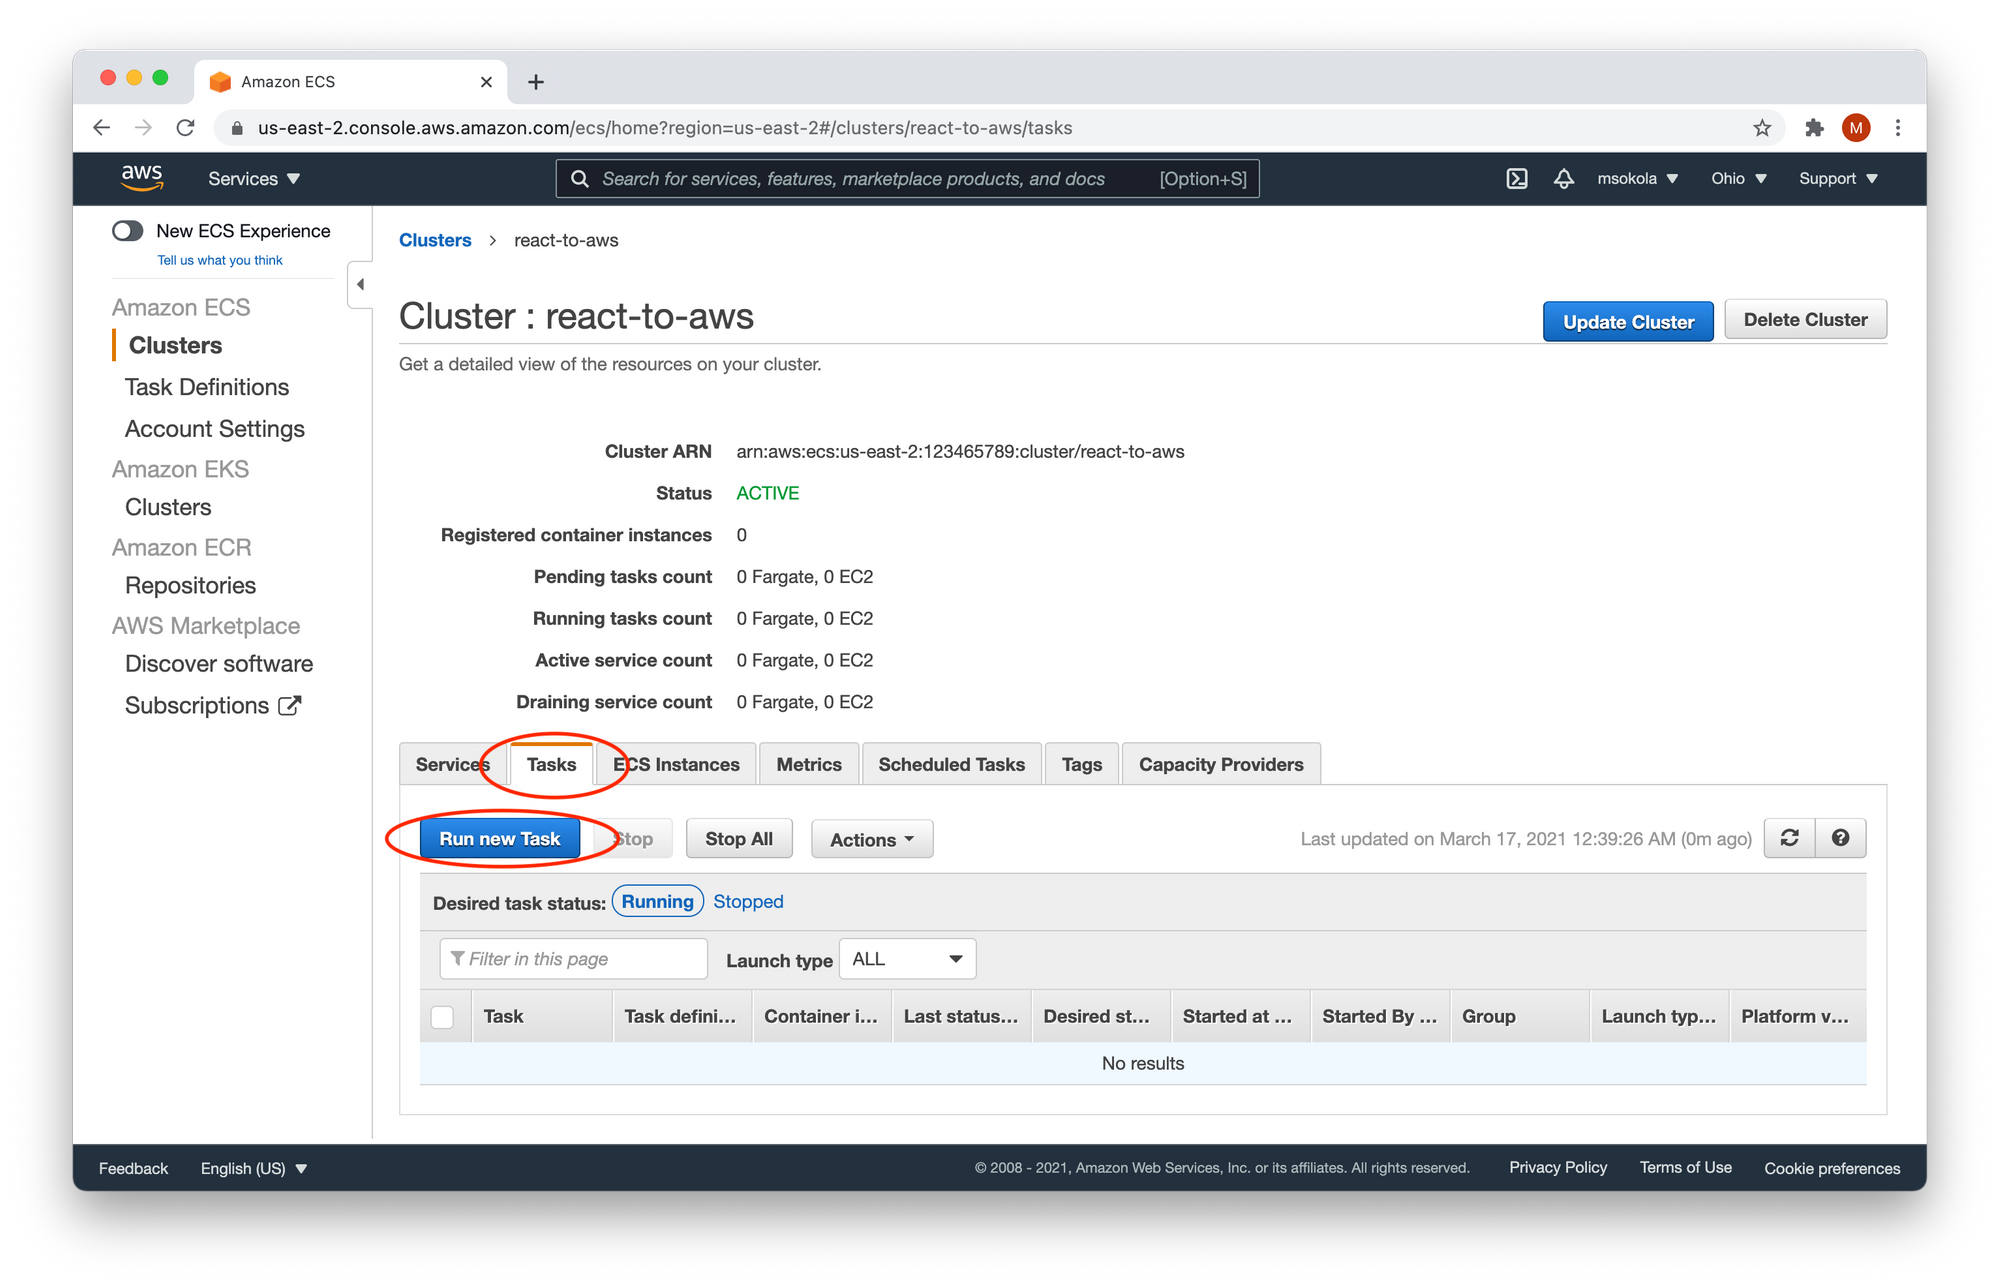
Now you need to click on the "Tasks" tab, and click on "Run new Task". Congratulations! You have reached the very last form to fill out :)
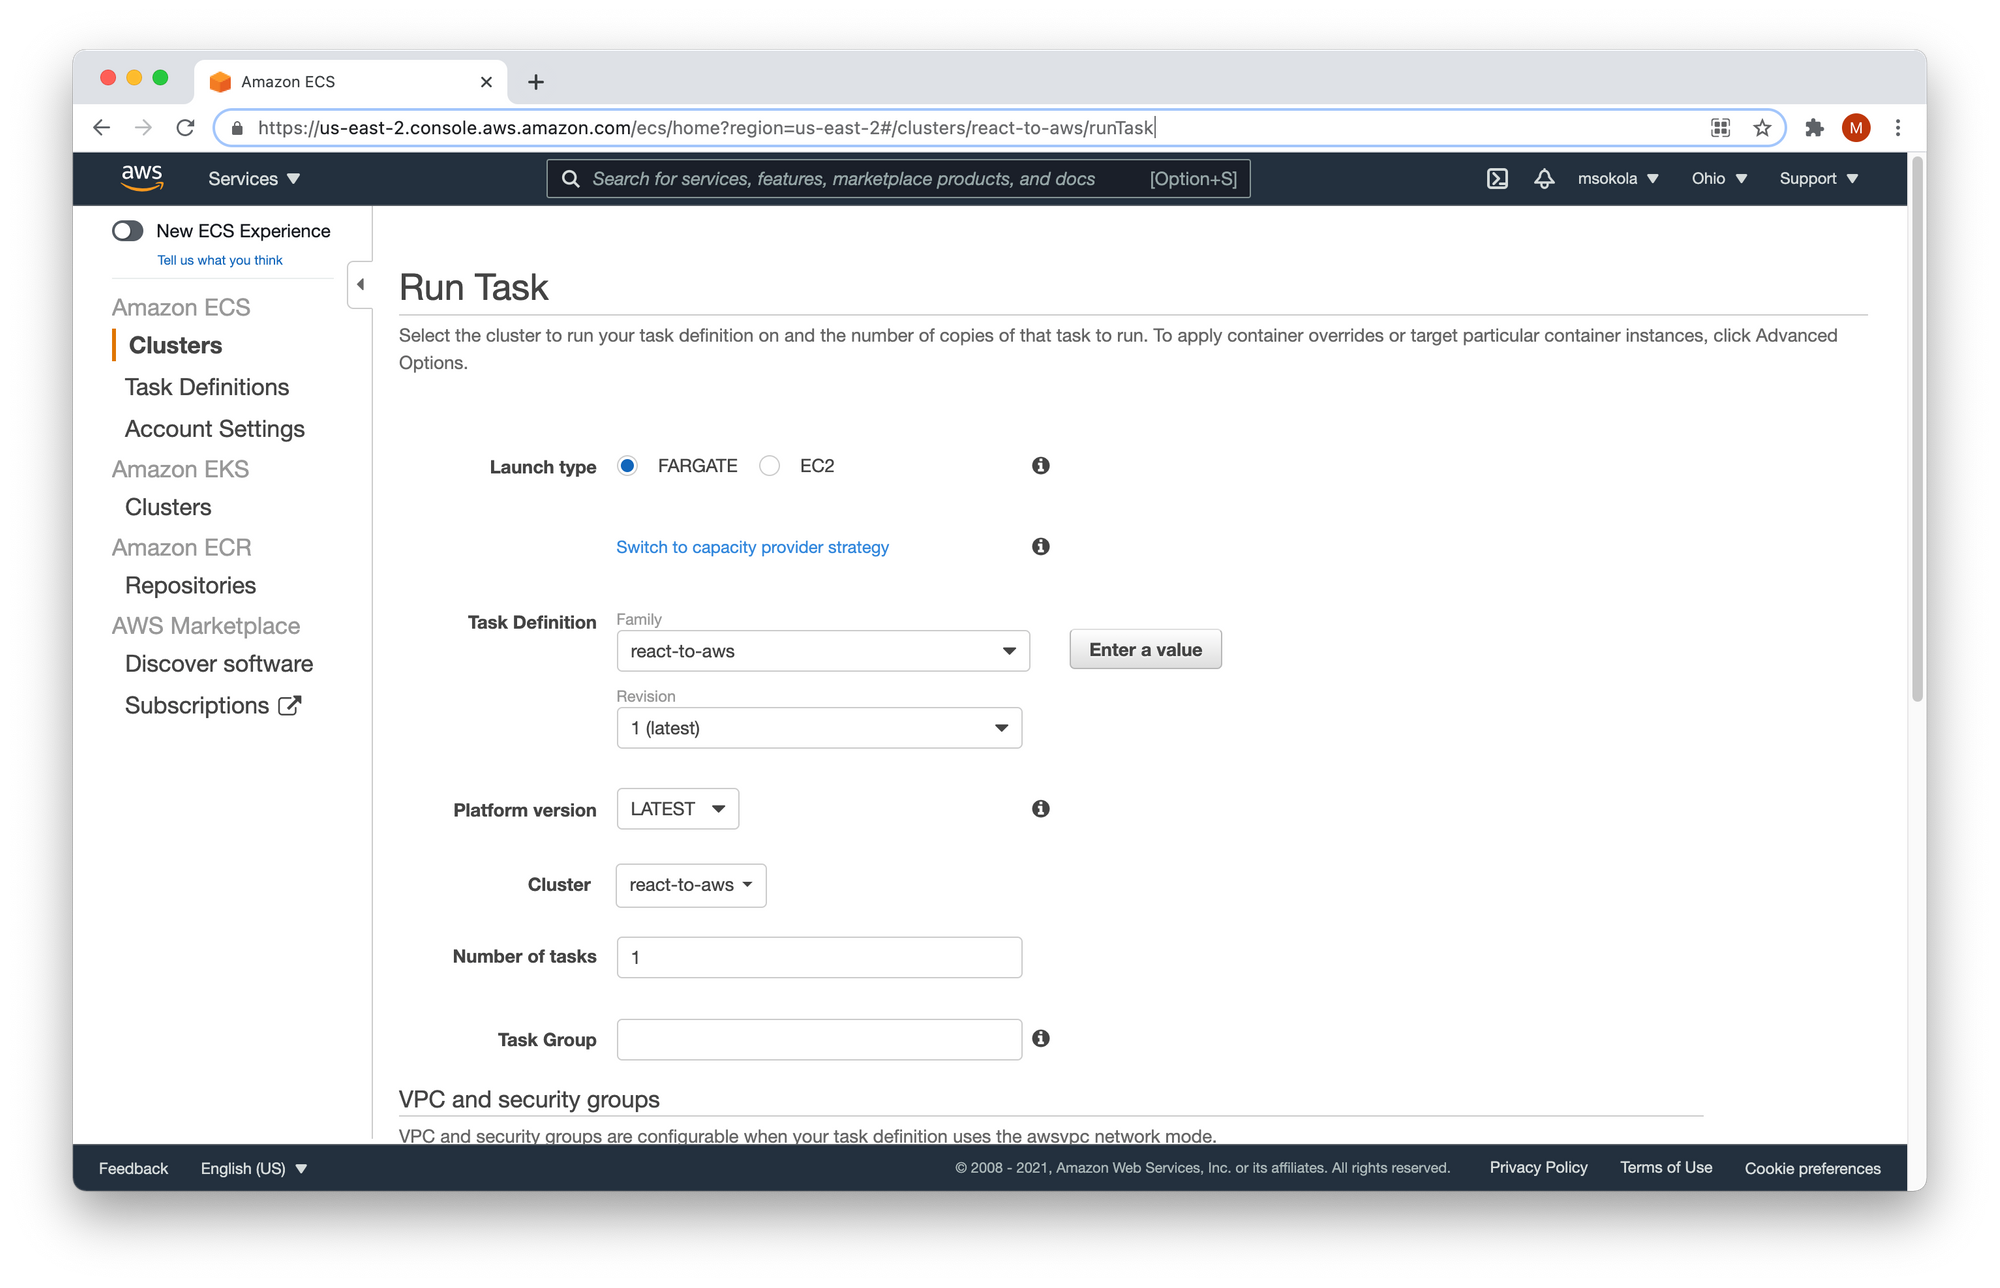
Fill out the form with the following values:
- Launch type -
FARGATE. - Cluster VPC - The first one.
- Subnet - The first one.
Keep the other values as they are, and click the "Run task" button. You should see the following screen:
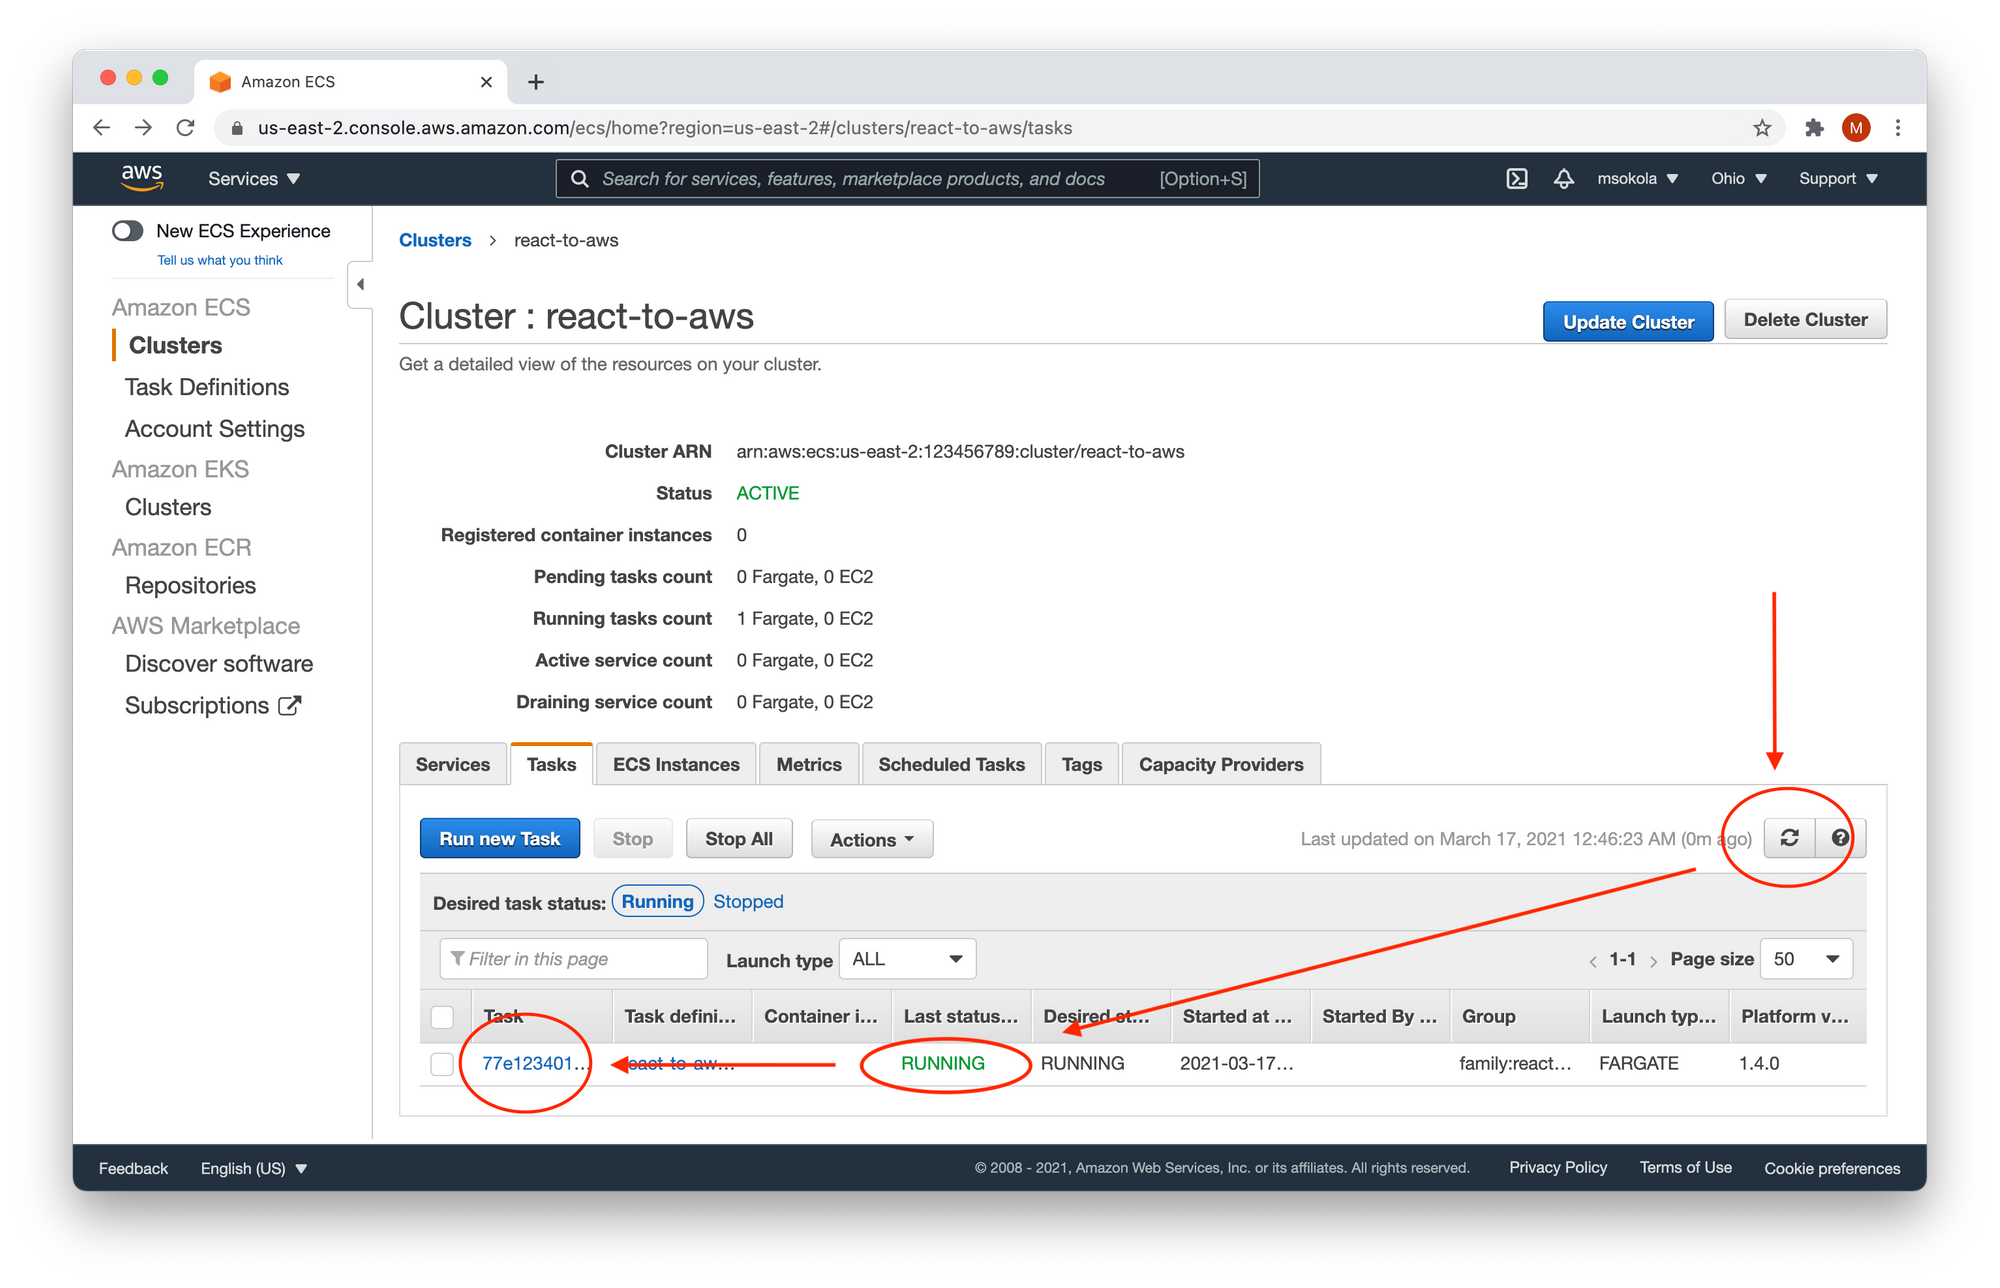
We will need to wait about a minute until the "Last status" changes into RUNNING. Please have in mind that you need to click the "Refresh" button to refresh the list. Once the task status is running, click on the task name.
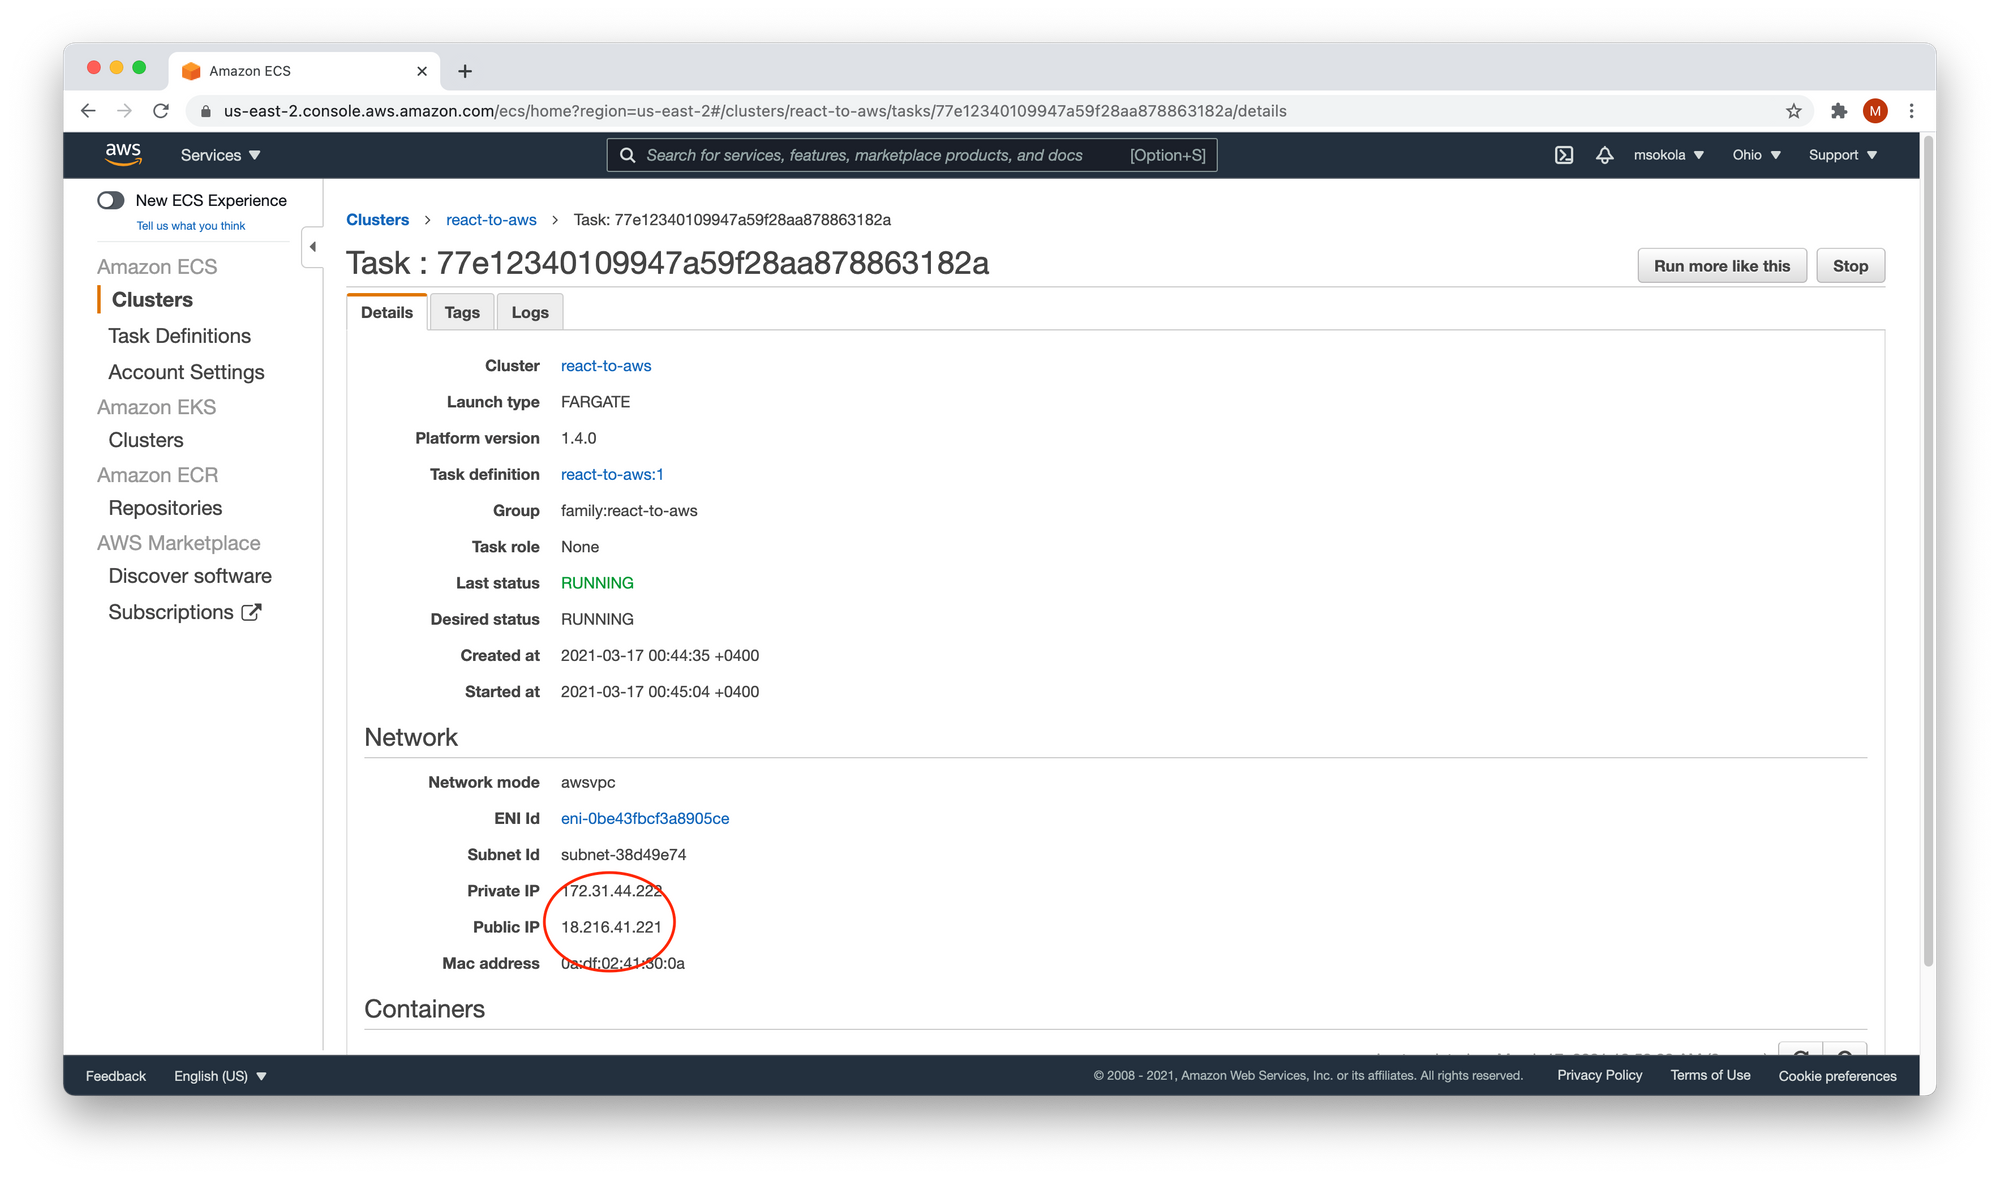
In the "Network" section you will find the Public IP of your container. You can open it in your browser, and you will see your application.
Summary
If you're at the beginning of your career, you might not have ever deployed an application yourself. But it is good to learn that skill, because one day you will need to do so.
Every project needs to face users otherwise it will have no chance of being successful, and will never pay for itself.
“A ship in harbor is safe — but that is not what ships are built for.”
— John A. Shedd
The configuration process is a bit tedious, but the good news is that you need to do it only once.
After you configure everything, your next deployments will be simpler. You only need to push the new image and restart the task to deploy a new version of your application.
If you are interested in digging deeper into AWS, FreeCodeCamp offers a free tutorial on it (~5 hours).
You can find a screencast of this tutorial (17 minutes) on my YouTube channel. I am at the very beginning of my YouTube journey - at least weekly I upload a video on programming. It would mean the world to me if you watch my screencast, subscribe, and hit the like button :)
You can find all the code in this GitHub repository : https://github.com/mateuszsokola/react-to-aws
You can DM me on Twitter: @msokola
That is all folks! I hope you liked it and have a great day :)
 _Photo by [Unsplash](https://unsplash.com/@vidarnm?utm_source=unsplash&utm_medium=referral&utm_content=creditCopyText">Vidar Nordli-Mathisen on <a href="https://www.freecodecamp.org/news/s/photos/ship-storm?utm_source=unsplash&utm_medium=referral&utmcontent=creditCopyText)