
NB: this blog covers Actions on Google node.js deployments only, and presumes some basic prior knowledge of Actions on Google/ Dialogflow
Google Home Devices that run the Google Assistant
Hello, world!
Problem statement
I’ve been getting into Actions on Google quite a bit of late — enjoying myself thoroughly — My learning has been primarily designing small “party tricks” that I can amuse visitors with. I’ve been doing the same with Alexa too, but since I’m a lot more familiar with the Google Cloud Platform and Firebase especially, I have prototyped more on Google.
Actions and working with the Google Assistant often requires server side logic to handle the interaction with the desired level of personalisation or customization. This is called “fulfillment”.
The development cycle for fulfillment can be a bit tedious because you need to push your server code to the cloud each time, to see if it’s working. Every time we make changes that we want to test, we need to push code to Firebase and give it 30–60 seconds to propagate. It’s like web dev before hot reloads — ugh! So 2011.
Summary of the Architecture
I won’t go into the details of building Actions for the Assistant, as there is plenty out there to help you with that. But a high level overview of the system now will help you understand the problem statement that inspired this blog.
Here is a diagram from Google that explains how Actions/ Assistant interactions are processed.
A user’s interaction gets picked up by the device, converted to text that is parsed by the device, and passed to a DialogFlow agent which is a NLUengine. That then works out the “intent” of the user’s statement (“phrase” or “utterance”). That intent then gets matched to code that “fulfills” the intent of the user, then returns a response that is (hopefully) appropriate and acceptable.
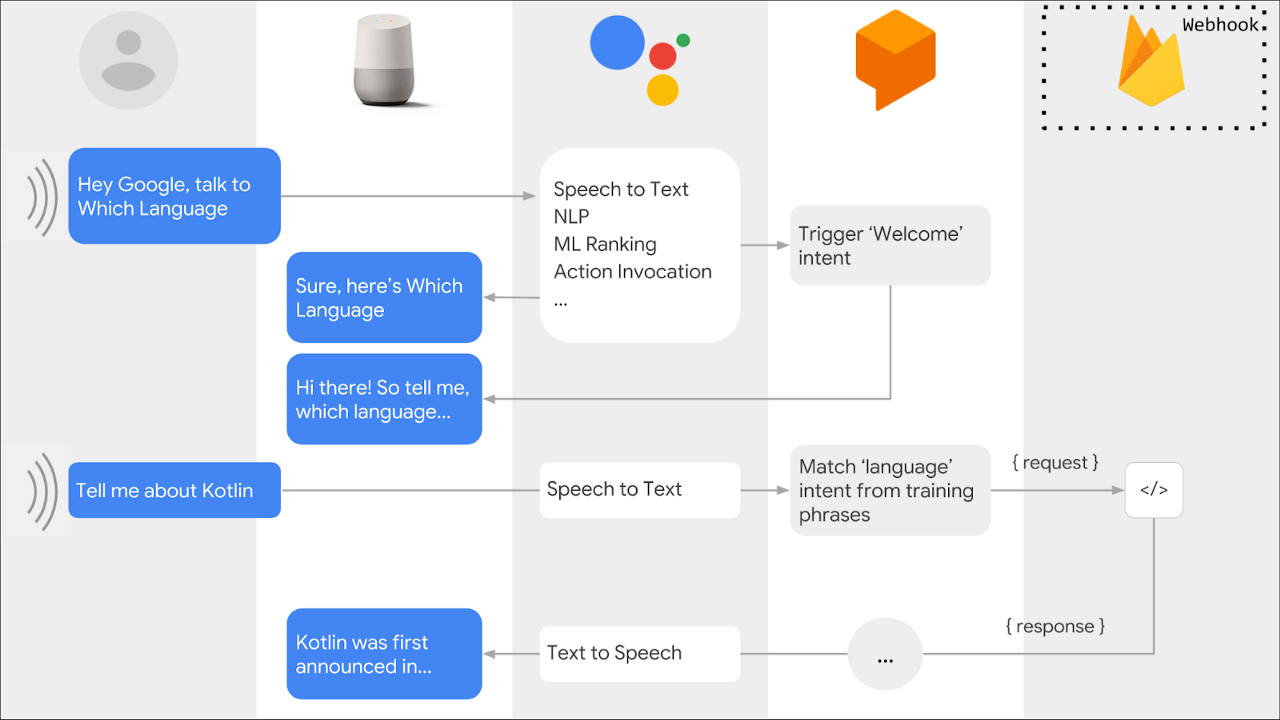
If you have studied the picture, you will see that a request is made in the last column, which denotes Firebase. What it really denotes is a back-end server that has a HTTP webhook that receives ‘requests’ for fulfillment and then works out how to respond appropriately. Architecturally, the Dialogflow NLU agent sends a POST request to the server webhook, which then gets processed by the server using SDKs.
The back end server that processes requests and responses is easily hosted on Firebase Cloud Functions (of course, Google makes it easy to use their stack — that’s just good business!).
Also, a locally run server will generate a webhook endpoint like http://localhost:3000, which is not accessible to Google Assistant’s POST requests.
Solution Statement — local fulfillment dev server!
There are three steps to this solution:
Create the back-end fulfillment server as an Express server.
Handle Dialogflow requests and responses as an Express endpoint. The default Firebase Cloud Functions server users the Actions on Google Nodejs Client Library which has built-in functionality to receive HTTP POST requests from the Dialogflow agent. But that won’t work outside the Firebase environment (i.e. on our local development server). So we need to deploy our fulfillment server an an Express app.
use the Ngrok Node package to create a temporary HTTP endpoint that tunnels HTTP requests through to our local:3000 (or whatever port you use) server.
I will not go into the steps of setting up your basic code for a simple nodejs fulfillment server — the Dialogflow/ Actions on Google docs help you with all that. But I do provide here the snippets that show you how to convert that Dialogflow App into an Express App, and what your package.json needs to look like.
Let’s start with the basic setup for the Dialogflow node.js client. We will call it the Dialogflow App.
const {
  dialogflow,
  BasicCard
} = require("actions-on-google");


// Instantiate the Dialogflow client.
const app = dialogflow({ debug: true });


// Handlers go here..
app.intent("Default Welcome Intent", conv => {
   // handler for this intent
});

app.intent("Say_Something_Silly", conv => {
   // handler for this intent
});


module.exports = app;
This is the app that ‘handles’ the intents. The above code is just scaffolding. Export the app, and import it in functions/index.js.
index.js is the entry point in our functions folder, which contains the cloud functions we push up to Firebase Cloud Functions. In this file we create the Express App, and import the DialogflowApp object, and then pass it in to the Express route that will receive the HTTP POST requests from Dialogflow. Note that we need the body-parser npm package as the HTTP requests are JSON.
"use strict";

const express = require("express");
const bodyParser = require("body-parser");
const functions = require("firebase-functions");


// clients
const dialogFlowApp = require("./DialogflowApp");
const expressApp = express().use(bodyParser.json());

// EXPRESS APP fulfillment route (POST). The entire dialogFlowApp object (incl its handlers) is the callback handler for this route.
expressApp.post("/", dialogFlowApp);


//  EXPRESS APP test route (GET)
expressApp.get("/", (req, res) => {
  res.send("CONFIRMED RECEIPT OF GET.");
});


/*
 *   LOCAL NGROK SERVER LOGIC. ENSURE that you "export IS_LOCAL_DEV=true" in terminal prior to start
 */
if (process.env.IS_LOCAL_DEV) {
  const PORT = 8000;
  expressApp.listen(PORT, () =>
    console.log(`*** SERVER RUNNING LOCALLY ON PORT ${PORT} ***`)
  );
} else {
  console.log("*** NOT LOCALLY SERVED - OR - LOCAL ENV VAR NOT SET  ****");
}

//EXPORT either of the following two endpoints:  one express app, one dialogflow app
exports.fulfillmentExpressServer = functions.https.onRequest(expressApp);
exports.dialogflowFirebaseFulfillment = functions.https.onRequest(dialogFlowApp);
The key parts of this code are that we create a POST route that takes, as the handler-callback, our DialogflowApp object. I created a GET route just to make quick browser GET requests to test the endpoint is working. But Dialogflow only uses the POST route.
Note that I’ve made two exports here. One is the Express app and the other is the dialogflow App itself. This creates to Firebase functions with two endpoints which are identified by the property attached to the exportsobject. One endpoint will be <……/fulfillmentExpressServer> and the other will be <……/dialogflowFirebaseFulfillment>.
I can use either of these HTTP endpoints for fulfillment, once I’m done developing locally and have pushed the final code up to Firebase Cloud Functions.
NGROK for the local development server tunneling
There is some funny looking code in there on line 26. On my Mac terminal, I use export IS_LOCAL_DEV=true before I start the server locally. That codeblock on line 26 basically starts the server listening locally, which is notneeded when we push the code up to Cloud Functions — it is for the local server only.
"dependencies": {
    "actions-on-google": "^2.0.0",
    "body-parser": "^1.18.3",
    "express": "^4.16.4",
    "firebase-functions": "^2.2.0"
  },
"devDependencies": {
    "ngrok": "^3.1.1"
  },
"scripts": {
    "lint": "eslint .",
    "serve": "firebase serve --only functions",
    "shell": "firebase experimental:functions:shell",
    "start": "npm run shell",
    "deploy": "firebase deploy --only functions",
    "logs": "firebase functions:log",
    "tunnel": "ngrok http 8000",
    "dev": "nodemon index.js"
  },
Which brings me to the above configuration in package.json. In the scripts property, you can see one called tunnel. Note the port number 8000 there. That can be set to anything you like, but make sure that the code in index.jsthat sets the PORT constant (line 27 in the Gist) is the same port number.
Before you run the code, check the following:
You’ve set your environment variable and the code matches it — in my case I used
IS_LOCAL_DEV=trueYour port numbers match in
index.jsand thetunnelscript
Then you open two terminal windows and run the following:
npm run dev and npm run tunnel
In the terminal that ran the tunnel (ngrok) you will see something like this:
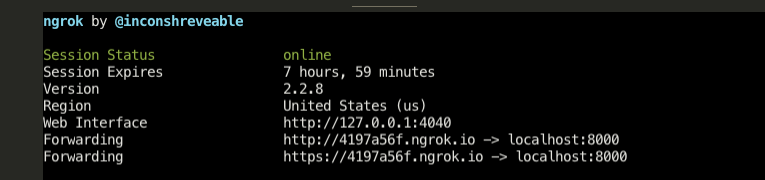
Note the two ‘Forwarding’ addresses. They’re identical, except one is https. Either works. That is your endpoint, assuming your POST route is / and not /<some path>. If you’ve added a path to the POST handler then you need to add that path to the Forwarding address.
Note that every time you run ngrok it generates a new, temporary URL for you. Therefore, you need to update your Dialogflow fulfillment webhook every time you run npm run tunnel.
And there you go. No more pushing every little change in code to Firebase Cloud Functions and waiting a minute or two before testing. Develop on the fly, and with nodemon, your server restarts and you can keep testing as you code!
And if you are a code newbie, and find this overwhelming, that is natural. You’re jumping too far ahead. I made that mistake too, and it cost me too much.
If you would like to learn more about my journey into code, check out episode 53 of the freeCodeCamp podcast, where Quincy (founder of freeCodeCamp) and I share our experiences as career changers that may help you on your journey. You can also access the podcast on iTunes, Stitcher, and Spotify.
I will also hold a few AMAs and webinars in the coming months. If this is of interest to you please let me know by going here. And of course, you can also Tweet me at @ZubinPratap.