
By Ridwan Yusuf
Greetings, fellow coding enthusiasts!
We're going to dive deep into the realm of Django code quality assessment. In this comprehensive guide, I'll walk you through an in-depth approach to measuring the code quality of your Django-based application.
By the end of this tutorial, you will be able to:
- Build CRUD APIs using Django and DRF (Django REST Framework)
- Write automated tests for the APIs using Pytest
- Measure code test coverage using Coverage
- Utilize SonarQube to assess code quality, identify code smells, security vulnerabilities, and more
Prerequisites to follow along in this tutorial include:
- Python 3 installation on your chosen Operating System (OS). We'll use Python 3.10 in this tutorial.
- Basic knowledge of Python and Django
- Any code editor of your choice
Without any further delay, let's jump right in and get started.
How to Get the APIs Up and Running
To begin, open your Terminal or bash. Create a directory or folder for your project using the command:
mkdir django-quality && cd django-quality
In my case, the folder name is "django-quality".
To isolate the project dependencies, we need to utilize a Python virtual environment.
To create a virtual environment, use the following command in your Terminal or bash:
python3 -m venv venv
Activate the virtualenv by running this command:
source venv/bin/activate
If everything works fine, you should see the virtual environment indicator enclosed in brackets, similar to the image shown below:
 Python Virtualenv activated successfully
At the root directory of your project, create a folder called "requirements" that will house the external packages required for various development stages, such as dev (development) and staging.
Inside the "requirements" folder, create two files: "base.txt" and "dev.txt". The "base.txt" file will include generic packages required by the application, while the "dev.txt" file will contain dependencies specific to development mode.
By now, the contents in your project folder should have the following structure
- requirements
    ├── base.txt
    └── dev.txt
- venv
Here are the updated contents for the "base.txt" and "dev.txt" files:
base.txt
Django==4.0.6
djangorestframework==3.13.1
drf-spectacular==0.22.1
dev.txt
-r base.txt
pytest-django==4.5.2
pytest-factoryboy==2.5.0
pytest-cov==4.1.0
- djangorestframework: Used for API development.
- drf-spectacular : Used for automated documentation of the APIs.
- pytest-cov: Utilized for measuring code coverage during testing.
- pytest-factoryboy: Used for creating test data using factory patterns.
Make sure your virtual environment is activated, then run the following command at the root directory to install the dependencies specified in "dev.txt":
pip install -r requirements/dev.txt
To create a new Django project, you can run the following command:
django-admin startproject core .
The name of the project is 'core'. You can decide to use any suitable name that fits your use case.
By now, you should see a couple of files and folders automatically created after running the command.
Here is the current project structure:
├── core
│   ├── asgi.py
│   ├── __init__.py
│   ├── settings.py
│   ├── urls.py
│   └── wsgi.py
├── manage.py
├── requirements
│   ├── base.txt
│   └── dev.txt
└── venv
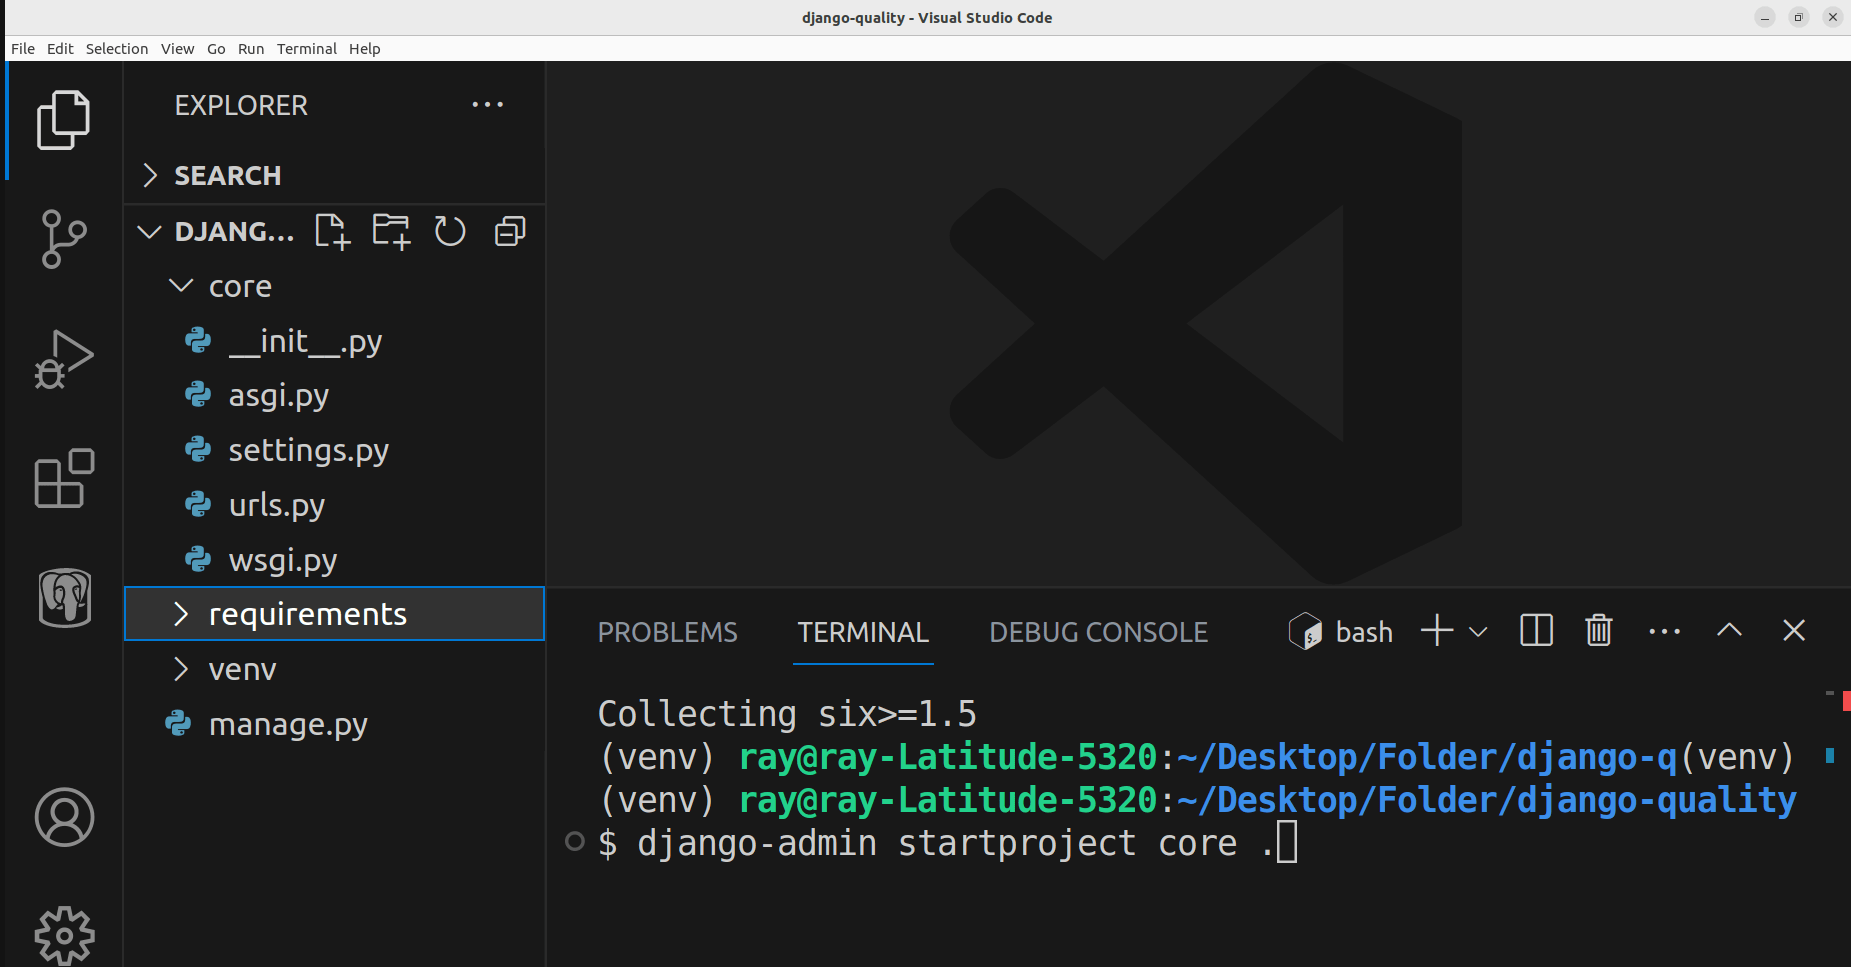 Current Folder Structure in VSCode
The APIs we will create will be a basic blog API with CRUD functionality. Let's create a new app within the project to host all the files related to the blog features.
Run this command to create a new app called 'blog':
python manage.py startapp blog
By now, a new folder named 'blog' has been auto-created by the command.
Here is the folder structure:
├── blog
│   ├── admin.py
│   ├── apps.py
│   ├── __init__.py
│   ├── migrations
│   ├── models.py
│   ├── tests.py
│   └── views.py
├── core
├── manage.py
├── requirements
└── venv
Update the models.py file in the blog folder. The Blog class defines the database schema for the blog.
blog/models.py
from django.db import models

class Blog(models.Model):
    title = models.CharField(max_length=50)
    body = models.TextField()
    published = models.BooleanField(default=True)
    created_at = models.DateTimeField(auto_now_add=True)
Create a new file named 'serializers.py' inside the 'blog' folder and update its content as shown below:
blog/serializers.py
from rest_framework import serializers

from .models import Blog

class BlogSerializer(serializers.ModelSerializer):
    class Meta:
        model = Blog
        fields = '__all__'

    extra_kwargs = {
            "created_at": {"read_only": True},
        }
The BlogSerializer class is utilized for validating incoming blog data sent by the client (such as from the frontend or mobile app) to ensure it adheres to the expected format.
Additionally, the serializer class is used for both serialization (converting Python objects to a transmittable format like JSON) and deserialization (converting a transmittable format like JSON back to Python objects).
Let's create the view to handle CRUD functionality, leveraging the DRF ModelViewSet to effortlessly create APIs with just a few lines of code.
blog/views.py
from rest_framework import filters, viewsets

from .models import Blog
from .serializers import BlogSerializer


class BlogViewSet(viewsets.ModelViewSet):
    queryset = Blog.objects.all()
    http_method_names = ["get", "post", "delete", "patch","put"]
    serializer_class = BlogSerializer
    filter_backends = [
        filters.SearchFilter,
        filters.OrderingFilter,
    ]
    filterset_fields = ["published"]
    search_fields = ["title", "body"]
    ordering_fields = [
        "created_at",
    ]
Create a new file named 'blog.urls' in the 'blog' folder.
By utilizing the DRF router for URL configuration, the URLs are automatically generated based on the allowed methods defined in the BlogViewSet.
blog/urls.py
from django.urls import include, path

from rest_framework.routers import DefaultRouter

from .views import BlogViewSet

app_name = "blog"

router = DefaultRouter()
router.register("", BlogViewSet)

urlpatterns = [
    path("", include(router.urls)),
]
The next step is to register the urls.py file defined in the 'blog' app within the main project's urls.py file. To do this, you should locate the project's urls.py file, which serves as the starting point for URL routing.
core/urls.py
from django.contrib import admin
from django.urls import path, include
from drf_spectacular.views import (
    SpectacularAPIView,
    SpectacularRedocView,
    SpectacularSwaggerView,
)

urlpatterns = [
    path('api/schema/', SpectacularAPIView.as_view(), name='schema'),
    path('api/v1/doc/', SpectacularSwaggerView.as_view(url_name='schema'), name='swagger-ui'),
    path('api/v1/redoc/', SpectacularRedocView.as_view(url_name='schema'), name='redoc'),
    path('admin/', admin.site.urls),
    path('api/v1/blogs/', include('blog.urls')),
]
The api/v1/blogs/ URL is mapped to the URLs defined in blog.urls. Additionally, other URLs are utilized for automated API documentation.
Update the settings.py file located inside the core folder. This file contains configurations for the Django application.
In the INSTALLED_APPS section, register the newly created 'blog' app, along with any desired third-party apps. Note that for brevity, the default Django apps are not included in the following list:
settings.py
INSTALLED_APPS = [


    #Third-party Apps
    'drf_spectacular',

    #Local Apps
    'blog',
]
Update the settings.py file to include configurations related to Django REST Framework (DRF) and documentation.
settings.py
REST_FRAMEWORK = {
    "DEFAULT_SCHEMA_CLASS": "drf_spectacular.openapi.AutoSchema",
    "TEST_REQUEST_DEFAULT_FORMAT": "json",
}


SPECTACULAR_SETTINGS = {
    'SCHEMA_PATH_PREFIX': r'/api/v1',
    'DEFAULT_GENERATOR_CLASS': 'drf_spectacular.generators.SchemaGenerator',
    'SERVE_PERMISSIONS': ['rest_framework.permissions.AllowAny'],
    'COMPONENT_SPLIT_PATCH': True,
    'COMPONENT_SPLIT_REQUEST': True,
    "SWAGGER_UI_SETTINGS": {
        "deepLinking": True,
        "persistAuthorization": True,
        "displayOperationId": True,
        "displayRequestDuration": True
    },
    'UPLOADED_FILES_USE_URL': True,
    'TITLE': 'Django-Pytest-Sonarqube - Blog API',
    'DESCRIPTION': 'A simple API setup with Django, Pytest & Sonarqube',
    'VERSION': '1.0.0',
    'LICENCE': {'name': 'BSD License'},
    'CONTACT': {'name': 'Ridwan Ray', 'email': 'ridwanray.com'},
    #OAUTH2 SPEC
    'OAUTH2_FLOWS': [],
    'OAUTH2_AUTHORIZATION_URL': None,
    'OAUTH2_TOKEN_URL': None,
    'OAUTH2_REFRESH_URL': None,
    'OAUTH2_SCOPES': None,
}
With all the necessary configurations in place, let's run the migrations command to ensure that the models in the application are synchronized with the database schema.
Execute the following commands in the root directory to synchronize the models with the database schema:
python manage.py makemigrations
python manage.py migrate
To start the development server, run the following command:
python manage.py runserver
 Starting local development server with runserver command
The application is now running at http://127.0.0.1:8000/.
To access the documentation, visit http://127.0.0.1:8000/api/v1/doc/.
 Automated Blog API documentation using drf-spectacular
How to Write Automated Tests with Pytest
Pytest, the testing tool we're using for writing automated tests, is included as part of the dependencies declared in the requirement folder. Now, let's write some tests and explore its functionality.
In the blog folder, a file named "tests.py" is automatically generated when starting the blog app. To organize the tests, create a new folder called "tests" within the blog directory.
Move the initial "tests.py" file into the newly created "tests" folder. To make the "tests" folder a module, create an empty file named "init.py".
Create a new file named 'conftest.py' inside the 'tests' folder. This file will store any pytest fixtures (that is, reusable components) required during the test writing process.
Test folder structure:
├── tests
│   ├── conftest.py
│   ├── factories.py
│   ├── __init__.py
│   ├── __pycache__
│   └── tests.py
tests/conftests.py
import pytest
from rest_framework.test import APIClient

@pytest.fixture
def api_client():
    return APIClient()
The api_client() is a Pytest fixture utilized for making actual API calls.
Create a new file named 'factories.py'. This file will include the factories used during test writing. Factories provide a convenient way to create objects (that is, model instances) without the need to specify all attributes each time.
tests/factories.py
import factory
from faker import Faker
from blog.models import Blog

fake = Faker()

class BlogFactory(factory.django.DjangoModelFactory):
    class Meta:
        model = Blog

    title = fake.name()
    body = fake.text()
    published = True
tests/tests.py
import pytest
from django.urls import reverse
from .factories import BlogFactory

pytestmark = pytest.mark.django_db


class TestBlogCRUD:
    blog_list_url = reverse('blog:blog-list')

    def test_create_blog(self, api_client):
        data = {
            "title": "Good news",
            "body": "Something good starts small",
            "published": True
            }

        response = api_client.post(self.blog_list_url, data)
        assert response.status_code == 201
        returned_json = response.json()
        assert 'id' in returned_json
        assert returned_json['title'] == data['title']
        assert returned_json['body'] == data['body']
        assert returned_json['published'] == data['published']

    def test_retrieve_blogs(self, api_client):
        BlogFactory.create_batch(5)
        response = api_client.get(self.blog_list_url)
        assert response.status_code == 200
        assert len(response.json()) == 5

    def test_delete_blog(self, api_client):
        blog = BlogFactory()
        url = reverse("blog:blog-detail",
                      kwargs={"pk": blog.id})
        response = api_client.delete(url)
        assert response.status_code == 204

    def test_update_blog(self, api_client):
        blog = BlogFactory(published= True)
        data = {
            "title": "New title",
            "body": "New body",
            "published": False,
        }
        url = reverse("blog:blog-detail",
                      kwargs={"pk": blog.id})

        response = api_client.patch(url, data)
        assert response.status_code == 200
        returned_json = response.json()
        assert returned_json['title'] == data['title']
        assert returned_json['body'] == data['body']
        assert returned_json['published'] == data['published']
The TestBlogCRUD class tests the CRUD functionalities of the application. The class defines four methods, each testing a specific CRUD functionality.
Create a Pytest configuration file named pytest.ini in the root directory. This file will contain settings that instruct Pytest on how to locate the test files.
pytest.ini
[pytest]
DJANGO_SETTINGS_MODULE = core.settings
python_files = tests.py test_*.py *_tests.py
addopts = -p no:warnings --no-migrations --reuse-db
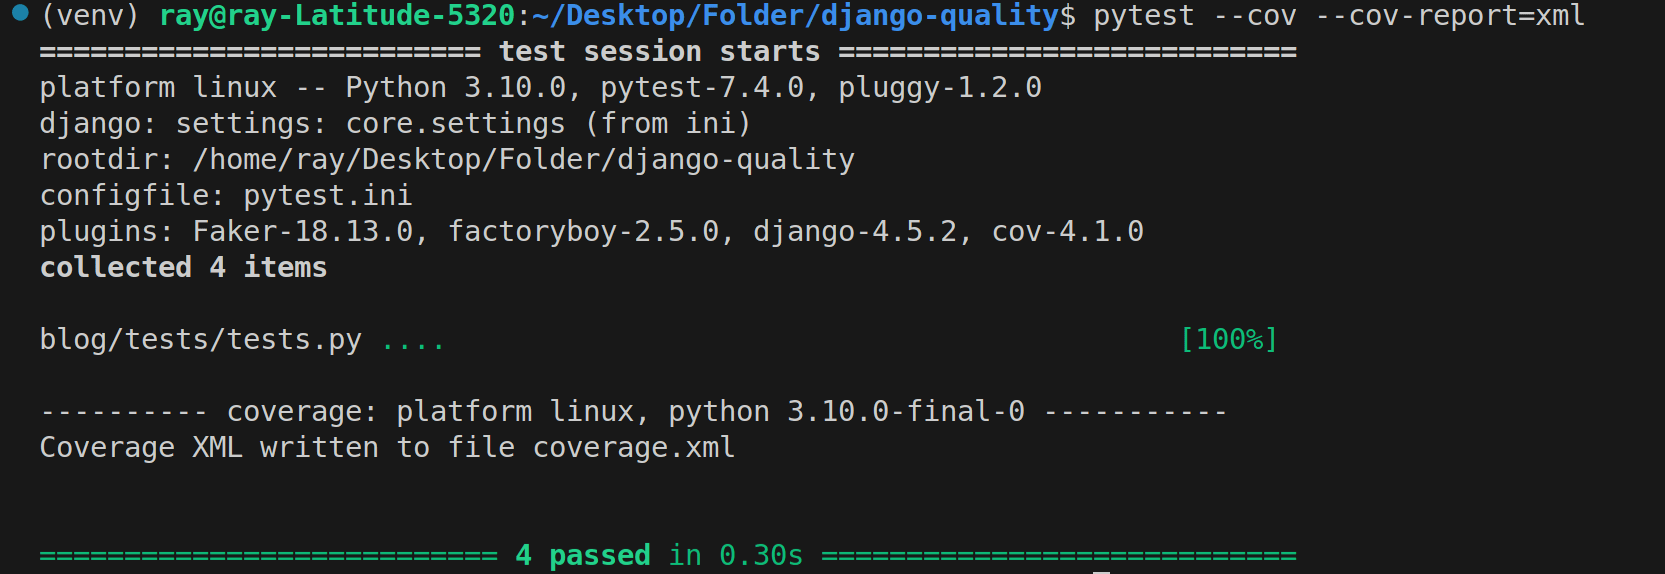
To run the tests, execute the pytest command in the root directory as shown below:
pytest
 Pytest testcases result
The test results indicate that all four test cases have passed successfully.
As of the time of writing, two popular tools used in the Python community for reporting test coverage in a codebase are Coverage and pytest-cov.
In our case, we'll be using pytest-cov for its flexibility when it comes to reporting test coverage.
Create a new file named 'setup.cfg' in the root directory. This file serves as the configuration file for coverage.
setup.cfg
[coverage:run]
source = .
branch = True
[coverage:report]
show_missing = True
skip_covered = True
The source value in the [coverage:run] section specifies the root directory location from which test coverage will be measured.
In addition to statement coverage in the test report, branch coverage identifies uncovered branches when using conditional statements (for example if, else, case).
Note: It is possible to specify folders to omit from test coverage, such as migration folders, in the setup.cfg file. We will configure these settings in SonarQube.
Let's rerun the test cases using the following command:
pytest --cov --cov-report=xml
The --cov-report option specifies the format of the coverage report. Various formats like HTML, XML, JSON, and so on are supported. In this case, we specify xml because it is supported by SonarQube.
 Pytest coverage report in XML format
For HTML format, a folder named 'htmlcov' will be generated in the root directory. This folder contains the 'index.html' file, which allows you to visualize the coverage results and areas that are not covered.
How to Setup SonarQube
SonarQube is a tool used for static code analysis. It helps in identifying code quality issues, bugs, vulnerabilities, and code smells in software projects.
To simplify the process, we can run a Docker container based on the SonarQube image.
Execute the following command in the command line:
docker run -d -p 9000:9000 -p 9092:9092 sonarqube
After a few moments, depending on your internet speed, visit http://0.0.0.0:9000/.
You can use the following login credentials to access the application: Username: admin Password: admin
Next, you need to download Sonar Scanner. Visit this link and select the option that is compatible with your operating system (OS).
 SonarScanner download on the Sonarsource.com website
Unzip the sonar-scanner and move it from the 'Downloads' folder to a secure directory .
unzip sonar-scanner-cli-4.8.0.2856-linux.zip

mv sonar-scanner-4.2.0.1873-linux /opt/sonar-scanner
Add the following lines to the content of the sonar-scanner.properties file located at /opt/sonar-scanner/conf/sonar-scanner.properties:
vim /opt/sonar-scanner/conf/sonar-scanner.properties
Add these two lines and save the file:
sonar.host.url=http://localhost:9000
sonar.sourceEncoding=UTF-8
Add /opt/sonar-scanner/bin to the system's PATH environment variable by executing this command:
export PATH="$PATH:/opt/sonar-scanner/bin
Update the content of .bashrc:
vim ~/.bashrc
Add this line to the .bashrc file and save it:
export PATH="$PATH:/opt/sonar-scanner/bin
Run the following command to apply the changes to your current terminal session:
source ~/.bashrc
To ensure that everything is functioning properly, execute the following command:
sonar-scanner -v
 Checking sonarqube version on the terminal
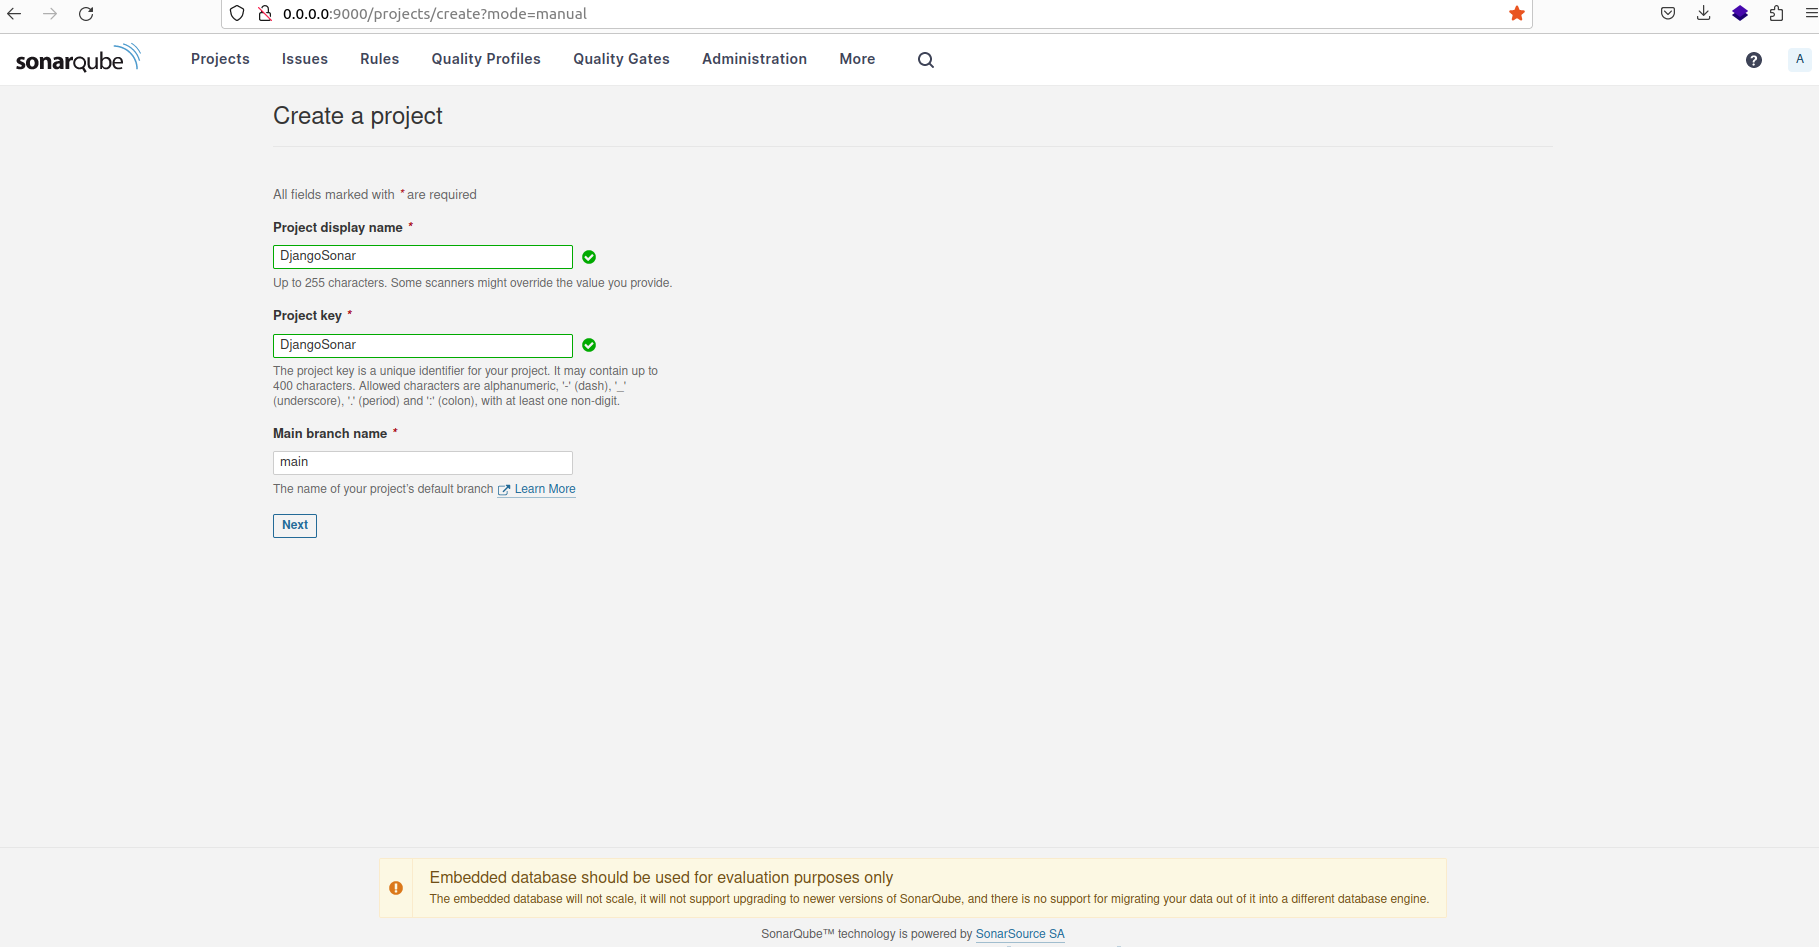
Navigate to the 'Projects' tab on the SonarQube dashboard and proceed to manually create a new project.
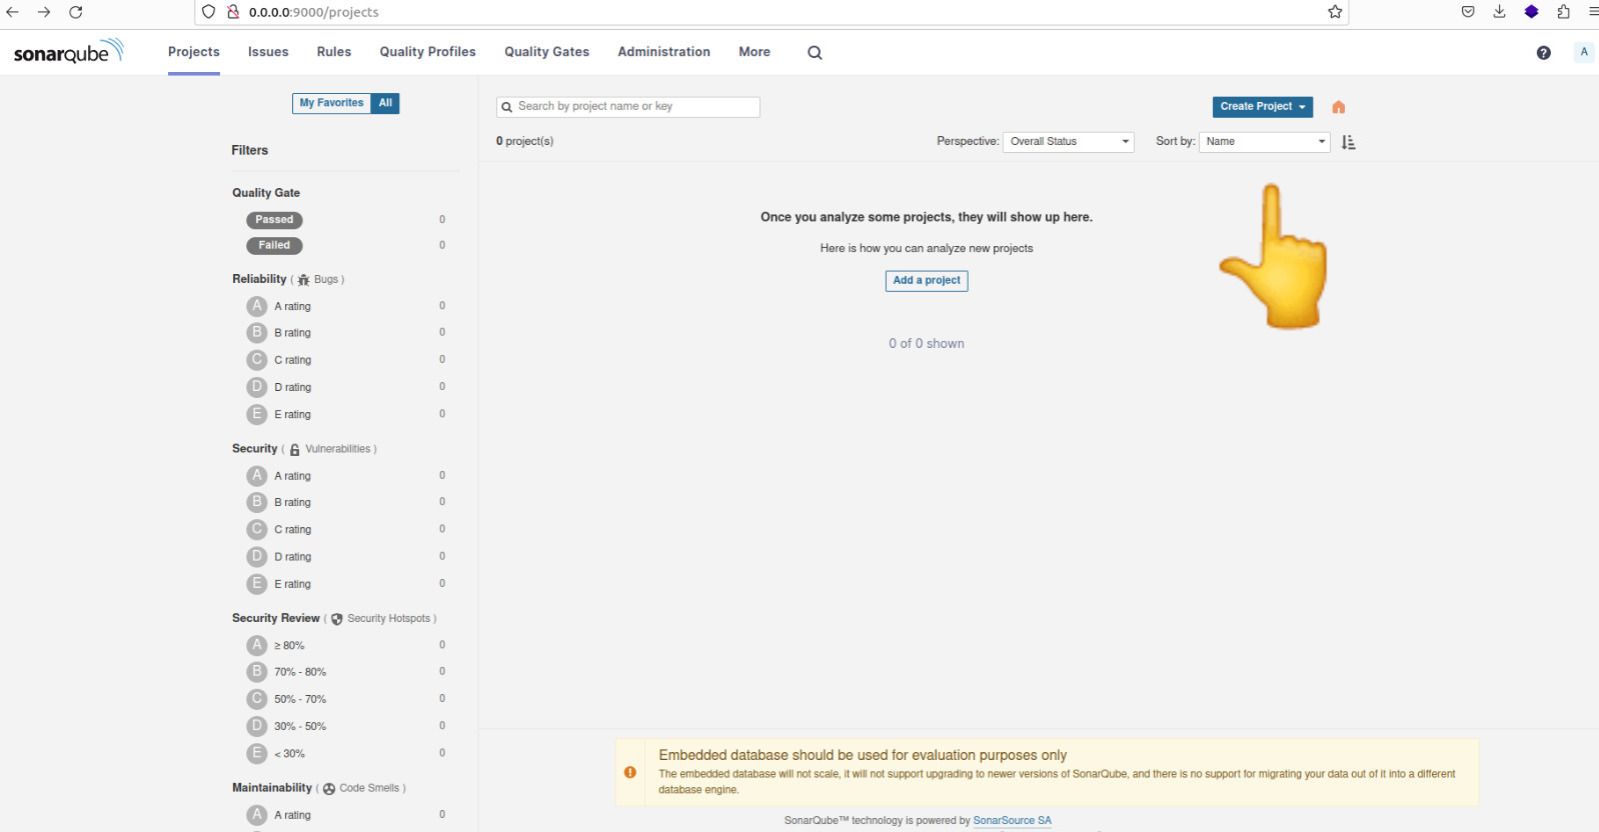 Creating a new project on the sonarqube dashboard
Provide a suitable name for the project, then select the option "Use the global setting" before proceeding to create the project.
 Choosing appropriate name as the name of the new preoject
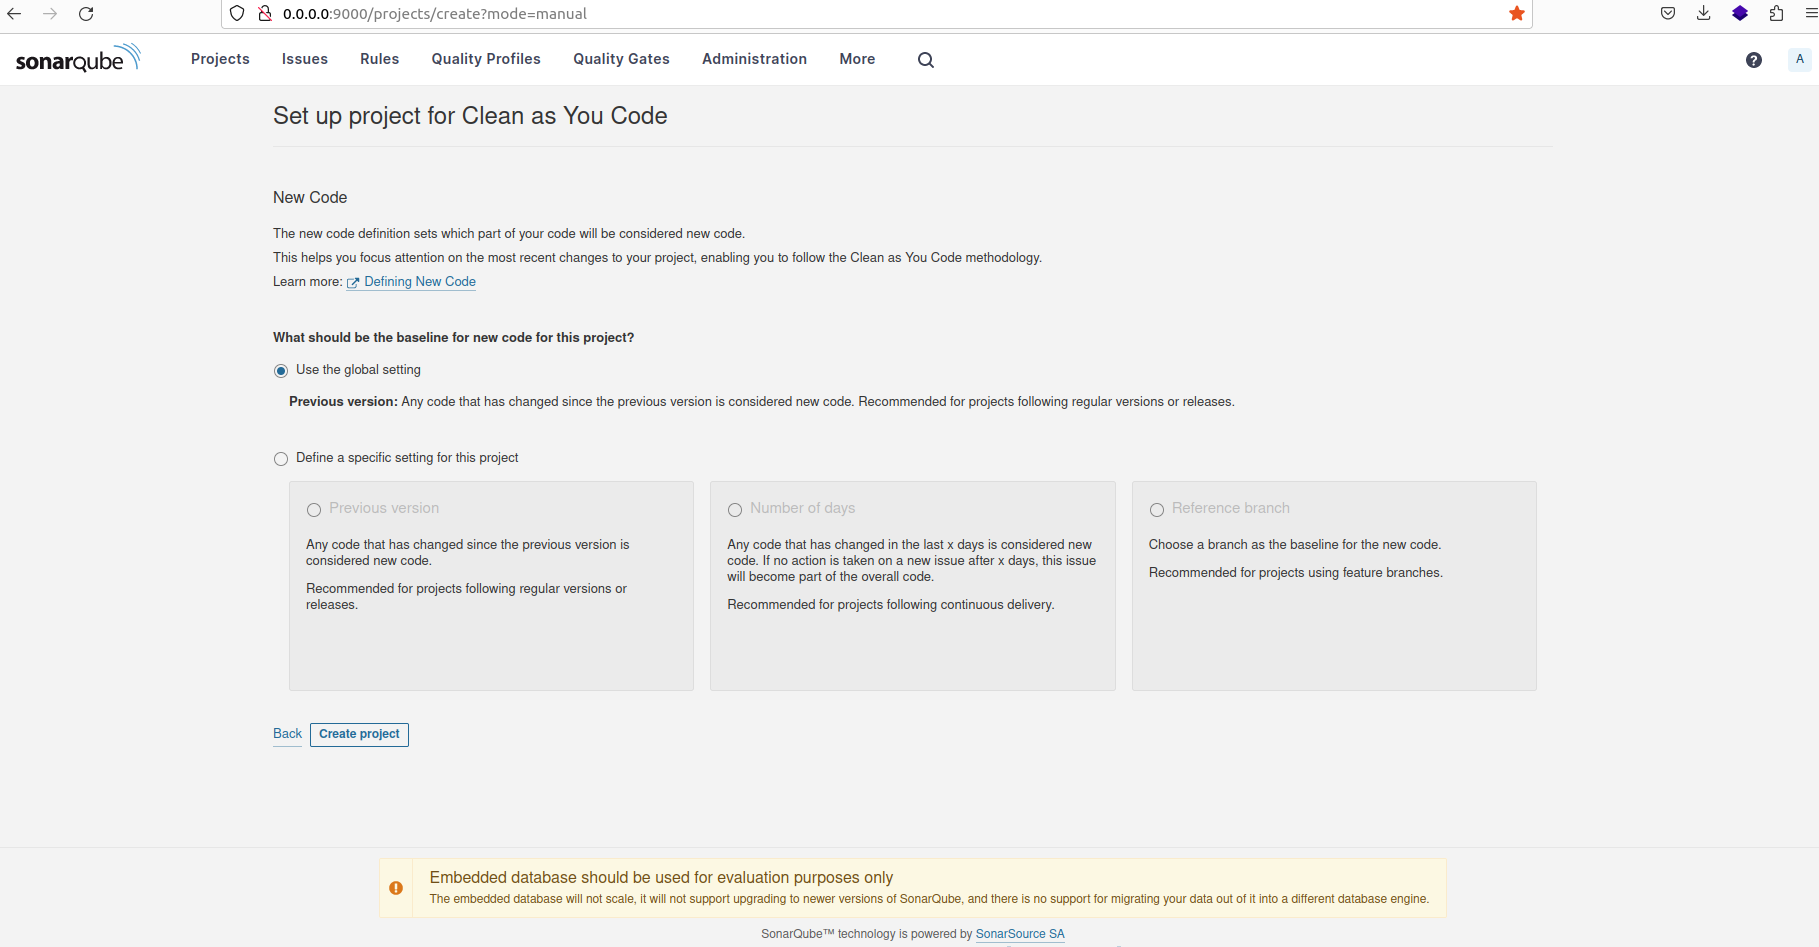 Configuring new project to use global settings
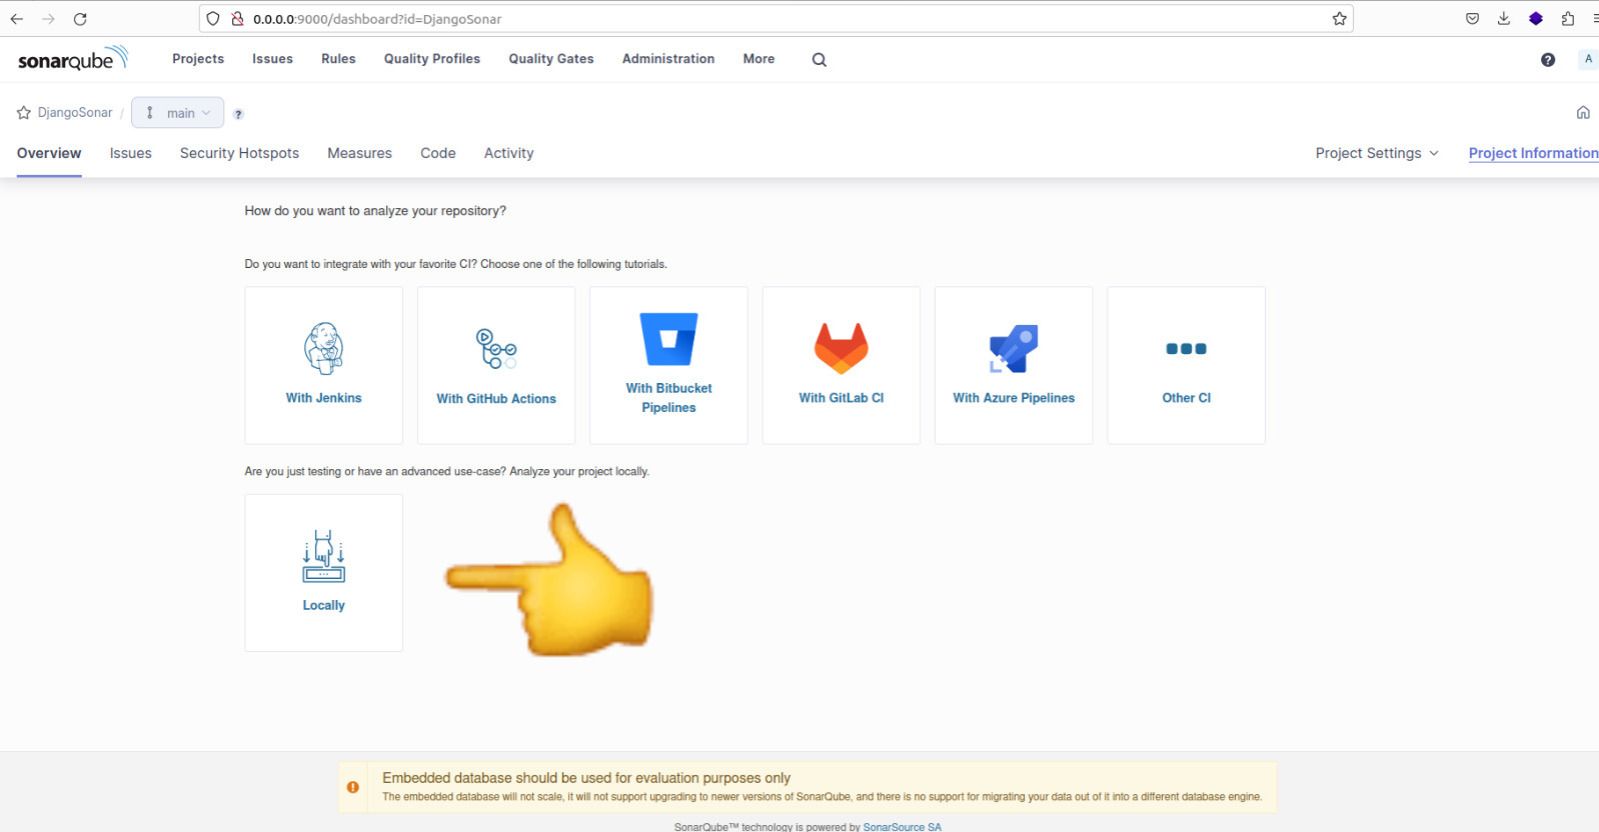
After creating the project, you will be prompted to select the analysis method for your project. Choose the 'Locally' option.
 Run analysis on the project locally
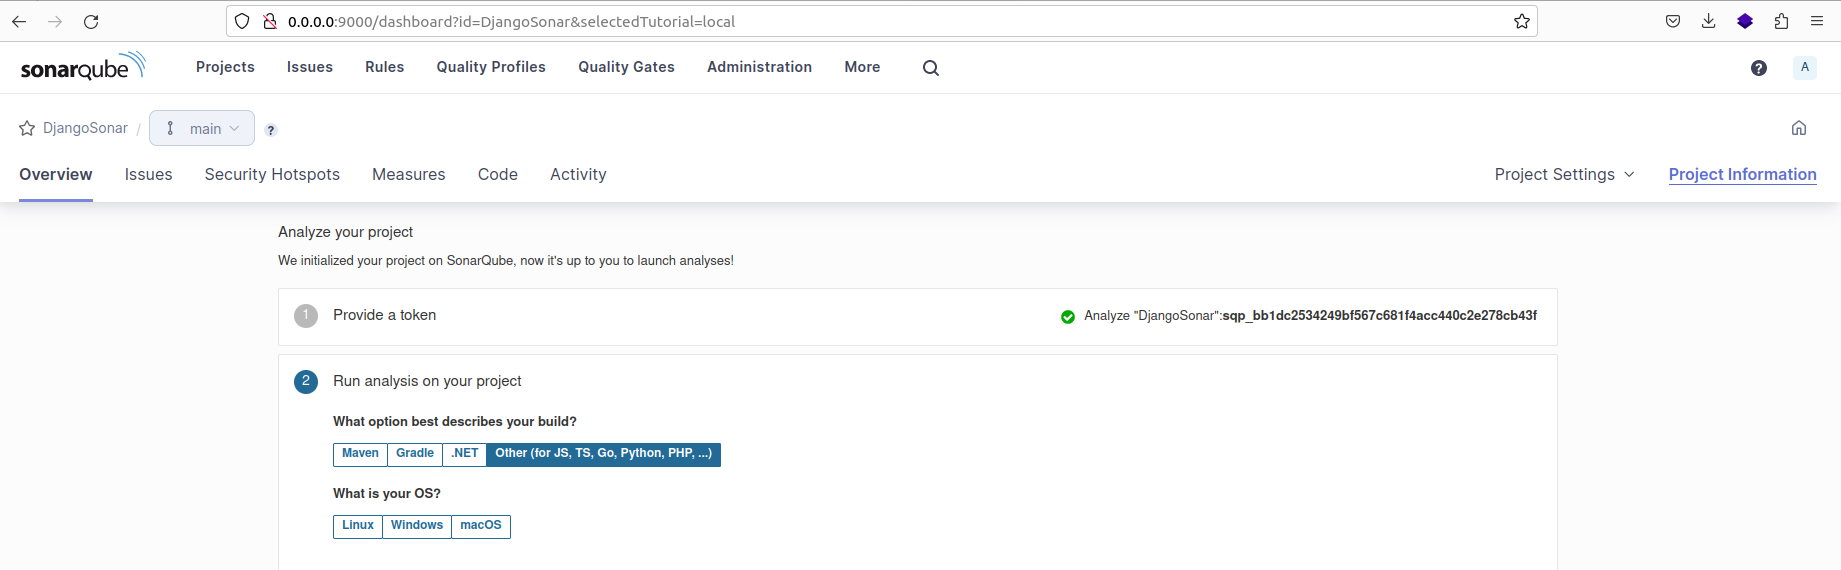
After selecting the 'Locally' option, you will be required to generate a token. Click on 'Continue' to proceed. Next, select the programming language of your project and the operating system (OS) it will be running on.
 Choose the programming language of project and OS
Copy the command displayed, as we'll use it to execute the analysis for the project.
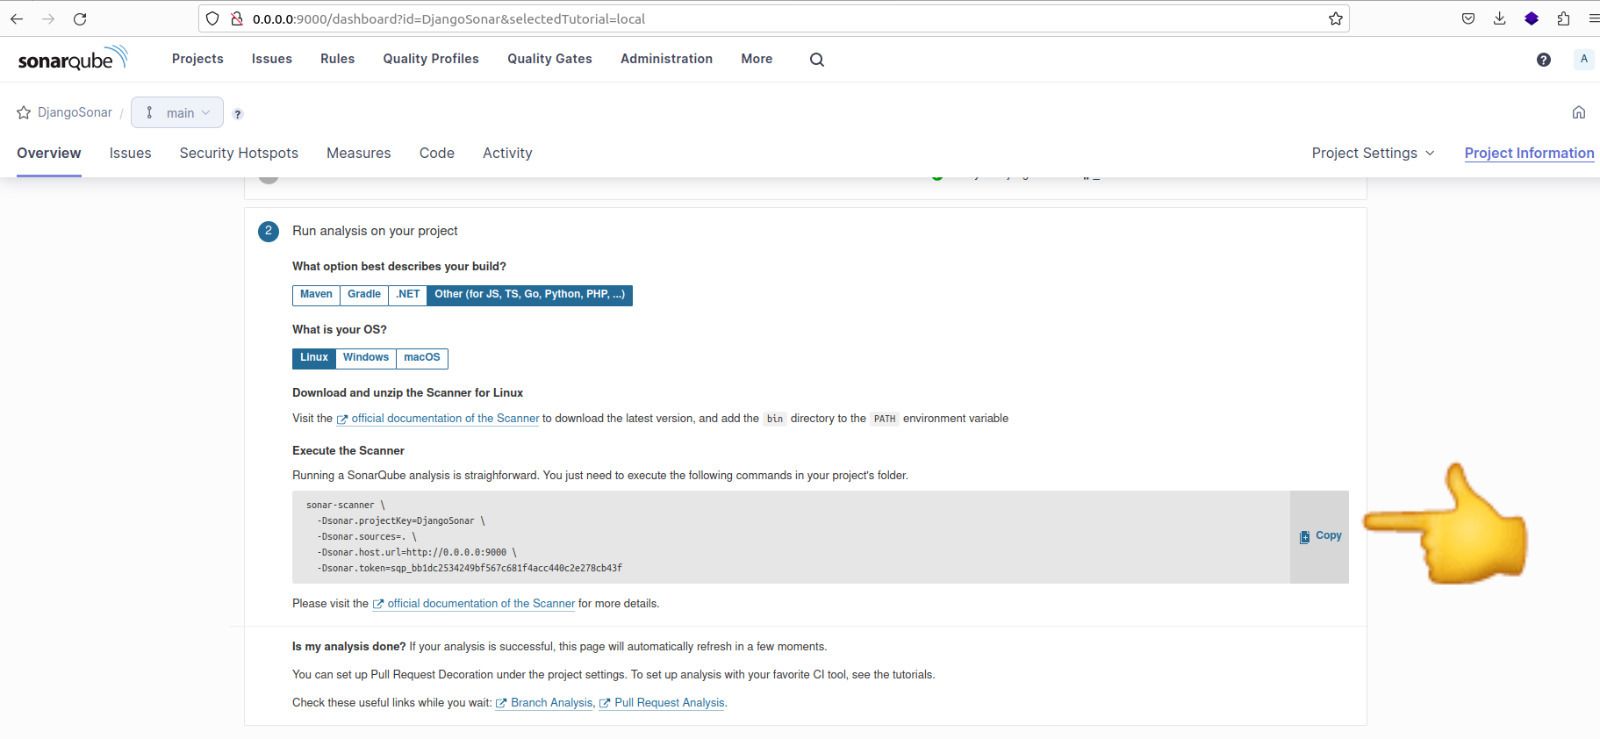 Code needed to run analyis
Here is the content of the command:
sonar-scanner \
  -Dsonar.projectKey=newretailer \
  -Dsonar.sources=. \
  -Dsonar.host.url=http://0.0.0.0:9000 \
  -Dsonar.token=sqp_7b6aada8ce53e97ebb7b2bf5e9b64d53b8938a6f \
  -Dsonar.python.version=3
Note: We have added an additional line to the command to specify the Python version as -Dsonar.python.version=3.
Before executing the analysis command, follow these steps:
- Click on "Project Settings" and then select "General Settings".
- Next, navigate to the "Analysis Scope" tab.
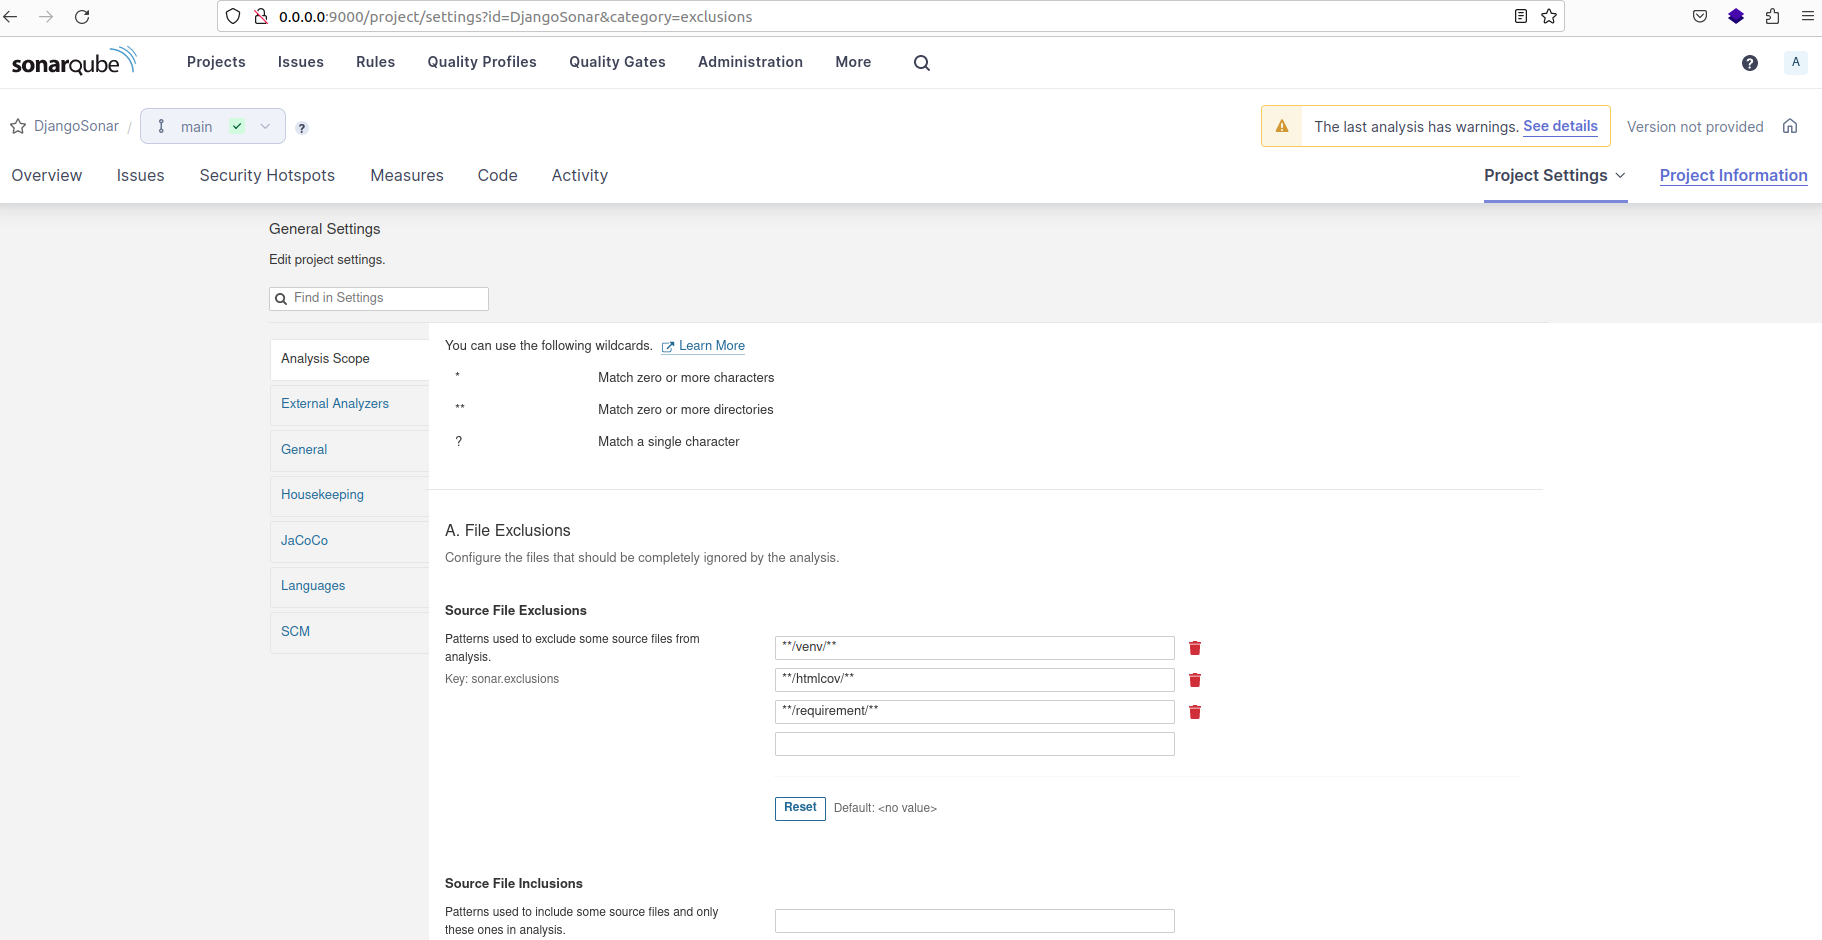 Source files that should be ignored by the analysis
Source File Exclusions are used to specify files or folders that SonarQube should not analyze as part of the codebase. These may include files or directories that are not directly part of the code but are still present in the project directory.
Some common examples of such files or folders are:
- venv (virtualenv)
- htmlcov (coverage HTML format)
- node_modules (Node.js modules directory)
Code Coverage Exclusions are used to specify files or folders that should be excluded when calculating the coverage percentage.
Here are the patterns for the files and folders ignored:
/tests/, /migrations/, /admin.py, /apps.py, core/asgi.py, core/wsgi.py, manage.py
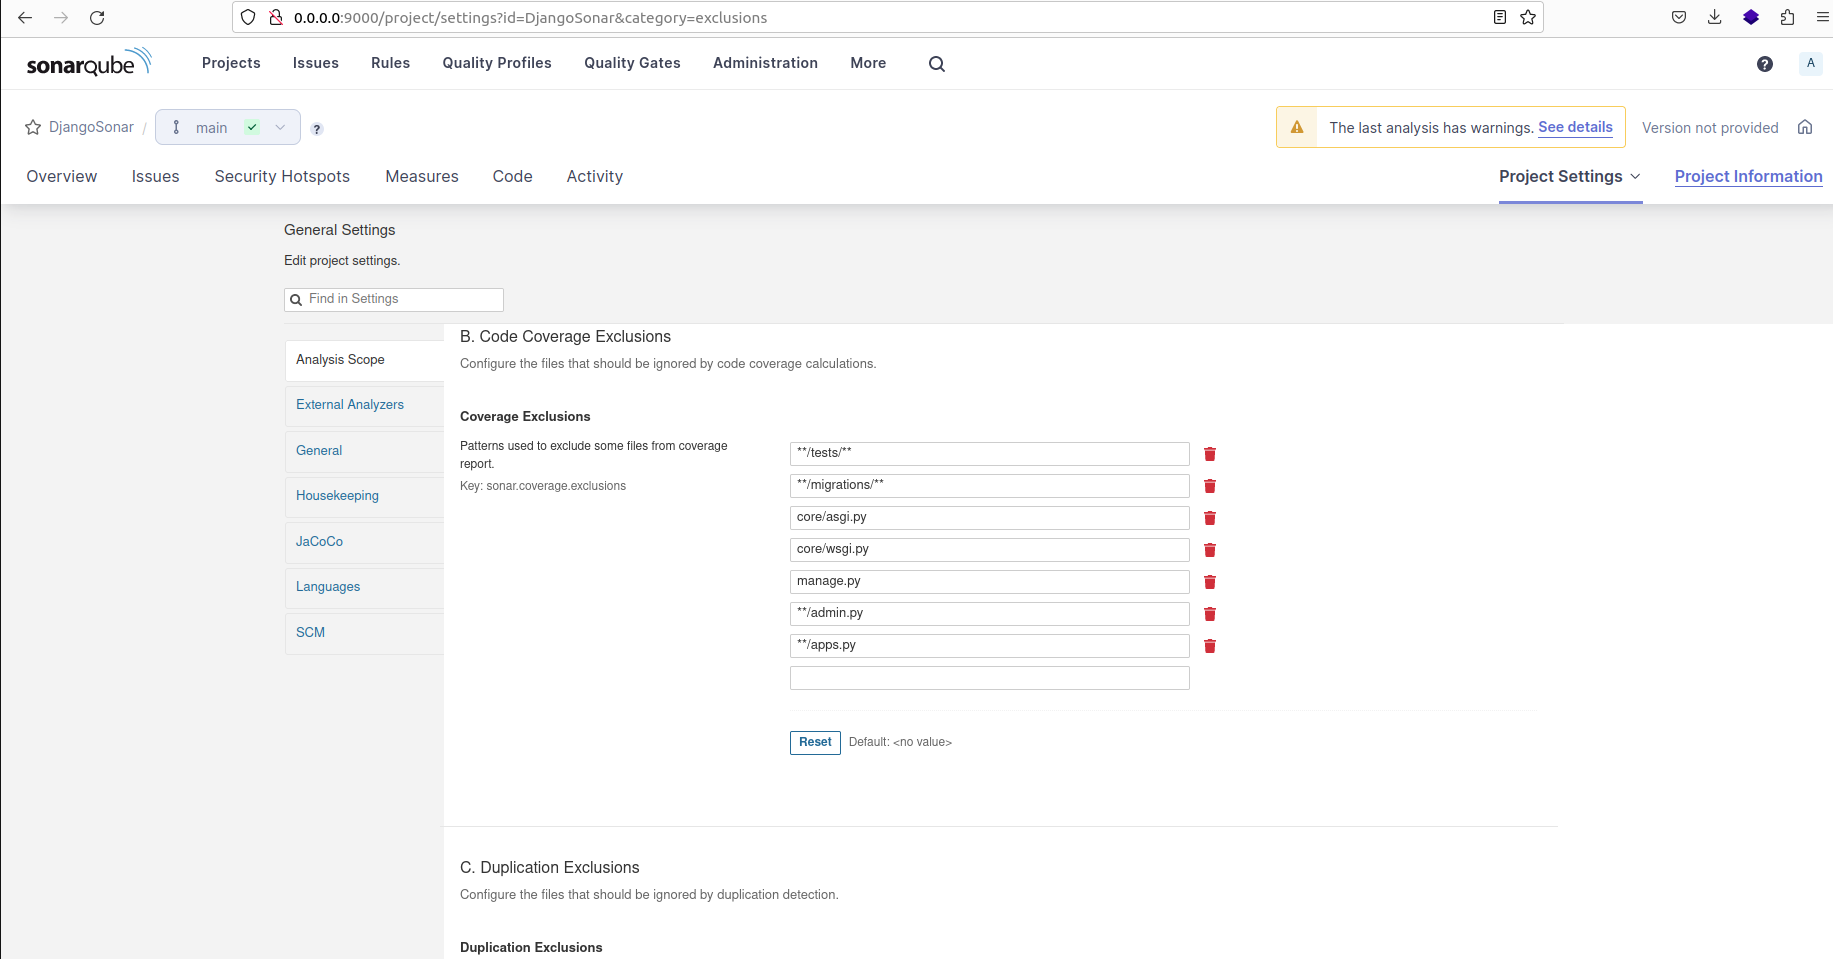 Patterns used to exclude some files from coverage report and coverage percent calculation
On the "Languages" tab, select "Python" as the programming language for the project. Then update the path to the coverage report as "coverage.xml".
 Programming language selection and XML coverage report location
Execute the previously provided command at the root directory:
sonar-scanner -Dsonar.projectKey=DjangoSonar -Dsonar.sources=. -Dsonar.host.url=http://0.0.0.0:9000 -Dsonar.token=sqp_bb1dc2534249bf567c681f4acc440c2e278cb43f -Dsonar.python.coverage.reportPaths=coverage.xml -Dsonar.python.version=3
If everything is functioning properly, you should see a successful result.
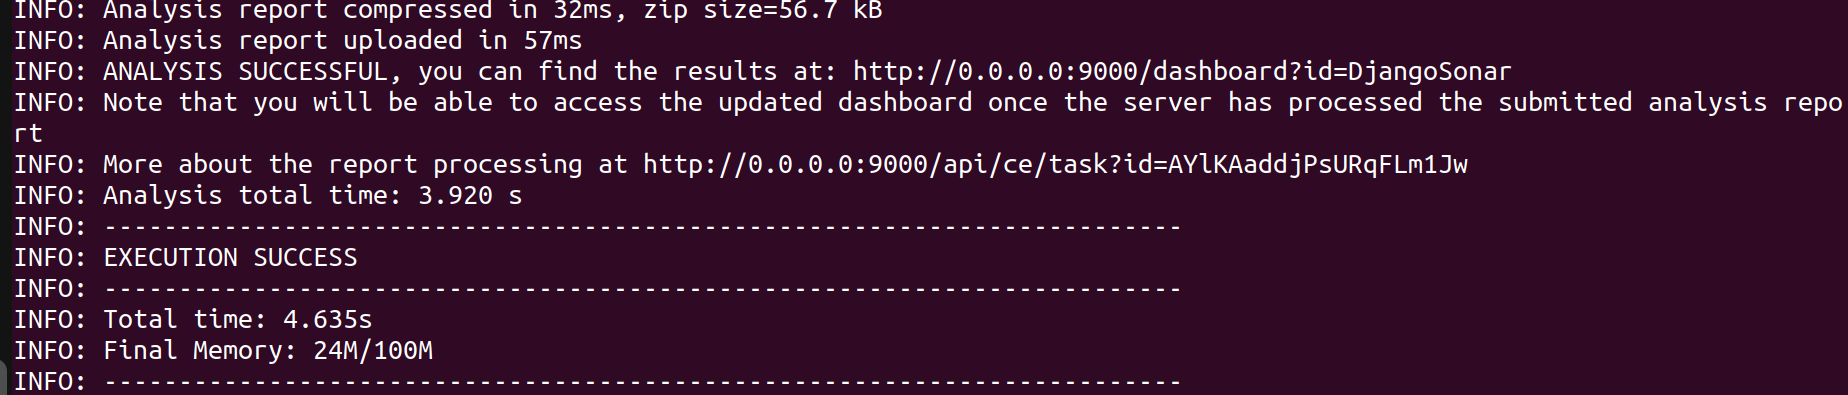 Running sonarqube analysis on the project with command given on the dashboard
If you encounter errors related to unauthorized access or permission issues when trying to analyze a project locally, follow these steps:
- Visit the SonarQube Administrator interface.
- Navigate to the 'Security' section.
- Look for the option labeled 'Force user authentication' and disable it.
- Save the changes and rerun the analysis using the previous command.
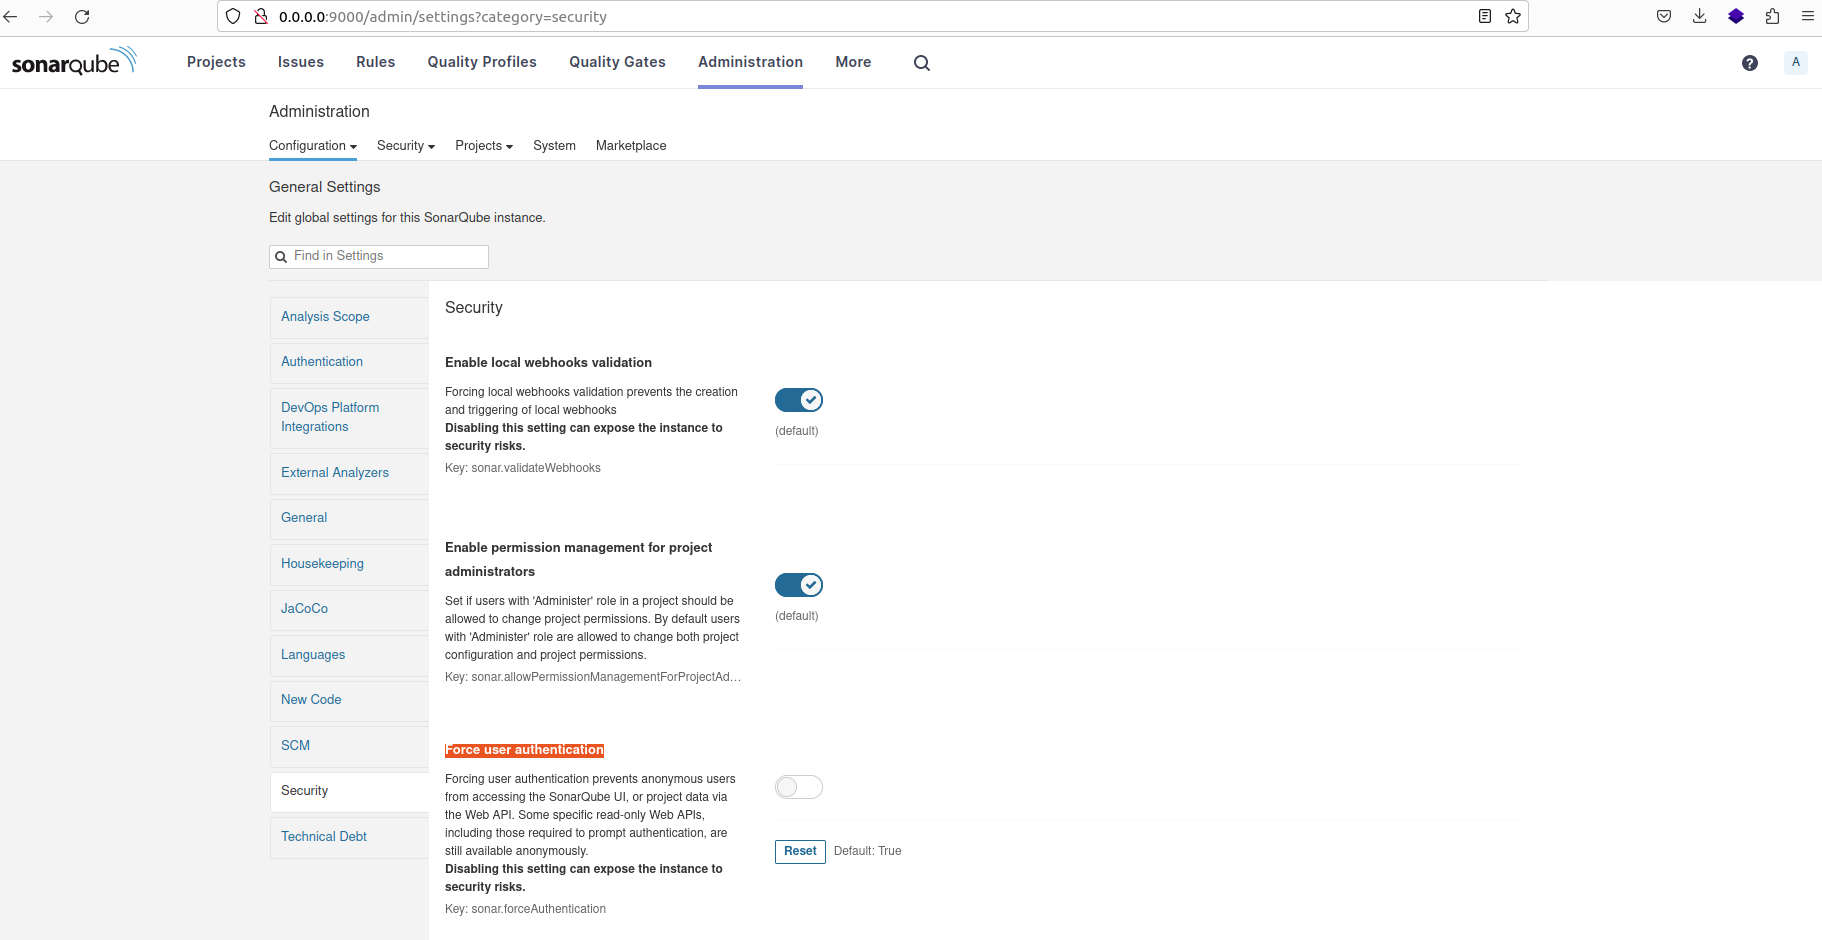 Debugging authentication error during project analysis
Another way to troubleshoot any errors is to visit the warning notifications and check for any errors encountered during the project analysis.
 Warning messages for analysis
Click on "Overall Code" to access the overall code analysis section:
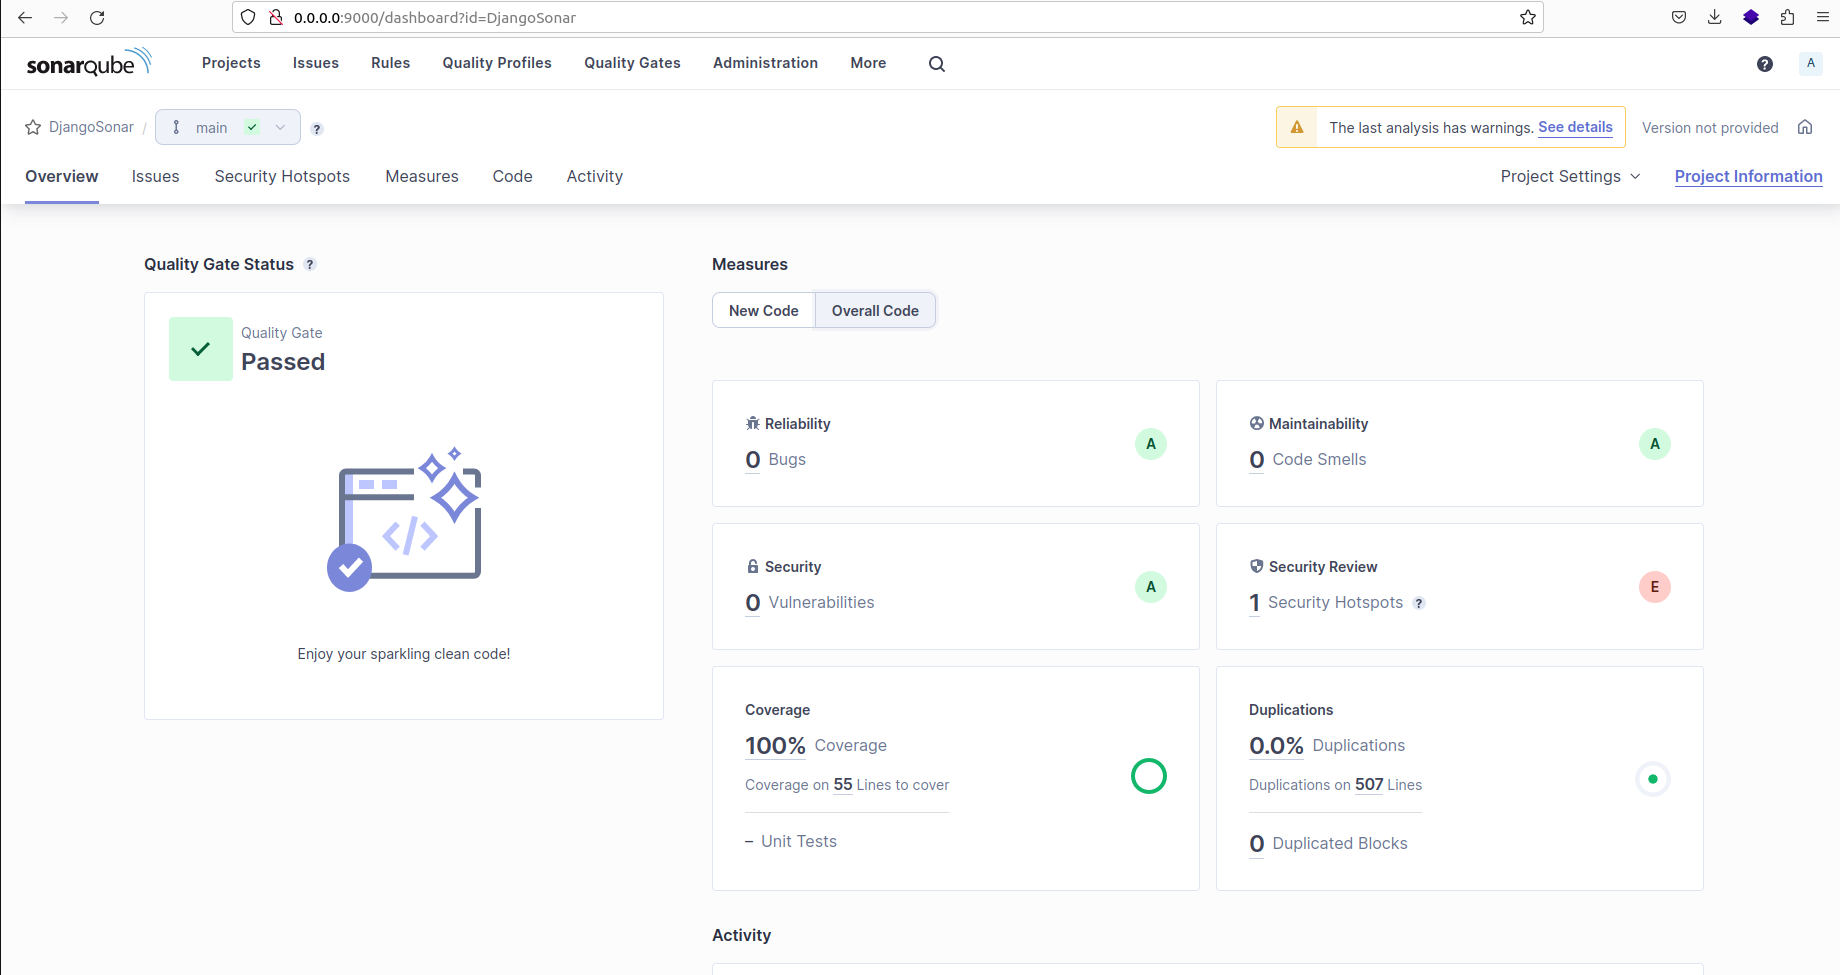 SonarQube analysis result for the project on the dashboard
Wrapping Up
The complete source code for this project is available on Github.
Remember to create a .gitignore file in the root directory of your GitHub repository to specify files and directories that should be ignored and not committed.
This article has explored the process of measuring Django code quality using powerful tools such as SonarQube, Pytest, and Coverage. By integrating these tools, you can gain insights into code health, write effective tests, and ensure adequate code coverage.
Applying these practices enhances code quality, resulting in efficient development processes and high-quality software.
If you enjoyed this article, you can check out my video collection on YouTube to find more fun stuff to learn. And follow me on LinkedIn