
By Andrew Brown
The old authentication systems from monolithic applications don't work well in modern applications.
When you build a web-application, you need a way to handle user authentication (the ability for a user to log in to your web-application).
Traditionally, web-applications were built as monoliths and authentication systems were installed via a programming library. So, for example, Ruby on Rails used Devise.
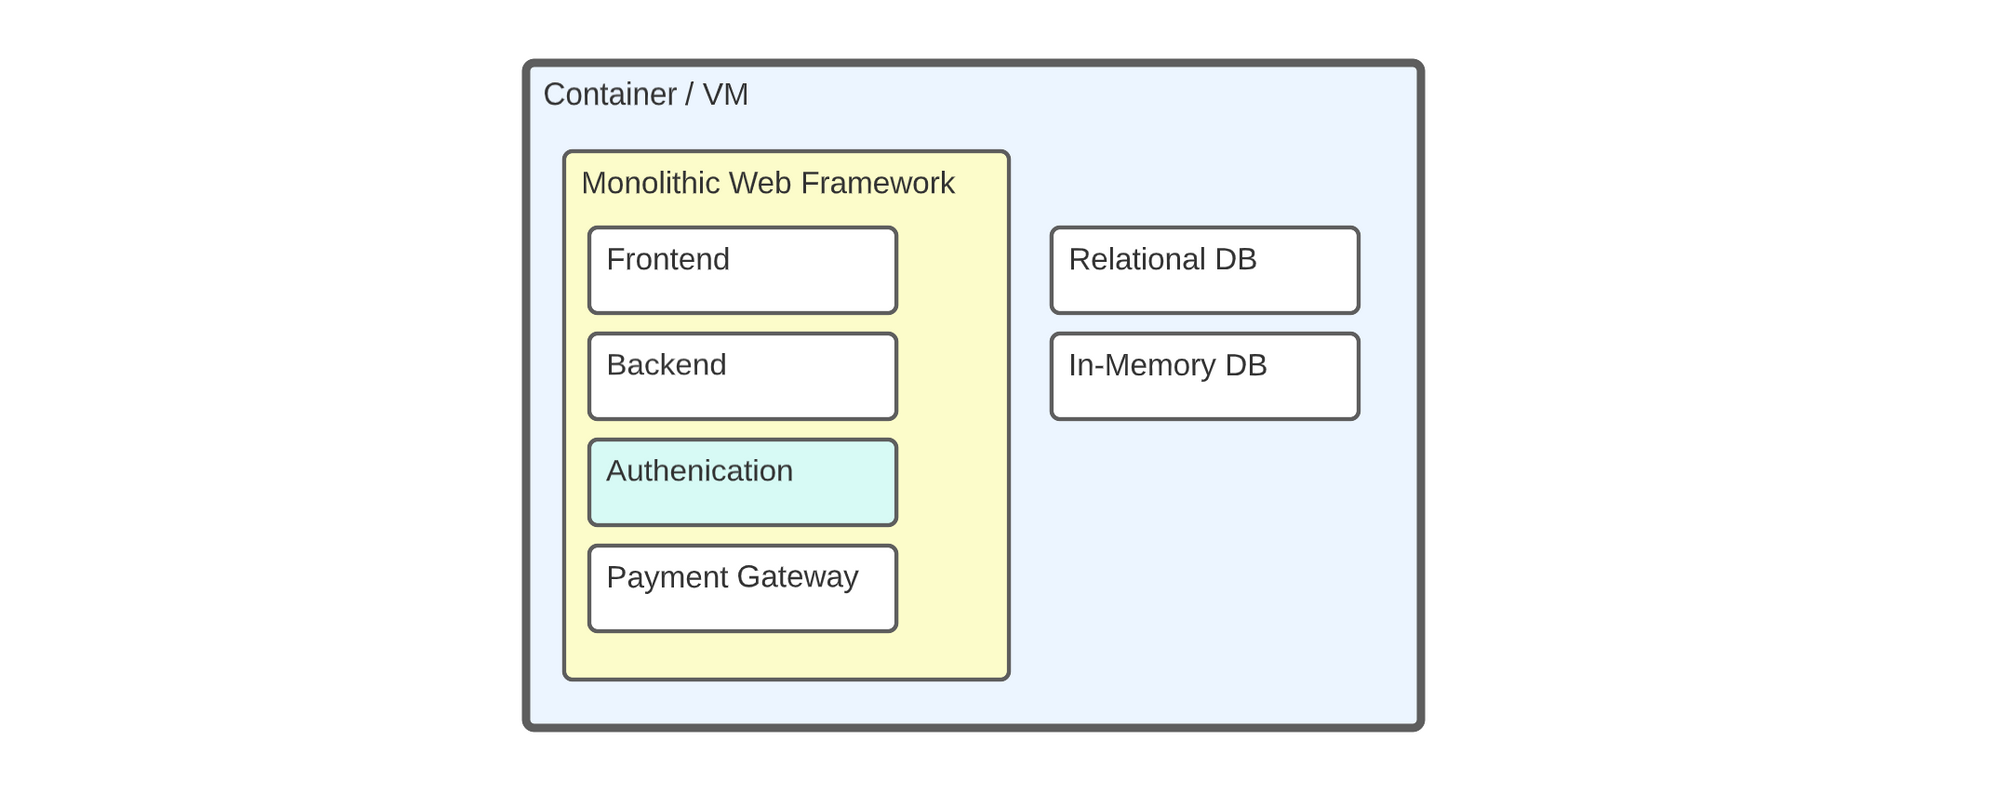 An example of Monolithic architecture running on a single Virtual Machine.
The industry, in general, is moving away from monolithic architecture (running all on a single server) and embracing modern application development. Devs often divide their codebase into smaller isolated services (web-apps) hosted in containers, known as Micro-service architecture.
The authentication libraries of yesterday were designed to be tightly coupled to a web-framework that encourages monolithic architecture. This means we end up with a centralized authentication system prone to a single point of failure, putting stress on a domain of our application shared along with business logic. This also results in poor isolation for identity security.
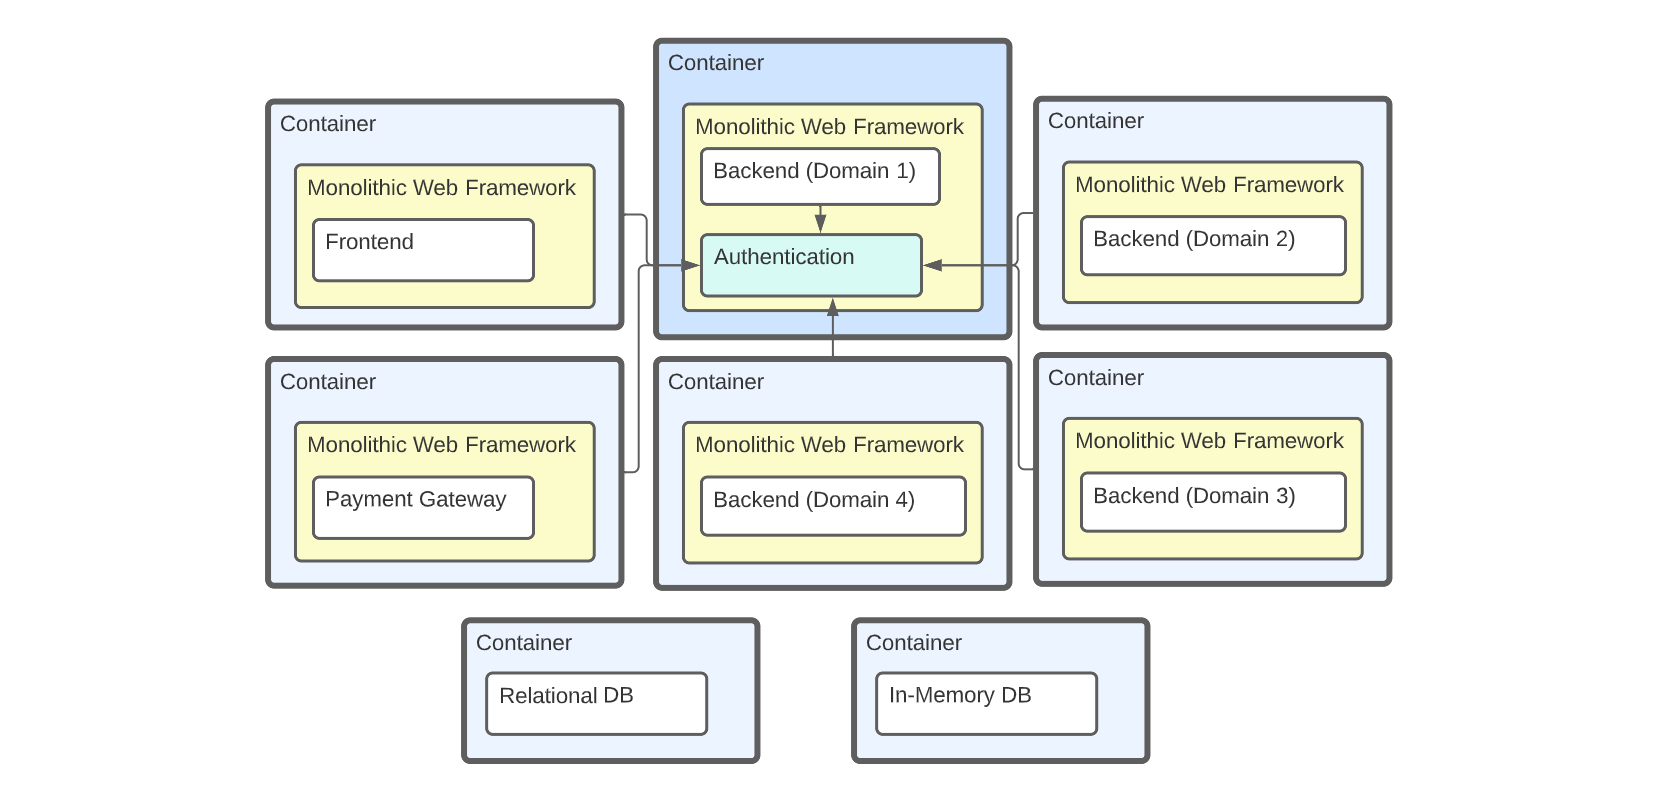 An example of Micro-services architecture with centralized authentication
What we want is for our authentication system to be decentralized, just as we would with our databases.
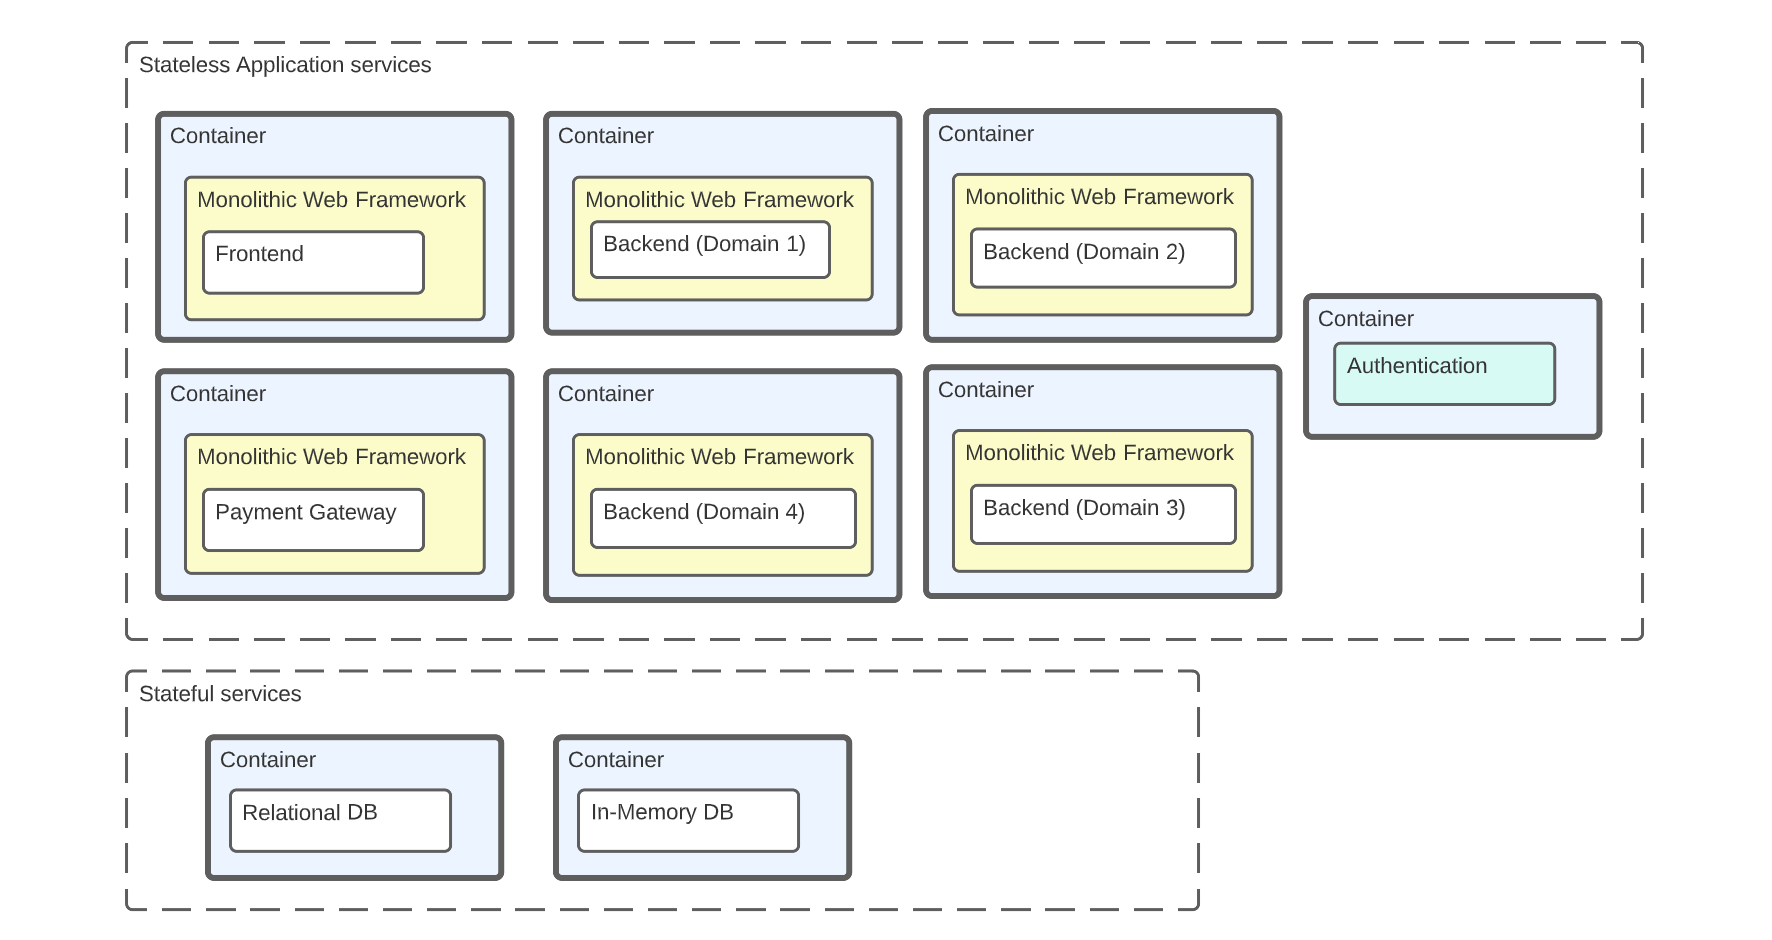 An example of micro-service architecture with decentralized authentication
For micro-service architectures, it is considered best practice to have stateful services such as your database or datastore services use managed cloud services like Amazon RDS, GCP Spanner, Azure Cosmos DB, Redis Cloud, or Aiven Postgres. This is because managing stateful containers is hard, and a large loss of data or a data breach can result in the death of the company.
But the question is, is this also true for authentication systems?
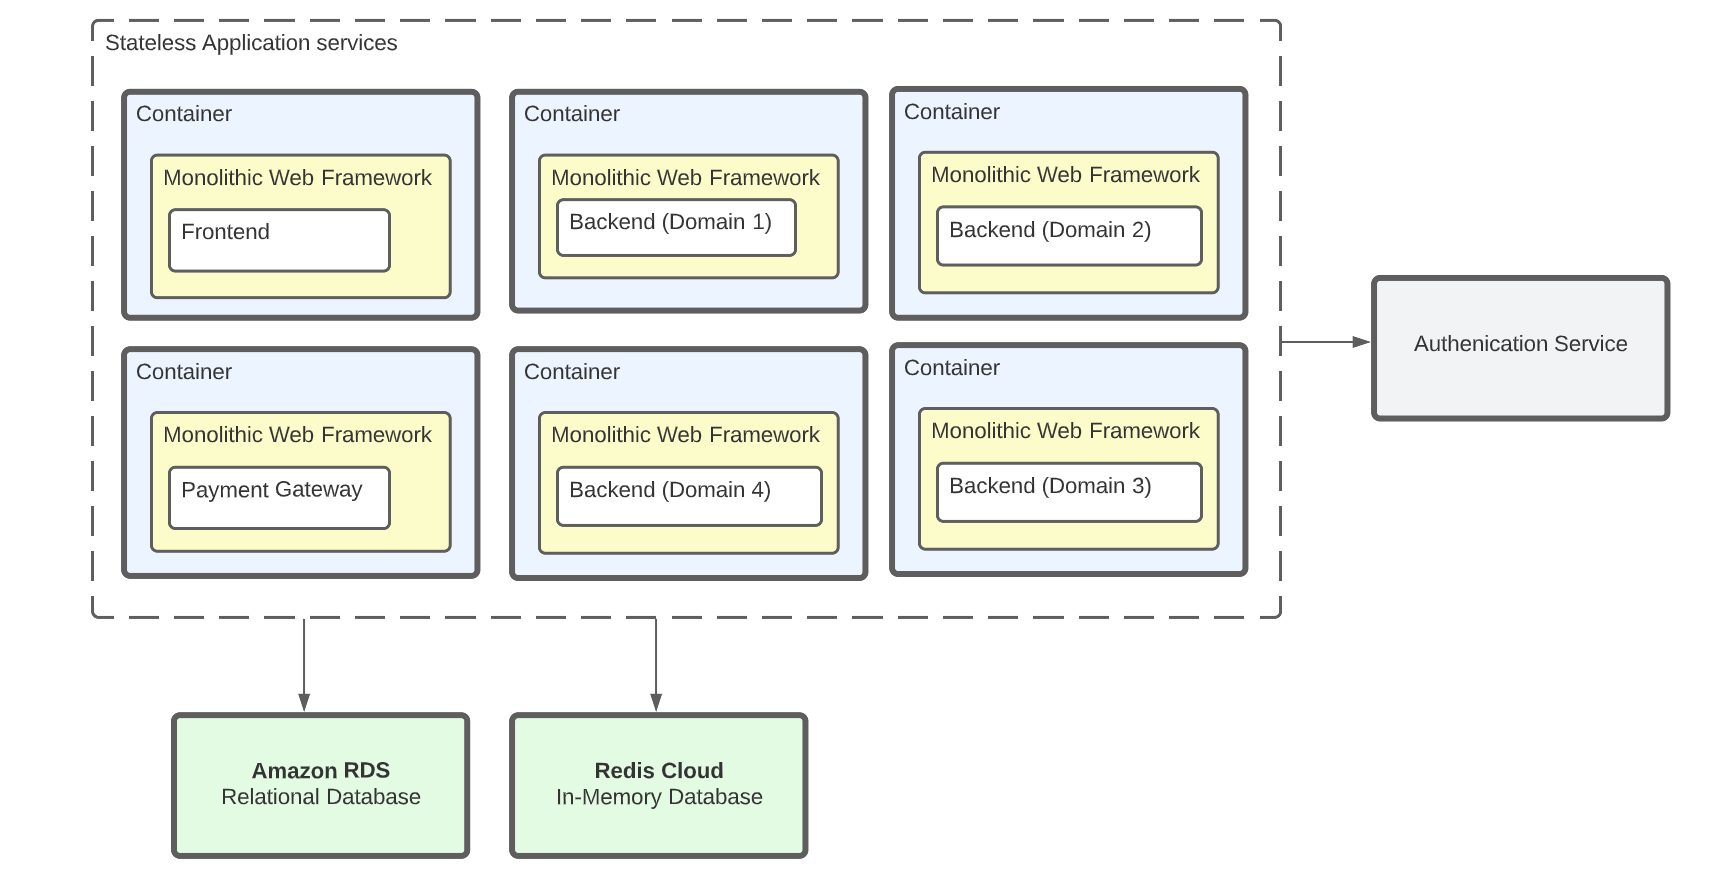 An example of micro-service architecture using decenteralized managed services
Is the Solution to Use a Managed Decentralized Authentication Service?
A possible solution is to use a managed decentralized authentication service such as Okta, AuthO, Amazon Cognito, Azure AD B2C, or Ory.sh. There is a growing industry belief that authentication is too complex or hard to implement and should use a managed cloud service.
On paper it seems simple: use a managed cloud service for authentication. But in practice, you'll discover that these services feel incomplete. They can also be downright expensive, and give a false sense of security and uptime:
- Amazon Cognito can't be replicated cross-region so we are susceptible (and Congito did experience downtime). Amazon Cognito doesn't support many popular (Identity Providers) IpD's. It's cost effective but difficult to configure, debug, and use
- Azure AD B2C has support for many IpDs, is very inexpensive, and has more customization around authentication flows. But you cannot easily track Monthly Active Users (MAUs), and often users will complain about authentication not working due to unexplained intermediate issues. To get the look you want, you have to mangle HTML, CSS, and write some JavaScript and then you're still limited.
- Okta and Auth0 are expensive per MAUs, and the pricing is confusing with a complex pricing matrix. Okta had a data breach in 2022. Many useful features are gated by paying considerably more, making it hard to run a freemium model alongside a paid model for your services.
- Ory.SH is trying to rebuild authentication from the ground up and could end up being the MUX.com of managed authentication services. But its implementation is incomplete and the company is immature (at the time of writing this article). So while it's promising, embracing Ory.SH might have you replacing your authentication system a few years down the road if anything goes sideways or drastic changes are made to pricing or feature-set.
We are challenging our dogmatic belief that authentication should be handled by a managed cloud service. And here, you'll learn how to implement your own authentication system using the AuthN open-source project to the solve the hardest part of rolling-your-own authentication service.
What is AuthN?
The Keratin AuthN project gives you an open source drop-in solution for core authentication mechanisms in your web app.
It has support for all of the cool things you would want right out of the box, like:
- passwordless sign-in
- simple session management
- OAuth2 support
This lets you implement industry standard security best practices for storing and managing user credentials without being an expert.
But because of its simplicity, there are several things it does not include that we will need to bring to the table, like:
- our own frontend/backend solution for signup and login pages,
- linking authenticated users with users in our application,
- email verification/confirmation checks
With that in mind, this article will explain how to get the AuthN service itself up and functional.
How to Set Up the AuthN Service
Our AuthN service will consist of 3 Docker containers defined in our Docker Compose file:
- authn (AuthN Microservice)
- db (AuthN Postgres Database)
- redis (AuthN Redis Instance)
How to Setup the Folder Structure
Run the mkdir and touch commands below to setup the required directories and files.
mkdir -p authn_service/db
touch authn_service/docker-compose.yml authn_service/dev_keys.sh authn_service/db/Dockerfile
This should setup a folder structure like the following:
authn_service
├── db
│   ├── Dockerfile
├── dev_keys.sh
├── docker-compose.yml
How to Setup SSL Certificates for Use with Postgres During Development.
As part of security best practices, AuthN by default requires that its database connection uses SSL. As such we will need to take some extra steps to generate keys for our Postgres Docker image to facilitate this.
dev_keys.sh
SECRET_KEY="TESTING123"
set -euo pipefail
openssl req -new -text -passout pass:$SECRET_KEY -subj /CN=localhost -out db/server.req -keyout db/privkey.pem
openssl rsa -in db/privkey.pem -passin pass:$SECRET_KEY -out db/server.key
openssl req -x509 -in db/server.req -text -key db/server.key -out db/server.crt
From the root of your folder, run the above commands which should output the following files into the db folder:
- privkey.pem (Certificate Chain)
- server.crt (Signed Certificate)
- server.key (Private Key)
- server.req (Certificate Signing Request)
How to Setup the Postgres Dockerfile
Create a simple Dockerfile in the db folder which will copy these generated keys into the image and set appropriate permissions for the Docker user.
db/Dockerfile
FROM postgres:14.1-alpine

WORKDIR /var/lib/postgresql

COPY . .

RUN chown 70:70 server.key
RUN chmod 600 server.key
How to Setup Docker Compose
Setup your Docker compose file with the below content. A full list of the available configuration options are available here.
AuthN Container
A complete list of the available configuration options for AuthN are available here. The config options we will use for this example are:
- APP_DOMAINS – the domain our app will be running on, needed for Cross-Origin Resource Sharing (CORS) with the AuthN service
- AUTHN_URL – the URL we are publishing the AuthN service to
- DATABASE_URL – Postgres connection string
- HTTP_AUTH_USERNAME – will be used for private endpoint communication
- HTTP_AUTH_PASSWORD – will be used for private endpoint communication
- PORT – the publicly accessible port to use for our service
- REDIS_URL – Redis connection string
- SECRET_KEY_BASE – used to generate HMAC keys for the service
- TIMEZONE – for tracking and reporting stats
Another important part to note here is the command being executed. This will force AuthN to run migrations against the database when it starts up the container. Without this, our database will not populate with any table definitions.
sh -c "./authn migrate && ./authn server"
Finally, we have a dependency on the Redis service being started and the Postgres service being healthy.
The reason we are using a health check for Postgres specifically instead of only waiting on the start, is so that Postgres has sufficient time to create our new database (if it doesnt exist), before AuthN attempts to start up.
Postgres Container
We need to setup our Postgres container database and credentials to match the connection string we provided to AuthN through the DATABASE_URL launch option.
- POSTGRES_DB – the name to use for our AuthN database
- POSTGRES_USER – desired Postgres username
- POSTGRES_PASSWORD – desired Postgres password
To satisfy our security requirements, we also need our Postgres image to launch with SSL mode enabled using our previously generated keys. We do this by providing some launch flags with reference to the paths in our Postgres Dockerfile.
-c ssl=on -c ssl_cert_file=/var/lib/postgresql/server.crt -c ssl_key_file=/var/lib/postgresql/server.key
Redis Container
For our Redis container, we will simply provide a port number so that the service starts up reliably on the same port each time. We will also adjust our startup command to enable append only mode on Redis which will ensure all write operations performed on the Redis database are logged to a file.
docker-compose.yml
version: "3.8"

services:
  authn:
    image: keratin/authn-server:1.15.0
    ports:
      - "8765:8765"
    environment:
      - TIMEZONE=EST
      - DATABASE_URL=postgres://postgres:postgres@db:5432/authn
      - REDIS_URL=redis://redis:6379/0
      - AUTHN_URL=http://authn:8765
      - PORT=8765
      - APP_DOMAINS=localhost
      - SECRET_KEY_BASE=MYSUPERSECRETKEYBASE
      - HTTP_AUTH_USERNAME=mysecretuser
      - HTTP_AUTH_PASSWORD=mysecretpass
    command: sh -c "./authn migrate && ./authn server"
    depends_on:
      redis:
        condition: service_started
      db:
        condition: service_healthy

  db:
    build: ./db
    restart: always
    command: -c ssl=on -c ssl_cert_file=/var/lib/postgresql/server.crt -c ssl_key_file=/var/lib/postgresql/server.key
    environment:
      - POSTGRES_DB=authn
      - POSTGRES_USER=postgres
      - POSTGRES_PASSWORD=postgres
    ports:
      - '5432:5432'
    healthcheck:
      test: ["CMD", "pg_isready", "-U", "postgres", "-d", "authn"]
      interval: 5s
      timeout: 5s
      retries: 2

  redis:
    image: redis
    ports:
      - '6379:6379'
    command: ['redis-server', '--appendonly', 'yes']
Start the service
Start the service using Docker compose. Note that on the first run it will need to create the Postgres database which can take a moment depending on your environment.
docker compose up
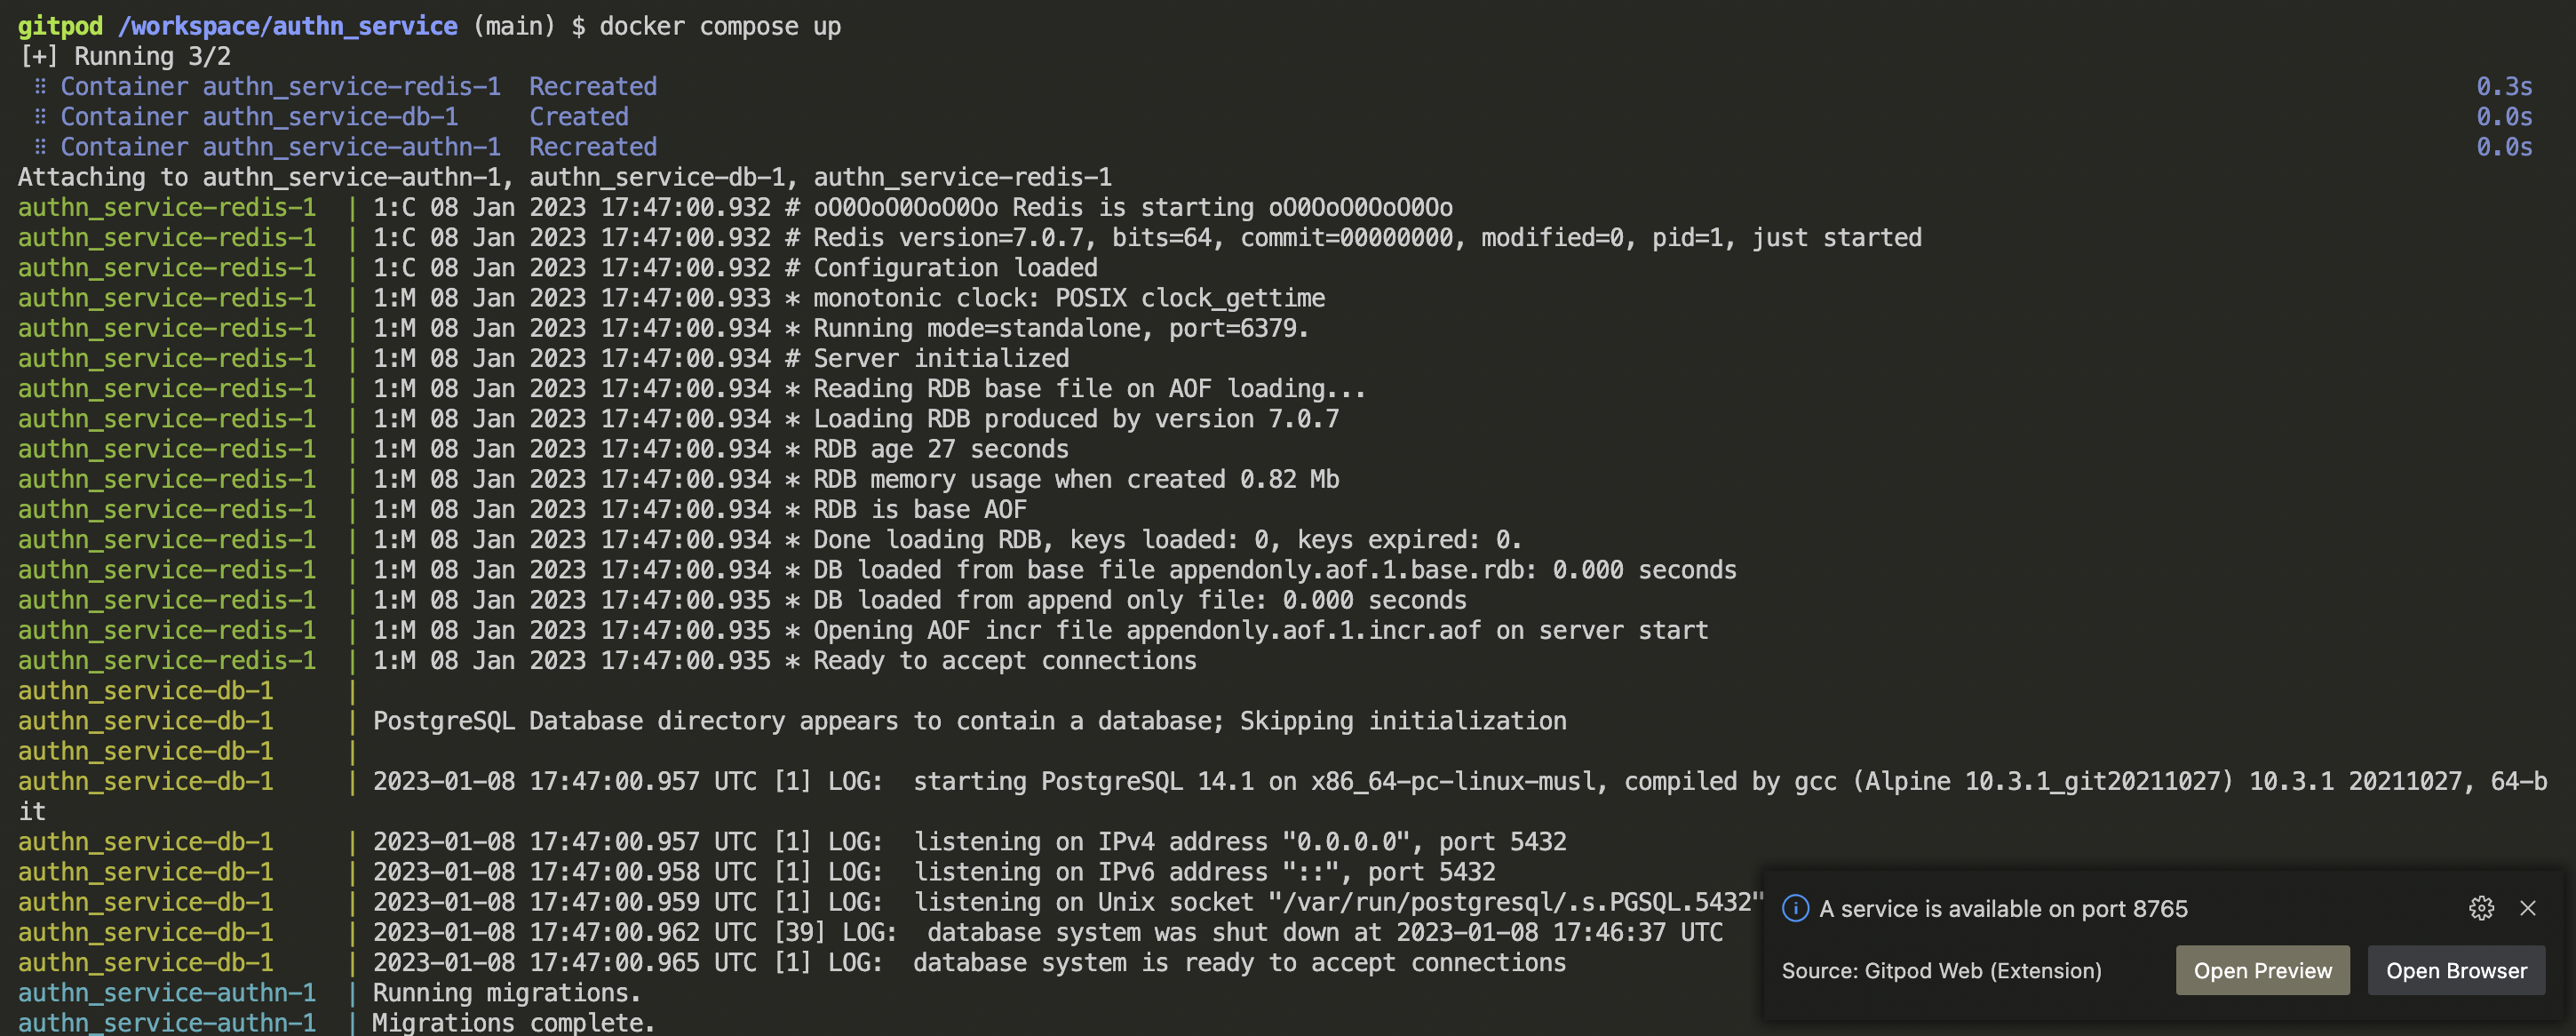 A Bash terminal showing docker compose up running AuthN
Navigating to http://localhost:8765 in your browser should now greet you with the Keratin welcome page.
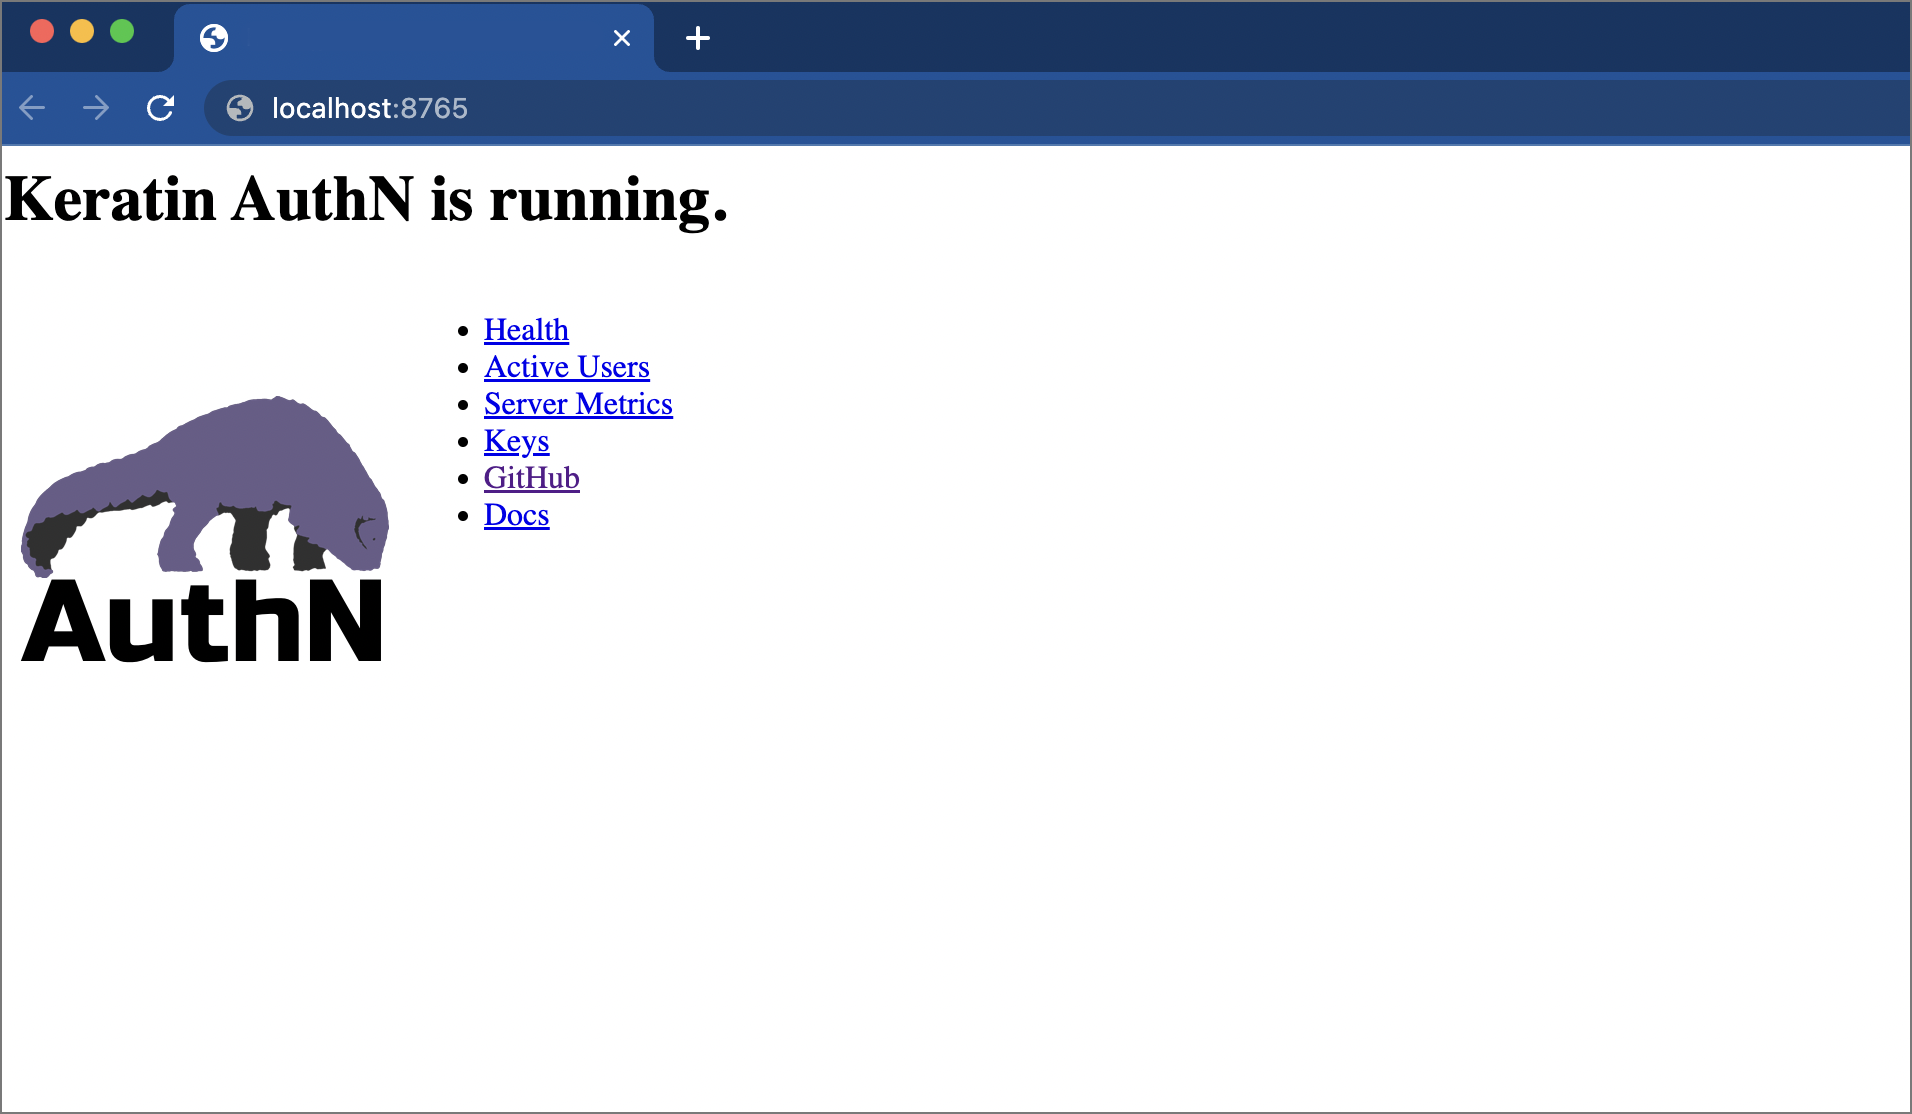 A web-browser showing AuthN running on localhost:8765
Create a test account
Use curl in your terminal make a post request to the accounts endpoint for creating new accounts (/accounts). You will need to include the CORS origin header with your request so AuthN will know it's from a trusted source.
curl -X POST \
  -H "Origin: http://localhost" \
  -H "Content-Type: application/json" \
  -d '{"username":"garak","password":"TerokNor2023!!"}' \
  http://localhost:8765/accounts
If successful, you should receive a 200 response containing an id_token (JWT) indicating that your new user has been created and logged on successfully.
In your frontend application, you would now store this in a cookie or local storage, respectively, for use on subsequent requests from the user.
{"result":{"id_token":"eyJhbGciOiJSUzI............"}}
Integrate with your application
You now have a fully functional authentication service running in your development environment. All that remains to do is setup your frontend client and backend integrations.
Set up the frontend client
AuthN doesn't actually include any physical web pages for your users to signup/login (only the endpoints). So we will need to bring our own solution for collecting/validating information we want to pass to AuthN.
We are also responsible for validating/confirming all user information BEFORE we provide it to AuthN.
A handy JS library is provided to help make integration easier which is linked above. Or you can interact with the public and private endpoints directly yourself.
Set up the backend integrations
AuthN does not provide any kind of direct backend integration with your application.
Users will simply be authenticated after signup. They are assigned a user_id by the system that you will need to manually associate yourself with matching records in your own users table for your application.
AuthN provides some basic integration tools for Ruby, Go, and NodeJS to serve as a starting point for your integration.
Conclusion
We can use AuthN to solve the hardest problems about decentralized authentication. But we will need to build out our own UI and our own transactional emails around AuthN to complete the solution.