
In late 2020, the React team introduced the "Zero-Bundle-Size React Server Components" concept. Since then, the React developer community has been experimenting with and learning how to apply this forward-looking approach.
React has changed how we think about building user interfaces. And the new model using React Server Components is way more structured, convenient, and maintainable, and offers a better user experience.
The latest release of Next.js has gone the "Thinking in Server Components" way. And as React devs, we must adapt to this new mental model to fully leverage its power in building applications.
In this tutorial, you'll learn about React Server Components (RSC). You'll learn exactly what they are and how they work, and more importantly, what problem they solve.
I'll also show you many examples so you can understand why we need RSC. Finally, you will learn the difference between React Server Components and another similar-sounding but different feature called Server Side Rendering (SSR).
If you are new to React, you'll need to have some basic knowledge about component architecture, state, data passing using props, and the Virtual DOM tree before learning about React server components.
You can also read through this article and then go through this complete roadmap on freeCodeCamp to solidify your ground with ReactJS.
All set? Let's get started.
If you like to learn from video content as well, this article is also available as a video tutorial here: 🙂
React as a Client Side UI Library
Since its inception, React has been a client side user interface library. It is an open source JavaScript-based library that helps web and mobile developers build applications that use a component-based architecture.
The React philosophy suggests that we break our entire design into smaller, self-contained pieces called components.
 Image showing one component broken down into multiple components.
Then the components can have their own private data called state and a way to pass data across other components called props. You break these components into a component hierarchy, define the state, manage the effects that change the state, and decide the data flow.
 Image showing how state and props work.
Traditionally, all these components are JavaScript functions (we're only talking about functional components here – we'll leave class components in the past). When the app loads on the browser, we download the component code and make the app functional using them.
We'll use the term components here. But, since this article introduces you to the concept of React Server Components, let's call these traditional components Client Components (as they get downloaded on the client/browser and React performs its magic to render them).
Common Problems with React Applications
React Client Components are great and they work well to solve certain use cases. But we need to look at the pattern a bit differently when building React applications. This is because we should care about:
User Experience: We build software products for our users and customers. The user experience of the application matters if we want the app to be successful.Maintainability: The project code must be well maintained over the years, across several development teams.Performance Cost: The application shouldn't be sluggish and our design approach must not slow things down.
Let's now see a few examples of common problems you might encounter. We'll also understand how we can implement and design for each of these key points in our day-to-day web development using React.
The Layout Shift Problem
A very common user experience problem is the sudden layout shift when a component renders. Let's take a look at the code snippet below:
<CourseWraper>
 <CourseList />
 <Testimonials />
</CourseWraper>
This is some familiar JSX code where we have a CourseWrapper component and two child components, CourseList and Testimonials. Let's assume that both CourseList and Testimonials make network calls (API calls) to fetch the data.
Here's the CourseList component:
function CourseList() {

    // Assume a Network Call, in real-life
    // you will handle it with useEffect
    const info = fetchCourseList();

    return(
      <> </>
    )
}
And the Testimonial component:
function Testimonials() {

    // Assume a Network Call, in real-life
    // you will handle it with useEffect
    const info = fetchTestimonials();

    return(
      <> </>
    )
}
As these components make network calls, there is no guarantee about the sequence in which the responses may come back. It depends on the network speed, latency, and many other factors.
In a situation where the network call for the Testimonials component completes before the CourseList component, the Testimonials component will render first, and then the CourseList component will render. It will push the Testimonials component to fit itself in. You can see what I mean here:
 A Slow Motion Representation of the Layout Shift UX Issue.
We can make the experience a bit better by using a loading indicator or shimmer effect telling our users to expect something in a while (but we're not sure when).
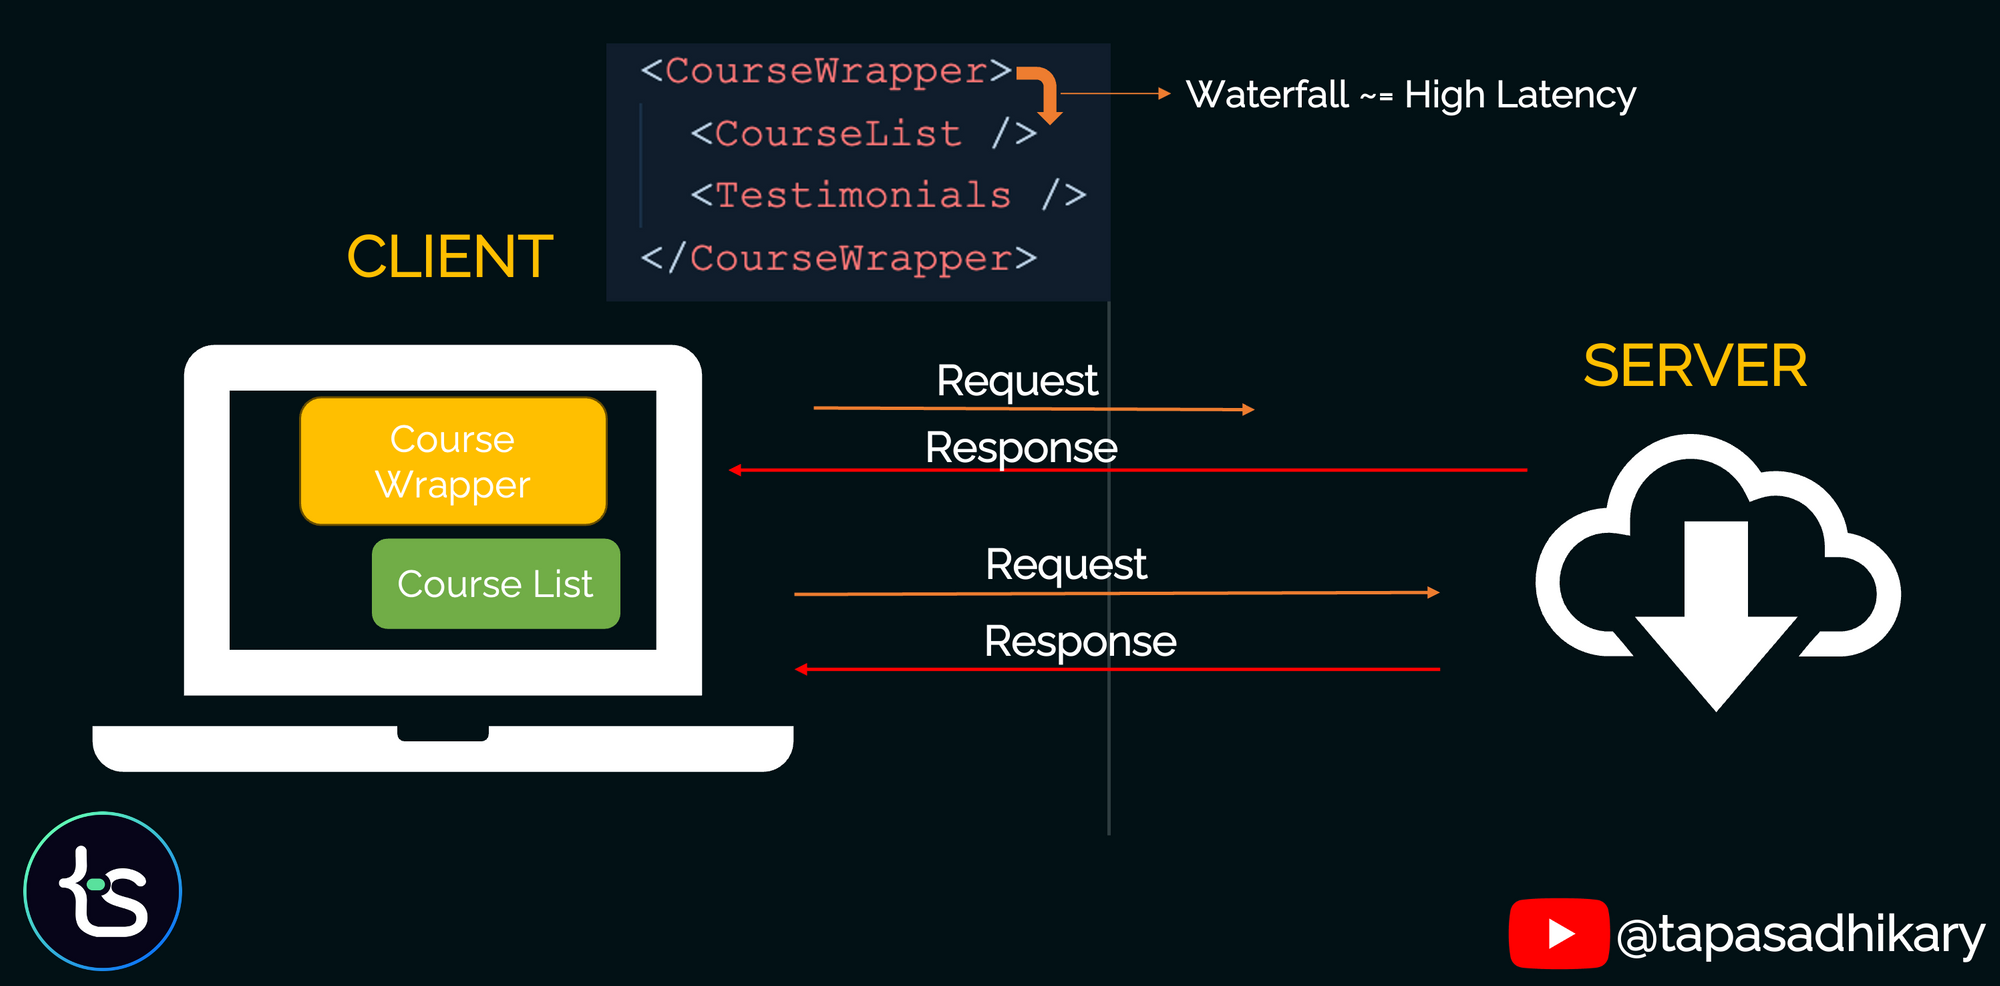
The Network Waterfall Problem
Let's discuss another typical user experience problem. Imagine a React component similar to what we had in the last example:
function Course() {
 return(
     <CourseWraper>
         <CourseList />
         <Testimonials />
     </CourseWraper>
 )
}
Let's make a small change here. Along with the CourseList and Testimonials components, now CourseWrapper also makes a Network call.
function CourseWrapper() {

    // Assume a Network Call, in real-life
    // you will handle it with useEffect
    const info = fetchWrapperInfo();

    return(
      <> </>
    )
}
So, the parent component makes a network call to fetch data and both of its child components are also making the network calls.
Now the interesting thing is, the parent component will not render until its network call is complete. It will hold the rendering of its child components as well.
This phenomenon where we wait for the response of the previous thing to complete to start on the current thing is known as a Waterfall. In this case we have both Network Waterfall and Component Rendering Waterfall problems.
Now, you may think of removing all these network calls from each components and lift it up as a single call so that individual components will not wait on the response. That's a smart move but it may cause a maintainability problem. Let's learn about that in the next section.
Maintainability Issues
Now that we've looked at a couple of user experience problems dealing with server side interactions, let's consider a maintainability problem.
Now assume that none of our components make any network calls. We fetch all the details for all the components (yes, including the parent component) at once using a single API call fetchAllDetails().
After that we pass the required information to each of the components as props. This is better than the "Waterfall" problem we saw above, right?
function Course() {

    // Assume a Network Call, in real-life
    // you will handle it with useEffect
    const info = fetchAllDetails();

    return(
        <CourseWrapper
            ino={info.wrapperInfo} >
            <CourseList
                ino={info.listInfo} />
            <Testimonials
                ino={info.testimonials} />
        </CourseWrapper>
    )
 }
But this might cause some maintainability issues for us.
Assume, one fine day, that the product decides to drop the Testimonials feature. So we can simply go and remove the Testimonials component from the above code. That works! But, we may forget to clean up the data that we get using the fetchAllDetails() call. It may unnecessarily be there without being used.
To mitigate this, you may end up changing your code in a way we have already discussed in the previous sections while explaining the possible user experience problems. So, we need to find a better solution. But before that, let's talk about one more consideration, the Performance Cost.
Performance Costs
The last problematic area we will be discussing is performance costs.
 I found this funny meme on Internet - It depicts the heaviness JS brings on clients.
Traditionally, React components are client side JavaScript functions. They are the building blocks for your React application. When we load the application on the client, the components get downloaded on the client and React performs what's necessary to render them for you.
But this comes with two significant problems:
First, when user sends the request, the app downloads HTML along with linked JavaScript, CSS, and other assets like images.
At the client site (on the browser), React starts its magic and hydrates the HTML structure. It parses the HTML, attaches the event listeners to the DOM, and fetches the data from the store. Thus the site becomes a fully operational React app.
But, the point is, there is lot happening on the client. We end up downloading all this code on the client.
 Amount of Scripts Downloaded on The Browser
Most often we need external libraries (Node modules) as dependencies for our project. All these dependencies will be downloaded on the client side, making it even bulkier.
Now that you understand the problems, I think you'll definitely appreciate what React Server Components offer and how they can address these problems.
But before we talk about this, let's understand a bit more about the client and server.
The Client-Server Model
We have used the terms client and server many times in this article. So let's give a formal definition of them and explain their relationship at a high level.
 Diagram showing the relationship between the client and server
Client: A client with respect to an application is a system that executes the tasks at the end-user's side. Examples of clients are your PC, laptop, mobile, browser, and so on.Server: A server, as the name suggests, provides services to the clients. It may be colocated to a data store or database for quick data access.Request: A request is a communication mode a client uses to ask for a service from a server.Response: A response is also a communication mode a server uses to send back the service (data/information) to the client.
React Client Components
As I mentioned above, traditionally React components live on the client side. When they interact with a server, they send a request and wait for the response to come back. On receiving a response, the client triggers the next set of actions.
If the requested service successfully completes, the client component acts on the UI accordingly and shows a success message. In case of an error, the client component reports that to the users.
 React Client Components - in a Client Server model.
When it causes a Network Waterfall, the response of the client component gets delayed and causes a bad user experience. So how do we mitigate this?
How React Server Components (RSCs) Help
How about we move our React components to the server? And perhaps we colocate them with the data sore...but is this even possible?
Yes! Let's now get to know React Server Components. These new components can fetch data faster as they are on the server. They have the access to your server infrastructure like file systems and data store without making any roundtrips over the network.
 React Server Components - In a Client Server Model
It is a complete paradigm shift for React developers, as we now must think in terms of server components.
With RSCs, you can move your data fetching logic to the server (so that your component fetches the data without a network call) and get it ready on the server itself. The data that comes back to the client is a well constructed component along with all the data fit into it. How amazing is that?
This means that using React server components, you can write code like this:
import { dbConnect } from '@/services/mongo'

import { addCourseToDB } from './actions/add-course'

import CourseList from './components/CourseList'

export default async function Home() {

  // Get a MongoDB connection
  await dbConnect();

  // Get all courses from the db using model
  const allCourses = await courses.find();

  // This gets printed on the server console
  console.log({allCourses})

  return (
    <main>
      <div>
        <CourseList allCourses={allCourses} />
      </div>
    </main>
  )
}
Look at that! You can spot some of the changes immediately:
- The component is of type
asyncas it will handle asynchronous calls. - We connect to the database (MongoDB) from the component itself. Wow! Usually we see this kind of code with
Node.jsorExpress, right? - Then we query the database and fetch the data to pass to our JSX for rendering.
Notice that the console log will log the information on the server console, not on your browser console.
Also, we got rid of the state management (useState) and effect management (useEffect) altogether. It's neat and simple.
With React server components, you may not need to use useEffect (ever!).
Limitations of React Server Components
With all these advantages, RSCs have some limitations as well that you must keep in mind:
- RSCs stay on the server and get rendered on the server. They don't have anything that is related to the client-side. This means that you can't add any user interactivity to the server components. For example, you can't use any event handlers or React hooks like useState, useReducer, useEffect in your server components.
- You can not use Browser Web APIs like localstorage, bluetooth, web USB, and so on in server components.
- For everything that's related to client interactions, you must continue to use client components.
Make sense? Then how best can you arrange your components for your application?
How to Use Client and Server Components Together
Your app can be a combination of server and client components. You will see an example soon, but let's understand the concept first.
Server components can import and render client components, but client components can't render the server components in it. If you want to use a server component in a client component, you can pass it as props and use it that way.
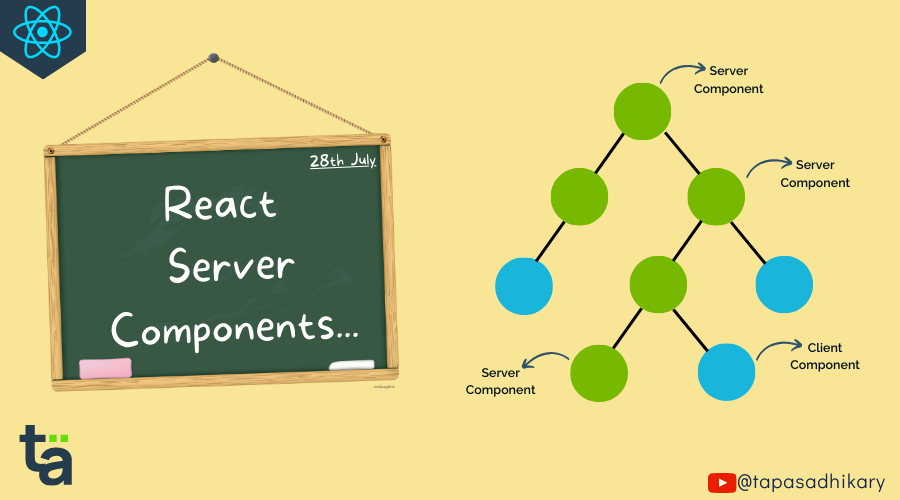
It is better to have the server components at the root of your component hierarchy and push the client components towards the leaves of the component tree.
The data fetching can happen at the top in the server components and you can pass them how React allows. User interactions (event handlers) and accessing browser APIs can be handled in the client component at the leaf level.
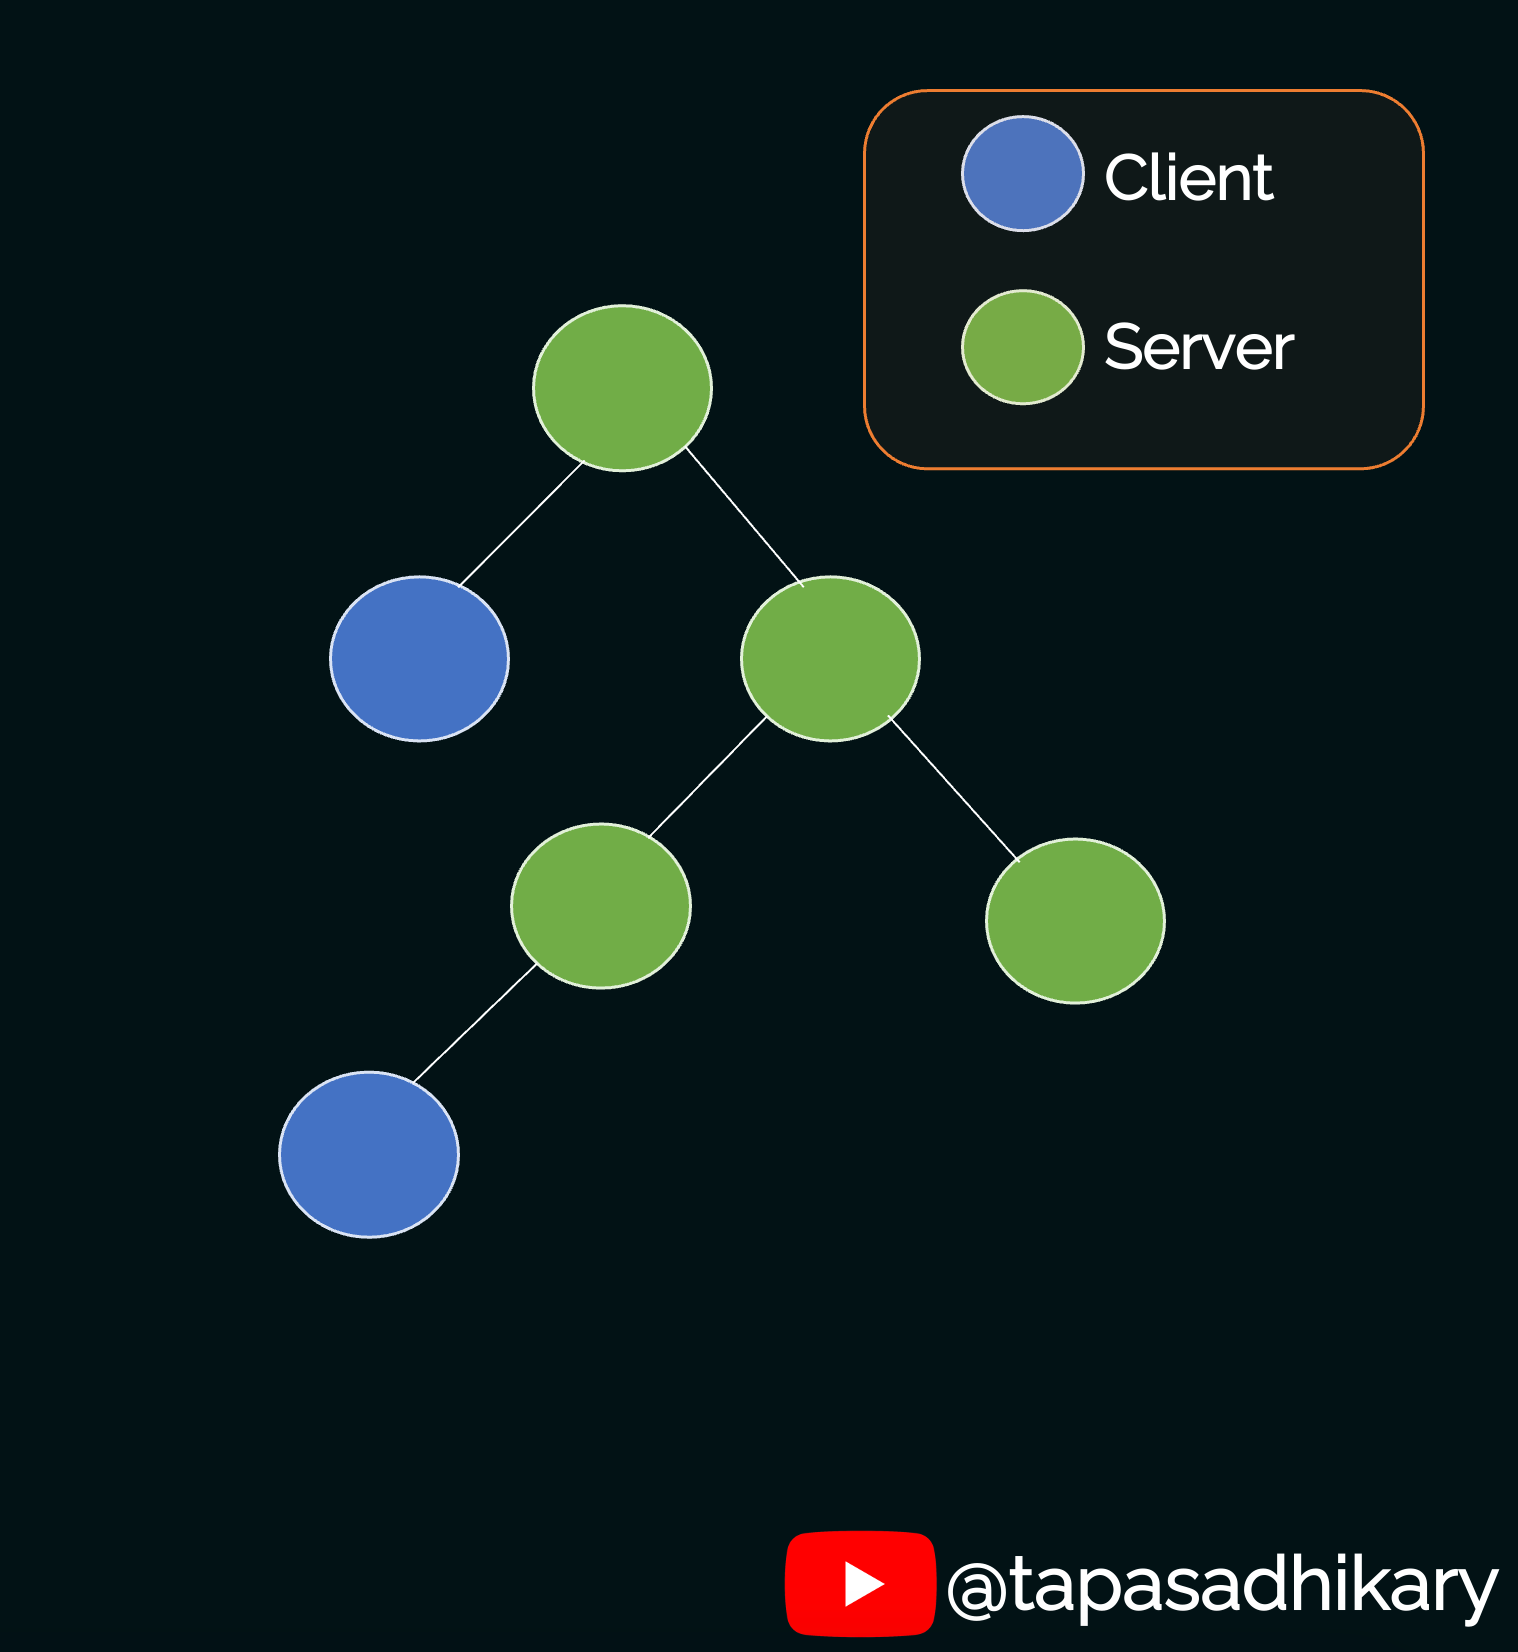 A Component Tree with both Server and Client Components
Wait, Aren't RSCs the Same as Server Side Rendering (SSR)?
No they are not. Both RSC and SSR have the word "server" in their names and the similarity ends there.
With Server Side Rendering, we send the raw HTML from the server to the client, then all the client side JavaScript gets downloaded. React starts the Hydration process to transform the HTML to an interactive React component. In SSR the component doesn't stay on the server.
We know by now that, with React server components, the components stay on the server and have access to the server infrastructure without making any network roundtrips.
SSR is useful for faster loading of the initial page of your application. You can use SSR and RSCs together in your application without any problems.
How to Build a Course List Page Using Next.js (with React Server Components) and MongoDB
Let's now build an application that uses React server components. Next.js is the leading web framework that has adopted RSCs in its recent release.
So now we will build a course list page to showcase how we can create server components in Next.js and how different it is from the client components.
Note that you won't learn Next.js or MongoDB in depth here. We're just using this application as an example to teach you how React server components work and how they differ from client components.
First, let's add the course data in a data store. For this app, I have used MongoDB. The image below shows that there are three documents added for three courses.
 Mongo Compass - courses collection
Next, we'll create a utility function to establish a connection to MongoDB. This is generic code you can use for any JavaScript-based project to connect to MongoDB using Mongoose and MongoDB URI.
import mongoose from "mongoose";

export async function dbConnect(): Promise<any> {
  try {
    const conn = await mongoose.connect(String(process.env.MONGO_DB_URI));
    console.log(`Database connected : ${conn.connection.host}`);
    return conn;
  } catch (err) {
    console.error(err);
  }
}
Now, we need to create the model that maps to the document in MongoDB. As we are dealing with course data, here's the model corresponding with it:
import mongoose, { Schema } from "mongoose";

const schema = new Schema({
  name: {
      required: true,
      type: String
  },
  description: {
      required: true,
      type: String
  },
  cover: {
    required: true,
    type: String
  },
  rating: {
    required: true,
    type: Number
  },
  price: {
    required: true,
    type: Number
  },
  createdOn: {
    type: { type: Date, default: Date.now }
  },
  link: {
    required: true,
    type: String
  },
  type: {
    required: true,
    type: String
  },
  comments: {
    required: false,
    type: [{ body: String, date: Date }]
  }
});

export const courses = mongoose.models.course ?? mongoose.model("course", schema);
Now the magic starts! With Next.js App Router, all the components are by default server components. This means that they are located near to the server and have access to your server ecosystem.
The code below is a regular Next.js component but with a special feature: we can directly get a database connection in the component and query the data directly without going through any state and effect management. Cool, huh?
Anything you log from this component will never get logged to your browser console because this is a server component. You can view the log in your server console (maybe a terminal where you started the server using yarn dev command).
As the interaction to the database is asynchronous, we use the await keyword while making the calls and use the async keyword for the component. On receiving the response we pass it as a prop to the child components.
import { dbConnect } from '@/services/mongo'
import { courses } from '@/models/courseModel'
import { addCourseToDB } from './actions/add-course'

import AddCourse from './components/AddCourse'
import CourseList from './components/CourseList'

export default async function Home() {

  // Get a MongoDB connection
  await dbConnect();

  // Get all courses from the db using model
  const allCourses = await courses.find().select(
                          ["name", "cover", "rating"]);

  // This gets printed on the server console
  console.log({allCourses})

  return (
    <main>
      <div>
        <h1>Courses</h1>
        <AddCourse addCourseToDB={addCourseToDB} />
        <CourseList allCourses={allCourses} />
      </div>
    </main>
  )
}
The Home component has:
- A heading
- A component (AddCourse) that wraps a button to add a course
- A component (CourseList) to show the courses as a list.
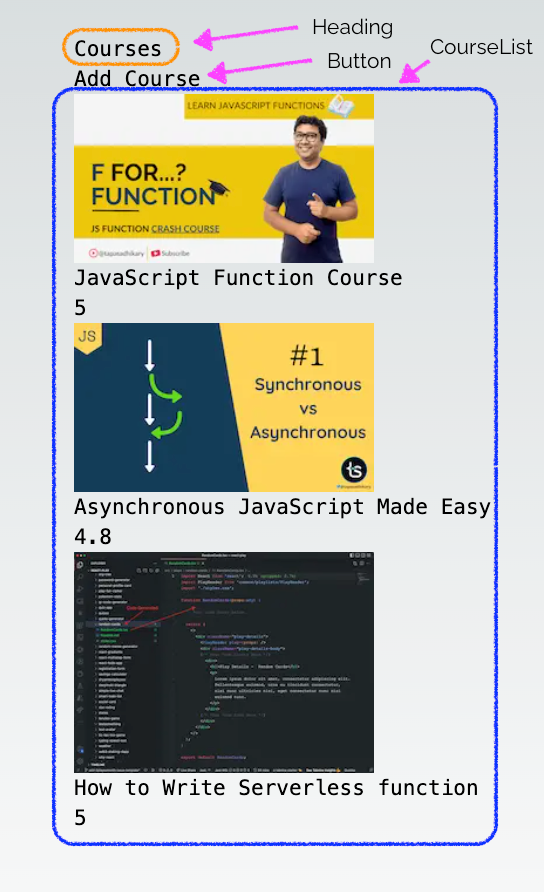 The Course List Page
We know that a server component can render both client and server components. The AddCourse component needs a user interaction, as in users need to click on a button to add a course. So this can not be a server component (remember the limitations of server components that you read above)!
So let's create a client component for AddCourse. With Next.js App Router, all components are server components by default. If you want to create a client component, you have to explicitly make one using the directive called 'use client' at the top of the component (even before any import statements).
'use client'

import { useState } from 'react';
import Modal from './Modal';
import AddCourseForm from "./AddCourseForm";

export default function AddCourse({
  addCourseToDB,
}: {
  addCourseToDB: (data: any) => Promise<void>
}) {
  const [showAddModal, setShowAddModal] = useState(false);
  const add = async(data: any) => {
    await addCourseToDB(data);
    setShowAddModal(false);
  }

  return (
    <>
    <button
      onClick={() => setShowAddModal(true)}
    >
      Add Course
    </button>
    <Modal
      shouldShow={showAddModal}
      body={
        <AddCourseForm
          saveAction={add}
          cancelAction={() => setShowAddModal(false)} />} />
    </>
  )
}
The CourseList component doesn't need any event handlers so we can keep it as a server component.
import Image from 'next/image'
import Link from 'next/link'

export default function CourseList(courseList: any) {
  const allCourses = courseList.allCourses;
  return(
    <div>
      {
        allCourses.map((course: any) =>
        <Link key={course['_id']} href={`/courses/${course['_id']}`}>
          <div>
            <Image
              src={course.cover}
              width={200}
              height={200}
              alt={course.name}
            />
            <h2>{course.name}</h2>
            <p>{course.rating}</p>
          </div>
        </Link>
      )}
    </div>
  )

}
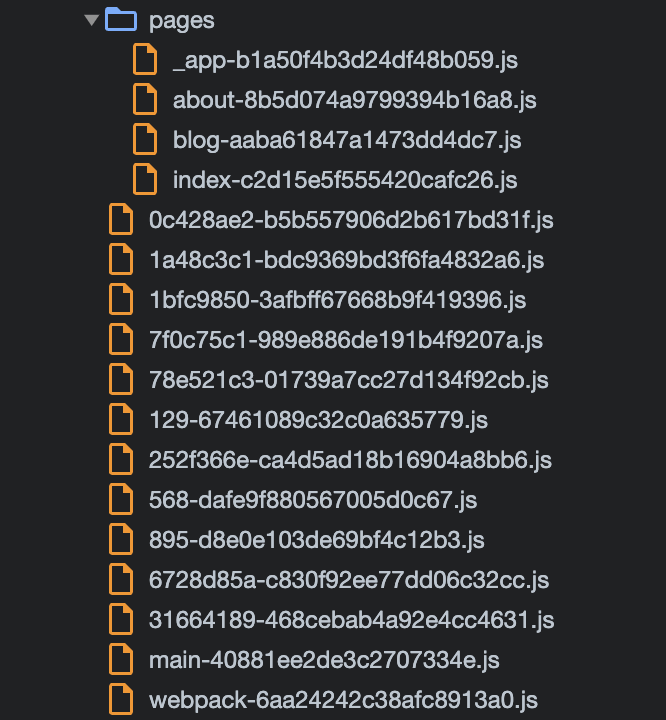
Also notice the borowser DevTools's Sources tab to identify what gets downloaded on the client and what remains on the server. Do you see page.tsx file or CourseList.tsx file here? Nope. Because those are server components and they are never part of your client bundles.
We only see the components that we have explicitly marked as client components in our application.
 Inspecting the Client Bundle
I hope this application flow has shows you how all the theory connects to the practice. You should now understood how to use server components in your React apps.
In Summary
To Summarize,
- React Server Components have backend access without any network roundtrips.
- We can avoid network waterfalls using React Server Components
- React server components support automatic code splitting and improve your app's performance with zero bundle size.
- As these components are on the server side, they do not have access to client side event handlers, state, and effects. This means you can not use any event handlers, or React hooks like useState, useReducer, and useEffect.
- A React server component can import and render a client component but the reverse is not true. But you can pass a server component as props to a client component.
Before We End...
That's all for now. I hope you found this article informative and insightful.
Let's connect.
- I am an educator on my YouTube channel,
tapaScript. Please SUBSCRIBE to the channel if you want to learn JavaScript, ReactJS, Node.js, Git, and all about Web Development in the fundamental way. - Follow on Twitter or LinkedIn if you don't want to miss the daily dose of Web Development and Programming Tips.
- Check out my Open Source work on GitHub.
See you soon with my next article. Until then, please take care of yourself, and stay happy.