

Redis is a data store that stores data primarily in memory. It's faster than traditional databases, and has grown quite popular.
In this tutorial, you'll learn the basics of how Redis works, when to use it, how to install it on your device, and how to use it as a caching system in a PHP web application.
What Is Redis?
Redis is a data store – like a database, but one that stores data primarily in-memory. This makes it much faster than traditional databases where data is stored in disks. Because of this speed, Redis is often used as a caching tool.
Redis can store data in any data type, as it uses a key-value pair system to store data. This is also unlike traditional databases that use documents or rows.
You can think of a Redis database as a big JSON object, where everything in the database is a key-value pair. This means it might not be the best place to store structured data.
You can also use Redis as a database, as it has the ability to write data to disk for persistence. You can configure Redis to persist data either periodically or after every command you issue. When Redis isn't configured to persist data, it is very volatile, and a system crash would result in a loss of data.
Redis is popular in production level applications and it's used by large companies like Twitter, Github, SnapChat and StackOverFlow.
When to Use Redis
- For One Time Passwords (OTPs): These are usually generated to be used once, and have short lifespans. With Redis' ability to set an expiry date for data, you can safely store the OTP without worrying about deleting them after a certain period.
- For frequently accessed resources: For data that doesn't change too frequently but is accessed a lot, you can use Redis to save time that would have been spent querying the database or making a call to some external service.
- For heavy duty queries: For database queries that take time, and also won't change too often, use Redis to reduce this time by storing the results for as long as you like.
How to Install Redis
You can install Redis on any operating system. Here are the instructions for macOS, Windows Subsystem for Linux, and Linux.
macOS
To install Redis on macOS, run:
brew install redis
Then, run this command to start Redis:
redis-server
Windows Subsystem for Linux and Linux
Redis doesn't exactly support the Windows operating system yet, so you can install WSL (Windows Subsystem for Linux) on windows to have a Linux environment.
To install Redis on Linux, run:
curl -fsSL https://packages.redis.io/gpg | sudo gpg --dearmor -o /usr/share/keyrings/redis-archive-keyring.gpg

echo "deb [signed-by=/usr/share/keyrings/redis-archive-keyring.gpg] https://packages.redis.io/deb $(lsb_release -cs) main" | sudo tee /etc/apt/sources.list.d/redis.list

sudo apt-get update
sudo apt-get install redis
Then, run this command to start Redis:
sudo service redis-server start
Now that Redis is installed, you can test it by running redis-cli ping. This will output "PONG". Like this:
 Testing Redis Installation
Redis Basics
To use Redis as a REPL or as a standalone application, run redis-cli. It will open the REPL environment.
How to Set Data
Use the SET keyword to set a key value pair in Redis. To set a username key to the value Zubs , run this:
SET username Zubs
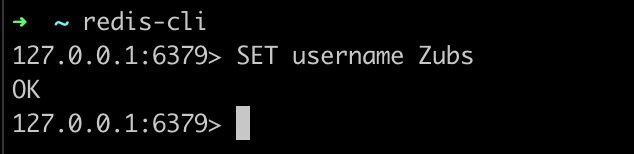 Setting a key-value pair
How to Get Data
To get the recently saved username key, use the GET keyword like this:
GET username
 Getting a value by key
How to Delete Data
You can also delete a previously stored key using the DEL keyword like this:
DEL username
 Deleting a value by key
How to Check if a Value Exists
You can check for the existence of a key by using the EXISTS keyword. It returns 0 when the key doesn't exist, and 1 if it does. You can test by checking if the recently deleted username key exists. Like this:

How to Set a Time to Live for Keys
Redis lets you specify how long some key should exist for when creating it. This is one really great feature of Redis. To do this, use the SETEX keyword like this:
SETEX key seconds value
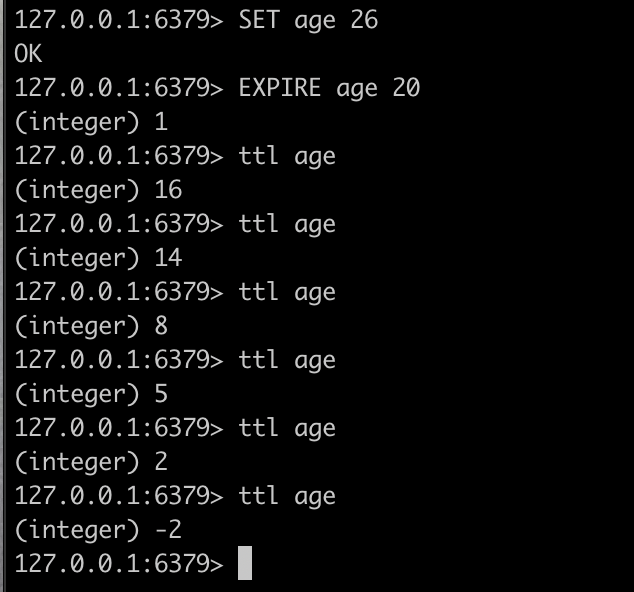
You can check the time to live for a specific key using the TTL keyword. This returns -1 if the key has no set expiration, meaning it will be stored indefinitely. It returns -2 if the key doesn't exist. And it returns the time in seconds if the key exists.
You can set an expiration time in seconds for a key previously created without an expiration time using the EXPIRE keyword. For example, create a key to store a variable age with a value of 26.
SET age 26
Then, set an expiration time of 10 seconds for it.
EXPIRE age 20
Check the time left to live repeatedly a couple of times to see how it actually reduces and eventually doesn't exist again.
How to Build a Simple Application with Redis
To help you understand how Redis works, we'll now build a basic web application that uses Redis to cache data to load responses faster. You'll be building a simple application that fetches images data from JSONPlaceholder and returns them.
Create a New PHP Project Using Composer
Create a new folder for the project, change directory into the newly created folder, and run the following compound to create a new composer project:
composer init -q

This will create a new composer.json file that should look like this:
{
    "require": {}
}
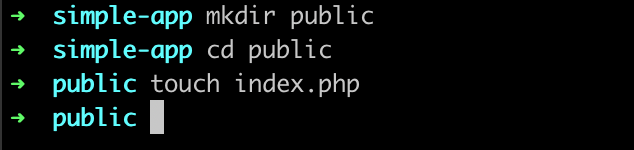
Next, create a public folder to house your public facing code files. Then create a new index.php file in the folder.
Put in some boilerplate content in the PHP file for now and start a server.
<?php

echo "Hello World!";
php -S localhost:8080
Install a Simple Router and Handle Requests
To complete the project, install a simple PHP router, Altorouter, and a web client, Guzzlehttp.
composer require altorouter/altorouter guzzlehttp/guzzle
Update the index.php to contain this code:
<?php

// Import composer autoload file
require_once __DIR__ . '/../vendor/autoload.php';

// Import GuzzleHttp Client
use GuzzleHttp\Client;

// Instantiate router and web client
$router = new AltoRouter();
$client = new Client();

// Register Sample route
$router->map('GET', '/', function () {
    // Set response Content-Type
    header('Content-Type: application/json; charset=utf-8');

    // Return basic response
    echo json_encode(['data' => 'Hello World']);
});

/**
 * Route to get all photos
 */
$router->map('GET', '/photos', function () use ($client) {
    // Make request to JSONPlaceholder
    $response = $client->request('GET', 'https://jsonplaceholder.typicode.com/photos');

    header('Content-Type: application/json; charset=utf-8');
    echo json_encode([
        'data' => json_decode($response->getBody()->getContents())
    ]);
});

/**
 * Route to get single photo by id
 */
$router->map('GET', '/photos/[i:id]', function (int $id) use ($client) {
    $response = $client->request('GET', 'https://jsonplaceholder.typicode.com/photos/' . $id);

    header('Content-Type: application/json; charset=utf-8');
    echo json_encode([
        'data' => json_decode($response->getBody()->getContents())
    ]);
});

$match = $router->match();

if( is_array($match) && is_callable( $match['target'] ) ) {
    call_user_func_array( $match['target'], $match['params'] );
} else {
    // no route was matched
    header( $_SERVER["SERVER_PROTOCOL"] . ' 404 Not Found');
}
The code is pretty self explanatory. But, here's a breakdown for clarity. From lines 1-11, the required classes GuzzleHttp and AltoRouter are imported and instantiated.
From lines 14-20, the first route is registered, with a simple closure that returns "Hello World!". Lines 25-45 register two more routes, one to fetch all photos, /photos and another to fetch a single photo, /photos/id.
The final lines are required based on documentation of the router package to actually execute the closures set in the routes declaration.
You can test these routes using Postman.
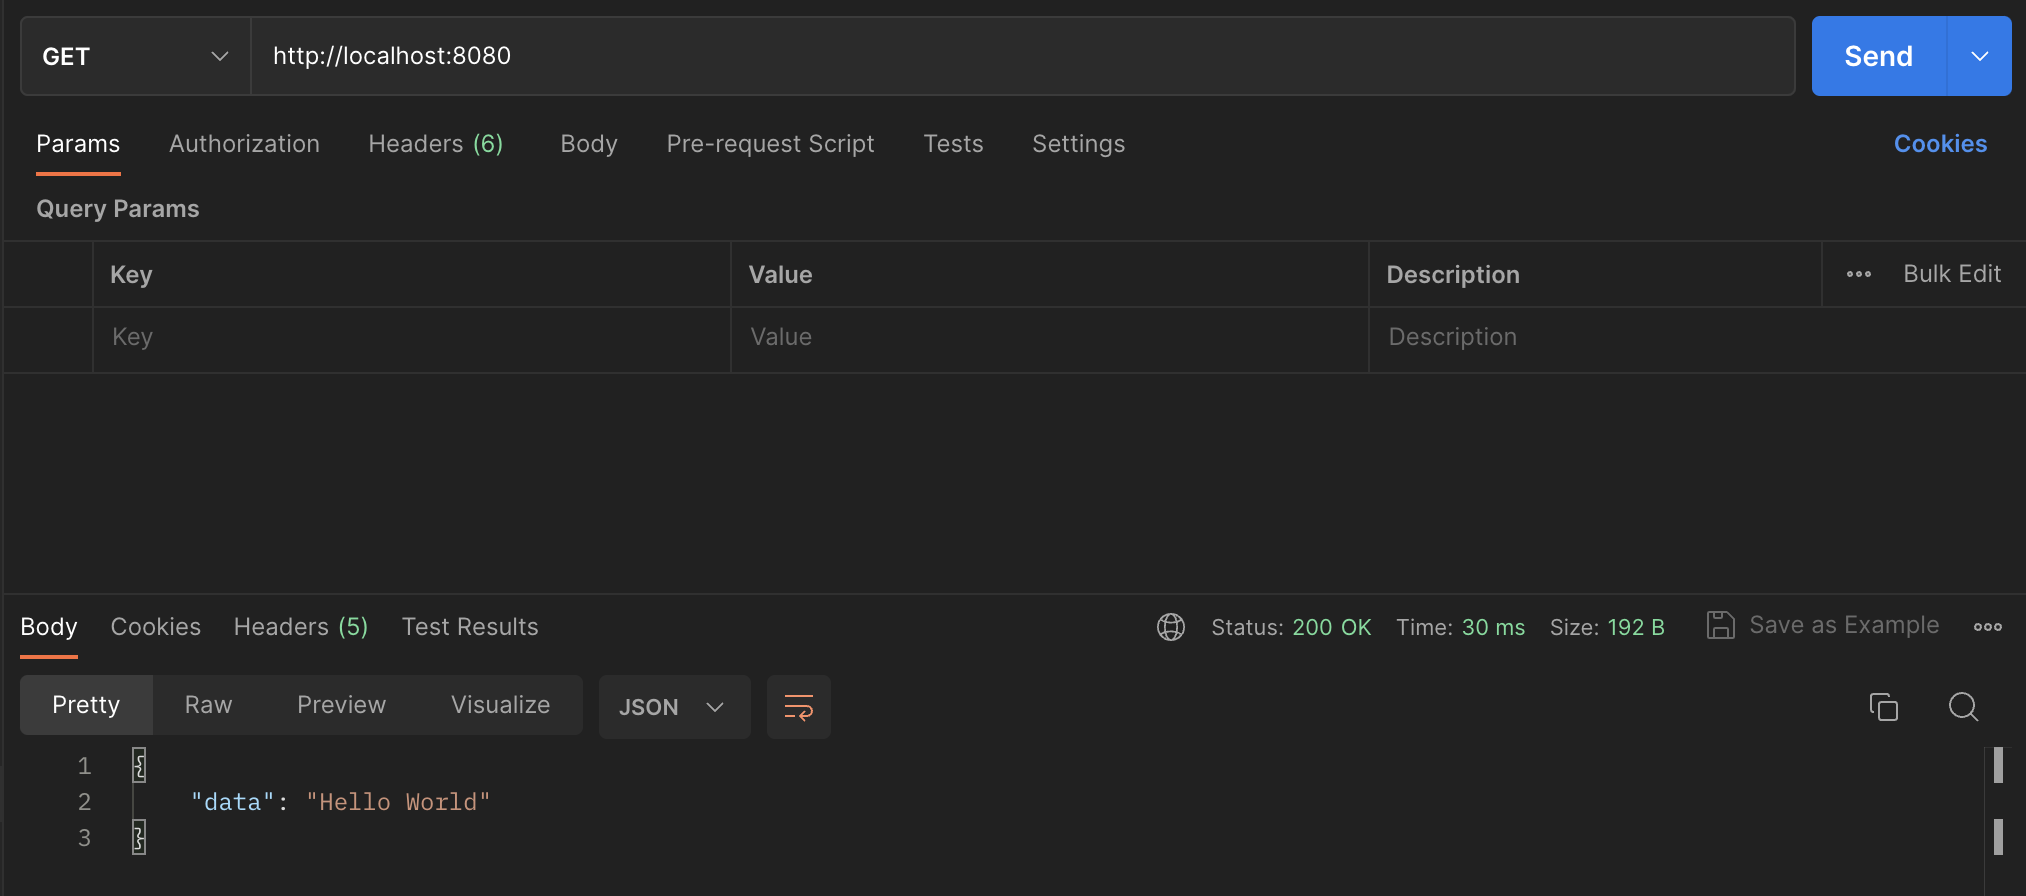 Hello World route
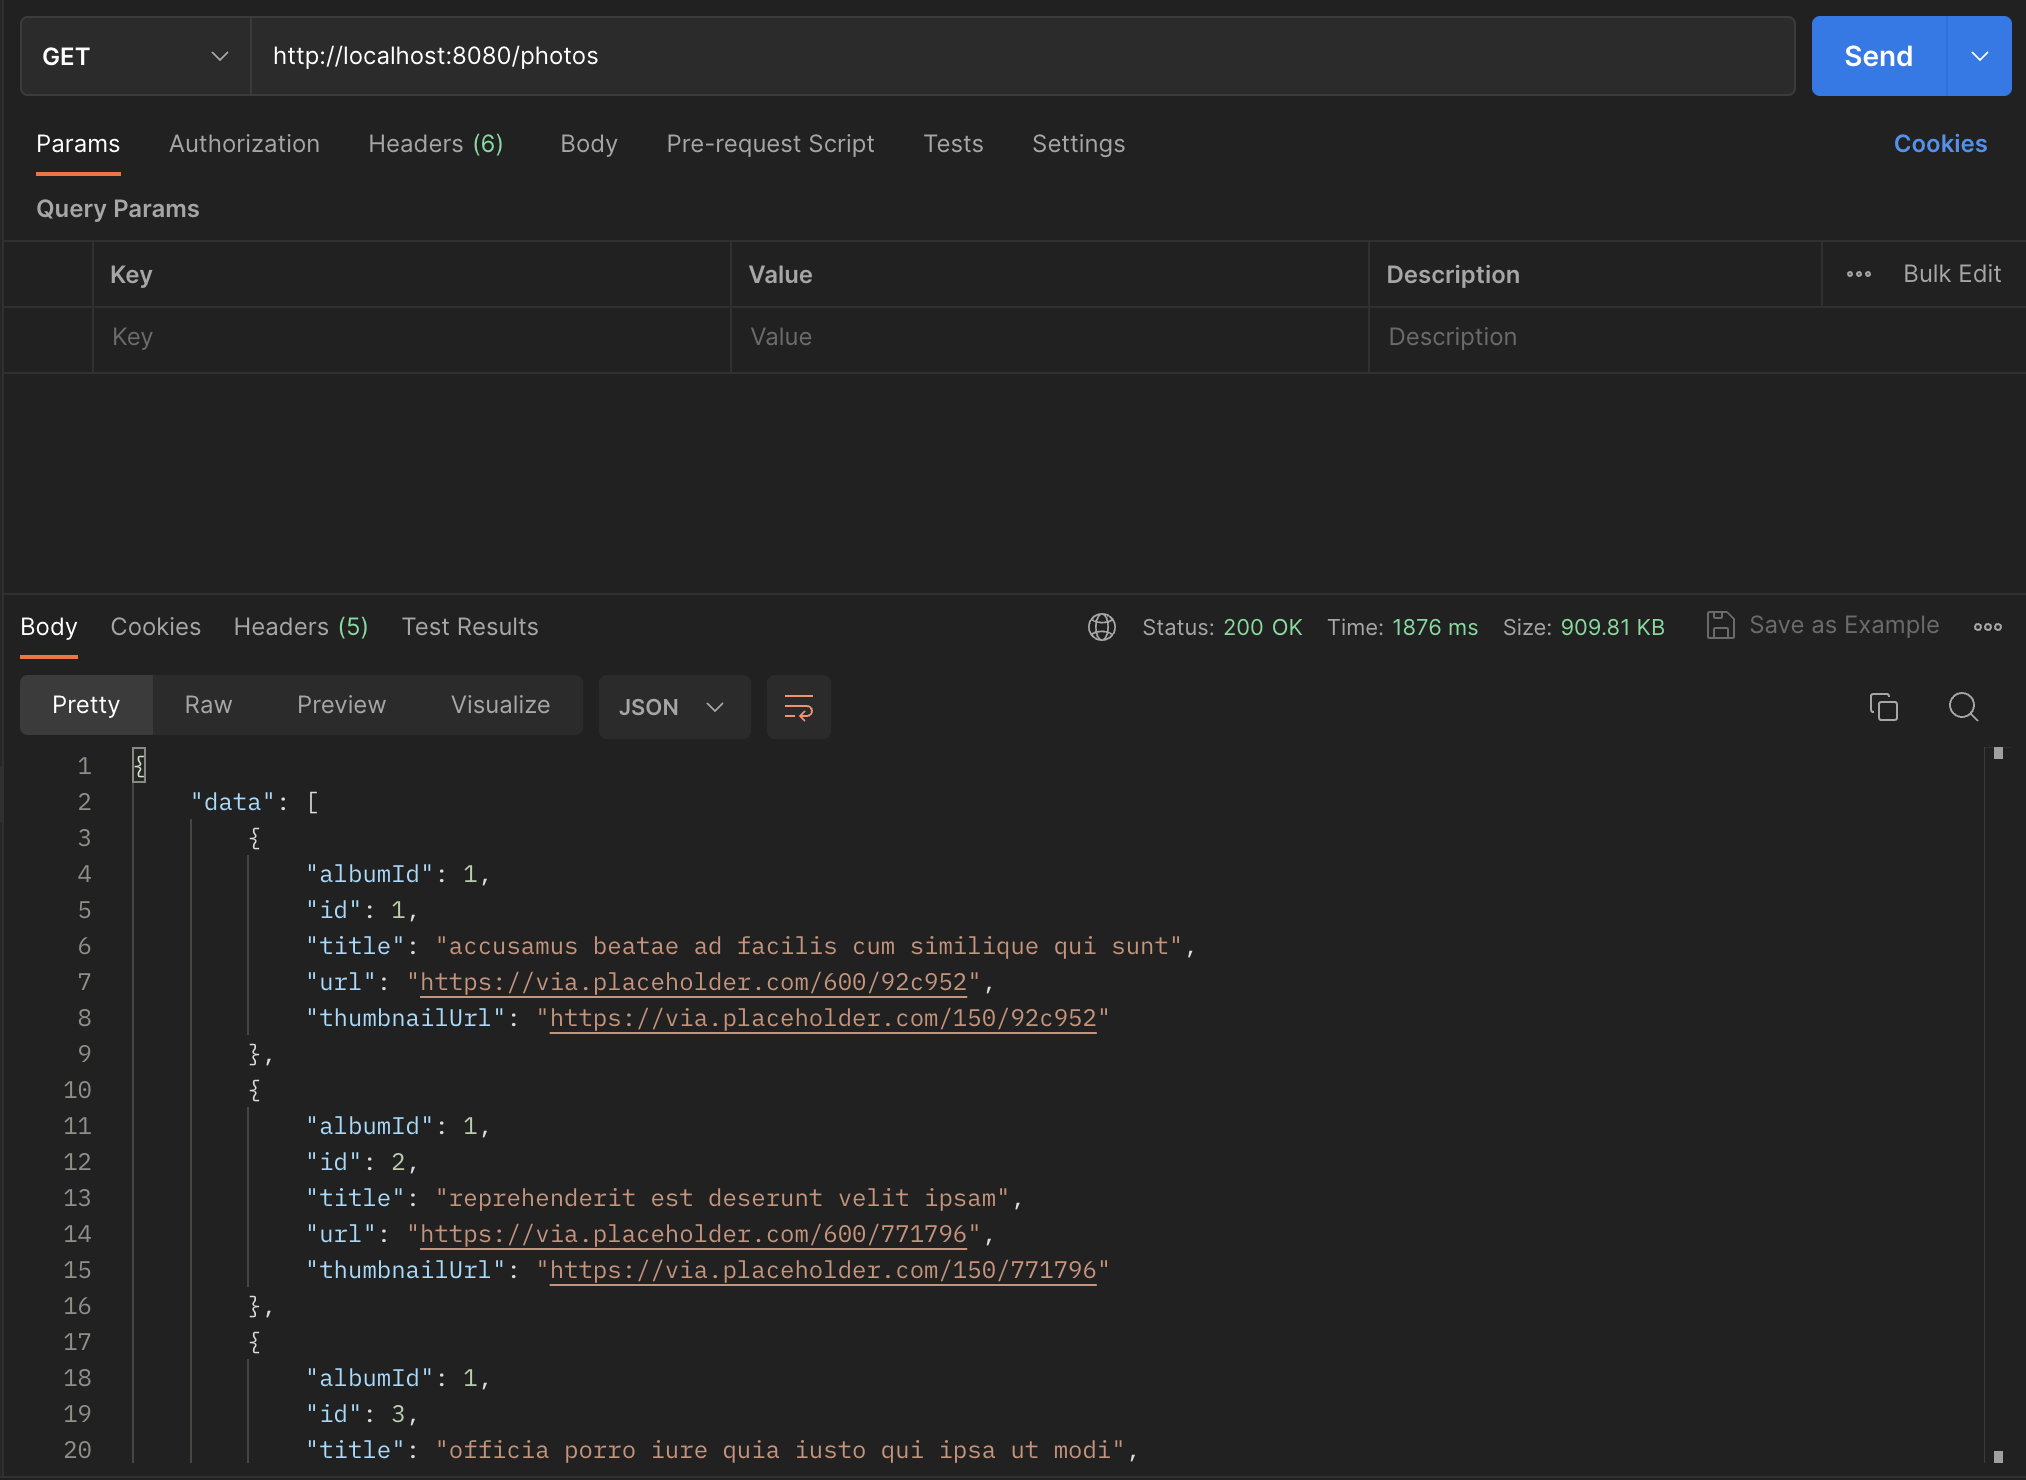 Get All Photos route
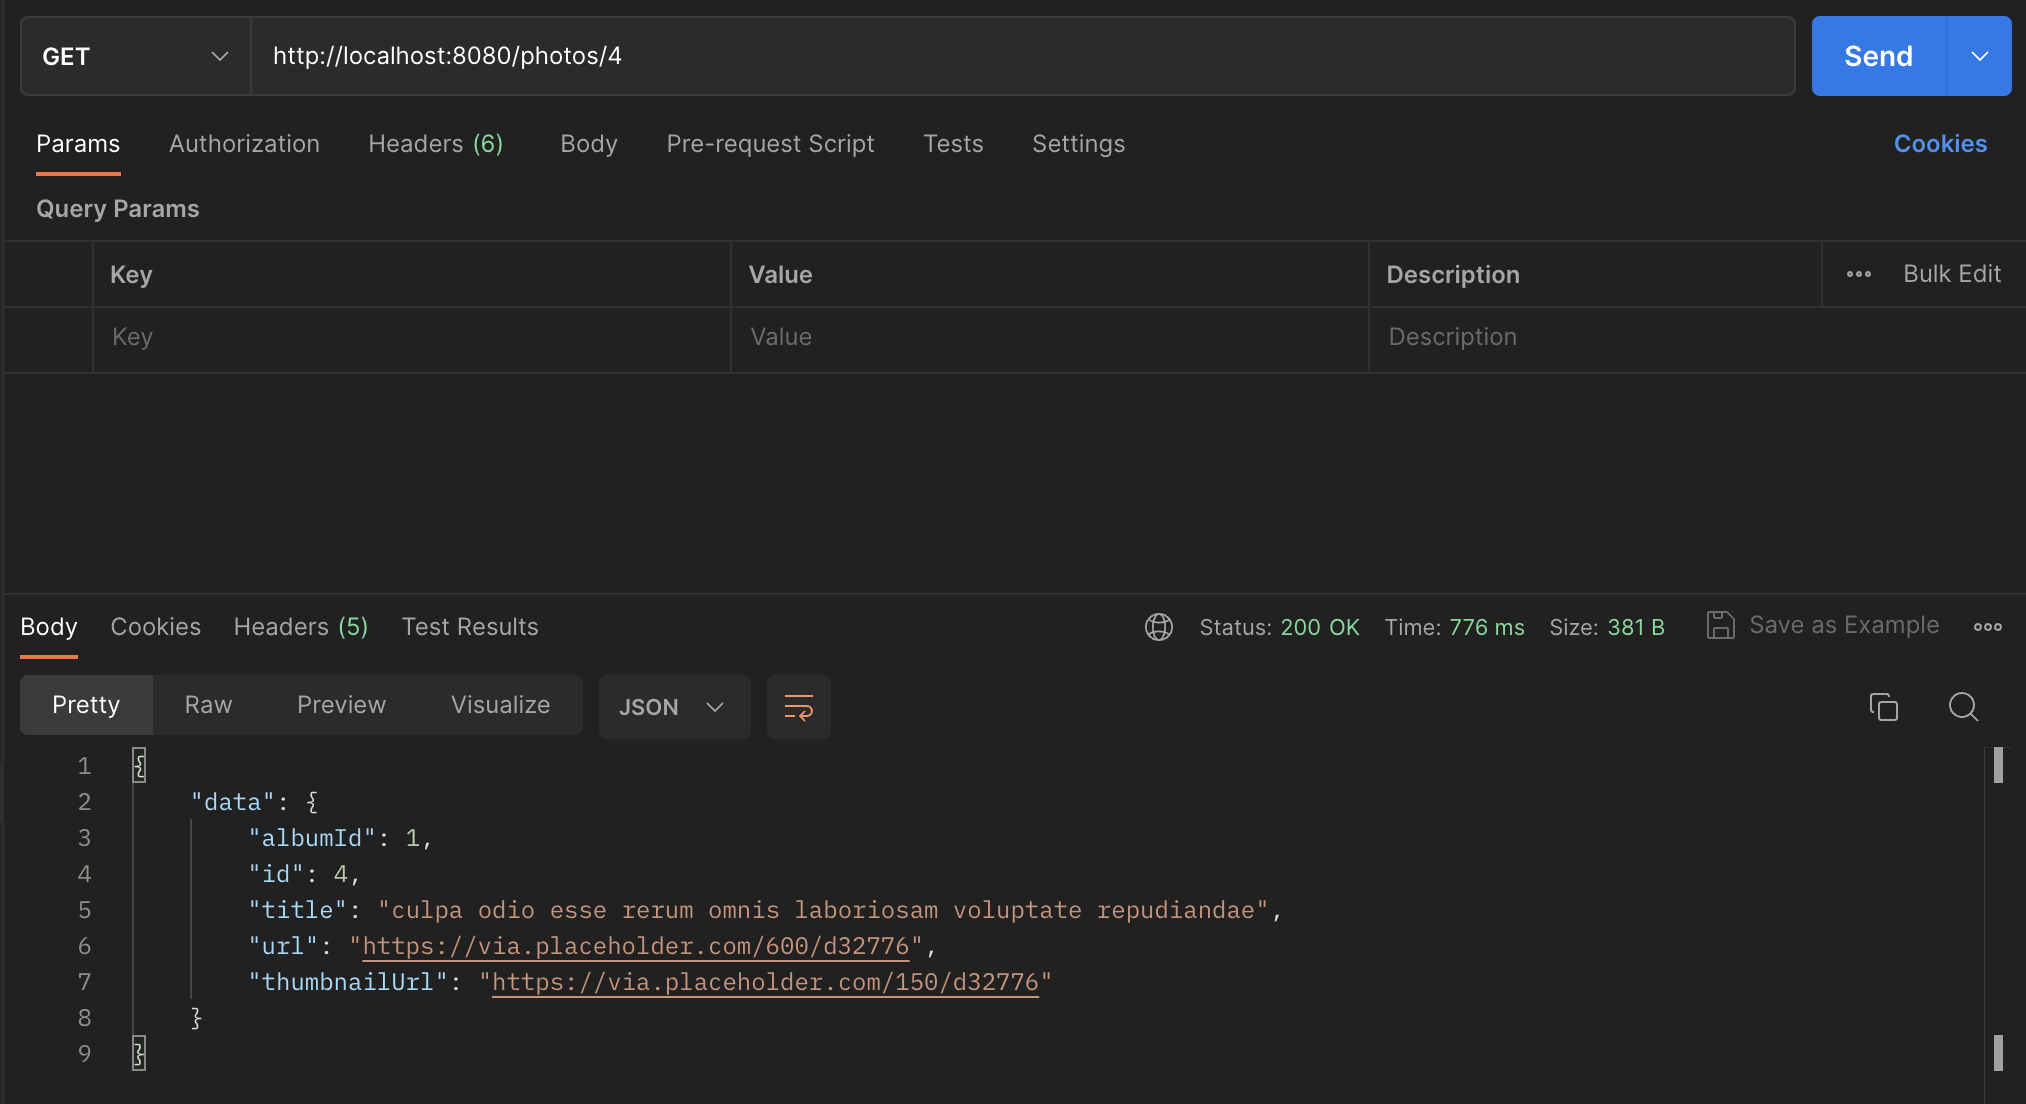 Get a Single Photo route
The /photos route takes an average of 1400ms per request. The /photos/id takes an average of 900ms per request.
Install and Instantiate Redis
These times can be reduced by caching the results of the original request to JSONPlaceholder, then returning a response from the cache instead of making a request every time.
To use Redis with PHP, install the PhpRedis extension. This extension provides an API for communicating with Redis. You can easily install it using the command:
pecl install redis
After installation, you can then use this class in your PHP project. Import the class and instantiate it at the top of your index.php file:
$redis = new Redis();
$redis->connect('127.0.0.1');
Having done this, you can now use Redis in your project.
How to Cache Data with Redis
Store the raw JSON response returned from JSONPlaceholder to Redis with an expiry time of 1 hour (3600 seconds).
$response = $client->request('GET', 'https://jsonplaceholder.typicode.com/photos');

$redis->setex(
    'photos',
    3600,
    $response->getBody()->getContents()
);
Here, you create a new key called photos, give it an expiration time of 1 hour, then assign it the raw response gotten from JSONPlaceholder.
But at this point the API still takes a long time to respond. This is because you're only storing this response, you're not using Redis to return the response.
To fix this, when a new request comes in, check if you have some data previosuly stored in-memory. If yes, you return the data in-memory, else, you make a call to JSONPlaceholder.
Update the /photos block to this:
/**
 * Route to get all photos
 */
$router->map('GET', '/photos', function () use ($client, $redis) {
    // Check if Redis has the key
    if (!$redis->exists('photos')) {
        $response = $client->request('GET', 'https://jsonplaceholder.typicode.com/photos');

        // Store the data for next use
        $redis->setex(
            'photos',
            REDIS_STANDARD_EXPIRY,
            $response->getBody()->getContents()
        );
    }

    header('Content-Type: application/json; charset=utf-8');
    echo json_encode([
        'data' => json_decode($redis->get('photos'))
    ]);
});
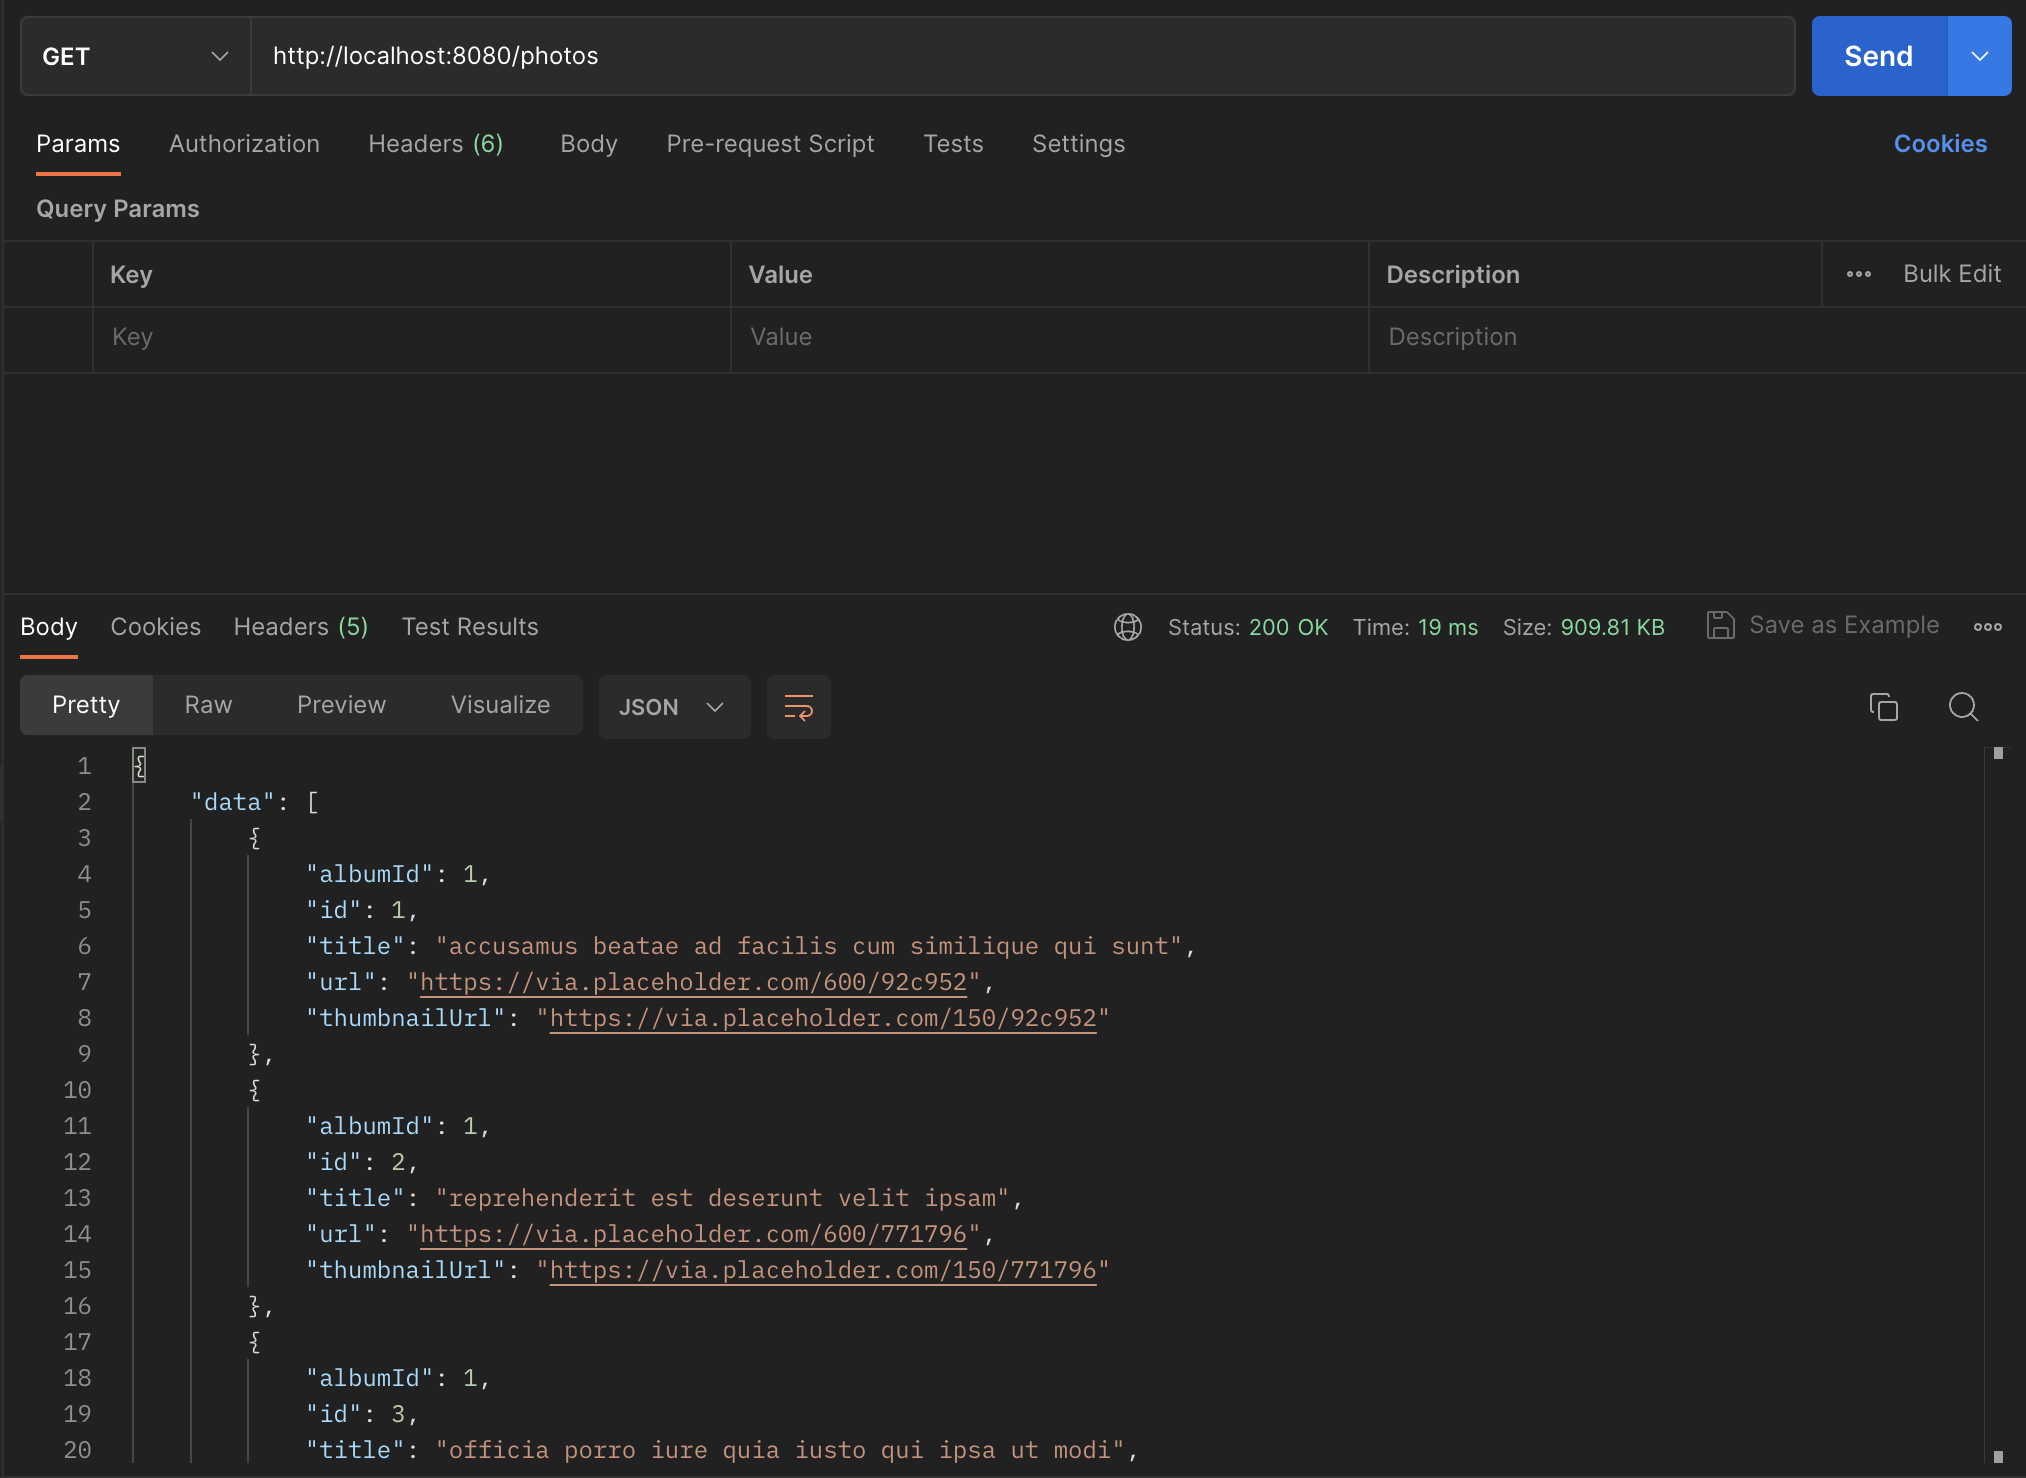
Testing in Postman to see improvements, you see the average response time after the first call (the original call before it is cached) has dropped to an average of 20ms for the /photos route. This is an improvement of over 50x. Redis saves a lot of processing time and power.
Update the /photos/id route to use Redis too:
$router->map('GET', '/photos/[i:id]', function (int $id) use ($client, $redis) {
    if (!$redis->exists('photos:' . $id)) {
        $response = $client->request('GET', 'https://jsonplaceholder.typicode.com/photos/' . $id);

        $redis->setex(
            'photos:' . $id,
            REDIS_STANDARD_EXPIRY,
            $response->getBody()->getContents()
        );
    }

    header('Content-Type: application/json; charset=utf-8');
    echo json_encode([
        'data' => json_decode($redis->get('photos:' . $id))
    ]);
});
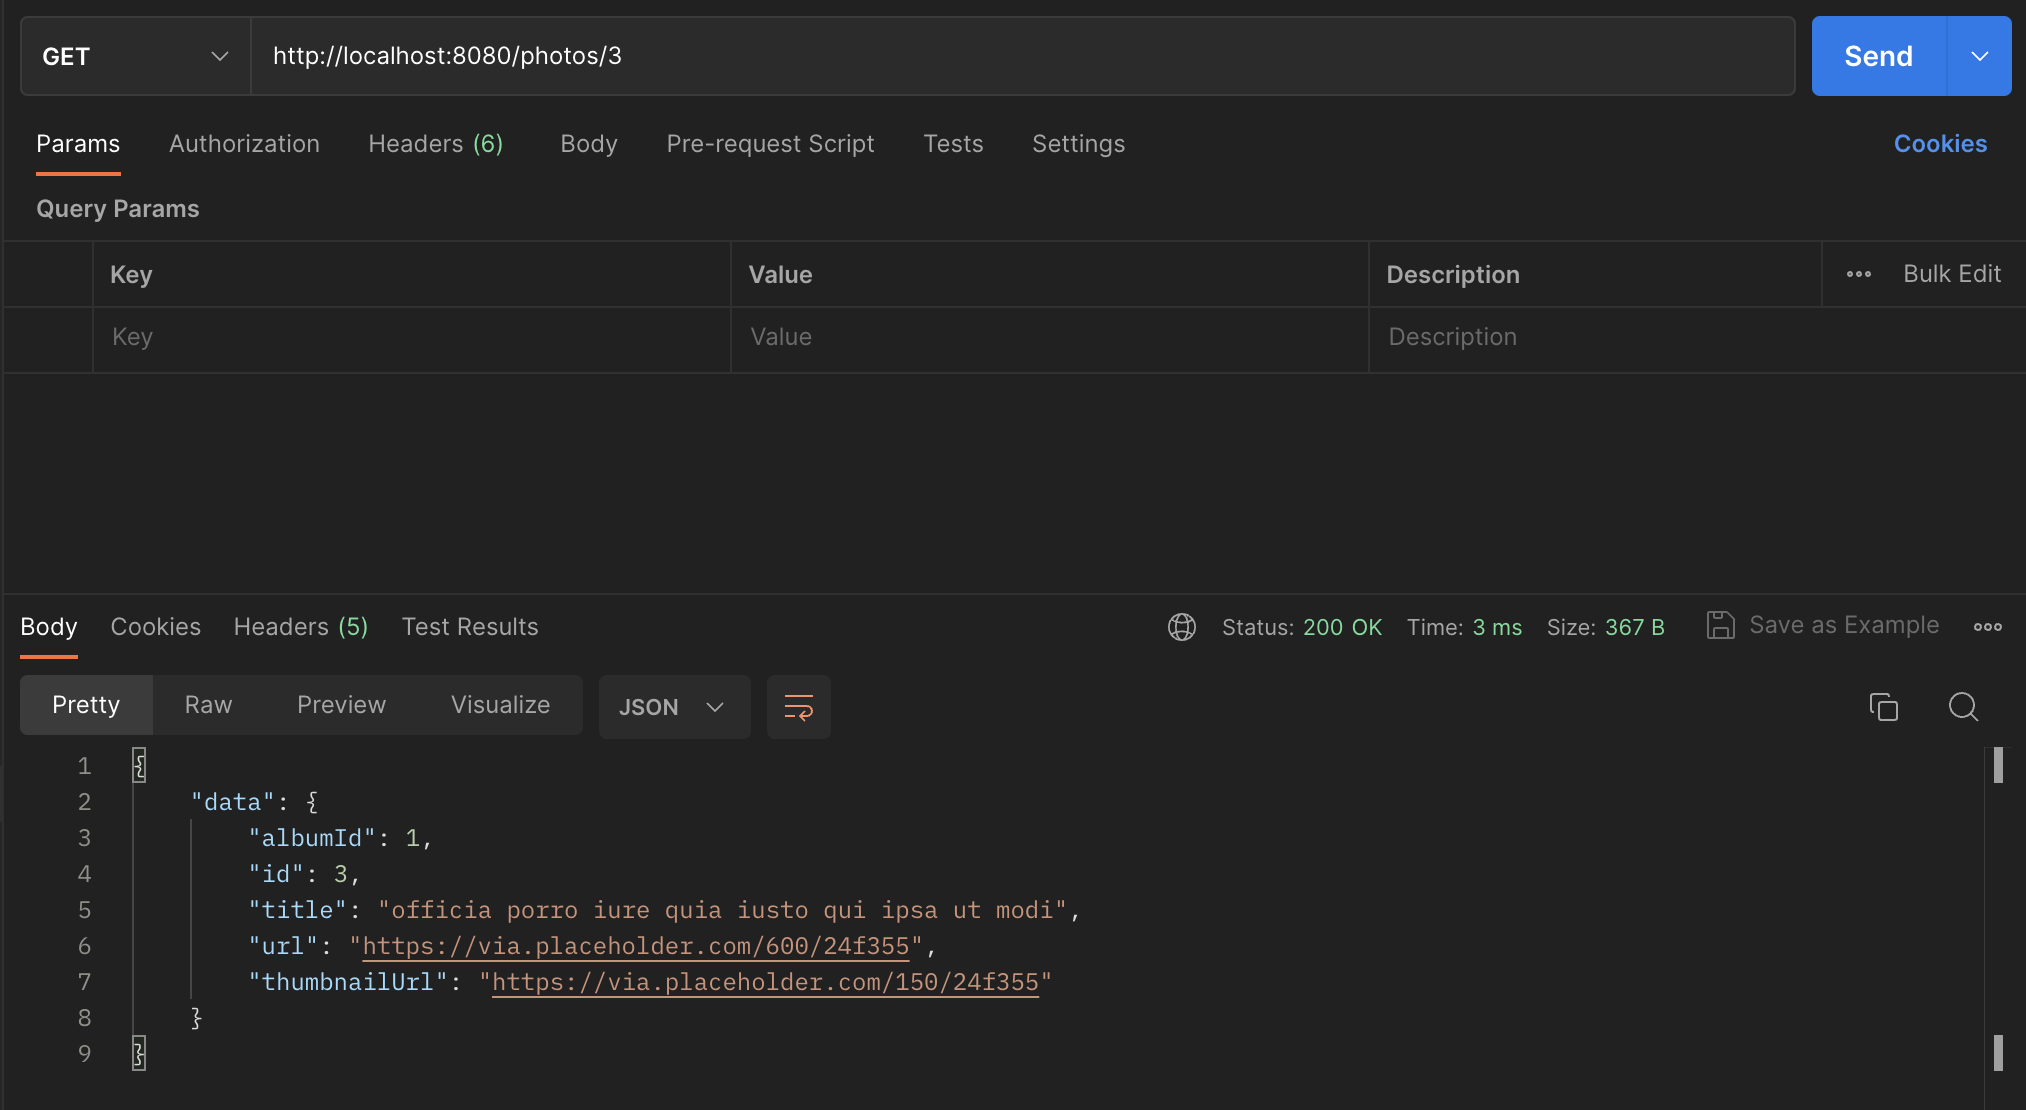
The /photos/id route is now also much faster as it takes less than 5ms to get a response, an improvement of over 45x.
Summary
I hope you now understand the what Redis is, its basics, and how you can use it to enhance the speed of your PHP web applications. You can find the code files used in this article on GitHub.
If you have any questions or relevant advice, please get in touch with me to share them.
To read more of my articles or follow my work, you can connect with me on LinkedIn, Twitter, and Github. It’s quick, it’s easy, and it’s free!