By Bayrem Gharssellaoui
IoT is all about connecting devices, or “things” as you may call them, to the internet and then analyzing data collected from these devices in order to extract an added value. In this article you’ll discover how to benefit from Firebase when working on an IoT project and how it can help you develop IoT prototypes much faster and easier than traditional methods. You will also develop your own IoT project and host it in Firebase.
Before Firebase Realtime Database
Most of my IoT projects require some way of communication between the different endpoints. These endpoints can be anything from devices and services to applications, and eventually data needs to be stored somewhere for further processing and analyzing.
So let’s say you want to build an IoT system where a device will measure temperature and humidity values from sensors and send them to a database service to store them. Then you want to have a web application that will fetch these values and display them in a dashboard. Quite simple, right…?
The easy and lightweight way to go about this is to setup an MQTT broker that will act as a hub and reroute all incoming messages published from the device to all subscribed clients like the web application in this case.
Now the question here is how can the web application display the data? Meaning will it be displaying messages coming from the broker directly or will it be fetching data from a database service?
Let’s say that you want the app to do both things: display data coming from the broker in realtime and fetch data from the database. In this case you can think of 2 ways (actually there are many different ways) to achieve this:
First solution:

Using this architecture the device will first publish its data to the broker then it will send an HTTP request to the database web-service to save the data. For this solution the device needs to implement 2 clients: an MQTT and an HTTP client.
Second solution:
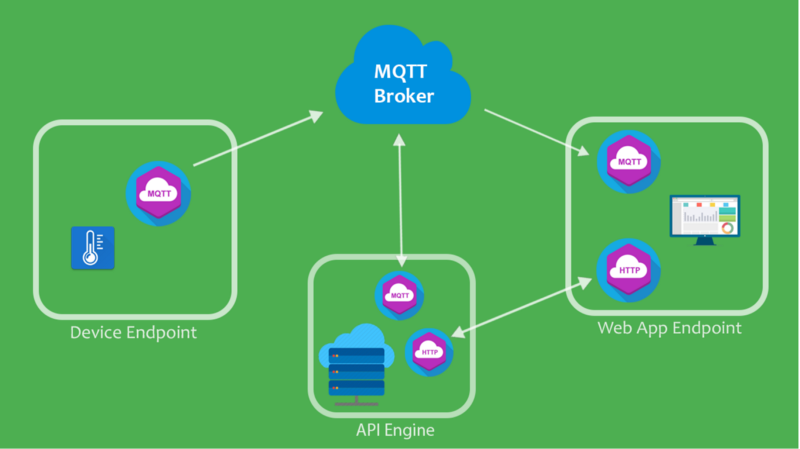
The other way to go about this is that the device will send or publish its data to the broker, then the broker (as expected) will reroute this message to all connected subscribers like the web app. But this time there’s another subscriber connected which represents an API Engine that will accept this data and send it to the database web-service to be stored.
As you may have noticed in this solution, the HTTP client is decoupled from the device and implemented as a backend service. This way you make the device program much lighter. This is an important thing to keep in mind when developing on constrained IoT devices where resources like CPU and memory are limited.
Still, this solution required some additional work in developing the back-end service that will act as a persistence layer.
So is there much easier way of doing this?
Firebase to the rescue
As you may have seen above, things can get quite complex quite easily. For someone like me who wants to get up and running quickly when working on a prototype, that can take some extra time. That’s why, in this part of the article, you’ll see how Firebase can make your life easier and save you a lot of time when developing an IoT prototype.
Firebase offers many cloud services that ranges from authentication, storage, and cloud functions to hosting your web application. In this article you’ll use 2 services: Realtime Database and Hosting.
Let’s start with Firebase Realtime Database. The first thing that comes to mind when reading this service name is: okay so I know what a database is but what does it mean to be realtime here?
Well according to Wikipedia:
A real-time database is a database system which uses real-time processing to handle workloads whose state is constantly changing. This differs from traditional databases containing persistent data, mostly unaffected by time
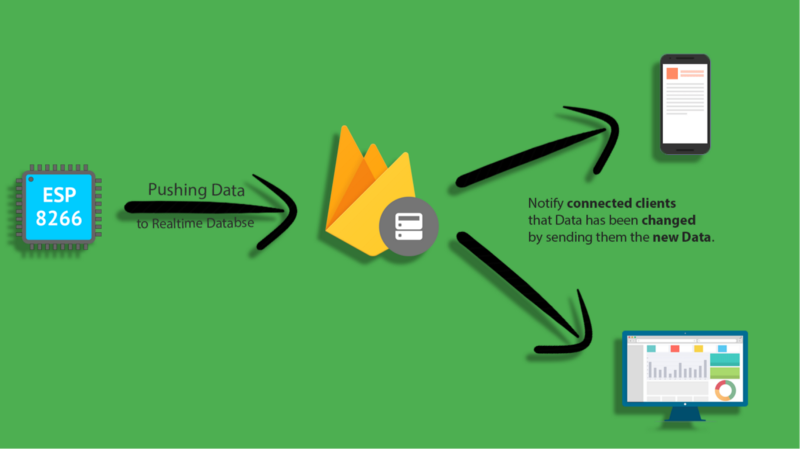
In the case of Firebase Realtime Database, clients will be connected to the database and will maintain an open bidirectional connection via websockets. Then if any client pushes data to the database it will be triggered and (in this case) inform all connected clients that it has been changed by sending them the newly saved data.
This way of working may remind you of the MQTT broker and how it reacts when it receives a message from a publisher and sends it to all subscribers. The difference this time is the addition of the data persistent part, which is the database. So as you can see here, you don’t need to route messages yourself using other protocols — Firebase Realtime Database will take care of that plus performing its normal database function. Amazing isn’t it?
Returning to the IoT system mentioned earlier, you can now connect the device to the Firebase Realtime Database and make it push data periodically to the database. On the other part of the system you have a web application which will be connected to the same service as the device and will receive new data whenever there is a change in the database.
But what about hosting the web application?
Firebase offers a hosting service that you can use to host your app rather than managing your own web server and dealing with deployment and networking configurations. The good thing is that it is free (yet limited) and pretty easy to use.
Now for the part you all have been waiting for. In this demo you’ll use the example discussed throughout this article and bring it to life.
If you remember, the IoT system is made of 2 endpoints: the first one is the IoT device which is responsible for sending temperature and humidity data to the Firebase Realtime Database. This in turn will communicate with the second endpoint — the web application — that will read the data and display it on a nice dashboard.
I’ll break this project into 3 steps so it becomes easier to follow.
1. Setting up Firebase Realtime Database
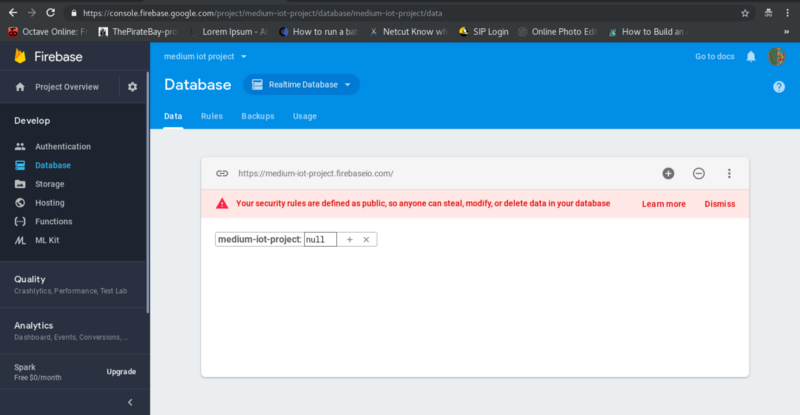
There is nothing special about this step. You just need to go to your firebase console and create a new project. After your project is ready, go to the database section and make sure to create a Realtime Database not a cloud Firestore Database. Select start in test mode and proceed as you’ll be using this database only for testing and prototyping and not for production solutions (so you can ignore the red warning). Now the database should be ready for use.
2. Developing the IoT device application
When talking about embedded systems development, you often hear terms like low level programming, assembly, registers, memory management and so on. These terms and concepts are related to the hardware specifics you’re working with and can change from one to another.
That’s why, when prototyping ideas, you don’t have time to dig deep into these specifics and study them in details because you’ll be dealing at the same time with other high level languages and thus other ways of thinking about code. So instead you should have a clear overall idea about the architecture and characteristics of the device and how to use them.

Luckily for you there is a platform that was made specially for prototyping and abstracting all the low level functionalities of hardware. Yes I’m talking about the famous Arduino.
Arduino - Home
_Open-source electronic prototyping platform enabling users to create interactive electronic objects._www.arduino.cc
Note here that when I’m talking about Arduino, I’m referring to the Arduino Framework with its IDE, compilers, and libraries — not the board.
So you will be using Arduino to program the board, but what board you ask? Well, you need a board that is able to interface with sensors and measure physical values like temperature. It should also be able to connect to the internet in order to send this data to the database. Finally, it should be able to be programmed using the Arduino framework.
There are a variety of boards on the market that can achieve these tasks. Some of them are Arduino boards and others are Arduino-compatible boards.
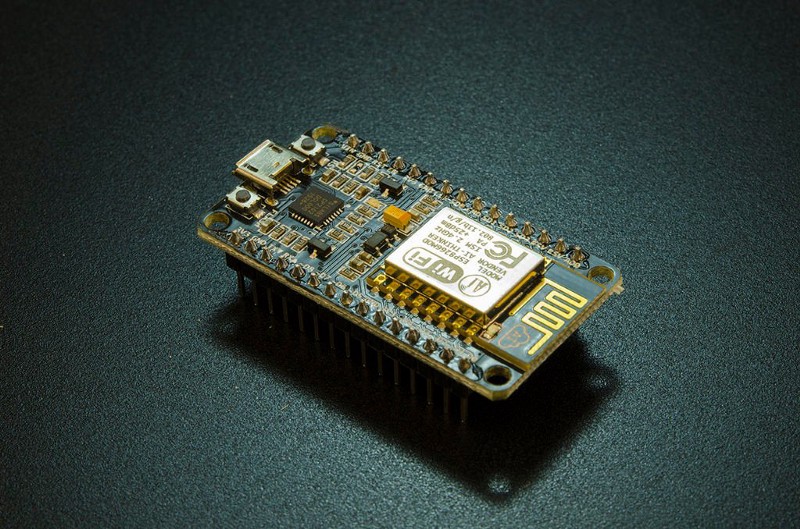
In this demo you will use the famous NodeMCU, an Arduino compatible board. It’s based on the ESP8266 SoC, a chipset produced by the Shanghai-based Chinese manufacturer, Espressif Systems. This board is attractive for developers, as single units can be bought for as little as $3.
Our Gear
Although the Arduino platform offers an IDE for programming and uploading code to boards, it’s not very friendly to developers as it does not provide any intelliSense features or debugging functionalities. That’s why, for most my IoT projects, I use an environment called PlatformIO.
PlatformIO: An open source ecosystem for IoT development
_Cross-platform build system and library manager. Cross-platform IDE and unified debugger. Remote unit testing and…_platformio.org
It’s an open source ecosystem for IoT development, and guess what? It supports the Arduino Framework. So you can use it to write Arduino code, compile it, and upload it to the board. Finally the cool thing about PlatformIO is that it comes as an extension that you can use inside Atom or VScode so you can use it alongside the other functionalities of your IDE (Atom or VScode). I highly recommend watching these 2 YouTube video tutorials to setup and get familiar with the environment.
Enough talk — let’s get started:
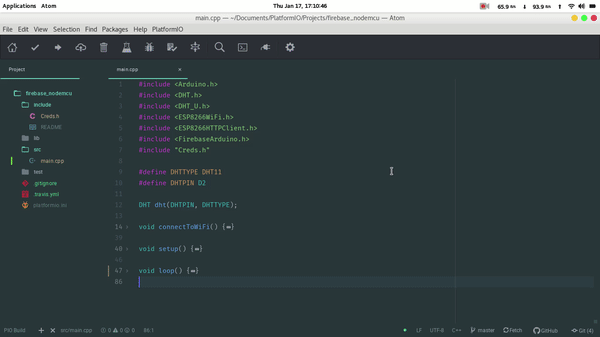
Developing Firmware for NodeMCU
kaizoku-619/firebase_nodemcu
_Arduino Firebase Nodemcu client developed sending DHT11 data to Firebase Realtime Database …_github.com
Before diving into developing the firmware, let’s talk about the electronics setup.
If you remember from the example earlier, the IoT device will measure temperature and humidity values from a sensor and send them to the cloud. In this case that means the NodeMCU will read temperature and humidity values from DHT11 sensor module and send them to Firebase. The DHT11 module will be used here because it’s cheap and doesn’t require any additional electronic components to function.
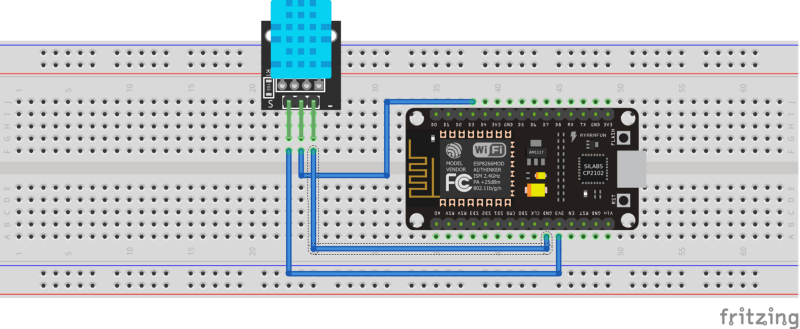 Wiring Diagram
As you can see from the wiring diagram above, DHT11 is connected to the board with 3 wires GND, 3.3V and Data signal in the middle. Connect the data pin to one of the Dx pins on the board and you’re done with wiring.
Now that the wiring is done you can start coding the firmware using PlatformIO.
 We’re not writing Go but I like the GIF
But before you dig into writing code directly, let’s stop for a moment and think about what the program should do.
So the first thing the device needs to do is to connect to the internet. To do that it needs to connect to the WiFi access point. Once online, it needs to open a connection with Firebase. After that the device will read temperature and humidity values from the sensor and finally publish the data.
Here is an ordered list of tasks:
(Note that the world task is used here to refer to a functionality of a bloc of code and not a task in realtime OS like FreeRTOS tasks.)
1. Connect to WiFi
2. Open connection with Firebase
3. Read sensor values
3. Publish values to Firebase
Let’s start with the first task:
- Connect to WiFi:
This function begins with printing the SSID (AP name) and setting the NodeMCU into station mode rather than AP mode. Then it keeps loading until it connects to the AP. SSID and PASSWORD are 2 constants defined in another file as you’ll see later.
- Open connection with Firebase:
This function is very straightforward: it takes 2 parameters FIREBASE_HOST and FIREBASE_AUTH. These are also 2 constants defined in another file.
- Read sensor values:
You start by defining 2 constants for the DHT sensor type and pin. After that you create a DHT object by passing these 2 constants to the DHT constructor. Finally you use the object methods readHumidity() and readTemperature() to read humidity and temperature respectively.
- Publish values to Firebase:
Here, the pushInt() method of Firebase class is used to push an integer to Firebase and in case of an error, print it.
And now you’re done with the tasks! All that’s left is to put these tasks together in a clean arduino sketch.
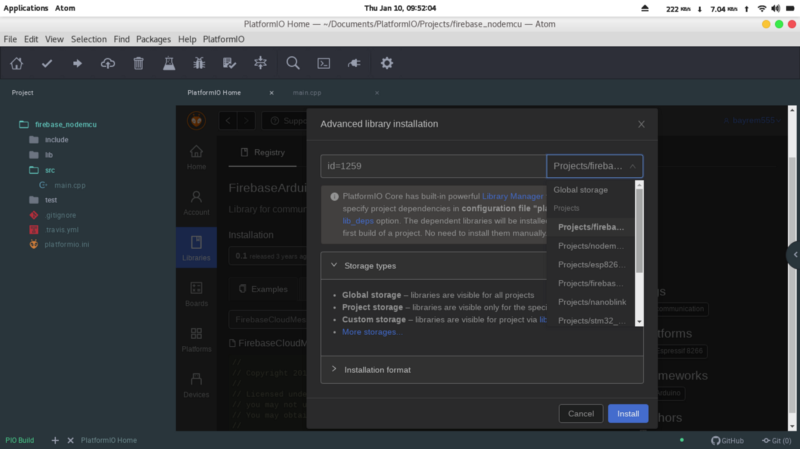
Start by creating a new project in PlatformIO as shown here:

Next you need to install the libraries needed for the project. Note that in this case you will install the libraries locally, meaning they’re only available for this project. This is a best practice if you decided one day to use another version of the library in another project.
Go to the PlatformIO home page → Libraries and search for firebase. FirebaseArduino will show up, so click on it. But don’t click install button, instead click on the … next to install and choose the project to install the library into. Then finally click install. Repeat this process for the DHT library.
Copy this code in the main.cpp file:
Remember the file containing the credentials for the WiFi and Firebase? Go to the include folder and create a new file Creds.h and copy this code to it. Don’t forget to change the code according to your credentials.
And there you go! Upload the firmware to NodeMCU and your device should be able to send data to Firebase Realtime Database.
3. Developing and hosting the web application
kaizoku-619/firebase_iot_web
_Firebase web application client connected to Firebase Realtime database fetching sensor values …_github.com
Now that the IoT device is ready and pushing data to the Realtime Database, you can move to the other endpoint in the system, the web application. It will receive data from Firebase and display it on a dashboard.
You will start by developing the app locally and eventually deploying it.
Start by setting up the project.
Installing Firebase CLI:
The Firebase CLI (command line interface) requires Node.js and npm (the Node Package Manager). Once they are installed you proceed to install the Firebase CLI using npm by running:
npm install -g firebase-tools
You can follow the video to complete the project setup.
Once project setup is done your directory should look something like this:
├── database.rules.json├── firebase.json└── public ├── 404.html └── index.html
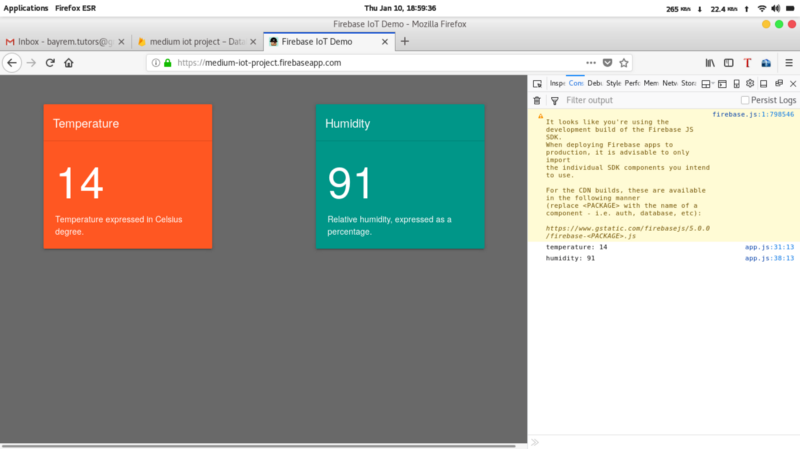
Start by building the dashboard UI. This will be the index.html file. Open the file and change it to look like this:
This is a simple HTML page designed using Bootstrap Material Design. It consists of 2 Card elements, one for displaying Humidity and the other for displaying Temperature.
As for the Firebase part here, first you import the firebase dependency in the script tag inside the head tag. Finally when the page finishes loading, it calls app.js.
Now that the Dashboard UI is ready you can move on to app.js where you implement the firebase connection and your business logic. In the same directory create a new file called app.js and copy this code:
The script starts by creating a configuration object. The best way is to copy it directly from the firebase project in the firebase console. To do that, navigate to your firebase console and go to the firebase project settings. Then scroll down and click on the <;/> icon as shown here:

I guess the rest of the code is self explanatory with the comments.
Now your app should be ready and you can test it locally with the following command:
firebase serve
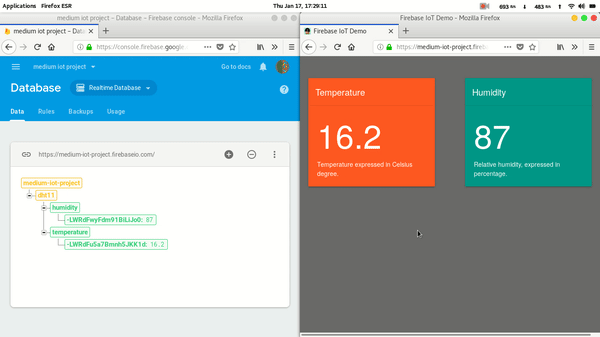
Note that on startup the app will fetch the last temperature and humidity values from the database. Great! The app is working locally, but up until now it’s working only inside your localhost and can’t be accessed from the outside world. This means that it’s time to host it on the web using Firebase Hosting.
But before you deploy it there is just one last thing you need to do. Go to the database.rules.json file and change the read and write rules to “true”. This method is not advised for production, as it is not secure, but it’s fine for demonstration purposes here.
With that done you are ready for deployment:
firebase deploy
There you go! If you’ve made it this far, by now you should have a live web application deployed and up and running.
Putting it all together

It’s time to put everything together and test the system. Plug in the NodeMCU to your PC and upload the sketch if you haven’t already:
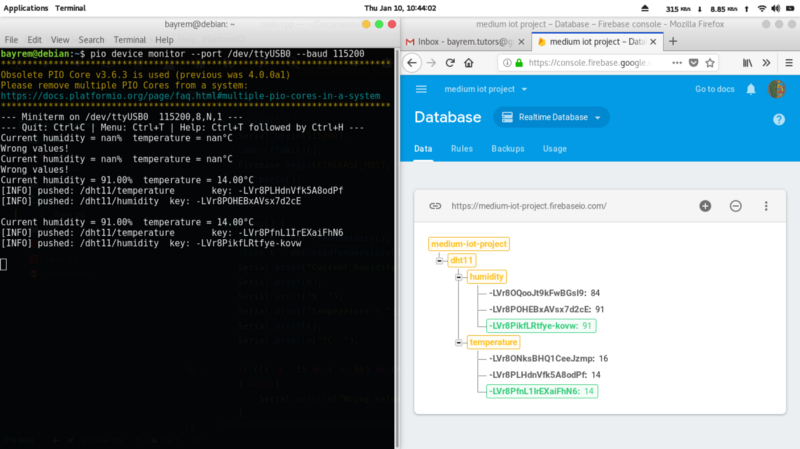
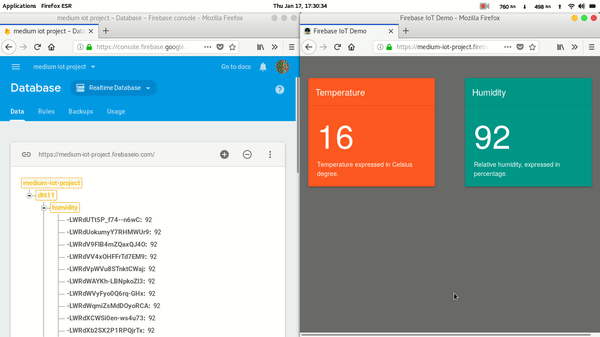
Open up the web app and the firebase database and watch it change in realtime with the values sent by the device.
Now open up the serial monitor and watch the data pushed from the device to the web app. Note that you can open the console in the browser to watch the received values. Here I use Gtk Serial port terminal with a baud-rate of 115200 bps, but you can use the integrated PlatformIO Serial Monitor or any other tool of your choice.
Troubleshooting
I faced a problem while developing the application on the ESP8266 (and it took me sometime to figure out). Even when everything was configured correctly (WiFi Connection, Firebase Host, Secret Key), the ESP8266 couldn’t connect to Firebase. This was caused by the wrong Fingerprint inside FirebaseHttpClient.h file in the Firebase library. You need to replace it with your own fingerprint. If you installed the library locally using PlatformIO then you can find the file in this path:
your_project_folder/.piolibdeps/FirebaseArduino_ID1259/src/
To generate a fingerprint, go to this website and copy your Firebase host link without the https part and click on Fingerprint Site (mine is:
medium-iot-project.firebaseio.com):
GRC | SSL TLS HTTPS Web Server Certificate Fingerprints
_GRC's HTTPS Web Server Certificate Fingerprint Service_www.grc.com
This will generate a fingerprint for your site, so go ahead and copy it in place of the old kFirebaseFingerprint[] value inside the FirebaseHttpClient.h file. That should fix the problem.

Conclusion

Congratulations if you’ve made it this far!
We’ve only scratched the surface here. The Internet of Things is all about experimenting and exploring, so I encourage you to not stop here and keep learning by making mistakes and finding bugs in your code. But above all don’t forget to have fun along your learning journey.
References
Firebase Realtime Database | Firebase Realtime Database | Firebase
_Store and sync data with our NoSQL cloud database. Data is synced across all clients in realtime, and remains available…_firebase.google.comPlatformIO: An open source ecosystem for IoT development
_Cross-platform build system and library manager. Cross-platform IDE and unified debugger. Remote unit testing and…_platformio.orgArduino - Home
_Open-source electronic prototyping platform enabling users to create interactive electronic objects._www.arduino.ccBootstrap Material Design
_The most popular HTML, CSS, and JS Material Design library in the world._fezvrasta.github.ioesp8266/Arduino
_ESP8266 core for Arduino. Contribute to esp8266/Arduino development by creating an account on GitHub._github.comFirebaseExtended/firebase-arduino
_Arduino samples for Firebase. Contribute to FirebaseExtended/firebase-arduino development by creating an account on…_github.comGRC | SSL TLS HTTPS Web Server Certificate Fingerprints
_GRC's HTTPS Web Server Certificate Fingerprint Service_www.grc.com