
By Chandrabhan Singh
Install Docker, create your first container, and more
You may have seen Docker somewhere on the internet and you may feel curious about it. Now you want to take it to the next level. How about going on a date with Docker? No — I am not kidding!
But, how do you plan a perfect first date? What should you do? Where to find the right resources? What prerequisites might you need?
The questions are endless. Follow these first-date guidelines, and you’ll be well on your way to landing a second.
Planning your date
Getting to know your date before you start planning is crucial to crafting a memorable first experience. It will likely boost your confidence during the meeting, as well.
It’s never too late to say Hi. Here is a short introduction to my first time meeting Docker if you’re interested.
Okay! So the road map we will follow today looks something like this:
- Setting up the Venue
- The Pickup
- The Conversation
Prelude
The place where we will set up our date is the Docker engine.
Docker engine is no different from any other engine. It is a combination of various components working together.
We will see a few of these components later in this article. But for now, let’s decorate our machine with Docker. The installation process depends upon your operating system.
The key for uninterrupted execution is always to refer to an official website. Docker has this fantastic guide, where you can find out more about installation.
Docker comes in two flavors: Docker Community Edition (CE) and Docker Enterprise Edition (E.E.). For our demonstration purposes, we must stick to the community edition. The Enterprise Edition is paid. And besides, making an expensive reservation for your first date is not the best idea ?
The Venue
The core mantra for any propitious date is to choose the right meeting place. Meeting Docker is no different. First, we should decide on the platform. Cloud? Mac? Linux? Or Windows? Once we know our environment, we can choose the simplest way to set up the meeting place.
Windows
If your choice is Windows, the process for setup is quite simple. Remember our favorite process: Next, Next, Next, and Finish.
Jump to the download page and choose the “Edge channel.” Edge has experimental features and fits best for our learning purposes.
Note! Docker for Windows needs the “Hyper-V” feature, but there is nothing to worry about — Docker will turn it on for you. However, it means that you can’t use Virtual Box.
Linux
When I first started experimenting on a Linux box, I thought it was going to be a nightmare. But to my relief, setting up Docker on a Linux distribution turned out to be simple. Again, there are many ways to install Docker on a Linux distribution.
My favorite is: “Install using the convenience script.” We grab a long shell script from the internet and then pipe it to a shell terminal.
How? Like this:
sudo wget -qO- https://get.docker.com |sh
Done! Yeah, you have Docker on your machine up and running.
Now that the venue is all set, we are ready to proceed. But first, let’s make some inquiries to make sure everything is working fine here. The same as you might inquire with a restaurant before booking a table ?.
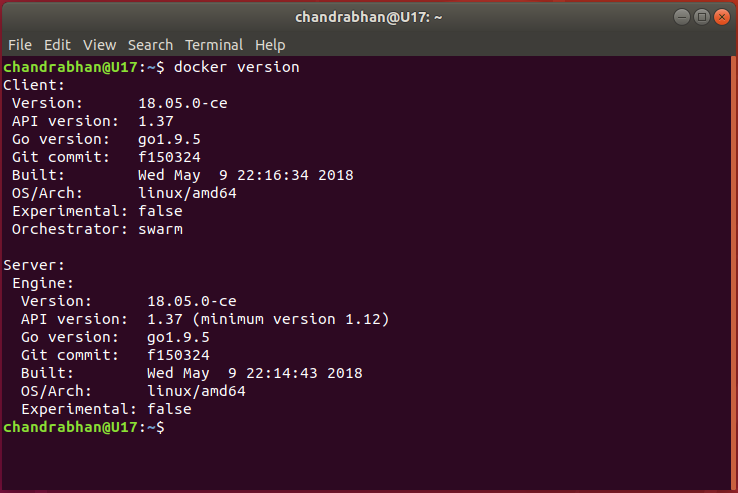
Let’s execute the below command in the terminal:
docker version
You should see the installation details. It gives you information about the Client and Server version, the Go-lang version, and so on and so forth.
If the output of your command is somehow like the one below, the sun is shining, and the world is beautiful. Next: time to get ready for the “Pickup.”
The Pickup
As you may already be aware, Docker uses Images to create containers. These images are large binary immutable files.
An image contains application binaries and their dependencies. It may also contain other components such as a web server or even an OS.
We will need such images to create a container and run an application inside it.
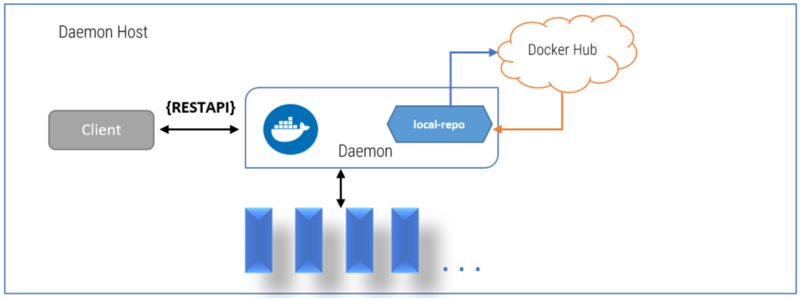
So, where do these images live? Simple question, simple answer: on a Host. This host can be your machine or a registry somewhere on the internet. Docker has its registry called Docker-Hub.
To avoid wandering, you should know the right pickup location for your date.
To make your first date smoother, I found the exact location of an image that I can share with you. Excited enough? Here you go!
docker pull chandrabhan/dotnetconsole
Let’s confirm that we are at the right location. ?
docker image ls

Here you can see various properties of the images on your machine. Cool, it looks like things are going good so far.
Before moving further, let’s break down the previous two commands and understand what’s going on here.
With Docker pull, we asked Docker Daemon to pull an image for us. The Daemon could not find the image in the local registry, so it went ahead and pulled a remote copy from Docker-Hub.
Through docker image ls we saw all available images and their properties.
I must admit, I am getting excited. We’ve done a great job so far. Next, let the interaction begin.
The Conversation
Start the conversation, and things will turn out in your favor.
So again, to make it smoother for you, I want to offer you a few icebreakers.
We will create some containers for .Net Core framework applications. The first one will be a simple console application. The other will be a bit more colorful — a web application.
docker run chandrabhan/dotnetconsole
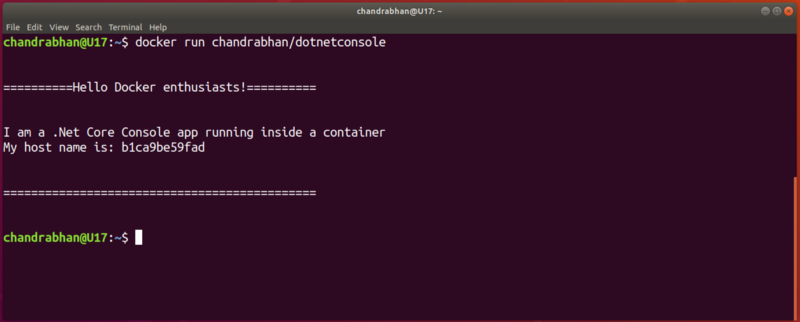
Magnificent! Did you see what happened there? This stuff is amazing. A .Net core application is running inside a container. Docker went ahead and created a container and executed the application inside it. And as soon as the console application ends, the container exists!
Let’s see how many containers we have in our machine:
docker container ls -a
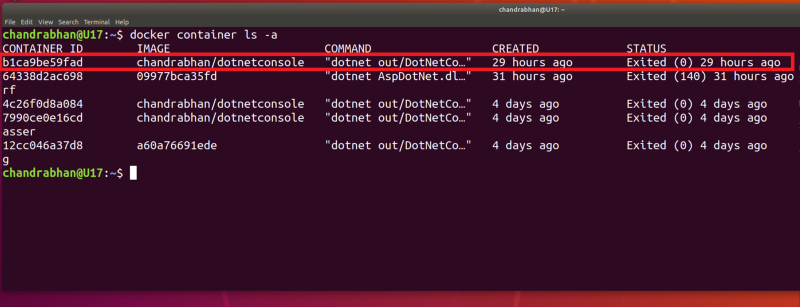
What you see here is the list of containers on your machine. You can identify a container by its **ID**. The output tells us when the container was **CREATED** and what it’s current **STATUS** is. The container we created is in **Exited** status. Remember? Our application is exited! So is the container.
It looks like the conversation is progressing well, so let’s keep going.
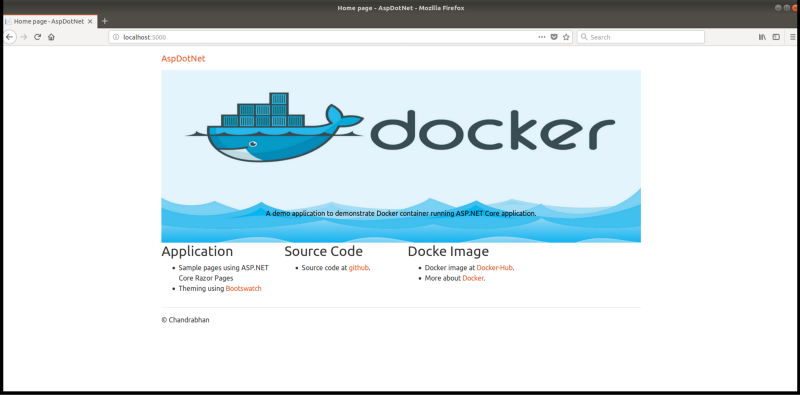
docker run -it --rm -p 5000:80 --name app chandrabhan/aspdotnet
Go to your favorite browser and browse http://localhost:5000. You should see more amazing stuff.
An ASP.Net core web app is running inside a container:
Before moving further, let’s see the anatomy of the above command.
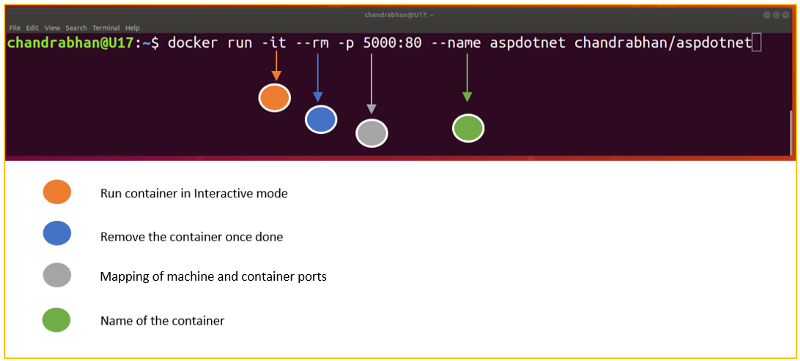
Did you notice? This time we did not pull the image, but we were still able to create a container out of it. When you execute docker run, Docker daemon tries to find a local copy of the image. If it cannot, it goes ahead and tries to find it in the default registry (Docker-Hub in this case).
I believe our planning was excellent and so was the execution. Let’s rewind what we did and review how we planned an auspicious date with Docker ?.
Rewinding
- First, we installed Docker. We saw how the installation process varies depending on the operating system.
- Then we went ahead and pulled an image from the Docker-Hub registry, a simple .Net Core console app.
- Once we had this image on our machine, we used Docker to create a container out of this image.
- We also saw how to pull an image and run a container through a single command.
Here is an illustration that may help you understand a high-level picture.
Follow up
Out of sight out of mind
Following up is as important as any other stage during the date. Now I should leave you with your date, and would like to hear how it went. Below are a few links that may be useful: