
In this guide, we'll explore the process of creating JSON Web Tokens (JWTs) from scratch in PHP, which is a superior and more secure authentication scheme.
By implementing this advanced approach, you'll have a robust and highly secure authentication mechanism that significantly enhances data protection and user authentication.
Table Of Contents
- What Are JSON Web Tokens (JWTs)?
- Getting Started
- Sending Our Requests
- Testing Database Connection
- Registering Users
- Setting up the JWT Class
- The Encode Method
- The Login Endpoint
- Protected Resources And Decoding JSON Web Tokens
- What Happens Now?
- How to Set Up The Decode Method In Our JWT Class
- Protected Resources
- Checking The Headers For The Correct Authorization Scheme
- Creating Instances In The API Entry Point
- Suggestions
- How to Implement Token Expiration
- Updated Folder Structure
- Conclusion
What Are JSON Web Tokens (JWTs)?
A JSON Web Token is a string composed of three parts, each joined by a period (.), and then base64url encoded.
Here are the three parts of a JWT:
Header: A header consists of metadata about the token, such as the token type and the algorithm used.
 $header = json_encode([
            "alg" => "HS256",
            "typ" => "JWT"
        ]);

        $header = $this->base64urlEncode($header);
Payload: Within the JWT structure, the payload encapsulates specific indices referred to as claims, housing user data that is encoded using base64url.
$payload = [
    "id" => $user['id'],
    "name" => $user["name"]
];

  $payload = $this->base64urlEncode($payload);
Signature: This is generated by creating a hash of the header and payload, combined with a secret key typically generated as either 256 bits or 32 bytes. By convention, the secret key matches the size of the hash output.
We will use the link below to generate a secret key we need for this project:
 $signature = hash_hmac("sha256", $header . "." . $payload, $secret_key, true);
 $signature = $this->base64urlEncode($signature);
A JSON Web Token is simply a combination of the header, payload, and signature, where each component is concatenated together with periods (“.”) in between:
$header . "." . $payload . "." . $signature;
Getting Started
To kickstart this project, please download the project starter from the following link: PHP Authentication with JWT Tutorial.
Once downloaded, carefully review the README.md file included in the repository for comprehensive information regarding pre-installed packages. The file contains essential details such as notes on security and best practices. Taking the time to thoroughly read through the README will ensure a smooth setup and understanding of the project.
To initiate the setup of the project, utilize Git by executing the following command:
git clone https://github.com/Oghenekparobo/php_auth_jwt_tut.git
This command will clone the project repository to your local system, allowing you to proceed with the installation and configuration process.
After cloning the project from GitHub, your project structure should align with the following layout:
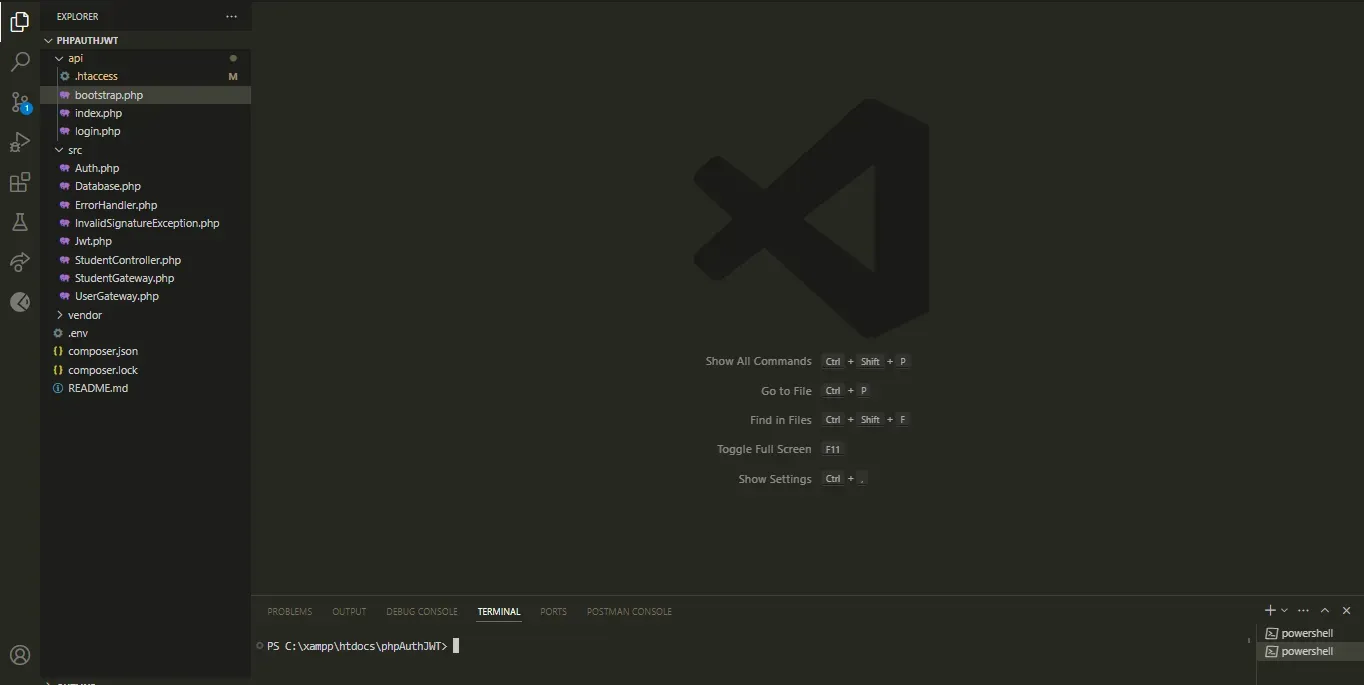 project structure on VS Code
project_root/ │ ├── api/ │ ├── .htaccess │ ├── index.php │ └── (other PHP files) │ ├── vendor/ │ ├── (Composer dependencies) │ └── ... │ ├── .env ├── README.md └── (other project files)
In this structure:
- The
api/directory contains PHP files responsible for handling API requests and responses. It includes an.htaccessfile for URL rewriting and anindex.phpfile, along with other PHP files for specific functionalities. - The
vendor/directory contains Composer dependencies installed for the project. These dependencies are managed by Composer and should not be modified directly. - The
.envfile contains environment variables necessary for configuring the application environment, such as database credentials and API keys. - The
README.mdfile provides essential information about the project, including setup instructions, usage guidelines, and any other relevant details.
Ensure that you maintain this structure and follow any instructions provided in the README file to set up and run the project successfully.
Sending Our Requests
When referring to our project, the URL would typically be structured as follows: http://localhost/php_auth_jwt_tut/api. However, depending on the project's name, this URL might vary accordingly. Nonetheless, the base URL remains consistent: [http://localhost/php_auth_jwt_tut/api](http://localhost/php_auth_jwt_tut/api.).
Thanks to our implementation of URL rewriting in the .htaccess file, additional prefixes such as index.php or .php are unnecessary when accessing our URLs. We've meticulously configured our server settings to ensure seamless navigation without these prefixes.
In simpler terms, accessing our project’s API endpoints can be done directly from the base URL: http://localhost/php_auth_jwt_tut/api. This streamlined approach enhances user experience and eliminates unnecessary complexity for this project.
To make testing our project’s API endpoints easier, we can use the index.php file located in the api folder. This file acts as the starting point for our application and contains all the necessary setups.
Firstly, we’ll simply print out any desired output within the index.php file. This helps us confirm that our endpoint is working correctly. Then, we'll test the endpoint by accessing the URL: [http://localhost/php_auth_jwt_tut/api](http://localhost/php_auth_jwt_tut/api.).
Additionally, we’ll set up our database connection to ensure smooth communication between our API endpoints and the database. All the required configurations are included within the bootstrap.php file for convenience. By importing this file into our index.php, managing configurations and imports becomes simpler.
Furthermore, it’s important to note that we’ll be enforcing strict typing throughout our codebase. This means that we’ll specify the types of data our variables and functions can hold or return. This helps maintain consistency and reduces the chances of errors in our code.
Testing Database Connection
Before proceeding with the steps outlined in this section, it is imperative to thoroughly review the README file of this project. This will provide you with comprehensive instructions on how to set up your database properly. In the root of the project, you will find a file named college.sql, which contains the necessary tables for your database. Simply follow the instructions provided in the README file to import and configure the database accordingly.
In the src folder of our project, we find essential classes and gateways, including the necessary database connections for our project. The file responsible for this is database.php, already configured to establish a PDO database connection.
Note: Before use, ensure to adjust or configure the variables in the .env environment file to match your database credentials.
.env file:
DB_HOST= 'db_host'
DB_NAME = 'db_name'
DB_USER = 'db_user'
DB_PASS = 'db_password'
SECRET_KEY = "secret_key"
bootstrap.php:
require dirname(__DIR__)  . '/vendor/autoload.php';

set_error_handler('ErrorHandler::handleError');
set_exception_handler('ErrorHandler::handleException');

$dotenv = Dotenv\Dotenv::createImmutable(dirname(__DIR__));
$dotenv->load();

header("Content-type: application/json; charset=UTF-8");


$database = new Database(
    $_ENV["DB_HOST"],
    $_ENV["DB_NAME"],
    $_ENV["DB_USER"],
    $_ENV["DB_PASS"]
);
The code prepares our application by doing a few key things. First, it loads the necessary files to handle errors and exceptions smoothly. Then, it grabs environment variables from a special file (.env) where we store important settings like database information. After that, it tells the application to send back data in a specific format (JSON). Finally, it sets up a connection to the database using the information from the .env file. This setup ensures our application runs smoothly and securely.
database.php:
class Database
{
    private ?PDO $conn = null;

    public function __construct(
        private string $host,
        private string $name,
        private string $user,
        private string $password
    ) {
    }

    public function getConnection(): ?PDO
    {
        try {
            if ($this->conn === null) {
                $this->conn = new PDO("mysql:host=$this->host;dbname={$this->name}", $this->user, $this->password);
                $this->conn->setAttribute(PDO::ATTR_ERRMODE, PDO::ERRMODE_EXCEPTION);
                $this->conn->setAttribute(PDO::ATTR_EMULATE_PREPARES, false);
                $this->conn->setAttribute(PDO::ATTR_STRINGIFY_FETCHES, false);
            }

            return $this->conn;
        } catch (PDOException $e) {
            echo "Connection failed: " . $e->getMessage();
            return null;
        }
    }
}
Include an echo statement to indicate a successful database connection before returning the $this->conn object. This helps to verify the connection status and ensure smooth operation of the application. For instance:
try {
    if ($this->conn === null) {
        $this->conn = new PDO("mysql:host=$this->host;dbname={$this->name}", $this->user, $this->password);
        $this->conn->setAttribute(PDO::ATTR_ERRMODE, PDO::ERRMODE_EXCEPTION);
        $this->conn->setAttribute(PDO::ATTR_EMULATE_PREPARES, false);
        $this->conn->setAttribute(PDO::ATTR_STRINGIFY_FETCHES, false);

        // Echo message indicating successful database connection
        echo "Database connected successfully.";
    }

    return $this->conn;
} catch (PDOException $e) {
    echo "Connection failed: " . $e->getMessage();
    return null;
}
Proceed to the index.php file to invoke the getConnection function and verify the application's functionality. It's important to note that we've initialized our Database class in our bootstrap PHP file, ensuring seamless integration and operation.
Invoking the getConnection function in the index.php file should look like this:
 index.php file
Upon successfully implementing the database connection and firing our request, you can expect the following response:
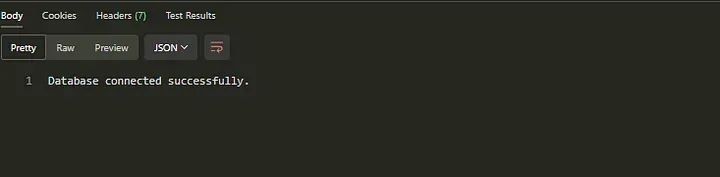 database connected successfully
Note: Make sure you clear the echo after we are done.
Registering Users
To efficiently manage user data, we will implement a minimal frontend solution by creating a new file named register.php in the root directory of our project. Additionally, we will introduce a stylesheet named style.css to enhance the visual presentation of the registration page.
We will establish a connection to our database, facilitating the seamless addition of users to the user table within our college database. Upon successful user registration, a confirmation message will be echoed to affirm the addition of the user to the database.
register.php:
require __DIR__ . "/vendor/autoload.php";

if ($_SERVER["REQUEST_METHOD"] === "POST") {

    $dotenv = Dotenv\Dotenv::createImmutable(__DIR__);
    $dotenv->load();

    $database = new Database(
        $_ENV["DB_HOST"],
        $_ENV["DB_NAME"],
        $_ENV["DB_USER"],
        $_ENV["DB_PASS"]
    );

    $conn = $database->getConnection();

    $sql = "INSERT INTO user (name, username, password_hash)
            VALUES (:name, :username, :password_hash)";

    $stmt = $conn->prepare($sql);

    $password_hash = password_hash($_POST["password"], PASSWORD_DEFAULT);


    $stmt->bindValue(":name", $_POST["name"], PDO::PARAM_STR);
    $stmt->bindValue(":username", $_POST["username"], PDO::PARAM_STR);
    $stmt->bindValue(":password_hash", $password_hash, PDO::PARAM_STR);


    $stmt->execute();

    echo "Thank you for registering.";
    exit;
}

?>
<!DOCTYPE html>
<html lang="en">

<head>
    <meta charset="UTF-8">
    <meta name="viewport" content="width=device-width, initial-scale=1.0">
    <title>User Registration</title>
    <link rel="stylesheet" href="style.css">
</head>

<body>
    <div class="container">
        <h2>User Registration</h2>
        <form action="register.php" method="post">
            <div class="form-group">
                <label for="name">Name:</label>
                <input type="text" id="name" name="name" required>
            </div>
            <div class="form-group">
                <label for="username">Username:</label>
                <input type="text" id="username" name="username" required>
            </div>
            <div class="form-group">
                <label for="password">Password:</label>
                <input type="password" id="password" name="password" required>
            </div>
            <div class="form-group">
                <input type="submit" value="Register">
            </div>
        </form>
    </div>
</body>

</html>
style.css:
body,
html {
  margin: 0;
  padding: 0;
  font-family: Arial, sans-serif;
}

.container {
  background-color: #fff;
  padding: 20px;
  border-radius: 8px;
  box-shadow: 0 0 10px rgba(0, 0, 0, 0.1);
  width: 300px;
  margin: 0 auto;
}

h2 {
  text-align: center;
  margin-bottom: 20px;
}

.form-group {
  margin-bottom: 20px;
}

label {
  font-weight: bold;
}

input[type="text"],
input[type="password"] {
  width: 100%;
  padding: 8px;
  border: 1px solid #ccc;
  border-radius: 4px;
  box-sizing: border-box;
}

input[type="submit"] {
  width: 100%;
  padding: 10px;
  border: none;
  background-color: #007bff;
  color: #fff;
  border-radius: 4px;
  cursor: pointer;
}

input[type="submit"]:hover {
  background-color: #0056b3;
}
Note: Ensure that these files are placed in the root directory of your project. The user interface will appear as follows:
Registration process:
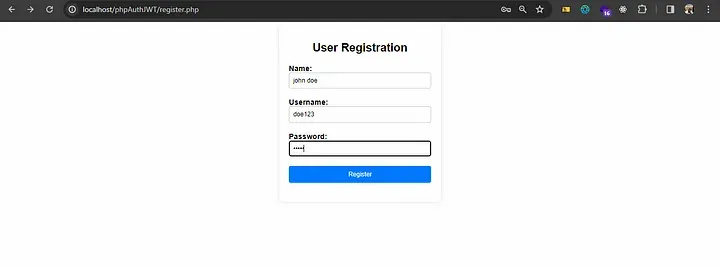 user registration form
Successful registration:
 successful registration page
Our database structure is illustrated in the image below:
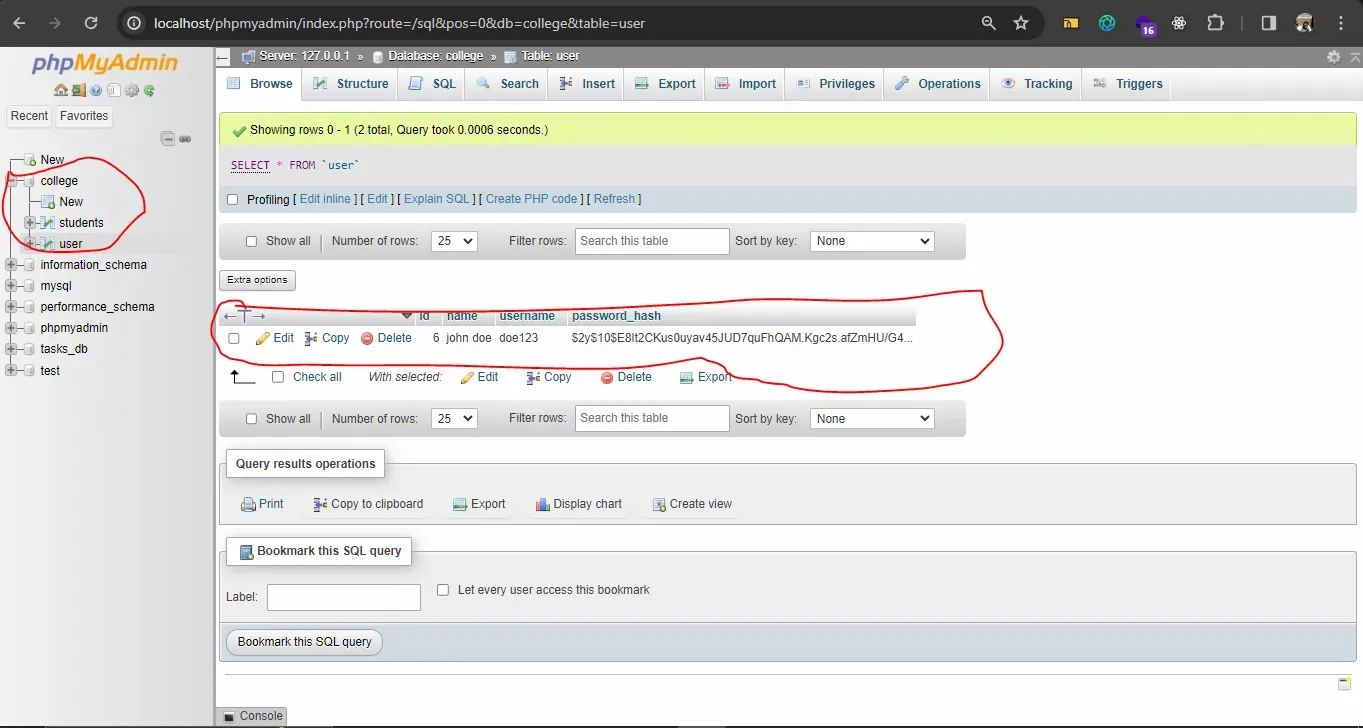 database structure on phpMyAdmin
Kudos! You deserve a big glass of juice for getting to this point, now let’s get to the next part, which is creating an JWT from scratch!
Setting up the JWT Class
In our project template, the Jwt.php file has already been created. Now, let’s proceed to create our Jwt class and implement the logic for encoding and generating a JWT token.
Encoding To JWT
In order to create a JWT, we need to convert our header, payload, and signature to base64url encoding. However, PHP doesn’t support the Base64URL standard, Therefore, we will develop our custom Base64URL encoding method to perform the necessary encoding operation.
Please copy the following code snippet and paste it into the Jwt class located in the src folder.
class Jwt
{

    public function __construct(private string $key)
    {

    }


    private function base64URLEncode(string $text): string
    {

        return str_replace(['+', '/', '='], ['-', '_', ''], base64_encode($text));
    }


}
This class is responsible for encoding JWT tokens using the base64url encoding scheme. It includes a constructor that accepts a key parameter, which presumably represents the secret key used for encoding the tokens. Additionally, it contains a private method named base64URLEncode, which performs the base64URL encoding operation.
The base64URLEncode Method: The base64urlEncode method is a private function within the Jwt class. It takes a string parameter, text, and returns the base64URL encoded version of the input string. The method first applies the standard base64 encoding to the input text using the base64_encode function.
Then, it replaces the characters ‘+’ (plus), ‘/’ (slash), and ‘=’ (equals sign) with ‘-’ (hyphen), ‘_’ (underscore), and an empty string, respectively. This substitution is necessary to ensure compatibility with the base64URL encoding scheme, which uses URL-safe characters. Finally, the method returns the base64URL encoded string.
Overall, the base64URLEncode method provides a crucial functionality for encoding data in JWT tokens using the base64URL encoding scheme, which is commonly used in JWT implementations.
The encode Method
Paste the following code snippet in your Jwt class:
public function encode(array $payload): string
    {

        $header = json_encode([
            "alg" => "HS256",
            "typ" => "JWT"
        ]);

        $header = $this->base64URLEncode($header);
        $payload = json_encode($payload);
        $payload = $this->base64URLEncode($payload);

        $signature = hash_hmac("sha256", $header . "." . $payload, $this->key, true);
        $signature = $this->base64URLEncode($signature);
        return $header . "." . $payload . "." . $signature;
    }
First, we have a class called Jwt. This class helps us create JWT tokens, In the constructor of the Jwt class, we specified a secret key. This secret key is important for creating and verifying the tokens on the signature component.
The encode method is where the magic happens. It takes some data (which we call the payload) and turns it into a JWT token. Here’s how it works:
- We create a header for the token. This header contains information about how the token is encrypted and what type of token it is. We then turn this header into a base64URL format.
- Next, we take the payload data (the information we want to include in the token) and turn that into a base64URL format too.
- After that, we combine the encoded header and payload with our secret key to create a signature. This signature helps ensure that the token hasn’t been tampered with.
- Finally, we put everything together; the encoded header, payload, and signature to create the final JWT token. This token is what we can use in our applications to authenticate users and authorize access to certain resources.
The base64URLEncode method ensures that data is encoded in a format suitable for URLs, making it safe for transmission over the web. Within our Jwt class, this method is employed internally by the encode function to encode both the header and payload sections of the token.
With that being said, let’s proceed to test and see our first JWT token, hurray!
The Login Endpoint
In our project, the api folder serves as the entry point for requests. Now that we’ve implemented the algorithm to encode and create a JWT token, let’s proceed to test it. To do this, we’ll create a login.php file within our api folder. In this file, we’ll send a request containing the username and password of the user profiled or created in our frontend register.php UI. We’ll pass the required user details in JSON format:
{
    "username": "test",
    "password": "12345"
}
Please integrate the following code snippet into the login.php file located within our api directory:
require __DIR__ . '/bootstrap.php';

if ($_SERVER['REQUEST_METHOD'] !== 'POST') {
    http_response_code(405);
    header('ALLOW: POST');
    exit();
}

$contentType = isset($_SERVER["CONTENT_TYPE"]) ? trim($_SERVER["CONTENT_TYPE"]) : '';


if ($contentType !== 'application/json') {
    http_response_code(415);
    echo json_encode(["message" => "Only JSON content is supported"]);
    exit();
}

$data = json_decode(file_get_contents('php://input'), true);

if ($data === null) {
    http_response_code(400);
    echo json_encode(["message" => "Invalid JSON data"]);
    exit();
}


if (!array_key_exists('username', $data) || !array_key_exists('password', $data)) {
    http_response_code(400);
    echo json_encode(["message" => "Missing login credentials"]);
    exit();
}
This code snippet serves as the backend logic for handling user login requests. It begins by including the bootstrap.php file to initialize essential components. Then, it checks if the incoming request method is POST, returning a “Method Not Allowed” error if not.
Next, it verifies that the content type of the request is JSON, responding with an “Unsupported Media Type” error if not. The code proceeds to decode the JSON data from the request body and checks its validity. If the JSON data is invalid or lacks the “username” and “password” keys, it returns a “Bad Request” error.
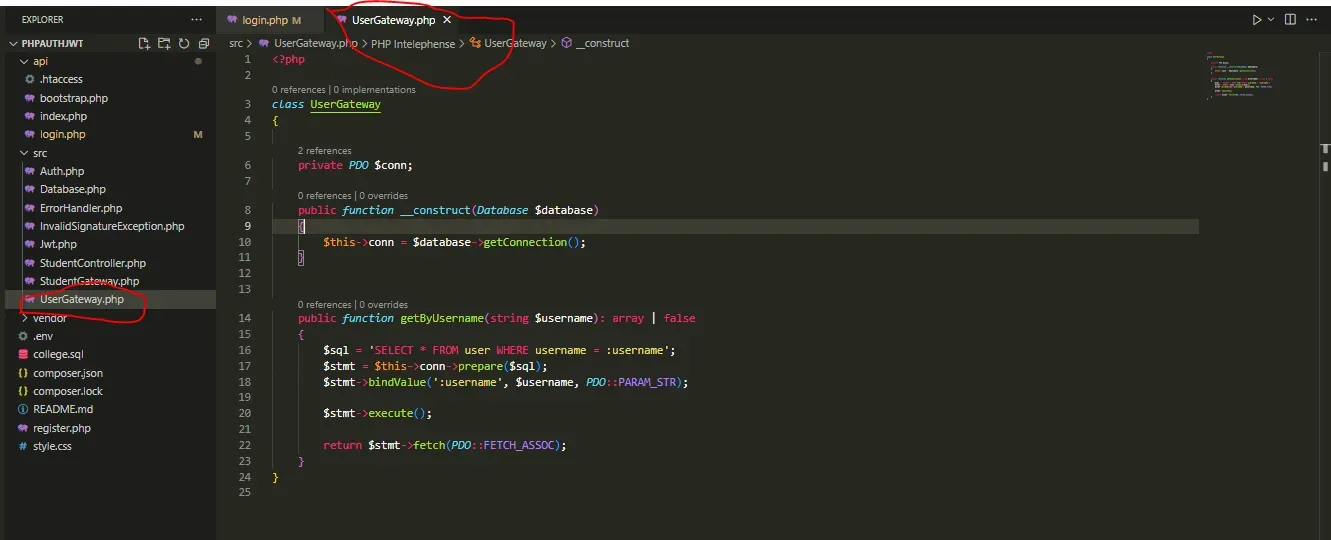
Before proceeding with our login endpoint, we need to configure our UserGateway class, which is already available in our project template within the src folder. This class facilitates interaction with the user data in the database. The provided snippet initializes the class and defines a method getByUsername() to fetch user data based on the provided username.
class UserGateway
{

    private PDO $conn;

    public function __construct(Database $database)
    {
        $this->conn = $database->getConnection();
    }


    public function getByUsername(string $username): array | false
    {
        $sql = 'SELECT * FROM user WHERE username = :username';
        $stmt = $this->conn->prepare($sql);
        $stmt->bindValue(':username', $username, PDO::PARAM_STR);

        $stmt->execute();

        return $stmt->fetch(PDO::FETCH_ASSOC);
    }
}
You will see the need for this as we go on.
Proceed to login.php.
Okay after that quick commercial break, we can create a class instance called $user_gateway and pass our $database connection to it. Next, we retrieve user data based on the provided username from the $user_gateway instance using the getByUsername() method. If no user is found (indicating invalid authentication), we return a 401 HTTP response status along with a corresponding error message in JSON format.
We validate the provided password against the hashed password stored in the user data. If the password verification fails, we return a similar 401 status and error message. If authentication is successful, we construct a payload containing the user's ID and name. Subsequently, we create a JWT token by encoding the payload using the Jwt class instantiated with the secret key from the environment variables. Finally, we respond with the generated token in JSON format, allowing access to protected resources, which will be implemented in a later section.
The code to implement this logic would be the following:
$user_gateway = new UserGateway($database);

$user = $user_gateway->getByUsername($data['username']);

if ($user === false) {
    http_response_code(401);
    echo json_encode(["message" => "invalid authentication"]);
    exit;
}

if (!password_verify($data['password'], $user['password_hash'])) {
    http_response_code(401);
    echo json_encode(["message" => "invalid authentication"]);
    exit;
}


$payload = [
    "id" => $user['id'],
    "name" => $user["name"]
];


$JwtController = new Jwt($_ENV["SECRET_KEY"]);

$token =$$JwtController->encode($payload);

echo json_encode(["token" => $token]);
Full login.php code:
<?php

require __DIR__ . '/bootstrap.php';

if ($_SERVER['REQUEST_METHOD'] !== 'POST') {
    http_response_code(405);
    header('ALLOW: POST');
    exit();
}

$contentType = isset($_SERVER["CONTENT_TYPE"]) ? trim($_SERVER["CONTENT_TYPE"]) : '';


if ($contentType !== 'application/json') {
    http_response_code(415);
    echo json_encode(["message" => "Only JSON content is supported"]);
    exit();
}

$data = json_decode(file_get_contents('php://input'), true);

if ($data === null) {
    http_response_code(400);
    echo json_encode(["message" => "Invalid JSON data"]);
    exit();
}


if (!array_key_exists('username', $data) || !array_key_exists('password', $data)) {
    http_response_code(400);
    echo json_encode(["message" => "Missing login credentials"]);
    exit();
}

$user_gateway = new UserGateway($database);

$user = $user_gateway->getByUsername($data['username']);

if ($user === false) {
    http_response_code(401);
    echo json_encode(["message" => "invalid authentication"]);
    exit;
}

if (!password_verify($data['password'], $user['password_hash'])) {
    http_response_code(401);
    echo json_encode(["message" => "invalid authentication"]);
    exit;
}


require __DIR__ . "/tokens.php";

$refresh_token_gateway = new RefreshTokenGateway($database, $_ENV["SECRET_KEY"]);

$refresh_token_gateway->create($refresh_token, $refresh_token_expiry);
Now that we have set up our login endpoint, established database connections, and implemented the JWT encoding algorithm, nothing stands in our way of obtaining our first JWT token. Let us proceed to test our application with the following steps:
- Please navigate to our user interface for registering users. The URL should be http://localhost/php_auth_jwt_tut/register.php if you followed the project structure.
- Send the username and password of the created user to the login endpoint (http://localhost/php_auth_jwt_tut/api/login.php) in JSON format, like this, and fire the request:
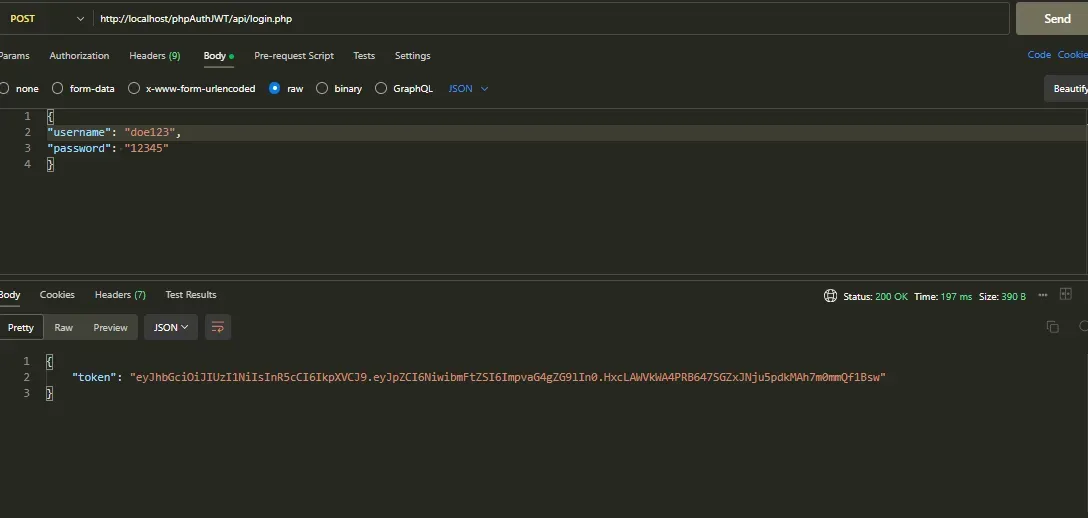 endpoint testing
Voila! Just like that, we obtain our JWT token!
Protected Resources And Decoding JSON Web Tokens
Having successfully generated a JWT token, let us now explore how we can safeguard our resources and verify the token’s contents by decoding it.
You’ll find that our controller classes, StudentController.php, and the gateway class StudentGateway.php, situated in the src folder, has already been configured with essential methods. Now, all that's left is to instantiate these classes in our index.php, serving as the entry point for our requests in the api folder.
To do this add the following code snippet in the index.php file located at the api folder of our project:
<?php

require __DIR__ . '/bootstrap.php';

if ($_SERVER['REQUEST_METHOD'] !== 'POST') {
    http_response_code(405);
    header('ALLOW: POST');
    exit();
}

$contentType = isset($_SERVER["CONTENT_TYPE"]) ? trim($_SERVER["CONTENT_TYPE"]) : '';


if ($contentType !== 'application/json') {
    http_response_code(415);
    echo json_encode(["message" => "Only JSON content is supported"]);
    exit();
}

$data = json_decode(file_get_contents('php://input'), true);

if ($data === null) {
    http_response_code(400);
    echo json_encode(["message" => "Invalid JSON data"]);
    exit();
}


if (!array_key_exists('username', $data) || !array_key_exists('password', $data)) {
    http_response_code(400);
    echo json_encode(["message" => "Missing login credentials"]);
    exit();
}

$user_gateway = new UserGateway($database);

$user = $user_gateway->getByUsername($data['username']);

if ($user === false) {
    http_response_code(401);
    echo json_encode(["message" => "invalid authentication"]);
    exit;
}

if (!password_verify($data['password'], $user['password_hash'])) {
    http_response_code(401);
    echo json_encode(["message" => "invalid authentication"]);
    exit;
}


$payload = [
    "id" => $user['id'],
    "name" => $user["name"]
];


$JwtController = new Jwt($_ENV["SECRET_KEY"]);

$token =$JwtController->encode($payload);

echo json_encode(["token" => $token]);

$user = new UserGateway($database);


$gateway = new StudentGateway($database);

$controller = new StudentController($gateway);


$controller->processRequest($_SERVER['REQUEST_METHOD']);
How the files are structured at this current stage:
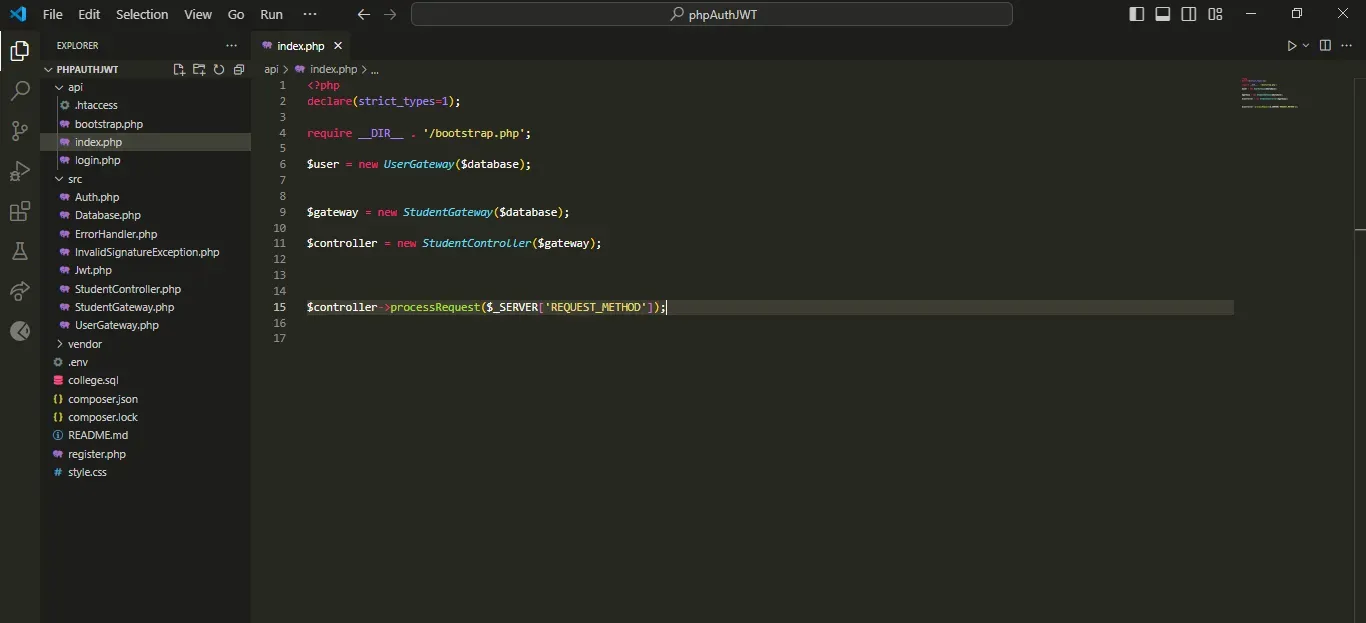 file structure on VS Code
Please note that upon testing the endpoint (http://localhost/phpAuthJWT/api) at this point, you’ll receive the following result, without any restrictions applied:
 endpoint testing
Note: After setting up the database connection and importing the provided file, college.sql, as instructed, the tables, including the “students” table, are populated with pre-added data. This enables us to view the student details that are currently visible.
What Happens Now?
We establish a custom URL endpoint to retrieve data via the GET HTTP method. The URL, [http://localhost/phpAuthJWT/api/](http://localhost/phpAuthJWT/api/getALLStudents)getAllStudents, will remain functional due to the server configuration specified in our .htaccess file located within the api folder. When making requests to this URL, we’ll include our token in the header using the standard HTTP Authorization request header, adhering to the bearer token format:
Authorization: Bearer
In our src folder, we have set up an Auth class where we will create a method to validate the JWT token. This method verifies if the token is provided in the HTTP header and decodes it.
How to Set Up The Decode Method In Our JWT Class
When setting up the decoding functionality in the Jwt class, as we did with the encoding method, we will ensure that our Jwt class, located in the src folder of our project within the jwt.php file handles this task. To achieve this, we will incorporate the following code snippets into our Jwt class – the new methods are the decode and base64UrlDecode methods, thus completing its structure. The final code will resemble the following:
class Jwt
{

    public function __construct(private string $key)
    {

    }

    public function encode(array $payload): string
    {

        $header = json_encode([
            "alg" => "HS256",
            "typ" => "JWT"
        ]);

        $header = $this->base64URLEncode($header);
        $payload = json_encode($payload);
        $payload = $this->base64URLEncode($payload);

        $signature = hash_hmac("sha256", $header . "." . $payload, $this->key, true);
        $signature = $this->base64URLEncode($signature);
        return $header . "." . $payload . "." . $signature;
    }


    public function decode(string $token): array
    {
        if (
            preg_match(
                "/^(?<header>.+)\.(?<payload>.+)\.(?<signature>.+)$/",
                $token,
                $matches
            ) !== 1
        ) {

            throw new InvalidArgumentException("invalid token format");
        }

        $signature = hash_hmac(
            "sha256",
            $matches["header"] . "." . $matches["payload"],
            $this->key,
            true
        );

        $signature_from_token = $this->base64URLDecode($matches["signature"]);

        if (!hash_equals($signature, $signature_from_token)) {

            // throw new Exception("signature doesn't match");
            throw new InvalidSignatureException;
        }

        $payload = json_decode($this->base64URLDecode($matches["payload"]), true);

        return $payload;
    }


    private function base64URLEncode(string $text): string
    {

        return str_replace(['+', '/', '='], ['-', '_', ''], base64_encode($text));
    }

    private function base64URLDecode(string $text): string
    {
        return base64_decode(
            str_replace(
                ["-", "_"],
                ["+", "/"],
                $text
            )
        );
    }


}
Decode Method:
The decode method is responsible for decoding a JWT token into its respective header and payload components. Here's a brief overview of what it does:
- Token Validation: First, it verifies if the provided token follows the expected format of three sections separated by periods.
- Signature Verification: It recalculates the signature based on the header and payload from the token and compares it with the signature provided in the token. This step ensures the integrity of the token.
- Payload Extraction: If the signature verification passes, it decodes the payload component of the token from base64 URL encoding into a JSON format. This decoded payload contains information about the user associated with the token.
- Finally, it returns the decoded payload as an associative array.
base64URLDecode Method:
The base64URLDecode method is a helper function used specifically for decoding strings that have been encoded using base64 URL encoding. Here's a breakdown of its functionality:
- Replace Characters: It first replaces the characters
-and_in the encoded string with+and/respectively. This step is necessary because URL encoding replaces certain characters for safe transmission over the web. - Base64 Decoding: After character replacement, it performs the standard base64 decoding operation on the modified string.
- Finally, it returns the decoded string.
In summary, the decode method validates and extracts the payload from a JWT token, while the base64URLDecode method assists in decoding strings encoded using base64 URL encoding, ensuring the integrity and accuracy of the decoded data.
Protected Resources
Now that we have completed the setup, let’s finalize our Jwt class. It’s essential to restrict access to our endpoints without the required authorization header. For instance, accessing the URL [http://localhost/phpAuthJWT/api/](http://localhost/phpAuthJWT/api/getALLStudents)getAllStudents should be restricted if the necessary authorization header is absent, and access to resources should be denied if the URL is incorrect.
To achieve this, add the following code snippet to the top of your index.php file, which serves as the entry point for accessing our student data. Paste this code after importing the bootstrap.php configuration file.
require __DIR__ . '/bootstrap.php';

$path = parse_url($_SERVER["REQUEST_URI"], PHP_URL_PATH);

$parts = explode("/", $path);


$resource = $parts[3];

$id = $parts[4] ?? null;

if ($resource != "getAllStudents") {

    http_response_code(404);
    exit;
}
This snippet shows how we extracted the path from the requested URI using the parse_url() function, isolating the endpoint accessed by the user. Then splitting the path into segments using the explode() function, allowing us to identify the requested resource. If the requested resource is not “getAllStudents”, indicating an invalid endpoint, the code responds with a 404 Not Found status code, signaling that the requested resource does not exist. This ensures that only valid endpoints can be accessed, preventing unauthorized access to our API’s resources.
Note: To verify that our project is functioning as intended, send a request to the “getAllStudents” endpoint at http://localhost/phpAuthJWT/api/getAllStudents
This request will help us ensure that our API is correctly configured and capable of retrieving all student data.
Checking The Headers For The Correct Authorization Scheme
We have established a custom URL, but it is crucial to verify that the JWT token provided in the header is valid. To accomplish this, we will utilize the Auth class, which is already available in our project’s src folder. This class, which was provided with our project template, will assist in ensuring the integrity of the JWT token.
Auth.php:
class Auth
{


    public function __construct(private UserGateway $user_gateway, private Jwt $JwtCtrl)
    {
    }


    public function authenticateJWTToken(): bool
    {

        if (!preg_match("/^Bearer\s+(.*)$/", $_SERVER["HTTP_AUTHORIZATION"], $matches)) {
            http_response_code(400);
            echo json_encode(["message" => "incomplete authorization header"]);
            return false;
        }

        try {
            $data = $this->JwtCtrl->decode($matches[1]);
        } catch (InvalidSignatureException) {

            http_response_code(401);
            echo json_encode(["message" => "invalid signature"]);
            return false;
        } catch (Exception $e) {

            http_response_code(400);
            echo json_encode(["message" => $e->getMessage()]);
            return false;
        }


        return true;
    }
}
This class is responsible for handling the authentication of JWT tokens. Within the class, we have a constructor method that initializes the Auth object with instances of two other classes: UserGateway and Jwt.
Absolutely! Let’s break down the code snippet in a more detailed and narrative manner:
In the provided PHP code snippet, we defined a class named Auth. This class is responsible for handling the authentication of JWT tokens. Within the class, we have a constructor method that initializes the Auth object with instances of two other classes: UserGateway and Jwt.
class Auth
{
    public function __construct(private UserGateway $user_gateway, private Jwt $JwtCtrl)
    {
    }
    // Other methods will go here...
}
The constructor method allows the Auth class to interact with user data through the UserGateway class and handle JWT tokens using the Jwt class.
Next, we have a method called authenticateJWTToken(), which is tasked with verifying the validity of a JWT token present in the HTTP authorization header of incoming requests.
public function authenticateJWTToken(): bool
{

}
Within the authenticateJWTToken() method, the code first checks if the authorization header is properly formatted and contains a valid JWT token.
if (!preg_match("/^Bearer\s+(.*)$/", $_SERVER["HTTP_AUTHORIZATION"], $matches)) {
    http_response_code(400);
    echo json_encode(["message" => "incomplete authorization header"]);
    return false;
}
If the authorization header is incomplete or improperly formatted, the method returns a 400 Bad Request response along with a message indicating the issue.
Next, the code attempts to decode the JWT token using the decode() method of the Jwt class. If the decoding process fails due to an invalid signature or any other exception, appropriate HTTP response codes and error messages are returned.
try {
    $data = $this->JwtCtrl->decode($matches[1]);
} catch (InvalidSignatureException) {
    http_response_code(401);
    echo json_encode(["message" => "invalid signature"]);
    return false;
} catch (Exception $e) {
    http_response_code(400);
    echo json_encode(["message" => $e->getMessage()]);
    return false;
}
If the JWT token is successfully decoded without any exceptions, the method returns true, indicating that the authentication process was successful.
The authenticateJWTToken() method ensures that incoming requests contain a valid JWT token in the Authorization header and handles various error scenarios gracefully to provide appropriate feedback to clients interacting with the API.
Creating Instances In The API Entry Point
Now that we have finished setting up our methods let us add our class instances to enable the protection of our resources from unauthorized users.
index.php:
declare(strict_types=1);

require __DIR__ . '/bootstrap.php';

$path = parse_url($_SERVER["REQUEST_URI"], PHP_URL_PATH);

$parts = explode("/", $path);


$resource = $parts[3];

if ($resource != "getAllStudents") {

    http_response_code(404);
    exit;
}


$user = new UserGateway($database);


$JwtCtrl = new Jwt($_ENV["SECRET_KEY"]);

$auth = new Auth($user, $JwtCtrl);

if (!$auth->authenticateJWTToken()) {
    exit;
}


$gateway = new StudentGateway($database);

$controller = new StudentController($gateway);


$controller->processRequest($_SERVER['REQUEST_METHOD']);
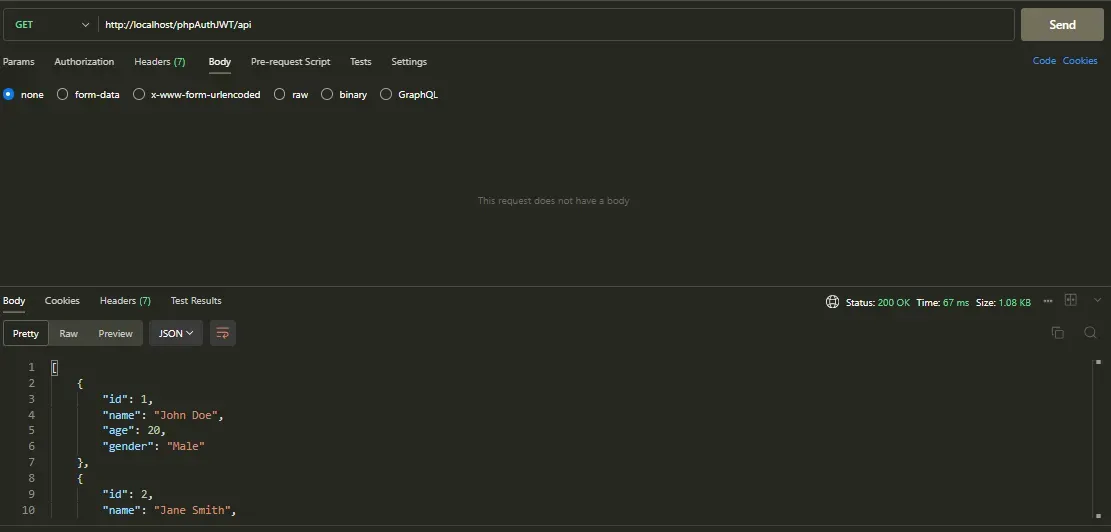
Once we’ve incorporated the provided snippet into our index.php, it's crucial to observe the different scenarios that occur when we access our API endpoint at http://localhost/phpAuthJWT/api/getAllStudents.
By accessing this URL, we can witness several possible outcomes, each indicative of a different state or functionality within our application. These outcomes may include:
- Successful Response: If the authentication process is successful and the JWT token is valid, the API should return a response containing the desired data, such as a list of all students.
- Invalid Token: In case the JWT token provided in the request’s Authorization header is invalid, expired, or improperly formatted, the API should respond with an error message indicating the issue. This ensures that only authorized users can access the protected resources.
- Unauthorized Access: If the request does not include a JWT token or lacks proper authorization, the API should respond with a 401 Unauthorized status code, indicating that access to the requested resource is restricted.
- Invalid Endpoint: If the URL provided does not match any of the defined endpoints or routes within our application, the API should respond with a 404 Not Found status code, signaling that the requested resource does not exist.
By examining these outcomes, we can gain insights into the functionality and reliability of our API, ensuring that it behaves as intended and provides appropriate responses to different types of requests and scenarios.
Working properly with Authorization Header: http://localhost/phpAuthJWT/api/getAllStudents
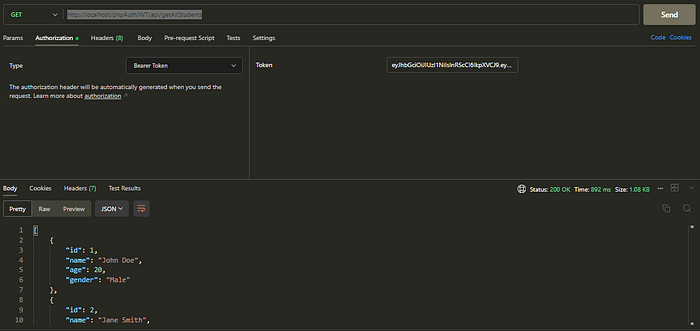 endpoint testing
Not working properly without Authorization Header: http://localhost/phpAuthJWT/api/getAllStudents
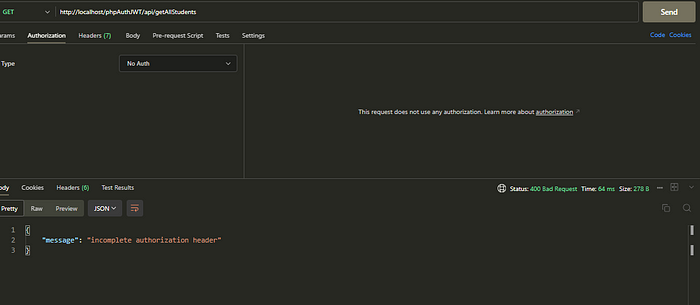 endpoint testing
Suggestions
After setting up our JWT, there’s a whole new world to explore. You can experiment with our API by creating custom URLs for specific tasks, such as finding students by name or letting users create and update their own student profiles by tracking the user_id of the user. You can use various HTTP methods like GET, POST, PATCH, and DELETE to manage data effectively. While this article covers the basics, there’s an abundance of possibilities waiting to be explored when comes to creating a robust API.
JWT tokens provide a convenient and efficient way to handle authentication and authorization in web applications. However, it’s crucial to recognize that they are not absolutely foolproof. It’s essential to avoid putting sensitive information in the payload component of the token, as the payload is typically base64URLEncoded and can be easily decoded. Additionally, the secret key used to sign the token should be kept hidden and never exposed to public information, as it can compromise the security of the system.
In JWT tokens, the header, payload, and signature are all base64URLEncoded, ensuring compatibility with URLs and safe transmission over the web. However, it’s important to note that JWT tokens should have an expiration time to mitigate the risk of token misuse. In the next part, we will explore how to implement token expiration and introduce refresh tokens to enhance the security of our authentication system.
We have explored the implementation of JSON Web Tokens (JWTs) and learned how to utilize them. However, a significant security concern persists: our tokens, specifically referred to as access tokens in this context, can currently access our resources indefinitely. This practice does not align with industry standards. To enhance security, we should implement token expiration for our JWTs. Additionally, adopting a two-token system comprising a refresh token alongside our access token is recommended.
How to Implement Token Expiration

We'll focus on implementing access tokens and refresh tokens. Any necessary additions to our project or database structure will be introduced as we progress through the implementation.
Let's get right into it!
Access tokens must have an expiration mechanism. We need our JWT tokens to automatically expire after a short period, requiring users to request a new token once it expires.
Prompting users to log in every minute when the token expires is not user-friendly. Instead, we can issue a refresh token. The refresh token typically has a longer lifespan than the access token. When the access token expires, the client can leverage the refresh token to obtain a new access token. We will incorporate an endpoint for the client to refresh the access token seamlessly.
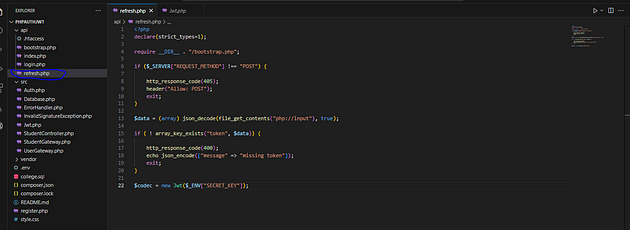
Continuing from where we left off, we will now create a refresh endpoint in our api folder. As we know this endpoint serves as our entry point for handling requests related to token refreshing and will be named refresh.php.
<?php
declare(strict_types=1);

require __DIR__ . "/bootstrap.php";

if ($_SERVER["REQUEST_METHOD"] !== "POST") {

    http_response_code(405);
    header("Allow: POST");
    exit;
}

$data = (array) json_decode(file_get_contents("php://input"), true);

if ( ! array_key_exists("token", $data)) {

    http_response_code(400);
    echo json_encode(["message" => "missing token"]);
    exit;
}

$JwtController = new Jwt($_ENV["SECRET_KEY"]);
It checks if the incoming request method is POST; otherwise, it responds with a 405 HTTP status code and allows only POST requests. The script then parses JSON data from the request body, ensuring it contains a “token” key. If the token is missing, it responds with a 400 status code and a JSON message indicating the absence of the token. Finally, the script initializes a Jwt object with a secret key from the environment variables for further token processing.
 refresh.php file
Before proceeding with the setup of our refresh endpoint, we will create a class called RefreshTokenGateway.php to handle operations related to refreshing tokens. The RefreshTokenGateway class includes methods for creating, deleting, fetching, and managing expired refresh tokens within our database.
The RefreshTokenGateway class utilizes a PDO connection and a secret key for hashing tokens. Its constructor initializes the database connection and secret key variables. The create method generates a hash for the token and inserts it into the refresh_token table along with its expiration time. The delete method removes a token from the database based on its hash value. The getByToken method retrieves token details based on its hash. Lastly, the deleteExpired method deletes expired tokens from the database, ensuring efficient token management.
Overall, the RefreshTokenGateway class provides essential functionality for maintaining and handling refresh tokens securely within our web application.
RefreshTokenGateway.php:
<?php

class RefreshTokenGateway
{
    private PDO $conn;
    private string $key;

    public function __construct(Database $database, string $key)
    {
        $this->conn = $database->getConnection();
        $this->key = $key;
    }

    public function create(string $token, int $expiry): bool
    {
        $hash = hash_hmac("sha256", $token, $this->key);

        $sql = "INSERT INTO refresh_token (token_hash, expires_at)
                VALUES (:token_hash, :expires_at)";

        $stmt = $this->conn->prepare($sql);

        $stmt->bindValue(":token_hash", $hash, PDO::PARAM_STR);
        $stmt->bindValue(":expires_at", $expiry, PDO::PARAM_INT);

        return $stmt->execute();
    }

    public function delete(string $token): int
    {
        $hash = hash_hmac("sha256", $token, $this->key);

        $sql = "DELETE FROM refresh_token
                WHERE token_hash = :token_hash";

        $stmt = $this->conn->prepare($sql);

        $stmt->bindValue(":token_hash", $hash, PDO::PARAM_STR);

        $stmt->execute();

        return $stmt->rowCount();
    }

    public function getByToken(string $token): array | false
    {
        $hash = hash_hmac("sha256", $token, $this->key);

        $sql = "SELECT *
                FROM refresh_token
                WHERE token_hash = :token_hash";

        $stmt = $this->conn->prepare($sql);

        $stmt->bindValue(":token_hash", $hash, PDO::PARAM_STR);

        $stmt->execute();

        return $stmt->fetch(PDO::FETCH_ASSOC);
    }

    public function deleteExpired(): int
    {
        $sql = "DELETE FROM refresh_token
                WHERE expires_at < UNIX_TIMESTAMP()";

        $stmt = $this->conn->query($sql);

        return $stmt->rowCount();
    }
}
Updated Folder Structure
From the code snippet provided for our [RefreshTokenGateway](https://github.com/Oghenekparobo/php_auth_jwt_tut/blob/refresh-token/src/RefreshTokenGateway.php) class, it's evident that a new table has been incorporated into our database. We have updated our college.sql file to accommodate this change. Kindly import the updated SQL file into your database, following the process outlined in the first part of this article.
Additionally, a new exception class named TokenExpiredException has been introduced. Ensure to update your project structure or files accordingly to include this new exception handling. This ensures that your project remains up-to-date and aligned with the latest changes in token management.
Before we finish setting up our refresh endpoint for obtaining a new access token after expiration, let’s integrate the retrieval of our refresh token and access token into our login endpoint. We have the RefreshTokenGateway class to manage refresh tokens, and we'll create the tokens.php file in our api folder for token creation, which will be used in both the refresh and login endpoints. This approach ensures a straightforward and unified token management process across our application.
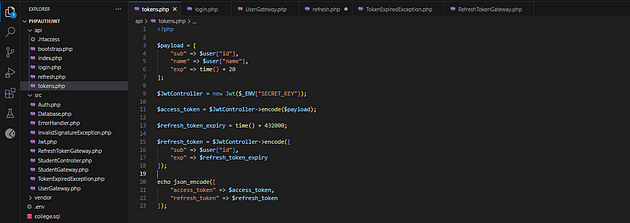
tokens.php:
<?php

$payload = [
    "sub" => $user["id"],
    "name" => $user["name"],
    "exp" => time() + 20
];

$JwtController = new Jwt($_ENV["SECRET_KEY"]);

$access_token = $JwtController->encode($payload);

$refresh_token_expiry = time() + 432000;

$refresh_token = $JwtController->encode([
    "sub" => $user["id"],
    "exp" => $refresh_token_expiry
]);

echo json_encode([
    "access_token" => $access_token,
    "refresh_token" => $refresh_token
]);
The main difference between the refresh token and the payload (access token claims) is that the payload contains detailed user information like ID and name, and its expiration is shorter (20 seconds) for security reasons. On the other hand, the refresh token only contains the user ID and has a longer expiration (5 days) to allow for longer-lasting authentication without needing frequent logins. This separation of tokens and their respective lifespans enhances security and user convenience in token-based authentication systems.
login.php:
<?php

require __DIR__ . '/bootstrap.php';

if ($_SERVER['REQUEST_METHOD'] !== 'POST') {
    http_response_code(405);
    header('ALLOW: POST');
    exit();
}

$contentType = isset($_SERVER["CONTENT_TYPE"]) ? trim($_SERVER["CONTENT_TYPE"]) : '';


if ($contentType !== 'application/json') {
    http_response_code(415);
    echo json_encode(["message" => "Only JSON content is supported"]);
    exit();
}

$data = json_decode(file_get_contents('php://input'), true);

if ($data === null) {
    http_response_code(400);
    echo json_encode(["message" => "Invalid JSON data"]);
    exit();
}


if (!array_key_exists('username', $data) || !array_key_exists('password', $data)) {
    http_response_code(400);
    echo json_encode(["message" => "Missing login credentials"]);
    exit();
}

$user_gateway = new UserGateway($database);

$user = $user_gateway->getByUsername($data['username']);

if ($user === false) {
    http_response_code(401);
    echo json_encode(["message" => "invalid authentication"]);
    exit;
}

if (!password_verify($data['password'], $user['password_hash'])) {
    http_response_code(401);
    echo json_encode(["message" => "invalid authentication"]);
    exit;
}


require __DIR__ . "/tokens.php";

$refresh_token_gateway = new RefreshTokenGateway($database, $_ENV["SECRET_KEY"]);

$refresh_token_gateway->create($refresh_token, $refresh_token_expiry);
Testing our login endpoint with the right parameters should result in the following response:
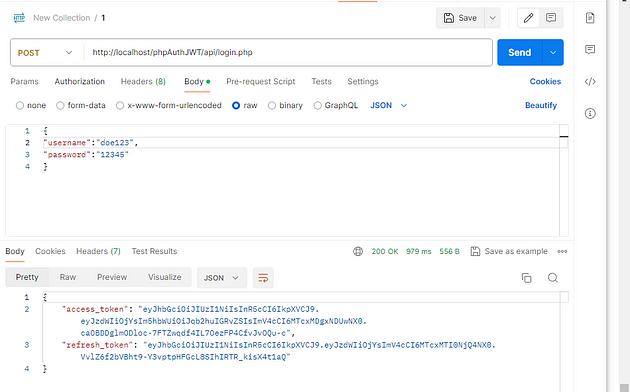 endpoint testing
Note: Before we move on let us update our Jwt class, the decode function to be specific. The updated decode function in the Jwt class checks if a token has the correct format, ensuring it has a header, payload, and signature. It then verifies the token's signature to confirm it hasn't been tampered with. After that, it decodes the payload (containing user information and expiration time) from the token. Lastly, it checks if the token has expired, throwing an error if it has. Overall, these steps ensure the token is valid, unaltered, and within its expiration period for secure usage in the application.
Jwt class:
<?php

class Jwt
{

    public function __construct(private string $key)
    {

    }

    public function encode(array $payload): string
    {

        $header = json_encode([
            "alg" => "HS256",
            "typ" => "JWT"
        ]);

        $header = $this->base64URLEncode($header);
        $payload = json_encode($payload);
        $payload = $this->base64URLEncode($payload);

        $signature = hash_hmac("sha256", $header . "." . $payload, $this->key, true);
        $signature = $this->base64URLEncode($signature);
        return $header . "." . $payload . "." . $signature;
    }


    public function decode(string $token): array
    {
        if (preg_match("/^(?<header>.+)\.(?<payload>.+)\.(?<signature>.+)$/",
                   $token,
                   $matches) !== 1) {

            throw new InvalidArgumentException("invalid token format");
        }

        $signature = hash_hmac("sha256",
                               $matches["header"] . "." . $matches["payload"],
                               $this->key,
                               true);

        $signature_from_token = $this->base64urlDecode($matches["signature"]);

        if ( ! hash_equals($signature, $signature_from_token)) {

            throw new InvalidSignatureException;
        }

        $payload = json_decode($this->base64urlDecode($matches["payload"]), true);

        if ($payload["exp"] < time()) {

            throw new TokenExpiredException;
        }

        return $payload;
    }


    private function base64URLEncode(string $text): string
    {

        return str_replace(['+', '/', '='], ['-', '_', ''], base64_encode($text));
    }

    private function base64URLDecode(string $text): string
    {
        return base64_decode(
            str_replace(
                ["-", "_"],
                ["+", "/"],
                $text
            )
        );
    }


}
Updated UserGateway.php class
<?php

class UserGateway
{
    private PDO $conn;

    public function __construct(Database $database)
    {
        $this->conn = $database->getConnection();
    }

    public function getByAPIKey(string $key): array | false
    {
        $sql = "SELECT *
                FROM user
                WHERE api_key = :api_key";

        $stmt = $this->conn->prepare($sql);

        $stmt->bindValue(":api_key", $key, PDO::PARAM_STR);

        $stmt->execute();

        return $stmt->fetch(PDO::FETCH_ASSOC);
    }

    public function getByUsername(string $username): array | false
    {
        $sql = "SELECT *
                FROM user
                WHERE username = :username";

        $stmt = $this->conn->prepare($sql);

        $stmt->bindValue(":username", $username, PDO::PARAM_STR);

        $stmt->execute();

        return $stmt->fetch(PDO::FETCH_ASSOC);
    }

    public function getByID(int $id): array | false
    {
        $sql = "SELECT *
                FROM user
                WHERE id = :id";

        $stmt = $this->conn->prepare($sql);

        $stmt->bindValue(":id", $id, PDO::PARAM_INT);

        $stmt->execute();

        return $stmt->fetch(PDO::FETCH_ASSOC);
    }
}
Fnishing up with the ‘refresh’ endpoint:
<?php
declare(strict_types=1);

require __DIR__ . "/bootstrap.php";

if ($_SERVER["REQUEST_METHOD"] !== "POST") {

    http_response_code(405);
    header("Allow: POST");
    exit;
}

$data = (array) json_decode(file_get_contents("php://input"), true);

if ( ! array_key_exists("token", $data)) {

    http_response_code(400);
    echo json_encode(["message" => "missing token"]);
    exit;
}

$JwtController = new Jwt($_ENV["SECRET_KEY"]);

try {
    $payload = $JwtController->decode($data["token"]);

} catch (Exception) {

    http_response_code(400);
    echo json_encode(["message" => "invalid token"]);
    exit;
}

$user_id = $payload["sub"];


$refresh_token_gateway = new RefreshTokenGateway($database, $_ENV["SECRET_KEY"]);

$refresh_token = $refresh_token_gateway->getByToken($data["token"]);

if ($refresh_token === false) {

    http_response_code(400);
    echo json_encode(["message" => "invalid token (not on whitelist)"]);
    exit;
}

$user_gateway = new UserGateway($database);

$user = $user_gateway->getByID($user_id);

if ($user === false) {

    http_response_code(401);
    echo json_encode(["message" => "invalid authentication"]);
    exit;
}

require __DIR__ . "/tokens.php";

$refresh_token_gateway->delete($data["token"]);

$refresh_token_gateway->create($refresh_token, $refresh_token_expiry);
The code then proceeds to validate the HTTP request method, ensuring that only POST requests are accepted for sensitive operations like token handling. This validation is significant as it helps prevent unauthorized access and ensures the security of authentication processes.
Next, the code retrieves and decodes JSON data from the request body, specifically looking for a “token” key. This token is pivotal for authentication and access control within the application. If the token is missing, the code responds with an error message, highlighting the importance of including valid tokens for secure access.
The decoded token is then passed to the JwtController instance to decode its payload and validate its authenticity. This step is crucial as it verifies the integrity of the token and ensures that it hasn't been tampered with or forged.
Furthermore, the code interacts with a RefreshTokenGateway to manage refresh tokens, which play a vital role in generating access tokens securely. Refresh tokens provide a way to obtain new access tokens without requiring the user to log in again, enhancing user experience and maintaining continuous access to resources.
When a user logs in via the login endpoint, two crucial tokens are provided: an access token and a refresh token. The access token grants immediate access to resources, while the refresh token serves as a long-term authorization tool. If the access token expires, the refresh token is then passed to the refresh endpoint. This action triggers the generation of a new access token, which, in turn, creates a fresh refresh token. This process forms a robust and secure mechanism ensuring continuous access to resources while maintaining high levels of security and user convenience.
 endpoint testing
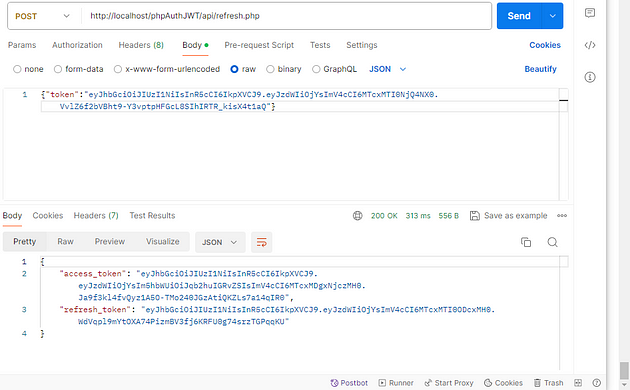 endpoint testing
Conclusion
In the analyzed code snippets and explanations regarding token management, authentication mechanisms, and refresh token usage within a web application, several key conclusions can be drawn.
Firstly, token-based authentication, especially using JSON Web Tokens, offer a secure and efficient way to handle user authentication and authorization processes. JWTs encapsulate user information in a compact format and are digitally signed, ensuring their integrity and authenticity.
Secondly, the implementation of access tokens and refresh tokens enhances security and user experience. Access tokens provide immediate access to resources and have a short lifespan, promoting security by limiting their usability in case of unauthorized access. On the other hand, refresh tokens have a longer lifespan and enable users to obtain new access tokens without repeated authentication, thereby improving user convenience.
Furthermore, strict typing enforcement, proper validation of HTTP request methods, and token format checks are crucial elements in ensuring the robustness and reliability of token-based authentication systems. These practices help prevent common vulnerabilities such as unauthorized access attempts, token tampering, and invalid token usage.
Overall, by combining secure token management practices, effective authentication mechanisms, and adherence to coding best practices, web applications can achieve a high level of security, user-friendliness, and resilience against potential threats.
See the full code here.