
Ever since I was a kid, I've been hooked on video games. My first experience with coding involved kind of a wild project – a Tron races simulator in Quick Basic on an ancient IBM computer (I was like 6 years old, so I didn't really understand what I was doing).
Fast forward through years of coding and here I am, still writing software and going into the world of game development.
With my sights set on becoming an indie game developer, I decided to explore PyGame, given my "fluency" in Python with teaching it and all.
After some brainstorming, I landed on a quirky concept: a game where you play as an alien cruising around in a UFO. Your mission? Hit a specific abduction quota each week to dodge sanctions from the Intergalactic Federation.
I won't lie, I was heavily inspired by the old "Luna lander" that I had in the same old IBM computer.
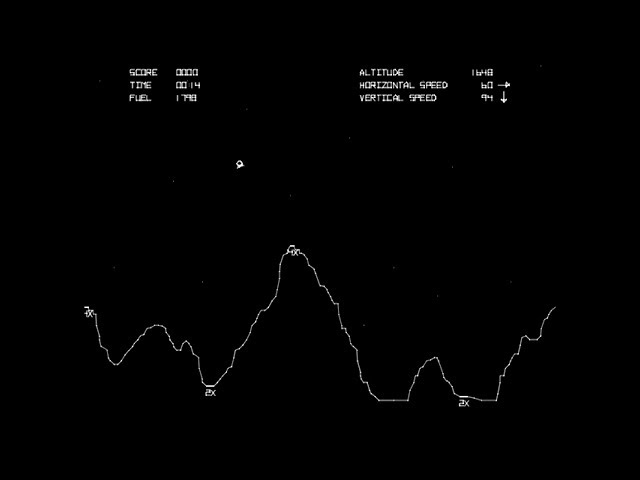
Black and White Luna Lander screen shot
Why I think making games is cooler than your average coding project
So, imagine you're coding, and suddenly it hits you – games! Yep, we're talking about the stuff that turns a screen into an interactive universe where you're not just a coder – you're a wizard creating spells (or lines of code) that make things move, shoot, and explode without legal repercussions.
Here's why diving into game development is like finding the secret level into software development:
It's coding with a purpose: Forget boring programs – you're creating a universe where aliens abduct cows because...why not?
No more lone wolf coding: Games need more than code. They also need stories, characters, and cool graphics. Suddenly, you're not just a coder – you're a one-person army conquering design, storytelling, and maybe a bit of sound engineering.
It's like LEGO for coders: You get to build stuff, break it, and then build it again! Game development is all about trial and error, making it the LEGO of coding projects. Who said debugging can't be fun?
Creativity party: Ever wanted to create a world where gravity works sideways, and cows wear spacesuits? In game development, your creativity runs wild.
Solving mysteries, coding edition: Games come with puzzles. Not just for players, but for you, the mastermind behind the scenes. Think of it as creating your own coding mystery novel where every bug is a plot twist waiting to be solved.
Learn by playing: Remember those boring textbooks? Well, forget them. With game development, you're not just reading – you're playing.
Show off your skills: Building games isn't just about fun. It's about flexing your coding muscles. Your game is your trophy, your badge of honor. Imagine showing up to a job interview with a game you built. Who's cool now?
So, why settle for coding when you can create a universe? Game development is where coding becomes an epic adventure, and you, my friend, are the hero. Ready to level up?
Alright, let's craft this game together, step by step, and make it a blast! Wondering what it'll look like when it's all done? Check out this snazzy preview:
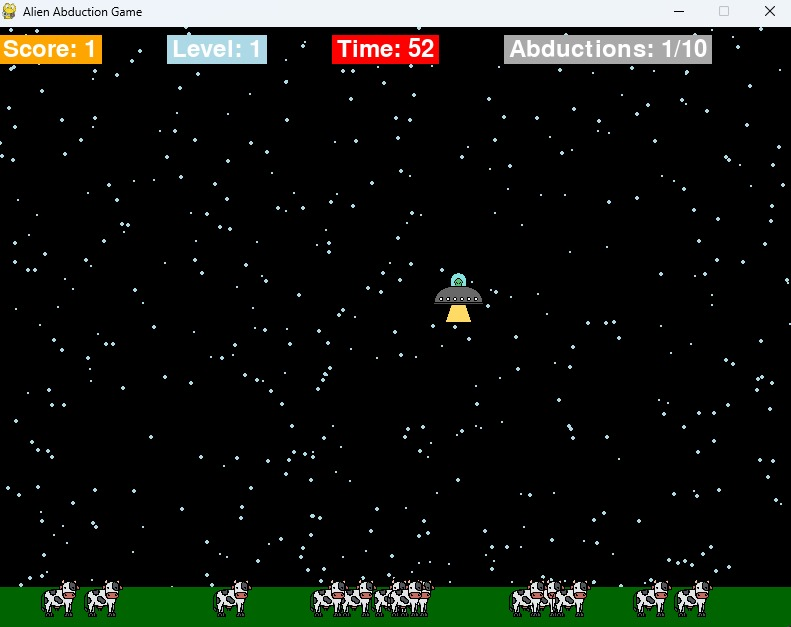
Preview of what the game will look like, showing an alien spaceship descending to pick up some cows.
Table of Contents:
How to Set Up the Environment
Install PyGame
Let's kick off this journey by setting up the playground. First, you'll need to install PyGame. Here's a simple guide to get you started.
1. Create a new directory
Open your favorite terminal and navigate to the location where you want to keep your game. Create a new directory for your project. Let's call it "AlienAbductionGame."
mkdir AlienAbductionGame
2. Navigate to the project directory
Move into your newly created directory.
cd AlienAbductionGame
3. Install PyGame
pip install pygame
Great! Now you're armed with PyGame, and you're ready to get into the coding.
What else do you need to start?
You already have Python with PyGame installed on your computer. So, the last thing you need is your favorite code editor. I will use and recommend Visual Studio Code, but you can use any other editor that you like or feel comfortable with.
Once you have everything installed and your editor ready, let's start by understanding the game concept and its mechanics.
How to Design the Game Concept
Game idea: Alien abduction adventure
Picture this: You're an alien pilot cruising through the cosmos in your trusty UFO. Unfortunately, you're falling behind on your weekly quota of abductions, and the Intergalactic Federation isn't too pleased. To avoid a cosmic penalty, you must abduct various targets on Earth.
Mechanics
Abduction quota and levels:
At the start of each level, you're given a specific abduction quota. This represents the number of cows you must abduct to progress.
The game consists of ten levels, each with an increasing quota. Completing one level unlocks the next and restart the quota counter.
UFO Controls:
Use the arrow keys or your preferred controls to navigate the UFO across the game screen.
Precise movements are crucial for successful abductions. Mastering the controls ensures efficient target acquisition.
Targets – adorable cows:
Targets are charming, pixelated cows wandering on the Earth's surface. You'll approach a cow, activate your tractor beam (space bar), and watch the cow dissappear from your screen.
Tractor beam mechanics:
You'll press the space bar to activate the tractor beam, which extends from your UFO to the ground.
When the beam touches a cow, it triggers the abduction process, and the cow dissappears, increasing your score and abduction quota.
Timer and urgency:
Each level comes with a countdown timer, adding a sense of urgency to your abductions.
Successfully reaching the abduction quota before the timer hits zero ensures advancement to the next level.
How to decide on game elements (spaceship, targets, and so on)
When it comes to selecting your game elements, simplicity is key. The simpler, the better. So, let's take a look at what you'll need to make the game mechanics work.
- Spaceship (UFO):
Instead of intricate designs, focus on a distinctive UFO sprite, a cute one
Prioritize smooth movements and responsiveness to player controls.
- Targets (cows):
Opt for a cute cow sprite that aligns with the game's humor.
Consider changing the cow's color when it's abducted – you will code a red bubble signifying abduction.
- Background and environment:
Maintain a clean and straightforward background, adjusting the color scheme to match the game's progression.
Gradually modify the star color with each level to signify advancement.
- Tractor beam:
- Ensure the tractor beam is visually distinguishable. You can experiment with a basic, yet effective, plain yellow color.
- Level indicators:
- Implement a simple level indicator displaying the current level. This can be a small section at the corner of the screen.
- Game Over and victory screens:
- Design straightforward screens indicating success or failure. A simple "Game Over" and "You Win" with accompanying text will suffice, like the following one
Winning screen
How to Code the Game
Walkthrough of key sections of the code
Now that you have a clear concept and understanding of our game mechanics and it's elements, it's time to get into the code. We'll walk through the key sections of the code.
First, let's start by importing the stuff you need to code our game:
import pygame
import random
import sys
In this section, you are importing three modules: pygame, random, and sys.
pygame: This is the main library you're using to create the game. It provides functions and tools for handling graphics, user input, and more.
random: you'll use this module to generate random numbers. This comes in handy when you want things to happen unpredictably, like the initial position of targets.
sys: This module provides access to some variables used or maintained by the Python interpreter and to functions that interact strongly with the interpreter. You'll use it for handling system events, such as quitting the game when the player closes the window.
So, you're basically gearing up with the tools you need to make the game visually appealing, dynamic, and responsive to player input.
How to code the start screen
def start_screen(screen):
    # Constants
    WIDTH, HEIGHT = 800, 600
    BLACK = (0, 0, 0)
    WHITE = (255, 255, 255)
    FONT_SIZE = 30

    # Font for displaying the text
    font = pygame.font.Font(None, FONT_SIZE)

    # Fill the screen with the background color
    screen.fill(BLACK)

    # Introduction text
    intro_text = [
        "Welcome, Alien Abductor!",
        "You're behind on your weekly quota of abductions.",
        "Help the alien catch up by abducting targets on Earth!",
        "",
        "----------------------------------------------------------------------------------------------",
        "Move the UFO with ARROWS and",
        "press SPACE to abduct cows with the track bean.",
        "----------------------------------------------------------------------------------------------",
        "",
        "Press any key to start the game...",
        "",
    ]

    # Render and display the introduction text
    y_position = HEIGHT // 4
    for line in intro_text:
        text = font.render(line, True, WHITE)
        text_rect = text.get_rect(center=(WIDTH // 2, y_position))
        screen.blit(text, text_rect)
        y_position += FONT_SIZE

    pygame.display.flip()

    # Wait for a key press to start the game
    wait_for_key()

def wait_for_key():
    waiting = True
    while waiting:
        for event in pygame.event.get():
            if event.type == pygame.QUIT:
                pygame.quit()
                sys.exit()
            elif event.type == pygame.KEYDOWN:
                waiting = False
Code explanation:
The
start_screenfunction takes ascreenparameter, which is the Pygame window where you'll display our introduction. It sets up some constants for screen dimensions, colors, and font size.The screen is filled with a black background.
An introduction text is defined in
intro_text, providing a welcome message, instructions, and a prompt to start the game.Using Pygame's font functionality, the text is rendered and displayed on the screen.
The function then waits for a key press to start the game by calling the
wait_for_keyfunction.The
wait_for_keyfunction loops until a key is pressed or the user closes the window. If a key is pressed, the loop exits, and the introduction screen disappears.
So, by now, you should have something like this:
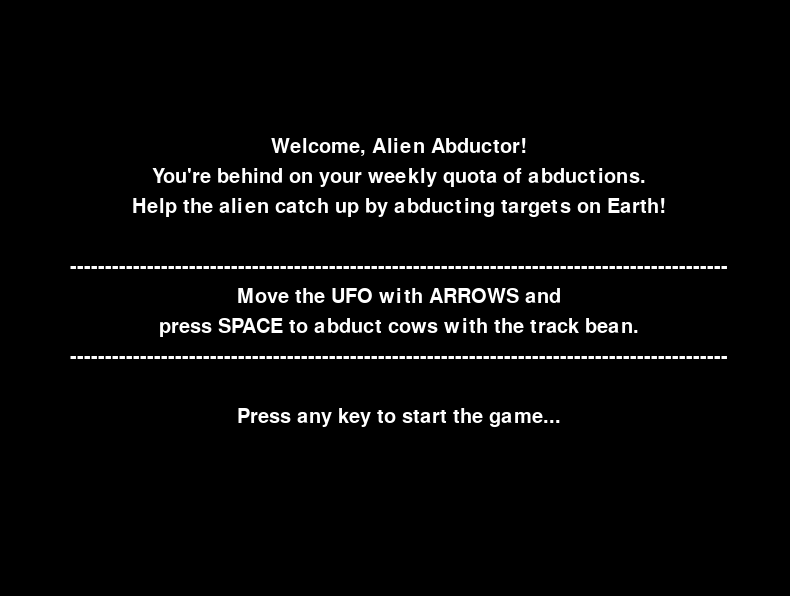
Start screen
How to build text on the screen function
Now, let's look at the following block of code:
def show_text_on_screen(screen, text, font_size, y_position):
    font = pygame.font.Font(None, font_size)
    text_render = font.render(text, True, (255, 255, 255))
    text_rect = text_render.get_rect(center=(WIDTH // 2, y_position))
    screen.blit(text_render, text_rect)
This code defines a function show_text_on_screen that displays a text message on the Pygame window. Let's break it down:
- The function takes four parameters:
screen: The Pygame window where the text will be displayedtext: The message or text string to be displayed.font_size: The size of the font for the text.y_position: The vertical position on the screen where the text will be centered.
It creates a Pygame font object with the specified size.
Using the font object, it renders the text with white color (
(255, 255, 255)represents RGB values for white).The
get_rectmethod is used to get the rectangular area that encloses the rendered text. The center of this rectangle is set to be at the horizontal center and the specified vertical position.Finally, the rendered text is blitted (drawn) onto the screen at the specified position.
This function provides a convenient way to display text messages on the screen with a specified font size and vertical position.
How to code the "Game Over" screen
Now, you will code a game over screen, so keep going and check the next block of code:
def game_over_screen(screen):
    screen.fill((0, 0, 0))  # Fill the screen with black
    show_text_on_screen(screen, "Game Over", 50, HEIGHT // 3)
    show_text_on_screen(screen, f"Your final score: {score}", 30, HEIGHT // 2)
    show_text_on_screen(screen, "Press any key to exit...", 20, HEIGHT * 2 // 3)
    pygame.display.flip()
    wait_for_key()
Picking apart the game over screen:
screen.fill((0, 0, 0)): Fills the entire Pygame window with a black background.show_text_on_screen(screen, "Game Over", 50, HEIGHT // 3): Displays the text "Game Over" with a font size of 50, centered vertically at one-third of the screen height.show_text_on_screen(screen, f"Your final score: {score}", 30, HEIGHT // 2): Displays the player's final score with a font size of 30, centered vertically at half of the screen height.show_text_on_screen(screen, "Press any key to exit...", 20, HEIGHT * 2 // 3): Displays the instruction to press any key to exit with a font size of 20, centered vertically at two-thirds of the screen height.pygame.display.flip(): Updates the display to show the changes.wait_for_key(): Waits for a key press before proceeding, effectively making the screen stay until the player interacts.
This function is used to show a game over screen with relevant information such as the final score and an exit instruction, something that by now should look like this:
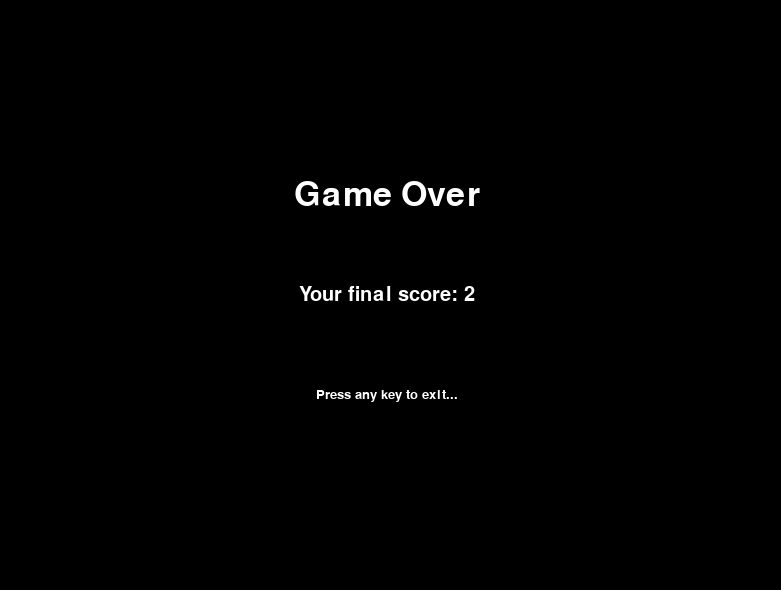
Game Over screen
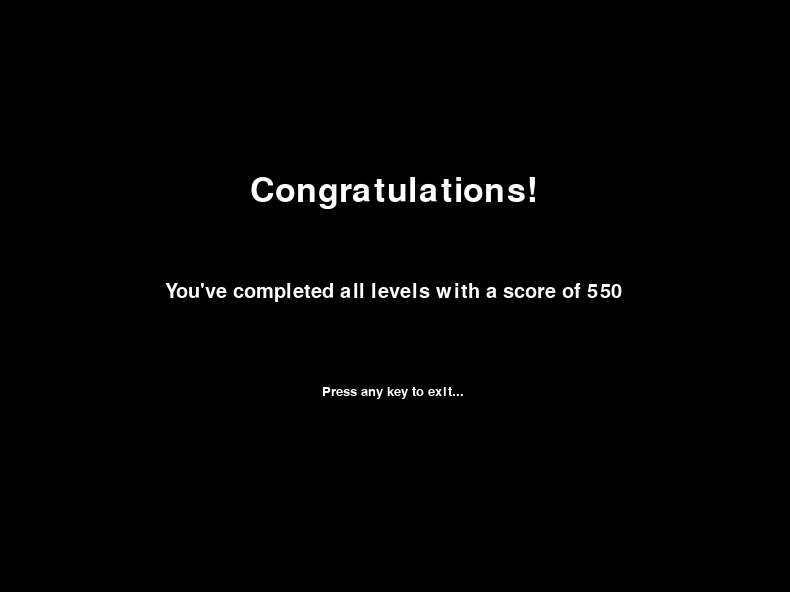
You win! How to code the victory screen :)
And last but not least, you have the victory screen, so let's take a look at the screen code:
def victory_screen(screen):
    screen.fill((0, 0, 0))  # Fill the screen with black
    show_text_on_screen(screen, "Congratulations!", 50, HEIGHT // 3)
    show_text_on_screen(screen, f"You've completed all levels with a score of {score}", 30, HEIGHT // 2)
    show_text_on_screen(screen, "Press any key to exit...", 20, HEIGHT * 2 // 3)
    pygame.display.flip()
    wait_for_key()
Code explanation:
screen.fill((0, 0, 0)): Fills the entire Pygame window with a black background.show_text_on_screen(screen, "Congratulations!", 50, HEIGHT // 3): Displays the text "Congratulations!" with a font size of 50, centered vertically at one-third of the screen height.show_text_on_screen(screen, f"You've completed all levels with a score of {score}", 30, HEIGHT // 2): Displays a congratulatory message with the player's final score and a font size of 30, centered vertically at half of the screen height.show_text_on_screen(screen, "Press any key to exit...", 20, HEIGHT * 2 // 3): Displays the instruction to press any key to exit with a font size of 20, centered vertically at two-thirds of the screen height.pygame.display.flip(): Updates the display to show the changes.wait_for_key(): Waits for a key press before proceeding, effectively making the screen stay until the player interacts.
This function is used to show a victory screen with a congratulatory message and the player's final score.
So now you have the start of the game, the screens you will use to communicate with the player.
Let's build some sprites
Next up, you will code the base parameters such as the window size, sprites (the UFO and cow), colors, stars, and so on.
Take a look to the following block of code:
# Load spaceship and cow images
ovni = pygame.image.load("ovni.png")
cow = pygame.image.load("cow.png")

# Resize images if needed
ovni = pygame.transform.scale(ovni, (50, 50))
cow = pygame.transform.scale(cow, (40, 40))

# Initialize Pygame
pygame.init()

# Constants
WIDTH, HEIGHT = 800, 600
FPS = 60
BLACK = (0, 0, 0)
WHITE = (255, 255, 255)
RED = (255, 0, 0)
YELLOW = (255, 255, 0)
GRAY = (169, 169, 169)
ORANGE = (255, 165, 0)
LIGHT_BLUE = (173, 216, 230)  # Light blue color for the level indicator
SHIP_GREEN = (0, 255, 0)  # Green color for the ship
GRASS_GREEN = (0, 100, 0)  # Darker green color for the grass
STAR_COUNT = int(WIDTH * HEIGHT * 0.001)
Code explanation:
ovni = pygame.image.load("ovni.png")andcow = pygame.image.load("cow.png"): Load the spaceship (ovni) and cow images from files.ovni = pygame.transform.scale(ovni, (50, 50))andcow = pygame.transform.scale(cow, (40, 40)): Resize the images if needed. In this case, the spaceship is resized to a width and height of 50 pixels, and the cow is resized to a width and height of 40 pixels.pygame.init(): Initializes Pygame.
Constants:
WIDTH, HEIGHT = 800, 600: Sets the width and height of the game window.FPS = 60: Sets the frames per second for the game.Colors:
BLACK, WHITE, RED, YELLOW, GRAY, ORANGE: Define color constants using RGB values.LIGHT_BLUE, SHIP_GREEN, GRASS_GREEN: Additional color constants for specific elements.STAR_COUNT: Calculates the number of stars based on the window size.
This section handles the setup of images for the spaceship and cow, adjusting their sizes as needed. It also establishes constants for various aspects of the game.
The subsequent steps involve creating the game window and implementing player controls, collision detection, and other essential elements of the gameplay.
How to code the game window and set up the FPS
# Create the game window
screen = pygame.display.set_mode((WIDTH, HEIGHT))
pygame.display.set_caption("Alien Abduction Game")

# Clock to control the frame rate
clock = pygame.time.Clock()

# Player (alien spaceship)
player_rect = pygame.Rect(WIDTH // 2 - 25, 10, 50, 50)
player_speed = 5

# List to store targets (animals)
targets = []

# Set initial score
score = 0

# Font for displaying the score, level, and timer
font = pygame.font.Font(None, 36)

# Flag to track if spacebar is pressed
space_pressed = False

# List to store stars
stars = [{'x': random.randint(0, WIDTH), 'y': random.randint(0, HEIGHT), 'size': random.randint(1, 3),
          'color': LIGHT_BLUE} for _ in range(STAR_COUNT)]

# Grassy area at the bottom
grass_rect = pygame.Rect(0, HEIGHT - 40, WIDTH, 40)

# Level and Countdown Variables
current_level = 1
abduction_target = 10  # Initial target
countdown_timer = 60  # Initial countdown timer in seconds
current_score = 0  # New counter to track the score for the current level

# Counter to control the pace of target appearances
target_spawn_counter = 0
TARGET_SPAWN_RATE = max(30, 120 - (current_level * 90))  # Adjust the rate based on the current level

# List of colors for each level
level_colors = [
    LIGHT_BLUE,
    ORANGE,
    RED,
    YELLOW,
    GRAY,
    (0, 255, 0),  # Green
    (255, 0, 255),  # Purple
    (0, 255, 255),  # Cyan
    (255, 165, 0),  # Orange
    (128, 0, 128),  # Indigo
]
Code explanation:
Creating the Game Window:
screen = pygame.display.set_mode((WIDTH, HEIGHT)): This line creates the game window with the specified width and height.pygame.display.set_caption("Alien Abduction Game"): Sets the title or caption of the game window.
Clock for Frame Rate:
clock = pygame.time.Clock(): Initializes a clock object to control the frame rate of the game.
Player (Alien Spaceship):
player_rect = pygame.Rect(WIDTH // 2 - 25, 10, 50, 50): Defines a rectangular area for the player (alien spaceship) at the top center of the window.player_speed = 5: Sets the speed at which the player can move.
Targets (Animals):
targets = []: Initializes an empty list to store targets (animals).
Score:
score = 0: Initializes the score to zero.
Font for Displaying Text:
font = pygame.font.Font(None, 36): Creates a font object for displaying score, level, and timer.
Spacebar Pressed Flag:
space_pressed = False: Initializes a flag to track whether the spacebar is pressed.
Stars:
stars = [...]: Creates a list of stars with random positions, sizes, and colors. This is used to create a starry background.
Grassy Area at the Bottom:
grass_rect = pygame.Rect(0, HEIGHT - 40, WIDTH, 40): Defines a rectangular area at the bottom for a grassy background.
Level and Countdown Variables:
current_level = 1: Initializes the game at level 1.abduction_target = 10: Sets the initial abduction target.countdown_timer = 60: Sets the initial countdown timer in seconds.current_score = 0: Initializes a counter to track the score for the current level.
Target Spawn Counter:
target_spawn_counter = 0: Initializes a counter to control the pace of target appearances.
Target Spawn Rate:
TARGET_SPAWN_RATE = max(30, 120 - (current_level * 90)): Adjusts the rate of target appearance based on the current level.
Colors for Each Level:
level_colors = [...]: Defines a list of colors for each level, which will be used in the game.
These variables and settings establish the initial state of the game, defining the player, targets, scoring system, and visual elements. Your game will evolve and respond to player actions based on these initial conditions.
How to code the game mechanisms
Take a look at these functions that you will use to run the game. Try to code it yourself before you copy and paste the code. This will help you understand the thinking process between the mechanics and the actual code.
# Function to display the start screen
start_screen(screen)

# Main game loop
running = True
game_started = False  # Flag to track whether the game has started

while running:
    for event in pygame.event.get():
        if event.type == pygame.QUIT:
            running = False
        elif event.type == pygame.KEYDOWN:
            if game_started:
                game_started = True  # Set the flag to True to avoid calling start_screen repeatedly
                continue  # Skip the rest of the loop until the game has started
            elif event.key == pygame.K_SPACE:
                space_pressed = True
        elif event.type == pygame.KEYUP and event.key == pygame.K_SPACE:
            space_pressed = False

    keys = pygame.key.get_pressed()

    # Move the player
    player_rect.x += (keys[pygame.K_RIGHT] - keys[pygame.K_LEFT]) * player_speed
    player_rect.y += (keys[pygame.K_DOWN] - keys[pygame.K_UP]) * player_speed

    # Ensure the player stays within the screen boundaries
    player_rect.x = max(0, min(player_rect.x, WIDTH - player_rect.width))
    player_rect.y = max(0, min(player_rect.y, HEIGHT - player_rect.height))

    # Spawn a new target based on the counter
    target_spawn_counter += 1
    if target_spawn_counter >= TARGET_SPAWN_RATE:
        target_rect = pygame.Rect(random.randint(0, WIDTH - 20), HEIGHT - 50, 50, 50)
        targets.append(target_rect)
        target_spawn_counter = 0

    # Update star glow animation and color for the current level
    for star in stars:
        star['size'] += 0.05
        if star['size'] > 3:
            star['size'] = 1
        star['color'] = level_colors[current_level - 1]
Code explanation:
Display Start Screen:
start_screen(screen): Calls thestart_screenfunction to display the initial start screen.
Main Game Loop:
running = True: Initializes a flag to control the main game loop.game_started = False: Initializes a flag to track whether the game has started.
Event Handling:
The loop iterates through pygame events to check for user input and window events.
pygame.QUIT: If the user closes the game window, therunningflag is set toFalse, exiting the game.pygame.KEYDOWN: If a key is pressed:If the game has started (
game_startedisTrue), the loop is skipped, preventing repeated calls to the start screen.If the spacebar (
pygame.K_SPACE) is pressed and the game hasn't started,space_pressedis set toTrue.pygame.KEYUP: If a key is released:If the released key is the spacebar,
space_pressedis set toFalse.
Player Movement:
The player's position (
player_rect) is updated based on arrow key input.The player's x-coordinate is adjusted by the difference between the right and left arrow keys multiplied by the player's speed.
The player's y-coordinate is adjusted by the difference between the down and up arrow keys multiplied by the player's speed.
The player's position is constrained to stay within the screen boundaries.
Spawn Targets:
A counter (
target_spawn_counter) is incremented in each iteration.If the counter exceeds the target spawn rate (
TARGET_SPAWN_RATE), a new target is created at a random x-coordinate within the screen width and a fixed y-coordinate above the screen's bottom edge.The target is represented by a rectangle (
target_rect) added to thetargetslist.The counter is reset.
Update Star Animation:
The animation of stars is updated by increasing their size. If the size exceeds 3, it is reset to 1.
The color of each star is set based on the current level.
This part of the code handles user input, player movement, target spawning, and updates the star animation. It's a crucial component of the game loop, ensuring player interaction and progression in the game.
How to render the elements of the game (player, assets, and so on)
The next part of the code handles the rendering of game elements on the screen, including stars, the grassy area, the player's spaceship, and targets. It also manages the drawing of the tractor beam and handles collisions between the tractor beam and targets.
# Clear the screen
    screen.fill(BLACK)

    # Draw stars with level-based color
    for star in stars:
        pygame.draw.circle(screen, star['color'], (star['x'], star['y']), int(star['size']))

    # Draw the grassy area
    pygame.draw.rect(screen, GRASS_GREEN, grass_rect)

    # Draw the player and targets
    screen.blit(ovni, player_rect)

    for target in targets:
        screen.blit(cow, target)

    # Draw the tractor beam when spacebar is pressed
    if space_pressed:
        tractor_beam_rect = pygame.Rect(player_rect.centerx - 2, player_rect.centery, 4, HEIGHT - player_rect.centery)
        pygame.draw.line(screen, YELLOW, (player_rect.centerx, player_rect.centery),
                         (player_rect.centerx, HEIGHT), 2)

        # Check for collisions with targets
        for target in targets[:]:
            if tractor_beam_rect.colliderect(target):
                # Change the color of the tractor beam to yellow
                pygame.draw.line(screen, YELLOW, (player_rect.centerx, player_rect.centery),
                                 (player_rect.centerx, target.bottom), 2)
                # Change the color of the target to red
                pygame.draw.rect(screen, RED, target)
                targets.remove(target)
                current_score += 1
                score += 1
Code explanation:
Clear the Screen:
screen.fill(BLACK): Fills the entire screen with a black color, effectively clearing the previous frame.
Draw Stars:
Iterates through the list of stars (
stars) and draws each star as a circle on the screen.The circle's color is determined by the star's color attribute, and its position and size are based on the star's x and y coordinates and size.
Draw Grassy Area:
pygame.draw.rect(screen, GRASS_GREEN, grass_rect): Draws a rectangle representing the grassy area at the bottom of the screen. The color is set toGRASS_GREEN.
Draw Player and Targets:
screen.blit(ovni, player_rect): Draws the player's spaceship (ovni) on the screen at the position specified byplayer_rect.for target in targets: screen.blit(cow, target): Draws each target (cow) from thetargetslist on the screen at their respective positions.
Draw Tractor Beam (When Spacebar is Pressed):
Checks if the spacebar is pressed (
space_pressedisTrue).If true,
tractor_beam_rect: Creates a rectangle representing the tractor beam based on the player's position.pygame.draw.line: Draws a yellow line representing the tractor beam from the player's center to the bottom of the screen.Checks for collisions between the tractor beam and targets.
If a collision is detected, the target is removed, the tractor beam color changes to yellow, and the target's color changes to red.
The score is updated.
Game logic
Now you are almost done – but first you need to add some logic in the game like the countdown timer which gives you one minute per level. You also need to draw like a navbar, a simple one with four elements containing the general score, level indicator, timer and abductions.
Here's how we'll do all that:
info_line_y = 10  # Adjust the vertical position as needed
    info_spacing = 75  # Adjust the spacing as needed

    # Draw the score in an orange rectangle at the top left
    score_text = font.render(f"Score: {score}", True, WHITE)
    score_rect = score_text.get_rect(topleft=(10, info_line_y))
    pygame.draw.rect(screen, ORANGE, score_rect.inflate(10, 5))
    screen.blit(score_text, score_rect)

    # Draw the level indicator in a light-blue rectangle at the top left (next to the score)
    level_text = font.render(f"Level: {current_level}", True, WHITE)
    level_rect = level_text.get_rect(topleft=(score_rect.topright[0] + info_spacing, info_line_y))
    pygame.draw.rect(screen, LIGHT_BLUE, level_rect.inflate(10, 5))
    screen.blit(level_text, level_rect)

    # Draw the countdown timer in a red rectangle at the top left (next to the level)
    timer_text = font.render(f"Time: {int(countdown_timer)}", True, WHITE)
    timer_rect = timer_text.get_rect(topleft=(level_rect.topright[0] + info_spacing, info_line_y))
    pygame.draw.rect(screen, RED, timer_rect.inflate(10, 5))
    screen.blit(timer_text, timer_rect)

    # Draw the targets to acquire for the current level in a gray rectangle at the top left (next to the timer)
    targets_text = font.render(f"Abductions: {current_score}/{abduction_target}", True, WHITE)
    targets_rect = targets_text.get_rect(topleft=(timer_rect.topright[0] + info_spacing, info_line_y))
    pygame.draw.rect(screen, GRAY, targets_rect.inflate(10, 5))
    screen.blit(targets_text, targets_rect)

    # Update the display
    pygame.display.flip()

    # Cap the frame rate
    clock.tick(FPS)
Code explanation:
Info Line Positioning:
info_line_y = 10: Specifies the vertical position for the information line at the top of the screen.info_spacing = 75: Sets the spacing between different pieces of information on the line.
Draw Score:
score_text: Renders the score text using the game font.score_rect: Retrieves the rectangle that encloses the rendered score text.pygame.draw.rect: Draws an orange rectangle around the score text, creating a background.screen.blit(score_text, score_rect): Blits (renders) the score text onto the screen.
Draw Level Indicator:
level_text: Renders the level indicator text.level_rect: Retrieves the rectangle for the level indicator text.pygame.draw.rect: Draws a light-blue rectangle around the level indicator text.screen.blit(level_text, level_rect): Blits the level indicator text onto the screen.
Draw Countdown Timer:
timer_text: Renders the countdown timer text.timer_rect: Retrieves the rectangle for the countdown timer text.pygame.draw.rect: Draws a red rectangle around the countdown timer text.screen.blit(timer_text, timer_rect): Blits the countdown timer text onto the screen.
Draw Abduction Targets:
targets_text: Renders the text indicating the number of abductions required for the current level.targets_rect: Retrieves the rectangle for the abduction targets text.pygame.draw.rect: Draws a gray rectangle around the abduction targets text.screen.blit(targets_text, targets_rect): Blits the abduction targets text onto the screen.
Update Display:
pygame.display.flip(): Updates the display to reflect the changes made in this iteration.
Frame Rate Cap:
clock.tick(FPS): Caps the frame rate to the specified frames per second (FPS). This ensures that the game runs at a consistent speed across different systems.
And now we're ready for the last code block. It contains the countdown timer logic that's related to the level progression logic and the abductions reset. This means that you need to restart the abductions made by the player to zero every time you level up, for example:
Level 1: 0/10 abductions
Level 2: 0/20 abductions
And so on – the maximum abductions quota is 100 abductions in level 10, adding 10 abductions to the required quota for every level.
Timer logic and quitting function
Check out the last block of code:
 # Countdown Timer Logic
    countdown_timer -= 1 / FPS  # Decrease the timer based on the frame rate
    if countdown_timer <= 0:
        # Check if the player reached the abduction target for the current level
        if current_score < abduction_target:
            # Player didn't reach the abduction target, end the game
            game_over_screen(screen)
            running = False
        else:
            # Move to the next level
            current_level += 1
            if current_level <= 10:
                current_score = 0
                abduction_target = 10 * current_level
                countdown_timer = 60  # Reset the countdown timer for the next level
                # Reset the targets text for the next level
                targets_text = font.render(f"Abductions: {current_score}/{abduction_target}", True, WHITE)
                targets_rect = targets_text.get_rect(topleft=(timer_rect.topright[0] + info_spacing, info_line_y))

    # Check if the player reached the abduction target for the current level
    if current_score >= abduction_target:
        # Move to the next level
        current_level += 1
        if current_level <= 10:
            current_score = 0
            abduction_target = 10 * current_level
            countdown_timer = 60  # Reset the countdown timer for the next level
            # Reset the targets text for the next level
            targets_text = font.render(f"Abductions: {current_score}/{abduction_target}", True, WHITE)
            targets_rect = targets_text.get_rect(topleft=(timer_rect.topright[0] + info_spacing, info_line_y))
        else:
            victory_screen(screen)
            running = False

# Quit Pygame
pygame.quit()
Countdown Timer Logic:
countdown_timer -= 1 / FPS: Decreases the countdown timer by the fraction1 / FPS. This adjustment ensures that the timer decreases uniformly based on the frame rate.
Check Timer Expiration:
if countdown_timer <= 0:: Checks if the countdown timer has reached or fallen below zero.
Player Didn't Reach Abduction Target:
if current_score < abduction_target:: Checks if the player's current score is less than the abduction target for the current level.game_over_screen(screen): Calls the function to display the game over screen.running = False: Sets therunningflag toFalse, terminating the game loop.
Move to Next Level:
else:: Executes when the player has reached the abduction target for the current level.current_level += 1: Increments the current level.if current_level <= 10:: Checks if there are more levels to proceed to.current_score = 0: Resets the current score for the next level.abduction_target = 10 * current_level: Sets the abduction target for the next level.countdown_timer = 60: Resets the countdown timer for the next level.Resets the targets text for the next level.
targets_text = font.render(f"Abductions: {current_score}/{abduction_target}", True, WHITE)targets_rect = targets_text.get_rect(topleft=(timer_rect.topright[0] + info_spacing, info_line_y))
Player Reached Abduction Target for All Levels:
else:: Executes when the player has successfully completed all levels (reached level 10).victory_screen(screen): Calls the function to display the victory screen.running = False: Sets therunningflag toFalse, terminating the game loop.
Quit Pygame:
pygame.quit(): Cleans up and quits Pygame after the game loop has ended.
Now, you're done and you can run the game by typing this in your shell:
python aliend_aductions_game.py
If everything it's ok, you should see the start screen that will let you play after you press any key.
Conclusion
We've covered a lot in this tutorial. You started out by setting up the development environment, installing PyGame, and designing the game concept with simple mechanics.
Then you followed the step-by-step process of coding the game, from initializing the environment to implementing player controls, collisions, and dynamic elements. You learned how to integrate images for the spaceship and cows, creating an engaging visual experience.
The game features various levels, each with its own challenge and a countdown timer, adding an element of urgency. You implemented a scoring system, level progression, and engaging graphics to enhance the player experience.
Encouragement for further learning:
Congratulations on reaching this point! Game development is a dynamic and rewarding learning path, and there's always more to learn. As you continue, consider delving into more advanced topics such as:
Advanced graphics: enhance your game with more detailed graphics, animations, and visual effects.
Sound and music: integrate sound effects and background music to elevate the gaming experience.
Game physics: explore realistic movements and interactions within the game world.
Multiplayer functionality: learn how to implement multiplayer features for a more interactive experience.
Optimization techniques: dive into optimizing your code and graphics for better performance.
If you reach this point, thanks for reading and I hope you enjoy this post as much as I enjoyed doing it, also you can check the original code of this game and download the assets from here: