

State management is a crucial concept in React, which is one of the most popular JavaScript libraries in the world for building dynamic user interfaces.
Due to its importance in handling data, it is essential know how to manage state, when you need it, and where it can be placed in your applications’ components.
This article dives into the world of React state management, providing a comprehensive guide to help you manage state efficiently. This article is for beginners and intermediate-level of React developers that want to understand how states work.
What is State?
State can be defined as an object that houses data that changes over time in an application. In other words, state is a dynamic data storage that provides a mechanism for components to manage, keep track of changing data, and trigger re-rendering when it is updated.
Due to modularization in React, state serves as a container that encapsulates relevant data, logic, and behavior within a component.
Now that you know what state means, you can visualize an application even before building it and have an idea of what data would be stored in different states. This brings us to a point I like to call: ‘Thinking In React’.
This coined terminology can be described as the mental picture a React developer has on how to go about building an application in the ‘React way’. Applying knowledge on keeping components pure, passing props from parent to child components, one-way data flow, lifting states up, and many other integral aspects of React.
When to Use State
When building an application, data plays an integral role in what is been displayed or stored. The same applies to building web applications in React, where components display or operate on data — which can be user input, data fetched from APIs, or any other dynamic content. When there is a need to get data that has to be updated inside of a component, we use state.
To understand this better, let’s look at an example of a simple Todo List app that primarily accepts inputted items that would eventually be added to a displayed list.
The item's names will be defined via a text input before being dynamically added to an array of items.
So, we've identified two aspects involving data that would change when triggered. Any update to the data will cause the component to re-render. Those two aspects need the useState hook to update their data and perform the respective logic attached to them.
const [name, setName] = useState(" ")
const [items, setItems] = useState([]);
Above, is the representation of useState hook functions that allow components to have state variables. As regards to our example of the Todo List app, we initialized our useState function with an empty string (“ ”) for the item names and an empty array ([ ]) for the items.
The useState functions consist of a destructuring assignment that extracts values from an array or properties from an object. In this instance, we are extracting two values returned by the useState functions.
name and items hold the current value of the state variable. While setName and setItems are the functions used to update the value of the state variables.
We can add the Header, Nav, ListArea and Footer components to the App component's JSX. Our root component should look like this:
import { useState } from "react";

export default function App() {
      const [items, setItems] = useState([]);
    const [name, setName] = useState(" ")
  return (
    <div>
      <Header />
      <Nav />
      <ListArea />
      <Footer />
    </div>
  );
}
The individual components with their JSX's should look like this:
function Header() {
  return <h2>ToDo List</h2>;
}

function Nav() {
  return (
    <>
      <input type="text"/>
      <button>Add</button>
    </>
  );
}

function ListArea() {
  return (
    <>
      <ul>
        <li></li>
      </ul>
    </>
  );
}

function Footer() {
  return (
    <>
      <p>You have items in your cart</p>
    </>
  );
}
 How our component's JSXs looks in the browser
This is a simple representation of our Todo List. Next, we'll add some logic and make the states come to life. For now, the states reside in the App component.
Where to Use State
When using state, it is important to note that there are two types of states in React development:
Global State
These are states that are accessible to every component in the application. It is always declared and located in the root component of your app before the JSX is returned.
A state can be considered as a global state if it is a piece of data that is accessible among multiple components thereby, aiding communication between components in the application.
Local State
Local states refers to the internal data maintained by a component. Local states are located within the parent components in an application. They are only needed and can be accessed in the component.
Using local state, components can independently change and handle their data which leads to partitioning within the application.
Looking at our declared states in the Todo List app, we can say that name is a local state and items is a global state.
The reasons are:
- Two or more components will need access to the
itemsstate. - The
namestate is only needed to input item names into theitemslist.
Here is the structure of our Todo List application with the states positioned according to where they are needed and logic of adding item names to the items list:
import { useState } from "react";

export default function App() {

//Global state
  const [items, setItems] = useState([]);

//handler function that takes item as a parameter
  function handleAddItems(item) {

  //setter function that returns a new array with elements from current state with a new item
    setItems((items) => [...items, item]);
  }

  return (
    <div>
      <Header />
      <Nav handleAddItems={handleAddItems} /> //passing handleAddItems as props
      <ListArea items={items} /> //passing items as props
      <Footer items={items} />    //passing items as props
    </div>
  );
}
function Header() {
  return <h2>ToDo List</h2>;
}

function Nav({ handleAddItems }) {
  //Local state function
  const [name, setName] = useState("");

  //create a handler function that is triggered by Add button
  const handleAddButtonClick = () => {
    //creating a newItem object with name and id properties
    const newItem = { name, id: Date.now() };

    //passing the newItem object into the handler function as an argument
    handleAddItems(newItem);
    // Reset the input field after adding the item
    setName("");
  };
  return (
    <>
      <input
        type="text"
        value={name}
        onChange={(e) => setName(e.target.value)}
      />
      <button onClick={handleAddButtonClick}>Add</button>
    </>
  );
}

//ListArea component recieving items as props from global state

function ListArea({ items }) {
  return (
    <>
      <ul>
      //mapping over items array to get individual item as list items
        {items.map((item) => (
          <li key={item.id}>{item.name}</li>
        ))}
      </ul>
    </>
  );
}

//Footer component recieving items as props from global state

function Footer({ items }) {
  return (
    <>
      {items.length !== 0 ? (
        <p>You have {items.length} items in your cart</p>
      ) : (
        <p>You can start adding items to your list</p>
      )}
    </>
  );
}
The Footer and ListArea components now have access to the items passed down through props.
The act of positioning a state in the root component so it can be accessed globally in a React application is known as "Lifting State Up"- which was what we did with the items state.
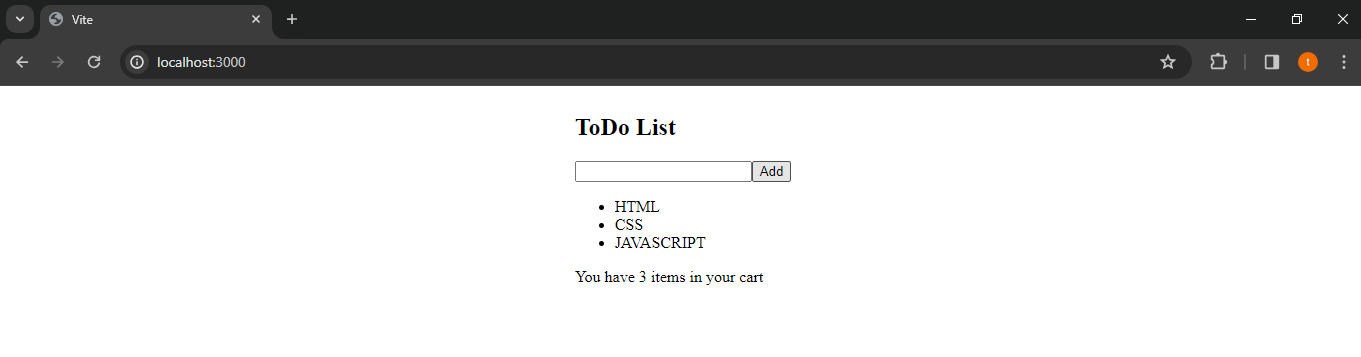 The Todo List after items have been added to the list
Here's a representation of the whole process:

Conclusion
In this article, we explored state management in React, when you need them, and where to place state in our applications’ components.
We also broke down how to ‘think in React’, to make our React components interact with each other and give the required output.
React is an interesting user interface library, but can get confusing sometimes if you don’t know the basics. You can now use the knowledge gained in this article to code your projects.