

In the ever-evolving world of web development, Next.js has consistently been a beacon of hope for developers seeking a balance between performance and ease of use.
With the introduction of the App Router in 2023, the framework has once again stirred the pot, leaving many of us scratching our heads and pondering, "Do we stick with the tried-and-true Pages directory or embrace the shiny new App Router?".
In this exploration, we will delve into the unique facets of the App Router, offering valuable guidance for navigating these new features.
Prerequisites
- A good understanding of JavaScript.
- A good understanding of React.js and Next.js.
A Brief Look at Routing
Routing is a critical aspect of web apps that enables users to move between various pages. It guarantees that users can access different parts of an application, whether they are moving from a homepage to a product listing or navigating within single-page applications.
The Pages Directory and App Router are two crucial components that determine how users navigate through a Next.js application.
How the Pages Directory Works in Next.js
While the spotlight shines on the new App Router, let's not forget the solid foundation provided by the Pages Directory. A key difference between the two lies in route generation.
The Pages Directory automatically creates routes within the pages folder, whereas the App Router organizes routes within the app folder. This folder routing system maintains developer familiarity with how routing works while introducing a shift in route organization.
This distinction enables efficient route management and facilitates a seamless transition between the two routing mechanisms.
How to Set Up the Pages Directory
To set up the Pages Directory for routing, you must first create a Next application. You can do this by running the command below on your local or code editor's terminal:
npx-create-next-app your-app-name
A list of configuration options appear underneath your command. Select "No" for App Router during the application setup. This creates a pages folder from which you can create routes.
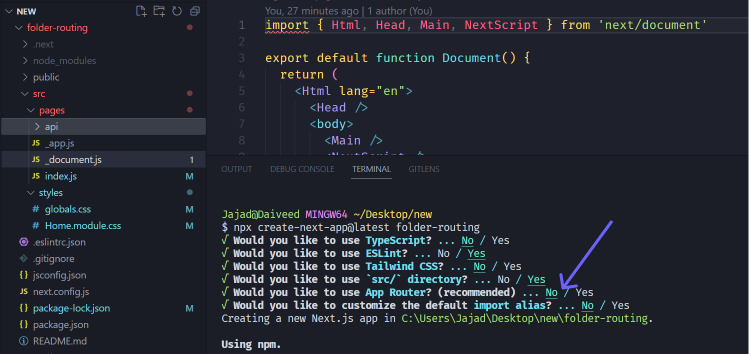 Folder directory installation and setup
How to Create a Route with Pages Directory
To create a route, create a folder in the pages folder and call it whatever you want the route to be (about, for example).
Then nest an index.js file in the about folder and fill it in with whatever content you want.
To route between pages, you can use the Next.js link component and pass in the corresponding URL you wish to route to.
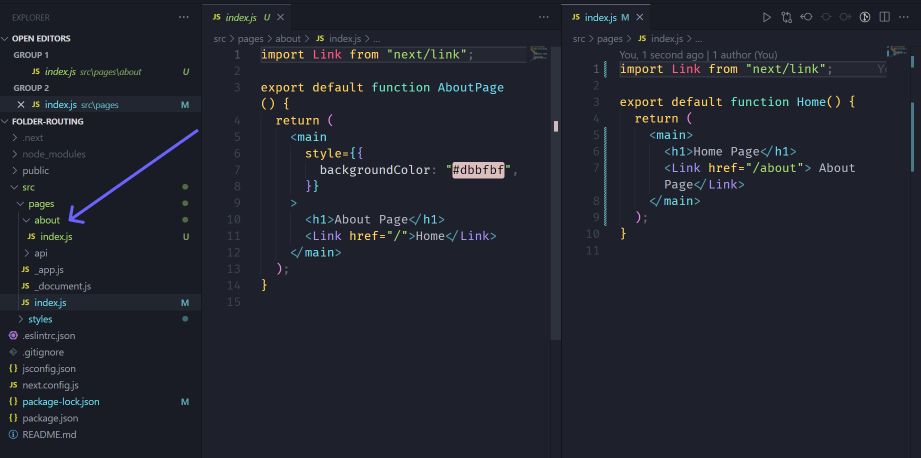 Folder directory example
Here's the result:
 Implementing routing using the folder directory
Limitations of the Pages Directory
The Pages Directory provides a great way to structure routes in a Next.js application, but it has some limitations. Here are a few things to keep in mind:
- Static exports: The Pages Directory configuration relies on dynamic routes generated using
getStaticPropsandgetStaticPaths. This means that not all pages in the directory can be statically exported. - Edge Runtime configuration: If you're using the Edge Runtime, you may need to do extra configuration beyond what's possible in the Pages Directory.
- Internationalization routing: While Next.js supports internationalization routing, you need to configure locales, default locales, and domain-specific locales in the next.config.js file instead of the Pages Directory.
- Serverless functions: API routes defined in the Pages Directory can handle basic API functionality, but more complex serverless functions may need extra configuration and alternative file placement.
- Statically generated pages distribution: Statically generated pages may not be optimized for visitors without additional CDN configuration or "vendoring". This can impact the performance and distribution of statically generated pages.
How the App Router Works in Next.js
The App Router is the fresh face on the Next.js scene, designed to address some of the limitations of the Pages Directory approach. While the app router still uses the folder directory for routing, it does so with a slightly different convention.
How to Setup the App Router
To set up the App router , follow the same installation process as mentioned in the pages directory, but opt for "Yes" when prompted to use the App Router during setup. This creates an app directory.
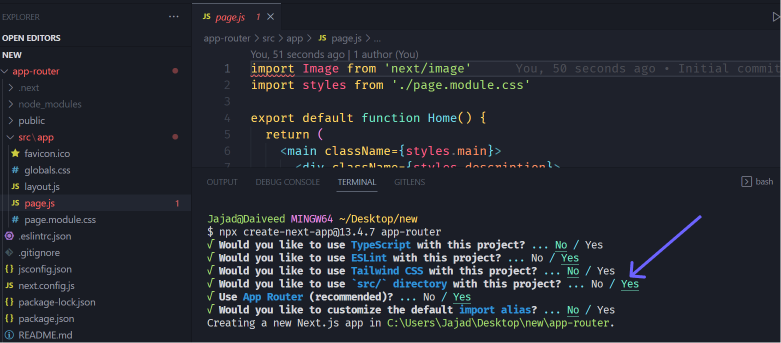 App Router installation and setup
How to Create a Route with App Router
Routing with the App Router also involves creating folders but within the app directory. Nest a page.js file within the appropriate folder to define your route.
 Folder directory example
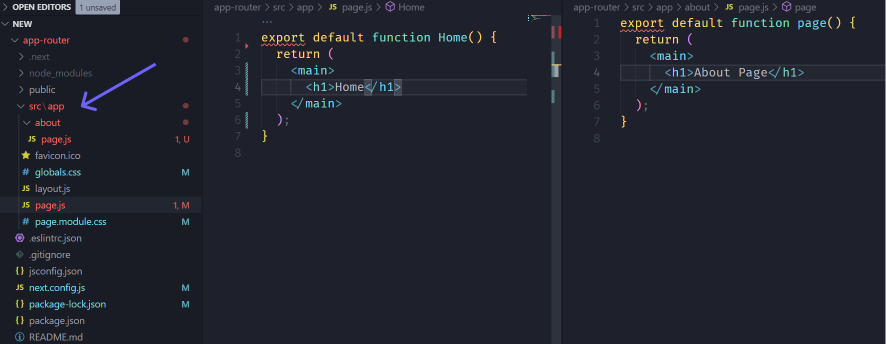
Here's the result:
 Implementing routing using the app router
Features of App Router in Next.js
Apart from routing, App Router boasts a range of other features, including:
Layout Component
A layout component is a versatile UI element that shapes a page's structure. It can include components like headers, footers, and sidebars, and even offer shared functions like navigation.
Layout components work with routing, enabling smooth transitions between app pages. Since the layout component remains active when routes change, its state is retained, ensuring consistent and reusable layouts with minimal effort.
This component is designed to receive a children prop and wrap all page files in the same directory with it:
export default function layout({ children }) {
  return <div className="layout">{children}</div>;
}
Here’s an example that uses a layout component (a grey box) like the one in the code above between the user page and the settings page:
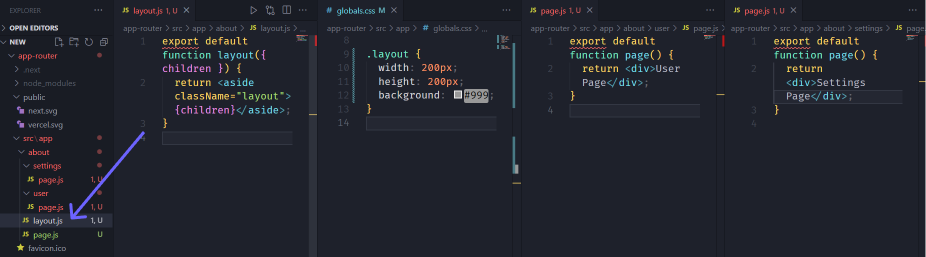 Creating a layout component that shares styles with its sibling pages
In the image above, the layout.js component is shared by both the user and settings pages. So both pages will have the styles and logic in the layout component.
And the result:
 Implementing the layout component on the user and settings page
Nested Layouts
These are layouts defined inside folders and apply to specific route segments and render when those segments are active. It allows you to define multiple levels of layout components, each enclosing the content of its child components.
This feature provides a flexible and modular way to structure your application's UI.
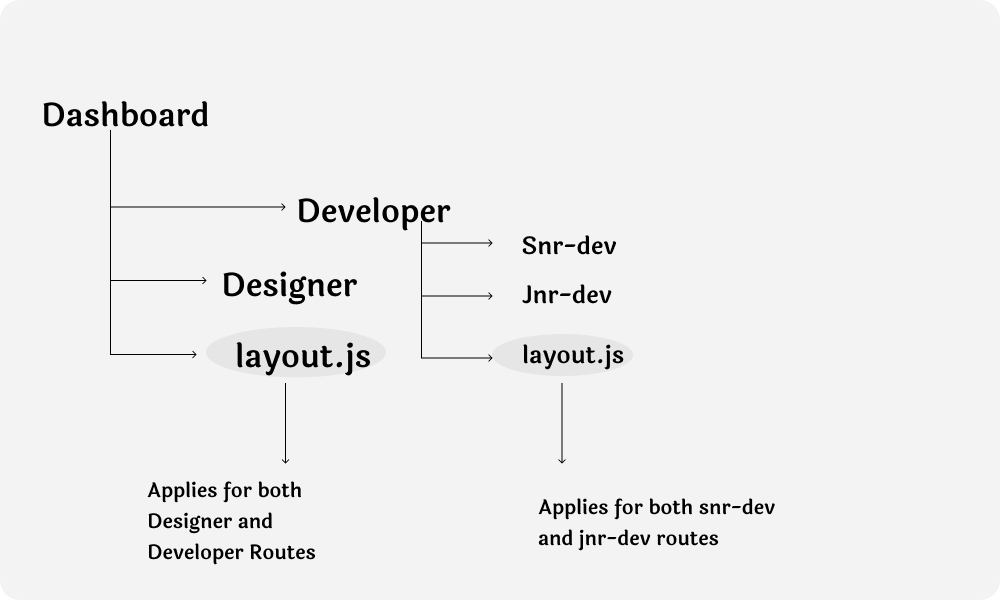 Demonstrating how layout work with sibling and child pages
In the diagram above, the styles and logic in the first layout file applies to all pages inside the dashboard directory, while the second layout file applies to the pages in the developer directory.
Template Components
Template components are like layouts, but they create a new instance for each child on navigation. This means recreating DOM elements, losing state, and resetting effects every time the route changes.
You can use them for things like tracking page views or interactive widgets. You can create a template by exporting a default React component from a template.js file. This component should be designed to receive a children prop.
export default function Template({ children }) {
  return <div>{children}</div>
}
Loading Component
This component can be made in any app folder directory. It auto-wraps pages with a React suspense boundary (that is, a component that helps manage loading moments when components need to fetch data or resources asynchronously). It shows on the first load and during sibling route navigation.
It looks something like this under the hood:
<Suspense fallback={<Loading />}>
   <YourComponent />
</Suspense>
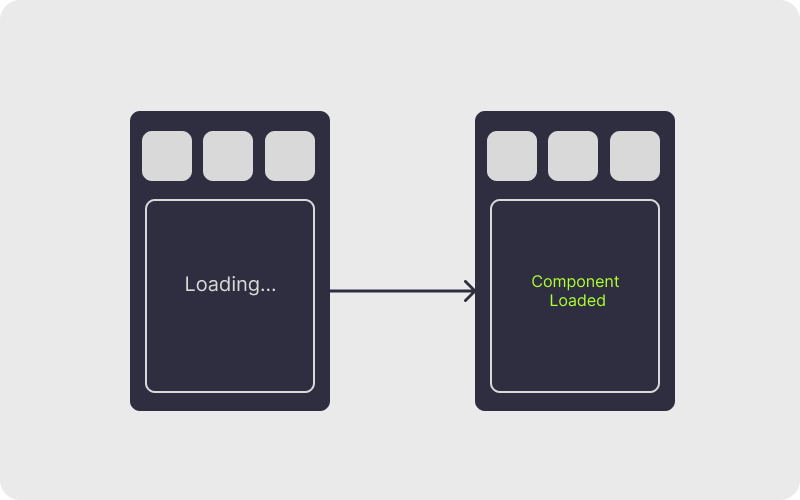 Showcasing the loading component in use
Streaming
This involves sending parts of a webpage progressively from the server to the user's device. Unlike the traditional Server-Side Rendering (SSR), where all the data must be fetched before rendering, streaming sends smaller chunks of HTML as they're ready.
Before streaming
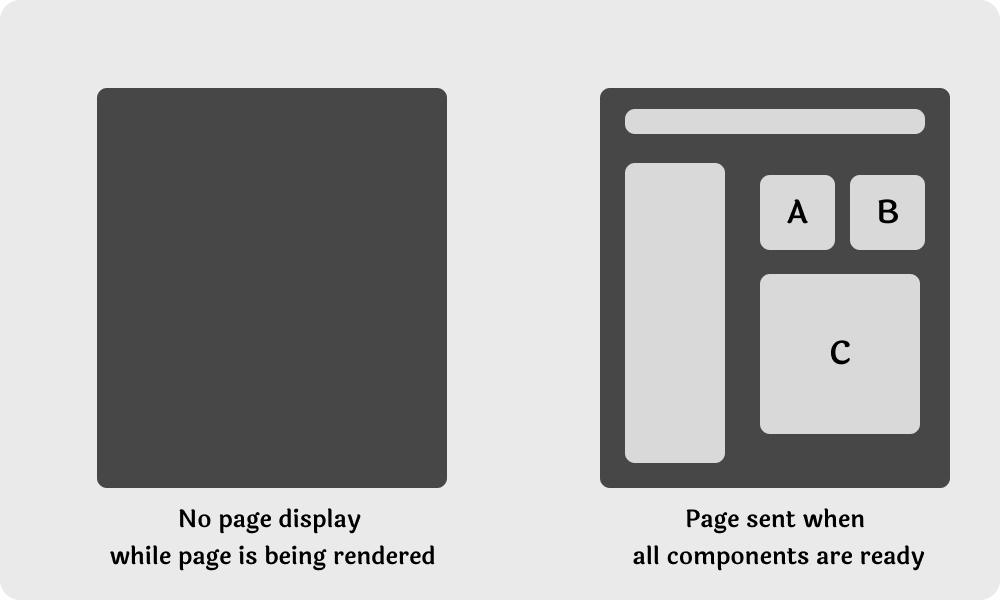 Displaying how SSR worked before stream was introduced
In the image above, no content is displayed while the page is being rendered. The component waits until all the contents are ready.
Using streaming
 How SSR now works with streaming
In the image above, the component doesn't wait for all the page content, it renders each one as soon as it's ready.
This speeds up the initial page display, prioritizing higher-priority components for early interactivity. Streaming reduces [Time To First Byte](https://en.wikipedia.org/wiki/Time_to_first_byte#:~:text=Time%20to%20first%20byte%20(TTFB,received%20by%20the%20client's%20browser.) (TTFB), enhances interactivity, and works well with React's component model.
It's works by using the <Suspense> component, improving loading and user experience, especially on slower devices.
Error Component
This component confines errors to the app's tiniest section. Making an error file auto-encloses the page with a React error boundary. Any error within this file's folder swaps the component with its contents.
The error component is rendered like this behind the scenes:
<Layout>
  <ErrorBoundary fallback={<Error />}>
    <Page/>
  </ErrorBoundary>
</Layout>
And shows something like this;
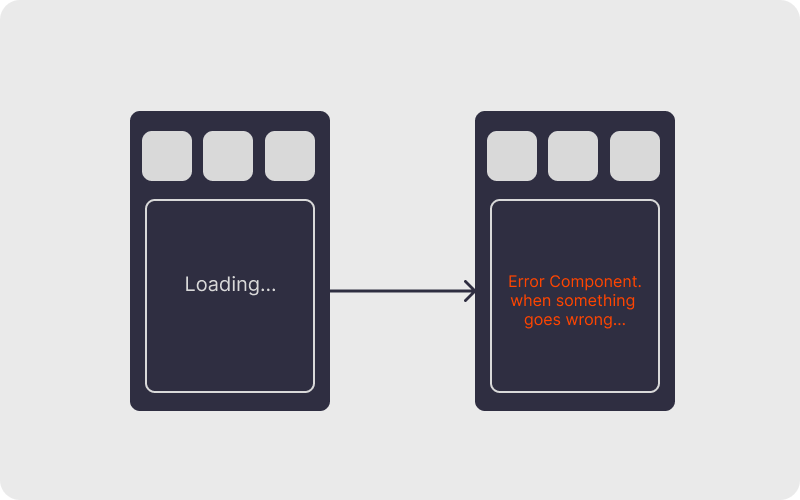 Showcasing the error component in the case of an error
Route Groups
Route Groups organize routes in the app directory without altering URL paths. Enclosing a folder name in parentheses creates a Route Group that keeps related routes together.
This allows for logical grouping, nested layouts, and a clean URL structure. That is:
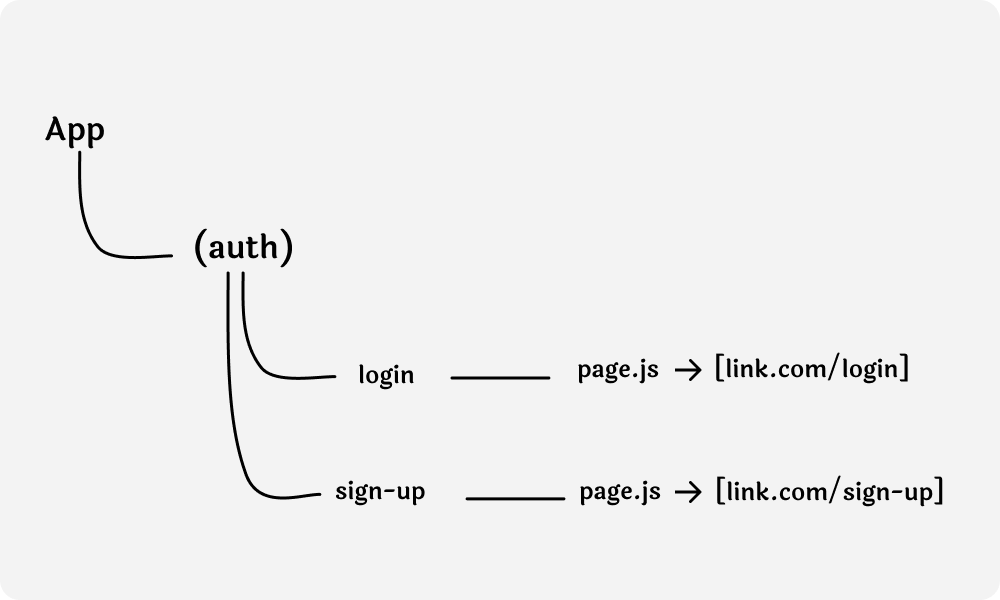 How to use route groups to organize routes
In the example above, authentication pages are grouped together for better organization, without altering URL structure.
Server Components
Server components, a prime addition to the App Router, renders on the server and streams to the client. This accelerates page loading and enhances performance. They speed up page load times as different page contents are loaded in small chunks and independently.
Note that they don't support client-side actions like click events and React hooks (useState , useRef). To convert a server component into a client component, mark it with use client at the beginning of the file.
Here's an example:
'use client'

import { useState } from 'react'

export default function Counter() {
  const [count, setCount] = useState(0)

  return (
    <div>
      <p>You clicked {count} times</p>
      <button onClick={() => setCount(count + 1)}>Click me</button>
    </div>
  )
}
Data Fetching
Server components bring a fresh data fetching pattern, allowing async components to fetch data within them. This reduces reliance on APIs like getServerSideProps.
To fetch data, mark a component as async and use the fetch function within:
export default async function Home() {
  const response = await fetch("https://api.adviceslip.com/advice");
  const data = await response.json();
  return (
    <main>
      <h1>Home Page</h1>
      <p>{data.slip.advice}</p>
    </main>
  );
}
And get your result on the page like this:
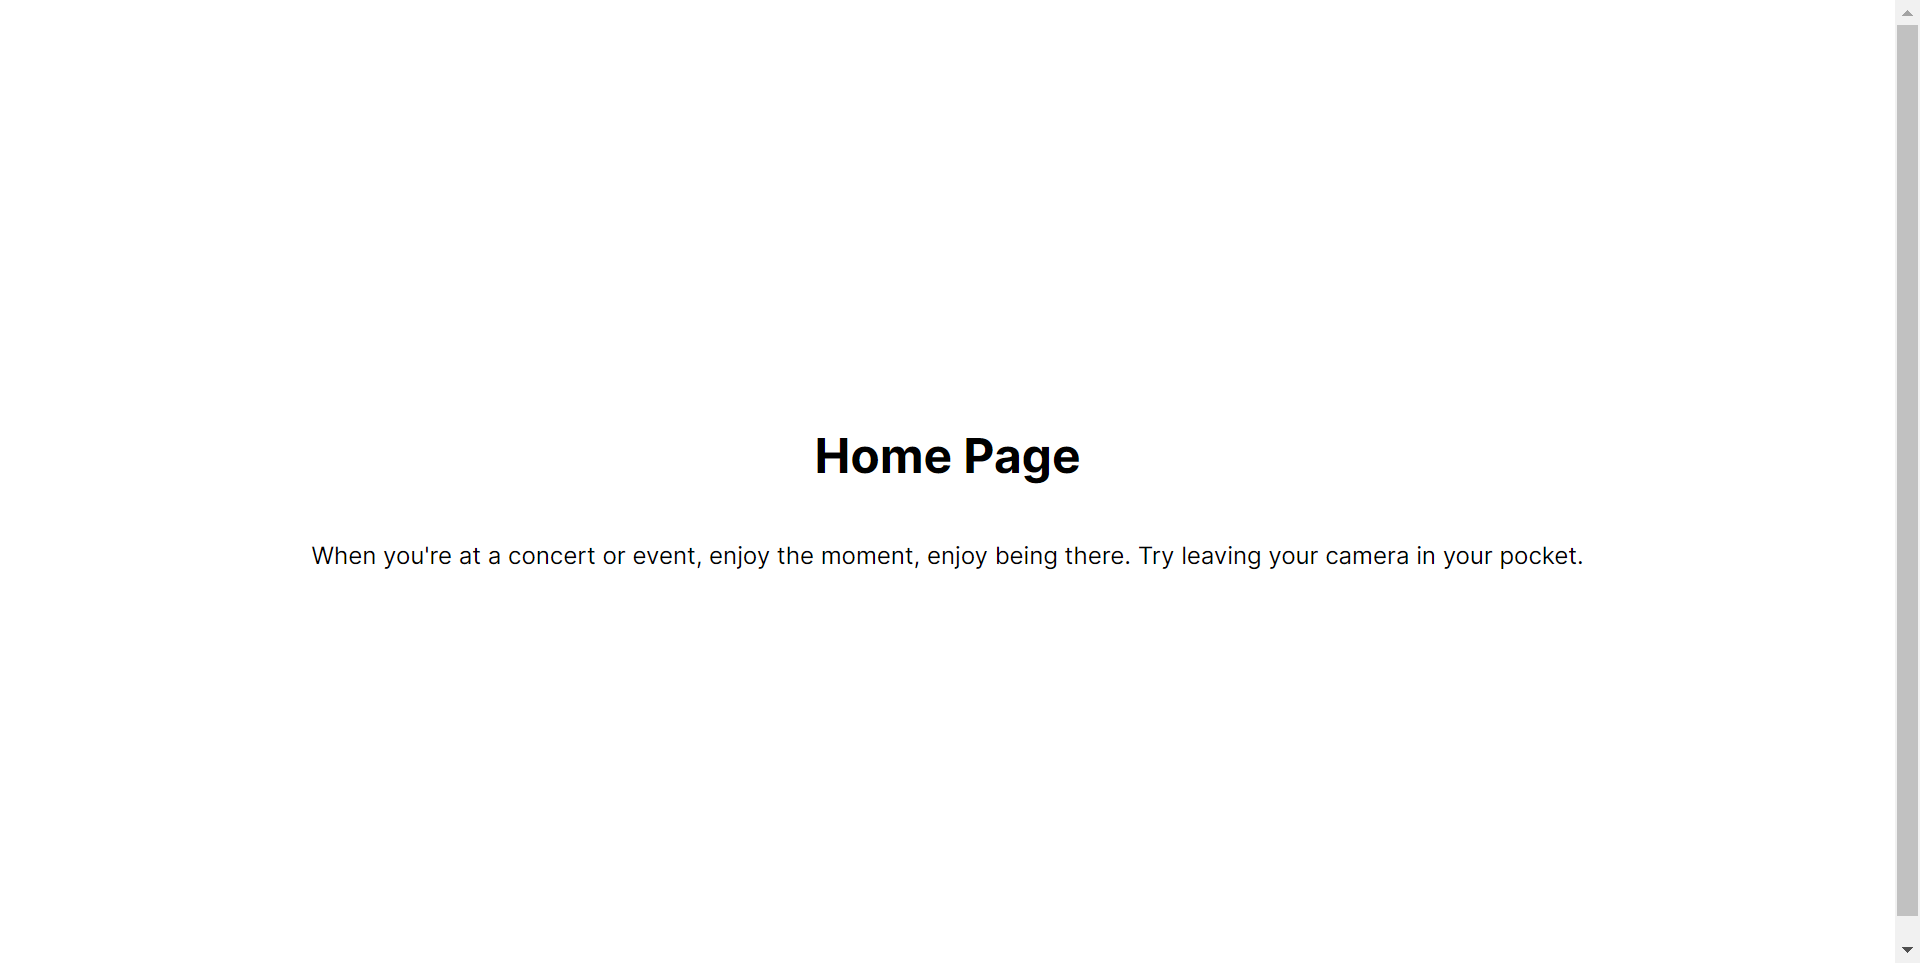 Using the fetch function in a server component
The App Router also caches the fetched data on the server, eliminating the need to re-fetch that data on every request, unless a revalidation parameter is passed in in the fetch function:
export default async function Home() {
  const response = await fetch("https://api.adviceslip.com/advice", {
    next: { revalidate: 5 },
  });
The code above causes a re-fetch of new data every 5 seconds.
Built-in SEO
Another feature of the Next.js App router is the built-in Metadata API, used as an SEO tool to optimize websites for search engines. This API provides a range of SEO settings, including the Open Graph protocol, to enhance the visibility of websites to search engines.
There are two methods of implementing this — static and dynamic methods.
Here's the static approach:
import { Metadata } from "next";

export const Metadata = {
  title: "Blog page title",
  description: "Blog page description",
};

export default function page() {
  return (
    <main>
      <h1>Blog Page</h1>
    </main>
  );
}
Here's the dynamic approach using the getMetadata function:
export async function generateMetadata({ params, searchParams}) {

const id= params.id

   const blog= await fetch(`https://blog/${id}`).then((res) =>res.json()

  return {
        title: blog.title,
        Description: blog.description,
   };

}

export default function Page({ params, searchParams }) {}
Advanced Features of App Router in Next.js
While we've covered notable aspects, the App Router's capabilities extend beyond what we've discussed. Features like server actions, data revalidation, parallel routes, and route interception provide further utility.
As always, you can turn to the Next.js docs for a wider range of information to elevate your understanding and mastery of these additions to the Next.js ecosystem.
Pages Directory vs App Router - Which to Use?
In the rapidly evolving world of web development, it's easy to get caught up in the hype surrounding new technologies and tools. However, when it comes to choosing between the Pages Directory and the App Router, it's important to strike a balance between excitement and caution.
Both options have their own strengths and considerations, and understanding your needs and goals will help you determine which one to use in a given context.
Selecting the Appropriate Tool for Your Requirements
When making the choice between the Pages Directory and the App Router, it is crucial to take into account your individual needs and objectives. Here are a few factors to bear in mind:
Stability vs Flexibility: If your main concerns are stability and user-friendliness, the Pages Directory is a dependable option. It provides a solid foundation for simple routing tasks. However, if you require more flexibility and the ability to customize, the App Router might be a more suitable choice.
Development speed: The Pages Directory offers a fast and efficient approach to creating and managing pages, making it ideal for speedy development. Conversely, due to its advanced capabilities, the App Router may cause more upfront configuration and development effort.
Complex routing scenarios: If your application requires intricate routing scenarios like nested routes or dynamic routing based on external data, the App Router's programmability can be a significant advantage.
Ultimately, the key to making well-informed decisions lies in staying knowledgeable about the capabilities and trade-offs of both the Pages Directory and the App Router.
Conclusion
In summary, you now have a good understanding of Next.js's App Router and its features.
You have learned how to structure routes using both the Pages Directory and the App Router, as well as advanced features such as layout components, server components, and data fetching.
By exploring these topics, you have not only gained insights into the capabilities of these tools. You've also learned how to choose between the new approach (App Router) and the old approach of using the Pages Directory.
With this knowledge, you are well-prepared to make informed decisions and create exceptional web experiences in the ever-changing landscape of web development.
Contact Information
Want to connect or contact me? Feel free to hit me up on the following:
- Twitter, sorry (X) 😂: @jajadavid8
- LinkedIn: David Jaja
- Email: Jajadavidjid@gmail.com