
Maintaining safe and frictionless user authentication is paramount in today's fast-changing web application landscape.
Among the many authentication methods available, GitHub OAuth has emerged as a useful tool for improving user login experience while strengthening security measures.
Django, a Python web framework, has recently gained popularity in web development due to its efficiency and versatility. Adding GitHub OAuth to your Django projects helps improve the authentication process.
Django developers can use GitHub OAuth to access a user's GitHub profile and (with permission) their repositories to personalize the user experience and tailor application services.
This article will walk you through how to implement GitHub OAuth. You'll see the benefits to your Django projects as we go. By embracing this technology, you can give users a seamless login experience while adhering to strict security standards.
Prerequisites
If you wish to follow this guide, you need to have a basic understanding of these tools or have them installed on your PC:
How to Create a GitHub OAuth Application
You must sign into your GitHub account to create a GitHub OAuth application.
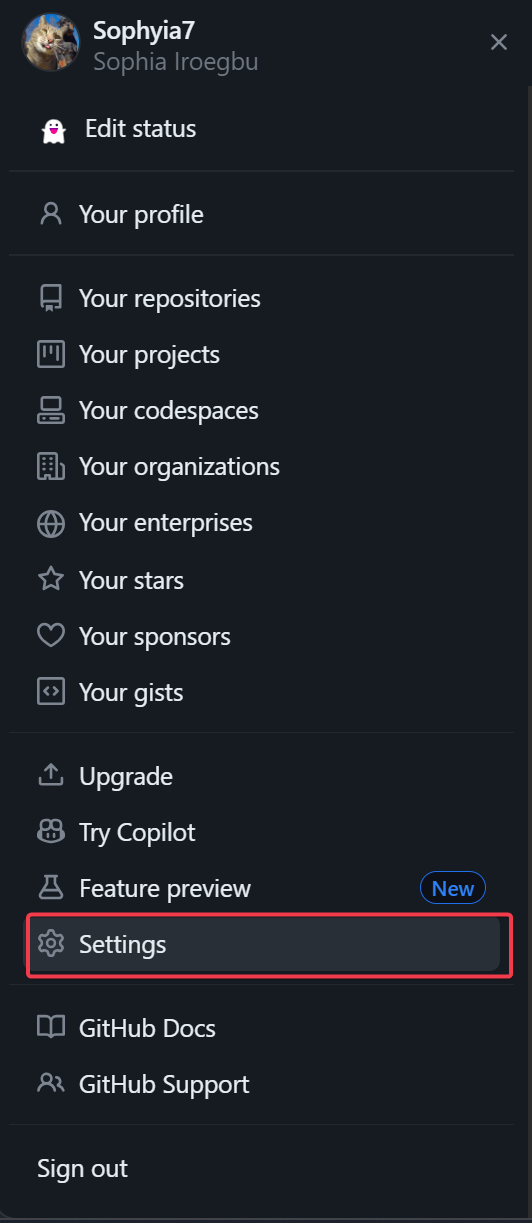
First, login to your GitHub account, click on your GitHub profile picture, and select Settings.
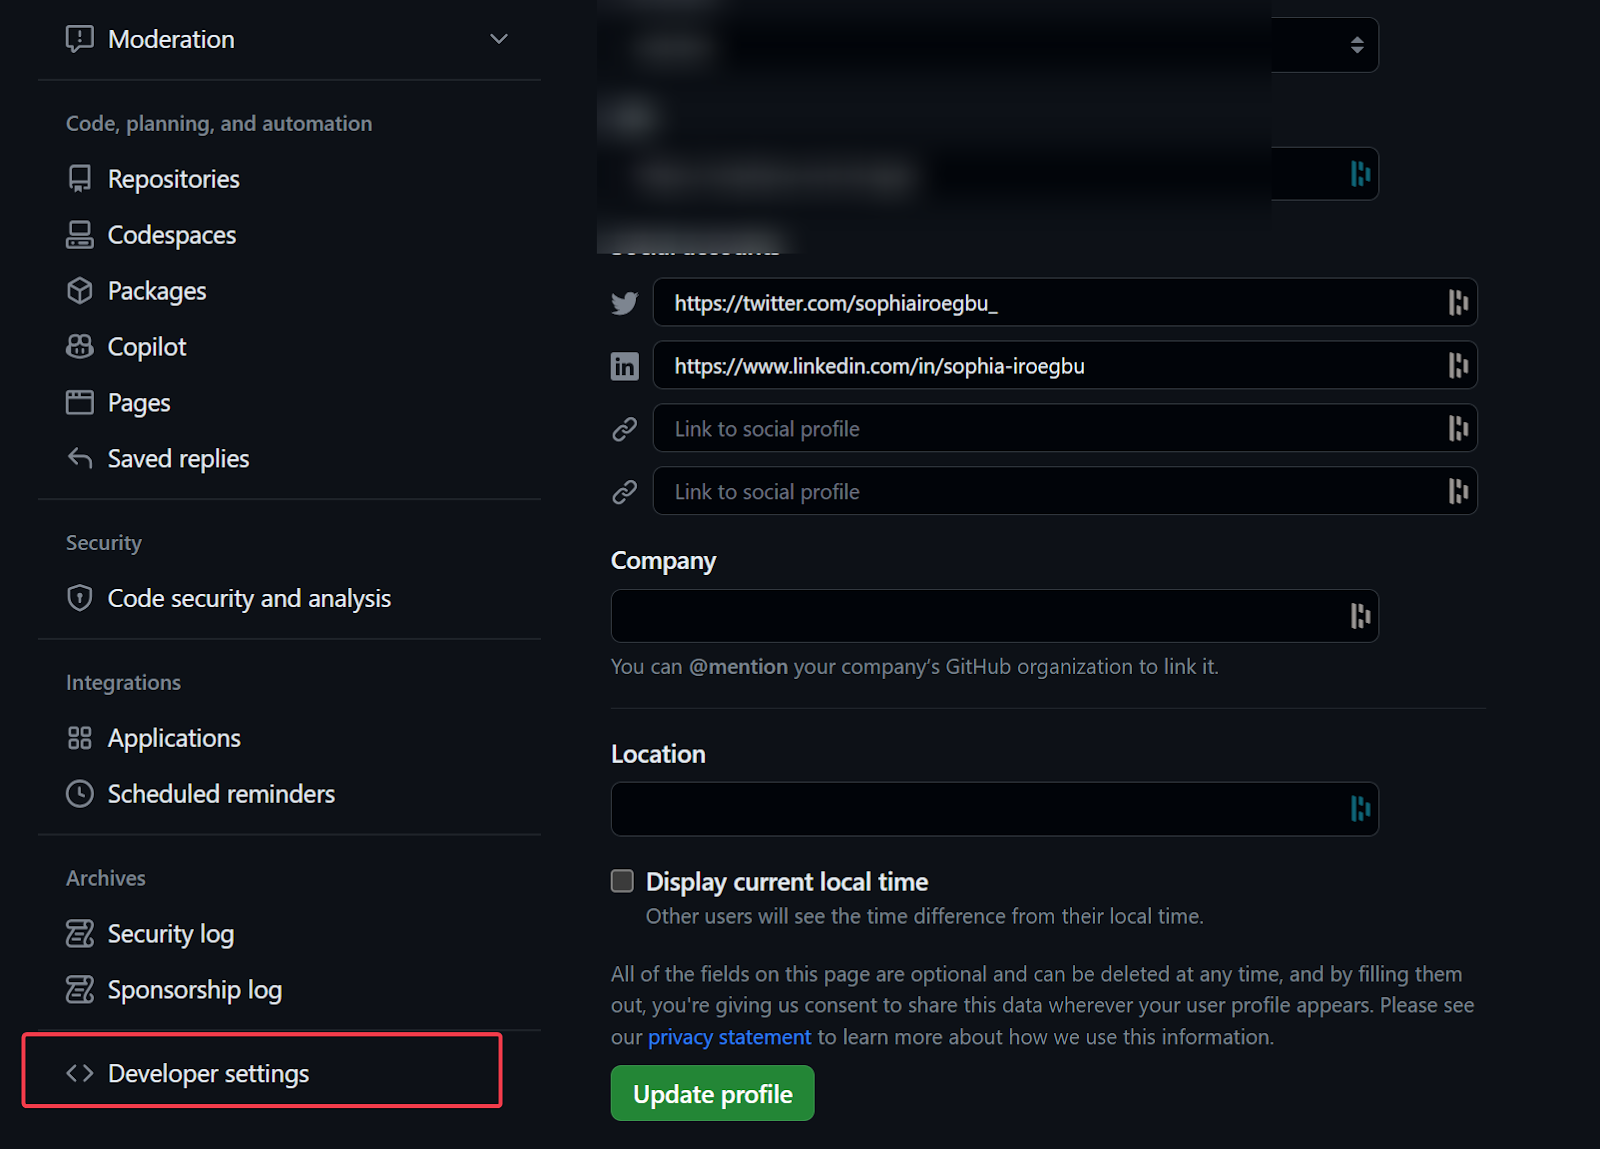
Then, once the new page comes up, scroll to the bottom and select Developer Settings.
Select OAuth Apps and click on New OAuth App.

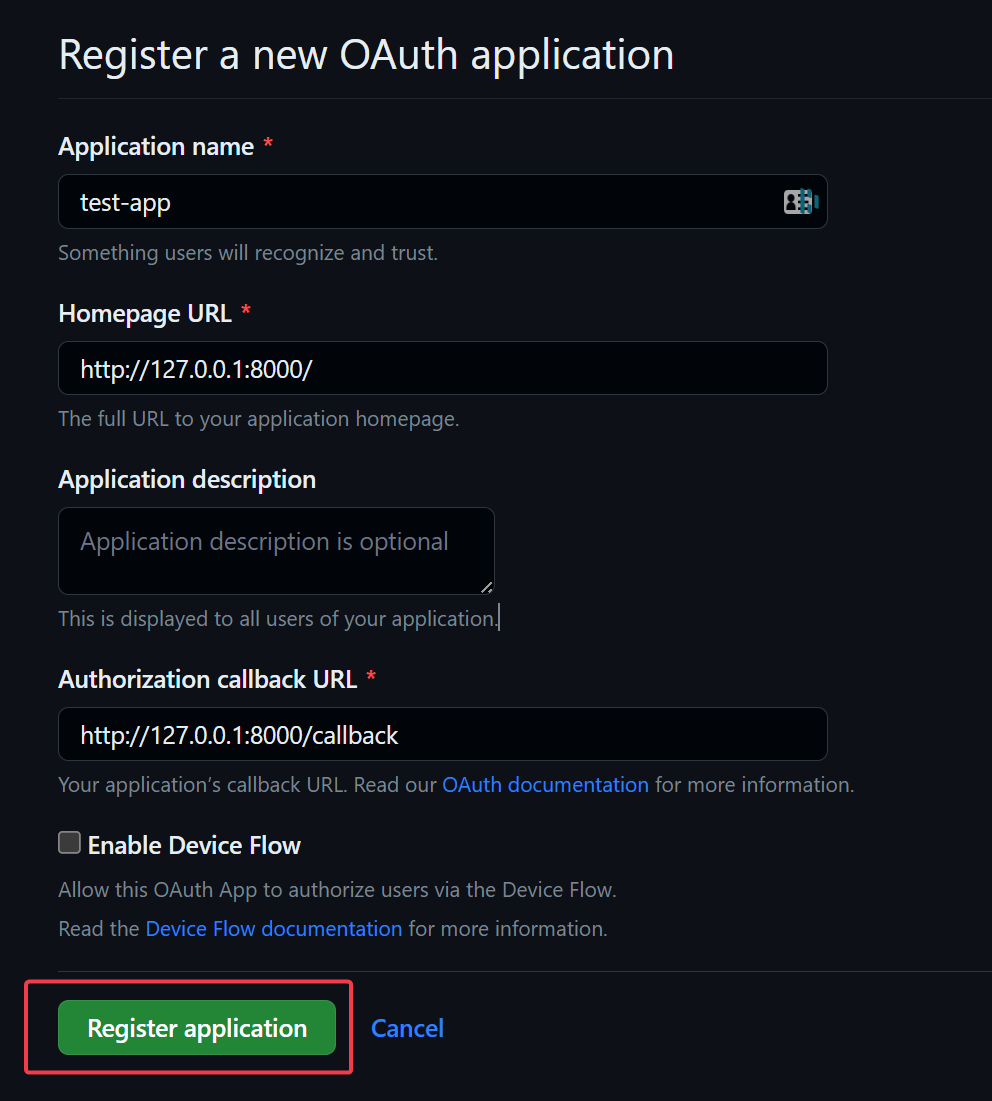
Define your OAuth application by naming it.
- The Homepage URL should be the URL that leads to the homepage of your website.
- The Authorization callback URL should be a site, or a page users view after their GitHub account has been authenticated.
Once you are done defining it, click Register application.
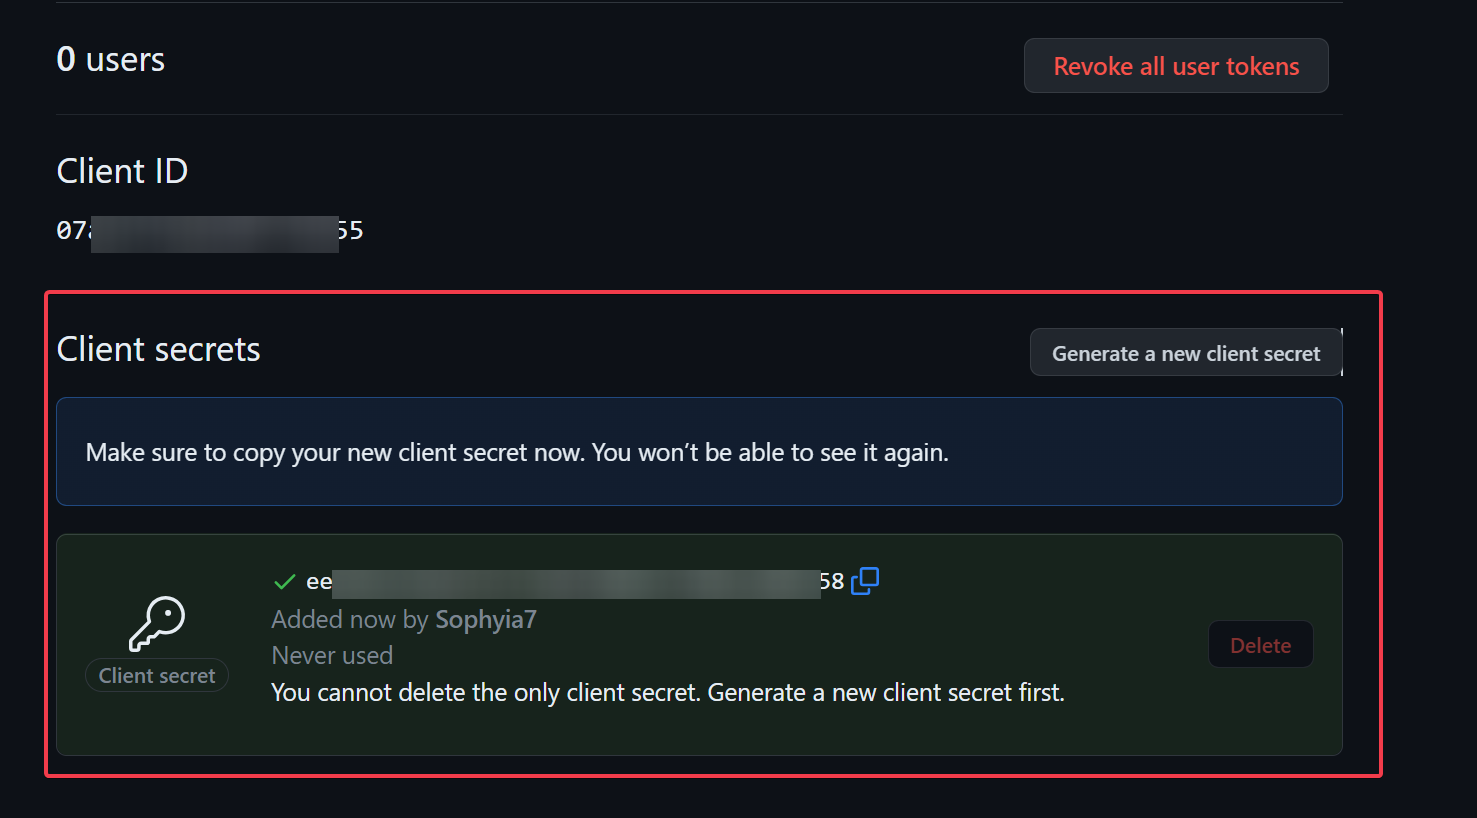
Next, you'll need a client secret and a client ID key to access your GitHub OAuth app on your Django project.
The Client ID is already defined once you create an application. Click Generate a new client secret to create a client secret key.

You might be prompted to sign in. Do so to continue.
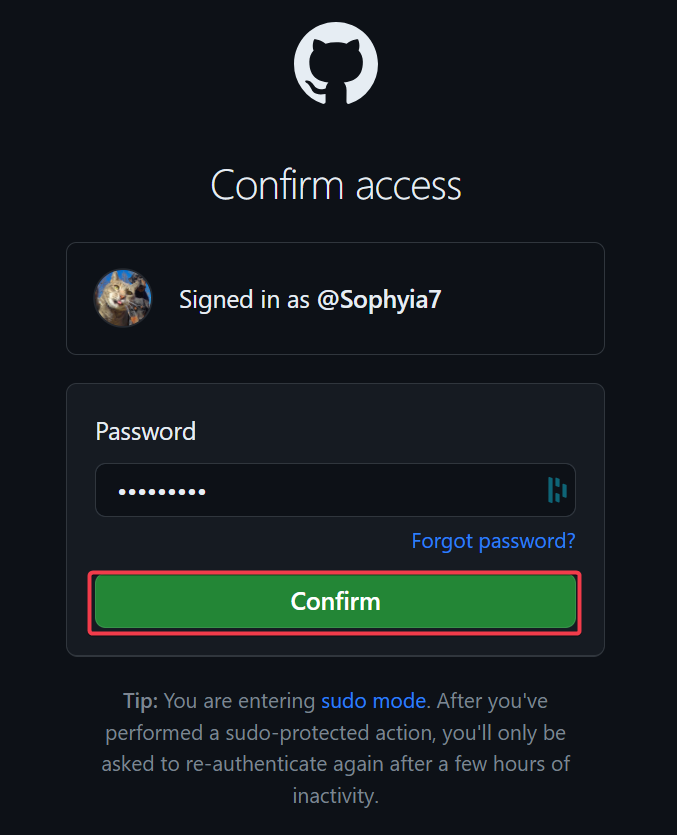
Once you log in, your client's secret key will be generated. Copy and save it on your .env file.
Now that you’ve set up your GitHub OAuth application, let’s connect it to your Django project.
How to Integrate GitHub OAuth with Django
This part will link your Django project's GitHub OAuth application to it using the social-auth app package.
First, install the dj-rest-auth package and define it on your settings.py.
pip install dj-rest-auth
Then configure dj-rest-auth package on your settings.py.
# Application definition
INSTALLED_APPS = [
    "django.contrib.admin",
    "django.contrib.auth",
    "django.contrib.contenttypes",
    "django.contrib.sessions",
    "django.contrib.messages",
    "django.contrib.staticfiles",
    "django.contrib.sites",
    "rest_framework",
    "rest_framework.authtoken",
    "dj_rest_auth",
    "allauth",
    "allauth.account",
    "allauth.socialaccount",
    "allauth.socialaccount.providers.github",
    "oauth2_provider",
    "users",
]
You'll need to enable the authentication classes for dj-rest-auth by updating REST_FRAMEWORK and AUTHENTICATION_BACKENDS on your settings.py.
Optionally, you can configure allauth if you intend to use templates. Do this on your settings.py file.
AUTHENTICATION_BACKENDS = ("allauth.account.auth_backends.AuthenticationBackend",)

REST_USE_JWT = True  # Use JWT for authentication with dj-rest-auth
SITE_ID = 1 #Set site ID

SITE_ID = 1  # Set the site ID

# Disable email verification for simplicity
ACCOUNT_EMAIL_VERIFICATION = "none"
LOGIN_REDIRECT_URL = "/"  # Redirect URL after successful login
LOGOUT_REDIRECT_URL = "/"  # Redirect URL after logout

SOCIALACCOUNT_PROVIDERS = {
    "github": {
        "APP": {
            "client_id": "YOUR_GITHUB_CLIENT_ID",
            "secret": "YOUR_GITHUB_SECRET_KEY",
            "key": "",
            "redirect_uri": "http://localhost:8000/accounts/github/login/callback/",
        }
    }
}
A Django app is required for this guide. Let's call it users. Head over to the views of the Django app and define the following code:
from allauth.socialaccount.providers.github.views import GitHubOAuth2Adapter
from allauth.socialaccount.providers.oauth2.client import OAuth2Client
from dj_rest_auth.registration.views import SocialLoginView

class GitHubLogin(SocialLoginView):
    adapter_class = GitHubOAuth2Adapter
    callback_url = CALLBACK_URL_YOU_SET_ON_GITHUB
    client_class = OAuth2Client

# Define the urls.py on the Django app
urlpatterns += [
    path('github/', GitHubLogin.as_view(), name='github_login')
    ]
How to Set Up a New Application
To specify the GitHub OAuth credentials, you'll need to log into the Django social application model. This will provide your Django project with an additional degree of protection. Because of this, changing the OAuth credentials will be simple and won't damage your existing code.
Start by logging into your Django admin, clicking Social Applications, and selecting Add Application. This will prompt you to create a new application.
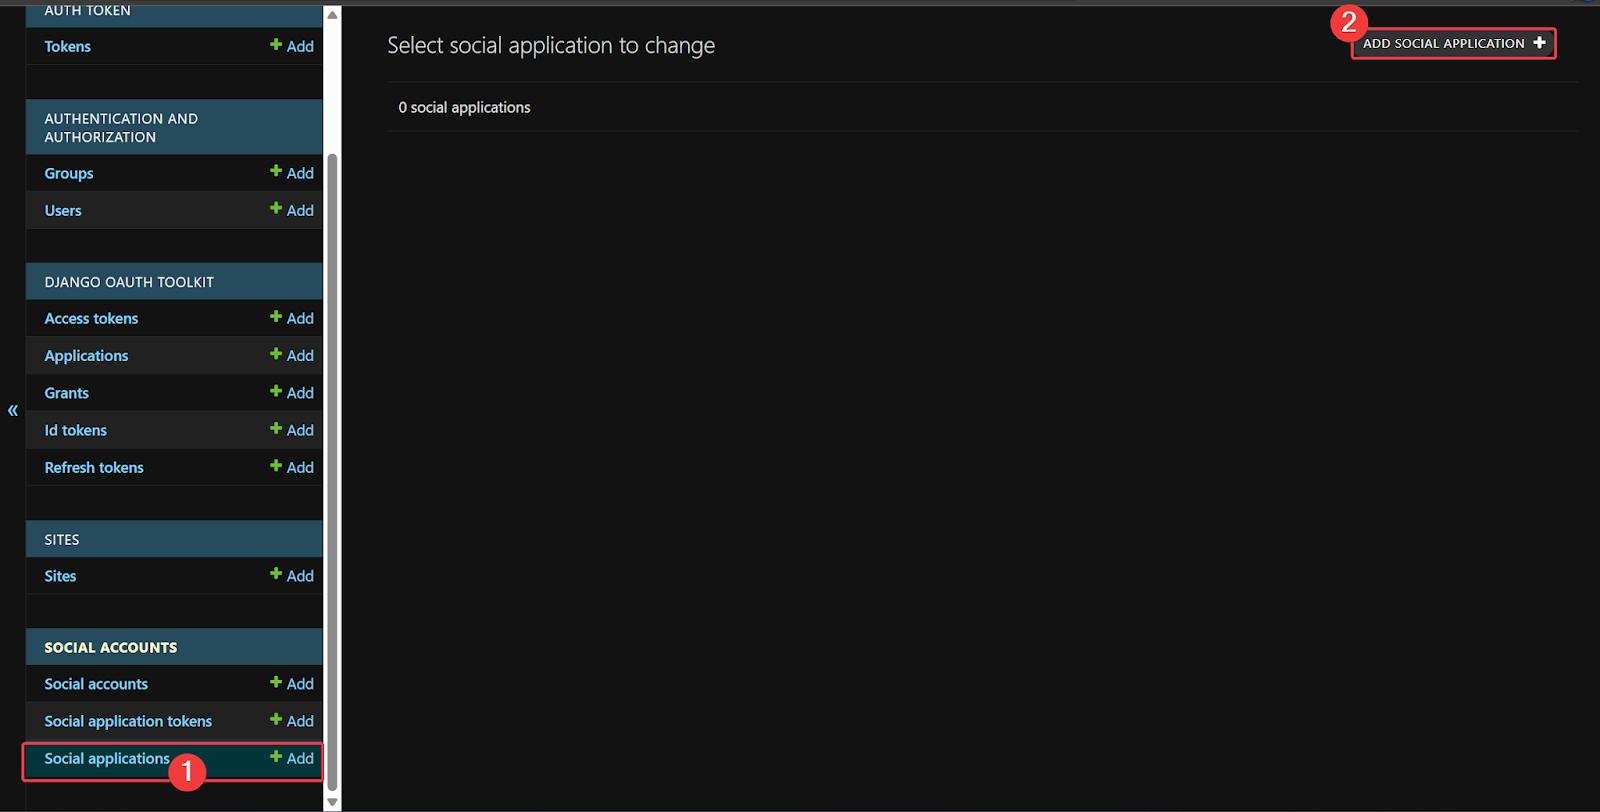
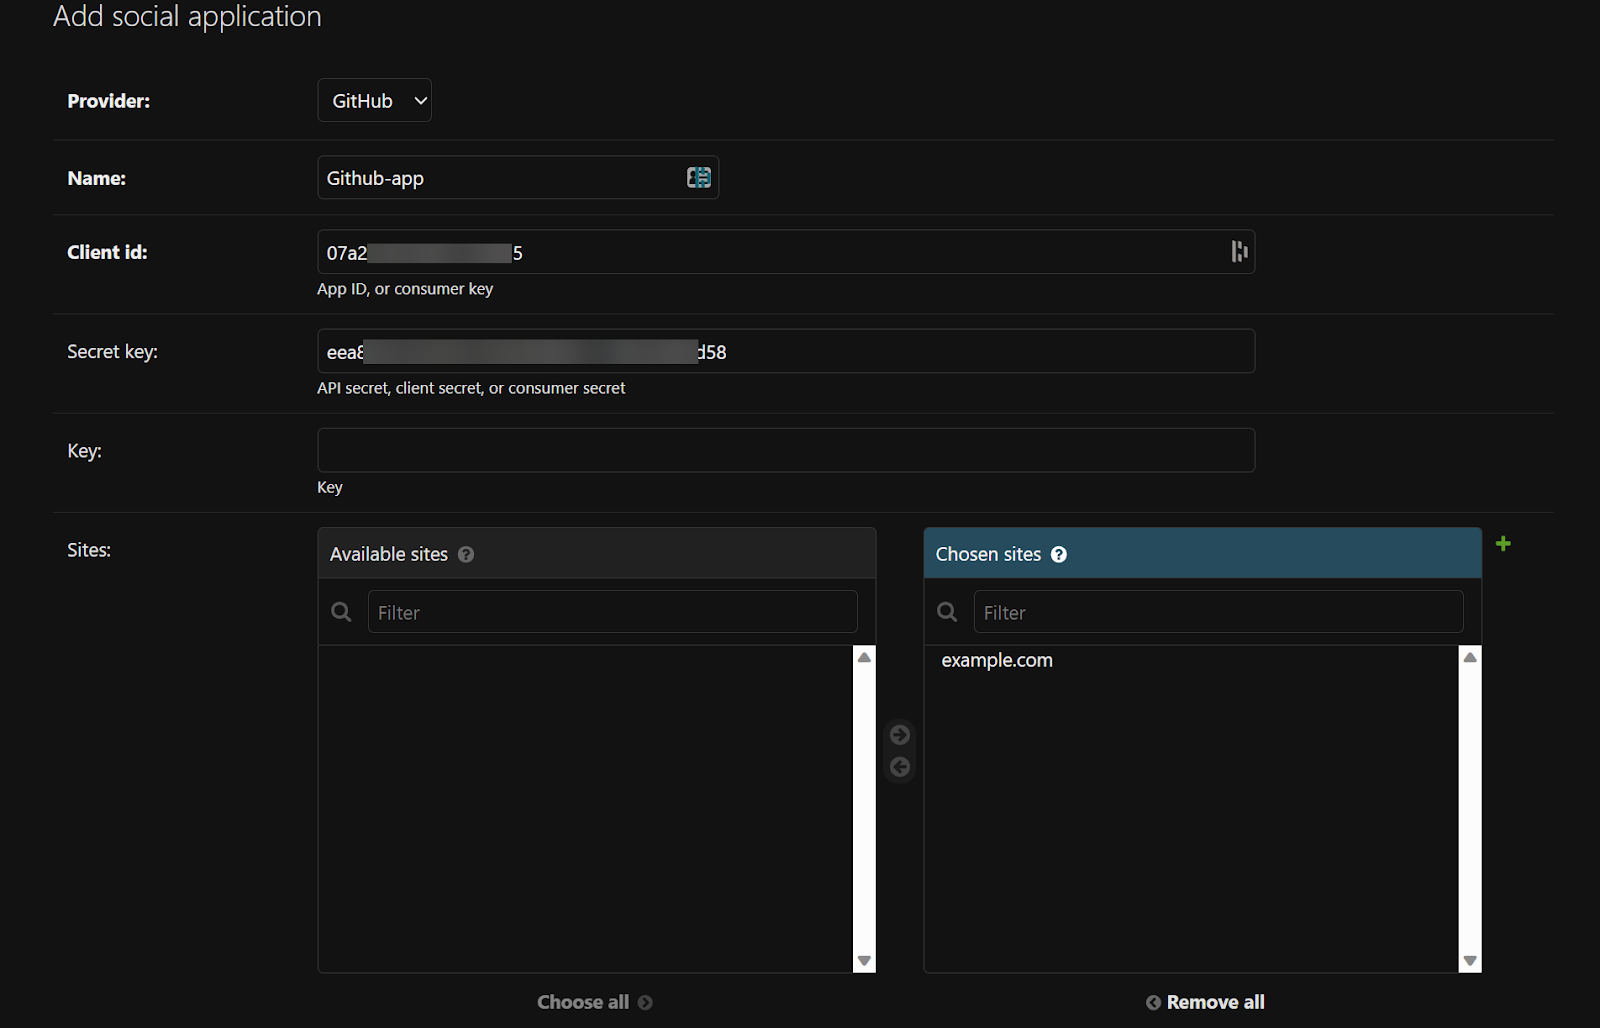
You will be prompted to enter information on the new page.
- Select GitHub as the provider.
- Give your social app a name.
- Enter the Client Secret and Client ID created from your GitHub OAuth app.
- Select the site on Available sites and move it to Chosen sites. Once done, click Save. This will create a new application.
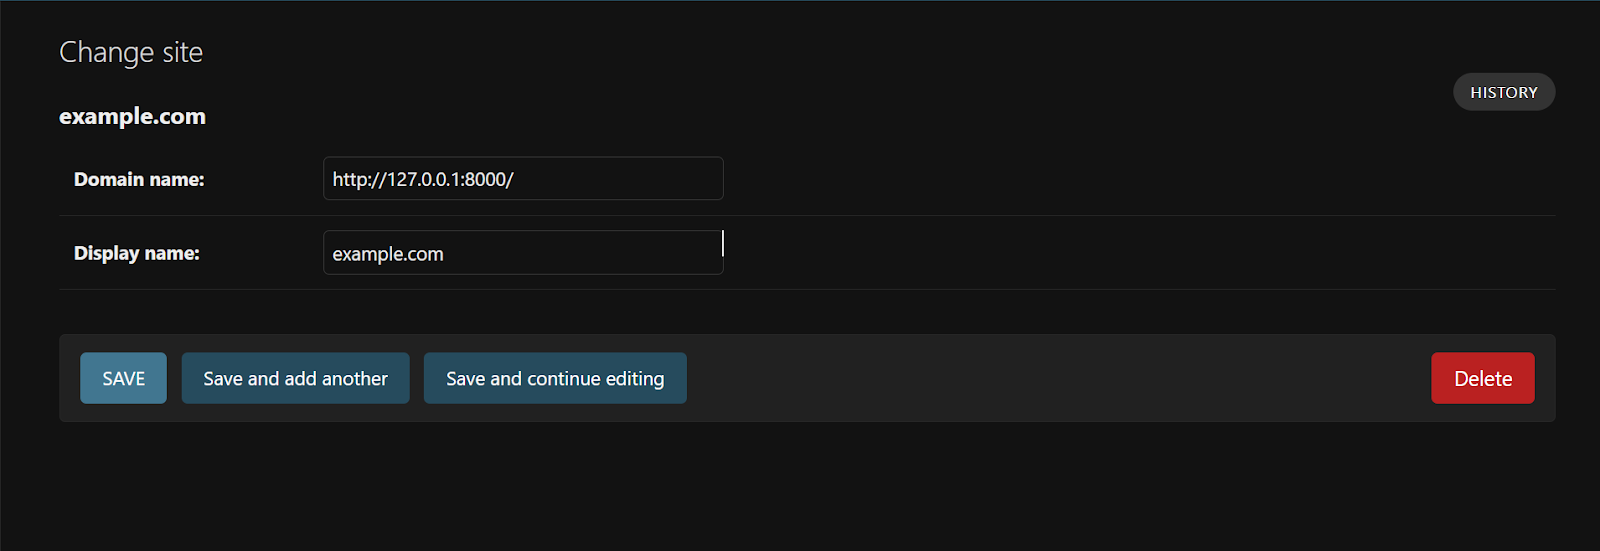
Change your site domain to localhost since this is still the development phase.
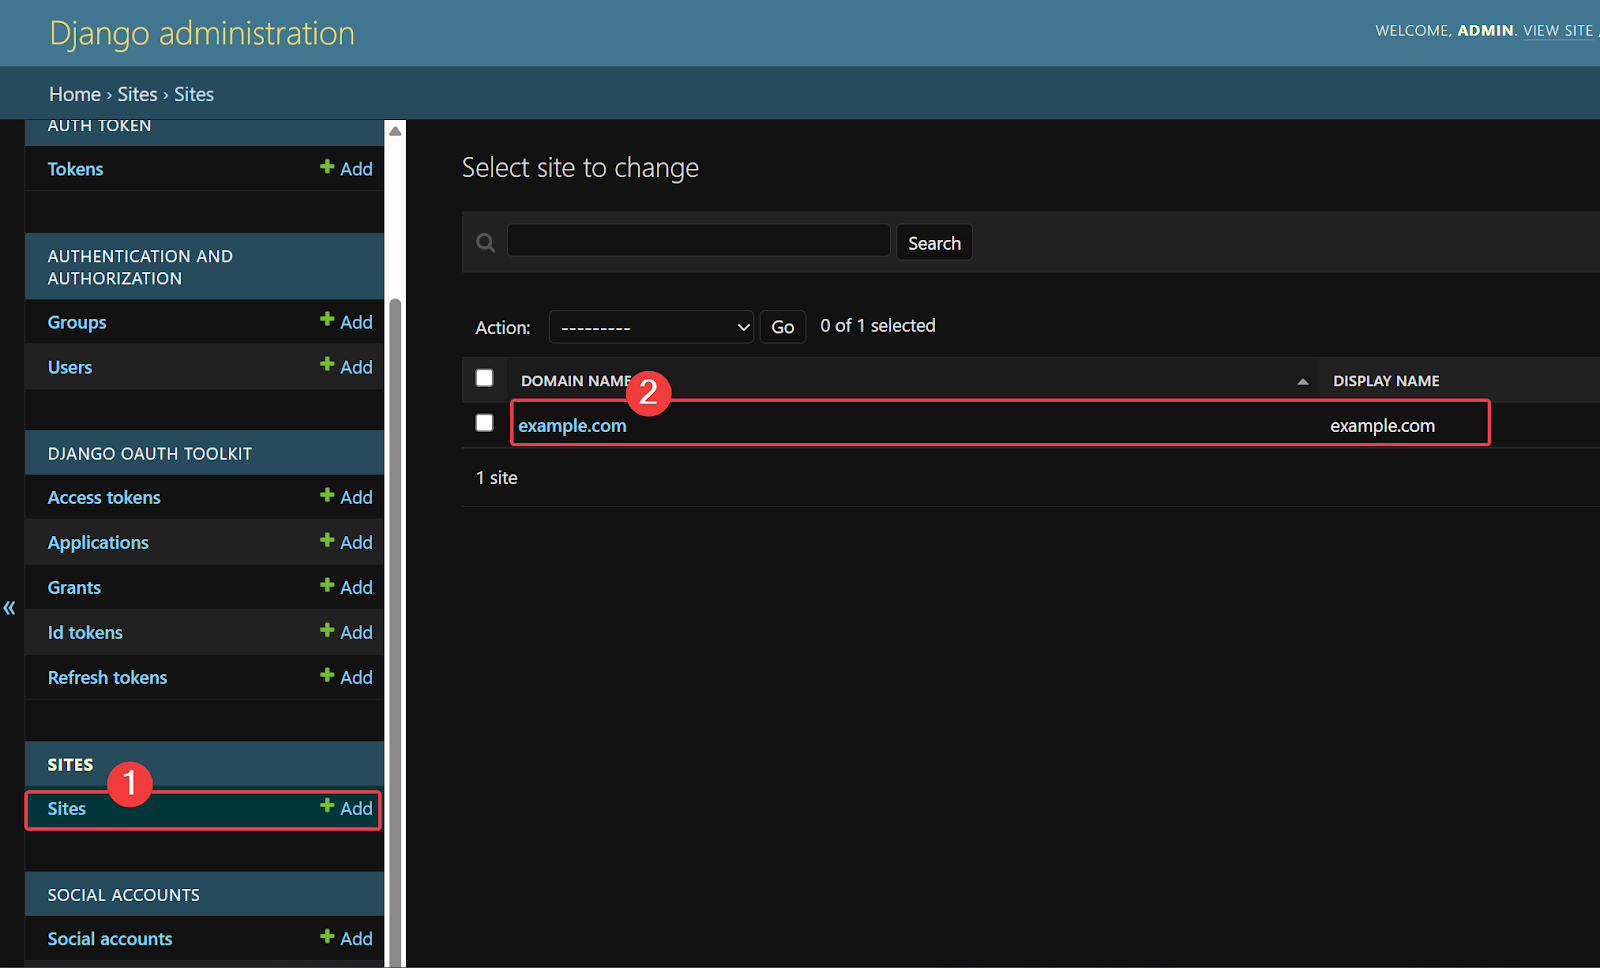
Select example.com and change it to http://127.0.0.1:8000/ then Save.
How to Test the Defined Social App
Once you are done defining and setting up the social Django app on your project, you will need to test it and make sure that it works.
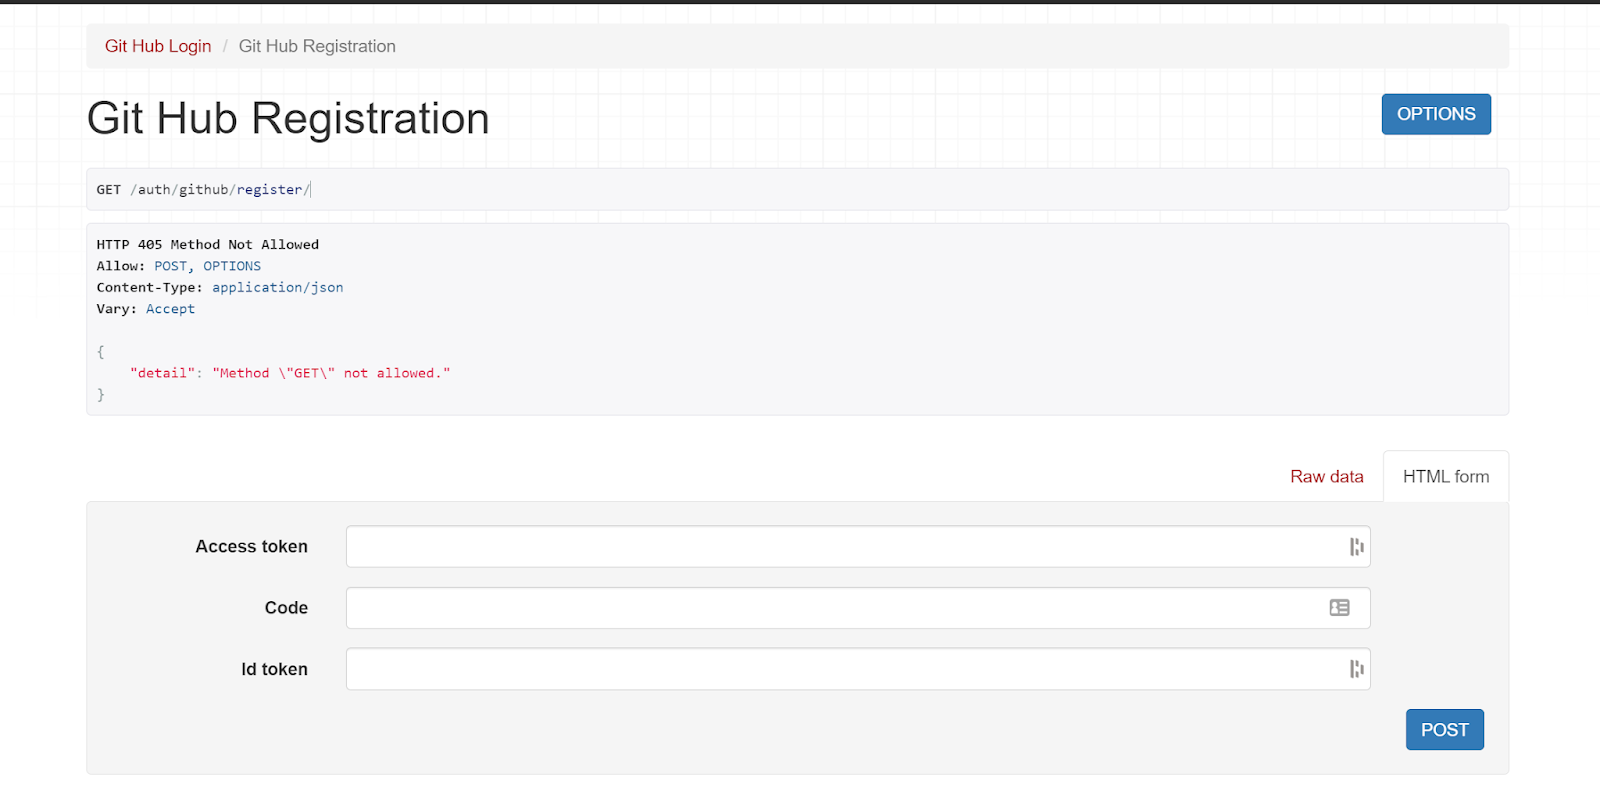
If you open the route http://127.0.0.1:8000/auth/github/, you'll need to enter some information such as Access token, ID token, and code.
We'll manually get this information, as the front end is meant to get and parse this information.
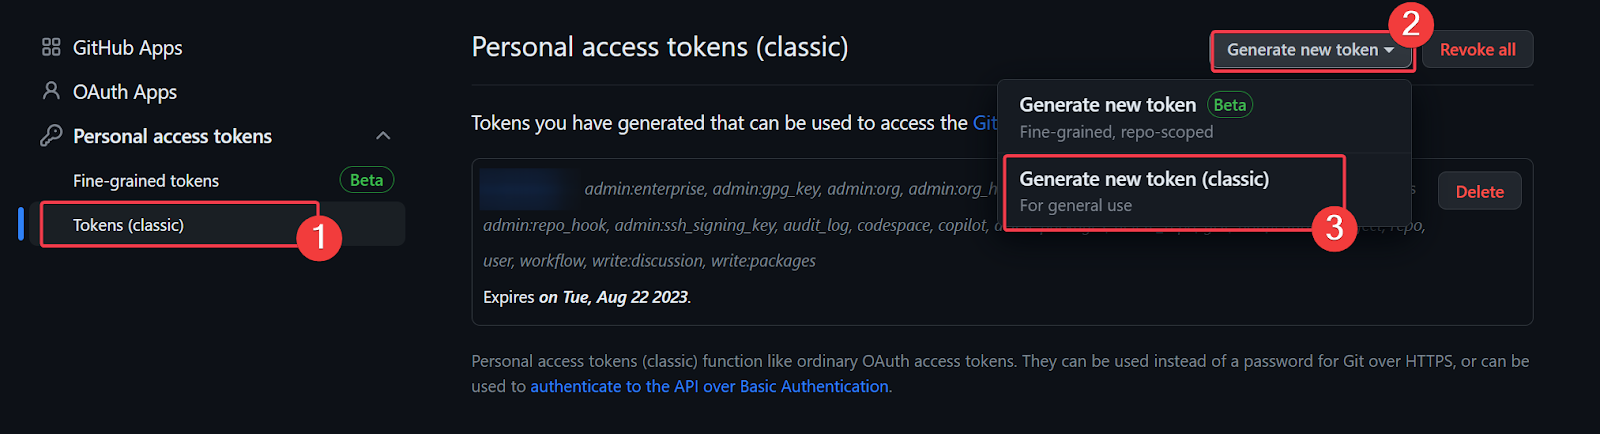
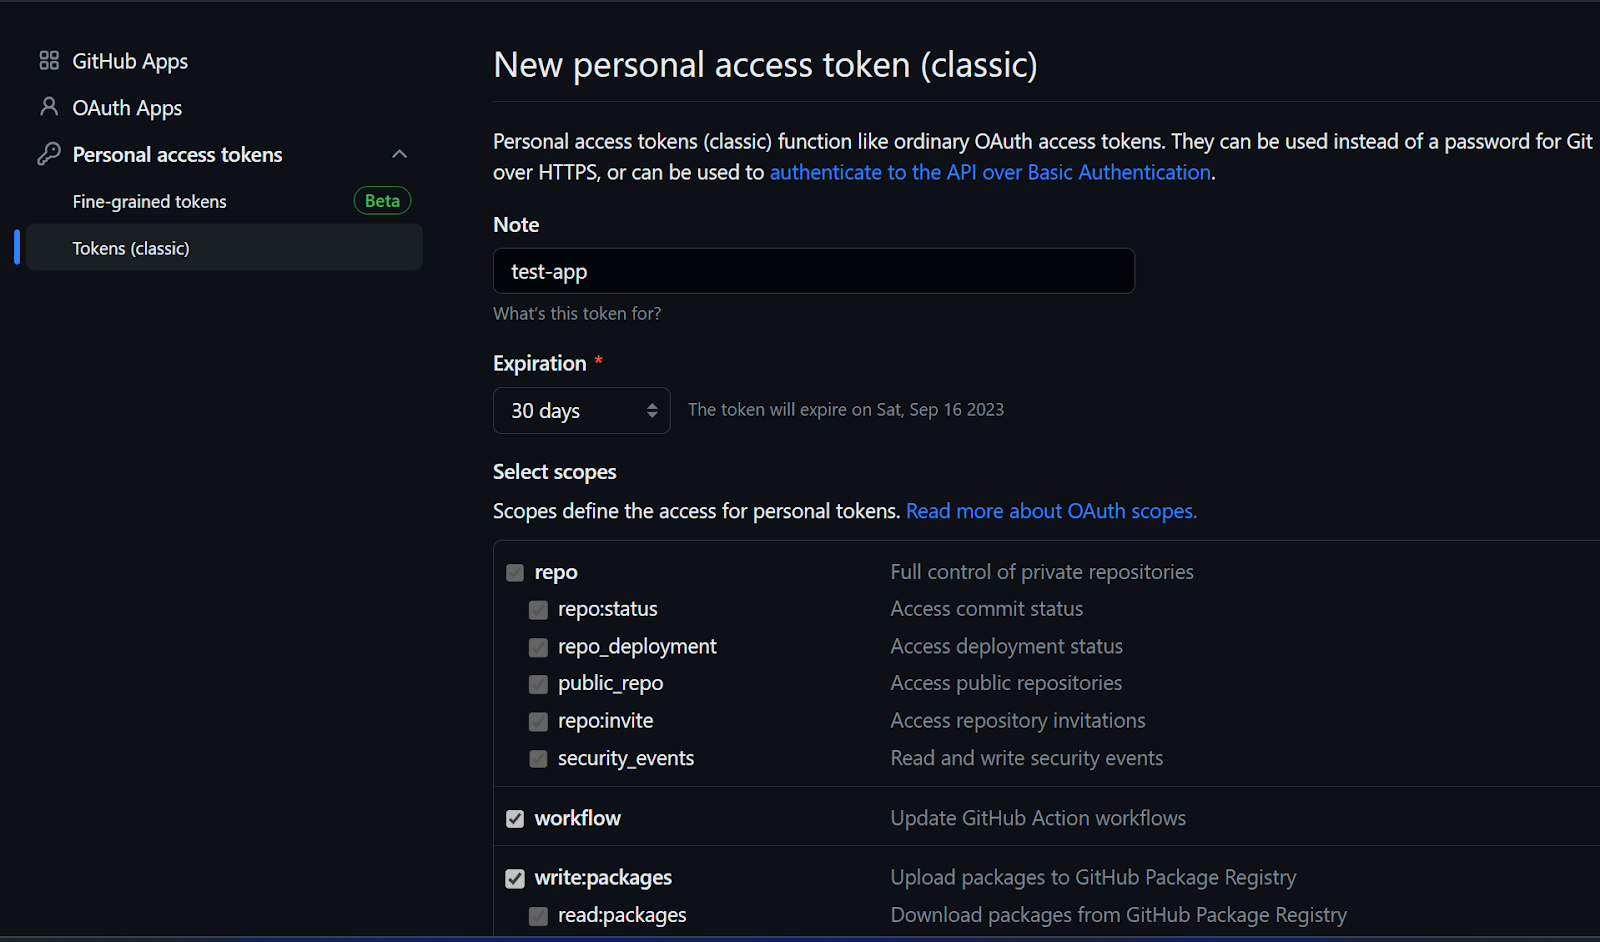
To do this, head over to https://github.com/settings/apps and select Personal access tokens then select Generate new token. Use the second option, Generate new token (classic), since this guide is focused on authenticating users just to get their GitHub user info.
Give the token a name and select scopes. Ensure you check all the user scopes. Then generate a new token.
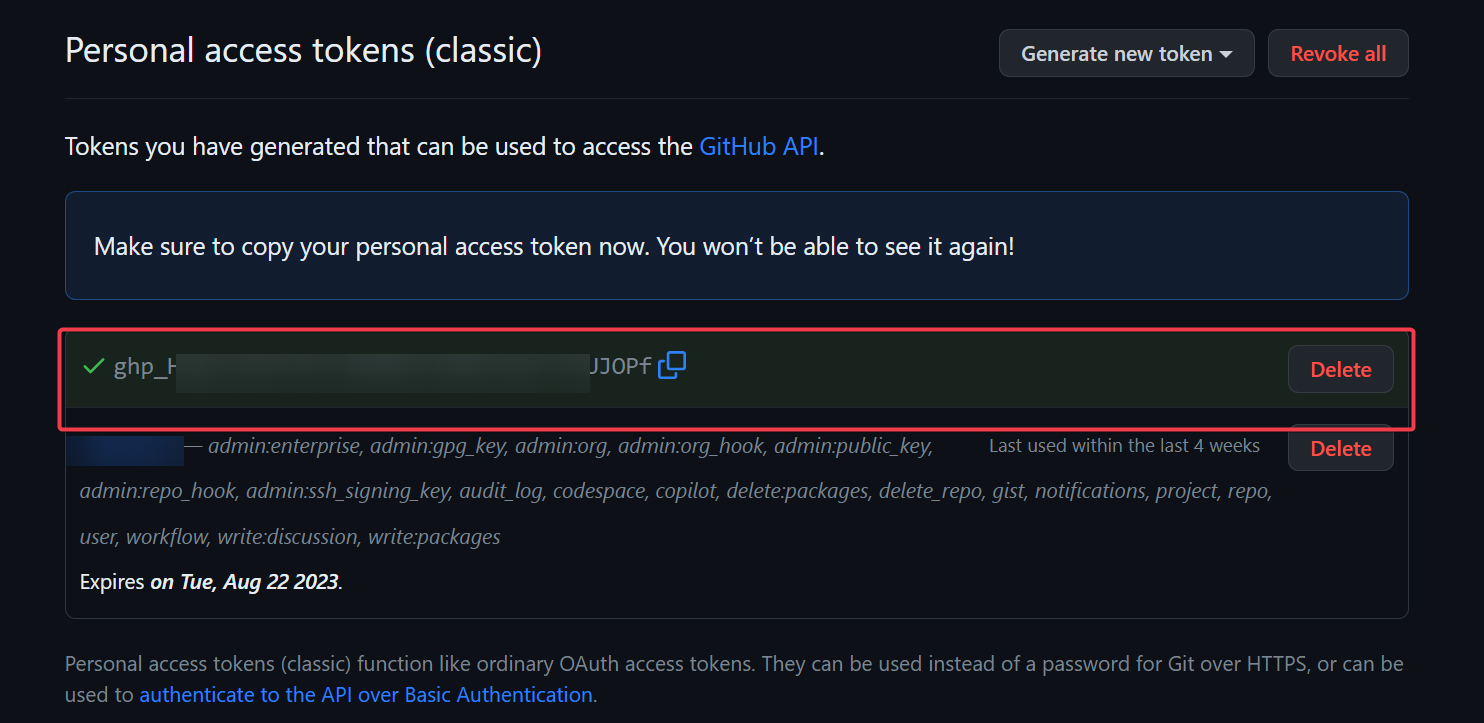
Your new token should look like this. Ensure you store it somewhere safe.
Head over to http://127.0.0.1:8000/auth/github/. Enter the access token generated and voilà! Your user access token and GitHub username will be sent as a response on the body.

How to Implement OAuth Authentication Flow
You have successfully installed and tested the dj-rest-auth package. Next, you will learn how to test the OAuth flow and how it obtains user data from GitHub.
To test the GitHub OAuth authentication flow, you'll need to send a request to https://github.com/login/oauth/authorize.
You can do so by either using curl:
"https://github.com/login/oauth/authorize?client_id=YOUR_CLIENT_ID&redirect_uri=http://127.0.0.1:8000/auth/callback/&scope=user"
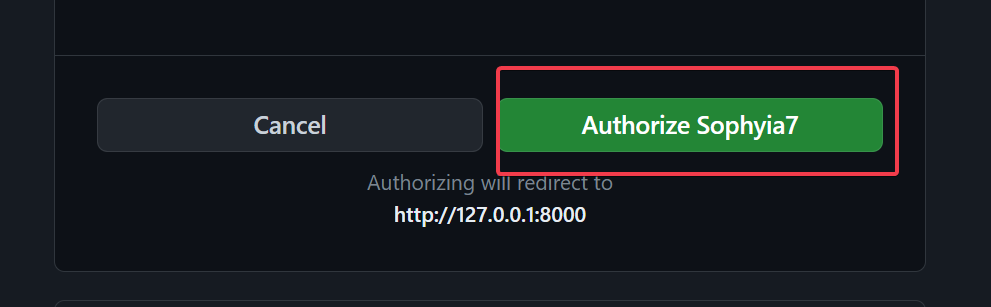
(and making sure you use the same redirect URI defined in your GitHub OAuth application) or opening https://github.com/login/oauth/authorize?client_id=YOUR_CLIENT_ID&redirect_uri=http://127.0.0.1:8000/auth/callback/&scope=user on your browser. It will redirect you to an authorization page.

Click Authorize YOUR USERNAME to authorize the user.
You will be redirected to a URL showing the code. With the code, you can generate the access token needed to authenticate the user.

To get the access token, send a request to this URL: https://github.com/login/oauth/access_token?client_id=YOUR_CLIENT_ID&client_secret=YOUR_CLIENT_SECRET&code=CODE
Or you can choose to use curl to send the request.
"https://github.com/login/oauth/access_token?client_id=YOUR_CLIENT_ID&client_secret=YOUR_CLIENT_SECRET&code=CODE"
This should either download the access token for you or return it as a response body depending on how you defined it. The response should look like this:

Now, with this token, you can authenticate your user when they make any request.
Conclusion
In conclusion, setting up GitHub OAuth on Django is a helpful way to enable users to log in to your web applications using their GitHub credentials.
By following this guide, you can enhance your application's security and access your users' data which improves the user experience of your Django app.