By Rishav Agarwal
Ten second takeaway: use Python and OpenCV to create an app that automatically captures a selfie on detecting a smile. Now let’s get into it. :)
I came across this advertisement for Oppo — the phone automatically captures a selfie when the beautiful actress smiles at the camera. This seemed like a pretty easy challenge given the wonderful dlib library from Python.
In this post, I’ll talk about how you can create a similar app that captures a selfie from a webcam on detecting a smile. All in ~50 lines of code.
Process Overview
- Use the facial landmark detector in dlib to get the mouth coordinates
- Set up a smile threshold, using a mouth aspect ratio (MAR)
- Access the webcam to setup a live stream
- Capture the image
- Save the image
- Close the cam feed
Libraries required
- Numpy: Used for fast matrix calculations and manipulations.
- dlib: Library containing the facial landmarks.
- Cv2: The Open CV library used for image manipulation and saving.
- Scipy.spatial : Used to calculate the Euclidean distance between facial points.
- Imutils: Library to access video stream.
All libraries can be installed using pip, except dlib. For dlib we have to install CMake and boost. Here is how to install them on macOS using brew.
If you don’t have brew, here’s how to install Homebrew.
Install CMake
brew install cmake
Install boost
brew install boostbrew install boost-python --with-python3
The second command makes sure that boost is usable with Python 3.
Install dlib
After this, we can install dlib using
pip install dlib
Tip: I like to use Anaconda, a virtual environment for each separate project. Here is a great blog on the whys and hows of the conda environment.
Importing libraries
from scipy.spatial import distance as distfrom imutils.video import VideoStream, FPSfrom imutils import face_utilsimport imutilsimport numpy as npimport timeimport dlibimport cv2
Facial landmark detector
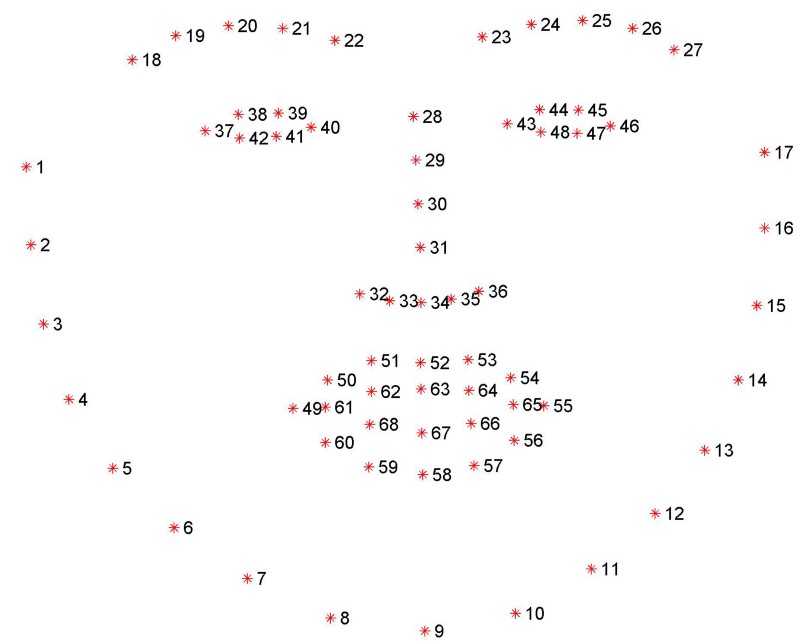
The facial landmark detector is an API implemented inside dlib. It produces 68 x- y-coordinates that map to specific facial structures.
This can be visualised as:

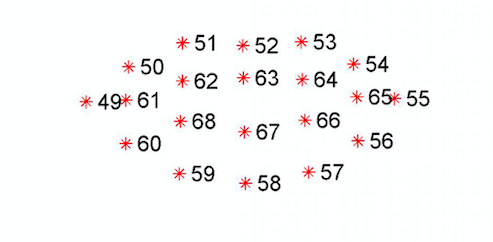
We will focus on the mouth which can be accessed through point range [49,…, 68]. There are twenty coordinates.
Using dlib, we can get these features using the following code:
shape_predictor= “../shape_predictor_68_face_landmarks.dat”detector = dlib.get_frontal_face_detector()predictor = dlib.shape_predictor(shape_predictor)(mStart, mEnd) = face_utils.FACIAL_LANDMARKS_IDXS[“mouth”]
(mStart, mEnd) gets us the first and last coordinates for the mouth.
You can download the pre-trained landmark file here or just email me and I’ll send it to you. Remember to extract it.
The smile function
The image below shows only the twenty mouth coordinates:
I created a mouth aspect ratio (MAR) inspired by two articles on blink detection. These are Real-Time Eye Blink Detection using Facial Landmarks. and Eye blink detection with OpenCV, Python, and dlib. The second article expands on the first. Both discuss an aspect ratio, in this case for the eyes (EAR):
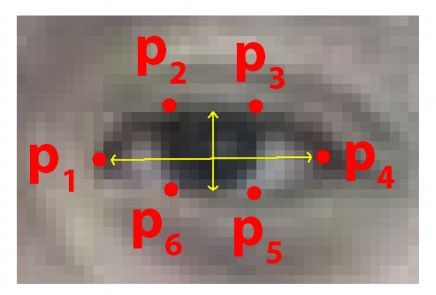
The formula for the EAR is:
D = distance between p1 and p4
L= average of distance between p2 and p6; p3 and p5
EAR equation
EAR= L/D
In our case, MAR is defined simply as the relationship of the points shown below

We compute the distance between p49 and p55 as D, and we average the distances between:
p51 and p59
p52 and p58
p53 and p57
Let’s call it L, using the same naming structure:
MAR equation
MAR = L/D
Here is the function to calculate the MAR.
def smile(mouth): A = dist.euclidean(mouth[3], mouth[9]) B = dist.euclidean(mouth[2], mouth[10]) C = dist.euclidean(mouth[4], mouth[8]) L = (A+B+C)/3 D = dist.euclidean(mouth[0], mouth[6]) mar=L/D return mar
Tip: When we splice the array the point 49 becomes first element of the array (0) and all the other indices are adjusted accordingly:
Smiling with the mouth closed increases the distance between p49 and p55 and decreases the distance between the top and bottom points. So, L will decrease and D will increase.
Smiling with mouth open leads to D decreasing and L increasing.
See how the MAR changes when I change mouth shapes:
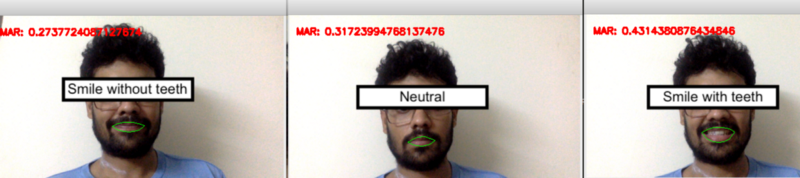
Based on this, I set a smile to be a MAR of <.3 or >.38. I could have taken just D as D will always increase when one is smiling. But D will not be same for all, as people have different mouth shapes.
These are crude estimates and may include other emotions like “awe”. To overcome this, you can create a more advanced model. You could take more facial features into account, or simply train a CV-based emotions classifier.
Now that we have a smile function, we can implement the video capture.
Video capture
Access the webcam
We can access the webcam through the imutils library using the following command. cv2.namedWindow creates a new window:
vs = VideoStream(src=0).start()fileStream = Falsetime.sleep(1.0)cv2.namedWindow('frame',cv2.WINDOW_NORMAL)
Face detection
Now we come to the main loop where the magic happens. First we capture a single frame and convert it to grayscale for easy computation. We use this to detect the face. cv2.convexHull(mouth) detects the mouth outline and cv2.drawContours draws a green outline around it.
while True: frame = vs.read() frame = imutils.resize(frame, width=450) gray = cv2.cvtColor(frame, cv2.COLOR_BGR2GRAY) rects = detector(gray, 0) for rect in rects: shape = predictor(gray, rect) shape = face_utils.shape_to_np(shape) mouth= shape[mStart:mEnd] mar= smile(mouth) mouthHull = cv2.convexHull(mouth) cv2.drawContours(frame, [mouthHull], -1, (0, 255, 0), 1)
Tip: this setup can detect multiple smiles in a single frame.
Auto-capture
Next we set the auto-capture condition:
if mar <= .3 or mar > .38 : COUNTER += 1 else: if COUNTER >= 15: TOTAL += 1 frame = vs.read() time.sleep(0.3) img_name = “opencv_frame_{}.png”.format(TOTAL) cv2.imwrite(img_name, frame) print(“{} written!”.format(img_name)) cv2.destroyWindow(“test”) COUNTER = 0
Here, I consider a smile to be “selfie worthy” if the person holds it for half a second, or 30 frames.
We check if the MAR is < .3 or > .38 for at least 15 frames and then save the 16th frame. The file is saved to the same folder as the code with name “opencvframe.png”.
I have added a few time.sleep functions to smooth out the experience. Phones usually get around these hardware issues by using tricks like animations or loading screens.
Tip: This part is inside the while loop.
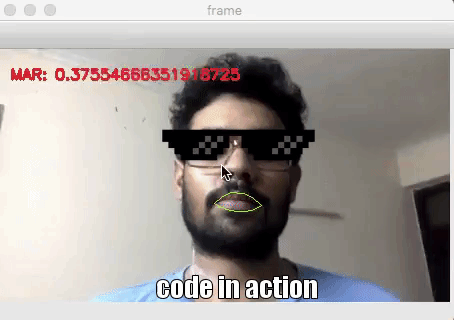
We also print the MAR on the frame with the cv2.putText function:
cv2.putText(frame, “MAR: {}”.format(mar), (10, 30), cv2.FONT_HERSHEY_SIMPLEX, 0.5, (0, 0, 255), 2)
Tip: My Mac has a 30 fps camera, so I used 30 as the number of frames. You can change this accordingly. An easier way is to find the fps is to use the fps function in imutils.
Quit video streaming
Finally, put a quit command that stops the video streaming when the “q” key is pressed. This is achieved by adding:
key2 = cv2.waitKey(1) & 0xFF if key2 == ord(‘q’): break
Lastly, we destroy the window using
cv2.destroyAllWindows()vs.stop()
and we are done!
The entire code in action:
You can find the entire code on my GitHub.
This was a basic application of the amazing dlib library. From here, you can go on to create things like your own snapchat filters, high-tech home surveillance systems, or even a post-Orwellian happiness detector.
Tweet at me in case you end up doing any more cool things with this or find a better smile detector. Another cool idea is to do some post processing to the captured image (as in the advertisement) to make the picture prettier.
Thanks for reading. If you liked what you read, clap, and follow me. It would mean a lot and encourage me to write more. Let’s connect on Twitter and Linkedin as well :)