

Figuring out state management in React applications can feel like trying to find your way through a labyrinth. You'll constantly be searching for the most efficient, scalable, and maintainable solution.
The journey often leads to two primary paths: Using Props or the Context API. As you embark on this quest for state management mastery, it's crucial to understand the intricacies, trade-offs, and use cases of each approach.
In this tutorial, we'll delve into the world of React state management, dissecting the advantages and disadvantages of using props and the Context API and providing valuable insights to help you make informed decisions for your application. You'll be able to unravel the mysteries of state management in React and discover which path will lead you to success.
Prerequisites
- React Fundamentals such as components, JSX syntax, props, and state.
- A familiarity with different state management techniques in React, such as using props and the Context API.
What is State Management in React?
State management refers to the methods and techniques used to handle, organise, and share data within a React application. It involves the systematic management and manipulation of data, ensuring seamless integration and synchronization across various components.
Benefits of React State Management
State management plays a pivotal role in developing dynamic and interactive applications that need to handle evolving data. This data can come from user interactions or other triggering events.
By implementing robust state management techniques, React applications can maintain data integrity, enhance performance, and provide a smooth user experience.
State Management Using Props
This is a technique where state is managed in a parent component and passed down to child components via props. This approach is suitable for small-scale applications with simple state requirements and a shallow component hierarchy. U
sing props is considered a local state management method, as the state is maintained and shared within a limited scope of closely related components.
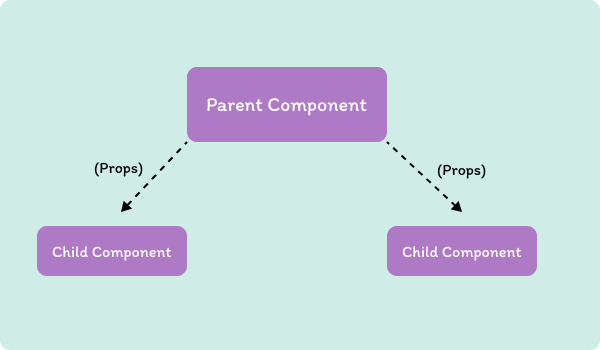 A diagram illustrating using props to manage state
In the diagram above, state is passed from the parent component to the children components via props, allowing the child components to access/manipulate that state.
How to Implement State Management in React Applications Using Props
Let's look at an example to illustrate prop usage. First, create a parent component in your React app.
const ParentComponent = () => {

  return (
    <div>
      <h1>Parent Component</h1>
    </div>
  );
};

export default ParentComponent;
Then, using the useState hook, create a state which will hold the initial state of a message.
import { useState } from "react";
const [message, setMessage] = useState("Hello from the Parent Component!");
To style the examples going forward, use the styles below:
@import url("https://fonts.googleapis.com/css2?family=Itim&display=swap");

.App {
  display: flex;
  justify-content: center;
  align-items: center;
  height: 100vh;
}

* {
  box-sizing: border-box;
  margin: 0;
  padding: 0;
}
body,
input,
button {
  font-family: "Itim", cursive;
  color: burlywood;
}
h1,
h2,
p {
  padding: 2rem;
}

input {
  width: 100%;
  padding: 1rem;
}

button {
  padding: 0.5rem 1rem;
  background: none;
  border: 1px solid #333;
  border-radius: 5px;
  cursor: pointer;
}

.dark {
  color: #333;
}
Here’s how the parent component looks so far:
 Initial Parent component look
Next, create a child component which will take in the state passed from the parent.
const ChildComponent = () => {

  return (
    <div>
      <h2>Child Component</h2>
      <p>Message from parent: </p>
    </div>
  );
};
export default ChildComponent;
In order for the child component to access the message state declared in the parent component, first import and embed the child component in the parent component like this:
import { useState } from "react";
import ChildComponent from "./ChildComponent";

const ParentComponent = () => {
  const [message, setMessage] = useState("Hello from the Parent Component!");

  return (
    <div>
      <h1>Parent Component</h1>
      <ChildComponent />
    </div>
  );
};
export default ParentComponent;
To pass the message state to the child component as a prop, you use a name property (whatever you want your props name to be in the child component) followed an equality sign, then a pair of curly brackets. In the curly brackets, pass in the data you want to move between components.
import { useState } from "react";
import ChildComponent from "./ChildComponent";

const ParentComponent = () => {
  const [message, setMessage] = useState("Hello from the Parent Component!");

  return (
    <div>
      <h1>Parent Component</h1>
      <ChildComponent message={message} />
    </div>
  );
};

export default ParentComponent;
To access the message state in your child component, pass in the props keyword as an argument in your child component function.
const ChildComponent = (props) => {
  console.log(props);

  return (
    <div>
      <h2>Child Component</h2>
      <p>Message from parent: </p>
          </div>
  );
};

export default ChildComponent;
Taking a look at the props in the console now gives the following result:
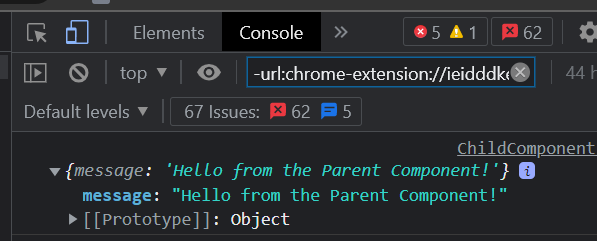 Confirming successful props passing by logging the props object to the console
To read the value of message in the child component, use dot notation to access the message property.
const ChildComponent = (props) => {
  console.log(props);

  return (
    <div>
      <h2>Child Component</h2>
      <p>Message from parent: {props.message}</p>
       </div>
  );
};

export default ChildComponent;
That updates the page to look like this:
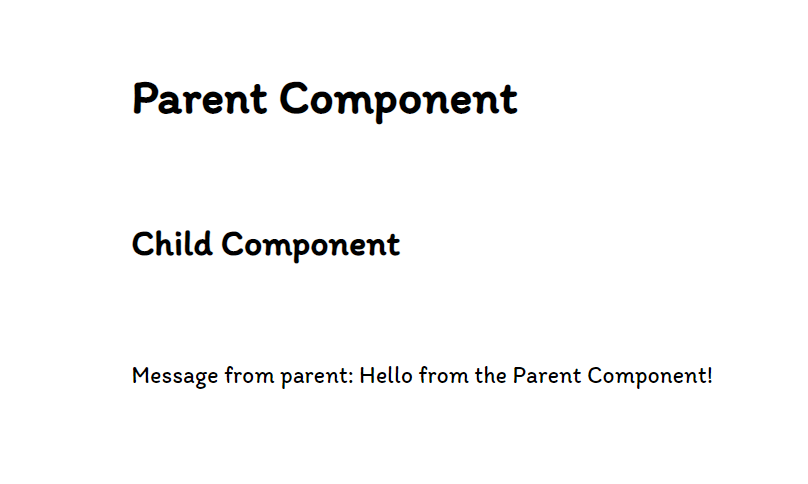 After successfully passing the message prop
To take this example further, let’s update the state of message from the child component. Start by creating a function that updates the state of message in the parent component:
 const updateMessage = (newMessage) => {
    setMessage(newMessage);
  };
Then pass that function as a prop to the child component:
const ParentComponent = () => {
  const [message, setMessage] = useState("Hello from the Parent Component!");

  const updateMessage = (newMessage) => {
    setMessage(newMessage);
  };

  return (
    <div>
      <h1>Parent Component</h1>
      <ChildComponent message={message} updateMessage={updateMessage} />
    </div>
  );
};

export default ParentComponent;
Then use an input field whose value is initially set to the current value of the message prop:
const ChildComponent = (props) => {
  console.log(props);


  return (
    <div>
      <h2>Child Component</h2>
      <p>Message from parent: {props.message}</p>
      <input type="text" value={props.message}/>
    </div>
  );
};

export default ChildComponent;
To update the value in the message state, use an onChange event to target the current value in the input field and set that to the value in the message state.
const ChildComponent = (props) => {
  console.log(props);
  const handleChange = (e) => {
    props.updateMessage(e.target.value);
  };

  return (
    <div>
      <h2>Child Component</h2>
      <p>Message from parent: {props.message}</p>
      <input type="text" value={props.message} onChange={handleChange} />
    </div>
  );
};

export default ChildComponent;
To confirm successful state management, let’s update the value in the input field on the browser.
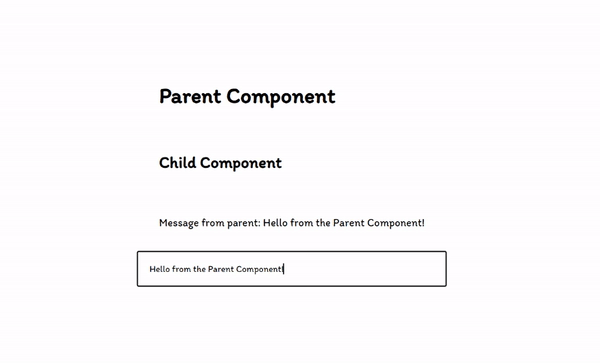 Successful state management with Props
Thus shows successful state management using props.
Benefits of Using Props for State Management
- Simplicity: The application of props in state management presents a simple method to transfer data between components. This approach eliminates the need for supplementary libraries or complex configurations, making it a beginner-friendly option.
- Readability: Using props to transmit data ensures clarity regarding the origin and destination of the information. This transparency helps simplify code interpretation and comprehension.
- One-Way Data Flow: The unidirectional data flow characteristic of React's props allows data to transition from the parent component to its child. This streamlined movement helps trace data sources and troubleshoot any issues tied to state alterations.
- Reusability: Components that rely solely on props (often referred to as stateless components) can be easily reused across different parts of an application. Because they don't manage their own state and only display data based on what they receive through props, they're more predictable and easier to test.
Drawbacks of Using Props for State Management
- Prop Drilling: This is when you need to pass props through multiple components to reach the ones that actually use them. This can make your code more difficult to maintain and understand, as each intermediate component needs to forward the props.
- Lack of State Control: Props are read-only, and child components cannot modify the props they receive from their parent component. To update a prop, you have to lift the state up to the parent or use callback functions, which can become complex in larger applications.
- Difficulty in Global State Management: Props work well for parent-child communication but can become cumbersome when you need to share state across many components or across sibling components. It becomes challenging to keep everything in sync.
- Testing and Debugging: While stateless components are generally easier to test, when props are used extensively for state management debugging can be challenging. This is because state changes are more scattered across components, making it harder to track where a state change originated.
State Management Using the Context API
The Context API is a React feature that allows sharing data between components without explicitly passing props through each level of the component tree (prop drilling). It allows you to create a global state that can be accessed by any component in your application, regardless of its position in the component hierarchy.
The Context API consists of two main parts: the context provider and the context consumer.
The Context Provider
The context provider is responsible for creating and managing the global state. It wraps a section of your component tree and makes the state available to all the components within that tree.
To create a context, you use the createContext function from the React module.
import { createContext } from 'react';
This function returns a Context object containing a Provider component and a Consumer component.
The Provider component is used to wrap the section of your component tree where you want to make the context available (that is, the component(s) you want to make the data available to).
The Consumer component is used to access the shared data within your components.
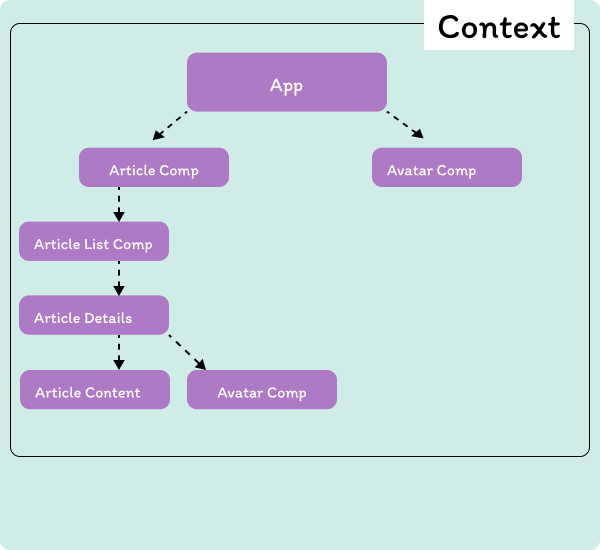 A diagram illustrating using Context API to wrap a React App
The diagram above demonstrates that the entire application has been wrapped in a context, which allows all components to access the data from the context without requiring it to be explicitly passed down as a prop from the parent component.
How to Implement State Management in React Applications using the Context API
Using an example to illustrate the use of Context API, let’s create a theme switcher that toggles between light and dark modes.
First, create three sibling components (Sibling Components A, B and C). Then create a ThemeContext.jsx file, importing the createContext function from React, and setting the default value of the context to the default theme.
import { createContext} from "react";

const ThemeContext = createContext({
  theme: "light",
});
Next, create a provider component which wraps the components you want the values in the context to be available to, using the children prop.
export const ThemeProvider = ({ children }) => {

    return (
    <>
    </>
  );
};

export default ThemeContext;
After that, create a state that holds the default value of the theme using useState.
import { useState } from "react";
const [theme, setTheme] = useState("light");
Then return the context provider (which wraps the children prop), and pass in the values you want to make available to the wrapped components.
export const ThemeProvider = ({ children }) => {
  const [theme, setTheme] = useState("light");

  return (
    <ThemeContext.Provider value={{ theme }}>
      {children}
    </ThemeContext.Provider>
  );
};
To ensure that the ThemeContext and its values are accessible to all descendant components within the component tree, import the sibling components in the App component and wrap them with the ThemeProvider component, imported from ThemeContext.
import { ThemeProvider } from "./ThemeContext";
function App() {
  return (
    <div className="App">
      <ThemeProvider>
        <SiblingComponentA />
        <SiblingComponentB />
        <SiblingComponentC />
      </ThemeProvider>
    </div>
  );
}
For confirmation, import the ThemeContext in all sibling components. Then using the useContext hook, which accepts a context object (ThemeContext), we extract the value of theme and log it to the console.
import { useContext } from "react";
import ThemeContext from "./ThemeContext";

export default function SiblingComponentA() {
  const { theme } = useContext(ThemeContext);
  console.log(“SiblingComponentA”, theme);
  return (
    <div>
      <h1>
        Sibling Component A
      </h1>
    </div>
  );
}
import { useContext } from "react";
import ThemeContext from "./ThemeContext";

export default function SiblingComponentB() {
  const { theme } = useContext(ThemeContext);
  console.log(“SiblingComponentB”, theme);
  return (
    <div>
      <h1>
        Sibling Component B
      </h1>
    </div>
  );
}
import { useContext } from "react";
import ThemeContext from "./ThemeContext";

export default function SiblingComponentC() {
  const { theme } = useContext(ThemeContext);
  console.log(“SiblingComponentC”, theme);
  return (
    <div>
      <h1>
        Sibling Component C
      </h1>
    </div>
  );
}
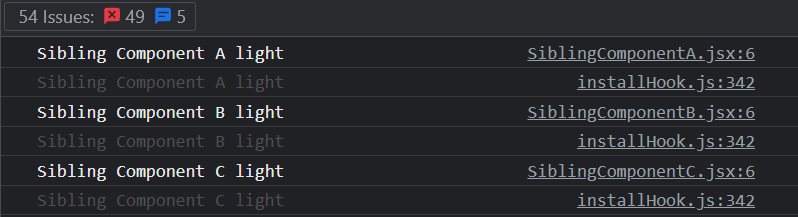 Confirming successful context passing
And with that, you’ve successfully passed data to components without moving it through its parent via props.
To take this example further, let’s update the state of theme from the themeContext.
In your ThemeProvider function, create a toggle function which compares the previous state of the theme with a value and toggles it based on the result of the comparison.
 const toggleTheme = () => {
    setTheme((prevTheme) => (prevTheme === "light" ? "dark" : "light"));
  };
Next, pass the toogleTheme function to the ThemeContext.Provider, making it available to all the descendants of the ThemeProvider.
 <ThemeContext.Provider value={{ theme, toggleTheme }}>
      {children}
 </ThemeContext.Provider>
To utilize this functionality, create a ThemeButton, and nest it in the App component.
function App() {
  return (
    <div className="App">
      <ThemeProvider>
        <SiblingComponentA />
        <SiblingComponentB />
        <SiblingComponentC />
        <ThemeButton />
      </ThemeProvider>
    </div>
  );
}
In the ThemeButton component, import the ThemeContext component, and use the useContext hook to extract the toggleTheme function.
import { useContext } from "react";
import ThemeContext from "./ThemeContext";

export default function ThemeButton() {
  const { toggleTheme } = useContext(ThemeContext);

  return <button >ThemeButton</button>;
}
Then attach an onClick event to the button, which calls the toggleTheme function.
return <button onClick={toggleTheme}>ThemeButton</button>;
To test your functionality, observe the console while you click on the theme button.
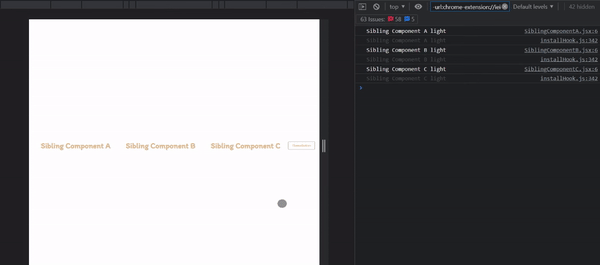 Theme Switching with context API
And violà! The theme value is updated on each click and synchronous on all components.
For added flair, you can add conditionals to each component and toggle its colour based on the current theme, like so:
import { useContext } from "react";
import ThemeContext from "./ThemeContext";

export default function SiblingComponentA() {
  const { theme } = useContext(ThemeContext);
  console.log("Sibling Component A", theme);
  return (
    <div>
      <h1 className={`${theme === "dark" ? "dark" : "light"}`}>
        Sibling Component A
      </h1>
    </div>
  );
}
Which results in the following:
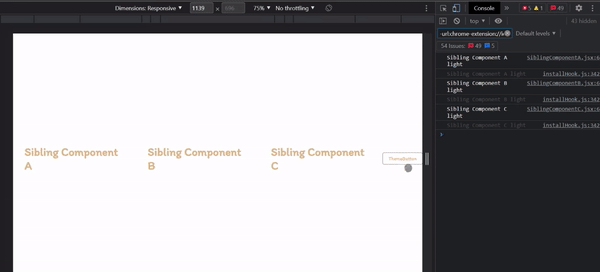 Theme Color switching with Context API
Advantages of Using Context API for State Management
- Global Data Sharing: Context provides a way to share state across multiple components without the need to pass props down through intermediate components. It allows you to establish a global data flow in your application, making the state accessible to any component that needs it.
- Avoids Prop Drilling: Prop drilling occurs when you need to pass data through multiple layers of components. With Context, you can avoid this issue by providing the data directly to the components that need it, regardless of their position in the component tree.
- Reduces Coupling: Using Context allows components to be more loosely coupled since they don't need to rely on specific props being passed down. Components can focus on their own responsibilities without having to worry about passing data down through multiple levels.
- Cleaner and More Maintainable Code: By centralizing the state in a single place, the code becomes cleaner and more maintainable. It avoids cluttering components with irrelevant state management logic and keeps the concerns separated.
Drawbacks of Using Context API for State Management
- Reduced Performance: Updating the context value can potentially cause unnecessary re-renders in consuming components, even if the changes are not relevant to them. This can impact performance, especially in larger component trees. Careful consideration of when and how to update the context value is necessary to mitigate this issue.
- Complexity in Testing: Testing components that consume context can be more complex compared to testing components with props-based state management. Mocking or providing the correct context values during testing may require additional setup and can make unit tests more cumbersome.
- Potential for Overuse: The simplicity and ease of use of the Context API can lead to its overuse, causing excessive coupling between components and making the codebase harder to understand and maintain. Overusing context for every piece of shared state, especially for unrelated concerns, can make the codebase less modular and harder to reason about.
- Lack of Type Safety: Context values are not type-checked by default, which means that incorrect usage or changes in the shape of the context value may not be caught by the compiler or development tools. This can lead to runtime errors and debugging challenges.
Comparing Props and the Context API
Use Cases for Props
- Local Component State: When the state is only needed within a specific component and doesn't need to be shared with other components, managing it through the local component state using props is a straightforward and efficient approach.
- Parent-to-Child Data Flow: Props are ideal for passing data from parent components to their child components. This allows parent components to control and provide the necessary data to their child components.
- Component Composition: Props facilitate the composition of components by allowing you to customize their behavior and appearance based on the data passed as props. This promotes reusability and flexibility in building component-based architectures.
- Explicit Data Flow: Using props offers a clear and explicit data flow, where the flow of data can be easily traced by following the props passed down through the component hierarchy. This makes it easier to understand how data is flowing and being consumed by different components.
Use Cases for the Context API
- Global or Application-Wide State: When you need to share state or data across multiple components in different parts of your application, the Context API simplifies the process by providing a centralized way to manage and access that state.
- Deeply Nested Components: The Context API becomes more advantageous when dealing with deeply nested components. It helps avoid prop drilling through multiple layers of components by providing a direct way for child components to access the context without passing props through intermediate components.
- Cross-Component Communication: If you have components that are not directly related in the component tree but need to share data, the Context API facilitates cross-component communication by providing a shared context that can be accessed by any interested component.
- Dynamic or Changing State: When the state needs to be updated frequently or dynamically, the Context API provides a convenient way to manage and update the state value. Components consuming the context will automatically re-render when the context value changes.
Alternative State Management Solutions
Besides props and the Context API, there are several alternative state management solutions available in the React ecosystem. Let's explore a few popular options:
- Redux: A centralized state management library with a single immutable state tree and strict unidirectional data flow.
- MobX: A reactive state management library that tracks state changes using observable data structures.
- React Query: A data-fetching library for handling asynchronous data in React, providing caching and background updates.
- Apollo Client: A full-featured GraphQL client for managing state through GraphQL queries and mutations.
- Zustand: A lightweight state management library that uses React hooks and the Context API for simplicity and performance.
Each of these state management solutions has its own strengths, features, and trade-offs. Deciding which one to use depends on factors such as the complexity of your application, the scalability requirements, the team's familiarity with the library, and the specific needs of your project.
It's important to evaluate and select the one that best fits your use case to effectively manage state in your React application.
Conclusion
When considering state management in React, the choice between props and the Context API depends on the scale, complexity, and data flow requirements of your project.
Props are suitable for local component state and controlled data flow within parent and child components. The Context API is ideal for global or application-wide state, deep component nesting, and cross-component communication.
Both approaches can be used together or in combination with other state management libraries to create a tailored solution that meets your specific needs. Understanding the trade-offs will help you build efficient and maintainable React applications.