

Adequate data protection and user confidentiality are key responsibilities for web developers. Hence, it is important to ensure the highest possible security while building API endpoints.
The act of application security is a shared responsibility amongst the client and server developers and negligence of one’s role can be disastrous. Statistics show that data breaches in 2023 resulted in exposure of over 8 million data records worldwide.
In this article, I'll be highlighting key areas of API security, which involves data validation. This concept is quite crucial in helping you protect your API from web attacks via malicious user data. This tutorial is well-suited for all backend developers regardless of years of experience.
To be able to follow this tutorial, here are some prerequisites:
- Knowledge of Node.js
- Knowledge of npm and package installation
With that in place, let’s get started.
How Does Data Validation Work?
First of all, what is data validation? Data validation simply entails ensuring the accuracy and reliability of the data received from external sources before onward data processing.
It is a key component of web API security as it is essential for preventing the occurrence of web injection attacks, SQL attacks and NoSQL attacks. To know more about these, you can check this link.
Note that data validation is needed but not limited to the following backend operations.:
- User login and sign up
- Response query
- Updating server databases
All these can be used as avenues by mischievous black hat hackers to gain access to the server database and obtain sensitive user details or even wreak havoc by formatting the entire database.
Popular Data Validation Tools
So far, there are lot of tools that can help the programmer achieve efficient data validation in API development.
They help you avoid reinventing the wheel of using long regex code to validate data. They provide a whole lot of features, including error handling and validation customization functionalities.
Some of these tools include:
• Joi
• Zod
• Yup
• AJv
• Valibot
• Validator.js
• Superstruct
To further shed light on these tools, we'll compare some of the most popular data validation tools mentioned above.
Pros and Cons of Data Validation Tools
To further enlighten you about these JavaScript validation tools, I will be highlighting some pros and cons of three of these popular JavaScript validation tools.
Joi
Pros
- It has a strong, large user community and development support
- It has built-in capabilities to handle complex validations
Cons
- It’s syntax is quite verbose
Zod
Pros
- It is easily compatible with Typescript projects
- It has efficient error-handling capabilities
Cons
- Async validation isn’t supported.
Yup
Pros
- It mainly uses declarative syntax to set its validation tool which confers its simplicity
- It has a comparable fast performance.
Cons
- It doesn’t provide customization features
- It has limited ability to handle complex validations
For the purpose of this tutorial, we'll use Joi as our data validation tool.
Introduction to Joi
Joi is a simple and efficient JavaScript-based data validation tool that is based on the schema-type configuration.
It has built-in capabilities for validating the occurrence of data in various forms, but not limited to Booleans, strings, functions and intervals. It can also handle complex validation operations.
Additionally, it provides minimal caching functionalities. More information about the tool can be found here.
How to Set Up Joi
In this section, we'll set up Joi in our local environment. To install Joi, navigate to the code folder via the command line and run this:
npm i joi
A message confirming successful installation should be displayed. With that completed, we can demonstrate the power of Joi in validating user registration in our demo API.
Demo Project
In this project, you'll use Joi to validate the input received from the client with the intent to sign up on the server. The default code for the user sign-up function for the Node.js application can be found here.
Go on and import the installed Joi package into your code:
const Joi = require("joi");
Before writing our signup controller, we'll initialize the Joi library within the code file:
const SignUpSchema = Joi.object({});
In this project, we'll validate the email, password and username parameters received from the client.
const SignUpSchema = Joi.object({
    email: Joi.string().email({
        minDomainSegments: 2,
        tlds: {
            allow: ['com', 'net']
        }
    }),
    username: Joi.string().alphanum().min(3).max(15).required(),
    password: Joi.string().min(8).required()
});
The email parameter object ensures that the email address is a string, and the domain site is limited to .com and .net, disallowing other forms of domains.
For the username parameter, it ensures that it is a string containing both letters and numbers with a minimum character count of 3 and a maximum character count of 15. The required function ensures that these conditions must be met or the entire request won't be validated.
The password parameter ensures that the password supplied is in a string format with a minimum character count of 8, and it is also required.
To apply it to our endpoints, we include this within the controller function:
const { error, value } = SignUpSchema.validate(req.body, { abortEarly: false });
if (error) {
    res.status(400).json(error.details);
    return;
}
This function gets executed before inserting the user details into the database. The schema tries to validate the received input and then proceeds to the database if successfully validated.
The abortEarly feature is included to allow for all parameters to be assessed. All the errors will be displayed if there is any.
The above can also be replicated in the Login controller function. You can also check out the documentation for other examples of complex validation options using Joi.
The final code for the project is displayed below:
const jwt = require("jsonwebtoken");
const userSchema = require("../Schema/User");
const Joi = require("joi");
const bcrypt = require("bcrypt");
const { createNewColumn, checkRecordsExists, insertRecord } = require('../utils/sqlSchemaFunction');

const generateAccessToken = (use) => {
    return jwt.sign({ userID: use }, process.env.JWT, { expiresIn: "1d" });
}

const SignUpSchema = Joi.object({
    email: Joi.string().email({ minDomainSegments: 2, tlds: { allow: ['com', 'net'] } }),
    username: Joi.string().alphanum().min(3).max(15).required(),
    password: Joi.string().min(8).required()
});

const loginSchema = Joi.object({
    email: Joi.string().email({ minDomainSegments: 2, tlds: { allow: ['com', 'net'] } }),
    password: Joi.string().min(8).required()
});

const register = async (req, res) => {
    const email = req.body.email;
    const password = req.body.password;

    if (!email || !password) {
        res.status(400).json("Please supply the email or password");
        return;
    }

    const { error, value } = SignUpSchema.validate(req.body, { abortEarly: false });
    if (error) {
        res.status(400).json(error.details);
        return;
    }

    const salt = await bcrypt.genSalt(10);
    const hashedPassword = await bcrypt.hash(password, salt);
    const user = {
        username: req.body.username,
        email: email,
        password: hashedPassword
    };

    try {
        const userAlreadyExists = await checkRecordsExists("users", "email", email);
        if (userAlreadyExists) {
            res.status(400).json("Email must be unique");
        } else {
            await insertRecord("users", user);
            res.status(200).json("User created successfully");
        }
    } catch (err) {
        res.status(500).json({ err: err.message });
    }
};

module.exports = { register };
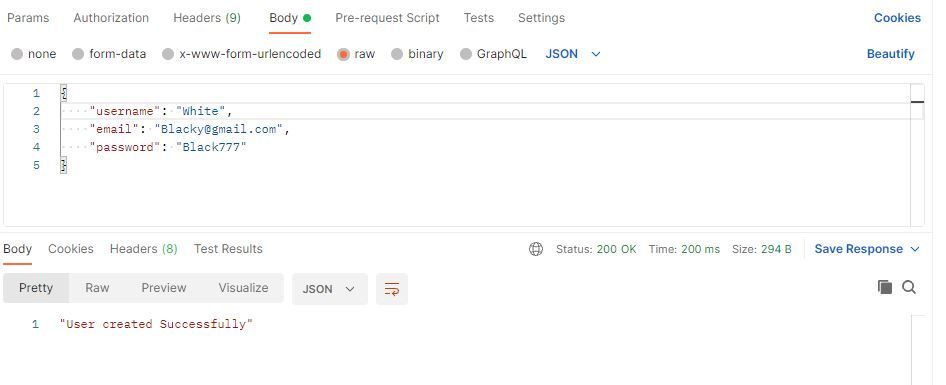 API testing in Postman
Ensuring that the code followed our defined schema resulted in it being successfully executed.
Conclusion
With this, we have come to the end of the tutorial. I hope you’ve learned about data validation, various data validation tools and data validation best practices.
You can also reach out to me and check out my other articles here. Till next time, keep on coding!