

Working with APIs is crucial to any web application. And as a frontend developer, knowing how to connect your apps with third-party APIs is an important skill to have.
In this article, you'll learn how to connect your app and fetch data from a third-party API by building a crypto exchange web application in React.
Table of Contents
Prerequisites
This tutorial assumes you have foundational knowledge of React. Also, you should be able to work with Axios, specifically for making API calls.
Also, you will need an API key from RapidAPI to follow along with this tutorial.
How to Set Up the Project
Initialize a new React project
Use the following command to initialize a new React project using Vite: npm create vite@latest
Then follow the prompts that come after.
Vite is a build tool that enables fast reloading of your React apps. For more information on Vite, you can check out their official documentation.
Install the necessary dependencies
For this tutorial, you will need a few packages:
Axios: a library for making promise-based API calls.
react-query: a data fetching library that handles caching, loading, and error state of our API call.
antd (Ant Design): a UI library of pre-built React components.
Use the following command to install these packages: npm install react-query antd axios
Set up your project structure
In this section, you are going to create some folders inside the src folder. This is to keep your app structure clean and easy to work with.
Inside the src folder, create a new folder called components.
Inside of the components folder, create three folders: fetchData, UI, and currencies.
With the project setup out of the way, let's move to building the application.
How to Build the UI
In this section, you are going to create the UI of the app. There will be little to no logic.
Navigate to the UI folder inside the components folder.
Create a new file, ExchangeRateUI.jsx, inside of the UI folder.
Add the following code inside the ExchangeRateUI.jsx file:
import { Typography, Card } from "antd";

export function ExchangeRateUI(props) {
 return (
   <div className="exchange-rate-ui">
     <Card
       extra={3}
       bordered={false}
       style={{ width: 350, backgroundColor: "#4d4add", color: "#fff" }}
       size="default"
     >
       <Typography.Paragraph style={{ color: "#fff" }}>Bitcoin</Typography.Paragraph>
     </Card>
   </div>
 );
}
In the code above, you used the Card and Typography components of the Ant Design UI library to create the UI of our app.
Next, navigate to the currencies folder and create a currencies.jsx file.
Add the following code inside currencies.jsx:
export const cryptocurrencies = [
  { value: "BTC", label: "Bitcoin" },
  { value: "ETH", label: "Ethereum" },
  { value: "BCH", label: "Bitcoin Cash" },
  { value: "XRP", label: "Ripple" },
  { value: "SOL", label: "Solana" },
  { value: "ADA", label: "Cardano" },
  { value: "BNB", label: "Binance Coin" },
];

export const fiatCurrencies = [
  { value: "USD", label: "US Dollar" },
  { value: "GBP", label: "British Pound" },
  { value: "EUR", label: "Euro" },
  { value: "NGN", label: "Naira" },
  { value: "CNY", label: "Chinese Yuan" },
  { value: "RUB", label: "Russian Ruble" },
  { value: "SGD", label: "Singaporean Dollar" },
];
In the code above, you created two arrays, fiatCurrencies and cryptocurrencies, and exported those arrays. They will be used by the Ant Design Select components.
Next, create a file, ExchangeRate.jsx, inside the components folder.
Add the following code inside the ExchangeRate.jsx file:
import { useState } from "react";
import { Typography, Select } from "antd";
import { cryptocurrencies, fiatCurrencies } from "./currencies/currencies.jsx";
import { ExchangeRateUI } from "./UI/ExchangeRateUI.jsx";

function ExchangeRate() {
  const [fromCurrency, setFromCurrency] = useState(cryptocurrencies[0].value);
  const [toCurrency, setToCurrency] = useState(fiatCurrencies[0].value);

  const handleFromCurrencyChange = (e) => {
    setFromCurrency(e);
    console.log(e);
  };

  const handleToCurrencyChange = (e) => {
    setToCurrency(e);
    console.log(e);
  };

  return (
    <section className="exchange-rate">
      <Typography.Title style={{ color: "#4d4add" }} level={2}>
        Exchange Rate
      </Typography.Title>
      <Typography.Text>
        Get the latest exchange rate of cryptocurrencies in your favorite
        currency
      </Typography.Text>
      <section className="select-group" style={{ display: "flex", marginTop: "1rem", gap: "1rem", justifyContent: "space-around" }}>
        <Select defaultValue={cryptocurrencies[0].value} options={cryptocurrencies} onChange={handleFromCurrencyChange} />
        <Select defaultValue={fiatCurrencies[0].value} options={fiatCurrencies} onChange={handleToCurrencyChange} />
      </section>
      <section style={{ marginTop: "1rem" }}>
        <ExchangeRateUI />
      </section>
    </section>
  );
}

export default ExchangeRate;
In the ExchahgeRate component, you imported the fiatCurrencies and cryptocurrencies arrays from the currencies folder. The fiatCurrencies and cryptocurrencies arrays are used by the Select component to render the selected currencies you wish to convert.
The useState hook is used to keep track of the selected currencies.
The return statement renders the ExchangeRateUI component.
Update your App.jsx file with the following code: import ExchangeRate from './components/ExchangeRate.jsx' function App(){ return ( <ExchangeRate/> ) } export default App;
If you followed each step correctly, your web app should look like this:
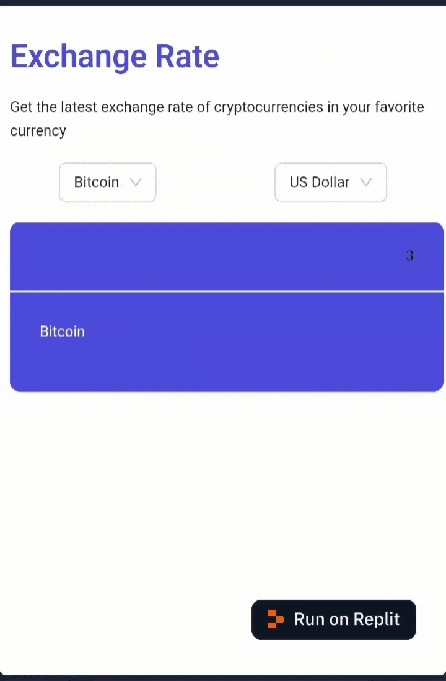
GIF of the crypto app UI
Now that the app's UI is set up, let's move on to implementing the data fetching logic.
How to Fetch Data with React Query
In this section, you are going to implement the data fetching logic.
Replace the code in the App.jsx file with the following code:
import { QueryClient, QueryClientProvider } from "react-query";
import ExchangeRate from "./components/ExchangeRate.jsx";

const queryClient = new QueryClient(); // Instantiate a new QueryClient instance

function App() {
  return (
    <QueryClientProvider client={queryClient}>
      <ExchangeRate />
    </QueryClientProvider>
  );
}

export default App;
In the code above, you created a queryClient using QueryClient() from react-query. The queryClient is passed to the QueryClientProvider via the client props. This allows the child components to have access to the queryClient, which will be used for data fetching.
React-query comes with good default configurations, but you are going to alter some of these default configurations. This is to avoid rate limiting due to excessive requests to the API.
Replace the queryClient declaration with the following code in your App.jsx:
// previous code

const queryClient = new QueryClient({
  defaultOptions: {
    queries: {
      method: "GET", // Default HTTP method for queries
      refetchOnWindowFocus: false, // Disable automatic refetching on window focus
      refetchInterval: 60000, // Refetch queries every 60 seconds
    },
  },
});

// remaining code
In the code above, you are stopping the component from refetching when you refocus on the web page. Also, you are increasing the background refetching time to six seconds.
After making the changes, your App.jsx should look like this:
import { QueryClient, QueryClientProvider } from "react-query";

const queryClient = new QueryClient({
  defaultOptions: {
    queries: {
      refetchOnWindowFocus: false, // Disable automatic refetching on focus
      refetchInterval: 60000, // Refetch queries every 60 seconds
    },
  },
});

function App() {
  return (
    <QueryClientProvider client={queryClient}>
      <ExchangeRate />
    </QueryClientProvider>
  );
}

export default App;
Next, you are going to create the data fetching function in the fetchData folder.
Create a new file called fetchData.jsx in the fetchData folder.
Add the following code in the fetchData.jsx file:
import axios from 'axios'

export function getExchangeRate(fromCurrency, toCurrency){

    const options = {
        method: 'GET',
        url: 'https://alpha-vantage.p.rapidapi.com/query',
        params: { from_currency: fromCurrency, function: 'CURRENCY_EXCHANGE_RATE', to_currency: toCurrency },
        headers: { 'X-RapidAPI-Key': 'YOUR API KEY', 'X-RapidAPI-Host': 'alpha-vantage.p.rapidapi.com' }
    };

    return axios.request(options)
        .then(res => { return res.data; })
        .catch((err) => { return err; })

}
In the code above, you used Axios to fetch data from the AlphaVantage API through RapidAPI.
Remember to replace YOUR API KEY with your API key from RapidAPI.
Navigate to your ExchangeRate component, and add the following code:
import { useQuery } from 'react-query';
import { getExchangeRate } from './fetchData/fetchData.jsx';

function ExchangeRate() {
  // previous code

  const dependencies = {
    fromCurrency: fromCurrency,
    toCurrency: toCurrency,
  };

  const { data, isLoading, isError, error } = useQuery({
    queryKey: ["exchangeRate", dependencies],
    queryFn: () => fetchData(fromCurrency, toCurrency),
    staleTime: 1000 * 60,
    retry: 1,
    retryDelay: 6000,
  });

  // further code
}
In the code above, you used the useQuery hook to fetch the exchange rate data with specified parameters.
The useQuery hook returns an object with many properties – but the following are the properties that are of interest:
data: holds the fetched data.isLoading: indicates if the data is still being fetched.isError: indicates if an error occurred during fetching.error: contains the error details if there's an issue.
The queryKey is an array representing a unique identifier for this query, and staleTime sets the cache to consider data stale after a minute. retry and retryDelay control retry attempts.
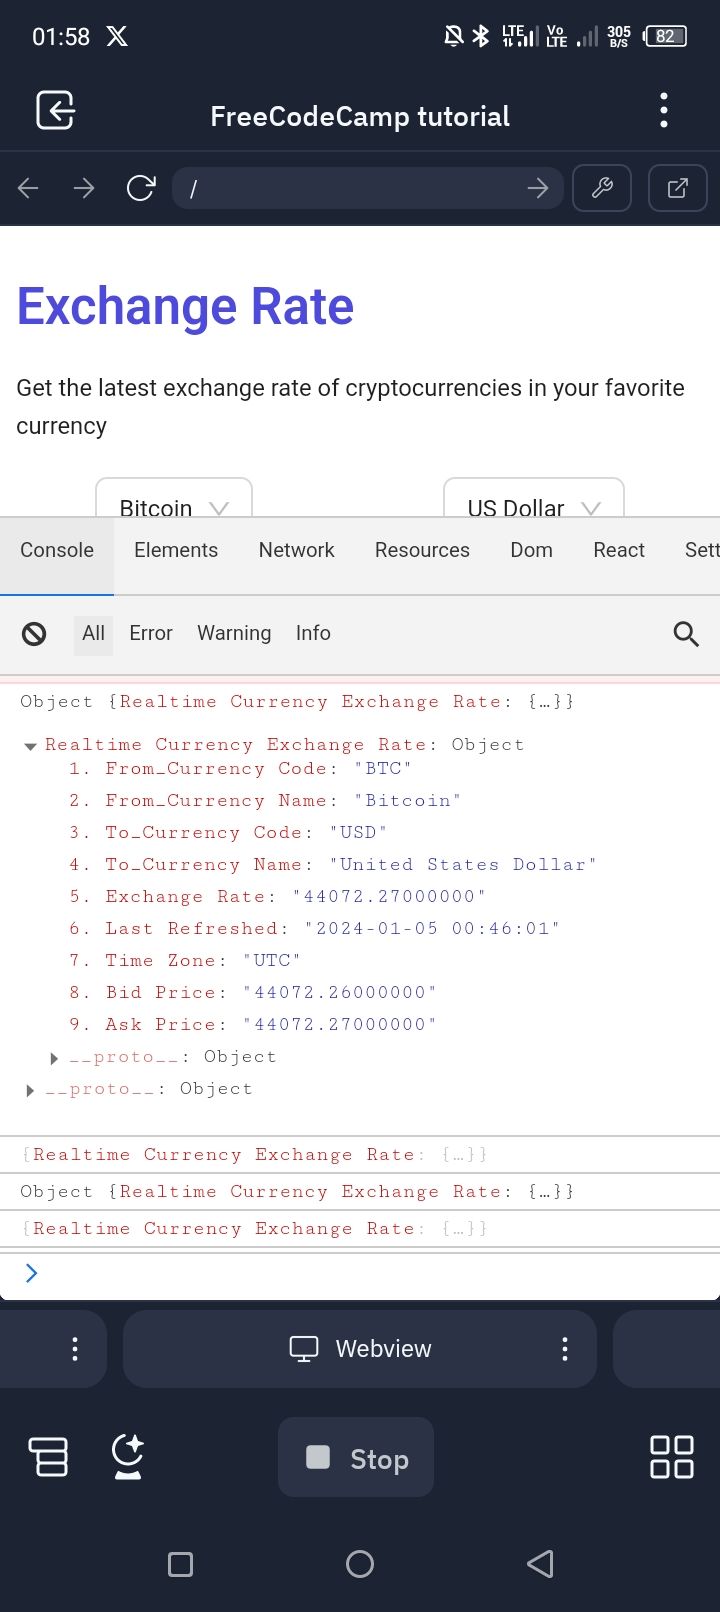
Let's look at the data property.
The data property is the response object that is successfully returned from our call to the AlphaVantage API.
The data property looks like this:
{
  "Realtime Currency Exchange Rate": {
    "1. From_Currency Code": "BTC",
    "2. From_Currency Name": "Bitcoin",
    "3. To_Currency Code": "USD",
    "4. To_Currency Name": "United States Dollar",
    "5. Exchange Rate": "44138.96000000",
    "6. Last Refreshed": "2024-01-05 00:16:03",
    "7. Time Zone": "UTC",
    "8. Bid Price": "44138.96000000",
    "9. Ask Price": "44138.97000000"
  }
}
We are only interested in the 5. Exchange Rate property of the data property as it contains the exchange rate.
Since we only need the 5. Exchange Rate, pass it as props to the ExchangeRateUI component.
After making the changes, your ExchangeRate component should look like this:
import React, { useState, useEffect } from 'react';
import { Typography, Select, Spin } from 'antd';
import { cryptocurrencies, fiatCurrencies } from './currencies/currencies.jsx';
import { ExchangeRateUI } from './UI/ExchangeRateUI.jsx';
import { useQuery } from 'react-query';
import { fetchData } from './fetchData/fetchData.jsx';

function ExchangeRate() {
  const [fromCurrency, setFromCurrency] = useState(cryptocurrencies[0].value);
  const [toCurrency, setToCurrency] = useState(fiatCurrencies[0].value);
  const [currencySymbol, setCurrencySymbol] = useState("Bitcoin");

  const handleFromCurrencyChange = (e) => {
    setFromCurrency(e);
    console.log(e);
  };

  const handleToCurrencyChange = (e) => {
    setToCurrency(e);
    console.log(e);
  };

  useEffect(() => {
    const fromCurrencyLabel = cryptocurrencies.find(currency => currency.value === fromCurrency)?.label;
    setCurrencySymbol(fromCurrencyLabel);
  }, [fromCurrency]);

  const dependencies = { fromCurrency: fromCurrency, toCurrency: toCurrency };
  const { data, isLoading, isError, error } = useQuery({
    queryKey: ["exchangeRate", dependencies],
    queryFn: () => fetchData(fromCurrency, toCurrency),
    staleTime: 1000 * 60,
    retry: 1,
    retryDelay: 60000
  });

  console.log(data);

  return (
    <section className="exchange-rate">
      <Typography.Title style={{ color: "#4d4add" }} level={2}>Exchange Rate</Typography.Title>
      <Typography.Text>Get the latest exchange rate of cryptocurrencies in your favorite currency</Typography.Text>
      <section className="select-group" style={{ display: "flex", marginTop: "1rem", gap: "1rem", justifyContent: "space-around" }}>
        <Select defaultValue={cryptocurrencies[0].value} options={cryptocurrencies} onChange={handleFromCurrencyChange} />{' '}
        <Select defaultValue={fiatCurrencies[0].value} options={fiatCurrencies} onChange={handleToCurrencyChange} />
      </section>
      <section style={{ marginTop: '1rem' }}>
        {isLoading ? (
          <Spin tip="Fetching results" spinning size="large" />
        ) : isError ? (
          <div>Error: {error.message}</div>
        ) : (
          <div>
            <ExchangeRateUI price={data["Realtime Currency Exchange Rate"]["5. Exchange Rate"]} dataObj={dependencies} currencySymbol={currencySymbol} />
          </div>
        )}
      </section>
    </section>
  );
}

export default ExchangeRate;
In the code above, you used the ternary operator to render different content based on the state of the data fetching.
currencySymbol is used to keep track of the cryptocurrency you're checking the exchange rate of.
Open your console and you should see something like this:
Now that you're done implementing the data fetching logic, let's display the data in the UI.
How to Display the data in the UI
In this section, you are going to add the final touches to the web app.
Update your ExchangeRateUI.jsx file with the following code:
import React from "react";
import { Typography, Card } from "antd";

export function ExchangeRateUI(props) {
  const { price, dataObj, currencySymbol } = props;
  const toCurrency = dataObj.toCurrency;
  let value = Number(price);
  let currencyCode = toCurrency;

  let currency = new Intl.NumberFormat('en-US', {
    style: 'currency',
    currency: currencyCode,
  });

  let formattedCurrency = currency.format(value);

  return (
    <div className="exchange-rate-ui">
      <Card extra={currencySymbol} bordered={false} style={{ width: 350, backgroundColor: "#4d4add", color: '#fff' }} size="default">
        <Typography.Paragraph style={{ color: "#fff" }}>{formattedCurrency}</Typography.Paragraph>
      </Card>
    </div>
  );
}
Let's understand what's going on in the code above.
First, you take the raw price representing the exchange rate, ensure it's treated as a number, determine the currency code, and then format the numeric value into a user-friendly currency string. This formatted currency is used for display in the user interface to provide a clear and standardized representation of the exchange rate.
Next, the formatted currency is displayed within a styled Card component from Ant Design. The Card includes the currencySymbol as an extra element. The background color, width, and text color are styled for a visually appealing UI.
Your app should look like this:

GIF of complete working crypto app
Congratulations. You have built a crypto exchange rate web app in React.
Error Handling
Error handling is a crucial aspect of developing web apps. This is because web apps and software in general can experience crashes and down time.
In React, when your app crashes, it usually shows a white/blank screen. This doesn't make for a good user experience. You'll want to display some kind of information to your users if your app crashes.
In this section, you are going to use the ErrorBoundary component to handle app crashes.
Create a file called ErrorBoundary.jsx in the src folder.
Add the following code in the ErrorBoundary.jsx file:
import React from "react";
import { Typography } from "antd";

export default class ErrorBoundary extends React.Component {
  constructor(props) {
    super(props);
    this.state = { hasError: false };
  }

  static getDerivedStateFromError(error) {
    // Update state so the next render will show the fallback UI.
    return { hasError: true };
  }

  componentDidCatch(error, errorInfo) {
    // You can also log the error to an error reporting service
    console.error("Caught error: ");
  }

  render() {
    if (this.state.hasError) {
      // You can render any custom fallback UI
      return <Typography.Title level={4}>Something went wrong.</Typography.Title>;
    }

    return this.props.children;
  }
}
In the code above, you are rendering the message "Something went wrong" if there's an error rendering your app.
Update your index.jsx file with the following code:
import React from 'react';
import ReactDOM from 'react-dom/client';
import App from './App';
import ErrorBoundary from './ErrorBoundary';

ReactDOM.createRoot(document.getElementById('root')).render(
  <React.StrictMode>
    <ErrorBoundary>
      <App />
    </ErrorBoundary>
  </React.StrictMode>
);
Visit the React docs for more information on ErrorBoundary.
Conclusion
This article walked you through how to work with third-party APIs in React by building a crypto exchange rate web app.
But don't stop here. You can improve this project by adding a news feature and styling it to your taste. Also, you can decide to support more currencies.