By Pedro Mendonça
In October, GitHub announced that their latest big feature — GitHub Actions — was going in public beta. At the time I wasn’t quite sure about what it was, but after taking a look at their blog post it looked pretty simple to me. GitHub Actions is a response to one of their main competitor ’s key feature: GitLab’s Auto DevOps feature.
 _Photo by [Unsplash](https://unsplash.com/photos/PqRvLsjD_TU?utm_source=unsplash&utm_medium=referral&utm_content=creditCopyText" rel="noopener" target="_blank" title="">Saad Salim on <a href="https://unsplash.com/search/photos/pipeline?utm_source=unsplash&utm_medium=referral&utm_content=creditCopyText" rel="noopener" target="blank" title=")
Recently I created my own personal GitLab account simply because GitLab offered me an easy way of automating the process of building and deploying a React single page application using a single .gitlab-ci.yml file.
However, when I got beta access to GitHub Actions, I had to give it a try. So I decided to build something similar.
Show me the code!
If you have a good idea of what actions are, and you just want to see the code for it, feel free to dig into the repository for this article here: https://github.com/pedsm/tryGithubActions
A quick disclaimer
All my experience with GitHub actions so far is based on their beta release, so take that into consideration. Many of the things I talk about here may not go into their final release, and I will be ignoring any of the bugs or ‘weird’ behaviours I found.
What is it?
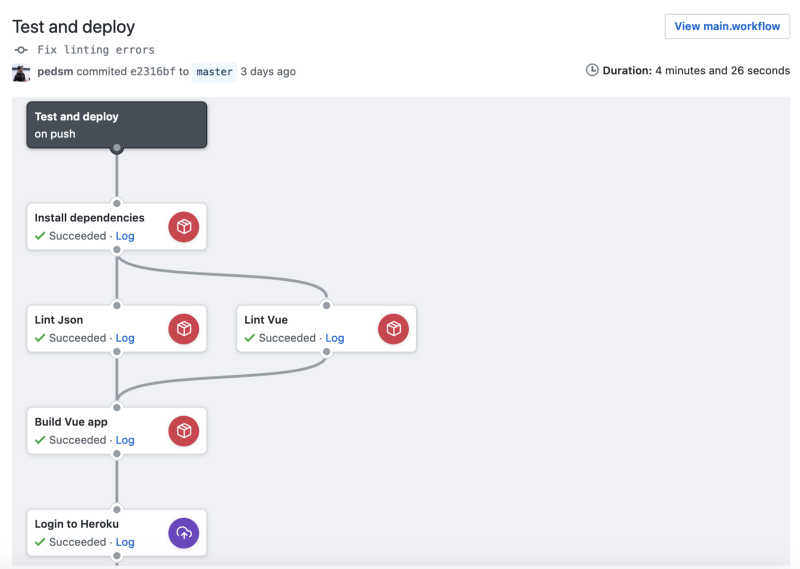
GitHub actions allows you to automate tasks to be done when something happens in one of your repositories (such as pushes, issues, releases and more). This means that you can set up your repository to be automatically tested and deployed every time you push a new commit, and this is exactly what I did.
As I mentioned before, the sole reason I decided to create a GitLab account is to have a workflow where any pushes to master would deploy straight to a live website, so I decided to recreate exactly that.
The setup
Once you have access to GitHub actions, you will be presented with a new tab namedActions in all of your repositories. In there you will be able to create your first workflow. A workflow is a .workflow file that lives inside the .github folder which is already used for other things such as PR templates and other repository-specific GitHub config.
 The new ‘Actions’ tab
GitHub Actions comes with a fully featured graphical editor for you workflows. This is a breath of fresh air if you thought that you would need to learn a new YAML schema or a technology specific language such as a Jenkinsfile . However, if you don’t want to use any of the shiny graphical tools, you are welcome to edit your .workflow files as you wish.
 The .workflow graphical visualizer.
Workflow files use HashiCorp Congifuration Language (also known as HCL). If you are familiar with Terraform than this should look familiar.
The differences
If you have implemented any kind of automated testing, this all may look very similar to you. Maybe apart from the fact that you have access to a graphical editor. However, there are fewer similarities as we move on.
GitHub Actions, as the name suggests, is a series of actions that are single command executions — which is very unusual. If you paid attention to the workflow file, you may have noticed that the actions definition has a uses parameter. If you use an npm action you can then perform a single NPM task such as npm install and then use another action to do the npm test . This is unusual as some logical tasks such as ‘installing dependencies’ may require more than one command and are usually grouped together in ‘Stages’ in other continuous integration solutions.
When using the graphical editor and adding a new action, you are first prompted with a list of the available actions (which can be found here if you are curious). Then a simple form appears where you can only fill in the label, an ‘args’ field, and a ‘runs’ field.
The label, as you may have expected, is just a friendly name for what you action does, such as ‘Testing’. The action then performs a ‘runs args’ in the terminal with runs usually not being worth overriding. This means that to run an npm install in the npm action, you would leave runs as default and args as install .
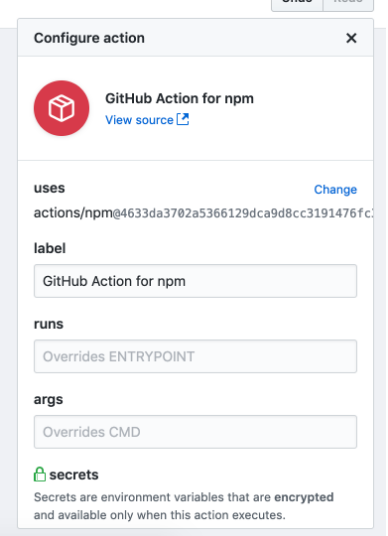 The configure action window for the GUI editor.
At the moment this feels to me like a pretty big let down, because GitHub seems to be locking down the functionality of this feature to only do the things that it wants it to do. Npm is available at the moment, but if you use pip for your python project than you will have to implement your own action or find an open-source alternative. It is already possible to create your own custom actions, but since this is in beta it is very unlikely you will find much out there at the moment. Looking on the bright side, they did have the two things I needed, NPM and Heroku.
The project
The idea for the project was very simple: I wanted to build a Vue application (as that is what I am currently learning) and have it automatically deploy to a hosting service.
Then I wanted to make it so the content of the website reflected a json file with a series of GitHub usernames. This way anyone could raise a PR with their GitHub handle so I could click a button and have it all magically deploy.
 _You can check it out here [https://try-github-action.herokuapp.com/](https://try-github-action.herokuapp.com/" rel="noopener" target="blank" title=")
I will skip all the Vue.js content and go straight into Actions. After building the simple application, I had only to do the following using actions:
- Install dependencies
- Run linters (Important to make sure the JSON input is not broken)
- Build the production ready code
- Deploy somewhere (I decided with Heroku because it just seemed the easiest to not have to think about servers and the actions are available)
The first 3 steps were the most intuitive experience I have ever had with automating anything. It almost gave me IFTTT vibes. You just click on the NPM action and then choose what you want NPM to do. I know I said it felt a bit restrictive to have only a series of actions, but the reality is that I never had to worry about what Linux distro I was using, if NPM was bundled with the Node.js install, and most important of all if the HCL syntax was correct. A few clicks on the UI and done. The whole process took 4 actions, so less than 5 minutes.
Then I went to the deployment bit. I knew this was gonna be harder, because although I knew how Heroku worked, I had never used it before. However, the actions/heroku repo had clear instructions for me to do exactly what I wanted to do. In the end, it was a simple matter of a couple more clicks and done.
Secrets
I guess this is the perfect time to talk about what may be my favourite feature in GitHub Actions, which is Secrets. As you may expect, Heroku requires an api key in order to allow someone to deploy the application. Otherwise, anyone reading this article could replace my application with whatever they wanted. Usually, this is a pain to handle on open-source projects as you can’t really keep it in the repository. AWS even has a whole service dedicated to this kind of thing. However, GitHub has implemented an elegant solution to this problem.
Secrets are values which you can store at a repository level which are automatically encrypted and then passed on as environment variables to the actions you define should have access.
If you have taken a look at the Heroku action repo, you will see that they list HEROKU_API_KEY as a required secret. The process to set this up in the editor is a simple as clicking new secret, and giving it a name and a value. From then on, you can simply check the tickbox for any actions you would like to have access to this information.
As these are environment variables, they don’t need to be locked down to the actions. For example, your test framework could receive credentials to a live database to keep a record of test results, so you could then pass this secret to the npm test action.
Env
Env is another option on the graphical editor which basically does the same as Secrets but skips all the hoops when it comes to encrypting your data. This is not really a big deal, as non-sensitive information can simply be stored in a .env file in the repository itself.
My thoughts on Actions
GitHub Actions is not doing anything new. There are dozens if not hundreds of commercially available, free and custom built solutions to do what Actions does. GitHub even has a whole marketplace category for automating tasks in your repositories.
However, I have personally never had such a good user experience when setting up a CI/CD pipeline. GitHub Actions is not reinventing the wheel, it is just making it cheaper.
As developers, we often have to find a balance between ease of use and how many features we want to shove into something. The eternal ‘git cli vs. git gui problem’. However, GitHub is well aware of what the market has available and they are not trying to go against the big names. No, you won’t get rid of Jenkins, Circle or whatever it is that your company uses at the moment. But if you have a little pet project, this is definitely worth a look.
Contribute
All the code for this article is opensource and available at https://github.com/pedsm/tryGithubActions. If you would like to raise an issue and add your GitHub handle to the project, feel free to raise a PR.