
By Krish Jaiswal
Hello folks! 👋 Recently, I have been learning about Node.js. So I decided to share my learnings with you here. 👨💻
In this tutorial, we'll take a high-level look at Node.js – what it is, and what you can do with it.
We will be covering all the important Node concepts with hands-on examples and a lot of code snippets. This will give you the foundational knowledge required to get started with backend development with NodeJS.
This article is heavily inspired by the NodeJS and Express - Full Course on freeCodeCamp taught by John Smilga. You can check that out here if you'd like.
Here's what we'll cover in this guide:
- What Is NodeJS?
- Global Variables
- Modules
- Short Note On
module.exports - Types Of Modules
- Event Driven Programming
- Creating our first server
- Let's Serve Something Interesting!
- Conclusion
What is Node?
Node is an environment in which you can run JavaScript code "Outside the web browser". Node be like – "Hey y'all, you give your JS code to me and I'll run it 😎". It uses Google's V8 Engine to convert the JavaScript code to Machine Code.
Since Node runs JavaScript code outside the web browser, this means that it doesn't have access to certain features that are only available in the browser, like the DOM or the window object or even the localStorage.
This means that at any point in your code, you can't type in document.querySelector() or alert() as these will produce errors (This is what is shown in the below image).
Remember: Node is meant for server-side programming, while those browser features are meant for client-side programming.

Front-end folks don't be sad – there's more to it! Node provides you with lots of API's and Modules with which you can perform a variety of operations like File Handling, Creating Servers, and much more. Before diving into the NodeJS, first let's install it in our machine.
How to Install NodeJS
Installing NodeJS is straightforward. If you already have Node installed in your machine, you can skip this section. If not, then follow along.
Here are the steps to download NodeJS on your machine:
- Navigate to https://nodejs.org/
- Download the LTS Version of NodeJS for your operating system
- Run the installer and follow the installation wizard. Simply answer Yes to all the questions.
- Once the installation is complete, open a new terminal or command prompt window and run the following command to verify that NodeJS is installed correctly:
node -v. If you see the version of NodeJS printed in your terminal, Congratulations! You have now successfully installed NodeJS on your machine.
Note: If you encounter any issues during the installation process, you can refer to the official NodeJS documentation for more detailed instructions and troubleshooting tips.
Global Variables
Let's start this article by learning about some variables present in NodeJS called Global Variables. These are basically variables which store some data and can be accessed from anywhere in your code – doesn't matter how deeply nested the code is.
You should know about these commonly used Global variables:
__dirname: This variable stores the path to the current working directory.__filename: This variable stores the path to the current working file.
Let's use them and see what value they contain. For this, let's create a new folder called NodeJSTut in your Desktop and open it up with your favorite text editor (In the entire tutorial, we will be using VS Code). Create a new file called app.js and open up a new integrated VS Code Terminal.
Paste the following code in the app.js file and save it:
// __dirname Global Variable
console.log(__dirname);

// __filename Global Variable
console.log(__filename);
To run this code using Node, type in the following command in the terminal and press Enter: node app.js. You will see the absolute path to the present working directory and the path to the current file is printed in the terminal. This is what the output looks like in my case:
C:\Desktop\NodeJSTut
C:\Desktop\NodeJSTut\app.js
You can go ahead and create your own global variables which can be accessed from anywhere in your code. You can do so, like this:
// Define a global variable in NodeJS
global.myVariable = 'Hello World';

// Access the global variable
console.log(myVariable); // Output: Hello World
Modules in NodeJS
In Node.js, a module is essentially a reusable block of code that can be used to perform a specific set of tasks or provide a specific functionality. A module can contain variables, functions, classes, objects, or any other code that can be used to accomplish a particular task or set of tasks.
The primary purpose of using modules in Node.js is to help organize code into smaller, more manageable pieces. A modules can then be imported at any time and used flexibly which helps in creating reusable code components that can be shared across multiple projects.
To understand this, consider this example: Let's say you have defined lots of functions in your code that works with a huge volume of JSON data.
Losing your sleep and increased anxiety levels are common side effects of keeping all this stuff (functions + data + some other logic) in one single file.
So you, being a clever programmer, thought of making a separate file for the JSON data and a separate file for storing all the functions. Now, you can simply import the data and the functions whenever you want and use them accordingly. This method increases efficiency as your file size reduces drastically. This is the concept of modules!
Let's see how we can make our own modules. For this, we are going to write some code where we will be defining a function called sayHello() in a file called hello.js. This function will accept a name as the parameter and simply print a greeting message in the console.
We will then import it in another file called app.js and use it there. How interesting, right 😂? Let's check out the code:
This is the code in hello.js file:
function sayHello(name){
    console.log(`Hello ${name}`);
}

module.exports = sayHello
This is the code in app.js file:
const sayHello = require('./hello.js');

sayHello('John');
sayHello('Peter');
sayHello('Rohit');
The file hello.js can be called the module in this case. Every module has an object called exports which should contain all the stuff you want to export from this module like variables or functions. In our case, we are defining a function in the hello.js file and directly exporting it.
The app.js file imports the sayHello() function from hello.js and stores it in the sayHello variable. To import something from a module, we use the require() method which accepts the path to the module. Now we can simply invoke the variable and pass a name as a parameter. Running the code in app.js file will produce the following output:
Hello John
Hello Peter
Hello Rohit
Short Note on module.exports
In the previous section of the article, we saw how to use module.exports but I felt that it is important to understand how it works in a bit more detail. Hence, this section of the article is like a mini tutorial where we will see how we can export one variable/function as well as multiple variables and functions using module.exports. So, Let's get started:
module.exports is a special object in NodeJS that allows you to export functions, objects, or values from a module, so that other modules can access and use them. Here's an example of how to use module.exports to export a function from a module:
// myModule.js

function myFunction() {
  console.log('Hello from myFunction!');
}

module.exports = myFunction;
In this example, we define a function myFunction and then export it using module.exports. Other modules can now require this module and use the exported function:
// app.js

const myFunction = require('./myModule');

myFunction(); // logs 'Hello from myFunction!'
Everything seems fine now and life is good. But the problem arises when we have to export multiple functions and variables from a single file. The point is when you use module.exports multiple times in a single module, it will replace the previously assigned value with the new one. Consider this code:
// module.js

function myFunction() {
  console.log('Hello from myFunction!');
}

function myFunction2() {
  console.log('Hello from myFunction2!');
}

// First Export
module.exports = myFunction;

// Second Export
module.exports = myFunction2;
In this example, we first export myFunction(). But we then overwrite module.exports with a new function - myFunction2(). As a result, only the second export statement will take effect, and the myFunction() function will not be exported.
This problem can be solved if you assign module.exports to an object which contains all the functions you want to export, like this:
// myModule.js

function myFunction1() {
  console.log('Hello from myFunction1!');
}

function myFunction2() {
  console.log('Hello from myFunction2!');
}

module.exports = {
  foo: 'bar',
  myFunction1: myFunction1,
  myFunction2: myFunction2
};
In this example, we export an object with three properties: foo, myFunction1, and myFunction2. Other modules can require this module and access these properties:
// app.js

const myModule = require('./myModule');

console.log(myModule.foo); // logs 'bar'
myModule.myFunction1(); // logs 'Hello from myFunction1!'
myModule.myFunction2(); // logs 'Hello from myFunction2!'
To summarize, you can use module.exports as many times as you want in your NodeJS code, but you should be aware that each new assignment will replace the previous one. You should use an object to group multiple exports together.
Types Of Modules in Node
There are 2 types of modules in NodeJS:
- Built In Modules: These are modules included in Node by default, so you can use them without installation. You just need to import them and get started.
- External Modules: These are modules created by other developers which are not included by default. So you need to install them first before using them.
Here is an image of popular built-in modules in NodeJS and what can you do using them:

Let's go over each of these in more detail so you can learn more about what they do.
The OS Module
The OS Module (as its name implies) provides you methods/functions with which you can get information about your Operating System.
To use this module, the first step is to import it like this:
const os = require('os');
This is how you can use the OS Module to get information about the Operating System:👇
const os = require('os')

// os.uptime()
const systemUptime = os.uptime();

// os.userInfo()
const userInfo = os.userInfo();

// We will store some other information about my WindowsOS in this object:
const otherInfo = {
    name: os.type(),
    release: os.release(),
    totalMem: os.totalmem(),
    freeMem: os.freemem(),
}

// Let's Check The Results:
console.log(systemUptime);
console.log(userInfo);
console.log(otherInfo);
This is the output of the above code:
Note that the output shows information about the Windows Operating System running on my system. The output could be different from yours.
521105
{
    uid: -1,
    gid: -1,
    username: 'krish',
    homedir: 'C:\\Users\\krish',
    shell: null
}
{
    name: 'Windows_NT',
    release: '10.0.22621',
    totalMem: 8215212032,
    freeMem: 1082208256
}
Let's break down the above code and output:
os.uptime()tells the system uptime in seconds. This function returns the number of seconds the system has been running since it was last rebooted. If you check the first line of the output:521105is the number of seconds, my system has been running since it was last rebooted. Of course, it will be different for you.os.userInfo()gives the information about the current user. This function returns an object with information about the current user including the user ID, group ID, username, home directory, and default shell. Below is the breakdown of the output in my case:
    {
        uid: -1,
        gid: -1,
        username: 'krish',
        homedir: 'C:\\Users\\krish',
        shell: null
    }
The uid and gid is set to -1 in Windows, because Windows does not have the concept of user IDs like Unix-based systems. The username of my OS is krish and the home directory is 'C:\\Users\\krish'. The shell is set to null because the concept of a default shell does not exist on Windows. Windows has a default command interpreter program called Command Prompt (cmd.exe), which runs commands and manages the system.
The other methods related to OS Module like os.type(), os.release() and so on, which you saw in the above code has been used within the otherInfo object. Here is a breakdown of what these methods do:
os.type()- Tells the name of the Operating Systemos.release()- Tells the release version of the Operating Systemos.totalMem()- Tells the total amount of memory available in bytesos.freeMem()- Tells the total amount of free memory available in bytes
This is the information which the above methods display about my OS:
{
    name: 'WindowsNT', // Name of my OS
    release: '10.0.22621', // Release Version of my OS
    totalMem: 8215212032, // Total Memory Available in bytes (~ 8 GB)
     freeMem: 1082208256 // Free Memory Available in bytes (~ 1 GB)
}
The PATH Module
The PATH module comes in handy while working with file and directory paths. It provides you with various methods with which you can:
- Join path segments together
- Tell if a path is absolute or not
- Get the last portion/segment of a path
- Get the file extension from a path, and much more!
You an see the PATH Module in action in the code below.
Code:
// Import 'path' module using the 'require()' method:
const path = require('path')

// Assigning a path to the myPath variable
const myPath = '/mnt/c/Desktop/NodeJSTut/app.js'

const pathInfo = {
    fileName: path.basename(myPath),
    folderName: path.dirname(myPath),
    fileExtension: path.extname(myPath),
    absoluteOrNot: path.isAbsolute(myPath),
    detailInfo: path.parse(myPath),
}

// Let's See The Results:
console.log(pathInfo);
Output:
{
  fileName: 'app.js',
  folderName: '/mnt/c/Desktop/NodeJSTut',
  fileExtension: '.js',
  absoluteOrNot: true,
  detailInfo: {
    root: '/',
    dir: '/mnt/c/Desktop/NodeJSTut',
    base: 'app.js',
    ext: '.js',
    name: 'app'
  }
}
Let's have a detailed breakdown of the above code and its output:
The first and foremost step to work with path module is to import it in the app.js file using the require() method.
Next, we are assigning a path of some file to a variable called myPath. This can be a path to any random file. For the purpose of understanding the path module, I chose this: /mnt/c/Desktop/NodeJSTut/app.js.
Using the myPath variable, we will understand the path module in detail. Let's check out the functions which this module has to offer and what can we do with it:
path.basename(myPath): Thebasename()function accepts a path and returns the last part of that path. In our case, the last part ofmyPathis:app.js.path.dirname(myPath): Thedirname()function selects the last part of the path provided to it and returns the path to it's parent's directory. In our case, since the last part ofmyPathisapp.js. Thedirname()function returns the path to the parent directory ofapp.js(the folder inside whichapp.jsfile lies), i.e,/mnt/c/Desktop/NodeJSTut. It can be also thought as: thedirname()function simply excludes the last part of the path provided to it and returns the leftover path.path.extname(myPath): This function checks for any extension on the last part of the provided path and it returns the file extension (if it exists), otherwise it returns an empty string:''. In our case, since the last part isapp.jsand a file extension exists, we get'.js'as the output.path.isAbsolute(myPath): This tells whether the provided path is absolute or not. On Unix-based systems (such as macOS and Linux), an absolute path always starts with the forward slash (/). On Windows systems, an absolute path can start with a drive letter (such asC:) followed by a colon (:), or with two backslashes (\\). Since the value stored inmyPathvariable starts with/, thereforeisAbsolute()returnstrue.
However, if you just change the myPath variable to this: Desktop/NodeJSTut/app.js (converting it to a relative path), isAbsolute() returns false.
path.parse(myPath): This function accepts a path and returns an object which contains a detailed breakdown of the path provided to it. Here is what it returns when we provide themyPathvariable to it:root: The root of the path (in this case,/).dir: The directory of the file (in this case,/mnt/c/Desktop/NodeJSTut).base: The base file name (in this case,app.js).ext: The file extension (in this case,.js).name: The base name of the file, without the extension (in this case,app).
Before continuing with the other functions of the path module, we need to understand something called path separator and the path structure.
You must have seen that the path to a same file looks different in different Operating Systems. For example, consider the path to a file named example.txt located in a folder called Documents on the desktop of a Windows user:
C:\Users\username\Desktop\Documents\example.txt
On the other hand, the file path to the same file for a user on a macOS system would look like this:
/Users/username/Desktop/Documents/example.txt
2 differences are to be noted here:
- Difference in path separators: In Windows, file paths use the backslash (
\) as the separator between directories, while in macOS/Linux (which is a Unix-based system), file paths use the forward slash (/) as the separator. - Difference in root directory of the users files: On Windows, the root directory for a user's files is commonly found at
C:\Users\username, whereas on macOS and Linux, it is located at/Users/username/. While this holds true for most Windows, macOS, and Linux systems, there may be some variations in the exact location of the user's home directory based on the system's configuration.
With this in mind, let's move ahead and understand some other functions provided by the path module:
path.sep:sepis a variable which contains the system specific path separator. For Windows machine:console.log(path.sep)prints\in the console while in case of macOS or Linux,path.sepreturns a forward slash (/).path.join(<paths>): Thepath.join()function accepts path(s) as strings. It then joins those paths using the system specific path separator and returns the joined path. For example, consider this code:
console.log(path.join('grandParentFolder', 'parentFolder', 'child.txt'))
The above code prints different results for different Operating Systems.
In Windows, it will give this output: grandParentFolder\parentFolder\child.txt while in macOS/Linux, it will give this output: grandParentFolder/parentFolder/child.txt. Note that the difference is only in the path separators - backward slash and forward slash.
path.resolve(<paths>): This function works in a similar way as compared topath.join(). Thepath.resolve()function just joins the different paths provided to it using the system specific path separator and then appends the final output to the absolute path of the present working directory.
Suppose you are a Windows user and the absolute path to your present working directory is this: C:\Desktop\NodeJSTut, If you run this code:
console.log(path.resolve('grandParentFolder', 'parentFolder', 'child.txt'));
You will see the following output in the console:
C:\Desktop\NodeJSTut\grandParentFolder\parentFolder\child.txt
The same is applicable to a macOS or a Linux user. It's just the difference in the absolute path of the present working directory and the path separator.
The FS Module
This module helps you with file handling operations such as:
- Reading a file (sync or async way)
- Writing to a file (sync or async way)
- Deleting a file
- Reading the contents of a director
- Renaming a file
- Watching for changes in a file, and much more
Let's perform some of these tasks to see the fs (File System) module in action below:
How to create a directory using fs.mkdir()
The fs.mkdir() function in Node.js is used to create a new directory. It takes two arguments: the path of the directory to be created and an optional callback function that gets executed when the operation is complete.
- path: Here, path refers to the location where you want to create a new folder. This can be an absolute or a relative path. In my case, the path to the present working directory (the folder I am currently in), is:
C:\Desktop\NodeJSTut. So, Let's create a folder in theNodeJSTutdirectory calledmyFolder. - callback function: The purpose of the callback function is to notify that the directory creation process has completed. This is necessary because the
fs.mkdir()function is asynchronous, meaning that it does not block the execution of the rest of the code while the operation is in progress. Instead, it immediately returns control to the callback function, allowing it to continue executing other tasks. Once the directory has been created, the callback function is called with an error object (if any) and any other relevant data related to the operation. In the below code, we are just using it to display a success message in the console or any error.
// Import fs module
const fs = require('fs');

// Present Working Directory: C:\Desktop\NodeJSTut
// Making a new directory called ./myFolder:

fs.mkdir('./myFolder', (err) => {
    if(err){
        console.log(err);
    } else{
        console.log('Folder Created Successfully');
    }
})
After executing the above code, you will see a new folder called myFolder created in the NodeJSTut directory.
How to create and write to a file asynchronously using fs.writeFile()
After the myFolder directory is created successfully, it's time to create a file and write something to it by using the fs module.
There are basically 2 ways of doing this:
- Synchronous Approach: In this approach, we create a file and write the data to it in a blocking manner, which means that NodeJS waits for the creation and write operation to complete before moving on to the next line of code. If an error occurs during this process, it throws an exception that must be caught using
try...catch. - Asynchronous Approach: In this approach, we create and write data to a file in a non-blocking manner, which means that NodeJS does not wait for the write operation to complete before moving on to the next line of code. Instead, it takes a callback function that gets called once the entire process is completed. If an error occurs during the write operation, the error object is passed to the callback function.
In this tutorial, we will be using the fs.writeFile() function which follows the asynchronous approach.
writeFile() is a method provided by the fs (file system) module in Node.js. It is used to write data to a file asynchronously. The method takes three arguments:
- The path of the file to write to (including the file name and extension)
- The data to write to the file (as a string or buffer)
- An optional callback function that is called once the write operation is complete or an error occurs during the write operation.
When writeFile() is called, Node.js creates a new file or overwrites an existing file at the specified path. It then writes the provided data to the file and closes it. Since the method is asynchronous, the write operation does not block the event loop, allowing other operations to be performed in the meantime.
Below is the code where we create a new file called myFile.txt in the myFolder directory and write this data to it: Hi,this is newFile.txt.
const fs = require('fs');

const data = "Hi,this is newFile.txt";

fs.writeFile('./myFolder/myFile.txt', data, (err)=> {
    if(err){
        console.log(err);
        return;
    } else {
        console.log('Writen to file successfully!');
    }
})
Since newFile.txt didn't exist previously, Hence the writeFile() function created this file for us on the provided path and then wrote the value in the data variable to the file. Suppose this file already existed. In that case, writeFile() will just open the file, erase all the existing text present in it and then write the data to it.
The problem with this code is: when you run the same code multiple times, it erases the previous data that is already present in newFile.txt and writes the data to it.
In case you do not want the original data to get deleted and just want the new data to be added/appended at the end of the file, you need to make a little change in the above code by adding this "options object": {flag: 'a'} as the third parameter to writeFile() – like this:
const fs = require('fs');

const data = 'Hi,this is newFile.txt';

fs.writeFile('./myFolder/myFile.txt', data, {flag: 'a'}, (err) => {
    if(err){
        console.log(err);
        return;
    } else {
        console.log('Writen to file successfully!');
    }
})
Once you run the above code again and again, you will see that the myFile.txt has the value of the data variable written to it multiple times. This is because the object (3rd parameter): {flag: 'a'} indicates the writeFile() method to append the data at the end of the file instead of erasing the previous data present in it.
How to read a file asynchronously using fs.readFile()
After creating and writing to the file, it's time we learn how to read the data present in the file using the fs module.
Again there are 2 ways of doing this: Synchronous approach and the Asynchronous approach (just like the previous function). Here we are going to use the readFile() function provided by fs module which performs the reading operation asynchronously.
The readFile() function takes 3 parameters:
- The path to the file which is to be read.
- The encoding of the file.
- The callback function that gets executed once the reading operation is completed or if any error occurs during the reading operation. It accepts 2 parameters: first parameter stores the file data (if read operation is successful) and the second parameter stores the error object (if read operation fails due to some error).
The readFile() function is very intuitive and once called, it reads the data present in the provided file according to the given encoding. If the read operation is successful, it returns the data to the callback function and if not, it will return the error occurred.
In the below code, we read the contents of the file - myFile.txt which we had created while learning the previous function and then log the data stored in it in the console.
const fs = require('fs');

fs.readFile('./myFolder/myFile.txt', {encoding: 'utf-8'}, (err, data) => {
    if(err){
        console.log(err);
        return;
    } else {
        console.log('File read successfully! Here is the data');
        console.log(data);
    }
})
It is to be noted here that the encoding property is set to 'utf-8'. At this point, some of you may not know about the encoding property, So Let's understand it in a bit more detail:
The encoding parameter in the fs.readFile() method of Node.js is used to specify the character encoding used to interpret the file data. By default, if no encoding parameter is provided, the method returns a raw buffer.
If the readFile() method is called without providing an encoding parameter, you will see a result similar to this printed in the console:
<Buffer 54 68 69 73 20 69 73 20 73 6f 6d 65 20 64 61 74 61 20 69 6e 20 61 20 66 69 6c 65>
This raw buffer is difficult to read and interpret as it represents the contents of the file in binary form. To convert the buffer to a readable string, you can specify an encoding parameter when calling readFile().
In our case, we specified the 'utf8' encoding as the second parameter of the readFile() method. This tells Node.js to interpret the file contents as a string using the UTF-8 character encoding, thus you see the original data printed in the console. Other common encodings that can be used with readFile() include:
'ascii': Interpret the file contents as ASCII-encoded text.'utf16le': Interpret the file contents as 16-bit Unicode text in little-endian byte order.'latin1': Interpret the file contents as ISO-8859-1 (also known as Latin-1) encoded text.
Reading and Writing to a File Synchronously
Up until now, you have learned how to write to and read the data from a file asynchronously. But there are synchronous alternatives to the 2 functions we learnt above, namely: readFileSync() and writeFileSync().
Note that since these are synchronous operations, they need to be wrapped in a try...catch block. In case the operations fail for some reason, the errors thrown will be caught by the catch block.
In the below code, we first create a new file: ./myFolder/myFileSync.txt and write to it using the writeFileSync() method. Then we read the contents of the file using the readFileSync() method and print the data in the console:
const fs = require('fs');

try{
    // Write to file synchronously
    fs.writeFileSync('./myFolder/myFileSync.txt', 'myFileSync says Hi');
    console.log('Write operation successful');

    // Read file synchronously
    const fileData = fs.readFileSync('./myFolder/myFileSync.txt', 'utf-8');
    console.log('Read operation successful. Here is the data:');
    console.log(fileData);

} catch(err){
    console.log('Error occurred!');
    console.log(err);
}
When you run the above code, a new file called myFileSync.txt is created in the myFolder directory and it contains the following text in it: myFileSync says Hi. This is the output printed in the console:
Write operation successful
Read operation successful. Here is the data:
myFileSync says Hi
How to read the contents of a directory using fs.readdir()
If you have been following along until now, you will see that we currently have 2 files in the myFolder directory, i.e, myFile.txt and myFileSync.txt. The fs module provides you with readdir() function using which you can read the contents of a directory (the files and folders present in the directory).
The readdir() function accepts 2 parameters:
- The path of the folder whose contents are to be read.
- Callback function which gets executed once the operation is completed or if any error occurs during the operation. This function accepts 2 parameters: The first one which accepts the error object (if any error occurs) and the second parameter which accepts an array of the various files and folders present in the directory whose path has been provided.
In the code below, we are reading the contents of the myFolder directory and printing the result in the console.
const fs = require('fs');

fs.readdir('./myFolder', (err, files) => {
    if(err){
        console.log(err);
        return;
    }
    console.log('Directory read successfully! Here are the files:');
    console.log(files);
})
This is what we get as output when we run the above code:
[ 'myFile.txt', 'myFileSync.txt' ]
How to rename a file using fs.rename()
The fs.rename() method in Node.js is used to rename a file or directory. The method takes two arguments, the current file path and the new file path, and a callback function that is executed when the renaming is complete.
Here's the syntax for the fs.rename() method:
fs.rename(oldPath, newPath, callback);
where:
oldPath(string) - The current file pathnewPath(string) - The new file pathcallback(function) - A callback function to be executed when the renaming is complete. This function takes an error object as its only parameter.
Let's rename the newFile.txt file to newFileAsync.txt:
const fs = require('fs');

fs.rename('./newFolder/newFile.txt', './newFolder/newFileAsync.txt', (err)=>{
    if(err){
        console.log(err);
        return;
    }
    console.log('File renamed successfully!')
})
Once you run the above code, you will see that the newFile.txt gets renamed to newFileAsync.txt.
Note that you should only provide valid paths (absolute or relative) to the rename() function and not just the names of the files. Remember it's oldPath and newPath and NOT oldName and newName.
For example, consider this code: fs.rename('./newFolder/newFile.txt', 'newFileAsync.txt', ...rest of the code). In this case, since we did not provide a proper path in the 2nd parameter, rename() assumes that the path to the newly named file should be: ./newFileAsync.txt. Thus, it basically removes the newFile.txt from the newFolder directory, renames the file to newFileAsync.txt and moves it to the current working directory.
How to delete a file using fs.unlink()
Last but not the least, we have the fs.unlink() function which is used to delete a file. It takes in 2 parameters:
- The path of the file which you want to delete, and
- The callback function which gets executed once the delete operation is over or if any error occurs during the operation.
Running the following code deletes the newFileSync.txt file present in the myFolder directory:
const fs = require('fs');

fs.unlink('./myFolder/myFileSync.txt', (err) => {
    if(err){
        console.log(err);
        return;
    }
    console.log('File Deleted Successfully!')
})
Event-Driven Programming
Ok, before we move forward to learn the HTTP Module and create our own servers, it's important to know about something called "Event driven programming".
Event-driven programming is a programming paradigm where program flow is largely determined by events or user actions, rather than by the program's logic.
In this type of programming, the program listens for events, and when they occur, it executes some code/function that should run in response to that event.
An event could be anything from a mouse click or a button press to the arrival of new data in the system.
The below image demonstrates how event driven programming works. In this form of programming, we write some code which constantly listens for a particular event and once that event occurs, we run some code in response to it.

In this section of the tutorial we will be learning about events in NodeJS. Although we may not be using events directly for our day-to-day coding tasks, but a lot of NodeJS modules use the concept of events under the hood. This is why it becomes important to be aware about it.
To implement Event Driven Programming in NodeJS, You need to remember 2 things:
There is a function called
emit()which causes an event to occur.
For example,emit('myEvent')emits/causes an event calledmyEvent.There is another function called
on()which is used to listen for a particular event and when this event occurs, theon()method executes a listener function in response to it. For example, Consider this code:on('myEvent', myFunction): Here we are listening for an event calledmyEventand when this event takes place, we run themyFunctionlistener function in response to it.
We can access the on() and emit() functions by creating an instance of the EventEmitter class. The EventEmitter class can be imported from a built-in package called events.
In the below code, we are listening for the userJoined event and once this event takes place, we run the welcomeUser() function using the on() method and we emit the userJoined event using the emit() method:
// Importing 'events' module and creating an instance of the EventEmitter Class
const EventEmitter = require('events');
const myEmitter = new EventEmitter();

// Listener Function - welcomeUser()
const welcomeUser = () => {
    console.log('Hi There, Welcome to the server!');
}

// Listening for the userJoined event using the on() method
myEmitter.on('userJoined', welcomeUser);

// Emitting the userJoined event using the emit() method
myEmitter.emit('userJoined');
Points to Note:
There are 3 points you should note while working with events in Node.
Each point in shown in action in the corresponding code snippets:
- There can be multiple
on()'s for a singleemit():
Check out the following code, where multiple on() functions are listening for a single event to happen (userJoined event) and when this event is emitted in the last line of the code using the emit() function, you will see that the all the listener functions which were attached to the on() function get's executed:
// Importing `events` module and creating an instance of EventEmitter class
const EventEmitter = require('events');
const myEmitter = new EventEmitter();

// Listener Function 1: sayHello
const sayHello = () => {
    console.log('Hello User');
}

// Listener Function 2: sayHi
const sayHi = () => {
    console.log('Hi User');
}

// Listener Function 3: greetNewYear
const greetNewYear = () => {
    console.log('Happy New Year!');
}

// Subscribing to `userJoined` event
myEmitter.on('userJoined', sayHello);
myEmitter.on('userJoined', sayHi);
myEmitter.on('userJoined', greetNewYear);

// Emiting the `userJoined` Event
myEmitter.emit('userJoined');
You can think of it this way: Each time the userJoined event is emitted, a notification is sent to all the on() functions listening for the event and then all of them will run their corresponding listener functions: sayHello, sayHi, greetNewYear.
Thus, when you run the code, you will see the following output printed in the console:
Hello User
Hi User
Happy New Year!
- The
emit()can also contain arguments which will be passed to the listener functions:
In the following code, We are using the on() method to subscribe to an event called birthdayEvent and when this event is emitted, we run the greetBirthday() function in response to it.
The extra parameters mentioned in the emit() function, gets passed as parameters to all the listener functions which will run in response to the birthdayEvent. Therefore John and 24 gets passed as parameters to the greetBirthday() function.
const EventEmitter = require('events');
const myEvent = new EventEmitter();

// Listener function
const greetBirthday = (name, newAge) => {
    // name = John
    // newAge = 24
    console.log(`Happy Birthday ${name}. You are now {newAge}!`);
}

// Listening for the birthdayEvent
myEmitter.on('birthdayEvent', greetBirthday);

// Emitting the birthdayEvent with some extra parameters
myEmitter.emit('birthdayEvent', 'John', '24');
The following output will be seen printed in the console: Happy Birthday John, You are now 24!.
- The
emit()function should always be defined after theon()function(s):
The entire process of communication between on() and emit() works like this: Before emitting any event, you need to make sure that all the listener functions have subscribed/registered to that event. Any function which is registered as a listener after the event has been emitted, will not be executed.
Check out the following code where this process is studied in detail:
const EventEmitter = require('events');
const myEmitter = new EventEmitter();

// Listener Function 1 - sayHi
const sayHi = () => {
    console.log('Hi User');
}

// Listener Function 2 - sayHello
const sayHello = () => {
    console.log('Hello User');
}

// Registering sayHi function as listener
myEmitter.on('userJoined', sayHi);

// Emitting the event
myEmitter.emit('userJoined');

// Registering sayHello function as listener
myEmitter.on('userJoined', sayHello);
When the above code is executed, we see Hi User printed in the console but Hello User is not printed.
The reason behind this is: First we had registered the sayHi function as the listener using myEmitter.on('userJoined', sayHi). Next we emit the userJoined event which results in execution of the sayHi function. In the next line we are registering the sayHello function as the listener, but it's already too late to do this because userJoined event has been emitted. This signifies the importance of defining all the on() functions before we emit the event using emit().
You can also think of it this way: When you use emit() to trigger an event, NodeJS looks for any corresponding on() methods that have been defined in your code above the emit() method. If it finds any, it will execute them in order to handle the event.
The HTTP Module
Let's move forward and learn the HTTP Module which helps you create Web Servers.
HTTP stands for Hypertext Transfer Protocol. It is used to transfer data over the internet which allows communication between clients and servers.
Suppose you want to watch some YouTube videos, you go to your web browser and type in: https://youtube.com, and then YouTube's home page gets displayed on your screen. This entire process happened because of communication between your machine (client) and YouTube's Server. The client, in this case, your machine requested for YouTube's home page and the server sent back the HTML, CSS and JS Files as the response.
The client sends a request to the server in the form of a URL with some additional information, such as headers and query parameters.
The server processes the request, performs necessary operations, and sends a response back to the client. The response contains a status code, headers, and the response body with the requested data.
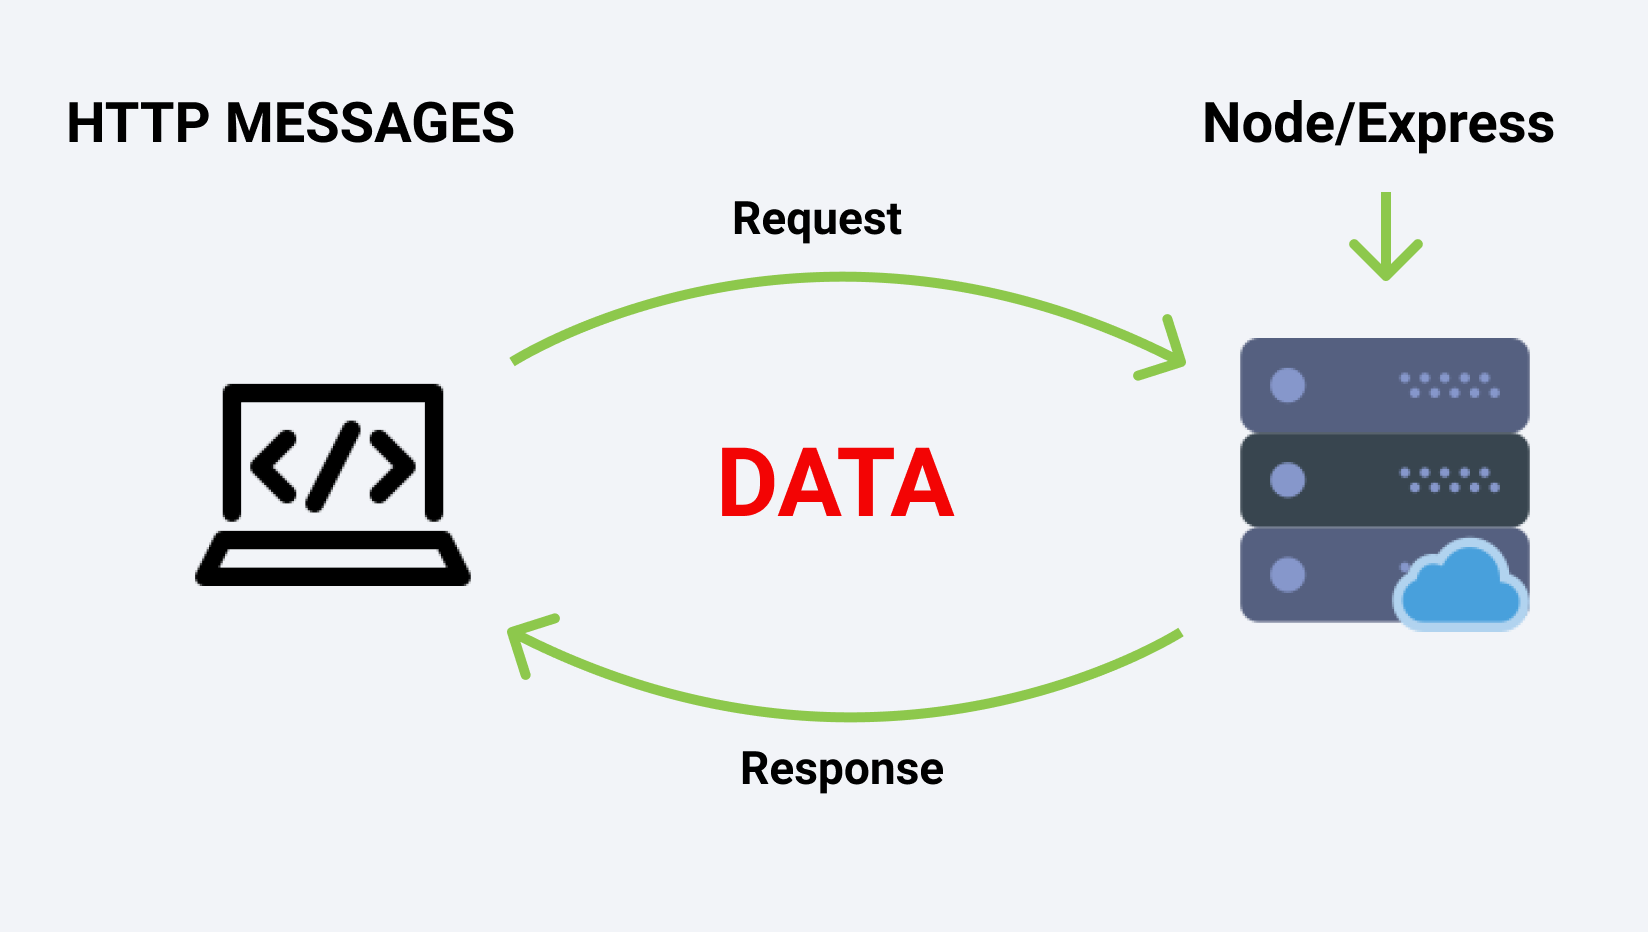 _Source: https://course-api.com/slides/_
Components Of Request-Response
Both the Request (sent by client to the server) and the Response (sent by server to the client) comprises of 3 parts:
- The Status Line: This is the first line of the request or response. It contains information about the message, such as the method used, URL, protocol version, and so on.
- The Header: This is a collection of key-value pairs, separated by colon.
The headers include additional information about the message such as the content type, content length, caching information, and so on. - The Body: The Body contains the actual data being sent or received. In the case of requests, it might contain form data or query parameters. In the case of responses, it could be HTML, JSON, XML, or any other data format.
The 3 components of a Request and Response are described in much more detail in the below image:
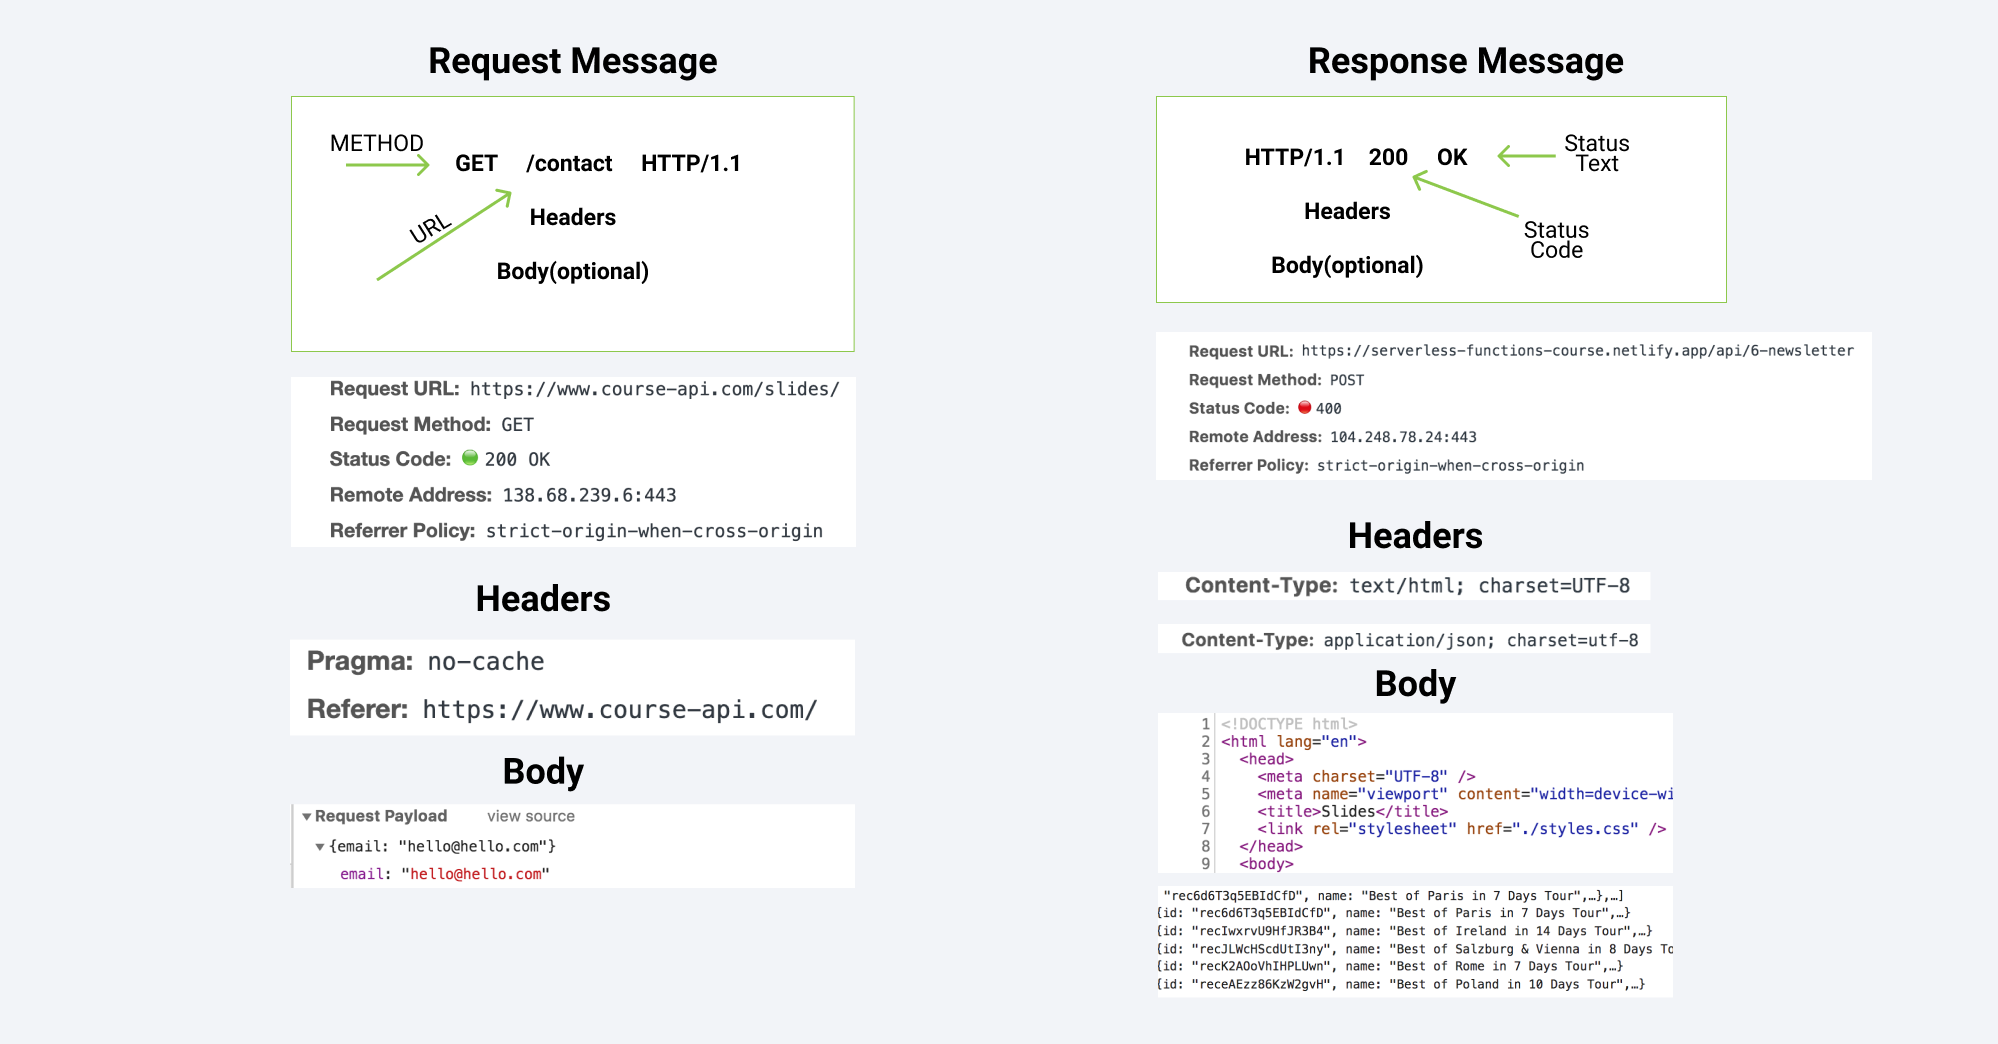 _Source: https://course-api.com/slides/_
What are HTTP Methods?
HTTP methods, also known as HTTP verbs, are actions that a Client can perform on a Server. The 4 HTTP Methods are:
- GET: Retrieves a resource from the server
- POST: Inserts a resource in the server
- PUT: Updates an existing resource in the server
- DELETE: Deletes a resource from the server
This might sound complicated, but let's try to understand these methods with the help of an example:
- GET: Retrieves a resource from the server
When you enterhttp://www.google.comin your web browser's address bar and press enter, your browser sends a HTTP GET request to the Google server asking for the HTML content of the Google homepage. That's then rendered and displayed by your browser. - POST: Inserts a resource in the server
Imagine you're filling out a registration form to create an account on Google. When you submit the form, your browser sends a POST request to Google's server with the data you typed in the form fields like: Username, Age, Birthdate, Address, Phone Number, Email, Gender and so on.
The server will then create a new user account in its database storing all the information sent to it using the POST Request. So a POST request is used to add/insert a resource in the server.
- PUT: Updates an existing resource in the server
Now imagine you want to update your Google account's password. You would send a PUT request to the server with the new password. The server would then update your user account in its database with the new password. - DELETE: Deletes a resource from the server
Finally, imagine you want to delete your Google user account. You would send a DELETE request to the server indicating that you want your account to be deleted. The server would then delete your user account from its database.
Note that these are just examples. The actual requests and their purposes may vary.
To see more examples of HTTP Methods, you can refer this image:
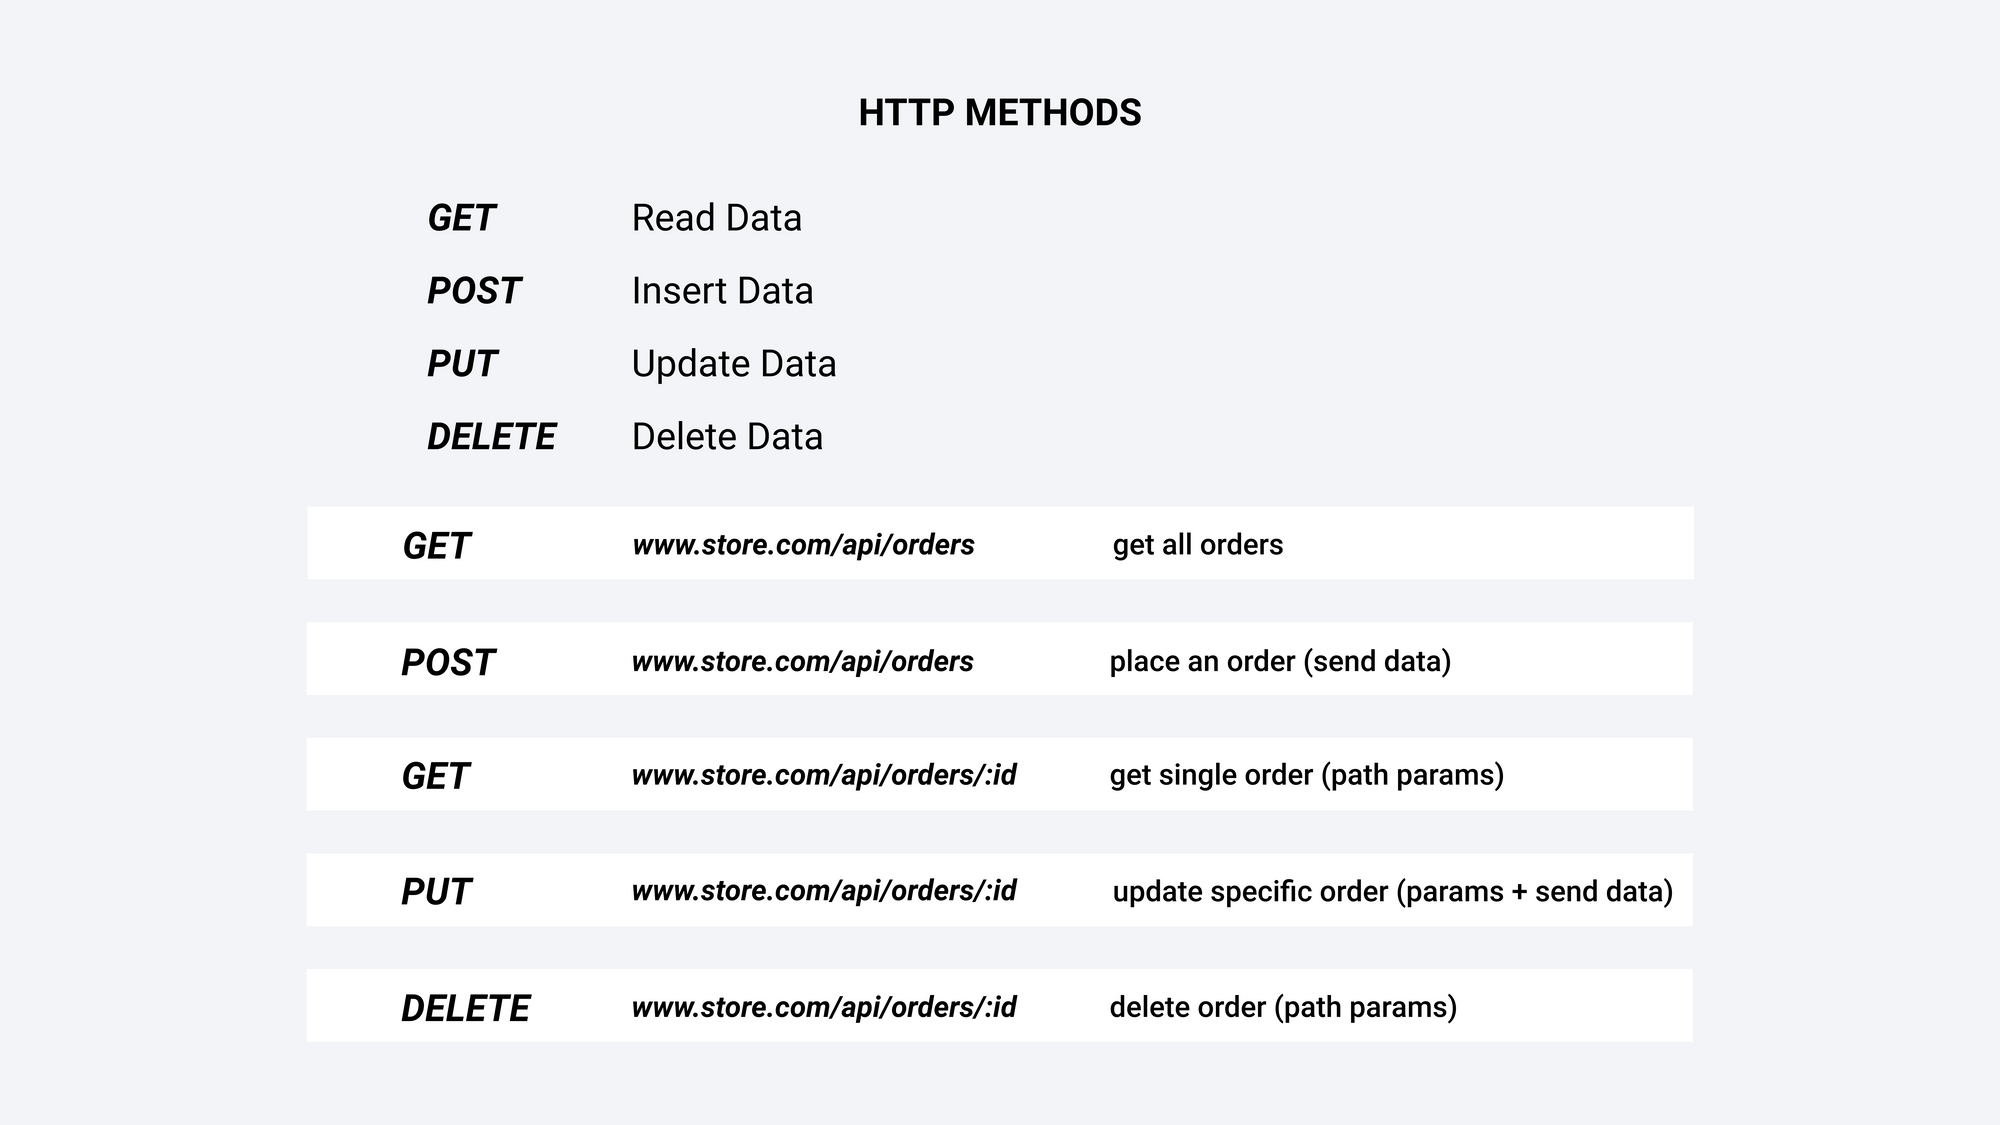 _Source: https://course-api.com/slides/_
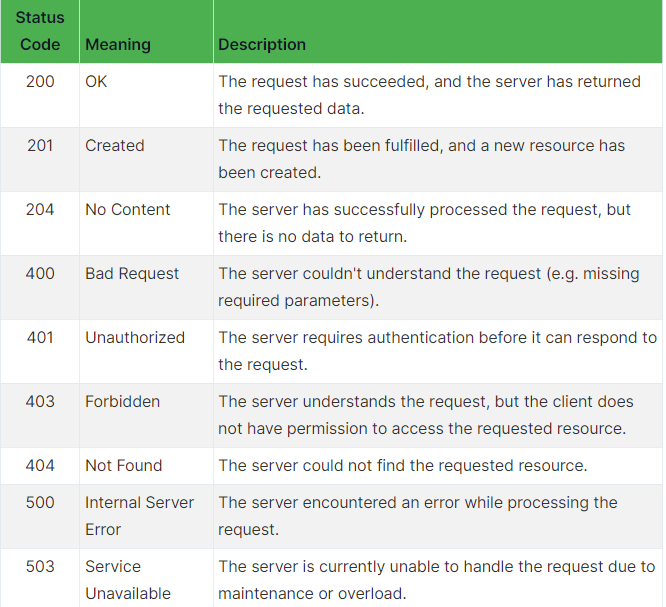
What is a Status Code?
HTTP status codes are three-digit numbers that indicate the status of a HTTP request made to a server. They are server responses that provide information about the request's outcome. Here are some of the most common HTTP status codes and what they represent:
Let's Create a Server
Finally let's move to the good part 🥳🔥 and learn how to create a Web Server using the http module:
Step 1: Import the http module like this:
const http = require('http');
Step 2: The http module provides you with http.createServer() function which helps you create a server. This function accepts a callback function with 2 parameters – req (which stores the incoming request object) and res which stands for the response to be sent by the server. This callback function gets executed every time someone hits the server.
This is how we can create a server using the createServer() function:
const http = require('http');

const server = http.createServer((req, res) => {
    res.end('Hello World');
})
Note: res.send() is a function attached on the res object using which we can send some data back to the client. Here once we are done setting up the server, you will see a Hello World message in your web browser.
Step 3: Listening the server at some port using the listen() method.
The listen() function in Node.js http module is used to start a server that listens for incoming requests. It takes a port number as an argument and binds the server to that port number so that it can receive incoming requests on that port.
In the below code, we use the listen() function to start the server and bind it to port 5000. The second argument to the listen() function is a callback function that is executed when the server starts listening on the specified port. We are using this callback function just to display a success message in the console.
const http = require('http');

const server = http.createServer((req, res) => {
    res.end('Hello World');
})

server.listen(5000, () => {
    console.log('Server listening at port 5000');
})
You are likely to see a Hello World message when you visit this URL: http://localhost:5000/.

If you try to visit some other port like 5001 (http://localhost:5001/), which is not bound to your server, you won't see any response because your server is not listening on that port. You will likely receive an error message stating that the connection to the server could not be established.
At this point, we've made a server that renders a simple Hello World message every time someone tries to access it. This is quite good but there is a problem....
The problem is that for every route, the server sends the same message. For example, if I try to access the about page or the contact page, still the server shows the same message:
- http://localhost:5000/ -> Hello World
- http://localhost:5000/about -> Hello World
- http://localhost:5000/contact -> Hello World
There is a simple way to fix this: there's a property called url in the req object which gives the URL of the request or in other words it tells you about the resource the client is trying to access.
Suppose if I type in: http://localhost:5000/about in my web browser's search bar, this means I am performing a GET Request on the server and I am trying to access the /about page. So In this case the value of req.url will be /about.
Similarly for the below requests, the value of req.url will be:
| URL | req.url |
|---|---|
| http://localhost:5000 | / |
| http://localhost:5000/about | /about |
| http://localhost:5000/contact | /contact |
| http://localhost:5000/error | /error |
We can use some conditionals if...else along with the req.url property to make our server respond to different requests differently. This is how we can achieve this:
const http = require('http');

const server = http.createServer((req, res) => {
    if(req.url === '/'){
        res.end('This is my Home Page');
    } else if(req.url === '/about'){
        res.end('This is my About Page');
    } else if(req.url === '/contact'){
        res.end('This is my Contact Page');
    } else {
        res.end('404, Resource Not Found');
    }
})

server.listen(5000, () => {
    console.log('Server listening at port 5000');
})

Now we have a perfect server that responds to different requests differently. We are sending back responses using a method called res.end(). But there is an even better way of sending back a response in which we can add on 2 more methods along with res.end():
res.writeHead()– This method is used to send the response headers to the client. The status code and headers likecontent-typecan be set using this method.res.write()– This method is used to send the response body to the client.res.end()– This method is used to end the response process.
Below is the modified code where we added the writeHead() and write() methods along with end() method:
const http = require('http');

const server = http.createServer((req, res) => {
    if(req.url === '/'){
        res.writeHead(200, {'content-type': 'text/html'});
        res.write('<h1>Home Page</h1>');
        res.end();
    } else if(req.url === '/about'){
        res.writeHead(200, {'content-type': 'text/html'});
        res.write('<h1>About Page</h1>');
        res.end();
    } else if(req.url === '/contact'){
        res.writeHead(200, {'content-type': 'text/html'});
        res.write('<h1>Contact Page</h1>');
        res.end();
    } else {
        res.writeHead(404, {'content-type': 'text/html'});
        res.write('<h1>404, Resource Not Found <a href="/">Go Back Home</a></h1>');
        res.end();
    }
})

server.listen(5000, () => {
    console.log('Server listening at port 5000');
})
The below image shows what the server sends back as response when we visit multiple URL's:

Let's break down what's happening in the above code:
- Here we are responding differently to different incoming requests by using the
req.urlproperty. - In every response, we are doing 3 things:
– Setting the response header using theres.writeHead()method. Here we provide 2 parameters tores.writeHead(): the status code and an object which has thecontent-typeproperty set totext/html
– Setting the response body using theres.write()method. Note that instead of sending simple messages, we are actually sending some HTML code in this case,
– And closing the response process using theres.end()method. - In case of resources like:
/,/aboutand/contactthe status code is set to200which means that the request to access a resource was successful. But if the client tries to access some other resource, they simply get back an error message and the status code is set to404. - Here the
'content-type': 'text/html'is a way of telling the browser how it should interpret and display the response. In this case, we are telling the browser to interpret the response as some HTML code. There are differentcontent-type's for different types of responses:
– To send back JSON data as a response, we need to set thecontent-typetoapplication/json
– To send back CSS as a response, thecontent-typeshould betext/css
– To send back JavaScript code as a response, thecontent-typeshould betext/javascript, and so on...
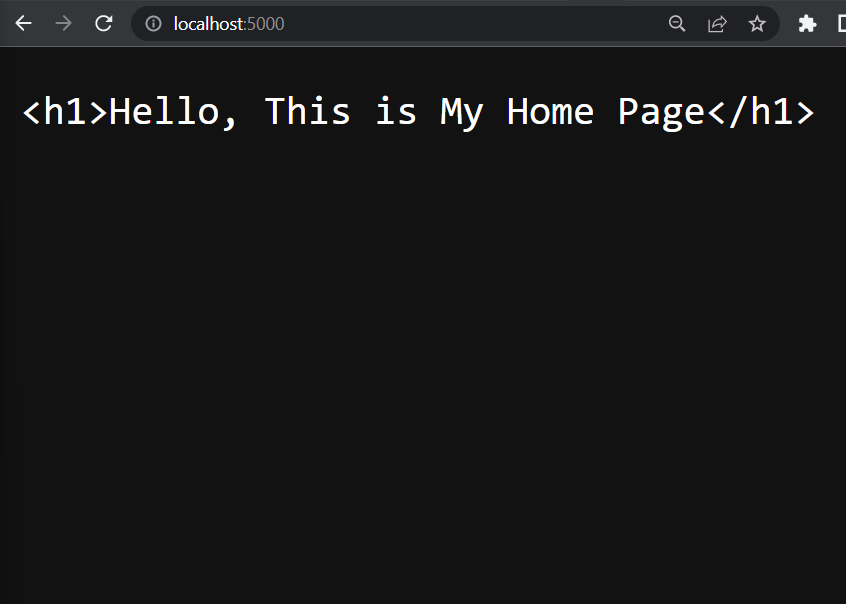
Setting the content type is very important as it determines how the web browser interprets the response. For example: if we just change the content-type from text/html to text/plain, this is how the response will be displayed in the web browser:
Let's Serve Something Interesting
Up until now you've learned how to set up web servers but we haven't built anything interesting. So let's add some fun to our lives.
In the last section of this tutorial, we will be serving this navbar:

Since this is not a front-end related tutorial, we will not be building this navbar from scratch. Instead, you can head over to this GitHub repo and copy the contents of the navbar-app directory and set it up locally: John Smilga's GitHub repo. The idea is to:
- Set up the
navbar-appfolder locally - Use the
fsmodule to read the contents of the HTML, CSS, JS file and the Logo - Using the
httpModule to render the files when someone tries to access the/route or the home page. So Let's Get Started:
In the below code, we are using the fs module's readFileSync() method to read the contents of the HTML, CSS, JS file and the Logo.
Note that we are going to serve the contents of the file and not the file itself. So readFileSync() comes into picture.
Then, we serve the contents of the HTML file (stored in homePage variable) using the res.write() method. Remember to set the content-type as text/html as we are serving HTML content. We have also set up responses for /about route and also a 404 page.
const http = require('http');
const fs = require('fs');

// Get the contents of the HTML, CSS, JS and Logo files
const homePage = fs.readFileSync('./navbar-app/index.html');
const homeStyles = fs.readFileSync('./navbar-app/style.css');
const homeLogo = fs.readFileSync('./navbar-app/logo.svg');
const homeLogic = fs.readFileSync('./navbar-app/browser-app.js');

// Creating the Server
const server = http.createServer((req, res) => {
    const url = req.url;
    if(url === '/'){
        res.writeHead(200, {'content-type': 'text/html'});
        res.write(homePage);
        res.end();
    } else if(url === '/about'){
        res.writeHead(200, {'content-type': 'text/html'});
        res.write(<h1>About Page</h1>);
        res.end();
    } else{
        res.writeHead(200, {'content-type': 'text/html'});
        res.write(<h1>404, Resource Not Found</h1>);
        res.end();
    }
})

server.listen(5000, () => {
    console.log('Server listening at port 5000');
})
When you run this code using node app.js command, you will see these responses sent by the server for the following routes:
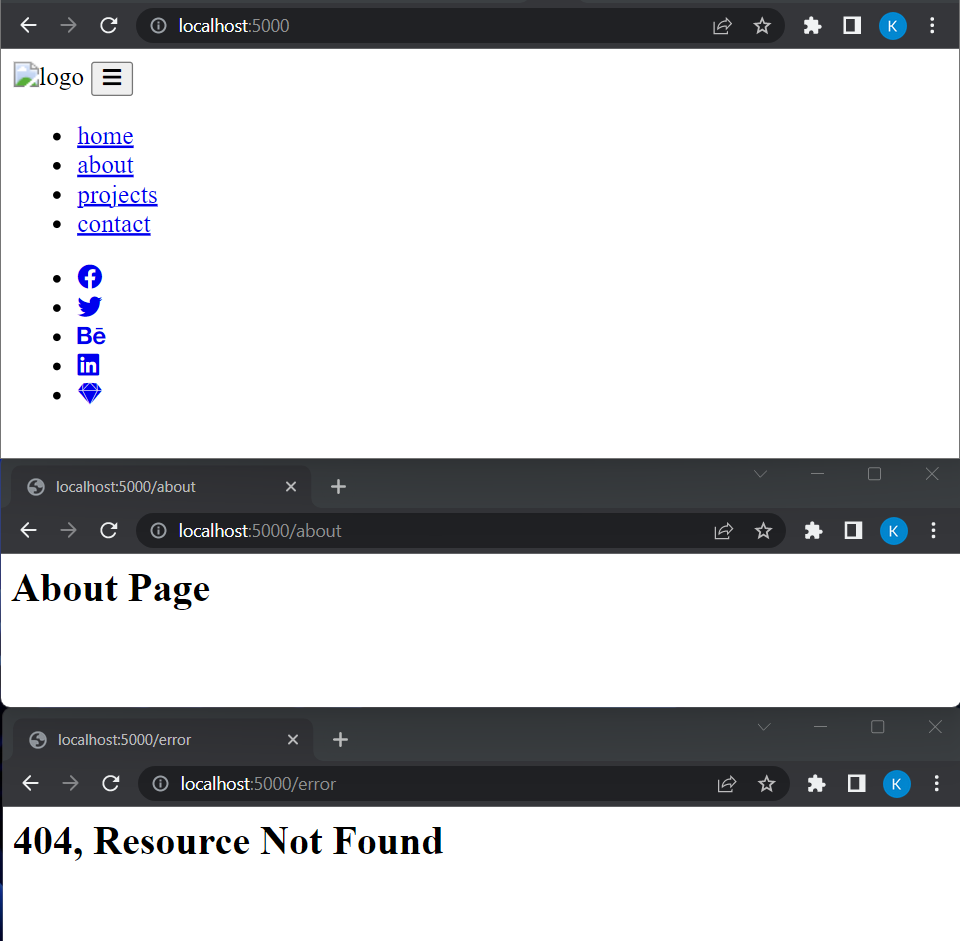
We see that the other routes work fine, but the home page doesn't look as we expected. The problem is that we only see the HTML Structure of the navbar being displayed and not the other stuff like the CSS, logo, and JavaScript.
Let's see what the bug is. We can check what requests are being made by the web browser to the server by modifying the above code like this:
// ... above code
const server = http.createServer((req, res) => {
    const url = req.url;
    console.log(url);

    // ... rest of the code
})
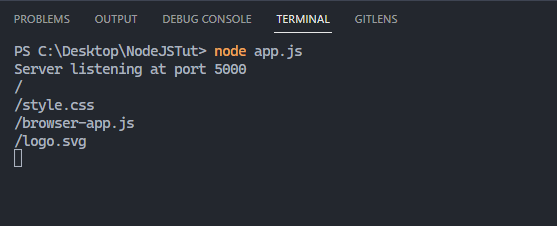
Here we are simply printing the url of the request being made by the client to the server.
Once we refresh the page, we see that initially the browser asks for the home page and makes a GET request with the / URL. Afterward it makes 3 more requests:
/style.css– asking for the CSS file/browser-app.js– asking for the JS file/logo.svg– asking for the logo
From this, we can infer how browsers work.
The browser makes request for the contents of the / path and the server just sends back the HTML content. Once the browser receives the HTML content, it interprets it and starts displaying the elements. While parsing HTML, if the browser encounters any additional resource like a CSS page or JS page, it will make a request to the server for the same.
Since we are not sending the CSS, JS and Logo in the response, we do not see them on the screen. We can fix this by adding some more if()s in the code and sending those resources which the browser asks for and BOOM – this bug is fixed.
const http = require('http');
const fs = require('fs');

// Get the contents of the HTML, CSS, JS and Logo files
const homePage = fs.readFileSync('./navbar-app/index.html');
const homeStyles = fs.readFileSync('./navbar-app/style.css');
const homeLogo = fs.readFileSync('./navbar-app/logo.svg');
const homeLogic = fs.readFileSync('./navbar-app/browser-app.js');

// Creating the Server
const server = http.createServer((req, res) => {
    const url = req.url;
    if(url === '/'){
        res.writeHead(200, {'content-type': 'text/html'});
        res.write(homePage);
        res.end();
    } else if(url === '/style.css'){
        res.writeHead(200, {'content-type': 'text/css'});
        res.write(homeStyles);
        res.end();
    } else if(url === '/browser-app.js'){
        res.writeHead(200, {'content-type': 'text/javascript'});
        res.write(homeLogic);
        res.end();
    } else if(url === '/logo.svg'){
        res.writeHead(200, {'content-type': 'image/svg+xml'});
        res.write(homeLogo);
        res.end();
    } else if(url === '/about'){
        res.writeHead(200, {'content-type': 'text/html'});
        res.write(<h1>About Page</h1>);
        res.end();
    } else{
        res.writeHead(200, {'content-type': 'text/html'});
        res.write(<h1>404, Resource Not Found</h1>);
        res.end();
    }
})

server.listen(5000, () => {
    console.log('Server listening at port 5000');
})
Now we can see the HTML, CSS, Logo and the JS Functionality present:

Conclusion
With this we come to the end of this tutorial – I hope you liked it and learned a lot about Node.
Do share your learnings from this guide on Twitter and LinkedIn (#LearnInPublic) and follow freeCodeCamp for more such informative coding articles.
Connect with me on Twitter: Twitter - Krish4856, DMs Open.
See you next time 👋 ❤️ ✨