
Hi everyone! In this tutorial we're going to take a deep dive into GraphQL APIs.
I recently wrote this article where I explained the main differences between common API types nowadays. And this tutorial aims to show you an example of how you can fully implement a GraphQL API.
We'll cover basic setup and architecture with Node and Apollo GraphQL, unit testing with Supertest, seeing how we can consume the API from a React front-end app using Apollo client and finally documenting the API using Apollo sandbox.
Keep in mind we won't go too deep into how each technology works. The goal here is to give you a general overview of how a GraphQL API works, how its pieces interact, and what a full implementation might consist of.
Let's go!
Table of Contents
What is GraphQL?
GraphQL is a query language and runtime for APIs that was developed by Facebook in 2012. It was released to the public in 2015 and has since gained popularity as an alternative to REST APIs.
GraphQL was originally developed by Facebook as a way to simplify data fetching for their mobile applications. They needed a way to make complex data requests from the server without causing performance issues or over-fetching data. GraphQL was born out of the need to solve these problems.
GraphQL was released as an open-source project in 2015 and has since gained popularity in the developer community. It is now supported by many development tools and frameworks, including Apollo, Prisma, and Hasura.
Main Characteristics:
Strongly Typed: GraphQL APIs are strongly typed, which means that each field has a specific data type. This makes it easier to validate and handle data on the client and server sides.
Query Language: GraphQL has its own query language that allows clients to specify exactly what data they need. This reduces over-fetching of data and improves performance.
Single Endpoint: GraphQL APIs have a single endpoint, which means that clients can fetch all the data they need from a single request.
Declarative: GraphQL APIs are declarative, which means that clients specify what they want, not how to get it. This allows for more efficient and flexible data fetching.
Schema-Driven: GraphQL APIs are schema-driven, which means that the schema defines the structure of the data and the available queries and mutations. This makes it easier for developers to understand and work with the API.
Pros:
Efficient Data Fetching: GraphQL APIs allow clients to fetch only the data they need, reducing over-fetching and improving performance.
Strongly Typed: GraphQL APIs are strongly typed, making it easier to validate and handle data.
Single Endpoint: GraphQL APIs have a single endpoint, reducing the complexity of the API and making it easier to work with.
Schema-Driven: GraphQL APIs are schema-driven, which makes it easier for developers to understand and work with the API.
Cons:
Complexity: GraphQL APIs can be more complex to set up and work with compared to REST APIs.
Caching: Caching can be more challenging with GraphQL APIs due to the flexible nature of the API.
Learning Curve: GraphQL requires a learning curve for both developers and clients, as it has its own query language and approach to data fetching.
Best for:
Efficient and flexible needs: GraphQL is well-suited for building applications that require efficient and flexible data fetching, such as mobile and web applications.
Complex data requirements: It is particularly useful in situations where there are complex data requirements and where over-fetching data can cause performance issues.
So to recap, GraphQL is a query language and runtime for APIs that provides efficient and flexible data fetching capabilities.
While it can be more complex to set up and work with compared to REST APIs, it offers benefits such as strongly typed data, single endpoints, and schema-driven development. It is well-suited for building applications with complex data requirements and where efficient data fetching is important.
Core GraphQL Concepts
Before we jump into building stuff, there are some core GraphQL concepts you need to understand in order to know what you're doing and how the code will work.
Object Types
In GraphQL, an Object Type is a complex type that represents a collection of fields. Object Types are used to define the structure of data that can be queried and mutated through a GraphQL API.
Each Object Type has a unique name and a set of fields, where each field has a name and a type. The type of a field can be a scalar type (such as Int, String, or Boolean), another Object Type, or a list of another type.
If you're familiar with Typescript and interfaces, this might ring a bell or two for you.
Here's an example of an Object Type that represents a "User" in a social media application:
type User {
  id: ID!
  name: String!
  email: String!
  friends: [User!]!
}
The ! sign means the field is mandatory.
In this example, the "User" Object Type has four fields: "id", "name", "email", and "friends". The "id" field has a type of ID, which is a built-in scalar type in GraphQL that represents a unique identifier. The "name" and "email" fields have a type of String, and the "friends" field has a type of a list of "User" Objects.
Here's another example of an Object Type that represents a "Book" in a library application:
type Book {
  id: ID!
  title: String!
  author: Author!
  genre: String!
  published: Int!
}
In this example, the "Book" Object Type has five fields: "id", "title", "author", "genre", and "published". The "id" field has a type of ID, the "title" and "genre" fields have a type of String, the "published" field has a type of Int, and the "author" field has a type of an "Author" Object.
Object Types can be used to define the structure of data that is returned from a query or mutation in a GraphQL API. For example, a query that returns a list of users might look like this:
query {
  users {
    id
    name
    email
    friends {
      id
      name
    }
  }
}
In this query, the "users" field returns a list of "User" Objects, and the query specifies which fields to include in the response.
Queries
In GraphQL, a query is a request for specific data from the server. The query specifies the shape of the data that the client wants to receive, and the server responds with the requested data in the same shape.
A query in GraphQL follows a similar structure to the shape of the data it expects to receive. It consists of a set of fields that correspond to the properties of the data the client wants to retrieve. Each field can also have arguments that modify the data returned.
Here's an example of a simple query in GraphQL:
query {
  user(id: "1") {
    name
    email
    age
  }
}
In this example, the query is requesting information about a user with the ID of "1". The fields specified in the query are "name", "email", and "age", which correspond to the properties of the user object.
The response from the server would be in the same shape as the query, with the requested data returned in the corresponding fields:
{
  "data": {
    "user": {
      "name": "John Doe",
      "email": "johndoe@example.com",
      "age": 25
    }
  }
}
Here, the server has returned the requested data about the user in the "name", "email", and "age" fields. The data is contained in a "data" object to differentiate it from any errors or other metadata that may be included in the response.
Mutations
In GraphQL, mutations are used to modify or create data on the server. Like queries, mutations specify the shape of the data being sent to and received from the server. The main difference is that while queries only read data, mutations can both read and write data.
Here's an example of a simple mutation in GraphQL:
mutation {
  createUser(name: "Jane Doe", email: "janedoe@example.com", age: 30) {
    id
    name
    email
    age
  }
}
In this example, the mutation is creating a new user on the server with the name "Jane Doe", email "janedoe@example.com", and age 30. The fields specified in the mutation are "id", "name", "email", and "age", which correspond to the properties of the user object.
The response from the server would be in the same shape as the mutation, with the newly created user data returned in the corresponding fields:
{
  "data": {
    "createUser": {
      "id": "123",
      "name": "Jane Doe",
      "email": "janedoe@example.com",
      "age": 30
    }
  }
}
Here, the server has returned the data about the newly created user in the "id", "name", "email", and "age" fields.
Mutations can also be used to update or delete data on the server. Here's an example of a mutation that updates a user's name:
mutation {
  updateUser(id: "123", name: "Jane Smith") {
    id
    name
    email
    age
  }
}
In this example, the mutation is updating the user with the ID of "123" to have the name "Jane Smith". The fields specified in the mutation are the same as in the previous example.
The response from the server would be the updated user data:
{
  "data": {
    "updateUser": {
      "id": "123",
      "name": "Jane Smith",
      "email": "janedoe@example.com",
      "age": 30
    }
  }
}
Mutations in GraphQL are designed to be composable, meaning that multiple mutations can be combined into a single request. This allows clients to perform complex operations with a single network round-trip.
Resolvers
In GraphQL, a resolver is a function responsible for fetching the data for a specific field defined in a GraphQL schema. Resolvers are the bridge between the schema and the data source. The resolver function receives four parameters: parent, args, context, and info.
parent: The parent object for the current field. In nested queries, it refers to the parent field's value.args: The arguments passed to the current field. It is an object with key-value pairs of the argument names and their values.context: An object shared across all resolvers for a particular request. It contains information about the request such as the currently authenticated user, database connection, etc.info: Contains information about the query including the field name, alias, and the query document AST.
Here's an example of a resolver function for a User type's posts field:
const resolvers = {
  User: {
    posts: (parent, args, context, info) => {
      return getPostsByUserId(parent.id);
    },
  },
};
In this example, User is a GraphQL object type with a posts field. When the posts field is queried, the resolver function is called with the parent object User, any arguments passed, the context object, and query information. In this example, the resolver function calls a function getPostsByUserId to fetch the posts for the current user.
Resolvers can also be used for mutations to create, update or delete data. Here's an example of a resolver function for a createUser mutation:
const resolvers = {
  Mutation: {
    createUser: (parent, args, context, info) => {
      const user = { name: args.name, email: args.email };
      const createdUser = createUser(user);
      return createdUser;
    },
  },
};
In this example, Mutation is a GraphQL object type with a createUser mutation field. When the mutation is invoked, the resolver function is called with the parent object, arguments passed, context object, and query information. In this example, the resolver function calls a function createUser to create a new user with the given name and email, and returns the newly created user.
Schemas
In GraphQL, a schema is a blueprint that defines the structure of the data that can be queried in the API. It defines the available types, fields, and operations that can be performed on those types.
GraphQL schemas are written in the GraphQL Schema Definition Language (SDL), which uses a simple syntax to define the types and fields available in the API. The schema is typically defined in the server-side code and then used to validate and execute incoming queries.
Here's an example of a simple GraphQL schema definition:
type Book {
  id: ID!
  title: String!
  author: String!
  published: Int!
}

type Query {
  books: [Book!]!
  book(id: ID!): Book
}

type Mutation {
  addBook(title: String!, author: String!, published: Int!): Book!
  updateBook(id: ID!, title: String, author: String, published: Int): Book
  deleteBook(id: ID!): Book
}
In this schema, we have three types: Book, Query, and Mutation. The Book type has four fields: id, title, author, and published. The Query type has two fields: books and book, which can be used to retrieve a list of books or a specific book by ID, respectively. The Mutation type has three fields: addBook, updateBook, and deleteBook, which can be used to create, update, or delete books.
Note that each field has a type, which can be a built-in scalar type like String or Int, or a custom type like Book. The ! after a type indicates that the field is non-nullable, meaning it must always return a value (that is, it cannot be null).
TLDR and Comparison with Equivalent REST Concepts
Object Types: In GraphQL, Object Types are used to define the data that can be queried from an API, similar to how the response data model is defined in REST APIs. However, unlike REST, where data models are often defined in different formats (for example, JSON or XML), GraphQL Object Types are defined using a single language-agnostic syntax.
Queries: In GraphQL, queries are used to fetch data from an API, similar to HTTP GET requests in REST APIs. However, unlike REST APIs, where multiple requests may be required to fetch nested data, GraphQL queries can be used to fetch nested data in a single request.
Mutations: In GraphQL, mutations are used to modify data in an API, similar to HTTP POST, PUT, and DELETE requests in REST APIs. However, unlike REST APIs, where different endpoints may be required to perform different modifications, GraphQL mutations are performed through a single endpoint.
Resolvers: In GraphQL, resolvers are used to specify how to fetch data for a particular field in a query or mutation. Resolvers are similar to controller methods in REST APIs, which are used to fetch data from a database and return it as a response.
Schemas: In GraphQL, a schema is used to define the data that can be queried or mutated from an API. It specifies the types of data that can be requested, how they can be queried, and what mutations are allowed. In REST APIs, schemas are often defined using OpenAPI or Swagger, which specify the endpoints, request and response types, and other metadata for an API.
Overall, GraphQL and REST APIs differ in how they handle data fetching and modification.
REST APIs rely on multiple endpoints and HTTP methods to fetch and modify data, whereas GraphQL uses a single endpoint and queries/mutations to accomplish the same.
GraphQL's use of a single schema to define the data model of an API makes it easier to understand and maintain compared to REST APIs, which often require multiple documentation formats to describe the same data model.
How to Build a GraphQL API with Node and Apollo GraphQL
Our Tools
Node.js is an open-source, cross-platform, back-end JavaScript runtime environment that allows developers to execute JavaScript code outside of a web browser. It was created by Ryan Dahl in 2009 and has since become a popular choice for building web applications, APIs, and servers.
Node.js provides an event-driven, non-blocking I/O model that makes it lightweight and efficient, allowing it to handle large amounts of data with high performance. It also has a large and active community, with many libraries and modules available to help developers build their applications more quickly and easily.
Apollo GraphQL is a full-stack platform for building GraphQL APIs. It provides tools and libraries that simplify the process of building, managing, and consuming GraphQL APIs.
The core of the Apollo GraphQL platform is the Apollo Server, a lightweight and flexible server that makes it easy to build scalable and performant GraphQL APIs. The Apollo Server supports a wide range of data sources, including databases, REST APIs, and other services, making it easy to integrate with existing systems.
Apollo also provides a number of client libraries, including the Apollo Client for web and mobile, which simplifies the process of consuming GraphQL APIs. The Apollo Client makes it easy to query and mutate data, and provides advanced features like caching, optimistic UI, and real-time updates.
In addition to the Apollo Server and Apollo Client, Apollo provides a number of other tools and services, including a schema management platform, a GraphQL analytics service, and a set of developer tools for building and debugging GraphQL APIs.
If you're new to GraphQL or to Apollo itself, I really recommend you check out their docs. They're some of the best out there in my opinion.
Our Architecture
For this project we'll follow a layers architecture in our codebase. Layers architecture is about dividing concerns and responsibilities into different folders and files, and allowing direct communication only between certain folders and files.
The matter of how many layers should your project have, what names should each layer have, and what actions should it handle is all a matter of discussion. So let's see what I think is a good approach for our example.
Our application will have five different layers, which will be ordered in this way:
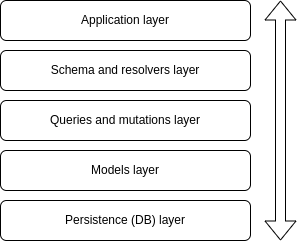
Application layers
The application layer will have the basic setup of our server and the connection to our schema and resolvers (the next layer).
The schema and resolvers layer will have the type definitions for our data and the connection to our queries and mutations (the next layer).
The queries and mutations layer will have the actual logic we want to perform in each of our queries and mutations and the connection to the model layer (the next layer, you get the idea...)
The model layer will hold the logic for interacting with our mock database.
Finally, the persistence layer is where our database will be.
An important thing to keep in mind is that in these kinds of architectures, there's a defined communication flow between the layers that has to be followed for it to make sense.
This means that a request first has to go through the first layer, then the second, then the third and so on. No request should skip layers because that would mess with the logic of the architecture and the benefits of organization and modularity it gives us.
If you'd like to know some other API architecture options, I recommend this software architecture article I wrote a while ago.
The Code
Before jumping to the code, let's mention what we'll actually build. We'll be building an API for a pet shelter business. This pet shelter needs to register the pets that are staying in the shelter, and for that we'll perform basic CRUD operations (create, read, update and delete).
We're using the exact same example we used in my article about fully implementing a REST API. If you're interested in reading that too, this should help to compare concepts between REST and GraphQL, and understand its differences and similarities. ;)
Now let's get this thing going. Create a new directory, hop in to it and start a new Node project by running npm init -y. For our GraphQL server we'll need two more dependencies, so run npm i @apollo/server and npm i graphql too.
App.js
In the root of your project, create an app.js file and drop this code in it:
import { ApolloServer } from '@apollo/server'
import { startStandaloneServer } from '@apollo/server/standalone'
import { typeDefs, resolvers } from './pets/index.js'

// The ApolloServer constructor requires two parameters: your schema
// definition and your set of resolvers.
const server = new ApolloServer({
    typeDefs,
    resolvers
})

// Passing an ApolloServer instance to the `startStandaloneServer` function:
//  1. creates an Express app
//  2. installs your ApolloServer instance as middleware
//  3. prepares your app to handle incoming requests
const { url } = await startStandaloneServer(server, {
    listen: { port: 4000 }
})

console.log(`🚀  Server ready at: ${url}`)
Here we're setting up our Apollo server, by passing it our typeDefs and resolvers (we'll explain those in a sec), and then starting the server in port 4000.
Next, go ahead and create this folder structure in your project:
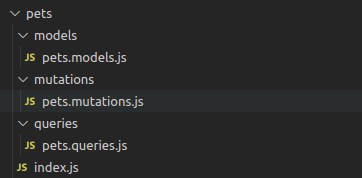
Our folder structure
index.js
Within the index.js file put this code:
import { addPet, editPet, deletePet } from './mutations/pets.mutations.js'
import { listPets, getPet } from './queries/pets.queries.js'

// A schema is a collection of type definitions (hence "typeDefs")
// that together define the "shape" of queries that are executed against your data.
export const typeDefs = `#graphql
  # OBJECT TYPES
  # This "Pet" type defines the queryable fields for every pet in our data source.
  type Pet {
    id: ID!
    name: String!
    type: String!
    age: Int!
    breed: String!
  }

  # INPUT TYPES
  # Define the input objects for addPet and editPet mutations
  input PetToEdit {
    id: ID!
    name: String!
    type: String!
    age: Int!
    breed: String!
  }

  input PetToAdd {
    name: String!
    type: String!
    age: Int!
    breed: String!
  }

  # The "Query" type is special: it lists all of the available queries that
  # clients can execute, along with the return type for each. In this
  # case, the "pets" query returns an array of zero or more pets.
  # QUERY TYPES
  type Query {
    pets: [Pet],
    pet(id: ID!): Pet
  }

  # MUTATION TYPES
  type Mutation {
    addPet(petToAdd: PetToAdd!): Pet,
    editPet(petToEdit: PetToEdit!): Pet,
    deletePet(id: ID!): [Pet],
  }
`

export const resolvers = {
    // Resolvers for Queries
    Query: {
        pets: () => listPets(),
        pet: (_, { id }) => getPet(id)
    },

    // Resolvers for Mutations
    Mutation: {
        addPet: (_, { petToAdd }) => addPet(petToAdd),
        editPet: (_, { petToEdit }) => editPet(petToEdit),
        deletePet: (_, { id }) => deletePet(id)
    }
}
Here we have two main things: typeDefs and resolvers.
typeDefs defines the types for the data that can be queried in our API (in our case that's the pet object), as well as the input for queries/mutations (in our case that's PetToEdit and PetToAdd).
Lastly, it also defines the available queries and mutations for our API, declaring their names, as well as their input and return values. In our case we have two queries (pets and pet) and three mutations (addPet, editPet and deletePet).
resolvers contain the actual implementation of our queries and mutations types. Here we're declaring each query and mutation, and indicating what each should do. In our case, we're linking them with the queries/mutations we're importing from our queries/mutations layer.
pets.queries.js
In your pets.queries.js file drop this:
import { getItem, listItems } from '../models/pets.models.js'

export const getPet = id => {
    try {
        const resp = getItem(id)
        return resp
    } catch (err) {
        return err
    }
}

export const listPets = () => {
    try {
        const resp = listItems()
        return resp
    } catch (err) {
        return err
    }
}
As you can see, this file is very simple. It declares the functions that are imported in the index.js file and links them to the functions declared in the models layer.
pets.mutations.js
Same goes for our pets.mutations.js file, but with mutations now.
import { editItem, addItem, deleteItem } from '../models/pets.models.js'

export const addPet = petToAdd => {
    try {
        const resp = addItem(petToAdd)
        return resp
    } catch (err) {
        return err
    }
}

export const editPet = petToEdit => {
    try {
        const resp = editItem(petToEdit?.id, petToEdit)
        return resp
    } catch (err) {
        return err
    }
}

export const deletePet = id => {
    try {
        const resp = deleteItem(id)
        return resp
    } catch (err) {
        return err
    }
}
pets.models.js
Now go to the models folder and create a pets.models.js file with this code in it:
import db from '../../db/db.js'

export const getItem = id => {
    try {
        const pet = db?.pets?.filter(pet => pet?.id === parseInt(id))[0]
        return pet
    } catch (err) {
        console.error('Error', err)
        return err
    }
}

export const listItems = () => {
    try {
        return db?.pets
    } catch (err) {
        console.error('Error', err)
        return err
    }
}

export const editItem = (id, data) => {
    try {
        const index = db.pets.findIndex(pet => pet.id === parseInt(id))

        if (index === -1) throw new Error('Pet not found')
        else {
            data.id = parseInt(data.id)
            db.pets[index] = data
            return db.pets[index]
        }
    } catch (err) {
        console.error('Error', err)
        return err
    }
}

export const addItem = data => {
    try {
        const newPet = { id: db.pets.length + 1, ...data }
        db.pets.push(newPet)
        return newPet
    } catch (err) {
        console.error('Error', err)
        return err
    }
}

export const deleteItem = id => {
    try {
        // delete item from db
        const index = db.pets.findIndex(pet => pet.id === parseInt(id))

        if (index === -1) throw new Error('Pet not found')
        else {
            db.pets.splice(index, 1)
            return db.pets
        }
    } catch (err) {
        console.error('Error', err)
        return err
    }
}
These are the functions responsible for interacting with our data layer (database) and returning the corresponding information to our controllers.
Database
We wont use a real database for this example. Instead we'll just use a simple array that will work just fine for example purposes, though our data will of course reset every time our server does.
In the root of our project, create a db folder and a db.js file with this code in it:
const db = {
    pets: [
        {
            id: 1,
            name: 'Rex',
            type: 'dog',
            age: 3,
            breed: 'labrador',
        },
        {
            id: 2,
            name: 'Fido',
            type: 'dog',
            age: 1,
            breed: 'poodle',
        },
        {
            id: 3,
            name: 'Mittens',
            type: 'cat',
            age: 2,
            breed: 'tabby',
        },
    ]
}

export default db
As you can see, our db object contains a pets property whose value is an array of objects, each object being a pet. For each pet, we store an id, name, type, age and breed.
Now go to your terminal and run nodemon app.js. You should see this message confirming your server is alive: 🚀 Server ready at: [http://localhost:4000/](http://localhost:4000/).
How to Test a GraphQL API with Supertest
Now that our server is up and running, let's implement a simple test suit to check if our queries and mutations behave as expected.
If you're not familiar with automated testing, I recommend you read this introductory article I wrote a while ago.
Our Tools
SuperTest is a JavaScript library that is used for testing HTTP servers or web applications that make HTTP requests. It provides a high-level abstraction for testing HTTP, allowing developers to send HTTP requests and make assertions about the responses received, making it easier to write automated tests for web applications.
SuperTest works with any JavaScript testing framework, such as Mocha or Jest, and can be used with any HTTP server or web application framework, such as Express.
SuperTest is built on top of the popular testing library Mocha, and uses the Chai assertion library to make assertions about the responses received. It provides an easy-to-use API for making HTTP requests, including support for authentication, headers, and request bodies.
SuperTest also allows developers to test the entire request/response cycle, including middleware and error handling, making it a powerful tool for testing web applications.
Overall, SuperTest is a valuable tool for developers who want to write automated tests for their web applications. It helps ensure that their applications are functioning correctly and that any changes they make to the codebase do not introduce new bugs or issues.
The Code
First we'll need to install some dependencies. To save up terminal commands, go to your package.json file and replace your devDependencies section with the code below. Then run npm install.
  "devDependencies": {
    "@babel/core": "^7.21.4",
    "@babel/preset-env": "^7.21.4",
    "babel-jest": "^29.5.0",
    "jest": "^29.5.0",
    "jest-babel": "^1.0.1",
    "nodemon": "^2.0.22",
    "supertest": "^6.3.3"
  }
Here we're installing the supertest and jest libraries, which we need for our tests to run, plus some babel stuff we need for our project to correctly identify which files are test files.
Still in your package.json, add this script:
  "scripts": {
    "test": "jest"
  },
To end with the boilerplate, in the root of your project, create a babel.config.cjs file and drop this code in it:
//babel.config.cjs
module.exports = {
    presets: [
      [
        '@babel/preset-env',
        {
          targets: {
            node: 'current',
          },
        },
      ],
    ],
  };
Now let's write some actual tests! Within your pets folder, create a pets.test.js file with this code in it:
import request from 'supertest'

const graphQLEndpoint = 'http://localhost:4000/'

describe('Get all pets', () => {
    const postData = {
        query: `query Pets {
            pets {
                id
                name
                type
                age
                breed
            }
        }`
    }

    test('returns all pets', async () => {
        request(graphQLEndpoint)
            .post('?')
            .send(postData)
            .expect(200)
            .end((error, response) => {
                if (error) console.error(error)

                const res = JSON.parse(response.text)

                expect(res.data.pets).toEqual([
                    {
                        id: '1',
                        name: 'Rex',
                        type: 'dog',
                        age: 3,
                        breed: 'labrador'
                    },
                    {
                        id: '2',
                        name: 'Fido',
                        type: 'dog',
                        age: 1,
                        breed: 'poodle'
                    },
                    {
                        id: '3',
                        name: 'Mittens',
                        type: 'cat',
                        age: 2,
                        breed: 'tabby'
                    }
                ])
            })
    })
})

describe('Get pet detail', () => {
    const postData = {
        query: `query Pet {
            pet(id: 1) {
                id
                name
                type
                age
                breed
            }
        }`
    }

    test('Return pet detail information', async () => {
        request(graphQLEndpoint)
            .post('?')
            .send(postData)
            .expect(200)
            .end((error, response) => {
                if (error) console.error(error)

                const res = JSON.parse(response.text)

                expect(res.data.pet).toEqual({
                    id: '1',
                    name: 'Rex',
                    type: 'dog',
                    age: 3,
                    breed: 'labrador'
                })
            })
    })
})

describe('Edit pet', () => {
    const postData = {
        query: `mutation EditPet($petToEdit: PetToEdit!) {
            editPet(petToEdit: $petToEdit) {
                id
                name
                type
                age
                breed
            }
        }`,
        variables: {
            petToEdit: {
                id: 1,
                name: 'Rexo',
                type: 'dogo',
                age: 4,
                breed: 'doberman'
            }
        }
    }

    test('Updates pet and returns it', async () => {
        request(graphQLEndpoint)
            .post('?')
            .send(postData)
            .expect(200)
            .end((error, response) => {
                if (error) console.error(error)

                const res = JSON.parse(response.text)

                expect(res.data.editPet).toEqual({
                    id: '1',
                    name: 'Rexo',
                    type: 'dogo',
                    age: 4,
                    breed: 'doberman'
                })
            })
    })
})

describe('Add pet', () => {
    const postData = {
        query: `mutation AddPet($petToAdd: PetToAdd!) {
            addPet(petToAdd: $petToAdd) {
                id
                name
                type
                age
                breed
            }
        }`,
        variables: {
            petToAdd: {
                name: 'Salame',
                type: 'cat',
                age: 6,
                breed: 'pinky'
            }
        }
    }

    test('Adds new pet and returns the added item', async () => {
        request(graphQLEndpoint)
            .post('?')
            .send(postData)
            .expect(200)
            .end((error, response) => {
                if (error) console.error(error)

                const res = JSON.parse(response.text)

                expect(res.data.addPet).toEqual({
                    id: '4',
                    name: 'Salame',
                    type: 'cat',
                    age: 6,
                    breed: 'pinky'
                })
            })
    })
})

describe('Delete pet', () => {
    const postData = {
        query: `mutation DeletePet {
            deletePet(id: 2) {
                id,
                name,
                type,
                age,
                breed
            }
        }`
    }

    test('Deletes given pet and returns updated list', async () => {
        request(graphQLEndpoint)
            .post('?')
            .send(postData)
            .expect(200)
            .end((error, response) => {
                if (error) console.error(error)

                const res = JSON.parse(response.text)

                expect(res.data.deletePet).toEqual([
                    {
                        id: '1',
                        name: 'Rexo',
                        type: 'dogo',
                        age: 4,
                        breed: 'doberman'
                    },
                    {
                        id: '3',
                        name: 'Mittens',
                        type: 'cat',
                        age: 2,
                        breed: 'tabby'
                    },
                    {
                        id: '4',
                        name: 'Salame',
                        type: 'cat',
                        age: 6,
                        breed: 'pinky'
                    }
                ])
            })
    })
})
This a test suite for our GraphQL API. It uses the supertest library to make HTTP requests to the API endpoint (http://localhost:4000/) and verifies that the API responds correctly to various queries and mutations.
The code has five different test cases:
Get all pets: This test queries the API for all pets and verifies that the response matches an expected list of pets.Get pet detail: This test queries the API for the details of a specific pet and verifies that the response matches the expected details for that pet.Edit pet: This test performs a mutation to edit the details of a specific pet and verifies that the response matches the expected edited details for that pet.Add pet: This test performs a mutation to add a new pet and verifies that the response matches the expected details for the newly added pet.Delete pet: This test performs a mutation to delete a specific pet and verifies that the response matches the expected list of pets after the deletion.
Each test case includes a postData object that contains the GraphQL query or mutation to be sent to the API endpoint as well as any necessary variables.
The actual HTTP request is made using the request function from the supertest library, which sends a POST request to the API endpoint with the postData object in the request body. The response is then parsed as JSON and the test case verifies that the response matches the expected result using the expect function from the Jest testing framework.
Now go to your terminal, run npm test, and you should see all your tests passing:
> jest

 PASS  pets/pets.test.js
  Get all pets
    ✓ returns all pets (15 ms)
  Get pet detail
    ✓ Return pet detail information (2 ms)
  Edit pet
    ✓ Updates pet and returns it (1 ms)
  Add pet
    ✓ Adds new pet and returns the added item (1 ms)
  Delete pet
    ✓ Deletes given pet and returns updated list (1 ms)

Test Suites: 1 passed, 1 total
Tests:       5 passed, 5 total
Snapshots:   0 total
Time:        0.607 s, estimated 1 s
Ran all test suites.
How to Consume a GraphQL API on a Front-end React App
Now we know our server is running and behaving as expected. Let's see some more realistic example of how our API might be consumed by a front end app.
For this example, we'll use a React application, and Apollo client to send and process our requests.
Our Tools
React is a popular JavaScript library for building user interfaces. It allows developers to create reusable UI components and efficiently update and render them in response to changes in application state.
Regarding Apollo client, we've introduced it already.
Side comment – we're using Apollo client here since it's a very popular tool and it makes sense to use the same set of libraries both in front and back-end. If you're interested in other possible ways a GraphQL API can be consumed from a front-end React App, Reed Barger has a pretty cool article on this topic.
The Code
Let's create our React app by running yarn create vite and following the terminal prompts. Once that's done, run yarn add react-router-dom (which we'll use to setup basic routing in our app).
App.jsx
Put this code within your App.jsx file:
import { Suspense, lazy, useState } from 'react'
import { BrowserRouter as Router, Routes, Route } from 'react-router-dom'
import './App.css'

const PetList = lazy(() => import('./pages/PetList'))
const PetDetail = lazy(() => import('./pages/PetDetail'))
const EditPet = lazy(() => import('./pages/EditPet'))
const AddPet = lazy(() => import('./pages/AddPet'))

function App() {
    const [petToEdit, setPetToEdit] = useState(null)

    return (
        <div className='App'>
            <Router>
                <h1>Pet shelter</h1>

                <Routes>
                    <Route
                        path='/'
                        element={
                            <Suspense fallback={<></>}>
                                <PetList />
                            </Suspense>
                        }
                    />

                    <Route
                        path='/:petId'
                        element={
                            <Suspense fallback={<></>}>
                                <PetDetail setPetToEdit={setPetToEdit} />
                            </Suspense>
                        }
                    />

                    <Route
                        path='/:petId/edit'
                        element={
                            <Suspense fallback={<></>}>
                                <EditPet petToEdit={petToEdit} />
                            </Suspense>
                        }
                    />

                    <Route
                        path='/add'
                        element={
                            <Suspense fallback={<></>}>
                                <AddPet />
                            </Suspense>
                        }
                    />
                </Routes>
            </Router>
        </div>
    )
}

export default App
Here we're just defining our routes. We'll have 4 main routes in our app, each corresponding to a different view:
One to see the whole list of pets.
One to see the detail of a single pet.
One to edit a single pet.
One to add a new pet to the list.
Besides, we have a button to add a new pet and a state that will store the information of the pet we want to edit.
Next, create a pages directory with these files in it:
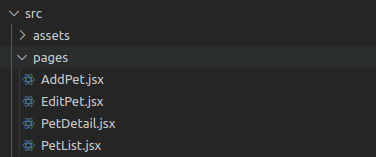
Folder structure
main.js
Before jumping into our pages, we have to set up the Apollo client library. Run yarn add @apollo/client and yarn add graphql to install the necessary dependencies.
The go to the main.js file and drop this code in it:
import React from 'react'
import ReactDOM from 'react-dom/client'
import App from './App'
import './index.css'
import { ApolloClient, InMemoryCache, ApolloProvider } from '@apollo/client'

const client = new ApolloClient({
  uri: 'http://localhost:4000/',
  cache: new InMemoryCache(),
})

ReactDOM.createRoot(document.getElementById('root')).render(
  <ApolloProvider client={client}>
    <App />
  </ApolloProvider>
)
Here we're initializing the ApolloClient, passing its constructor a configuration object with the uri and cache fields:
urispecifies the URL of our GraphQL server.cacheis an instance ofInMemoryCache, which Apollo Client uses to cache query results after fetching them.
Then we wrap our App component with our ApolloProvider. This allows any component in our component tree to use the hooks provided by Apollo client, much like React Context works. ;)
Mutations and queries
In the root of your project, create this folder structure:

Folder structure
In these two files we'll declare the request bodies we'll use for our queries and mutations. I like to separate this into different files because it gives use a clear view of the different kinds of request we have in our app, and it also keeps our component's code cleaner.
In the queries.js file drop this:
import { gql } from '@apollo/client'

export const GET_PETS = gql`
    query Pets {
        pets {
            id
            name
            type
            breed
        }
    }
`

export const GET_PET = gql`
    query Pet($petId: ID!) {
        pet(id: $petId) {
            id
            name
            type
            age
            breed
        }
    }
`
And in the mutations.js file drop this:
import { gql } from '@apollo/client'

export const DELETE_PET = gql`
    mutation DeletePet($deletePetId: ID!) {
        deletePet(id: $deletePetId) {
            id
        }
    }
`

export const ADD_PET = gql`
    mutation AddPet($petToAdd: PetToAdd!) {
        addPet(petToAdd: $petToAdd) {
            id
            name
            type
            age
            breed
        }
    }
`

export const EDIT_PET = gql`
    mutation EditPet($petToEdit: PetToEdit!) {
        editPet(petToEdit: $petToEdit) {
            id
            name
            type
            age
            breed
        }
    }
`
As you can see, the syntax for queries and mutations is fairly similar. Request bodies are written in GraphQL query language, which is used to define the structure and data types of data that can be requested from a GraphQL API.
- GraphQL Query Syntax:
export const GET_PETS = gql`
    query Pets {
        pets {
            id
            name
            type
            breed
        }
    }
`
This query is named Pets and it requests data from the pets field. The fields id, name, type, and breed are requested from each Pet object returned by the API.
In GraphQL, queries always start with the keyword query and are followed by the name of the query, if provided. The fields requested are enclosed in curly braces and can be nested to request data from related fields.
- GraphQL Mutation Syntax:
export const ADD_PET = gql`
    mutation AddPet($petToAdd: PetToAdd!) {
        addPet(petToAdd: $petToAdd) {
            id
            name
            type
            age
            breed
        }
    }
`
This mutation is named AddPet and sends a new Pet object to be added to the API via the addPet mutation. The $petToAdd variable is defined as a required input of type PetToAdd. When the mutation is executed, the input variable will be passed in as an argument to the addPet mutation. The mutation then returns the id, name, type, age, and breed fields for the newly created Pet object.
In GraphQL, mutations always start with the keyword mutation and are followed by the name of the mutation, if provided. The fields requested in the mutation response are also enclosed in curly braces.
Note that both queries and mutations in GraphQL can accept variables as input, which are defined in the query or mutation body using a special syntax ($variableName: variableType!). These variables can be passed in when the query or mutation is executed, allowing for more dynamic and reusable queries and mutations.
PetList.jsx
Let's start with the file responsible for rendering the whole list of pets:
import { Link } from 'react-router-dom'
import { useQuery } from '@apollo/client'
import { GET_PETS } from '../api/queries'

function PetList() {
    const { loading, error, data } = useQuery(GET_PETS)

    return (
        <>
            <h2>Pet List</h2>

            <Link to='/add'>
                <button>Add new pet</button>
            </Link>

            {loading && <p>Loading...</p>}
            {error && <p>Error: {error.message}</p>}

            {data?.pets?.map(pet => {
                return (
                    <div key={pet?.id}>
                        <p>
                            {pet?.name} - {pet?.type} - {pet?.breed}
                        </p>

                        <Link to={`/${pet?.id}`}>
                            <button>Pet detail</button>
                        </Link>
                    </div>
                )
            })}
        </>
    )
}

export default PetList
This code defines a React functional component called PetList that fetches a list of pets from a GraphQL API using the useQuery hook provided by the @apollo/client library. The query used to fetch the pets is defined in a separate file called queries.js, which exports a GraphQL query called GET_PETS.
The useQuery hook returns an object with three properties: loading, error, and data. These properties are destructured from the object and used to conditionally render different UI elements depending on the status of the API request.
If loading is true, a loading message is displayed on the screen. If error is defined, an error message is displayed with the specific error message returned by the API. If data is defined and contains an array of pets, each pet is displayed in a div with their name, type, and breed. Each pet div also contains a link to view more details about the pet.
The useQuery hook works by executing the GET_PETS query and returning the result as an object with the loading, error, and data properties. When the component first renders, loading is true while the query is being executed. If the query is successful, loading is false and data is populated with the results. If the query encounters an error, error is populated with the specific error message.
As you can see, managing requests with Apollo client is really nice and simple. And the hooks it provides, save us quite a bit of code normally used to execute requests, store it's response and handle errors.
Remember that to make calls to our server, we must have it up and running by running nodemon app.js in our server project terminal.
Just to show there's no weird magic going on here, if we go to our browser, open the dev tools and go to the network tab, we could see our app is making a POST request to our server endpoint. And that the payload is our request body in the form of a string.
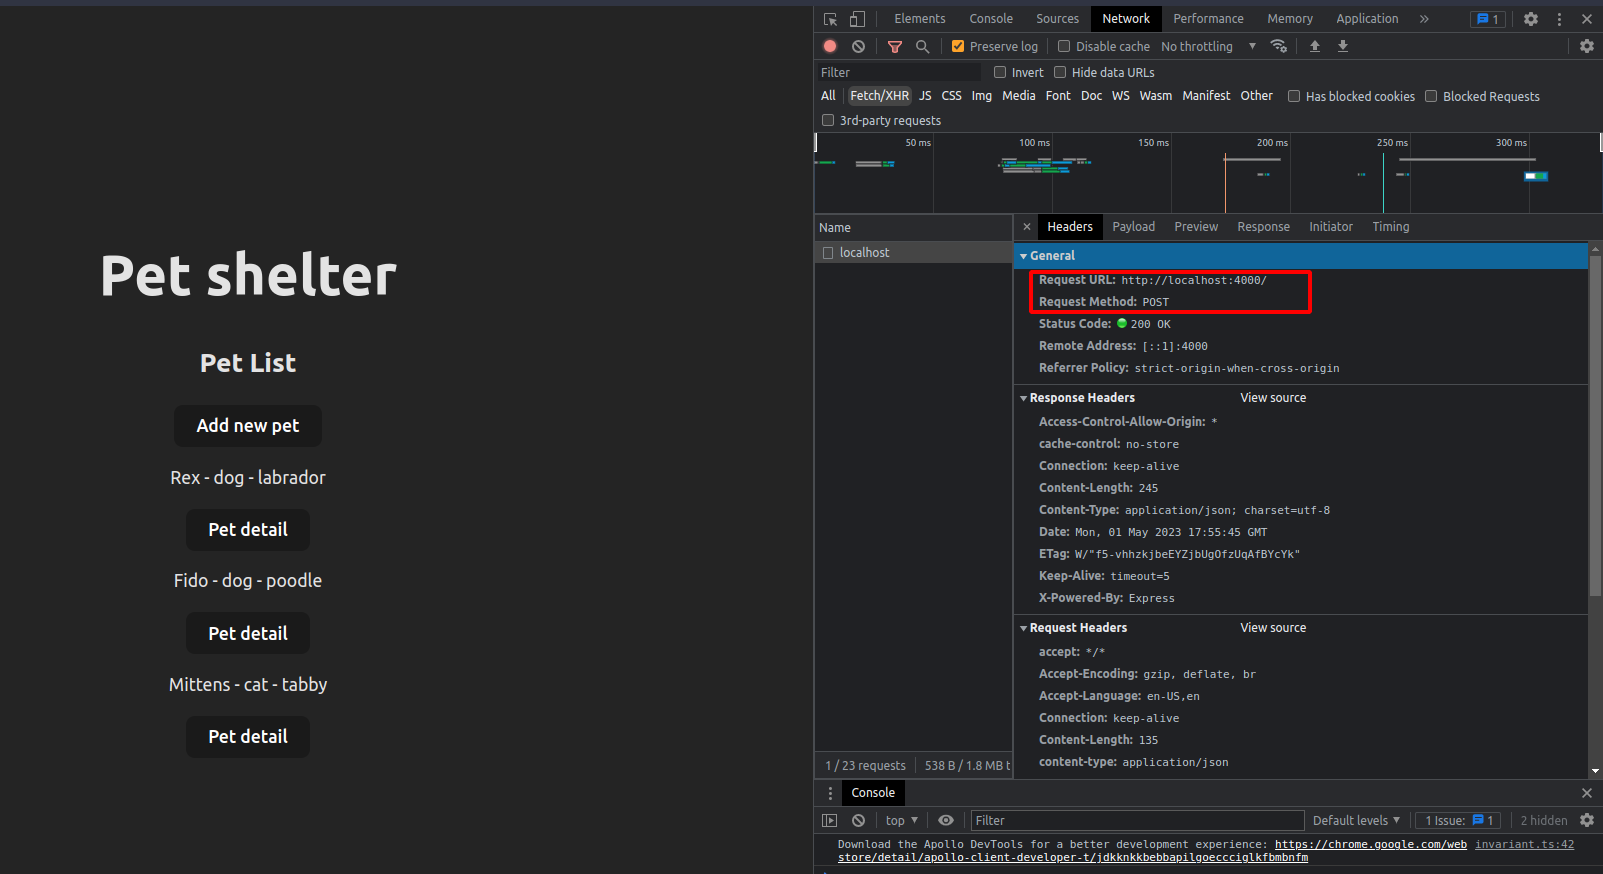
The POST request

Request body
This means that if we wanted to, we could also consume our GraphQL API by using fetch, like following:
import { Link } from 'react-router-dom'
import { useEffect, useState } from 'react'

function PetList() {

    const [pets, setPets] = useState([])

    const getPets = () => {
        fetch('http://localhost:4000/', {
            method: 'POST',
            headers: {
                'Content-Type': 'application/json'
            },
            body: JSON.stringify({
                query: `
                query Pets {
                    pets {
                    id
                    name
                    type
                    breed
                    }
                }
                `
            })
        })
            .then(response => response.json())
            .then(data => setPets(data?.data?.pets))
            .catch(error => console.error(error))
    }

    useEffect(() => {
        getPets()
    }, [])

    return (
        <>
            <h2>Pet List</h2>

            <Link to='/add'>
                <button>Add new pet</button>
            </Link>

            {pets?.map(pet => {
                return (
                    <div key={pet?.id}>
                        <p>
                            {pet?.name} - {pet?.type} - {pet?.breed}
                        </p>

                        <Link to={`/${pet?.id}`}>
                            <button>Pet detail</button>
                        </Link>
                    </div>
                )
            })}
        </>
    )
}

export default PetList
If you check your network tab again, you should see still the same POST request with the some request body.
Of course this approach is not very practical as it requires more lines of code to perform the same thing. But it's important to know that libraries like Apollo only give us a declarative API to work with and simplify our code. Beneath it all we're still working with regular HTTP requests.
PetDetail.jsx
Now let's go to the PetDetail.jsx file:
import { useEffect } from 'react'
import { useParams, Link } from 'react-router-dom'
import { useQuery, useMutation } from '@apollo/client'
import { GET_PET } from '../api/queries'
import { DELETE_PET } from '../api/mutations'

function PetDetail({ setPetToEdit }) {
    const { petId } = useParams()

    const { loading, error, data } = useQuery(GET_PET, {
        variables: { petId }
    })

    useEffect(() => {
        if (data && data?.pet) setPetToEdit(data?.pet)
    }, [data])

    const [deletePet, { loading: deleteLoading, error: deleteError, data: deleteData }] = useMutation(DELETE_PET, {
        variables: { deletePetId: petId }
    })

    useEffect(() => {
        if (deleteData && deleteData?.deletePet) window.location.href = '/'
    }, [deleteData])

    return (
        <div style={{ display: 'flex', flexDirection: 'column', justifyContent: 'center', aligniItems: 'center' }}>
            <h2>Pet Detail</h2>

            <Link to='/'>
                <button>Back to list</button>
            </Link>

            {(loading || deleteLoading) && <p>Loading...</p>}

            {error && <p>Error: {error.message}</p>}
            {deleteError && <p>deleteError: {deleteError.message}</p>}

            {data?.pet && (
                <>
                    <p>Pet name: {data?.pet?.name}</p>
                    <p>Pet type: {data?.pet?.type}</p>
                    <p>Pet age: {data?.pet?.age}</p>
                    <p>Pet breed: {data?.pet?.breed}</p>

                    <div style={{ display: 'flex', justifyContent: 'center', aligniItems: 'center' }}>
                        <Link to={`/${data?.pet?.id}/edit`}>
                            <button style={{ marginRight: 10 }}>Edit pet</button>
                        </Link>

                        <button style={{ marginLeft: 10 }} onClick={() => deletePet()}>
                            Delete pet
                        </button>
                    </div>
                </>
            )}
        </div>
    )
}

export default PetDetail
This component loads the detail info of the pet by executing a query in a very similar way than the previous component.
Moreover, it executes the mutation needed to delete the pet register. You can see that for this we're using the useMutation hook. It's quite similar to useQuery, but besides the loading, error and data values it also provides a function to execute our query after a given event.
You can see that for this mutation hook we're passing an object as second parameter, containing the variables this mutation requires. In this case, it's the id of the pet register we want to delete.
const [deletePet, { loading: deleteLoading, error: deleteError, data: deleteData }] = useMutation(DELETE_PET, {
    variables: { deletePetId: petId }
})
Remember that when we declared our mutation in mutations.js we had already declared the variables this mutation would use.
export const DELETE_PET = gql`
    mutation DeletePet($deletePetId: ID!) {
        deletePet(id: $deletePetId) {
            id
        }
    }
`
AddPet.jsx
This is the file responsible for adding a new pet to our register:
import React, { useState, useEffect } from 'react'
import { Link } from 'react-router-dom'
import { useMutation } from '@apollo/client'
import { ADD_PET } from '../api/mutations'

function AddPet() {
    const [petName, setPetName] = useState()
    const [petType, setPetType] = useState()
    const [petAge, setPetAge] = useState()
    const [petBreed, setPetBreed] = useState()

    const [addPet, { loading, error, data }] = useMutation(ADD_PET, {
        variables: {
            petToAdd: {
                name: petName,
                type: petType,
                age: parseInt(petAge),
                breed: petBreed
            }
        }
    })

    useEffect(() => {
        if (data && data?.addPet) window.location.href = `/${data?.addPet?.id}`
    }, [data])

    return (
        <div style={{ display: 'flex', flexDirection: 'column', justifyContent: 'center', aligniItems: 'center' }}>
            <h2>Add Pet</h2>

            <Link to='/'>
                <button>Back to list</button>
            </Link>

            {loading || error ? (
                <>
                    {loading && <p>Loading...</p>}
                    {error && <p>Error: {error.message}</p>}
                </>
            ) : (
                <>
                    <div style={{ display: 'flex', flexDirection: 'column', margin: 20 }}>
                        <label>Pet name</label>
                        <input type='text' value={petName} onChange={e => setPetName(e.target.value)} />
                    </div>

                    <div style={{ display: 'flex', flexDirection: 'column', margin: 20 }}>
                        <label>Pet type</label>
                        <input type='text' value={petType} onChange={e => setPetType(e.target.value)} />
                    </div>

                    <div style={{ display: 'flex', flexDirection: 'column', margin: 20 }}>
                        <label>Pet age</label>
                        <input type='text' value={petAge} onChange={e => setPetAge(e.target.value)} />
                    </div>

                    <div style={{ display: 'flex', flexDirection: 'column', margin: 20 }}>
                        <label>Pet breed</label>
                        <input type='text' value={petBreed} onChange={e => setPetBreed(e.target.value)} />
                    </div>

                    <button
                        style={{ marginTop: 30 }}
                        disabled={!petName || !petType || !petAge || !petBreed}
                        onClick={() => addPet()}
                    >
                        Add pet
                    </button>
                </>
            )}
        </div>
    )
}

export default AddPet
Here we have a component that loads a form to add a new pet and performs a mutation when the data is sent. It accepts the new pet info as parameter, in a similar way that the deletePet mutation accepted the pet id.
EditPet.jsx
Finally, the file responsible for editing a pet register:
import React, { useState, useEffect } from 'react'
import { Link } from 'react-router-dom'
import { useMutation } from '@apollo/client'
import { EDIT_PET } from '../api/mutations'

function EditPet({ petToEdit }) {
    const [petName, setPetName] = useState(petToEdit?.name)
    const [petType, setPetType] = useState(petToEdit?.type)
    const [petAge, setPetAge] = useState(petToEdit?.age)
    const [petBreed, setPetBreed] = useState(petToEdit?.breed)

    const [editPet, { loading, error, data }] = useMutation(EDIT_PET, {
        variables: {
            petToEdit: {
                id: parseInt(petToEdit.id),
                name: petName,
                type: petType,
                age: parseInt(petAge),
                breed: petBreed
            }
        }
    })

    useEffect(() => {
        if (data && data?.editPet?.id) window.location.href = `/${data?.editPet?.id}`
    }, [data])

    return (
        <div style={{ display: 'flex', flexDirection: 'column', justifyContent: 'center', aligniItems: 'center' }}>
            <h2>Edit Pet</h2>

            <Link to='/'>
                <button>Back to list</button>
            </Link>

            {loading || error ? (
                <>
                    {loading && <p>Loading...</p>}
                    {error && <p>Error: {error.message}</p>}
                </>
            ) : (
                <>
                    <div style={{ display: 'flex', flexDirection: 'column', margin: 20 }}>
                        <label>Pet name</label>
                        <input type='text' value={petName} onChange={e => setPetName(e.target.value)} />
                    </div>

                    <div style={{ display: 'flex', flexDirection: 'column', margin: 20 }}>
                        <label>Pet type</label>
                        <input type='text' value={petType} onChange={e => setPetType(e.target.value)} />
                    </div>

                    <div style={{ display: 'flex', flexDirection: 'column', margin: 20 }}>
                        <label>Pet age</label>
                        <input type='text' value={petAge} onChange={e => setPetAge(e.target.value)} />
                    </div>

                    <div style={{ display: 'flex', flexDirection: 'column', margin: 20 }}>
                        <label>Pet breed</label>
                        <input type='text' value={petBreed} onChange={e => setPetBreed(e.target.value)} />
                    </div>

                    <button
                        style={{ marginTop: 30 }}
                        disabled={!petName || !petType || !petAge || !petBreed}
                        onClick={() => editPet()}
                    >
                        Save changes
                    </button>
                </>
            )}
        </div>
    )
}

export default EditPet
Last, we have a component to edit a pet register through a form. It performs a mutation when the data is sent, and as parameters it accepts the new pet info.
And that's it! We're using all of our API queries and mutations in our front end app. =)
How to Document a GraphQL API with Apollo Sandbox
One of Apollo's coolest features is that it comes with a built-in sandbox you can use to test and document your API.
Apollo Sandbox is a web-based GraphQL IDE that provides a sandbox environment for testing GraphQL queries, mutations, and subscriptions. It is a free, online tool provided by Apollo that allows you to interact with your GraphQL API and explore its schema, data, and capabilities.
Here are some of the main features of Apollo Sandbox:
Query Editor: A feature-rich GraphQL query editor that provides syntax highlighting, autocompletion, validation, and error highlighting.
Schema Explorer: A graphical interface that allows you to explore your GraphQL schema and see its types, fields, and relationships.
Mocking: Apollo Sandbox allows you to easily generate mock data based on your schema, which is useful for testing your queries and mutations without connecting to a real data source.
Collaboration: You can share your sandbox with others, collaborate on queries, and see real-time changes.
Documentation: You can add documentation to your schema and query results to help others understand your API.
To use our sandbox, simply open your browser at http://localhost:4000/. You should see something like this:
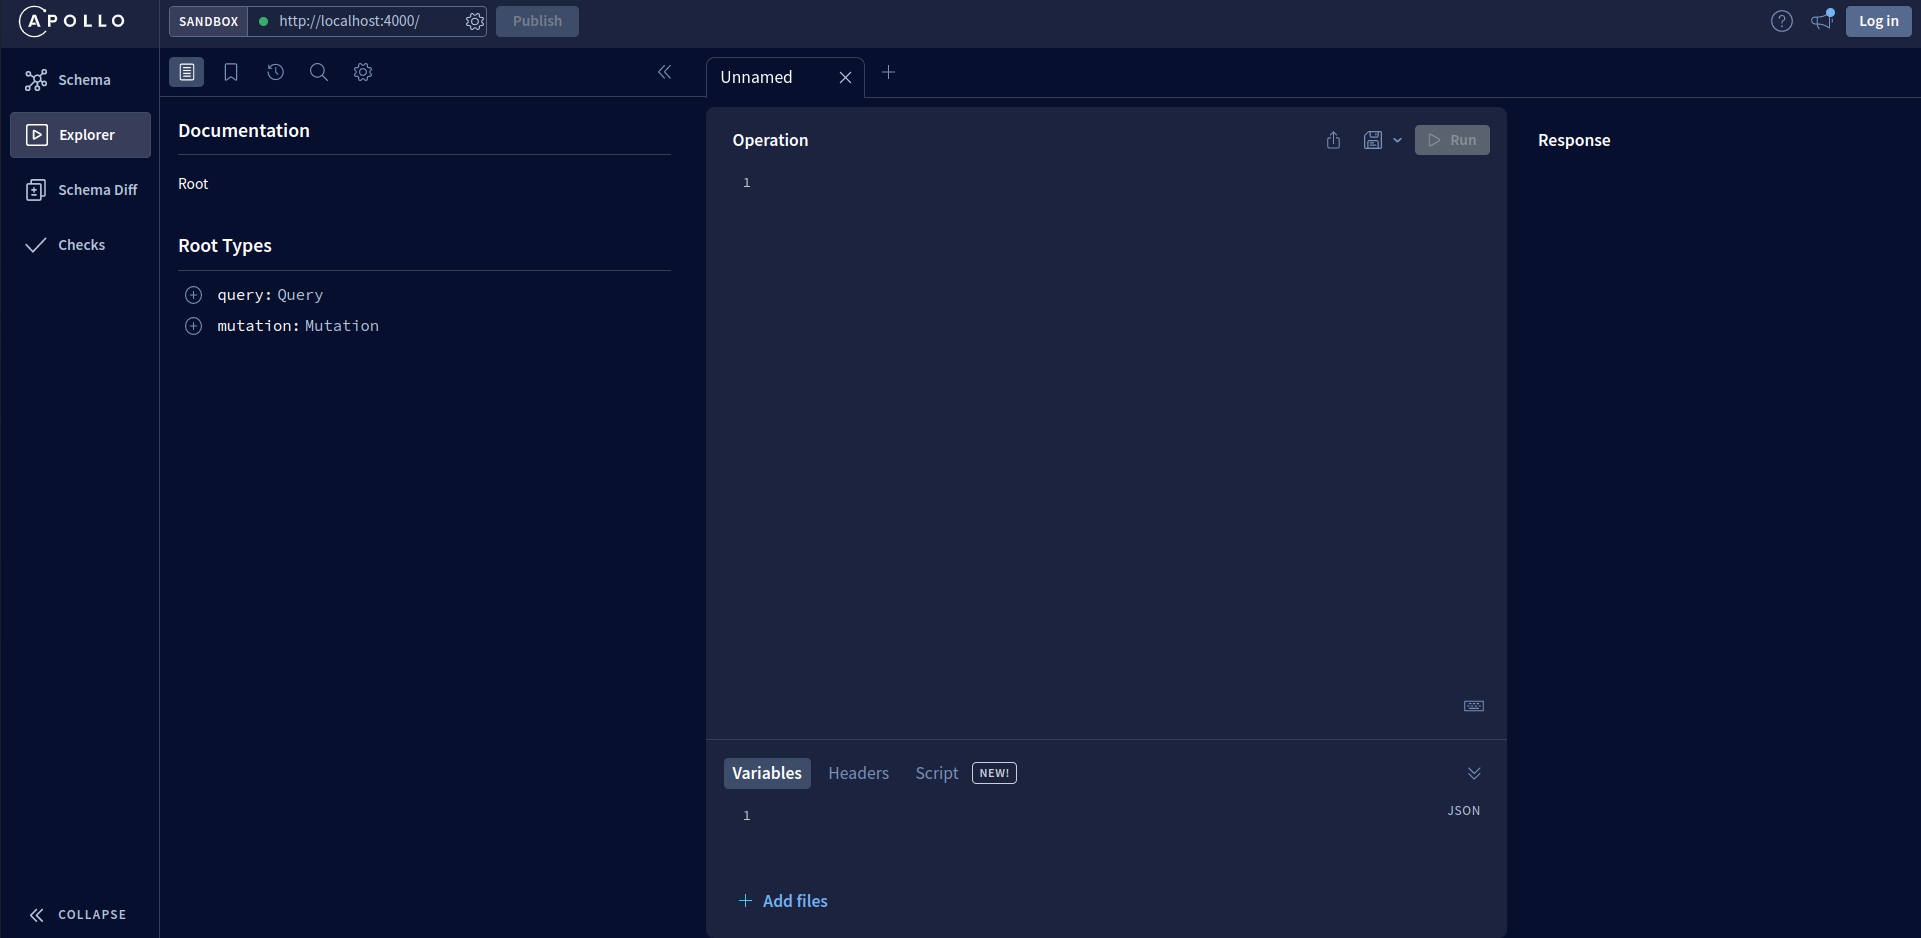
Apollo sandbox
From here you can see the API data schema and available mutations and queries, and also execute them and see how your API responds. For example, by executing the pets query, we can see that response on the right side panel.
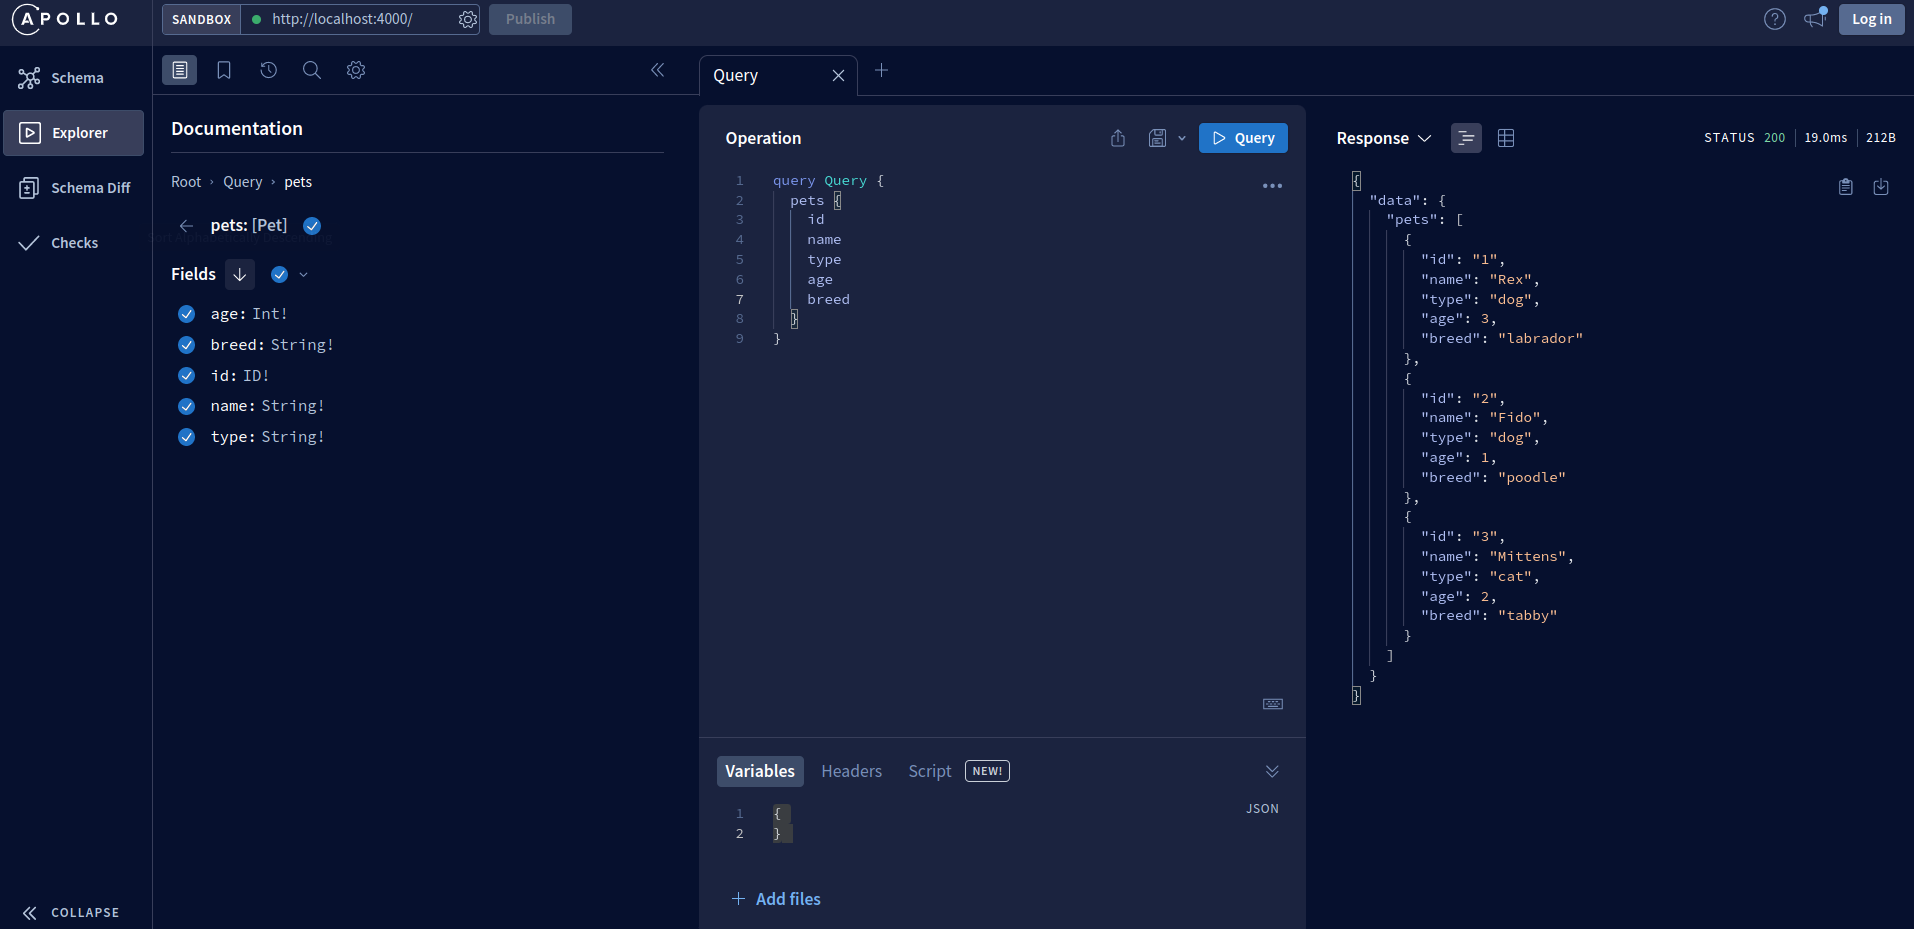
Executing a query
If you hop on to the schema section you could see a whole detail of the available queries, mutations object and input types in our API.
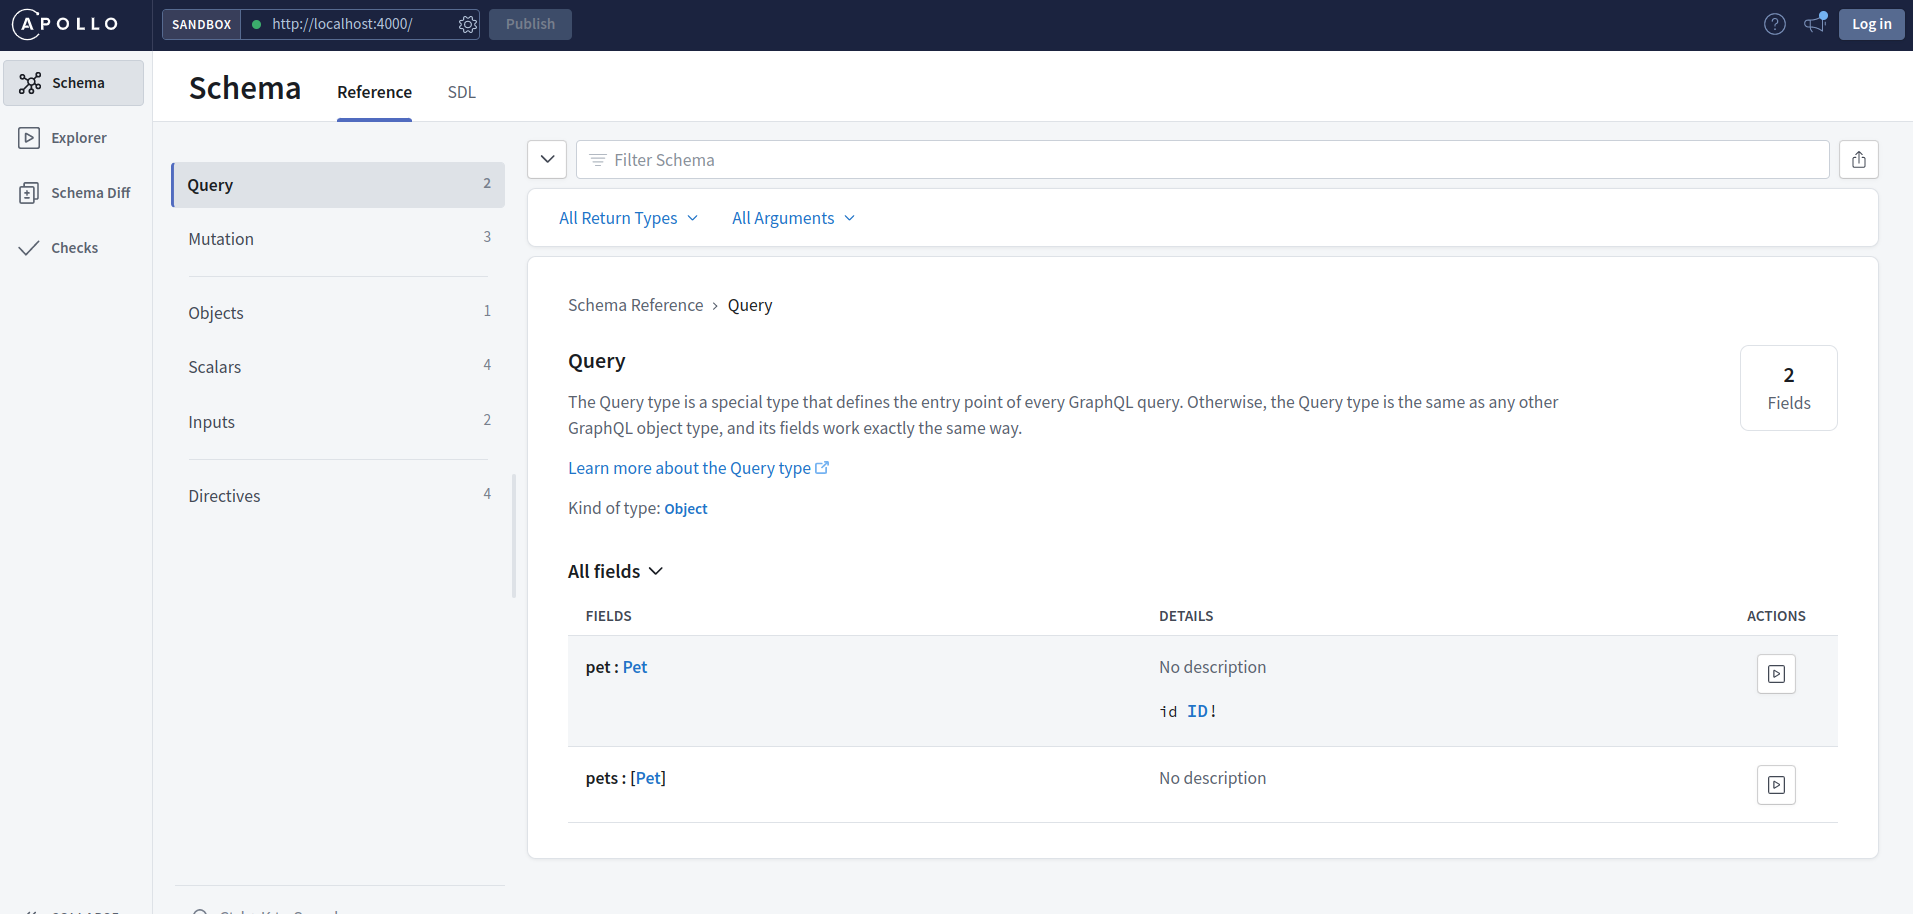
The schema section
Apollo sandbox is a great tool that can be used both as self-documentation for our API and a great development and testing tool.
Wrapping Up
Well everyone, as always, I hope you enjoyed the article and learned something new.
If you want, you can also follow me on LinkedIn or Twitter. See you in the next one!